check engine TOYOTA RAV4 2019 (in English) Owner's Guide
[x] Cancel search | Manufacturer: TOYOTA, Model Year: 2019, Model line: RAV4, Model: TOYOTA RAV4 2019Pages: 728, PDF Size: 21.09 MB
Page 199 of 728
1994-2. Driving procedures
4
Driving
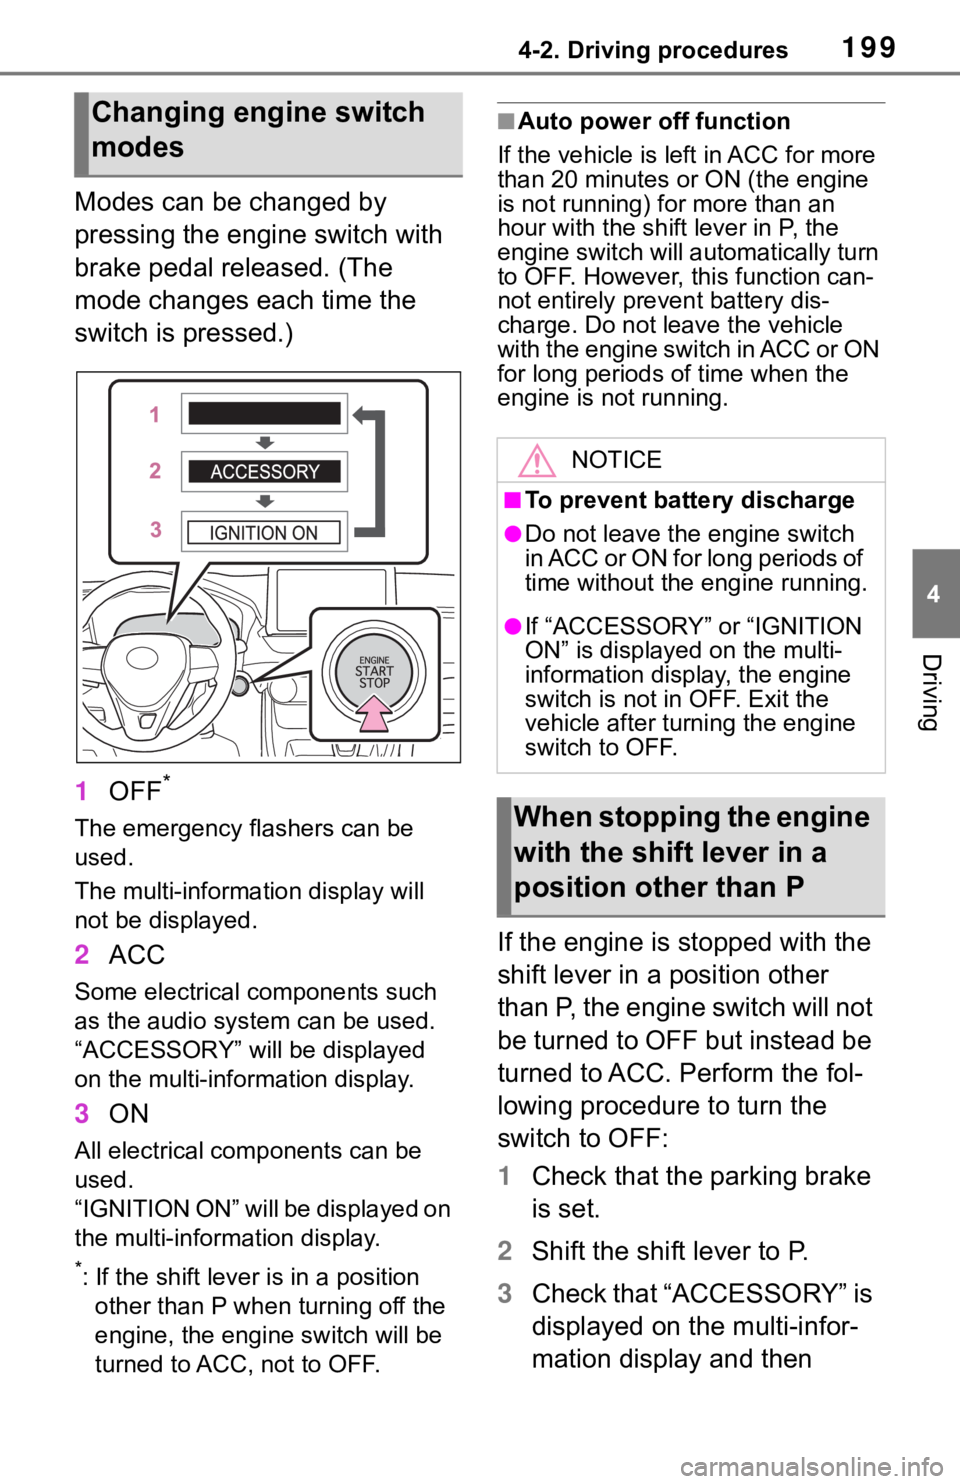
Modes can be changed by
pressing the engine switch with
brake pedal released. (The
mode changes each time the
switch is pressed.)
1OFF
*
The emergency flashers can be
used.
The multi-information display will
not be displayed.
2ACC
Some electrical components such
as the audio system can be used.
“ACCESSORY” will be displayed
on the multi-information display.
3ON
All electrical com ponents can be
used.
“IGNITION ON” will be displayed on
the multi-information display.
*: If the shift lever is in a position other than P when turning off the
engine, the engine switch will be
turned to ACC, not to OFF.
■Auto power off function
If the vehicle is left in ACC for more
than 20 minutes or ON (the engine
is not running) for more than an
hour with the shif t lever in P, the
engine switch will automatically turn
to OFF. However, this function can-
not entirely prevent battery dis-
charge. Do not leave the vehicle
with the engine switch in ACC or ON
for long periods of time when the
engine is not running.
If the engine is stopped with the
shift lever in a position other
than P, the engine switch will not
be turned to OFF but instead be
turned to ACC. Perform the fol-
lowing procedure to turn the
switch to OFF:
1 Check that the parking brake
is set.
2 Shift the shift lever to P.
3 Check that “ACCESSORY” is
displayed on the multi-infor-
mation display and then
Changing engine switch
modes
NOTICE
■To prevent battery discharge
●Do not leave the engine switch
in ACC or ON for long periods of
time without the engine running.
●If “ACCESSORY” or “IGNITION
ON” is displayed on the multi-
information display, the engine
switch is not in OFF. Exit the
vehicle after turning the engine
switch to OFF.
When stopping the engine
with the shift lever in a
position other than P
Page 200 of 728
2004-2. Driving procedures
press the engine switch
shortly and firmly.
4 Check that “ACCESSORY”
or “IGNITION ON” on the
multi-information display is
off.
*1: Shifting to the D position allows
the system to select a gear suit-
able for the driving conditions.
Setting the shift lever to the D
position is recommended for nor-
mal driving.
*2: Selecting shift ranges using S mode restricts the upper limit of
the possible gear ranges, con-
trols engine braking force, and
prevents unnecessary upshifting.
■When driving with dynamic
radar cruise control with full-
speed range activated
Even when perform ing the following
actions with the intent of enabling
engine braking, engine braking will
not activate because dynamic radar
cruise control with full-speed range
NOTICE
■To prevent battery discharge
Do not stop the engine when the
shift lever is in a position other
than P. If the engin e is stopped in
another shift lever position, the
engine switch will not be turned to
OFF but instead be turned to
ACC. If the vehicle is left in ACC,
battery discharge may occur.
Automatic transmis-
sion
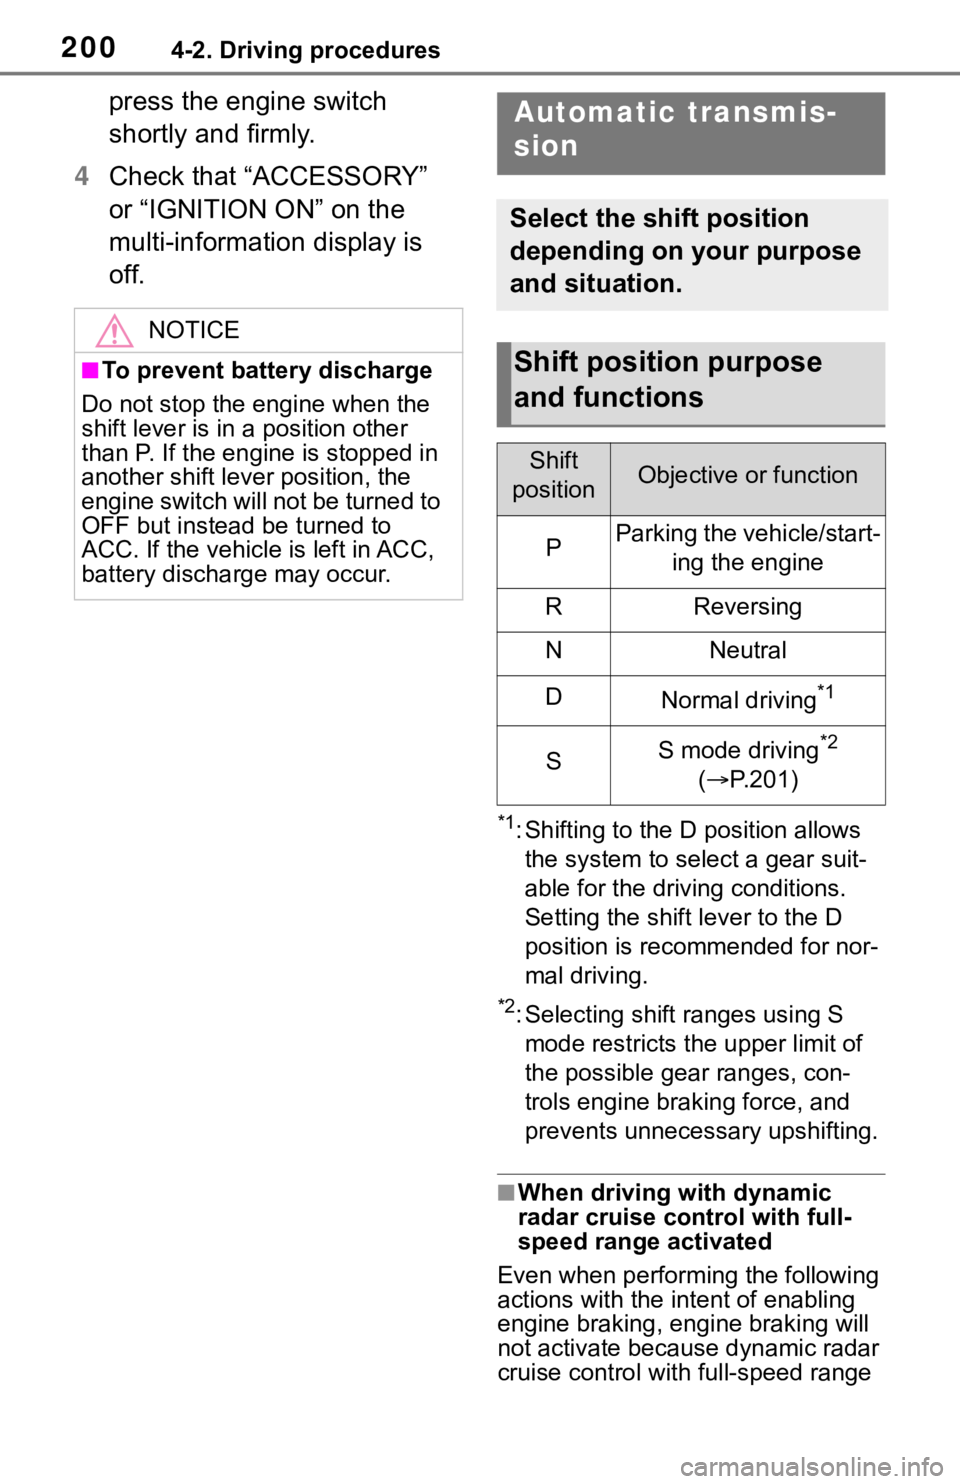
Select the shift position
depending on your purpose
and situation.
Shift position purpose
and functions
Shift
positionObjective or function
PParking the vehicle/start- ing the engine
RReversing
NNeutral
DNormal driving*1
SS mode driving*2
( P.201)
Page 202 of 728
2024-2. Driving procedures
first, the shift lock will not be
released.
■Shift lock system
The shift lock system is a system to
prevent accidental operation of the
shift lever in starting.
The shift lever can be shifted from P
only when the engine switch is in
ON, the brake pedal is depressed
and the shift release button is
pushed.
■If the shift lever cannot be
shifted from P
First, check whether the brake pedal
is being depressed.
If the shift lever cannot be shifted
even though the brake pedal is
depressed and the shift release but-
ton is pushed, there may be a prob-
lem with the shift lock system. Have
the vehicle inspected by your Toyota
dealer immediately.
The following steps may be used as
an emergency measure to ensure
that the shift lev er can be shifted.
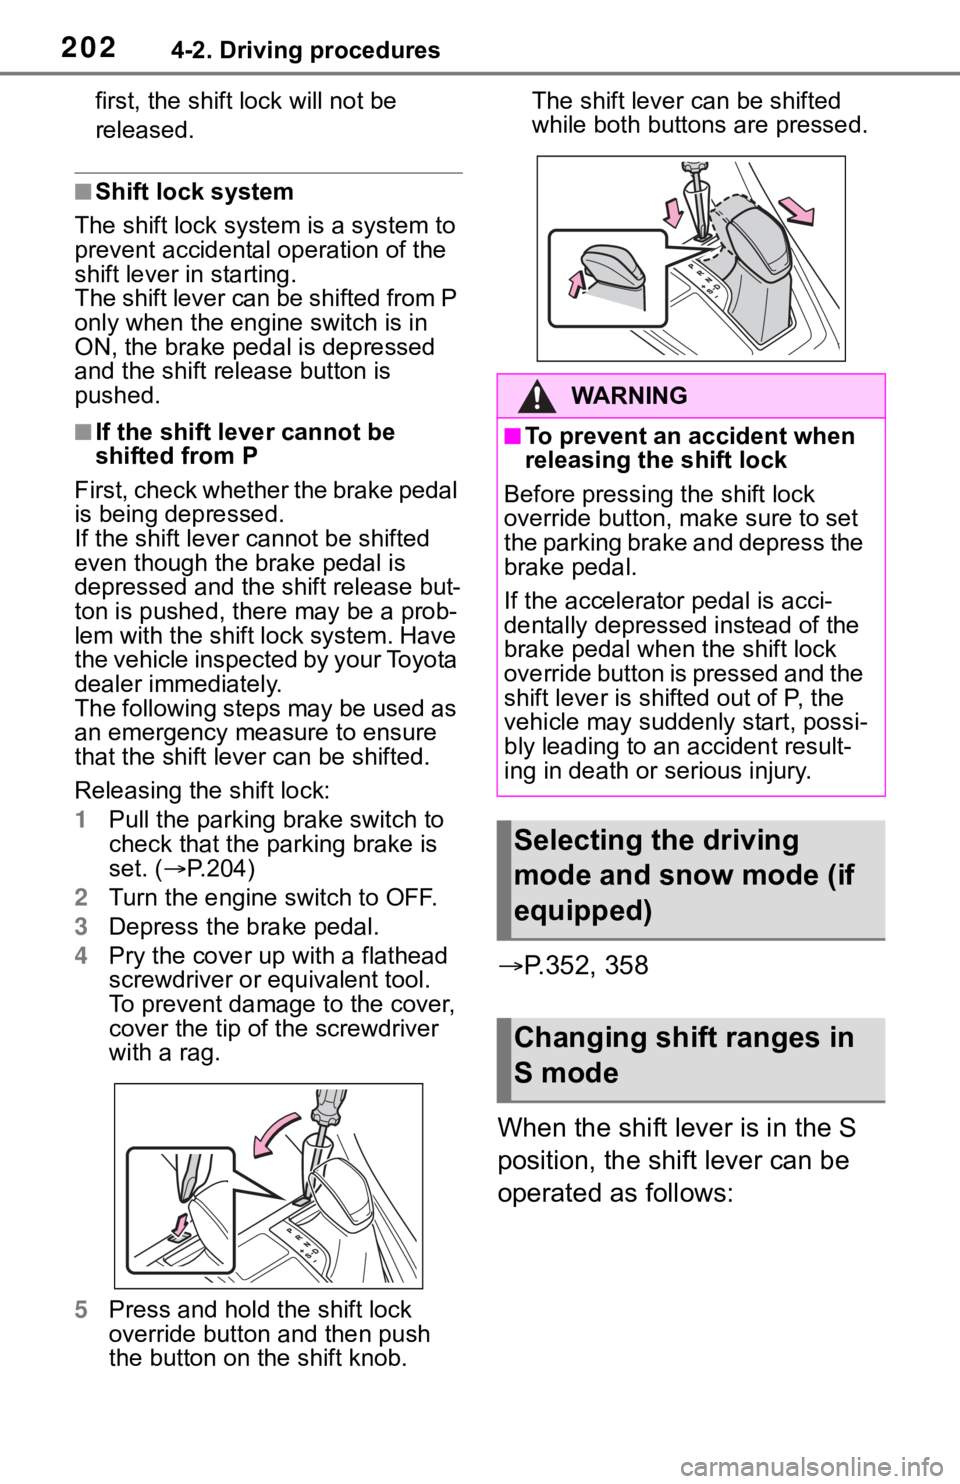
Releasing the shift lock:
1 Pull the parking brake switch to
check that the parking brake is
set. ( P.204)
2 Turn the engine switch to OFF.
3 Depress the brake pedal.
4 Pry the cover up with a flathead
screwdriver or equivalent tool.
To prevent damage to the cover,
cover the tip of the screwdriver
with a rag.
5 Press and hold the shift lock
override button and then push
the button on the shift knob. The shift lever can be shifted
while both buttons
are pressed.
P.352, 358
When the shift lever is in the S
position, the shift lever can be
operated as follows:
WA R N I N G
■To prevent an accident when
releasing the shift lock
Before pressing the shift lock
override button, m ake sure to set
the parking brake and depress the
brake pedal.
If the accelerator pedal is acci-
dentally depressed instead of the
brake pedal when the shift lock
override button is pressed and the
shift lever is shifted out of P, the
vehicle may suddenly start, possi-
bly leading to an accident result-
ing in death or serious injury.
Selecting the driving
mode and snow mode (if
equipped)
Changing shift ranges in
S mode
Page 204 of 728
2044-2. Driving procedures
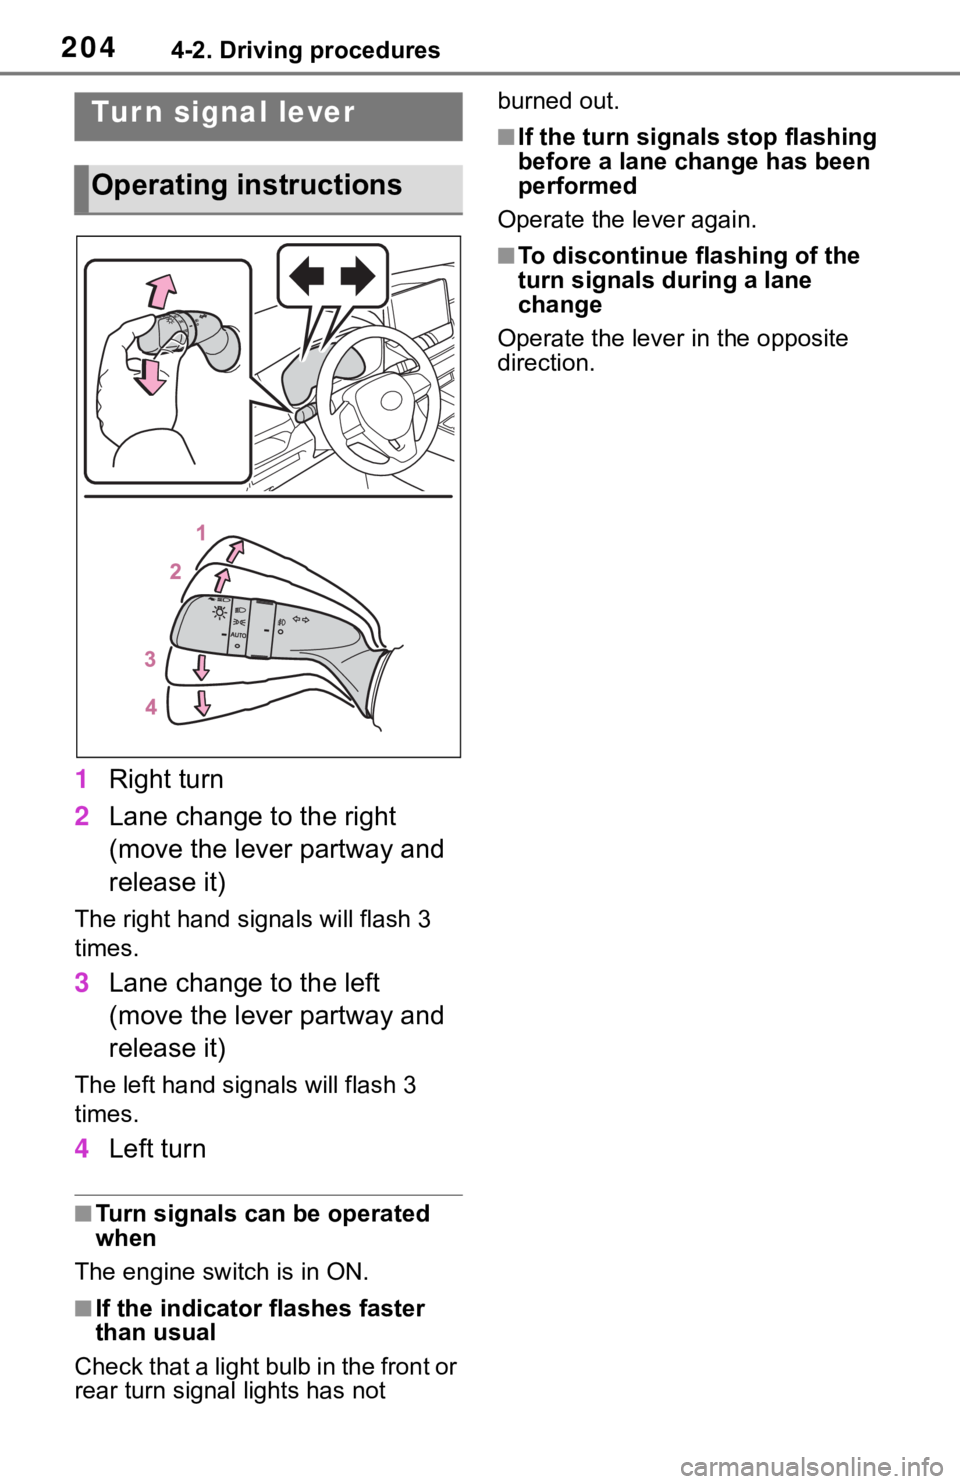
1Right turn
2 Lane change to the right
(move the lever partway and
release it)
The right hand signals will flash 3
times.
3Lane change to the left
(move the lever partway and
release it)
The left hand signals will flash 3
times.
4Left turn
■Turn signals can be operated
when
The engine switch is in ON.
■If the indicator flashes faster
than usual
Check that a light bulb in the front or
rear turn signal lights has not burned out.
■If the turn signals stop flashing
before a lane change has been
performed
Operate the lever again.
■To discontinue flashing of the
turn signals during a lane
change
Operate the lever in the opposite
direction.
Tur n signal lever
Operating instructions
Page 207 of 728
2074-2. Driving procedures
4
Driving
Not in ON: Stays on for approxi-
mately 15 seconds.
●When the engine switch is turned
off with the parking brake set, the
parking brake indicator light will
stay on for about 15 seconds. This
does not indicate a malfunction.
■When the parking brake switch
malfunctions
Automatic mode (automatic brake
setting and releas ing) will be turned
on automatically.
■Parking the vehicle
P. 1 7 1
■Parking brake engaged warning
buzzer
A buzzer will sound if the vehicle is
driven with the parking brake
engaged. “Parking Brake ON” is dis-
played on the multi-information dis-
play (with the v ehicle reaching a
speed of 5 km/h [3 mph]).
■If the brake system warning
light comes on
P. 6 2 2
■Usage in winter time
P. 3 6 8
WA R N I N G
■When parking the vehicle
Do not leave a child in the vehicle
alone. The parking brake may be
released unintentionally and there
is the danger of the vehicle mov-
ing that may lead to an accident
resulting in death or serious injury.
■Parking brake switch
Do not set any o bjects near the
parking brake switch. Objects
may interfere with the switch and
may lead the parking brake to
unexpectedly operate.
NOTICE
■When parking the vehicle
Before you leave the vehicle, shift
the shift position to P, set the park-
ing brake and make sure that the
vehicle does not move.
■When the system malfunc-
tions
Stop the vehicle in a safe place
and check the warning messages.
■When the parking brake can-
not be released due to a mal-
function
Driving the vehicle with the park-
ing brake set will lead to brake
components overheating, which
may affect braking performance
and increase brake wear. Have
the vehicle inspected by your Toy-
ota dealer immediately if this
occurs.
Page 218 of 728
2184-3. Operating the lights and wipers
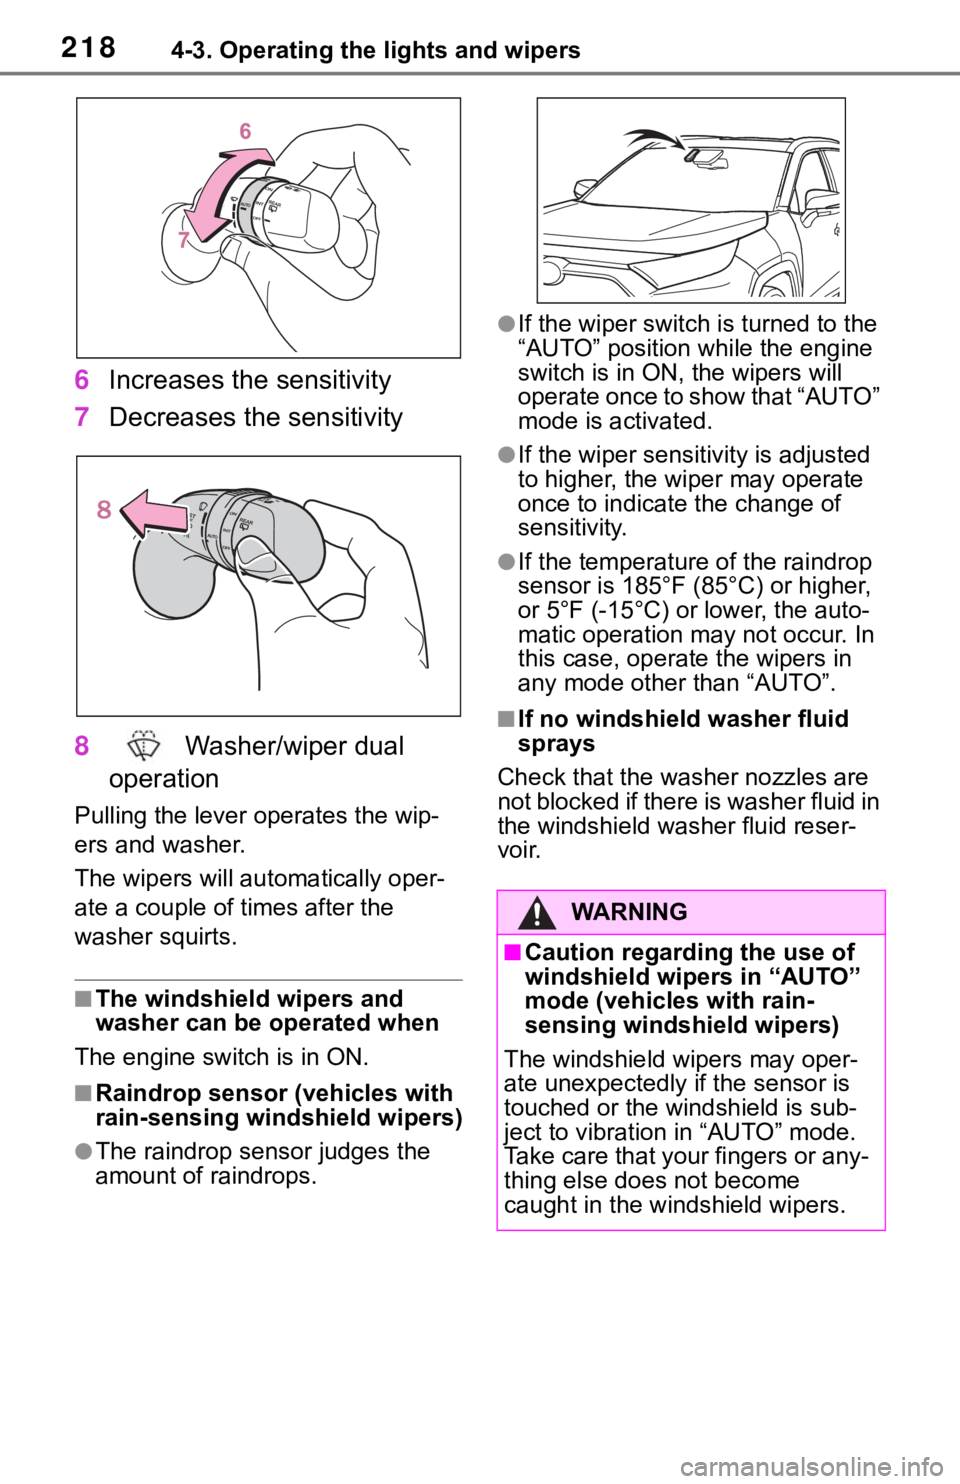
6Increases the sensitivity
7 Decreases the sensitivity
8 Washer/wiper dual
operation
Pulling the lever o perates the wip-
ers and washer.
The wipers will au tomatically oper-
ate a couple of times after the
washer squirts.
■The windshield wipers and
washer can be operated when
The engine switch is in ON.
■Raindrop sensor (vehicles with
rain-sensing windshield wipers)
●The raindrop sensor judges the
amount of raindrops.
●If the wiper switch i s turned to the
“AUTO” position while the engine
switch is in ON, the wipers will
operate once to show that “AUTO”
mode is activated.
●If the wiper sensitivity is adjusted
to higher, the wiper may operate
once to indicate the change of
sensitivity.
●If the temperature of the raindrop
sensor is 185°F (85°C) or higher,
or 5°F (-15°C) or lower, the auto-
matic operation may not occur. In
this case, operate the wipers in
any mode other than “AUTO”.
■If no windshield washer fluid
sprays
Check that the washer nozzles are
not blocked if there is washer fluid in
the windshield washer fluid reser-
voir.
WA R N I N G
■Caution regarding the use of
windshield wipe rs in “AUTO”
mode (vehicles with rain-
sensing windshield wipers)
The windshield wipers may oper-
ate unexpectedly if the sensor is
touched or the windshield is sub-
ject to vibration in “AUTO” mode.
Take care that your fingers or any-
thing else does not become
caught in the windshield wipers.
Page 220 of 728
2204-3. Operating the lights and wipers
*2: For Canada
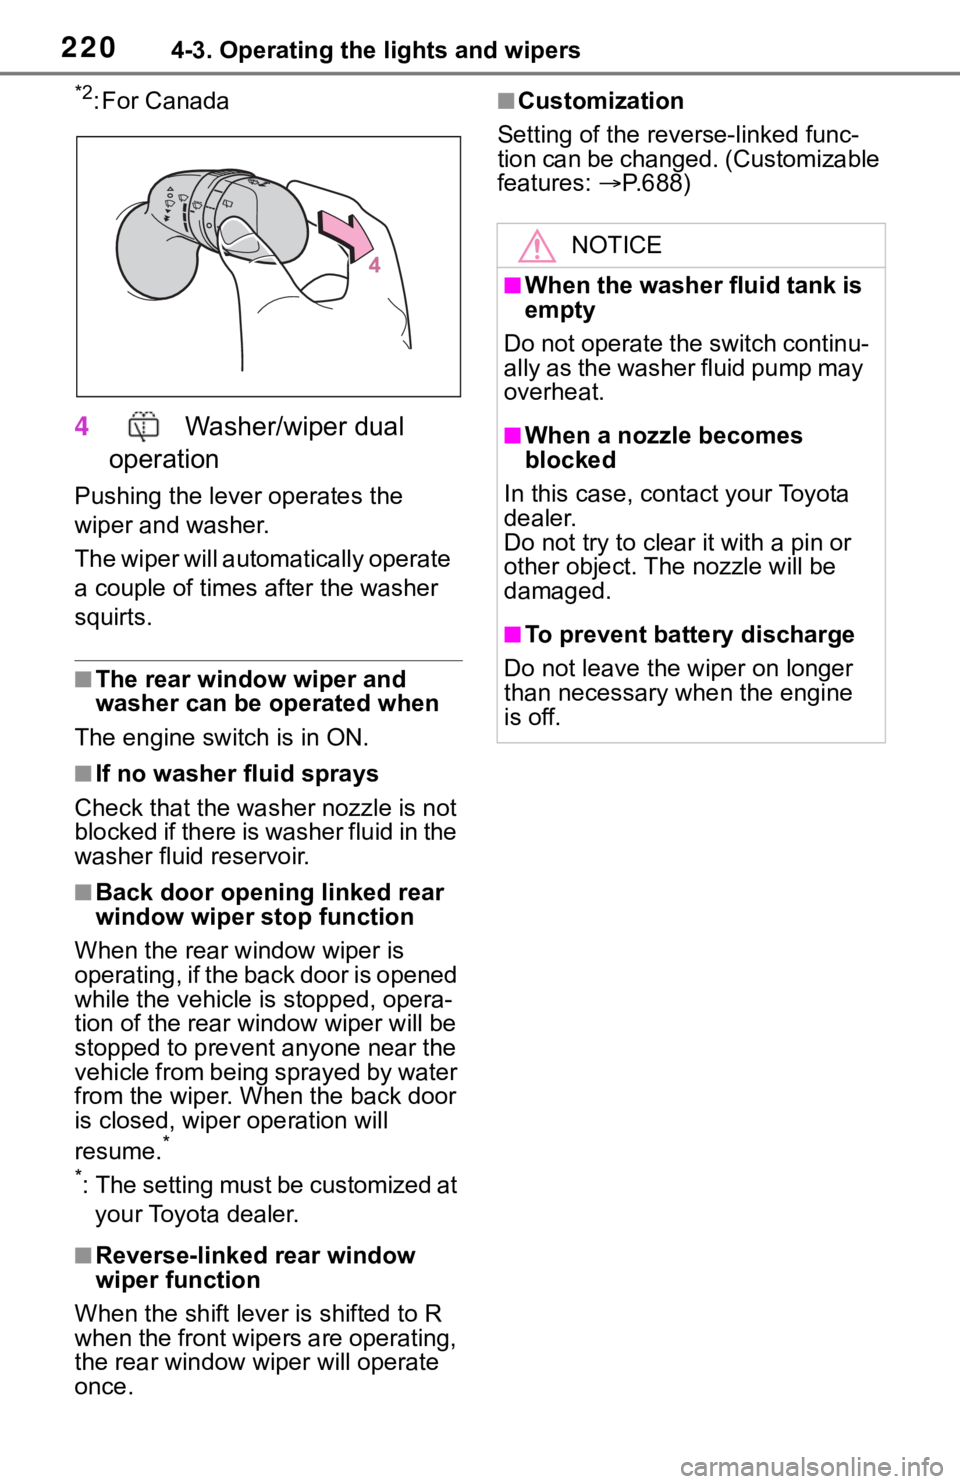
4 Washer/wiper dual
operation
Pushing the lever operates the
wiper and washer.
The wiper will automatically operate
a couple of times after the washer
squirts.
■The rear window wiper and
washer can be operated when
The engine switch is in ON.
■If no washer fluid sprays
Check that the washer nozzle is not
blocked if there is washer fluid in the
washer fluid reservoir.
■Back door opening linked rear
window wiper stop function
When the rear w indow wiper is
operating, if the back door is opened
while the vehicle is stopped, opera-
tion of the rear window wiper will be
stopped to prevent anyone near the
vehicle from being sprayed by water
from the wiper. When the back door
is closed, wiper operation will
resume.
*
*
: The setting must be customized at your Toyota dealer.
■Reverse-linked rear window
wiper function
When the shift lever is shifted to R
when the front wipers are operating,
the rear window wiper will operate
once.
■Customization
Setting of the reverse-linked func-
tion can be changed. (Customizable
features: P.688)
NOTICE
■When the washer fluid tank is
empty
Do not operate the switch continu-
ally as the washer fluid pump may
overheat.
■When a nozzle becomes
blocked
In this case, contact your Toyota
dealer.
Do not try to clear it with a pin or
other object. The nozzle will be
damaged.
■To prevent battery discharge
Do not leave the wiper on longer
than necessary w hen the engine
is off.
Page 222 of 728
2224-4. Refueling
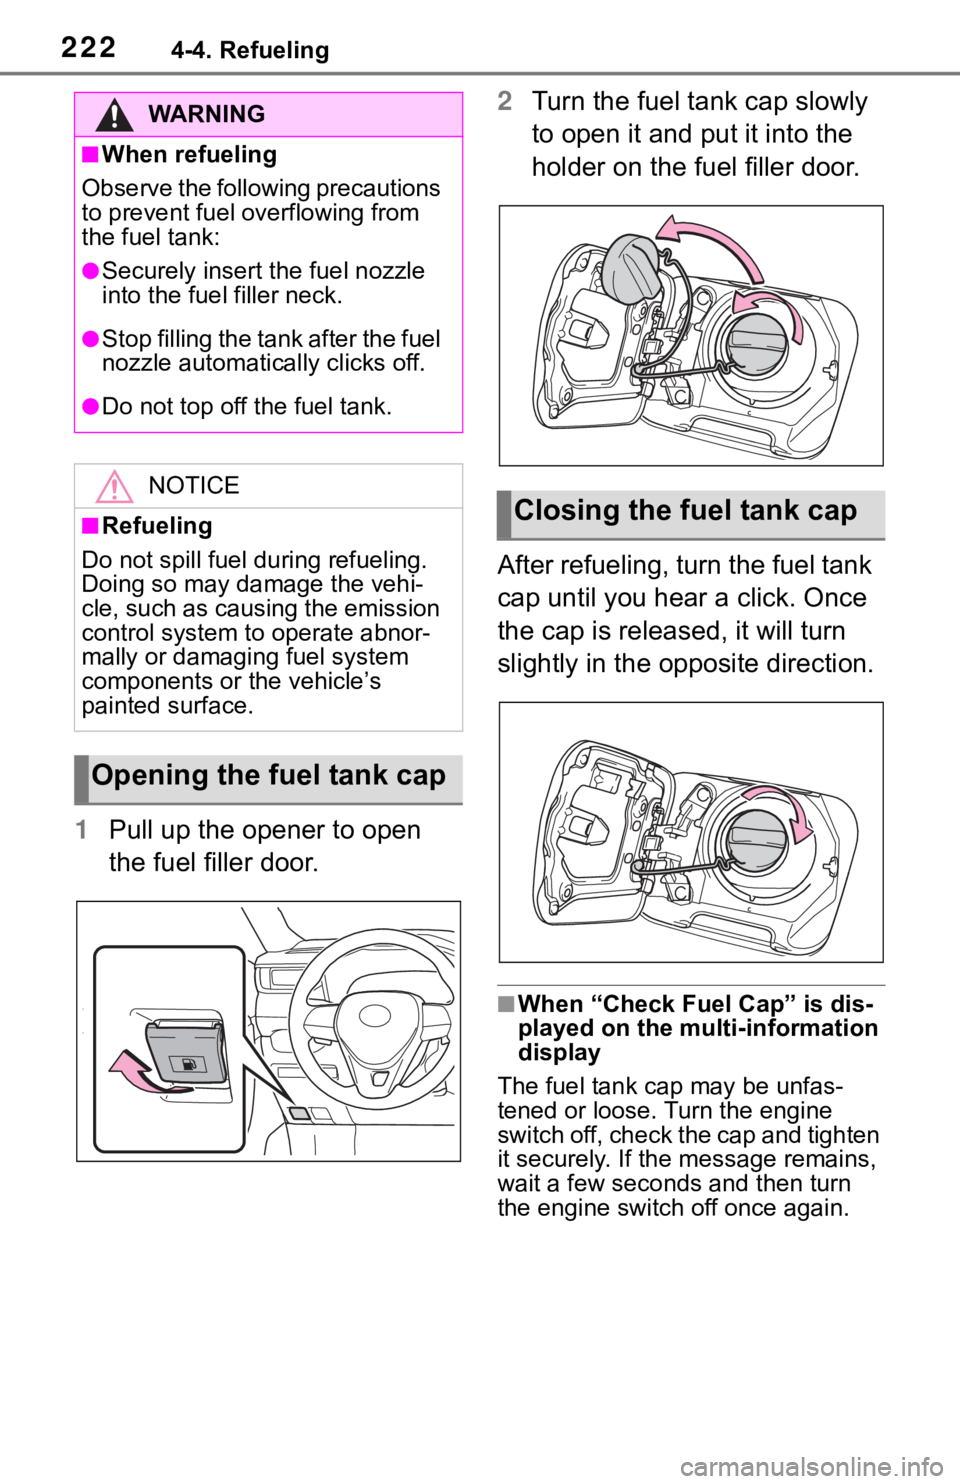
1Pull up the opener to open
the fuel filler door. 2
Turn the fuel tank cap slowly
to open it and put it into the
holder on the fuel filler door.
After refueling, turn the fuel tank
cap until you hear a click. Once
the cap is released, it will turn
slightly in the opposite direction.
■When “Check Fuel Cap” is dis-
played on the multi-information
display
The fuel tank ca p may be unfas-
tened or loose. Turn the engine
switch off, check the cap and tighten
it securely. If the message remains,
wait a few seconds and then turn
the engine switch off once again.
WA R N I N G
■When refueling
Observe the following precautions
to prevent fuel overflowing from
the fuel tank:
●Securely insert the fuel nozzle
into the fuel filler neck.
●Stop filling the tank after the fuel
nozzle automatically clicks off.
●Do not top off the fuel tank.
NOTICE
■Refueling
Do not spill fuel during refueling.
Doing so may damage the vehi-
cle, such as causing the emission
control system to operate abnor-
mally or damaging fuel system
components or the vehicle’s
painted surface.
Opening the fuel tank cap
Closing the fuel tank cap
Page 273 of 728

2734-5. Using the driving support systems
4
Driving
Except panoramic view
A simplified image is displayed
on the upper corner of the
screen when an obstacle is
detected.
The Intuitive parking assist can
be enabled/disabled on
screen of the multi-information
display. ( P. 9 4 )
When the intuitive parking assist
function is disabled, the intuitive
parking assist OFF indicator
( P.79) illuminates on the multi-
information display.
To re-enable the system, select
on the multi-inform ation display,
select and turn it on.
If the system is disabled, it will
remain off even if the engine switch
is turned to ON after the engine
switch has been turned off.
Turning intuitive parking
assist on/off
WA R N I N G
■Intuitive parking assist pre-
cautions
Observe the following precau-
tions.
Failing to do so may result in the
vehicle being unable to be driven
safely and possibly cause an acci-
dent.
●Do not use the sensor at
speeds in excess of 6 mph (10
km/h).
●The sensors’ d etection areas
and reaction times are limited.
When moving forward or revers-
ing, check the areas surround-
ing the vehicle (especially the
sides of the vehicle) for safety,
and drive slowly, using the
brake to control the vehicle’s
speed.
●Do not install accessories near
the bumpers as those areas are
within the sensors’ detection
areas.
●The area directly under the
bumpers is not detected.
Thin posts or objects lower than
the sensor may not be detected
when approached, even if they
have been detected once.
Page 274 of 728
2744-5. Using the driving support systems
■The system can be operated
when
●The engine switch is in ON.
●Intuitive parking assist function is
on.
●The vehicle speed is less than
about 6 mph (10 km/h).
●The shift lever is in a position
other than P.
■If “Parking Assist Unavailable
Clean Parking Assist Sensor” is
displayed on the multi-informa-
tion display
A sensor may be covered with ice,
snow, dirt, etc. Remove the ice,
snow, dirt, etc., fro m the sensor to
return the system to normal.
Also, due to ice forming on a sensor
at low temperatures, a warning
message may be displayed or the
sensor may not be able to detect an
object. Once the ice melts, the sys-
tem will return to normal.
If a warning message is displayed
even if the sensor is clean, there
may be a sensor malfunction. Have
the vehicle inspected by your Toyota
■When to disable the function
In the following situations, disable
the function as it may operate
even though there is no possibility
of a collision.
●The vehicle is equipped with a
commercial fender pole, wire-
less antenna or fog lights.
●The front or rear bumper or a
sensor receives a strong
impact.
●A non-genuine Toyota suspen-
sion (lowered suspension, etc.)
is installed.
●Towing eyelets (if equipped) are
installed.
●A backlit license plate is
installed.
■When using the intuitive park-
ing assist
In the following s ituations, the
system may not function correctly
due to a sensor mal function, etc.
Have the vehicle checked by your
Toyota dealer.
●The intuitive parking assist
operation display flashes or
shows continuously, and a
buzzer sounds when no objects
are detected.
●If the area around a sensor col-
lides with something, or is sub-
jected to strong impact.
●If the bumper or grille collides
with something.
●If the display flashes or is dis-
played continuously and a
buzzer does not sound, except
when the mute function has
been turned on.
WA R N I N G
■Notes when washing the vehi-
cle
Do not apply intensive bursts of
water or steam to the sensor
area.
Doing so may result in the sensor
malfunctioning.
●When using a high pressure
washer to wash the vehicle, do
not spray the sensors directly,
as doing so may cause a sensor
to malfunction.
●When using steam to clean the
vehicle, do not direct steam too
close to the sensors as doing so
may cause a sensor to malfunc-
tion.