reverse light TOYOTA RAV4 2019 Owners Manual (in English)
[x] Cancel search | Manufacturer: TOYOTA, Model Year: 2019, Model line: RAV4, Model: TOYOTA RAV4 2019Pages: 728, PDF Size: 21.09 MB
Page 118 of 728
1183-2. Opening, closing and locking the doors
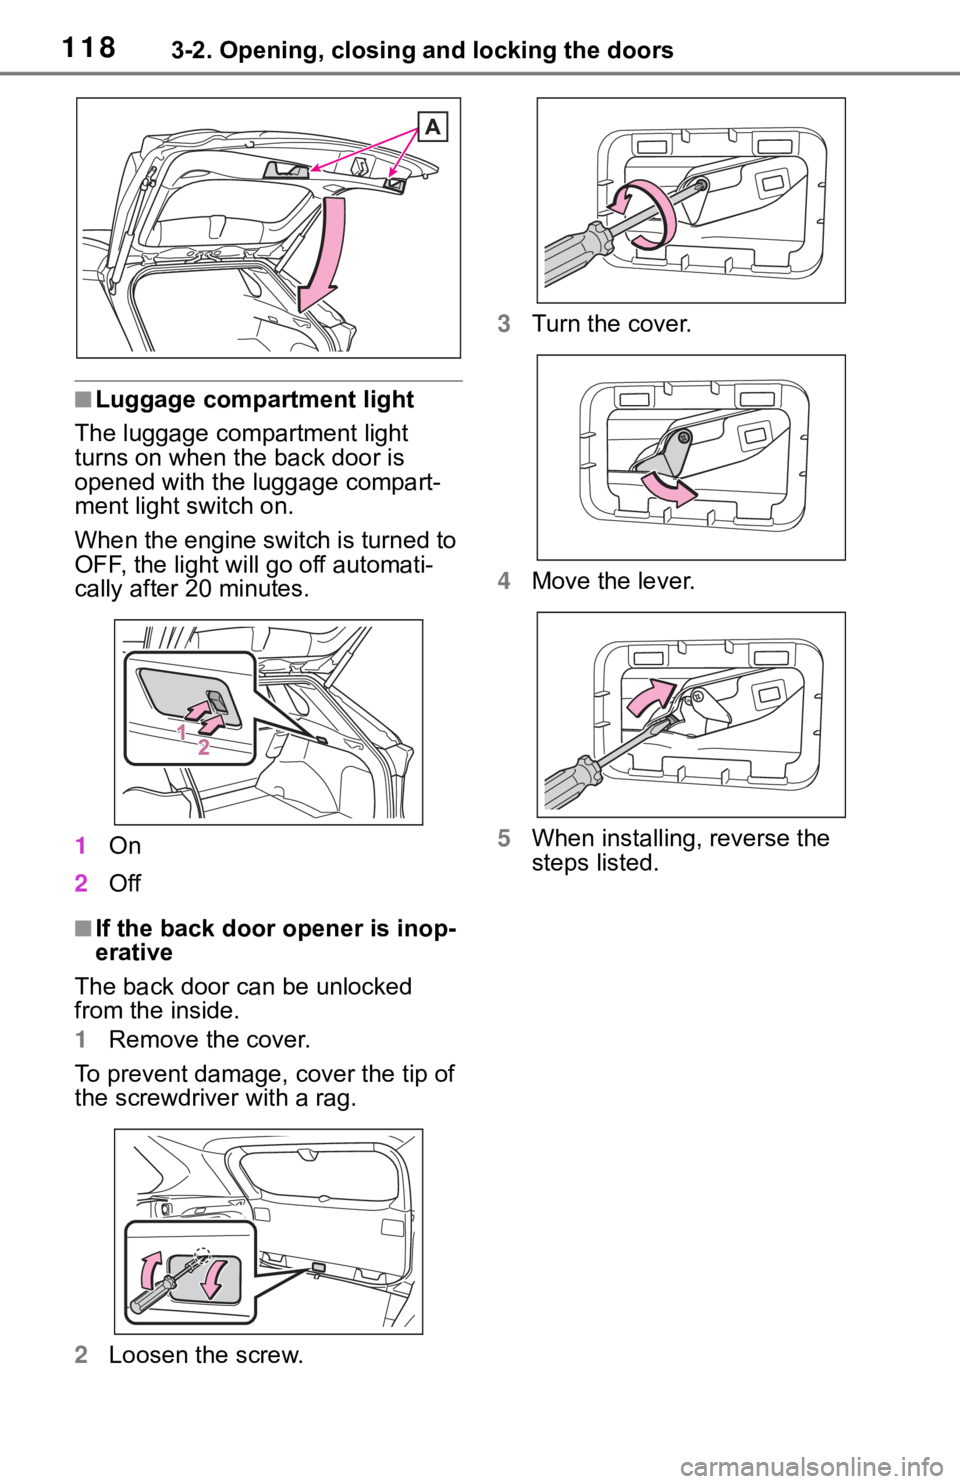
■Luggage compartment light
The luggage compartment light
turns on when the back door is
opened with the luggage compart-
ment light switch on.
When the engine switch is turned to
OFF, the light will go off automati-
cally after 20 minutes.
1 On
2 Off
■If the back door opener is inop-
erative
The back door can be unlocked
from the inside.
1 Remove the cover.
To prevent damage, cover the tip of
the screwdriver with a rag.
2 Loosen the screw. 3
Turn the cover.
4 Move the lever.
5 When installing, reverse the
steps listed.
Page 124 of 728
1243-2. Opening, closing and locking the doors
●When a small animal or small
object, such as a ball, moves
under the rear bumper
●When an object is moved from
under the rear bumper
●If someone is swinging their legs
while sitting on the rear bumper
●If the legs or another part of some-
one’s body contacts the rear
bumper while passing by the vehi-
cle
●When the vehicle is parked near
an electrical noise source which
affects the sensitivity of the Hands
Free Power Back Door, such as a
pay parking spot , gas station,
electrically heated road, or fluo-
rescent light
●When the vehicle is near a TV
tower, electric po wer plant, radio
station, large display, airport or
other facility that generates strong
radio waves or electrical noise
●When the vehicle is parked in a
place where objects such as
plants are near the rear bumper
●If luggage, etc. is s et near the rear
bumper
●If accessories or a vehicle cover is
installed/removed near the rear
bumper
●When the vehicle is being towed
To prevent unintentional operation,
turn the Hands Free Power Back
Door (kick sensor) operation setting
off. ( P. 9 4 )
■When reconnecting the battery
To enable the power back door to
operate properly, close the back
door manually.
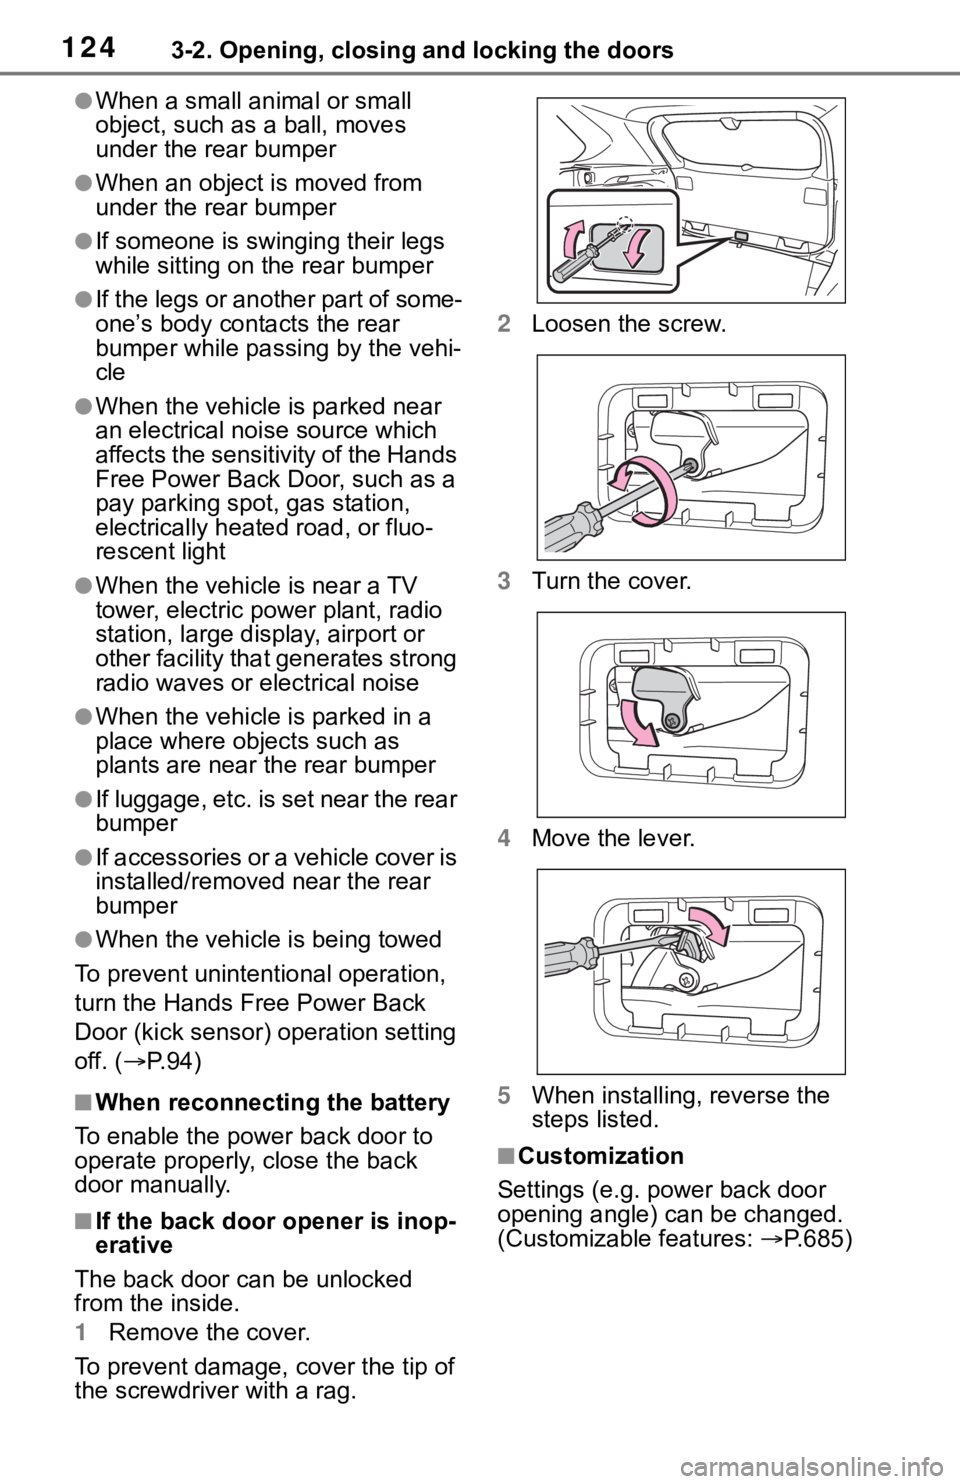
■If the back door opener is inop-
erative
The back door can be unlocked
from the inside.
1 Remove the cover.
To prevent damage, cover the tip of
the screwdriver with a rag. 2
Loosen the screw.
3 Turn the cover.
4 Move the lever.
5 When installing, reverse the
steps listed.
■Customization
Settings (e.g. power back door
opening angle) can be changed.
(Customizable features: P.685)
Page 206 of 728
2064-2. Driving procedures
brake will be released, and
the parking brake indicator
light and parking brake lamp
will turn off.
When the shift position is
shifted to P, the parking brake
will be set, and the parking
brake indicator light and park-
ing brake lamp will turn on.
Operate the shift lever with the
vehicle stopped and the brake
pedal depressed.
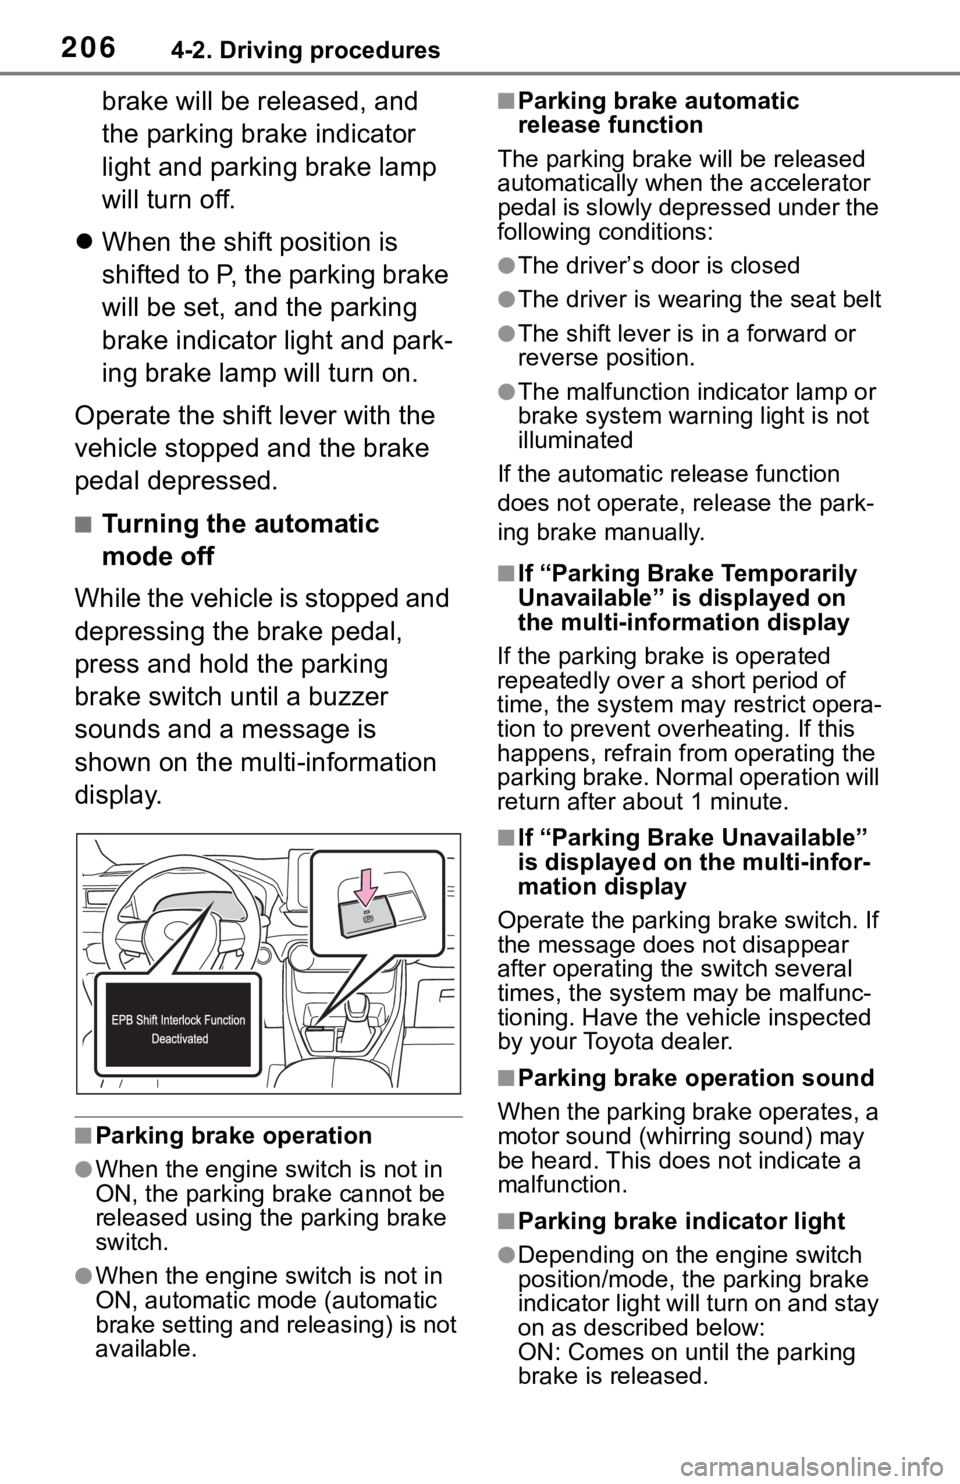
■Turning the automatic
mode off
While the vehicle is stopped and
depressing the brake pedal,
press and hold the parking
brake switch until a buzzer
sounds and a message is
shown on the multi-information
display.
■Parking brake operation
●When the engine switch is not in
ON, the parking brake cannot be
released using the parking brake
switch.
●When the engine switch is not in
ON, automatic mode (automatic
brake setting and releasing) is not
available.
■Parking brake automatic
release function
The parking brake will be released
automatically when the accelerator
pedal is slowly depressed under the
following conditions:
●The driver’s door is closed
●The driver is wearing the seat belt
●The shift lever is in a forward or
reverse position.
●The malfunction in dicator lamp or
brake system warning light is not
illuminated
If the automatic release function
does not operate, release the park-
ing brake manually.
■If “Parking Brake Temporarily
Unavailable” is displayed on
the multi-info rmation display
If the parking brake is operated
repeatedly over a short period of
time, the system may restrict opera-
tion to prevent ove rheating. If this
happens, refrain from operating the
parking brake. Normal operation will
return after about 1 minute.
■If “Parking Brake Unavailable”
is displayed on the multi-infor-
mation display
Operate the parking brake switch. If
the message does not disappear
after operating the switch several
times, the system may be malfunc-
tioning. Have the vehicle inspected
by your Toyota dealer.
■Parking brake operation sound
When the parking brake operates, a
motor sound (whirr ing sound) may
be heard. This does not indicate a
malfunction.
■Parking brake indicator light
●Depending on the engine switch
position/mode, the parking brake
indicator light will turn on and stay
on as described below:
ON: Comes on until the parking
brake is released.
Page 220 of 728
2204-3. Operating the lights and wipers
*2: For Canada
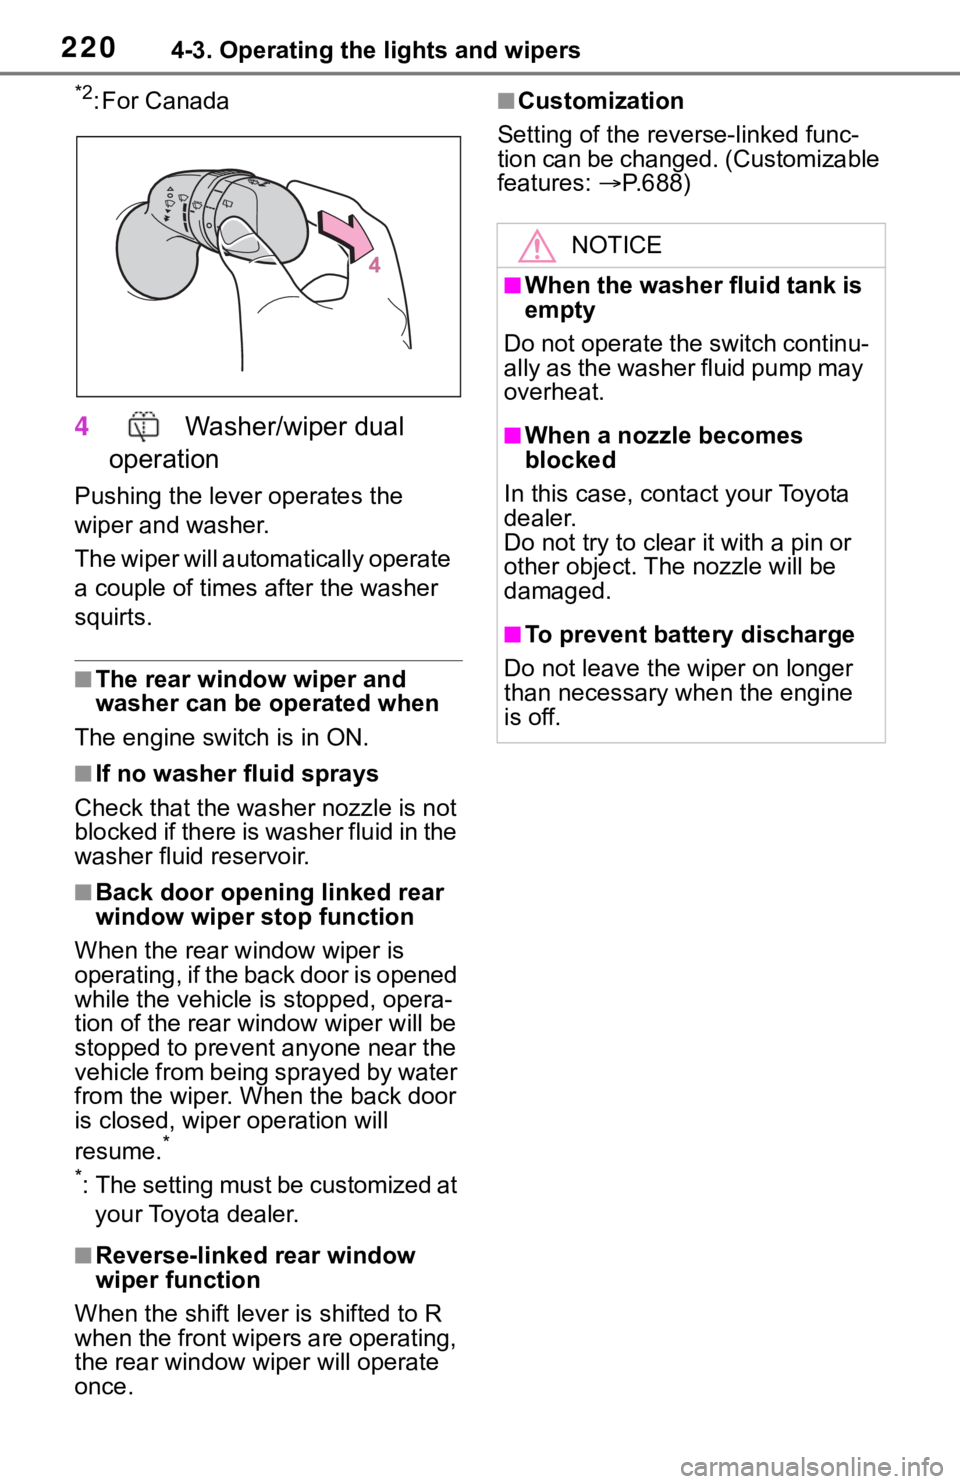
4 Washer/wiper dual
operation
Pushing the lever operates the
wiper and washer.
The wiper will automatically operate
a couple of times after the washer
squirts.
■The rear window wiper and
washer can be operated when
The engine switch is in ON.
■If no washer fluid sprays
Check that the washer nozzle is not
blocked if there is washer fluid in the
washer fluid reservoir.
■Back door opening linked rear
window wiper stop function
When the rear w indow wiper is
operating, if the back door is opened
while the vehicle is stopped, opera-
tion of the rear window wiper will be
stopped to prevent anyone near the
vehicle from being sprayed by water
from the wiper. When the back door
is closed, wiper operation will
resume.
*
*
: The setting must be customized at your Toyota dealer.
■Reverse-linked rear window
wiper function
When the shift lever is shifted to R
when the front wipers are operating,
the rear window wiper will operate
once.
■Customization
Setting of the reverse-linked func-
tion can be changed. (Customizable
features: P.688)
NOTICE
■When the washer fluid tank is
empty
Do not operate the switch continu-
ally as the washer fluid pump may
overheat.
■When a nozzle becomes
blocked
In this case, contact your Toyota
dealer.
Do not try to clear it with a pin or
other object. The nozzle will be
damaged.
■To prevent battery discharge
Do not leave the wiper on longer
than necessary w hen the engine
is off.
Page 582 of 728
5827-3. Do-it-yourself maintenance
over those of other vehicles.
If initialization does not complete
after driving for 1 hour or more, park
the vehicle in a safe place for
approximately 20 minutes and then
drive the vehicle again.
●If the vehicle is reversed during
initialization, the data up to that
point is reset, so perform the ini-
tialization procedure again from
the beginning.
●In the following si tuations, initial-
ization will not be started or was
not completed properly and the
system will not ope rate properly.
Perform the initialization proce-
dure again.
• If, when attempting to start initial- ization, the tire pressure warning
light does not b link 3 times.
• If, when the vehicle has been driven for about 20 minutes after
performing initialization, the tire
pressure warning light blinks for
approximately 1 minute and then
illuminates.
If the inflation pressure of each tire
is still not displayed, have the vehi-
cle inspected by your Toyota dealer.
For models made in Japan*1
without tire inflation pressure
display function
Every tire pressure warning
valve and transmitter has a
unique ID code. In addition to
the set of tire pressure warning
system sensor ID codes initially
registered to the vehicle, a sec-
ond set of ID codes can be reg-
istered. A second set of tire
pressure warning system sensor
ID codes can be registered at
your Toyota dealer. When 2 sets
of ID codes have been regis-
tered, either ID code set can be
selected.
*1: The country of production is writ- ten on the Certification Regula-
tion label. ( P.659)
Except for models made in
Japan
*2 without tire inflation
pressure display function
*2: The country of production is writ- ten on the Certification Regula-
tion label. ( P.659)
Every tire pressure warning
valve and transmitter has a
unique ID code. When replacing
a tire pressure warning valve
and transmitter, it is necessary
to register the ID code.
When registering the ID codes,
perform the following procedure.
WA R N I N G
■When initializing the tire pres-
sure warning system
Do not initializing tire inflation
pressure without first adjusting
the tire inflation pressure to the
specified level. Otherwise, the tire
pressure warning light may not
come on even if the tire inflation
pressure is low, or it may come on
when the tire inflation pressure is
actually normal.
Registering ID codes
(vehicles with tire pres-
sure warning system)
Page 584 of 728

5847-3. Do-it-yourself maintenance
●ID codes can be registered by
yourself, but depending on the
driving conditions and driving
environment, registration may
take some time to complete.
■Canceling ID code registration
●To cancel ID code registration
after it has been started, turn the
engine switch off before driving
the vehicle. If the vehicle is driven
after ID code registration is
started, to cancel registration, per-
form the ID code registration start
procedure again and turn the
engine switch off before driving.
●If ID code registration has been
canceled, the tire pressure warn-
ing light will blink for approxi-
mately 1 minute when the engine
switch is turned to ON and then
illuminate. The tire pressure warn-
ing system will be operational
when the tire pressure warning
light turns off.
●If the warning light does not turn
off even after se veral minutes
have elapsed, ID code registration
may not have bee n canceled cor-
rectly. To cancel registration, per-
form the ID code registration start
procedure again and then turn the
engine switch off before driving.
■If ID codes are not registered
properly
In the following situations, ID code
registration may take longer than
usual to be completed or may not be
possible. Normally, registration com-
pletes within appro ximately 30 min-
utes.
• Vehicle is not pa rked for approxi-
mately 20 minutes or more before
driving
• Vehicle is not driven at approxi- mately 25 mph ( 40 km/h) or more
• Vehicle is driven on unpaved roads
• Vehicle is driven near other vehi- cles and system cannot recog-
nize tire pressure warning valve and transmitters o
f your vehicle
over those of other vehicles
• Wheel with tire p ressure warning
valve and transmitter installed is
inside or near the vehicle
If registration does not complete
after driving for 1 hour or more, per-
form the ID code registration proce-
dure again from the beginning.
●If the vehicle is reversed during
registration, the data up to that
point is reset, so p erform the reg-
istration procedure again from the
beginning.
●In the following situations, ID code
registration will not be started or
was not completed properly and
the system will not operate prop-
erly. Perform the ID code registra-
tion procedure again.
• If, when attempt ing to start ID
code registration, the tire pressure
warning light does not blink slowly
3 times.
• If, when the veh icle has been
driven for about 20 minutes after
performing ID code registration,
the tire pressure warning light
blinks for approximately 1 minute
and then illuminates.
If the ID codes cannot be registered
even when performing the above
procedure, contact your Toyota
dealer.
Page 593 of 728
5937-3. Do-it-yourself maintenance
7
Maintenance and care
install them to the replace-
ment wiper insert.
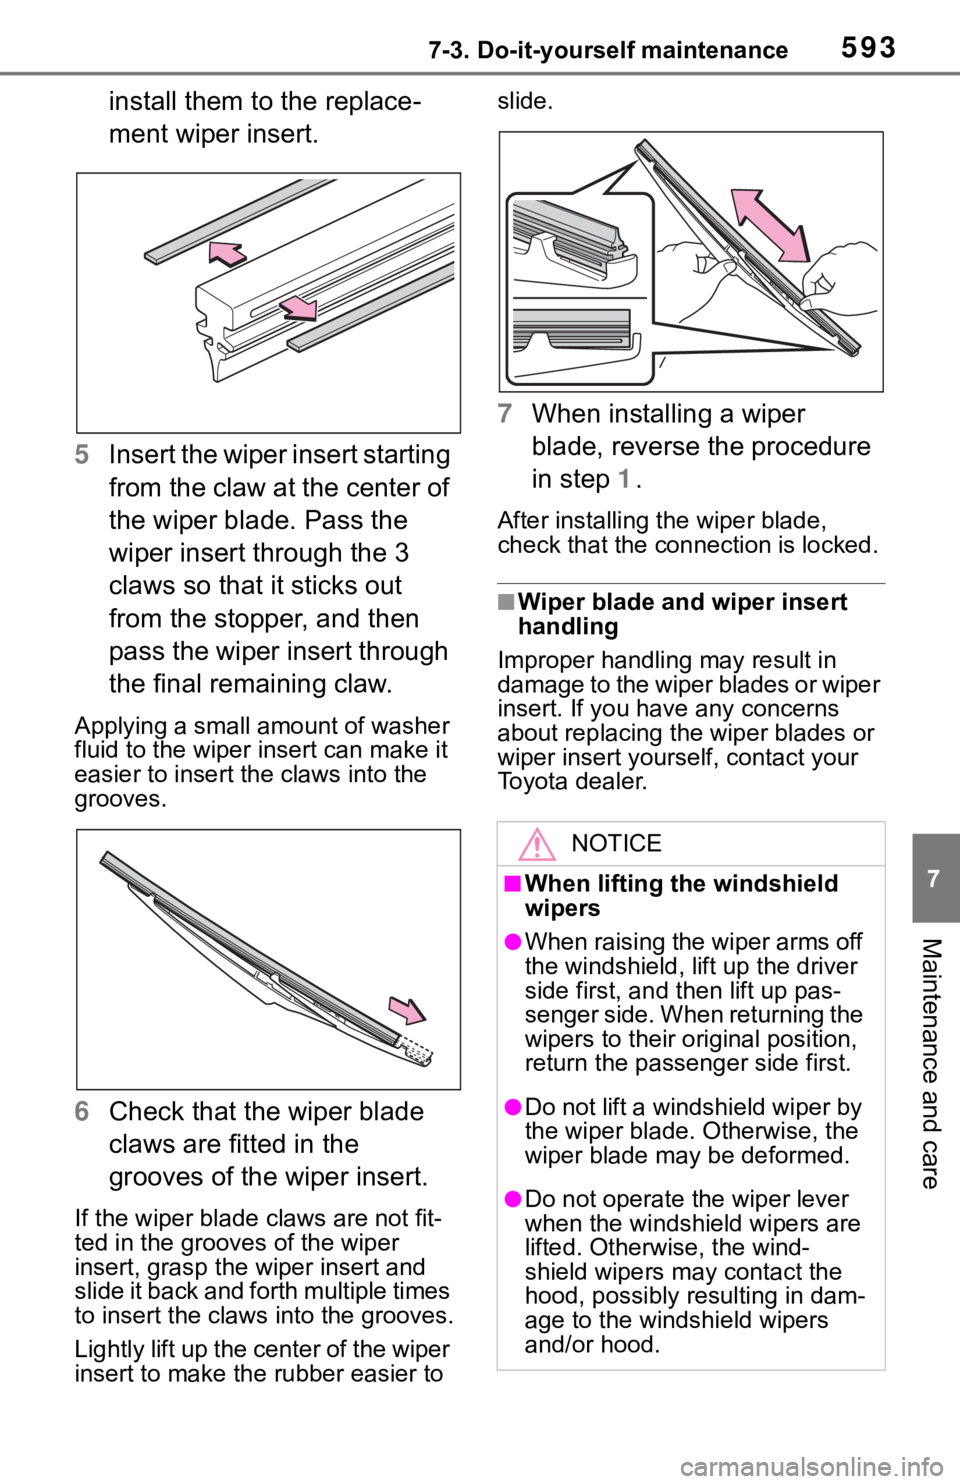
5 Insert the wiper insert starting
from the claw at the center of
the wiper blade. Pass the
wiper insert through the 3
claws so that it sticks out
from the stopper, and then
pass the wiper insert through
the final remaining claw.
Applying a small amount of washer
fluid to the wiper insert can make it
easier to insert the claws into the
grooves.
6Check that the wiper blade
claws are fitted in the
grooves of the wiper insert.
If the wiper blade claws are not fit-
ted in the grooves of the wiper
insert, grasp the wiper insert and
slide it back and fo rth multiple times
to insert the claws into the grooves.
Lightly lift up the center of the wiper
insert to make the rubber easier to slide.
7
When installing a wiper
blade, reverse the procedure
in step 1.
After installing the wiper blade,
check that the connection is locked.
■Wiper blade and wiper insert
handling
Improper handling may result in
damage to the wiper blades or wiper
insert. If you have any concerns
about replacing the wiper blades or
wiper insert yourself, contact your
Toyota dealer.
NOTICE
■When lifting the windshield
wipers
●When raising the wiper arms off
the windshield, lift up the driver
side first, and then lift up pas-
senger side. When returning the
wipers to their original position,
return the passenger side first.
●Do not lift a windshield wiper by
the wiper blade. Otherwise, the
wiper blade may be deformed.
●Do not operate the wiper lever
when the windshield wipers are
lifted. Otherwise, the wind-
shield wipers may contact the
hood, possibly resulting in dam-
age to the windshield wipers
and/or hood.
Page 650 of 728

6508-2. Steps to take in an emergency
Negative (-) battery term inal (second vehicle)
Solid, stationary, unpainted metallic point away from the batte ry
and any moving parts as shown in the illustration
4 Start the engine of the sec-
ond vehicle. Increase the
engine speed slightly and
maintain at that level for
approximately 5 minutes to
recharge the battery of your
vehicle.
5 Vehicles with smart key sys-
tem only: Open and close
any of the doors of your vehi-
cle with the engine switch
OFF.
6 Vehicles without smart key
system: Maintain the engine
speed of the second vehicle
and start the engine of your
vehicle.
Vehicles with smart key sys-
tem: Maintain the engine
speed of the second vehicle
and start the engine of your
vehicle by turning the engine
switch to ON.
7 Once the vehicle’s engine
has started, remove the
jumper cables in the exact
reverse order from which
they were connected.
Once the engine starts, have the
vehicle inspected at your Toyota
dealer as soon as possible.
■Starting the engine when the
battery is discharged
The engine cannot be started by push-starting.
■To prevent bat
tery discharge
●Turn off the headlights and the
audio system while the engine is
stopped.
(Vehicles with Stop & Start system:
Except when the en gine is stopped
due to the Stop & Start system)
●Turn off any unnecessary electri-
cal components when the vehicle
is running at a low speed for an
extended period, such as in heavy
traffic.
■When the battery is removed or
discharged
●Information stored in the ECU is
cleared. When the battery is
depleted, have the vehicle
inspected at your Toyota dealer.
●Some systems may require initial-
ization. ( P.693)
■When removing the battery ter-
minals
When the battery terminals are
removed, the information stored in
the ECU is cleared. Before remov-
ing the battery term inals, contact
your Toyota dealer.
■Charging the battery
The electricity stored in the battery
will discharge grad ually even when
the vehicle is not in use, due to nat-
ural discharge and the draining
effects of certain electrical appli-
ances. If the vehicle is left for a long
time, the battery may discharge,
and the engine may be unable to
start. (The battery recharges auto-
matically during driving.)
■When recharging or replacing
the battery (vehicles with smart
key system)
●In some cases, it may not be pos-
C
D