change time TOYOTA RAV4 2021 Owners Manual (in English)
[x] Cancel search | Manufacturer: TOYOTA, Model Year: 2021, Model line: RAV4, Model: TOYOTA RAV4 2021Pages: 68, PDF Size: 5.17 MB
Page 2 of 68
RAV4 2021
This Quick Reference Guide is a summary of basic vehicle
operations. It contains brief descriptions of fundamental
operations so you can locate and use the vehicle’s main
equipment quickly and easily.
The Quick Reference Guide is not intended as a substitute for
the Owner’s Manual located in your vehicle’s glove box. We
strongly encourage you to review the Owner’s Manual and
supplementary manuals so you will have a better understanding
of your vehicle’s capabilities and limitations.
Your dealership and the entire staff of Toyota Motor North
America, Inc. wish you many years of satisfied driving in your
new RAV4.
A word about safe vehicle operations
This Quick Reference Guide is not a full description of RAV4 operations.\
Every
RAV4 owner should review the Owner’s Manual that accompanies this veh\
icle.
Pay special attention to the boxed information highlighted in color throughout
the Owner’s Manual. Each box contains safe operating instructions to \
help you
avoid injury or equipment malfunction.
All information in this Quick Reference Guide is current at the time of \
printing.
Toyota reserves the right to make changes at any time without notice.
Page 18 of 68
16
FEATURES & OPERATIONS
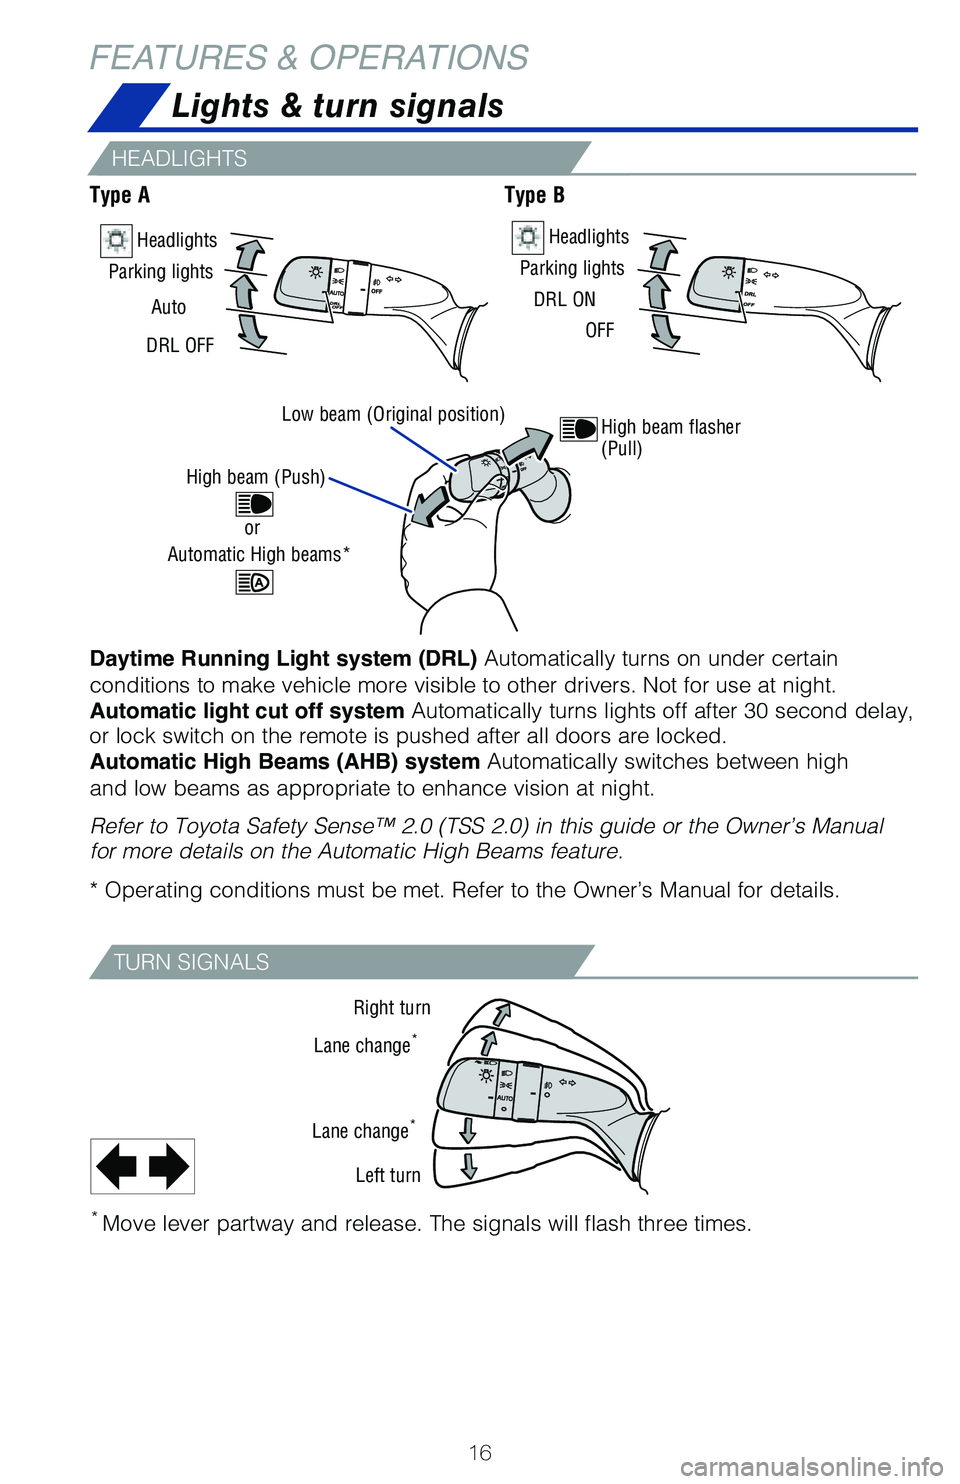
* Move lever partway and release. The signals will flash three times.
Right turn
Lane change
*
Lane change*
Left turn
Lights & turn signals
Daytime Running Light system (DRL) Automatically turns on under certain
conditions to make vehicle more visible to other drivers. Not for use at\
night.
Automatic light cut off system Automatically turns lights off after 30 second delay,
or lock switch on the remote is pushed after all doors are locked.
Automatic High Beams (AHB) system Automatically switches between high
and low beams as appropriate to enhance vision at night.
Refer to Toyota Safety Sense™ 2.0 (TSS 2.0) in this guide or the Ow\
ner’s Manual
for more details on the Automatic High Beams feature.
* Operating conditions must be met. Refer to the Owner’s Manual for d\
etails.
Type AType B
HEADLIGHTS
Parking lights
Low beam (Original position)
High beam (Push)
Automatic High beams* or
Auto
Headlights
DRL OFF Parking lights
DRL ON Headlights
OFF
High beam flasher
(Pull)
TURN SIGNALS
Page 22 of 68
20
FEATURES & OPERATIONS
Moonroof (if equipped)
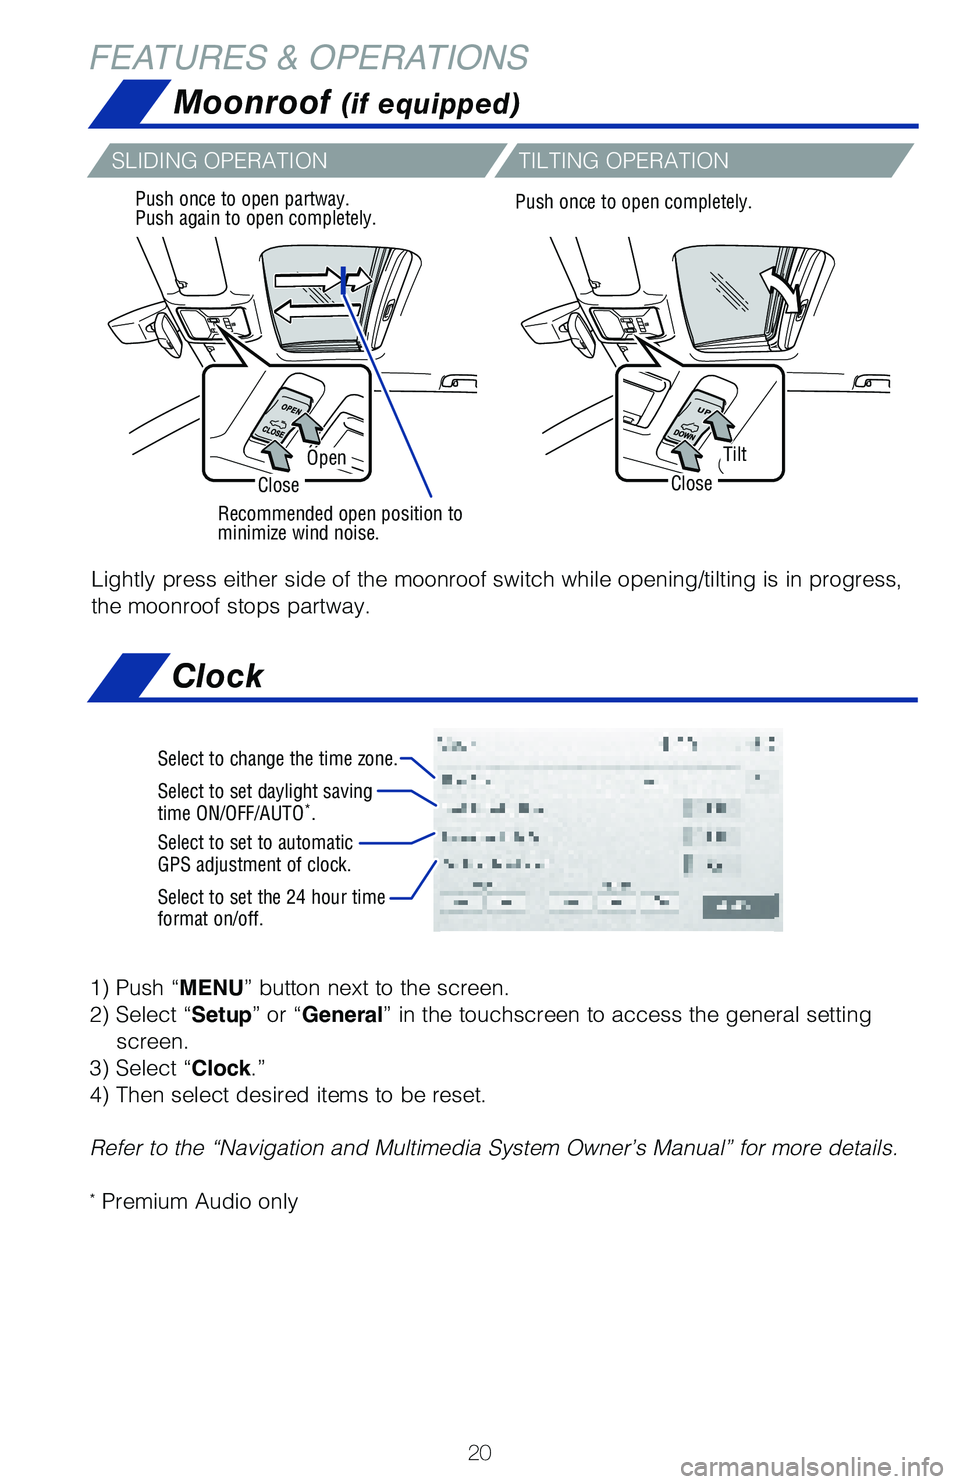
Recommended open position to
minimize wind noise.
Push once to open partway.
Push again to open completely.
SLIDING OPERATION
TILTING OPERATION
Lightly press either side of the moonroof switch while opening/tilting i\
s in progress,
the moonroof stops partway.
Push once to open completely.
Tilt
Close
Open
Close
Clock
1) Push “MENU” button next to the screen.
2) Select “Setup” or “General” in the touchscreen to access the general setting screen.
3) Select “Clock.”
4) Then select desired items to be reset.
Refer to the “Navigation and Multimedia System Owner’s Manual” \
for more details.
* Premium Audio only
Select to change the time zone.
Select to set daylight saving
time ON/OFF/AUTO*.
Select to set to automatic
GPS adjustment of clock.
Select to set the 24 hour time
format on/off.
Page 26 of 68
24
Microphone
FEATURES & OPERATIONS
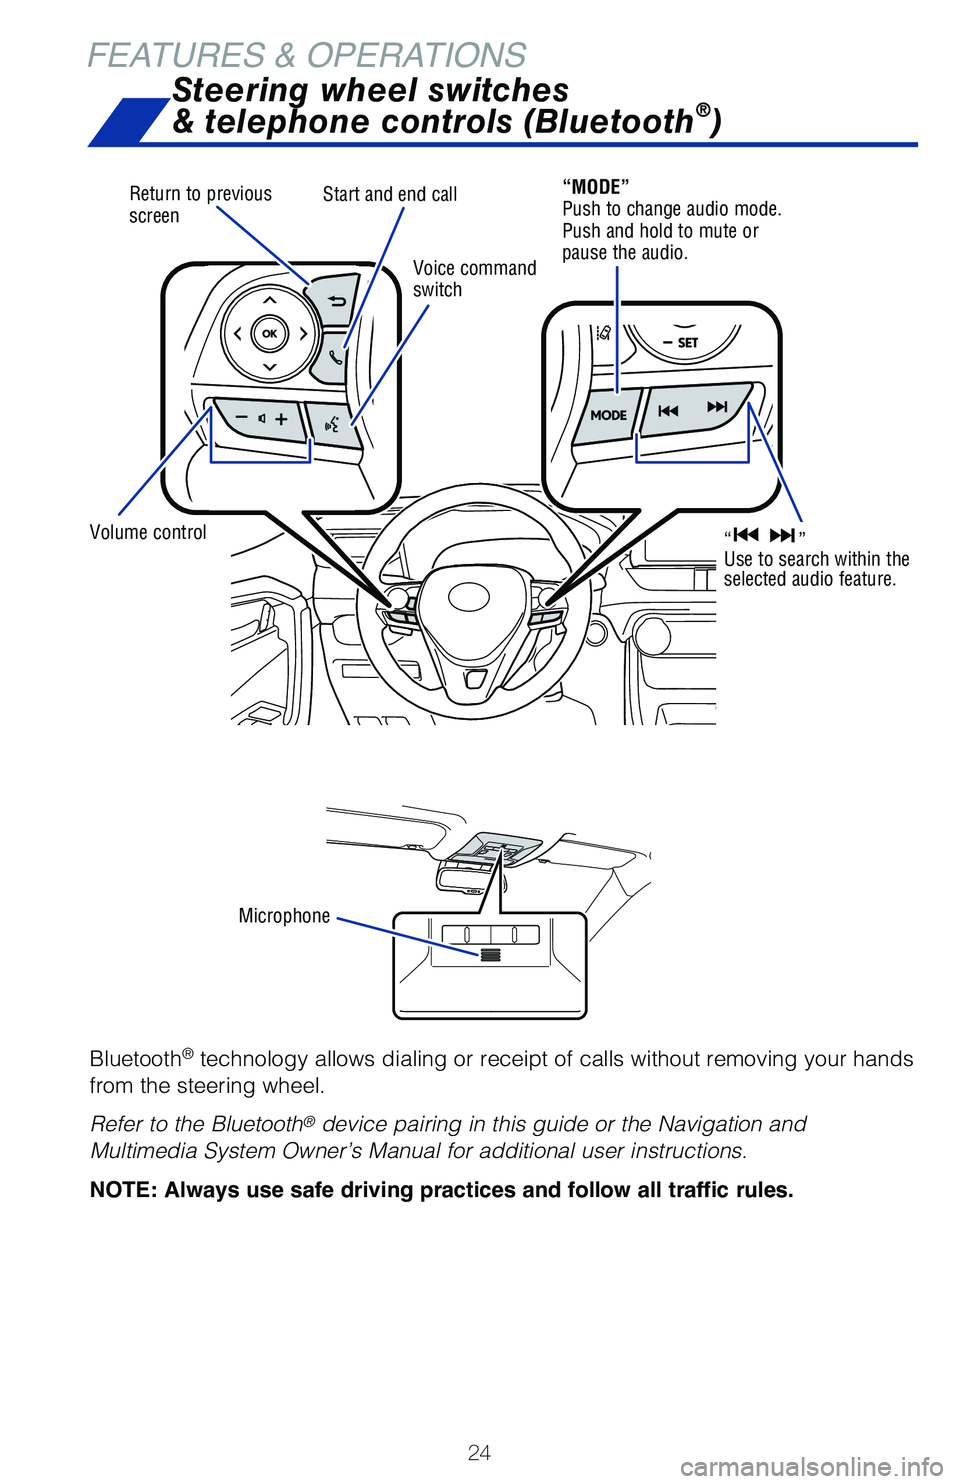
Bluetooth® technology allows dialing or receipt of calls without removing your han\
ds
from the steering wheel.
Refer to the Bluetooth
® device pairing in this guide or the Navigation and
Multimedia System Owner’s Manual for additional user instructions.
NOTE: Always use safe driving practices and follow all traffic rules.
Return to previous
screen
Volume control
Voice command
switch
Start and end call
“MODE”
Push to change audio mode.
Push and hold to mute or
pause the audio.
“ ”
Use to search within the
selected audio feature.
Steering wheel switches
& telephone controls (Bluetooth®)
Page 43 of 68
41
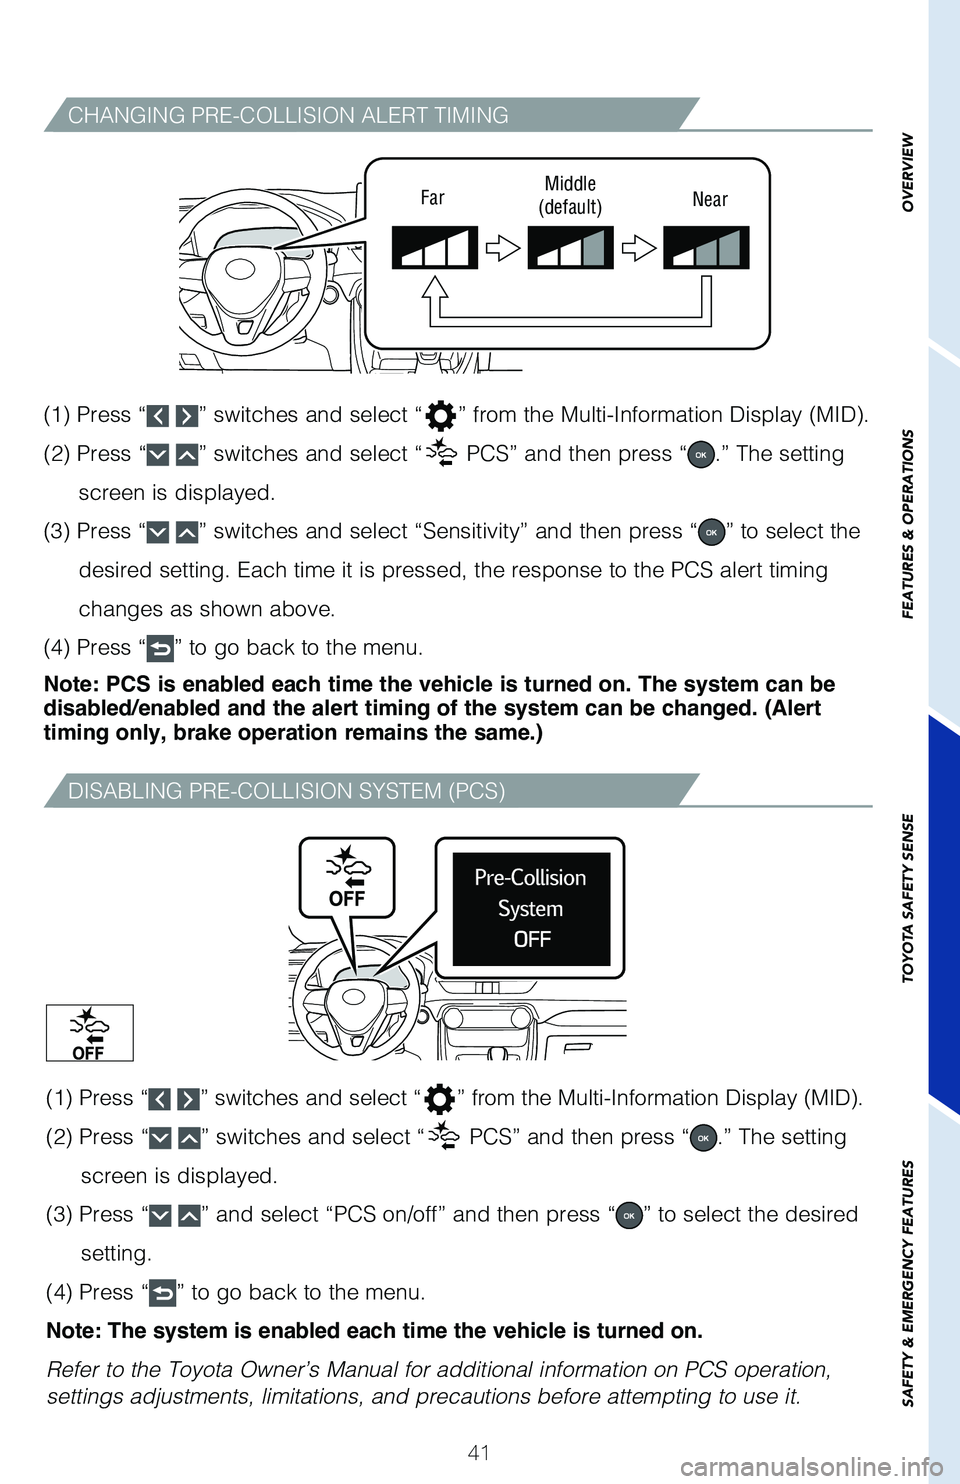
CHANGING PRE-COLLISION ALERT TIMING
DISABLING PRE-COLLISION SYSTEM (PCS)
FarMiddle
(default) Near
(1) Press “ ” switches and select “” from the Multi-Information Display (MID).
(2) Press “
” switches and select “ PCS” and then press “.” The setting
screen is displayed.
(3) Press “
” switches and select “Sensitivity” and then press “” to select the
desired setting. Each time it is pressed, the response to the PCS alert \
timing
changes as shown above.
(4) Press “
” to go back to the menu.
Note: PCS is enabled each time the vehicle is turned on. The system can be
disabled/enabled and the alert timing of the system can be changed. (Alert
timing only, brake operation remains the same.)
(1) Press “
” switches and select “” from the Multi-Information Display (MID).
(2) Press “
” switches and select “ PCS” and then press “.” The setting
screen is displayed.
(3) Press “
” and select “PCS on/off” and then press “” to select the desired
setting.
(4) Press “
” to go back to the menu.
Note: The system is enabled each time the vehicle is turned on.
Refer to the Toyota Owner’s Manual for additional information on PCS \
operation,
settings adjustments, limitations, and precautions before attempting to \
use it.
OVERVIEW
FEATURES & OPERATIONS
TOYOTA SAFETY SENSE
SAFETY & EMERGENCY FEATURES
Page 52 of 68
50
TOYOTA SAFETY SENSE™
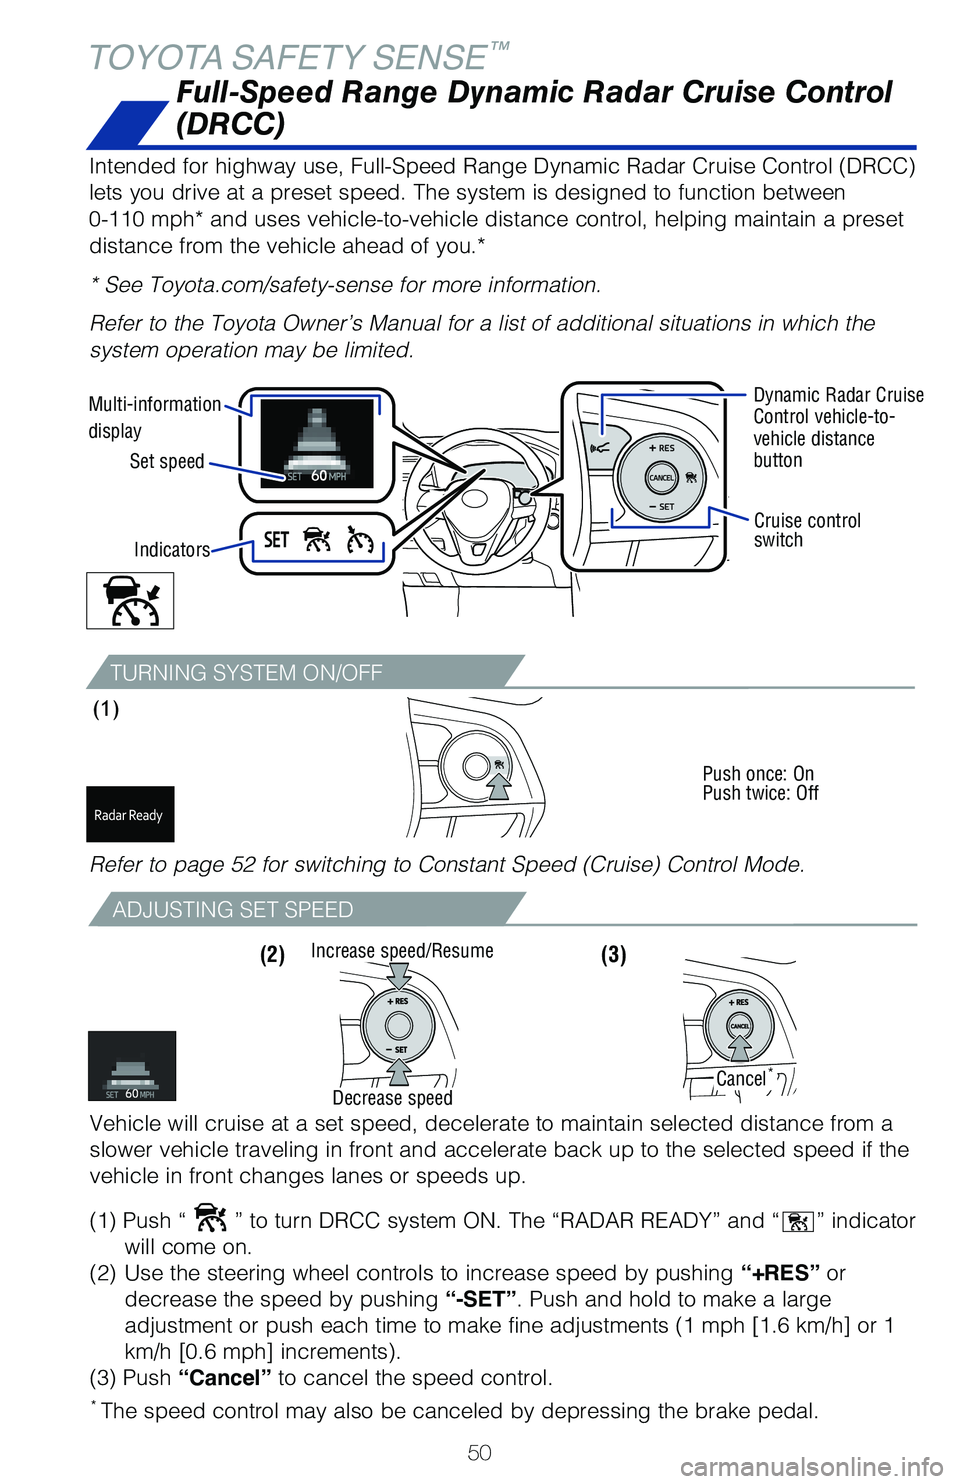
TURNING SYSTEM ON/OFF
(1)
Push once: On
Push twice: Off
Full-Speed Range Dynamic Radar Cruise Control
(DRCC)
Intended for highway use, Full-Speed Range Dynamic Radar Cruise Control (DRCC)
lets you drive at a preset speed. The system is designed to function bet\
ween
0-110 mph* and uses vehicle-to-vehicle distance control, helping maintai\
n a preset
distance from the vehicle ahead of you.*
* See Toyota.com/safety-sense for more information.
Refer to the Toyota Owner’s Manual for a list of additional situation\
s in which the
system operation may be limited.
Multi-information
displaySet speed Dynamic Radar Cruise
Control vehicle-to-
vehicle distance
button
Cruise control
switch
Indicators
Refer to page 52 for switching to Constant Speed (Cruise) Control Mode\
.
ADJUSTING SET SPEED
(3) (2)
* The speed control may also be canceled by depressing the brake pedal.
Vehicle will cruise at a set speed, decelerate to maintain selected dist\
ance from a
slower vehicle traveling in front and accelerate back up to the selected\
speed if the
vehicle in front changes lanes or speeds up.
(1) Push “
” to turn DRCC system ON. The “RADAR READY” and “” indicator
will come on.
(2) Use the steering wheel controls to increase speed by pushing “+RES” or
decrease the speed by pushing “-SET”. Push and hold to make a large
adjustment or push each time to make fine adjustments (1 mph [1.6 km/h] or 1
km/h [0.6 mph] increments).
(3) Push “Cancel” to cancel the speed control.
Increase speed/Resume
Cancel*
Decrease speed
Page 53 of 68
51
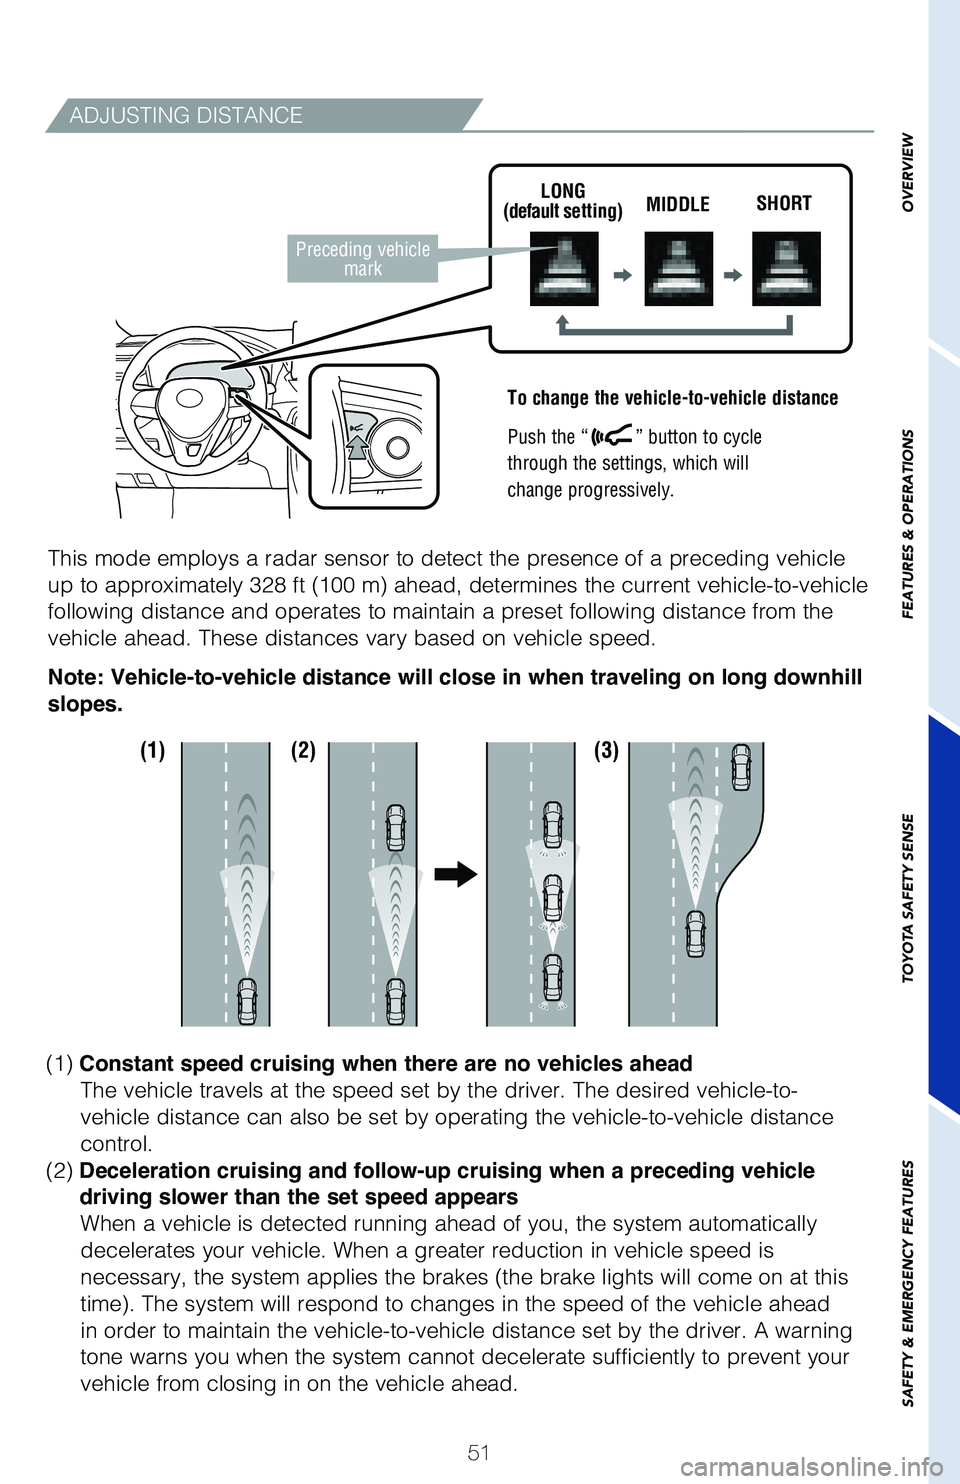
ADJUSTING DISTANCE
To change the vehicle-to-vehicle distance
Push the “
” button to cycle
through the settings, which will
change progressively.
This mode employs a radar sensor to detect the presence of a preceding v\
ehicle
up to approximately 328 ft (100 m) ahead, determines the current vehicle-to-vehicle
following distance and operates to maintain a preset following distance \
from the
vehicle ahead. These distances vary based on vehicle speed.
LONG
(default setting) MIDDLE
SHORT
Note: Vehicle-to-vehicle distance will close in when traveling on long downhill
slopes.
Preceding vehicle
mark
OVERVIEW
FEATURES & OPERATIONS
TOYOTA SAFETY SENSE
SAFETY & EMERGENCY FEATURES
(1) (2) (3)
(1) Constant speed cruising when there are no vehicles ahead
The vehicle travels at the speed set by the driver. The desired vehicle-\
to-
vehicle distance can also be set by operating the vehicle-to-vehicle dis\
tance
control.
(2) Deceleration cruising and follow-up cruising when a preceding vehicle
driving slower than the set speed appears When a vehicle is detected running ahead of you, the system automatically
decelerates your vehicle. When a greater reduction in vehicle speed is
necessary, the system applies the brakes (the brake lights will come on at this
time). The system will respond to changes in the speed of the vehicle ahead
in order to maintain the vehicle-to-vehicle distance set by the driver. \
A warning
tone warns you when the system cannot decelerate sufficiently to prevent\
your
vehicle from closing in on the vehicle ahead.
Page 59 of 68
57
OVERVIEW
FEATURES & OPERATIONS
TOYOTA SAFETY SENSE
SAFETY & EMERGENCY FEATURES
Tire Pressure Monitoring (warning) System (TPMS)
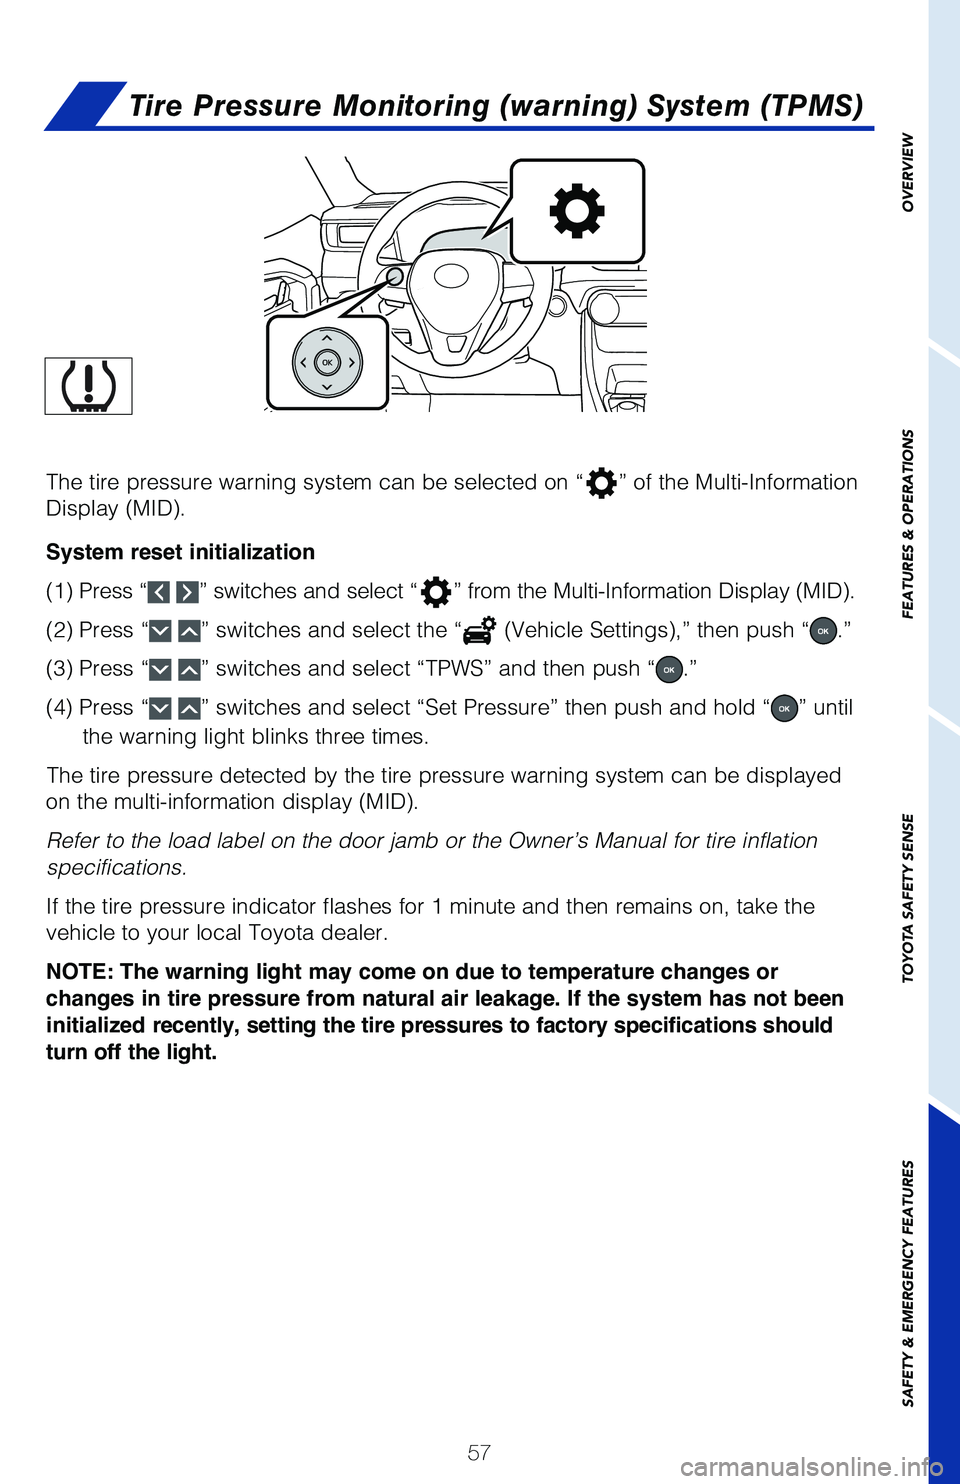
The tire pressure warning system can be selected on “” of the Multi-Information
Display (MID).
System reset initialization
(1) Press “
” switches and select “” from the Multi-Information Display (MID).
(2) Press “
” switches and select the “ (Vehicle Settings),” then push “.”
(3) Press “
” switches and select “TPWS” and then push “.”
(4) Press “
” switches and select “Set Pressure” then push and hold “” until
the warning light blinks three times.
The tire pressure detected by the tire pressure warning system can be di\
splayed
on the multi-information display (MID).
Refer to the load label on the door jamb or the Owner’s Manual for ti\
re inflation
specifications.
If the tire pressure indicator flashes for 1 minute and then remains on,\
take the
vehicle to your local Toyota dealer.
NOTE: The warning light may come on due to temperature changes or
changes in tire pressure from natural air leakage. If the system has not been
initialized recently, setting the tire pressures to factory specifications should
turn off the light.