remote control TOYOTA RAV4 2022 Owner's Guide
[x] Cancel search | Manufacturer: TOYOTA, Model Year: 2022, Model line: RAV4, Model: TOYOTA RAV4 2022Pages: 748, PDF Size: 22.93 MB
Page 439 of 748

4395-9. Audio/visual remote controls
5
Audio
USB*2, 3, iPod/iPhone (Apple
CarPlay)
*3, Bluetooth®
audio
*2, 3
• Press: Track/file up/down
• Press and hold (0.8 sec. or more): Fast forward/rewind
Android Auto*2
• Press: Track up/down
*1: This function is not made avail-able in some countries or areas.
*2: When an Apple CarPlay connec-tion is established, this function
will be unavailable.
*3: When an Android Auto connec-tion is established, this function
will be unavailable.
Page 500 of 748
5005-17. Connected Services overview
*: Vehicles equipped with remote connect only
Remote Connect is a service
that lets you view and remotely
control certain aspects of your
vehicle.
■Subscription
After you sign the Telematics
Subscription Service Agree-
ment (see the Safety Connect
section P.66), download the
Toyota App from your smart-
phone app store, and register
within the app (or enroll and
complete registration at the
dealer), you can begin using
these services.
A variety of subscription terms
are available. Contact your
Toyota dealer, or call 1-800-
331-4331 for further subscrip- tion details.
■Availability of function
Remote Connect is available
in the contiguous United
States, Washington D.C. and
Alaska.
●Availability of functions of the
Remote Connect is dependent on
network reception level.
●Remote Connect should only be
used by authorized users.
●Laws in some communities may
require that the vehicle be within
view of the user when operating
Remote Connect.
In some states, use of Remote
Connect may violate state or local
laws. Before using Remote Con-
nect, check your state and local
laws.
●Any malfunction of the vehicle
should be repaired by your Toyota
dealer.
●Remote Connect is designed to
work at temperatures above
approximately -22 °F (-30 °C).
This specification is related to the
Remote Conne ct operation, but is
dependent on the vehicle’s oper-
ating temperature range which
may be different.
●Content is subject to change with-
out notice.
●Additional information can be
found at http://www.toyota.com/
connected-services in the United
States.
Type D: Function
achieved by using
DCM and a smart-
phone
The functionality of Remote
Connect and Service Con-
nect are made possible by
the use of a DCM and a
smartphone.
For details about these ser-
vices, refer to
http://www.toyota.com/conn
ected-services.
Remote Connect*
WARNING
●Operating Remote Connect
incorrectly may lead to unfore-
seen accidents or malfunctions.
Check the vehicle condition and
assume full responsibility before
using.
Page 544 of 748
5446-4. Using the other interior features
NOTICE
■Situations in which the func-
tion may not operate normally
Devices may not be charged nor-
mally in the following situations.
●The portable device is fully
charged
●The portable device is being
charged with a cable connected
●There is foreign matter between
the charge area and portable
device
●Charging has caused the porta-
ble device to heat up
●The temperature around the
charging tray is 95°F (35°C) or
higher, such as in extreme heat
●The portable device is placed
with its charging side facing up
●The portable device is placed in
an area misaligned from the
charge area
●The portable device is larger
than the charging tray
●A foldable and portable device
is placed outside the charge
area
●The vehicle is in an area where
strong electrical waves or noise
are emitted, such as near a tele-
vision tower, power plant, gaso-
line station, broadcasting
station, large display, airport,
etc.
●Any of the following objects that
is 0.08 in (2 mm) or thicker is
between the charging side of
the portable device and the
charge area
• A card that has metal on it, such as aluminum foil, etc.
• A pack of cigarettes that includes aluminum foil
• A wallet or bag that is made of metal
• Coins
• A heating pad
• CDs, DVDs or other media
• A metal accessory
• A case or cover made of metal
●Electric wave type wireless
remote controls are being used
nearby
●2 or more portable devices are
placed on the charging tray at
the same time
If charging is abnormal or the
operation indicator light contin-
ues to flash for any other reason,
the wireless char ger may be mal-
functioning. Contact your Toyota
dealer.
■To prevent malfunctions and
data corruptions
●When charging, bringing a
credit, or other magnetic card,
or magnetic storage media
close to the charge area may
clear any stored data due to
magnetic influence. Also, do not
bring a wristwatch or other pre-
cision instrument close to the
charge area since doing so may
cause it to malfunction.
Page 547 of 748
5476-4. Using the other interior features
6
Interior features
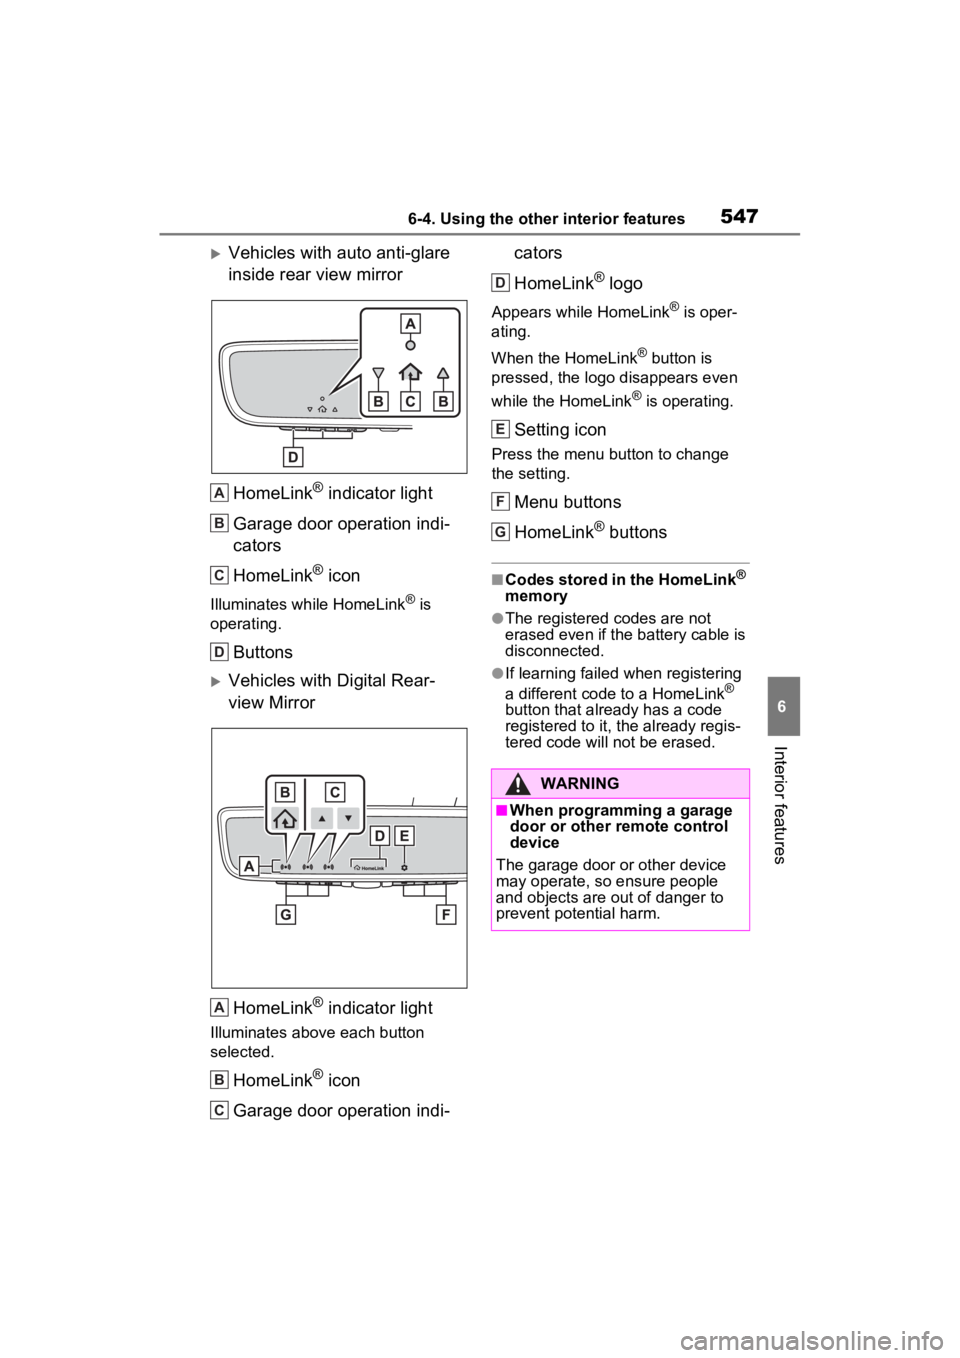
Vehicles with auto anti-glare
inside rear view mirrorHomeLink
® indicator light
Garage door operation indi-
cators
HomeLink
® icon
Illuminates while HomeLink® is
operating.
Buttons
Vehicles with Digital Rear-
view Mirror
HomeLink
® indicator light
Illuminates above each button
selected.
HomeLink® icon
Garage door operation indi- cators
HomeLink
® logo
Appears while HomeLink® is oper-
ating.
When the HomeLink
® button is
pressed, the logo disappears even
while the HomeLink
® is operating.
Setting icon
Press the menu button to change
the setting.
Menu buttons
HomeLink
® buttons
■Codes stored in the HomeLink®
memory
●The registered codes are not
erased even if the battery cable is
disconnected.
●If learning failed when registering
a different code to a HomeLink®
button that already has a code
registered to it, the already regis-
tered code will not be erased.
A
B
C
D
A
B
C
WARNING
■When programming a garage
door or other remote control
device
The garage door or other device
may operate, so ensure people
and objects are out of danger to
prevent potential harm.
D
E
F
G
Page 548 of 748
5486-4. Using the other interior features
■Before programming
HomeLink
®
During programming, it is pos-
sible that garage doors,
gates, or other devices may
operate. For this reason,
make sure that people and
objects are clear of the
garage door or other devices
to prevent injury or other
potential harm.
It is recommended that a new
battery be placed in the
remote control transmitter for
successful programming.
Garage door opener motors
manufactured after 1995 may
be equipped with rolling code
protection. If this is the case, you may need a stepladder or
other sturdy, safe device to
reach the “Learn” or “Smart”
button on the garage door
opener motor.
■Programming HomeLink®
Steps
2 through 4 must be per-
formed within 60 seconds, oth-
erwise the HomeLink
® indicator
light will stop flashing and pro-
gramming will not be success-
fully completed.
1 Vehicles with Digital Rear-
view Mirror: Press the
HomeLink
® button or menu
button
When the HomeLink® button is
pressed:
Homelink
® Training Tutorial will be
displayed to assist you program-
ming the HomeLink
®.
When Homelink
® Training Tutorial
is displayed, follow the instructions
displayed.
When the menu button is pressed:
Press the menu button and
select the “Set U p >”. Homelink
®
Training Tutorial will be displayed
to assist you programming the
HomeLink
®.
When Homelink
® Training Tutorial
is displayed, follow the instructions
displayed.
2 Press and release the
HomeLink
® button you want
to program and check that
the HomeLink
® indicator light
flashes (orange).
WARNING
■Conforming to federal safety
standards
Do not use the HomeLink
® com-
patible transceiver with any
garage door opener or device that
lacks safety stop and reverse fea-
tures as required by federal safety
standards.
This includes any garage door
that cannot detect an interfering
object. A door or device without
these features increases the risk
of death or se rious injury.
■When operating or program-
ming HomeLink®
Never allow a child to operate or
play with the HomeLink® buttons.
Programming HomeLink®
Page 549 of 748
5496-4. Using the other interior features
6
Interior features
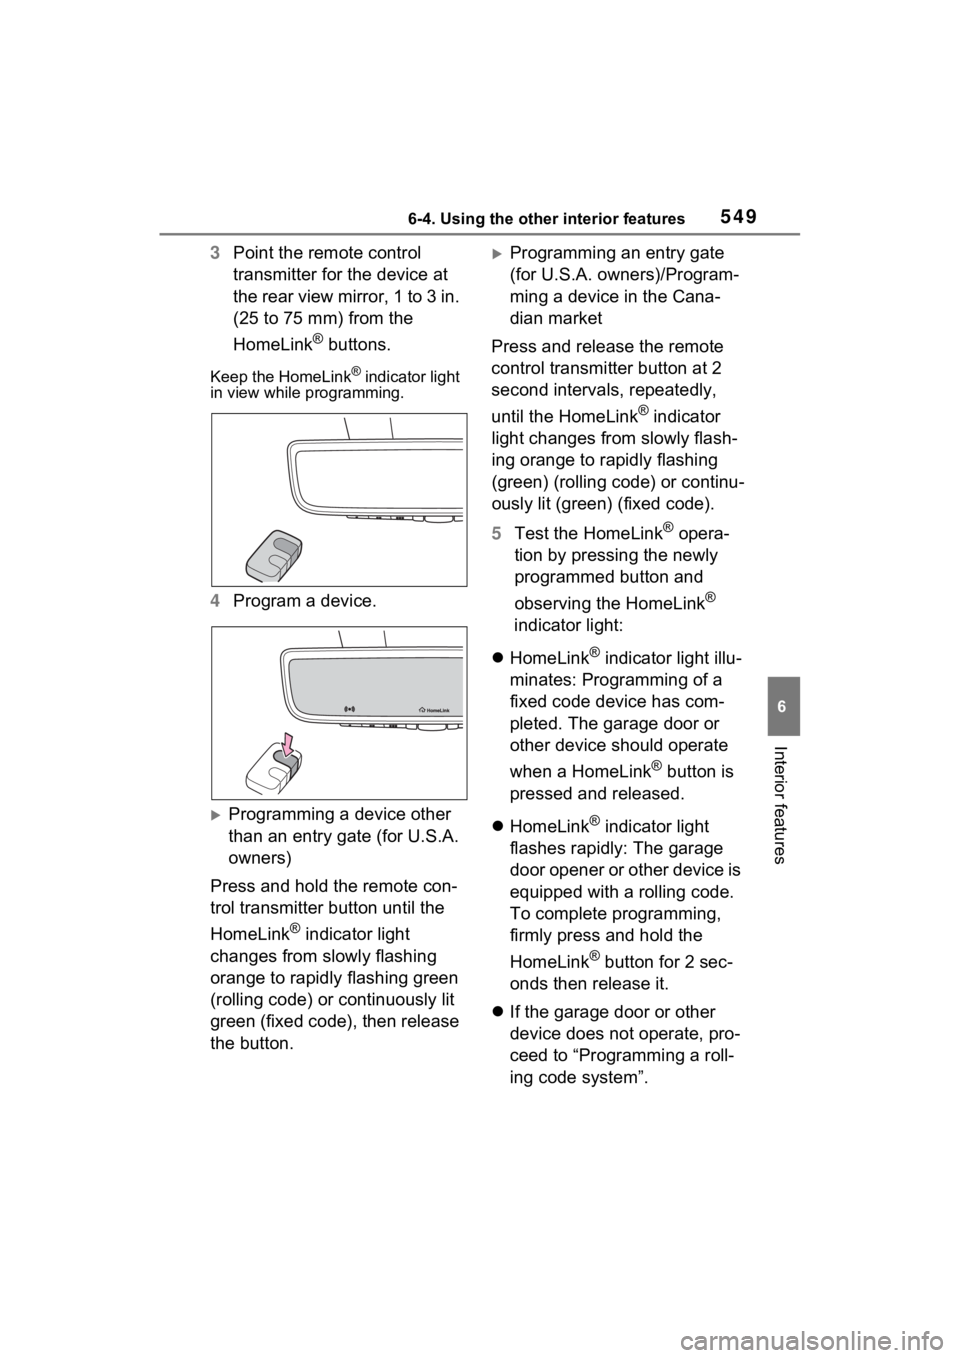
3Point the remote control
transmitter for the device at
the rear view mirror, 1 to 3 in.
(25 to 75 mm) from the
HomeLink
® buttons.
Keep the HomeLink® indicator light
in view while programming.
4 Program a device.
Programming a device other
than an entry gate (for U.S.A.
owners)
Press and hold the remote con-
trol transmitter button until the
HomeLink
® indicator light
changes from slowly flashing
orange to rapidly flashing green
(rolling code) or continuously lit
green (fixed code), then release
the button.
Programming an entry gate
(for U.S.A. owners)/Program-
ming a device in the Cana-
dian market
Press and release the remote
control transmitter button at 2
second intervals, repeatedly,
until the HomeLink
® indicator
light changes from slowly flash-
ing orange to rapidly flashing
(green) (rolling code) or continu-
ously lit (green) (fixed code).
5 Test the HomeLink
® opera-
tion by pressing the newly
programmed button and
observing the HomeLink
®
indicator light:
HomeLink
® indicator light illu-
minates: Programming of a
fixed code device has com-
pleted. The garage door or
other device should operate
when a HomeLink
® button is
pressed and released.
HomeLink
® indicator light
flashes rapidly: The garage
door opener or other device is
equipped with a rolling code.
To complete programming,
firmly press and hold the
HomeLink
® button for 2 sec-
onds then release it.
If the garage door or other
device does not operate, pro-
ceed to “Programming a roll-
ing code system”.
Page 577 of 748
5777-3. Do-it-yourself maintenance
7
Maintenance and care
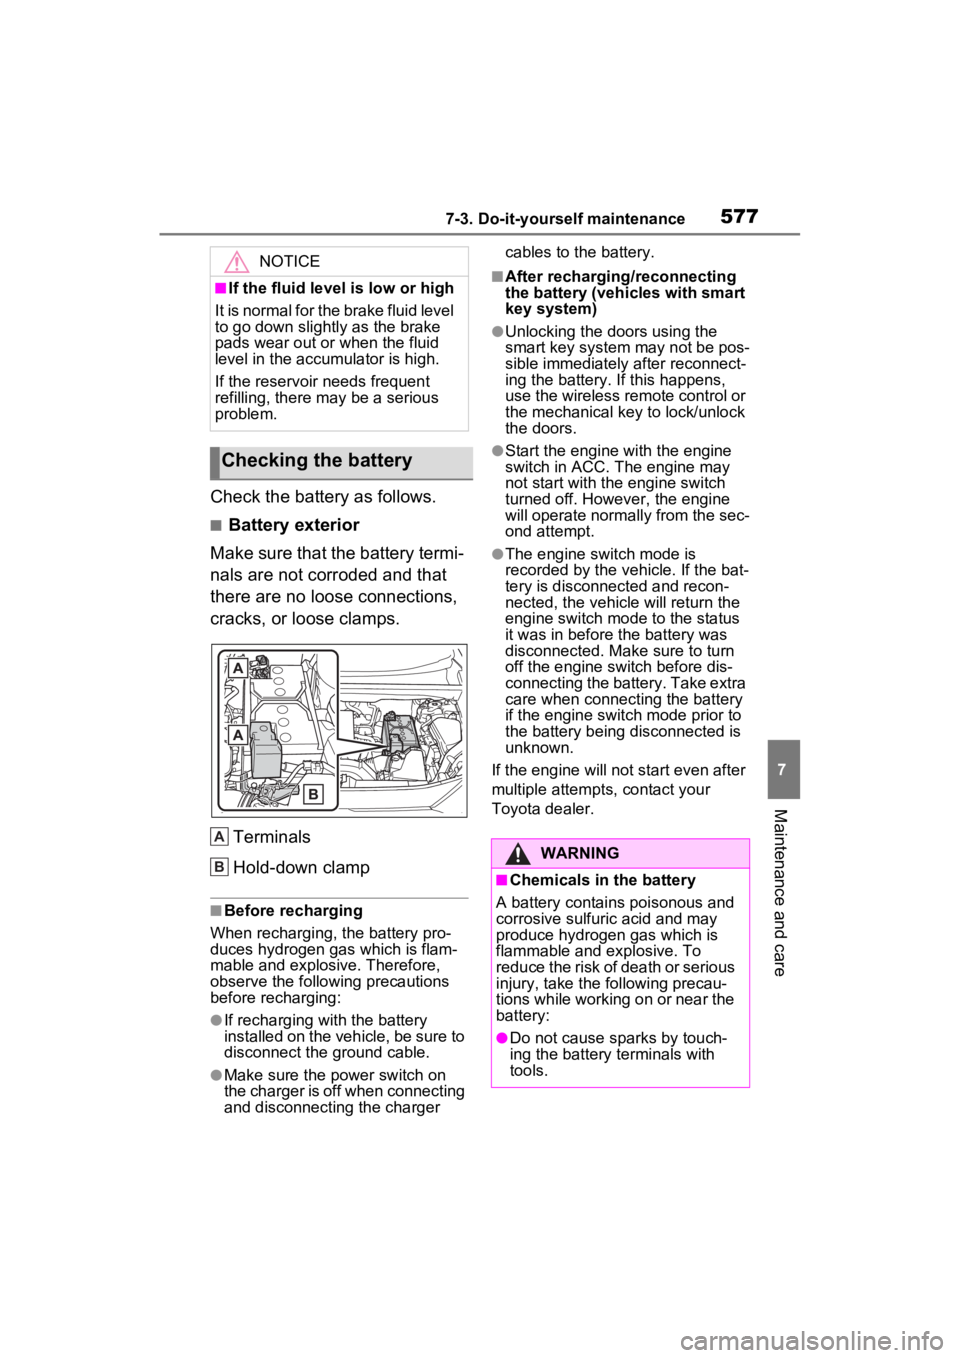
Check the battery as follows.
■Battery exterior
Make sure that the battery termi-
nals are not corroded and that
there are no loose connections,
cracks, or loose clamps.
Terminals
Hold-down clamp
■Before recharging
When recharging, t he battery pro-
duces hydrogen ga s which is flam-
mable and explosive. Therefore,
observe the following precautions
before recharging:
●If recharging wi th the battery
installed on the vehicle, be sure to
disconnect the ground cable.
●Make sure the power switch on
the charger is off when connecting
and disconnecting the charger cables to the battery.
■After recharging/reconnecting
the battery (vehicles with smart
key system)
●Unlocking the doors using the
smart key system may not be pos-
sible immediately
after reconnect-
ing the battery. If this happens,
use the wireless remote control or
the mechanical key to lock/unlock
the doors.
●Start the engine with the engine
switch in ACC. T he engine may
not start with th e engine switch
turned off. However, the engine
will operate normally from the sec-
ond attempt.
●The engine switch mode is
recorded by the vehicle. If the bat-
tery is disconnected and recon-
nected, the vehicle will return the
engine switch mode to the status
it was in before t he battery was
disconnected. Make sure to turn
off the engine switch before dis-
connecting the battery. Take extra
care when connecting the battery
if the engine switch mode prior to
the battery being disconnected is
unknown.
If the engine will no t start even after
multiple attempts, contact your
Toyota dealer.
NOTICE
■If the fluid level is low or high
It is normal for the brake fluid level
to go down slightly as the brake
pads wear out or when the fluid
level in the accumulator is high.
If the reservoir needs frequent
refilling, there may be a serious
problem.
Checking the battery
A
B�:�$�5�1�,�1�*
■Chemicals in the battery
A battery contains poisonous and
corrosive sulfur ic acid and may
produce hydrogen gas which is
flammable and explosive. To
reduce the risk of death or serious
injury, take the following precau-
tions while working on or near the
battery:
●Do not cause sparks by touch-
ing the battery terminals with
tools.
Page 597 of 748
5977-3. Do-it-yourself maintenance
7
Maintenance and care
■If the key battery is depleted
The following symptoms may occur:
●The smart key system (if
equipped) and wireless remote
control will not function properly.
●The operational range will be
reduced.
Prepare the following before
replacing the battery:
Flathead screwdriver
Small flathead screwdriver
Lithium battery CR2032
■Use a CR2032 lithium battery
●Batteries can be purchased at
your Toyota dealer, local electrical
appliance shops or camera stores.
●Replace only with the same or
equivalent type recommended by
the manufacturer.
●Dispose of used batteries accord-
ing to the local laws.
Vehicles without smart key
system
1 Remove the cover.
Use a screwdriver of an appropriate
size. Forcedly prying may cause
the cover damaged.
NOTICE
■To prevent damage
●Be careful not to damage the
claws when replacing the wiper
insert.
●After the wiper blade is removed
from the wiper arm, place a
cloth, etc., between the rear
window and wiper arm to pre-
vent damage to the rear win-
dow.
●Be sure not to pull excessively
on the wiper insert or deform its
metal plates.
Wireless remote con-
trol/electron ic key bat-
tery
Replace the battery with a
new one if it is depleted.
Items to prepare
Replacing the battery
Page 600 of 748
6007-3. Do-it-yourself maintenance
1Turn the engine switch to
OFF.
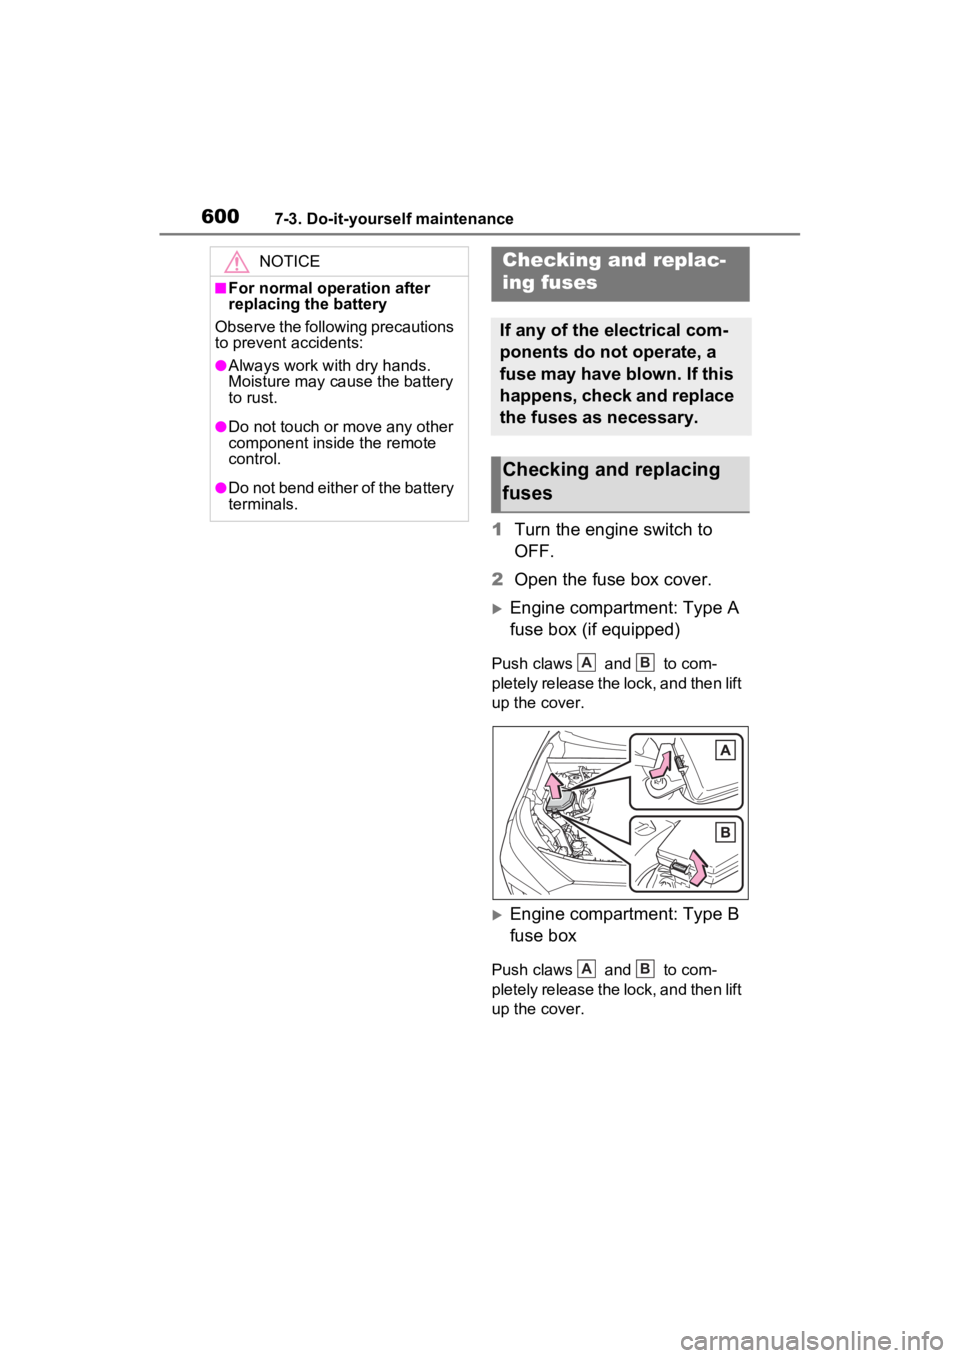
2 Open the fuse box cover.
Engine compartment: Type A
fuse box (if equipped)
Push claws and to com-
pletely release the lock, and then lift
up the cover.
Engine compartment: Type B
fuse box
Push claws and to com-
pletely release the lock, and then lift
up the cover.
NOTICE
■For normal operation after
replacing the battery
Observe the following precautions
to prevent accidents:
●Always work with dry hands.
Moisture may cau se the battery
to rust.
●Do not touch or move any other
component inside the remote
control.
●Do not bend either of the battery
terminals.
Checking and replac-
ing fuses
If any of the electrical com-
ponents do not operate, a
fuse may have blown. If this
happens, check and replace
the fuses as necessary.
Checking and replacing
fuses
AB
AB
Page 648 of 748
6488-2. Steps to take in an emergency
■When the electronic key does
not work properly
●Make sure that the smart key sys-
tem has not been deactivated in
the customization setting. If it is
off, turn the function on.
(Customizable features: P.688)
●Check if battery-saving mode is
set. If it is set, cancel the function.
( P.128)
●The electronic key function may
have stopped. ( P.128)
If you lose your keys
New genuine keys can be
made by your Toyota dealer
using the other key and the
key number stamped on
your key number plate.
Keep the plate in a safe
place such as your wallet,
not in the vehicle.
NOTICE
■When an electronic key is lost
(if equipped)
If the electronic key remains lost,
the risk of vehicle theft increases
significantly. Visit your Toyota
dealer immediately with all
remaining electronic keys that
were provided wit h your vehicle.
If the electronic key
does not operate prop-
erly (vehicles with
smart key system)
If communication between
the electronic key and vehi-
cle is interrupted ( P.128)
or the electronic key cannot
be used because the battery
is depleted, the smart key
system and wireless remote
control cannot be used. In
such cases, the doors can
be opened and the engine
can be started by following
the procedure below.
NOTICE
■In case of a smart key system
malfunction, o r other key
related problems
Take your vehicle with all the
electronic keys provided with your
vehicle to your Toyota dealer.