TOYOTA RAV4 2022 Owners Manual
Manufacturer: TOYOTA, Model Year: 2022, Model line: RAV4, Model: TOYOTA RAV4 2022Pages: 748, PDF Size: 22.93 MB
Page 681 of 748
6819-1. Specifications
9
Vehicle specifications
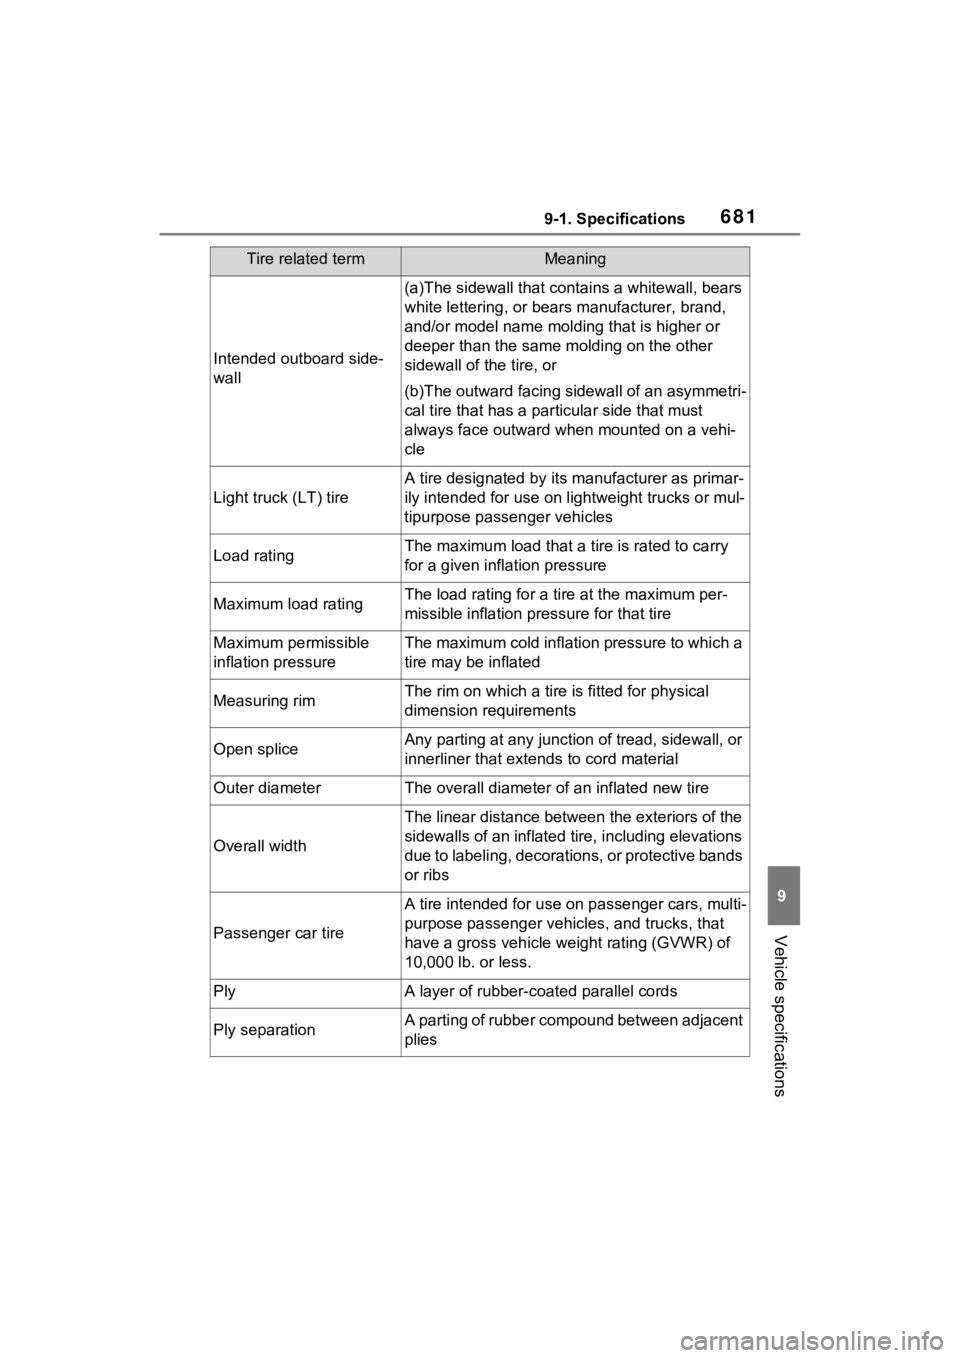
Intended outboard side-
wall
(a)The sidewall that contains a whitewall, bears
white lettering, or bear s manufacturer, brand,
and/or model name molding that is higher or
deeper than the same molding on the other
sidewall of the tire, or
(b)The outward facing sidewall of an asymmetri-
cal tire that has a par ticular side that must
always face outward whe n mounted on a vehi-
cle
Light truck (LT) tire
A tire designated by its manufacturer as primar-
ily intended for use on lightweight trucks or mul-
tipurpose passenger vehicles
Load ratingThe maximum load that a tire is rated to carry
for a given inflation pressure
Maximum load ratingThe load rating for a tire at the maximum per-
missible inflation pressure for that tire
Maximum permissible
inflation pressureThe maximum cold inflation pressure to which a
tire may be inflated
Measuring rimThe rim on which a tire is fitted for physical
dimension requirements
Open spliceAny parting at any junction of tread, sidewall, or
innerliner that extends to cord material
Outer diameterThe overall diameter o f an inflated new tire
Overall width
The linear distance between the exteriors of the
sidewalls of an inflated ti re, including elevations
due to labeling, decorations, or protective bands
or ribs
Passenger car tire
A tire intended for use on passenger cars, multi-
purpose passenger vehicles, and trucks, that
have a gross vehicle weight rating (GVWR) of
10,000 lb. or less.
PlyA layer of rubber-coated parallel cords
Ply separationA parting of rubber compound between adjacent
plies
Tire related termMeaning
Page 682 of 748

6829-1. Specifications
Pneumatic tire
A mechanical device made of rubber, chemi-
cals, fabric and steel or other materials, that,
when mounted on an aut omotive wheel, pro-
vides the traction and co ntains the gas or fluid
that sustains the load
Radial ply tire
A pneumatic tire in whic h the ply cords that
extend to the beads are laid at substantially 90
degrees to the centerline of the tread
Reinforced tire
A tire designed to operate at higher loads and at
higher inflation pressures than the correspond-
ing standard tire
Section width
The linear distance between the exteriors of the
sidewalls of an inflated tire, excluding elevations
due to labeling, decoratio n, or protective bands
SidewallThat portion of a tire between the tread and
bead
Sidewall separationThe parting of the rubber compound from the
cord material in the sidewall
Snow tire
A tire that attains a traction index equal to or
greater than 110, compared to the ASTM E-
1136 Standard Reference Test Tire, when using
the snow traction test a s described in ASTM F-
1805-00, Standard Test Method for Single
Wheel Driving Traction i n a Straight Line on
Snow-and Ice-Covered Su rfaces, and which is
marked with an Alpine Symbol ( ) on at least
one sidewall
Test rim
The rim on which a tire is fitted for testing, and
may be any rim listed as appropriate for use
with that tire
TreadThat portion of a tire t hat comes into contact
with the road
Tread ribA tread section running circumferentially around
a tire
Tread separationPulling away of the tread from the tire carcass
Tire related termMeaning
Page 683 of 748
6839-1. Specifications
9
Vehicle specifications
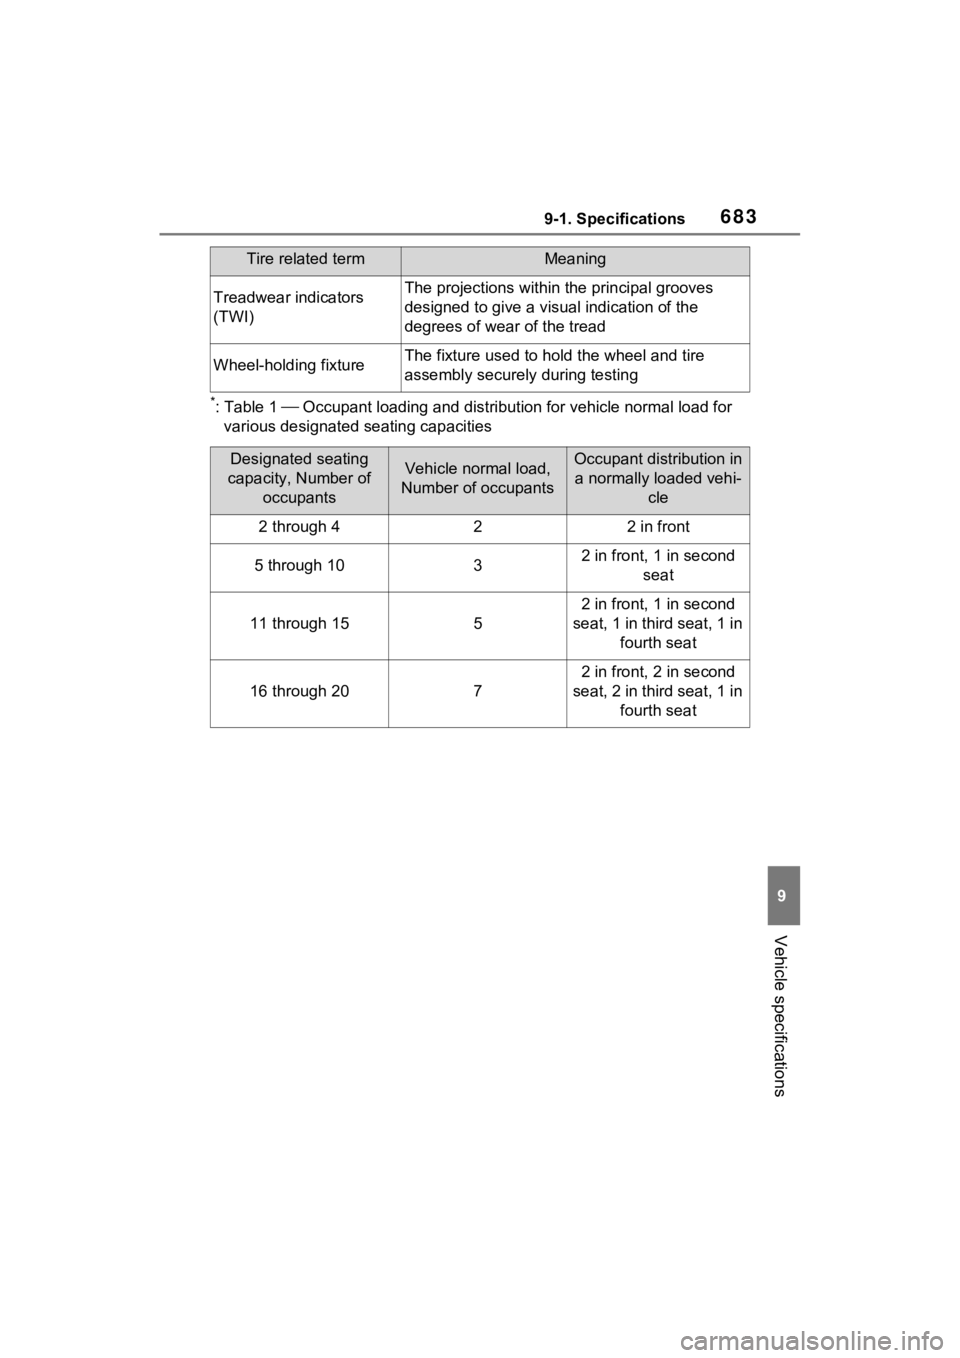
*:Table 1 Occupant loading and distribution for vehicle normal load for
various designated seating capacities
Treadwear indicators
(TWI)The projections within the principal grooves
designed to give a visual indication of the
degrees of wear of the tread
Wheel-holding fixtureThe fixture used to hold the wheel and tire
assembly securely during testing
Designated seating
capacity, Number of occupantsVehicle normal load,
Number of occupantsOccupant distribution in a normally loaded vehi- cle
2 through 422 in front
5 through 1032 in front, 1 in second
seat
11 through 155
2 in front, 1 in second
seat, 1 in third seat, 1 in fourth seat
16 through 207
2 in front, 2 in second
seat, 2 in third seat, 1 in fourth seat
Tire related termMeaning
Page 684 of 748
6849-2. Customization
9-2.Customization
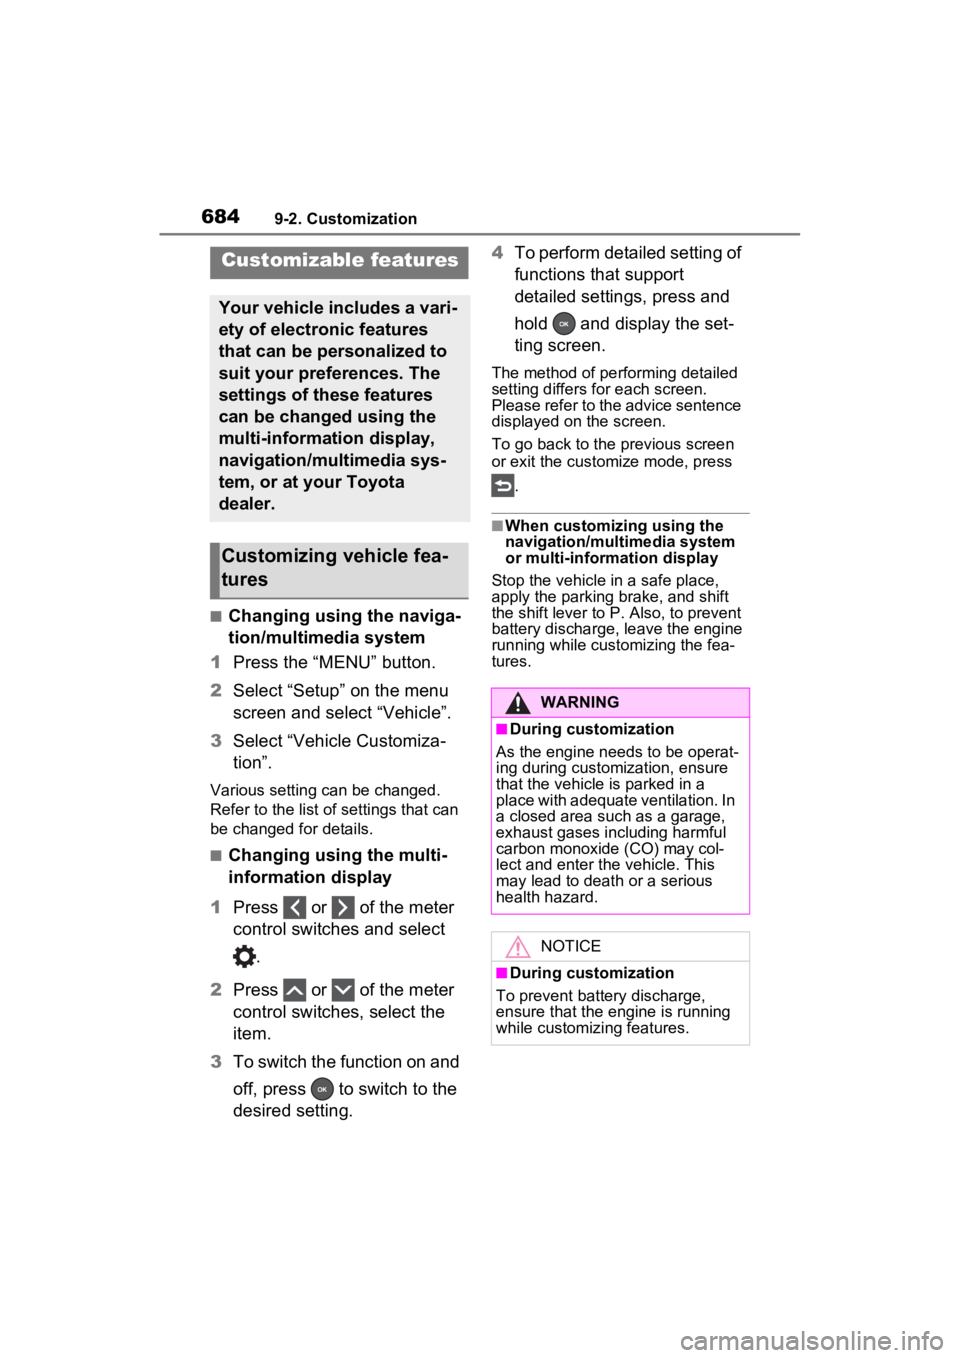
■Changing using the naviga-
tion/multimedia system
1 Press the “MENU” button.
2 Select “Setup” on the menu
screen and select “Vehicle”.
3 Select “Vehicle Customiza-
tion”.
Various setting can be changed.
Refer to the list o f settings that can
be changed for details.
■Changing using the multi-
information display
1 Press or of the meter
control switches and select
.
2 Press or of the meter
control switches, select the
item.
3 To switch the function on and
off, press to switch to the
desired setting. 4
To perform detailed setting of
functions that support
detailed settings, press and
hold and display the set-
ting screen.
The method of pe rforming detailed
setting differs for each screen.
Please refer to the advice sentence
displayed on the screen.
To go back to the p revious screen
or exit the customize mode, press
.
■When customizing using the
navigation/multimedia system
or multi-information display
Stop the vehicle in a safe place,
apply the parking brake, and shift
the shift lever to P. Also, to prevent
battery discharge, leave the engine
running while customizing the fea-
tures.
Customizable features
Your vehicle includes a vari-
ety of electronic features
that can be personalized to
suit your preferences. The
settings of these features
can be changed using the
multi-information display,
navigation/multimedia sys-
tem, or at your Toyota
dealer.
Customizing vehicle fea-
tures
WARNING
■During customization
As the engine needs to be operat-
ing during customization, ensure
that the vehicle is parked in a
place with adequate ventilation. In
a closed area such as a garage,
exhaust gases in cluding harmful
carbon monoxide (CO) may col-
lect and enter the vehicle. This
may lead to death or a serious
health hazard.
NOTICE
■During customization
To prevent battery discharge,
ensure that the engine is running
while customizing features.
Page 685 of 748
6859-2. Customization
9
Vehicle specifications
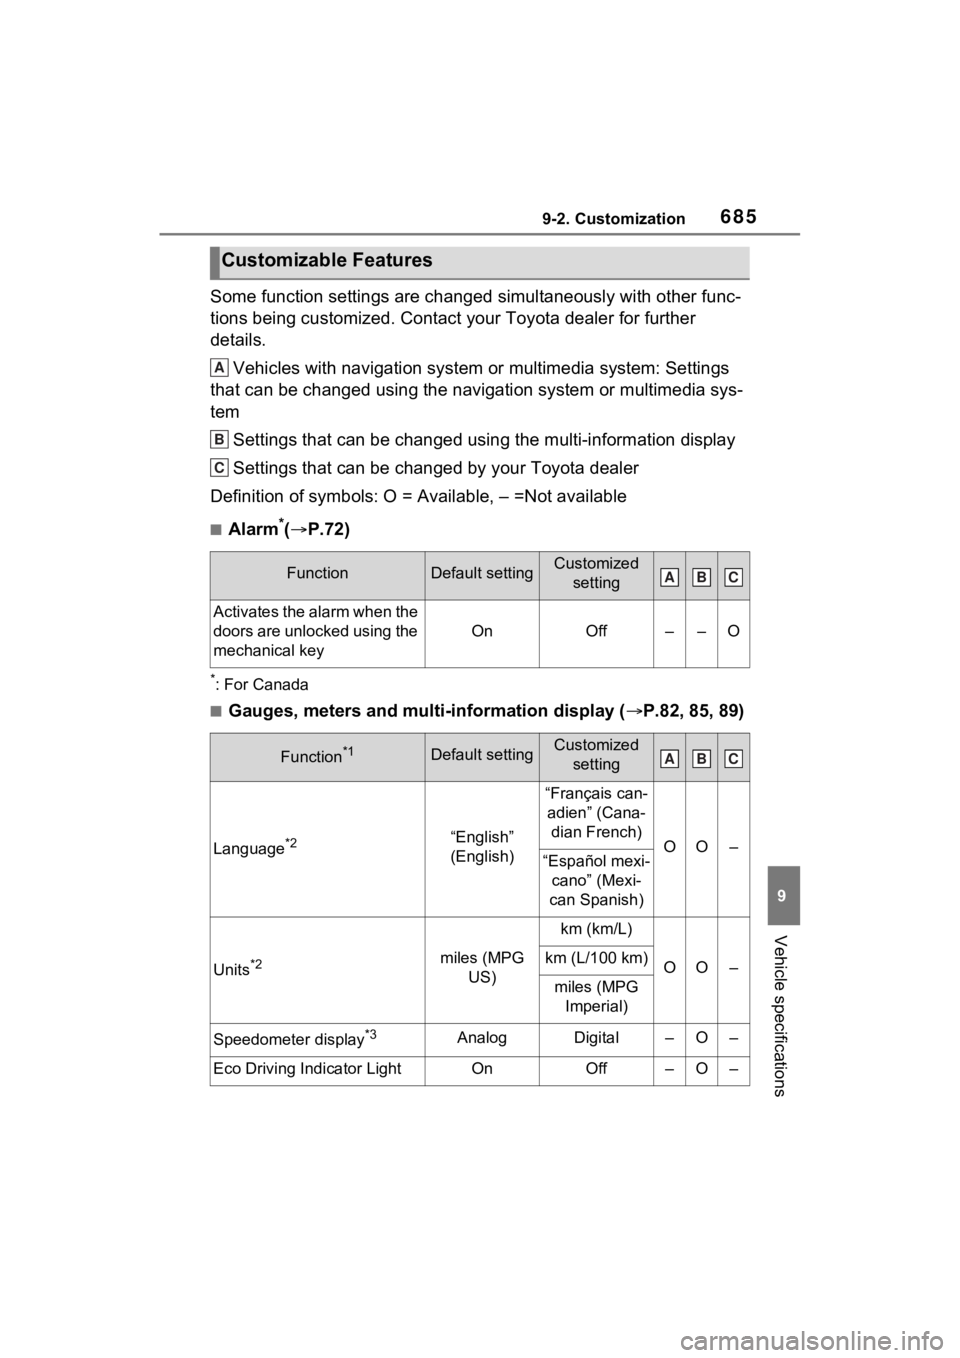
Some function settings are changed simultaneously with other func-
tions being customized. Contact your Toyota dealer for further
details.Vehicles with navigation system or multimedia system: Settings
that can be changed using the navigation system or multimedia s ys-
tem
Settings that can be changed using the multi-information displa y
Settings that can be changed by your Toyota dealer
Definition of symbols: O = Available, – =Not available
■Alarm*( P.72)
*: For Canada
■Gauges, meters and multi-information display ( P.82, 85, 89)
Customizable Features
FunctionDefault settingCustomized
setting
Activates the alarm when the
doors are unlocked using the
mechanical key
OnOff––O
Function*1Default settingCustomized setting
Language*2“English”
(English)
“Français can-adien” (Cana- dian French)
OO–“Español mexi- cano” (Mexi-
can Spanish)
Units*2miles (MPG US)
km (km/L)
OO–km (L/100 km)
miles (MPG Imperial)
Speedometer display*3AnalogDigital–O–
Eco Driving Indicator LightOnOff–O–
A
B
C
ABC
ABC
Page 686 of 748
6869-2. Customization
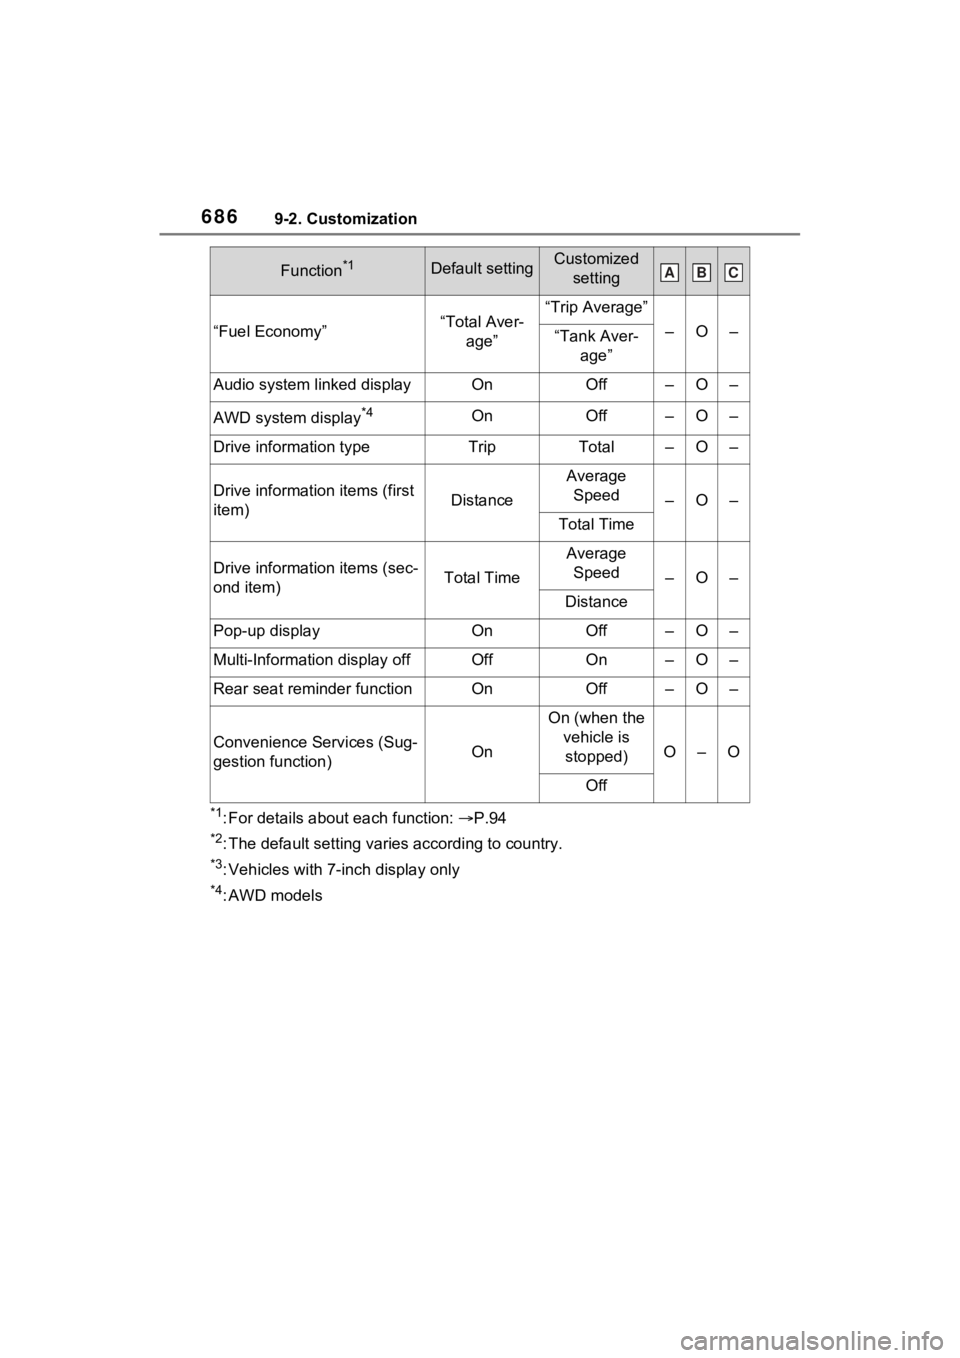
*1: For details about each function: P.94
*2: The default setting varies according to country.
*3: Vehicles with 7-inch display only
*4: AWD models
“Fuel Economy”“Total Aver-
age”“Trip Average”
–O–“Tank Aver- age”
Audio system linked displayOnOff–O–
AWD system display*4OnOff–O–
Drive information typeTripTotal–O–
Drive informatio n items (first
item)Distance
Average Speed
–O–
Total Time
Drive information items (sec-
ond item)Total Time
Average Speed
–O–
Distance
Pop-up displayOnOff–O–
Multi-Information display offOffOn–O–
Rear seat reminder functionOnOff–O–
Convenience Services (Sug-
gestion function)On
On (when the vehicle is stopped)
O–O
Off
Function*1Default settingCustomized settingABC
Page 687 of 748
6879-2. Customization
9
Vehicle specifications
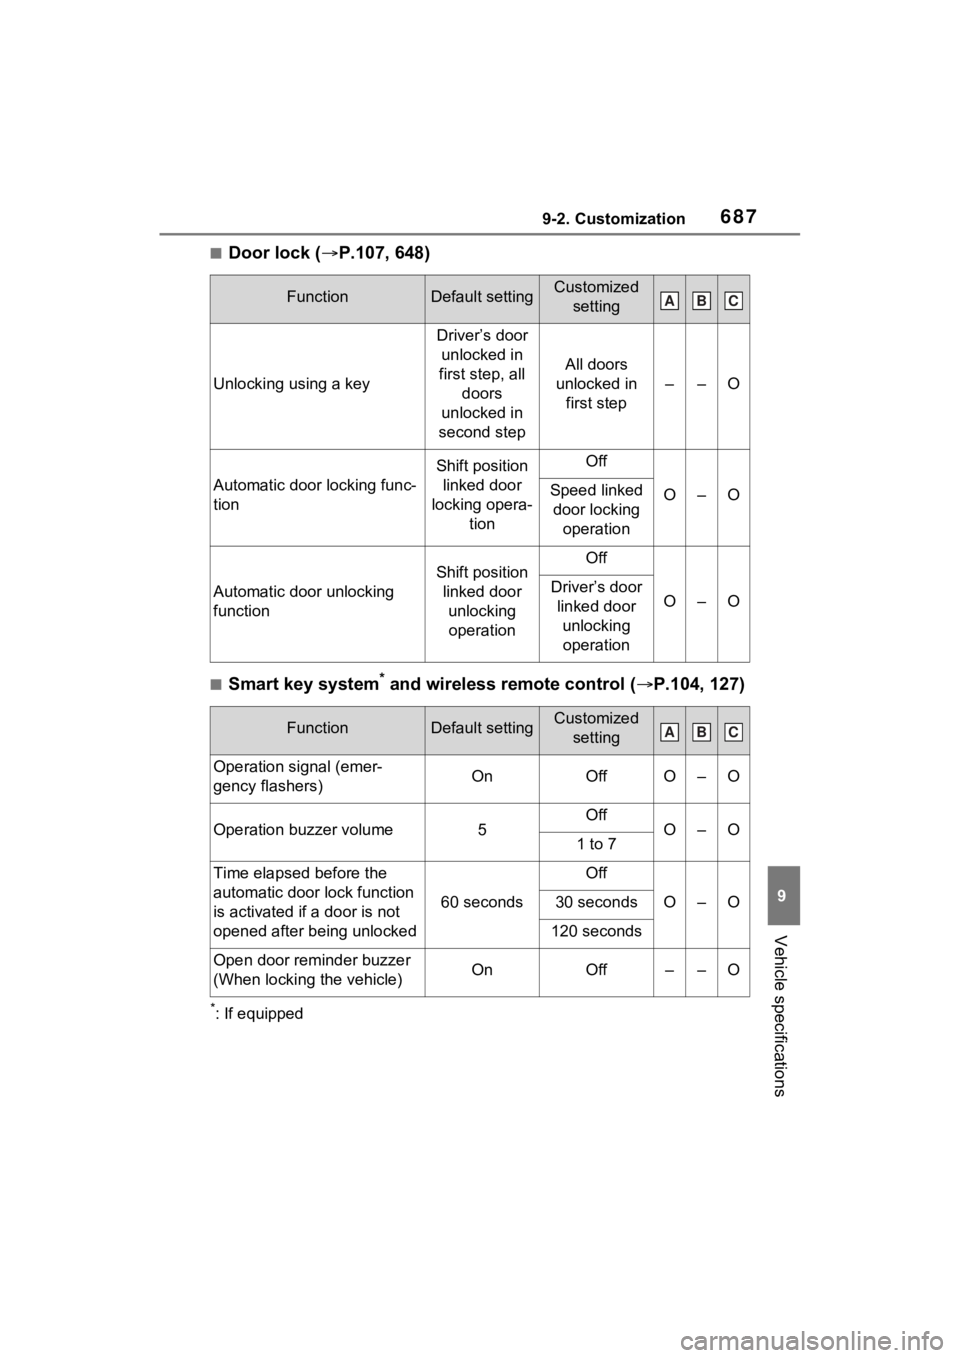
■Door lock (P.107, 648)
■Smart key system* and wireless remote control ( P.104, 127)
*: If equipped
FunctionDefault settingCustomized
setting
Unlocking using a key
Driver’s door unlocked in
first step, all doors
unlocked in
second step
All doors
unlocked in first step
––O
Automatic door locking func-
tion
Shift position linked door
locking opera- tionOff
O–OSpeed linked door locking operation
Automatic door unlocking
function
Shift position linked door unlocking operationOff
O–ODriver’s door linked door unlocking operation
FunctionDefault settingCustomized setting
Operation signal (emer-
gency flashers)OnOffO–O
Operation buzzer volume5OffO–O1 to 7
Time elapsed before the
automatic door lock function
is activated if a door is not
opened after being unlocked
60 seconds
Off
O–O30 seconds
120 seconds
Open door reminder buzzer
(When locking the vehicle)OnOff––O
ABC
ABC
Page 688 of 748
6889-2. Customization
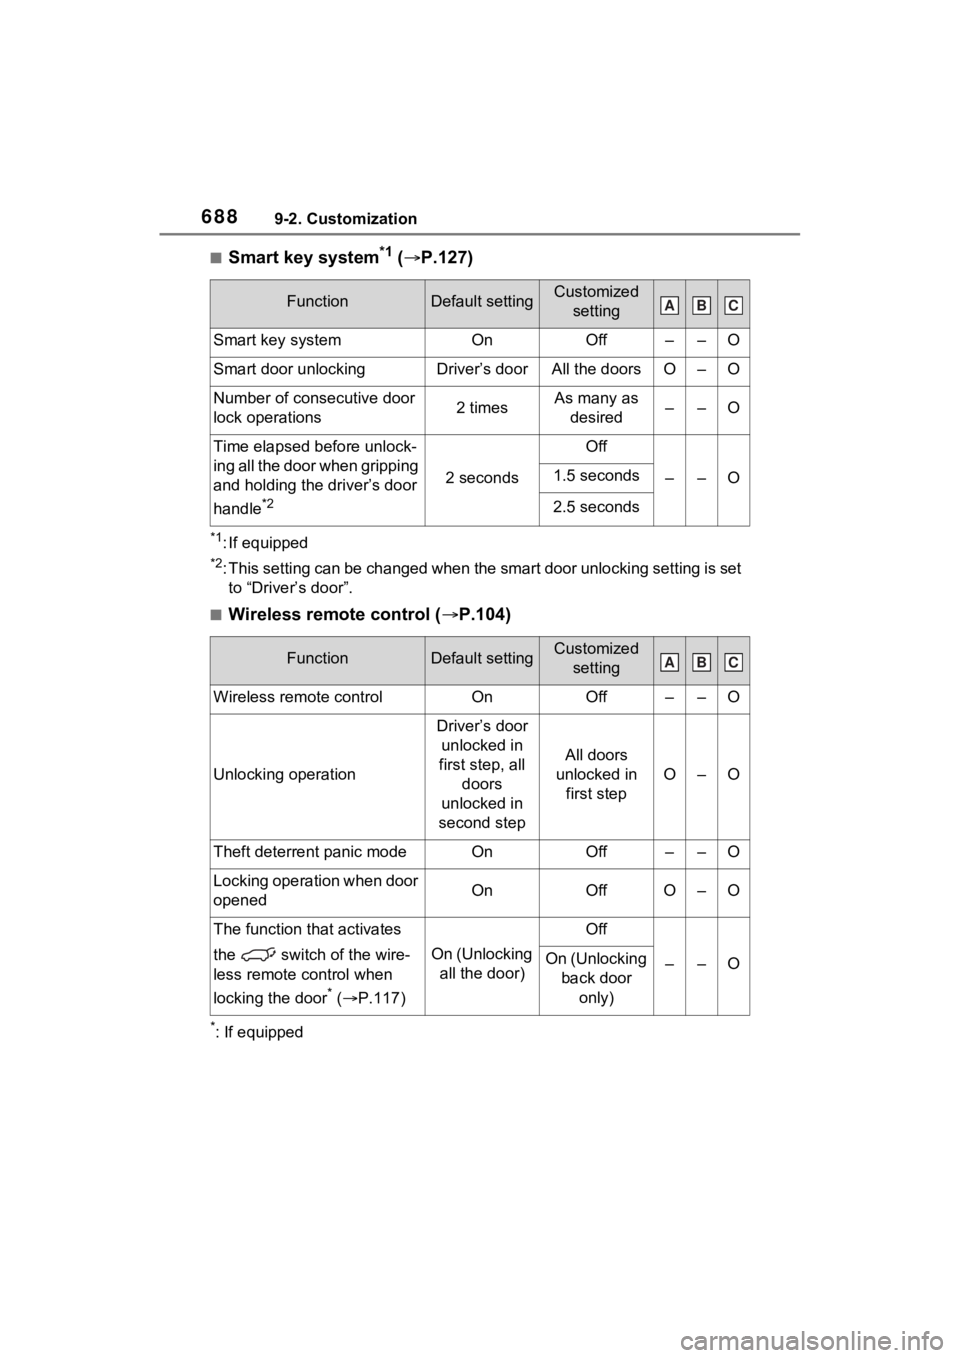
■Smart key system*1 ( P.127)
*1: If equipped
*2: This setting can be changed when the smart door unlocking sett ing is set
to “Driver’s door”.
■Wireless remote control ( P.104)
*: If equipped
FunctionDefault settingCustomized
setting
Smart key systemOnOff––O
Smart door unlockingDriver’s doorAll the doorsO–O
Number of consecutive door
lock operations2 timesAs many as desired––O
Time elapsed before unlock-
ing all the door when gripping
and holding the driver’s door
handle
*2
2 seconds
Off
––O1.5 seconds
2.5 seconds
FunctionDefault settingCustomized setting
Wireless remote controlOnOff––O
Unlocking operation
Driver’s door unlocked in
first step, all doors
unlocked in
second step
All doors
unlocked in first step
O–O
Theft deterrent panic modeOnOff––O
Locking operation when door
openedOnOffO–O
The function that activates
the switch of the wire-
less remote control when
locking the door
* ( P.117)
On (Unlocking
all the door)
Off
––OOn (Unlocking back door
only)
ABC
ABC
Page 689 of 748
6899-2. Customization
9
Vehicle specifications
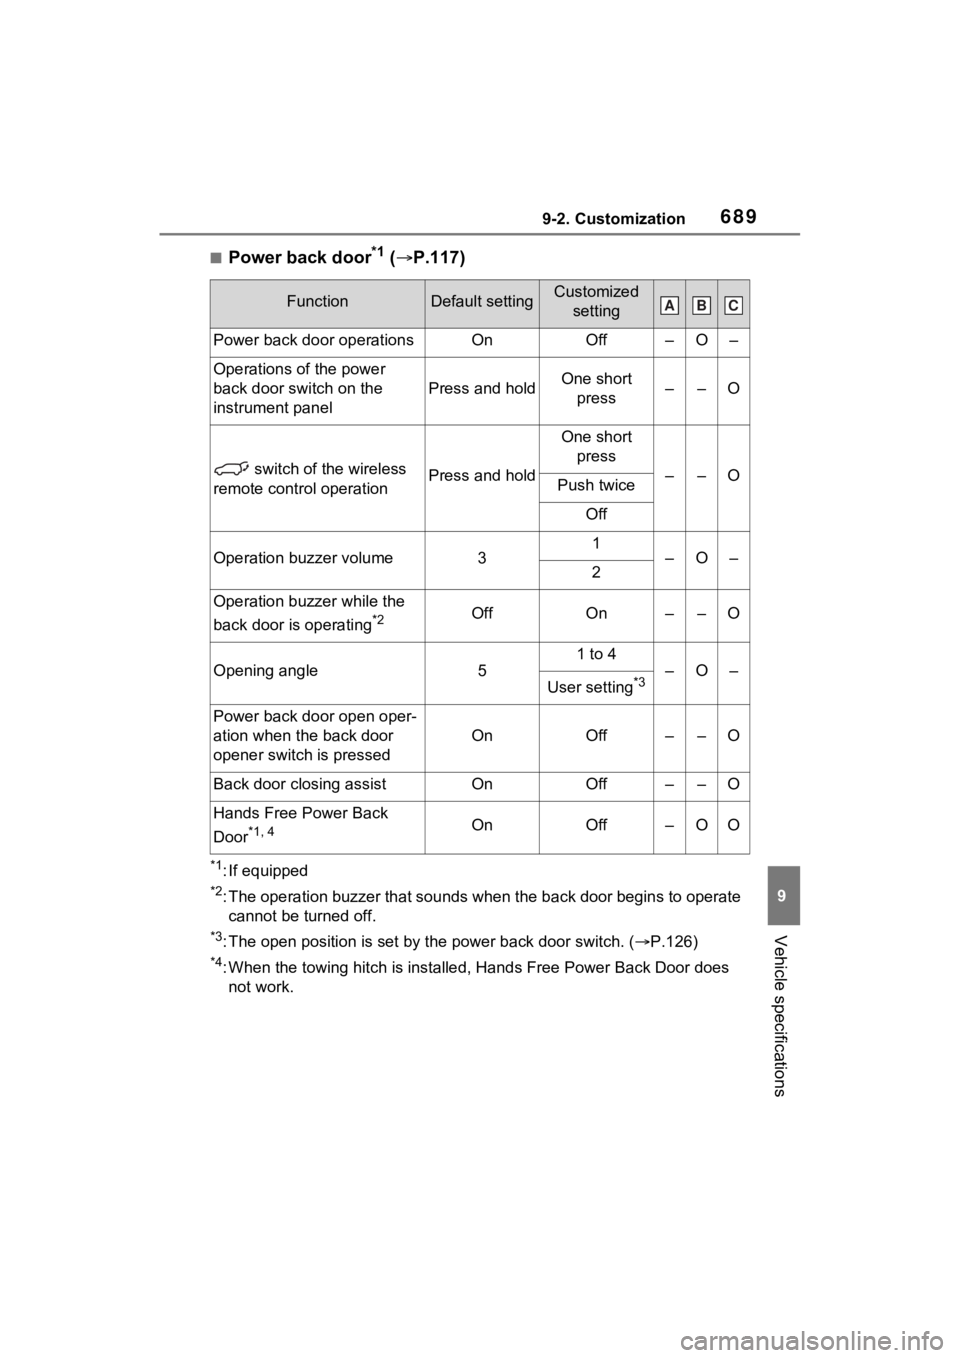
■Power back door*1 ( P.117)
*1: If equipped
*2: The operation buzzer that sounds when the back door begins to operate
cannot be turned off.
*3: The open position is set by the power back door switch. ( P.126)
*4: When the towing hitch is installe d, Hands Free Power Back Door does
not work.
FunctionDefault settingCustomized setting
Power back door operationsOnOff–O–
Operations of the power
back door switch on the
instrument panel
Press and holdOne short press––O
switch of the wireless
remote control operationPress and hold
One short press
––OPush twice
Off
Operation buzzer volume31–O–2
Operation buzzer while the
back door is operating
*2OffOn––O
Opening angle5
1 to 4
–O–
User setting*3
Power back door open oper-
ation when the back door
opener switch is pressed
OnOff––O
Back door closing assistOnOff––O
Hands Free Power Back
Door
*1, 4OnOff–OO
ABC
Page 690 of 748
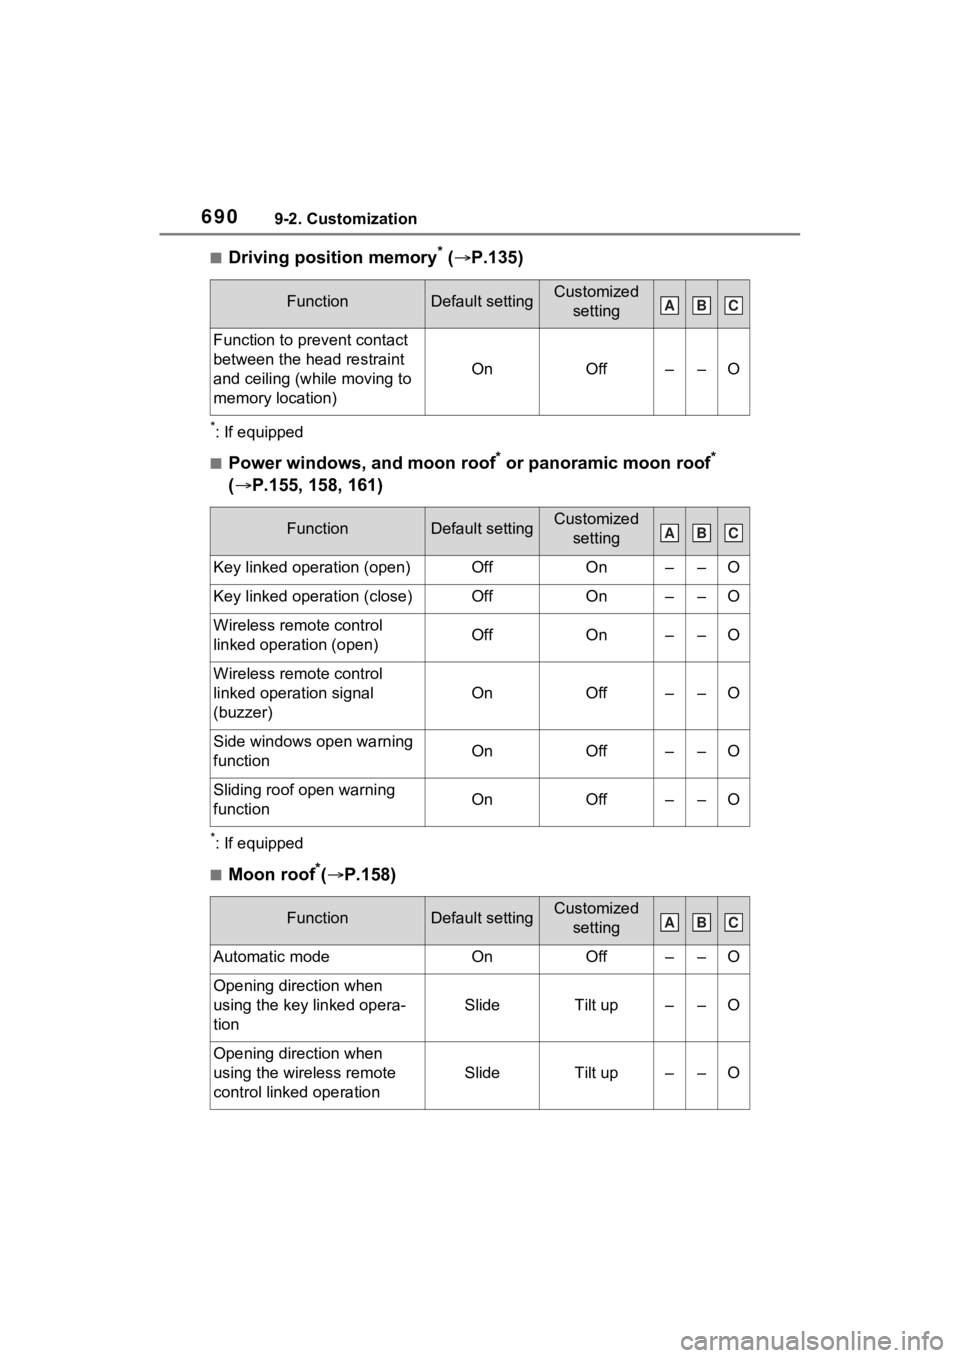
6909-2. Customization
■Driving position memory* ( P.135)
*: If equipped
■Power windows, and moon roof* or panoramic moon roof*
( P.155, 158, 161)
*: If equipped
■Moon roof*( P.158)
FunctionDefault settingCustomized
setting
Function to prevent contact
between the head restraint
and ceiling (while moving to
memory location)
OnOff––O
FunctionDefault settingCustomized setting
Key linked operation (open)OffOn––O
Key linked operation (close)OffOn––O
Wireless remote control
linked operation (open)OffOn––O
Wireless remote control
linked operation signal
(buzzer)
OnOff––O
Side windows open warning
functionOnOff––O
Sliding roof open warning
functionOnOff––O
FunctionDefault settingCustomized setting
Automatic modeOnOff––O
Opening direction when
using the key linked opera-
tion
SlideTilt up––O
Opening direction when
using the wireless remote
control linked operation
SlideTilt up––O
ABC
ABC
ABC