check engine light TOYOTA RAV4 2022 Owners Manual
[x] Cancel search | Manufacturer: TOYOTA, Model Year: 2022, Model line: RAV4, Model: TOYOTA RAV4 2022Pages: 748, PDF Size: 22.93 MB
Page 5 of 748
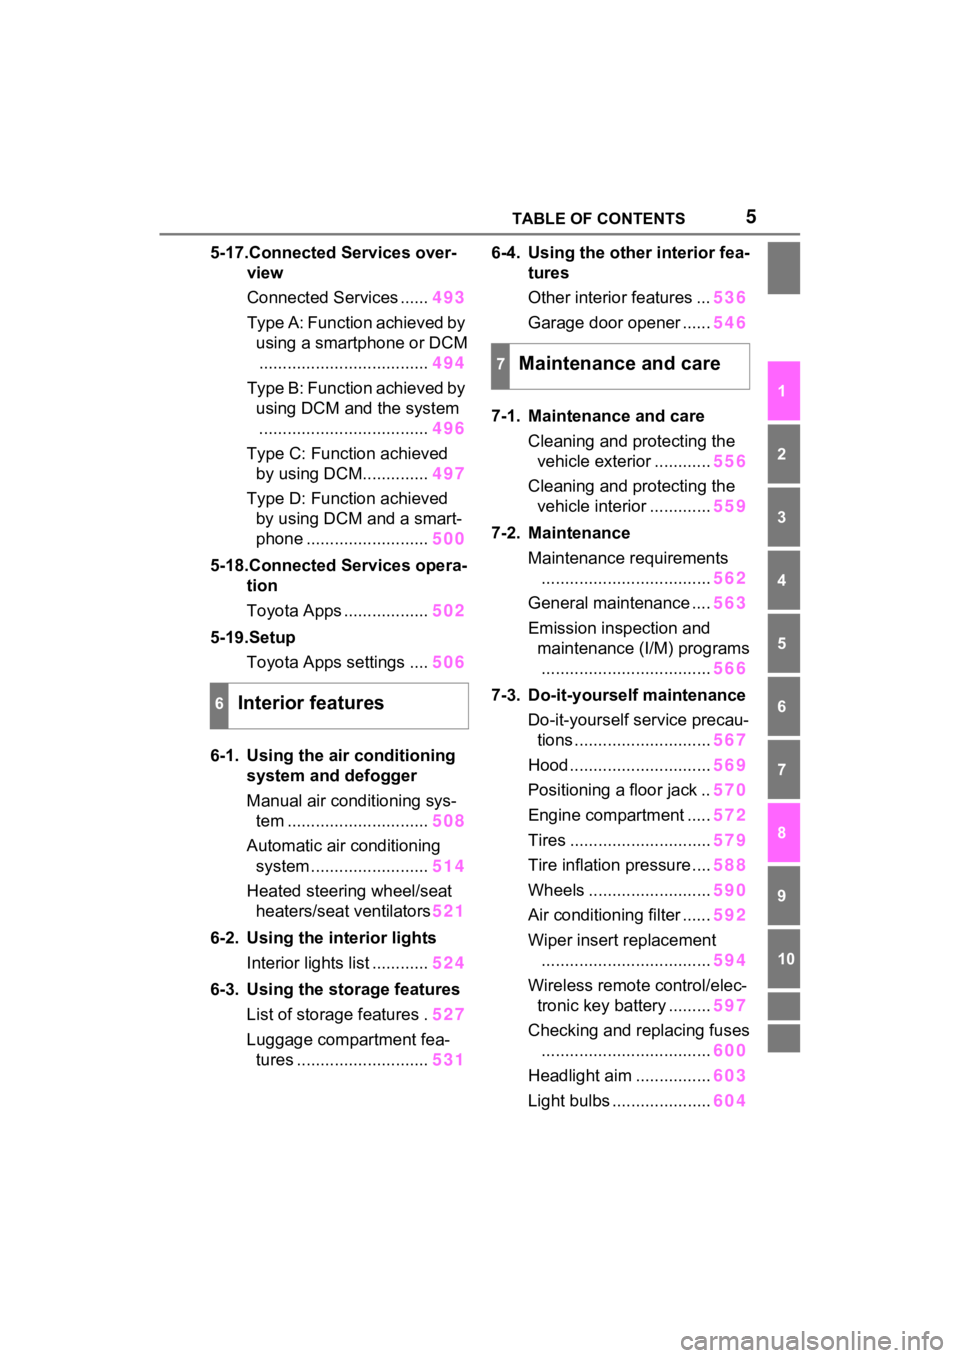
5TABLE OF CONTENTS
1
2
3
4
5
6
7
8
9
10
5-17.Connected Services over-view
Connected Services ...... 493
Type A: Function achieved by using a smartphone or DCM.................................... 494
Type B: Function achieved by using DCM and the system
.................................... 496
Type C: Function achieved by using DCM.............. 497
Type D: Function achieved by using DCM and a smart-
phone .......................... 500
5-18.Connected Services opera- tion
Toyota Apps .................. 502
5-19.Setup Toyota Apps settings .... 506
6-1. Using the air conditioning
system and defogger
Manual air conditioning sys- tem .............................. 508
Automatic air conditioning system ......................... 514
Heated steering wheel/seat heaters/seat ventilators 521
6-2. Using the interior lights Interior lights list ............ 524
6-3. Using the storage features List of storage features . 527
Luggage compartment fea- tures ............................ 5316-4. Using the other interior fea-
tures
Other interior features ... 536
Garage door opener ...... 546
7-1. Maintenance and care Cleaning and protecting the vehicle exterior ............ 556
Cleaning and protecting the vehicle interior ............. 559
7-2. Maintenance Maintenance requirements.................................... 562
General maintenance .... 563
Emission inspection and maintenance (I/M) programs.................................... 566
7-3. Do-it-yourself maintenance Do-it-yourself service precau-tions ............................. 567
Hood .............................. 569
Positioning a floor jack .. 570
Engine compartment ..... 572
Tires .............................. 579
Tire inflation pressure .... 588
Wheels .......................... 590
Air conditioning filter ...... 592
Wiper insert replacement .................................... 594
Wireless remote control/elec- tronic key battery ......... 597
Checking and replacing fuses .................................... 600
Headlight aim ................ 603
Light bulbs ..................... 604
6Interior features
7Maintenance and care
Page 17 of 748
17Pictorial index
Precautions against winter season ......................................P.362
To prevent freezing (windshield wiper de-icer)
*...................P.520
Precautions against car wash (R ain-sensing windshield wipers)
*
............................................................... ..............................P.557
Replacing the wiper insert ..................................... ...............P.594
Fuel filler door ............................................... .....................P.219
Refueling method ............................................... ..................P.219
Fuel type/fuel tan k capacity .................................................P.662
Tires ....................................................................................P.579
Tire size/inflation pressure ................................... ................P.667
Winter tires/tire chain ........................................ ...................P.362
Checking/rotation/tire pressure warning system
*.................P.579
Coping with flat tires......................................... ....................P.637
Hood ....................................................................................P.569
Opening ........................................................ .......................P.569
Engine oil ..................................................... ........................P.662
Coping with overheat ........................................... ................P.654
Warning messages ..............................................................P.633
Headlights..................................................... ......................P.207
Turn signal lights ...............................................................P.200
Parking lights .....................................................................P.207
Daytime running lights .. ....................................................P.207
Side marker lights ............................................. .................P.207
Fog lights
*............................................................... ............P.433
Stop lights/tail lights/turn s ignal lights ....................P.200, 207
Tail lights .................................................... ........................P.207
Back-up lights
Light bulbs of the exterior lights for driving
(Replacing method: P .604, Watts: P.670)
E
F
G
H
I
J
K
L
M
N
O
Page 29 of 748
291-1. For safe use
1
For safety and security
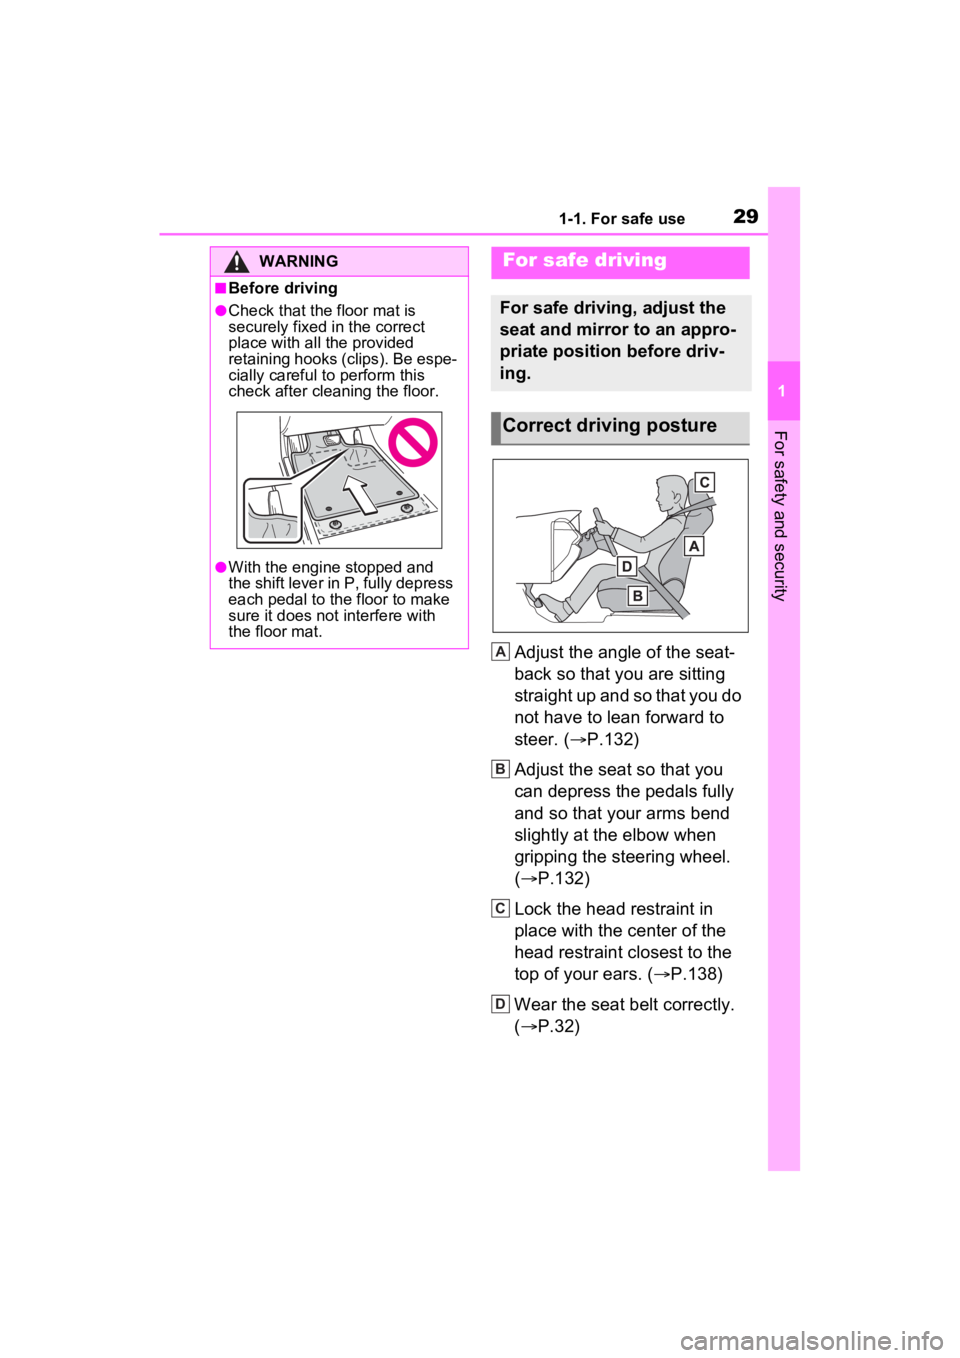
Adjust the angle of the seat-
back so that you are sitting
straight up and so that you do
not have to lean forward to
steer. (P.132)
Adjust the seat so that you
can depress the pedals fully
and so that your arms bend
slightly at the elbow when
gripping the steering wheel.
( P.132)
Lock the head restraint in
place with the center of the
head restraint closest to the
top of your ears. ( P.138)
Wear the seat belt correctly.
( P.32)
WARNING
■Before driving
●Check that the floor mat is
securely fixed in the correct
place with all the provided
retaining hooks (clips). Be espe-
cially careful to perform this
check after cleaning the floor.
●With the engine stopped and
the shift lever in P, fully depress
each pedal to the floor to make
sure it does not interfere with
the floor mat.
For safe driving
For safe driving, adjust the
seat and mirror to an appro-
priate position before driv-
ing.
Correct driving posture
A
B
C
D
Page 50 of 748
501-1. For safe use
Exhaust gas precau-
tions
Harmful substance to the
human body is included in
exhaust gases if inhaled.
WARNING
Exhaust gases contain harmful
carbon monoxide (CO), which is
colorless and odorless. Observe
the following precautions.
Failure to do so may cause
exhaust gases to enter the vehicle
and may lead to an accident
caused by light-headedness, or
may lead to death or a serious
health hazard.
■Important points while driving
●Keep the back door closed.
●If you smell exhaust gases in
the vehicle even when the back
door is closed, open the side
windows and have the vehicle
inspected at your Toyota dealer
as soon as possible.
■When parking
●If the vehicle is in a poorly venti-
lated area or a closed area,
such as a garage, stop the
engine.
●Do not leave the vehicle with
the engine running for a long
time.
If such a situation cannot be
avoided, park the vehicle in an
open space and ensure that
exhaust fumes do not enter the
vehicle interior.
●Do not leave the engine running
in an area with snow build-up,
or where it is snowing. If snow-
banks build up around the vehi-
cle while the engine is running,
exhaust gases may collect and
enter the vehicle.
■Exhaust pipe
The exhaust system needs to be
checked periodically. If there is a
hole or crack caused by corro-
sion, damage to a joint or abnor-
mal exhaust noise, be sure to
have the vehicle inspected and
repaired by your Toyota dealer.
Page 78 of 748
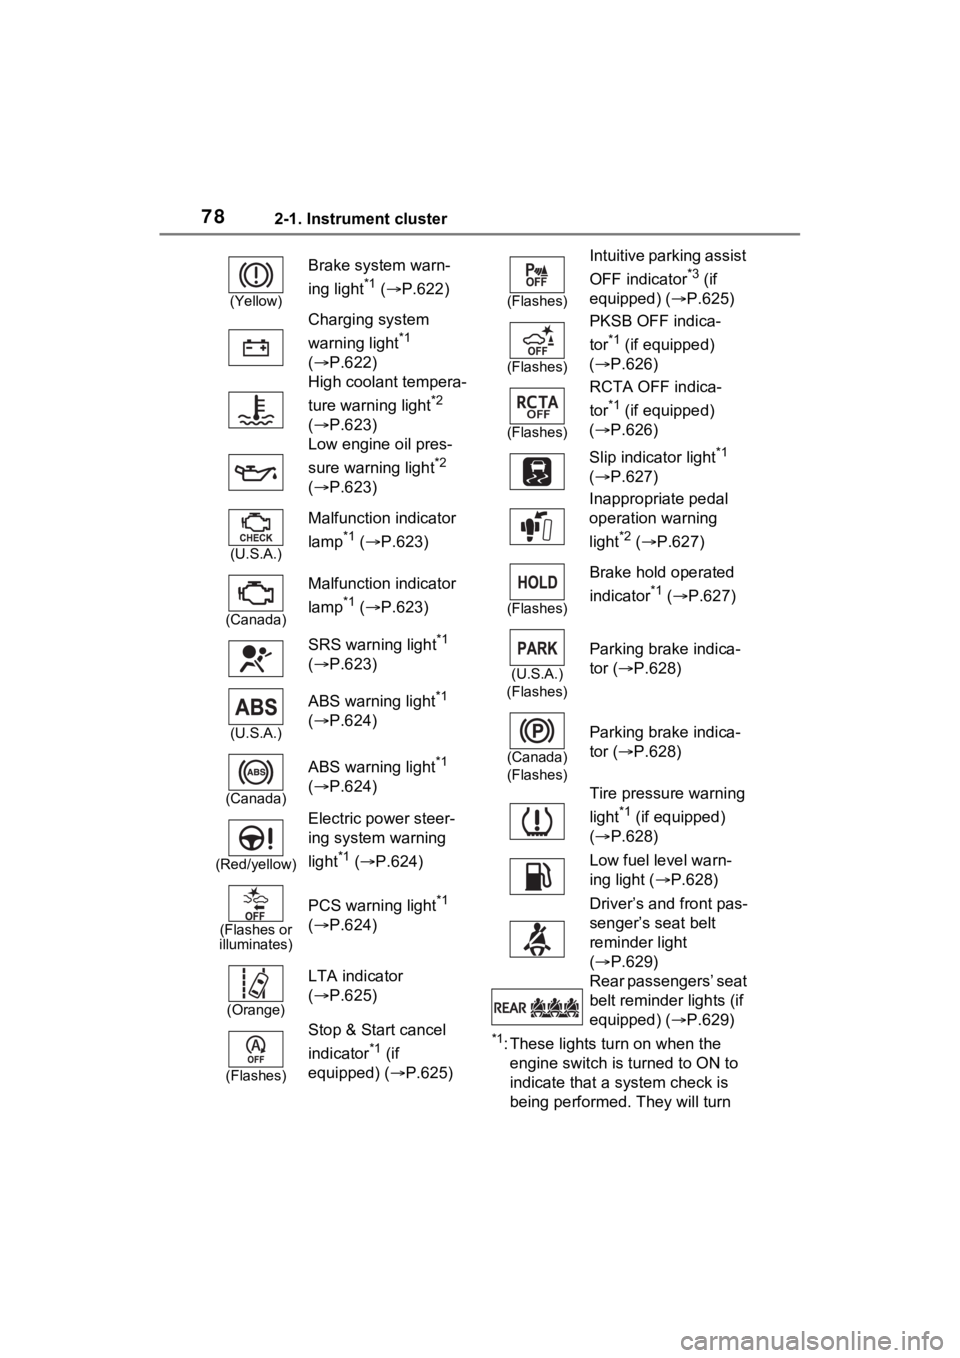
782-1. Instrument cluster
*1: These lights turn on when the
engine switch is turned to ON to
indicate that a system check is
being performed. They will turn
(Yellow)
Brake system warn-
ing light
*1 ( P.622)
Charging system
warning light
*1
( P.622)
High coolant tempera-
ture warning light
*2
( P.623)
Low engine oil pres-
sure warning light
*2
( P.623)
(U.S.A.)
Malfunction indicator
lamp
*1 ( P.623)
(Canada)
Malfunction indicator
lamp
*1 ( P.623)
SRS warning light
*1
( P.623)
(U.S.A.)
ABS warning light*1
( P.624)
(Canada)
ABS warning light*1
( P.624)
(Red/yellow)
Electric power steer-
ing system warning
light
*1 ( P.624)
(Flashes or
illuminates)
PCS warning light*1
( P.624)
(Orange)
LTA indicator
( P.625)
(Flashes)
Stop & Start cancel
indicator
*1 (if
equipped) (P.625)
(Flashes)
Intuitive parking assist
OFF indicator
*3 (if
equipped) ( P.625)
(Flashes)
PKSB OFF indica-
tor
*1 (if equipped)
( P.626)
(Flashes)
RCTA OFF indica-
tor
*1 (if equipped)
( P.626)
Slip indicator light
*1
( P.627)
Inappropriate pedal
operation warning
light
*2 ( P.627)
(Flashes)
Brake hold operated
indicator
*1 ( P.627)
(U.S.A.)
(Flashes)
Parking brake indica-
tor ( P.628)
(Canada)
(Flashes)
Parking brake indica-
tor ( P.628)
Tire pressure warning
light
*1 (if equipped)
( P.628)
Low fuel level warn-
ing light ( P.628)
Driver’s and front pas-
senger’s seat belt
reminder light
( P.629)
Rear passengers’ seat
belt reminder lights (if
equipped) ( P.629)
Page 80 of 748
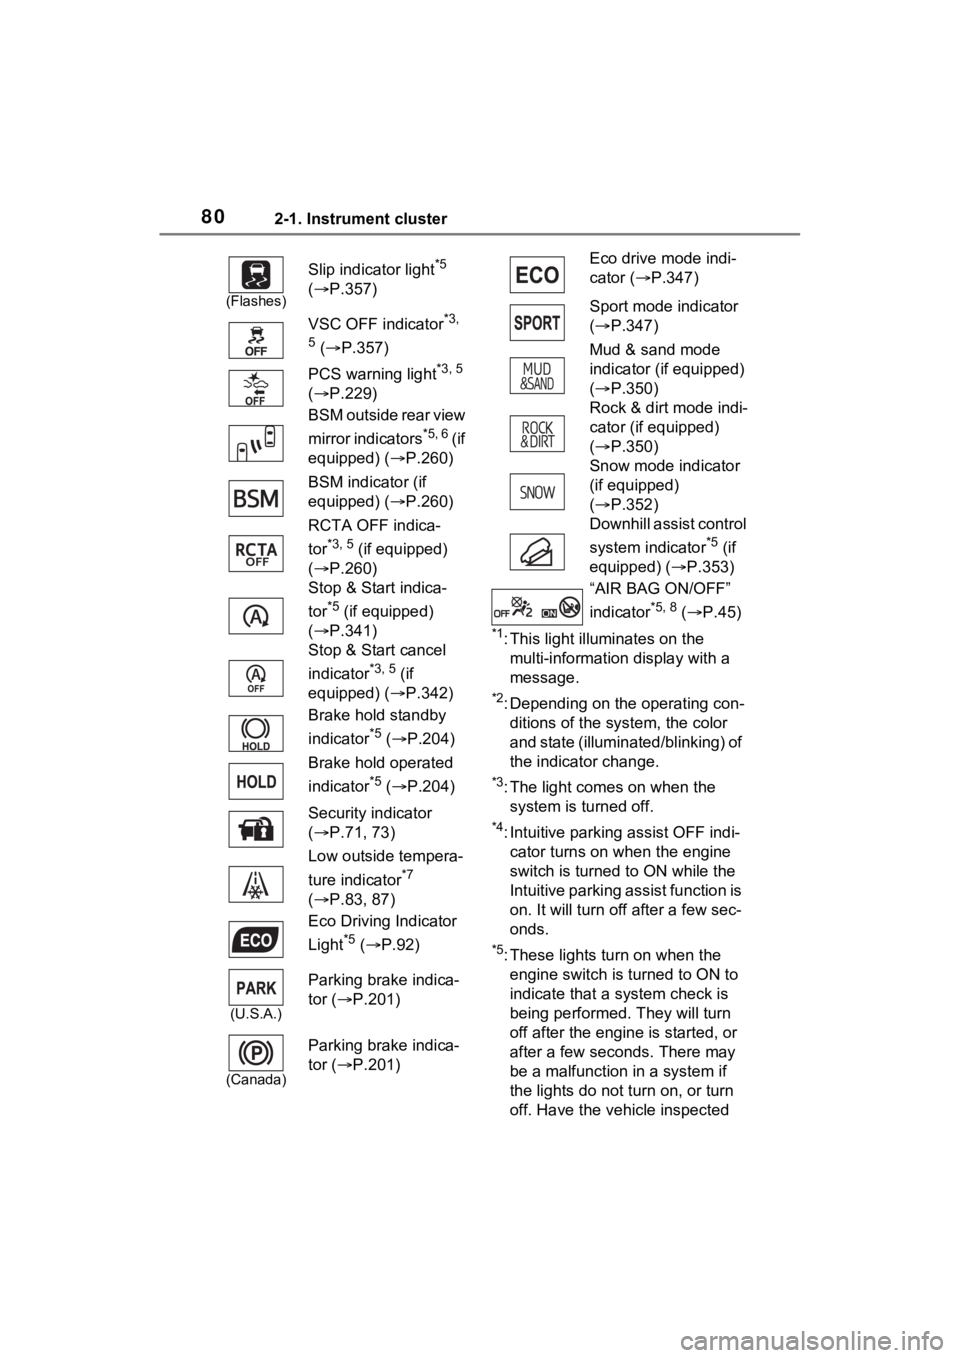
802-1. Instrument cluster
*1: This light illuminates on the multi-information display with a
message.
*2: Depending on the operating con-ditions of the system, the color
and state (illuminat ed/blinking) of
the indicator change.
*3: The light comes on when the system is turned off.
*4: Intuitive parking assist OFF indi-cator turns on wh en the engine
switch is turned t o ON while the
Intuitive parking assist function is
on. It will turn off after a few sec-
onds.
*5: These lights tu rn on when the
engine switch is turned to ON to
indicate that a system check is
being performed. They will turn
off after the engine is started, or
after a few seconds. There may
be a malfunction in a system if
the lights do not turn on, or turn
off. Have the vehicle inspected
(Flashes)
Slip indicator light*5
( P.357)
VSC OFF indicator
*3,
5
( P.357)
PCS warning light
*3, 5
( P.229)
BSM outside rear view
mirror indicators
*5, 6 ( i f
equipped) ( P.260)
BSM indicator (if
equipped) ( P.260)
RCTA OFF indica-
tor
*3, 5 (if equipped)
( P.260)
Stop & Start indica-
tor
*5 (if equipped)
( P.341)
Stop & Start cancel
indicator
*3, 5 (if
equipped) ( P.342)
Brake hold standby
indicator
*5 ( P.204)
Brake hold operated
indicator
*5 ( P.204)
Security indicator
( P.71, 73)
Low outside tempera-
ture indicator
*7
( P.83, 87)
Eco Driving Indicator
Light
*5 ( P.92)
(U.S.A.)
Parking brake indica-
tor ( P.201)
(Canada)
Parking brake indica-
tor ( P.201)
Eco drive mode indi-
cator (P.347)
Sport mode indicator
( P.347)
Mud & sand mode
indicator (if equipped)
( P.350)
Rock & dirt mode indi-
cator (if equipped)
( P.350)
Snow mode indicator
(if equipped)
( P.352)
Downhill assist control
system indicator
*5 (if
equipped) ( P.353)
“AIR BAG ON/OFF”
indicator
*5, 8 ( P.45)
Page 88 of 748
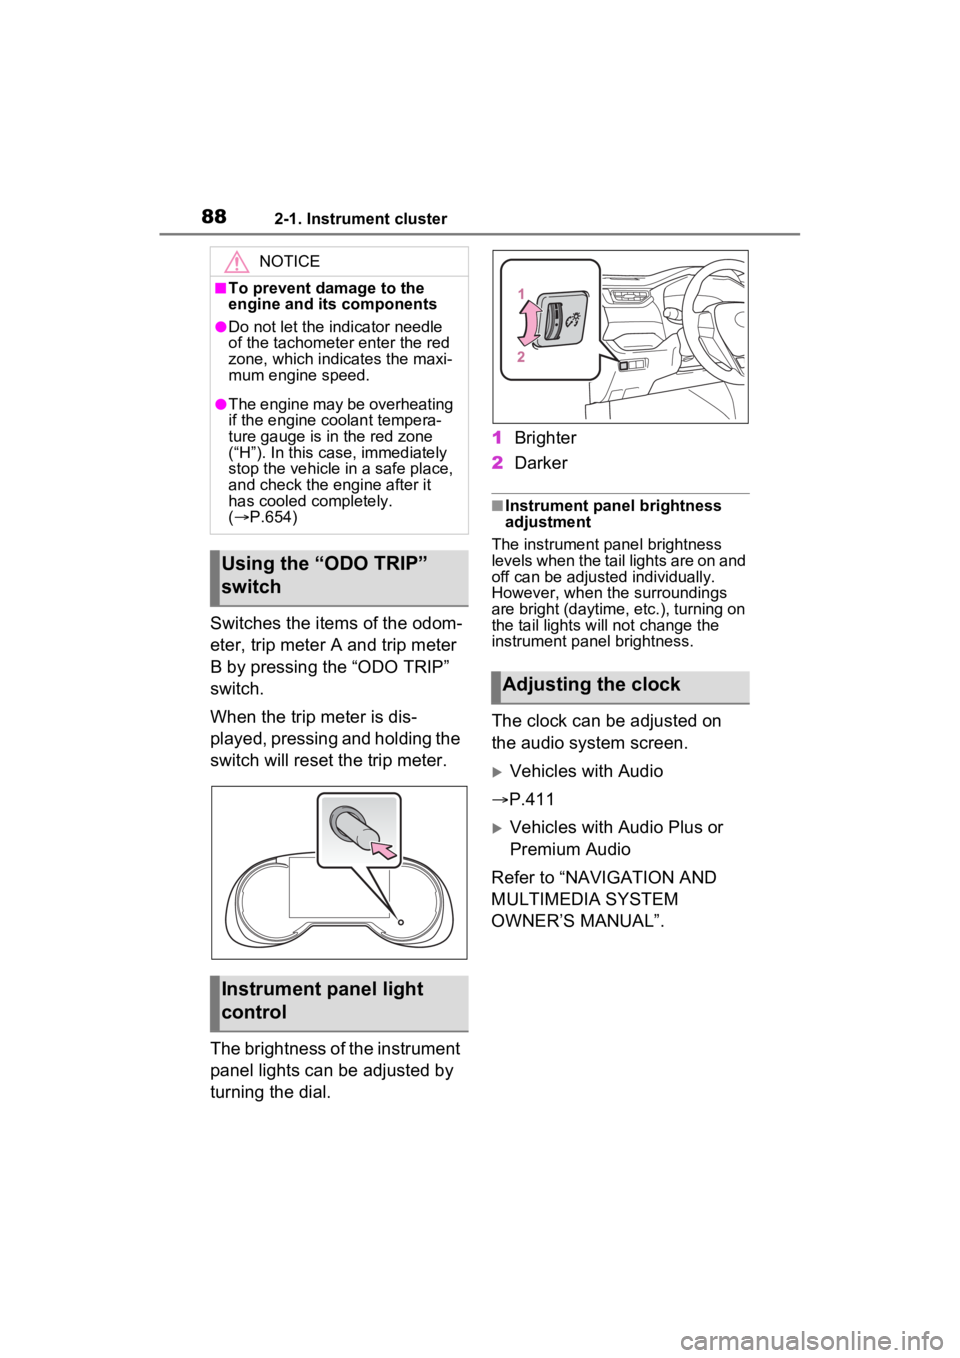
882-1. Instrument cluster
Switches the items of the odom-
eter, trip meter A and trip meter
B by pressing the “ODO TRIP”
switch.
When the trip meter is dis-
played, pressing and holding the
switch will reset the trip meter.
The brightness of the instrument
panel lights can be adjusted by
turning the dial.1
Brighter
2 Darker
■Instrument panel brightness
adjustment
The instrument panel brightness
levels when the tail lights are on and
off can be adjusted individually.
However, when the surroundings
are bright (daytime, etc.), turning on
the tail lights will not change the
instrument panel brightness.
The clock can be adjusted on
the audio system screen.
Vehicles with Audio
P.411
Vehicles with Audio Plus or
Premium Audio
Refer to “NAVIGATION AND
MULTIMEDIA SYSTEM
OWNER’S MANUAL”.
NOTICE
■To prevent damage to the
engine and its components
●Do not let the i ndicator needle
of the tachomete r enter the red
zone, which indicates the maxi-
mum engine speed.
●The engine may be overheating
if the engine coolant tempera-
ture gauge is in the red zone
(“H”). In this case, immediately
stop the vehicle in a safe place,
and check the engine after it
has cooled completely.
( P.654)
Using the “ODO TRIP”
switch
Instrument panel light
control
Adjusting the clock
Page 108 of 748
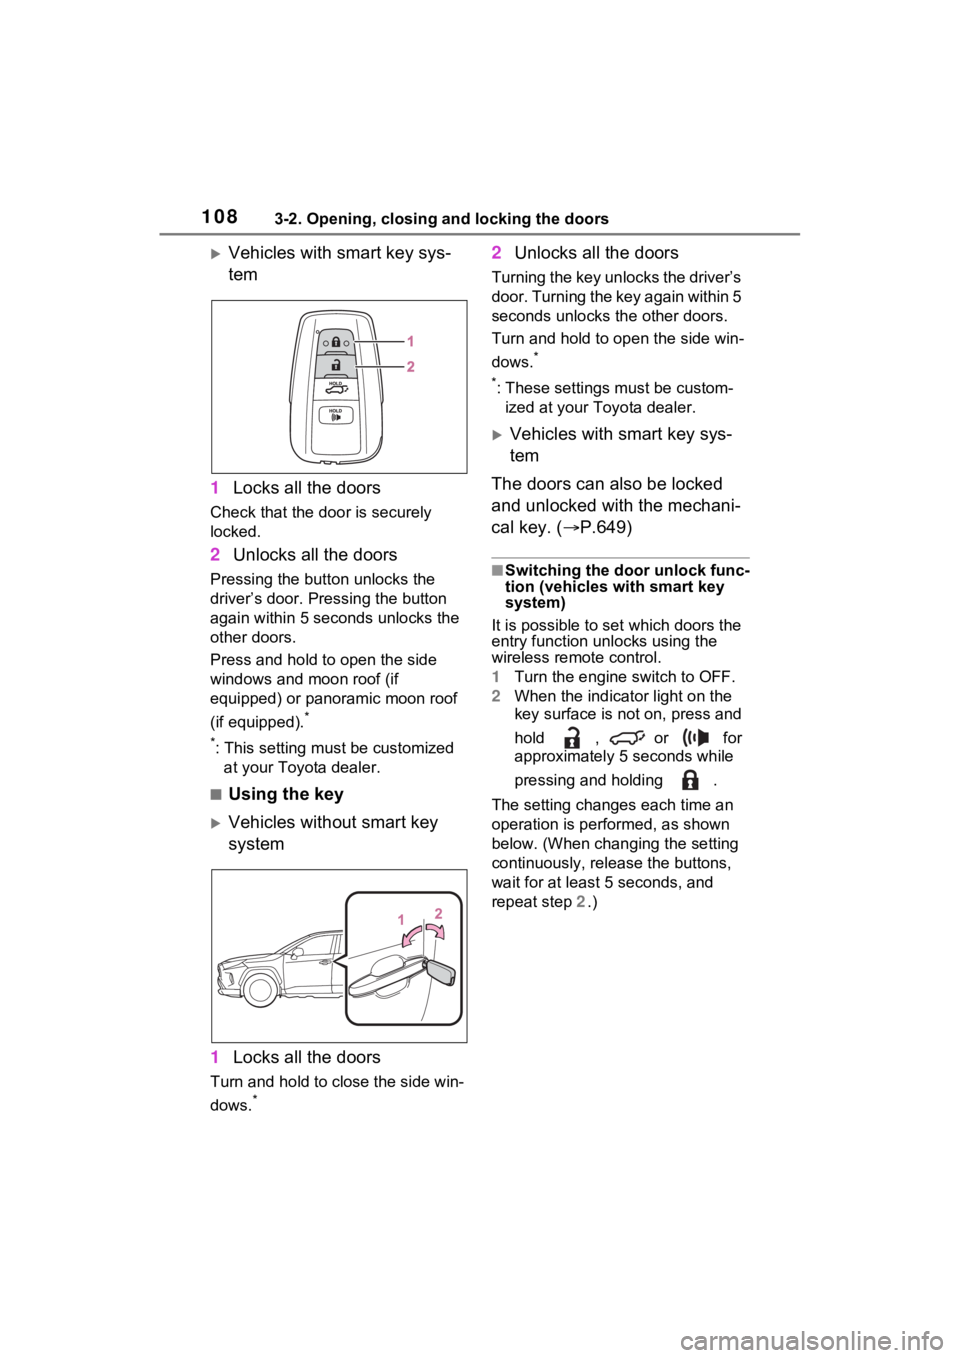
1083-2. Opening, closing and locking the doors
Vehicles with smart key sys-
tem
1 Locks all the doors
Check that the door is securely
locked.
2Unlocks all the doors
Pressing the button unlocks the
driver’s door. Pressing the button
again within 5 seconds unlocks the
other doors.
Press and hold to open the side
windows and moon roof (if
equipped) or panoramic moon roof
(if equipped).
*
*
: This setting must be customized at your Toyota dealer.
■Using the key
Vehicles without smart key
system
1 Locks all the doors
Turn and hold to close the side win-
dows.
*
2Unlocks all the doors
Turning the key unlocks the driver’s
door. Turning the key again within 5
seconds unlocks th e other doors.
Turn and hold to open the side win-
dows.
*
*
: These settings must be custom- ized at your Toyota dealer.
Vehicles with smart key sys-
tem
The doors can also be locked
and unlocked with the mechani-
cal key. ( P.649)
■Switching the door unlock func-
tion (vehicles with smart key
system)
It is possible to set which doors the
entry function unlocks using the
wireless remote control.
1 Turn the engine switch to OFF.
2 When the indicator light on the
key surface is not on, press and
hold , or for
approximately 5 seconds while
pressing and holding .
The setting changes each time an
operation is per formed, as shown
below. (When changing the setting
continuously, release the buttons,
wait for at least 5 seconds, and
repeat step 2 .)
Page 123 of 748
1233-2. Opening, closing and locking the doors
3
Before driving
WARNING
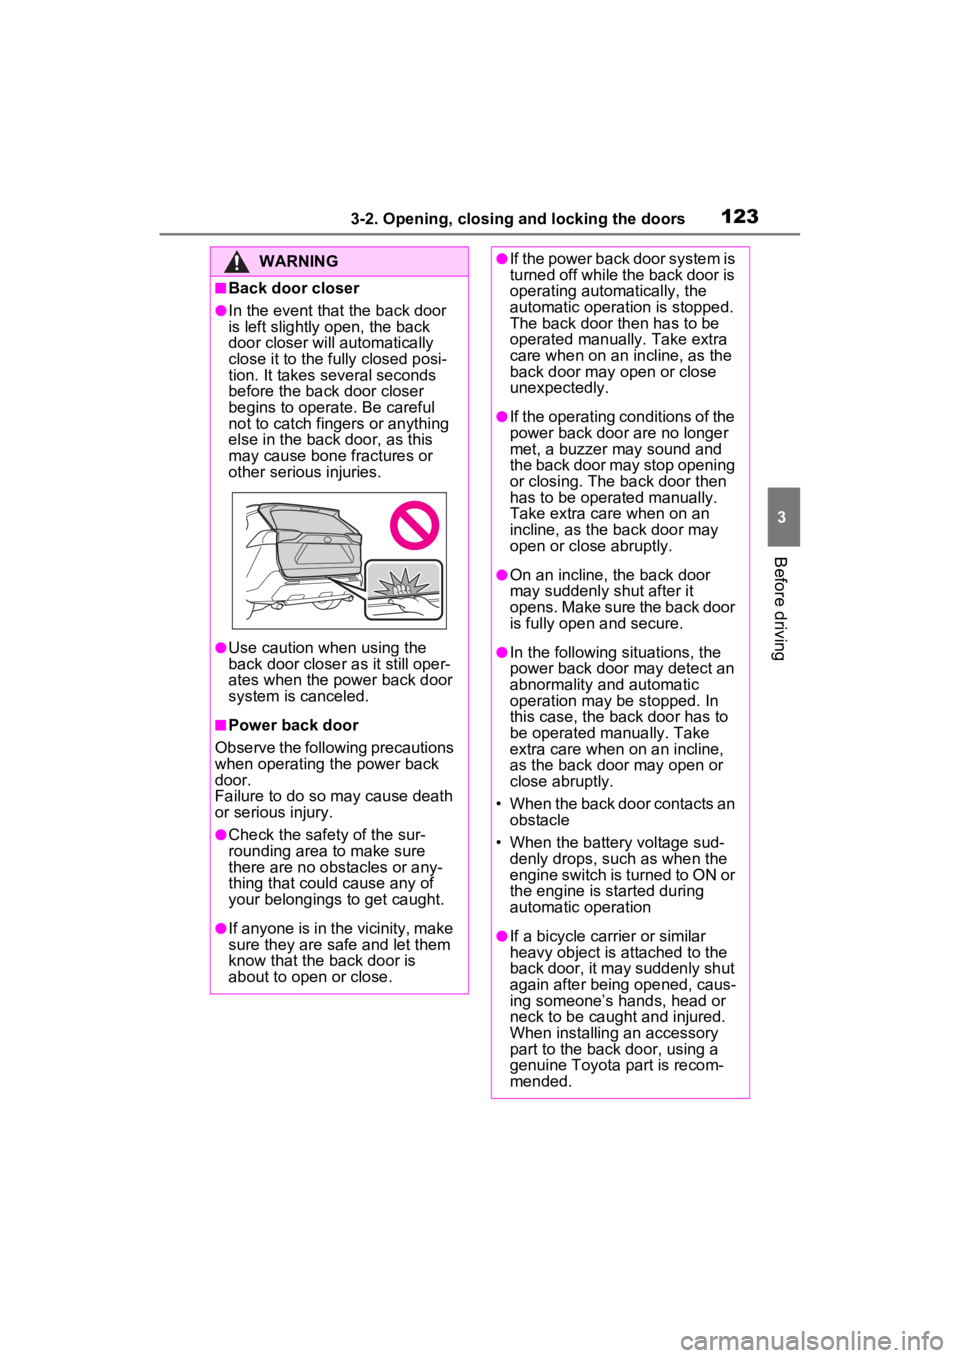
■Back door closer
●In the event that the back door
is left slightly open, the back
door closer will automatically
close it to the fully closed posi-
tion. It takes several seconds
before the back door closer
begins to operate. Be careful
not to catch fingers or anything
else in the back door, as this
may cause bone fractures or
other serious injuries.
●Use caution when using the
back door closer as it still oper-
ates when the power back door
system is canceled.
■Power back door
Observe the following precautions
when operating the power back
door.
Failure to do so may cause death
or serious injury.
●Check the safety of the sur-
rounding area to make sure
there are no obstacles or any-
thing that could cause any of
your belongings to get caught.
●If anyone is in the vicinity, make
sure they are safe and let them
know that the back door is
about to open or close.
●If the power back door system is
turned off while the back door is
operating automatically, the
automatic operation is stopped.
The back door then has to be
operated manually. Take extra
care when on an incline, as the
back door may open or close
unexpectedly.
●If the operating conditions of the
power back door are no longer
met, a buzzer may sound and
the back door may stop opening
or closing. The ba ck door then
has to be operated manually.
Take extra care when on an
incline, as the back door may
open or close abruptly.
●On an incline, the back door
may suddenly shut after it
opens. Make sure the back door
is fully open and secure.
●In the following si tuations, the
power back door may detect an
abnormality and automatic
operation may be stopped. In
this case, the back door has to
be operated manually. Take
extra care when on an incline,
as the back door may open or
close abruptly.
• When the back door contacts an obstacle
• When the battery voltage sud- denly drops, such as when the
engine switch is turned to ON or
the engine is started during
automatic operation
●If a bicycle carrier or similar
heavy object is attached to the
back door, it may suddenly shut
again after being opened, caus-
ing someone’s hands, head or
neck to be caught and injured.
When installing an accessory
part to the back door, using a
genuine Toyota part is recom-
mended.
Page 130 of 748

1303-2. Opening, closing and locking the doors
prevent lock operation. Remove
the gloves and touch the lock sen-
sor again.
●When the lock operation is per-
formed using the lock sensor, rec-
ognition signals will be shown up
to two consecutive times. After
this, no recogniti on signals will be
given.
●If the door handle becomes wet
while the electronic key is within
the effective ran ge, the door may
lock and unlock repeatedly. In that
case, follow the fo llowing correc-
tion procedures to wash the vehi-
cle:
• Place the electronic key in a loca- tion 6 ft. (2 m) or more away from
the vehicle. (Take care to ensure
that the key is not stolen.)
• Set the electronic key to battery- saving mode to disable the smart
key system. ( P.128)
●If the electronic key is inside the
vehicle and a door handle
becomes wet during a car wash, a
message may be shown on the
multi-informatio n display and a
buzzer will sound outside the vehi-
cle. To turn off the alarm, lock all
the doors.
●The lock sensor may not work
properly if it com es into contact
with ice, snow, mud, etc. Clean
the lock sensor and attempt to
operate it again, or use the lock
sensor on the lower part of the
door handle.
●A sudden approac h to the effec-
tive range or door handle may pre-
vent the doors from being
unlocked. In this case, return the
door handle to the original position
and check that the doors unlock
before pulling the door handle
again.
●If there is another electronic key in
the detection area, it may take
slightly longer to unlock the doors
after the door handle is gripped.
■When the vehicle is not driven
for extended periods
●To prevent theft of the vehicle, do
not leave the electronic key within
6 ft. (2 m) of the vehicle.
●The smart key system can be
deactivated in advance. ( P.688)
●Battery-saving mode can reduce
the power consumption of elec-
tronic keys. ( P.128)
■To operate the system properly
Make sure to carry the electronic
key when operating the system. Do
not get the electronic key too close
to the vehicle when operating the
system from the out side of the vehi-
cle.
Depending on the position and hold-
ing condition of the electronic key,
the key may not be detected cor-
rectly and the system may not oper-
ate properly. (The alarm may go off
accidentally, or the door lock pre-
vention may not operate.)
■If the smart key system does
not operate properly
●Locking and unlocking the doors:
Use the mechanical key.
( P.649)
●Starting the engine: P.649
■Customization
Settings (e.g. smart key system)
can be changed.
(Customizable features: P.687)
If the smart key system has been
deactivated in a customized setting,
refer to the explanations for the fol-
lowing operations.
●Locking and unlocking the doors:
Use the wireless remote control or
mechanical key. ( P.107, 649)
●Starting the engi ne and changing
engine switch modes: P.649
●Stopping the engine: P.194