torque TOYOTA RAV4 2022 Owners Manual
[x] Cancel search | Manufacturer: TOYOTA, Model Year: 2022, Model line: RAV4, Model: TOYOTA RAV4 2022Pages: 748, PDF Size: 22.93 MB
Page 94 of 748
942-1. Instrument cluster
■AWD system display (AWD
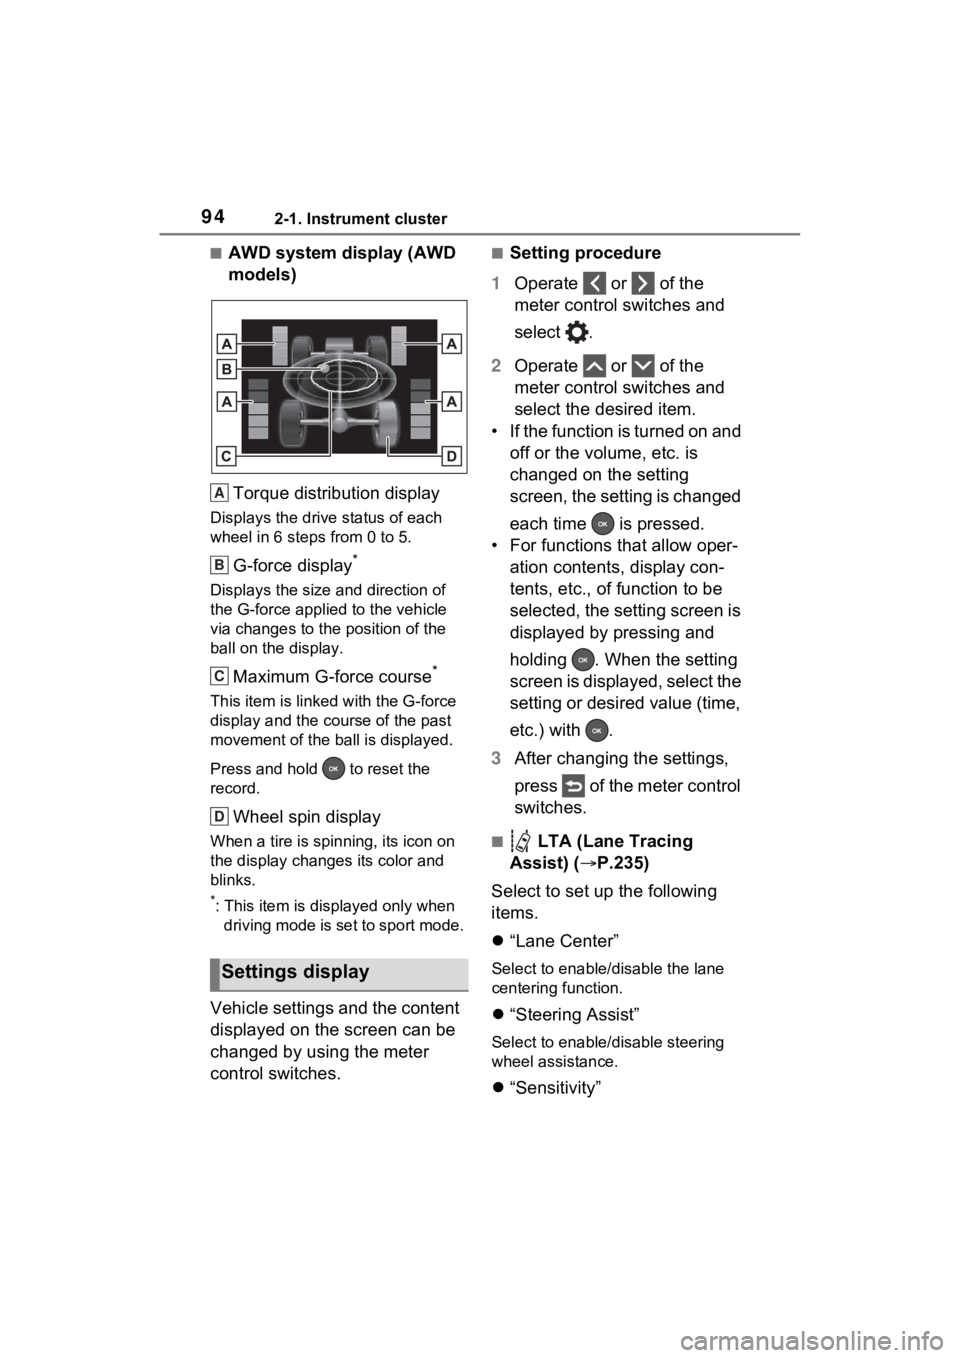
models)Torque distribution display
Displays the drive status of each
wheel in 6 steps from 0 to 5.
G-force display*
Displays the size and direction of
the G-force applie d to the vehicle
via changes to the position of the
ball on the display.
Maximum G-force course*
This item is linke d with the G-force
display and the course of the past
movement of the ball is displayed.
Press and hold to reset the
record.
Wheel spin display
When a tire is spin ning, its icon on
the display change s its color and
blinks.
*: This item is displayed only when driving mode is set to sport mode.
Vehicle settings and the content
displayed on the screen can be
changed by using the meter
control switches.
■Setting procedure
1 Operate or of the
meter control switches and
select .
2 Operate or of the
meter control switches and
select the desired item.
• If the function is turned on and off or the volume, etc. is
changed on the setting
screen, the setting is changed
each time is pressed.
• For functions that allow oper- ation contents, display con-
tents, etc., of function to be
selected, the setting screen is
displayed by pressing and
holding . When the setting
screen is displayed, select the
setting or desired value (time,
etc.) with .
3 After changing the settings,
press of the meter control
switches.
■ LTA (Lane Tracing
Assist) ( P.235)
Select to set up the following
items.
“Lane Center”
Select to enable /disable the lane
centering function.
“Steering Assist”
Select to enable/d isable steering
wheel assistance.
“Sensitivity”
Settings display
A
B
C
D
Page 182 of 748
1824-1. Before driving
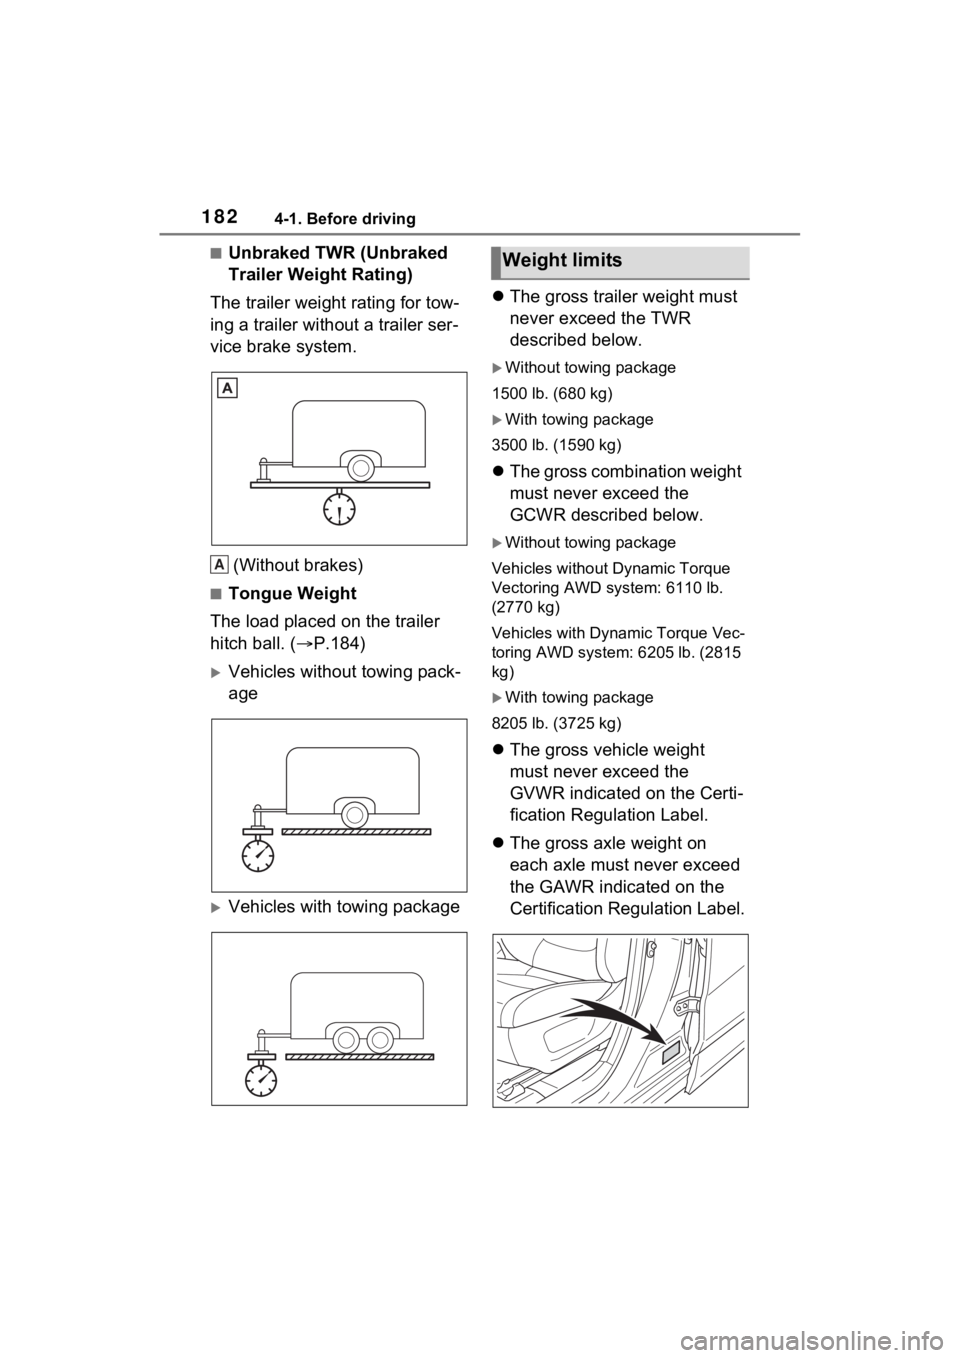
■Unbraked TWR (Unbraked
Trailer Weight Rating)
The trailer weight rating for tow-
ing a trailer without a trailer ser-
vice brake system.
(Without brakes)
■Tongue Weight
The load placed on the trailer
hitch ball. ( P.184)
Vehicles without towing pack-
age
Vehicles with towing package
The gross trailer weight must
never exceed the TWR
described below.
Without towing package
1500 lb. (680 kg)
With towing package
3500 lb. (1590 kg)
The gross combination weight
must never exceed the
GCWR described below.
Without towing package
Vehicles without Dynamic Torque
Vectoring AWD system: 6110 lb.
(2770 kg)
Vehicles with Dynamic Torque Vec-
toring AWD system: 6205 lb. (2815
kg)
With towing package
8205 lb. (3725 kg)
The gross vehicle weight
must never exceed the
GVWR indicated on the Certi-
fication Regulation Label.
The gross axle weight on
each axle must never exceed
the GAWR indicated on the
Certification Regulation Label.
A
Weight limits
Page 183 of 748
1834-1. Before driving
4
Driving
If the gross trailer weight is
over the unbraked TWR,
trailer service brakes are
required.
Vehicles with towing package:
If the gross trailer weight is
over 2000 lb. (907 kg), a sway
control device with sufficient
capacity is required.
Confirm that the gross trailer
weight, gross combination
weight, gross vehicle weight,
gross axle weight and tongue
weight are all within the limits.
■GCWR*
Without towing package
Vehicles without Dynamic
Torque Vectoring AWD system:
6110 lb. (2770 kg)
Vehicles with Dynamic Torque
Vectoring AWD system: 6205 lb.
(2815 kg)
With towing package
8205 lb. (3725 kg)
*: These models meet the tow-vehi- cle trailering requirement of SAE
International per SAE J2807.
■TWR*
Without towing package
1500 lb. (680 kg)
With towing package
3500 lb. (1590 kg)
*: These models meet the tow-vehi- cle trailering requirement of SAE
International per SAE J2807.
■Unbraked TWR*
1000 lb. (450 kg)
*: These models meet the tow-vehi-cle trailering requirement of SAE
International per SAE J2807.
A recommended tongue
weight varies in accordance
with the types of trailers or
towing as described below.
To ensure the recommended
values shown below, the
trailer must be loaded by
referring to the following
instructions.
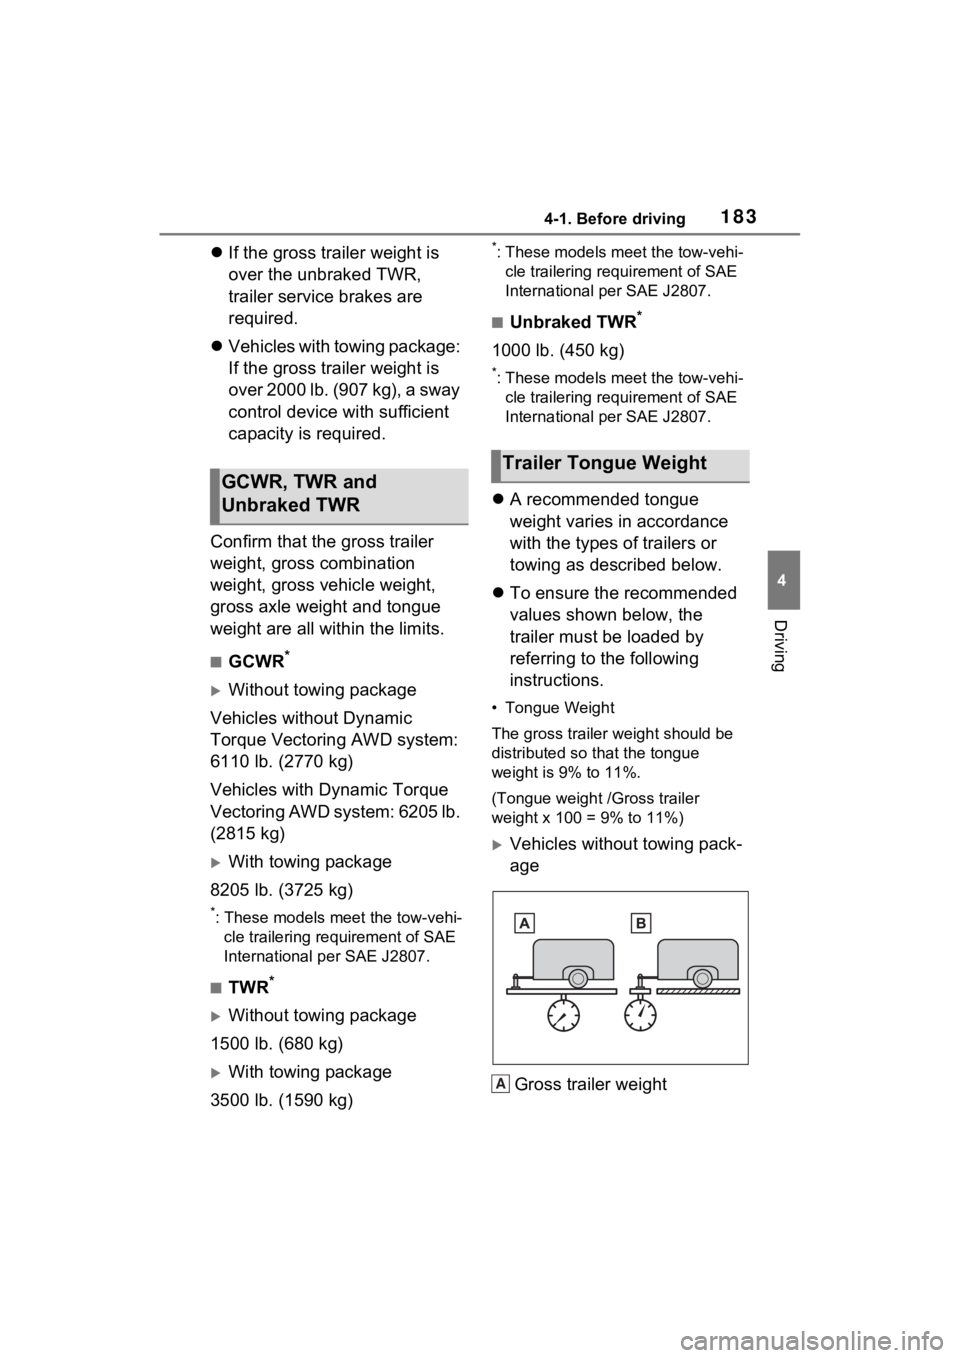
• Tongue Weight
The gross trailer weight should be
distributed so that the tongue
weight is 9% to 11%.
(Tongue weight /Gross trailer
weight x 100 = 9% to 11%)
Vehicles without towing pack-
age
Gross trailer weight
GCWR, TWR and
Unbraked TWR
Trailer Tongue Weight
A
Page 347 of 748
3474-5. Using the driving support systems
4
Driving
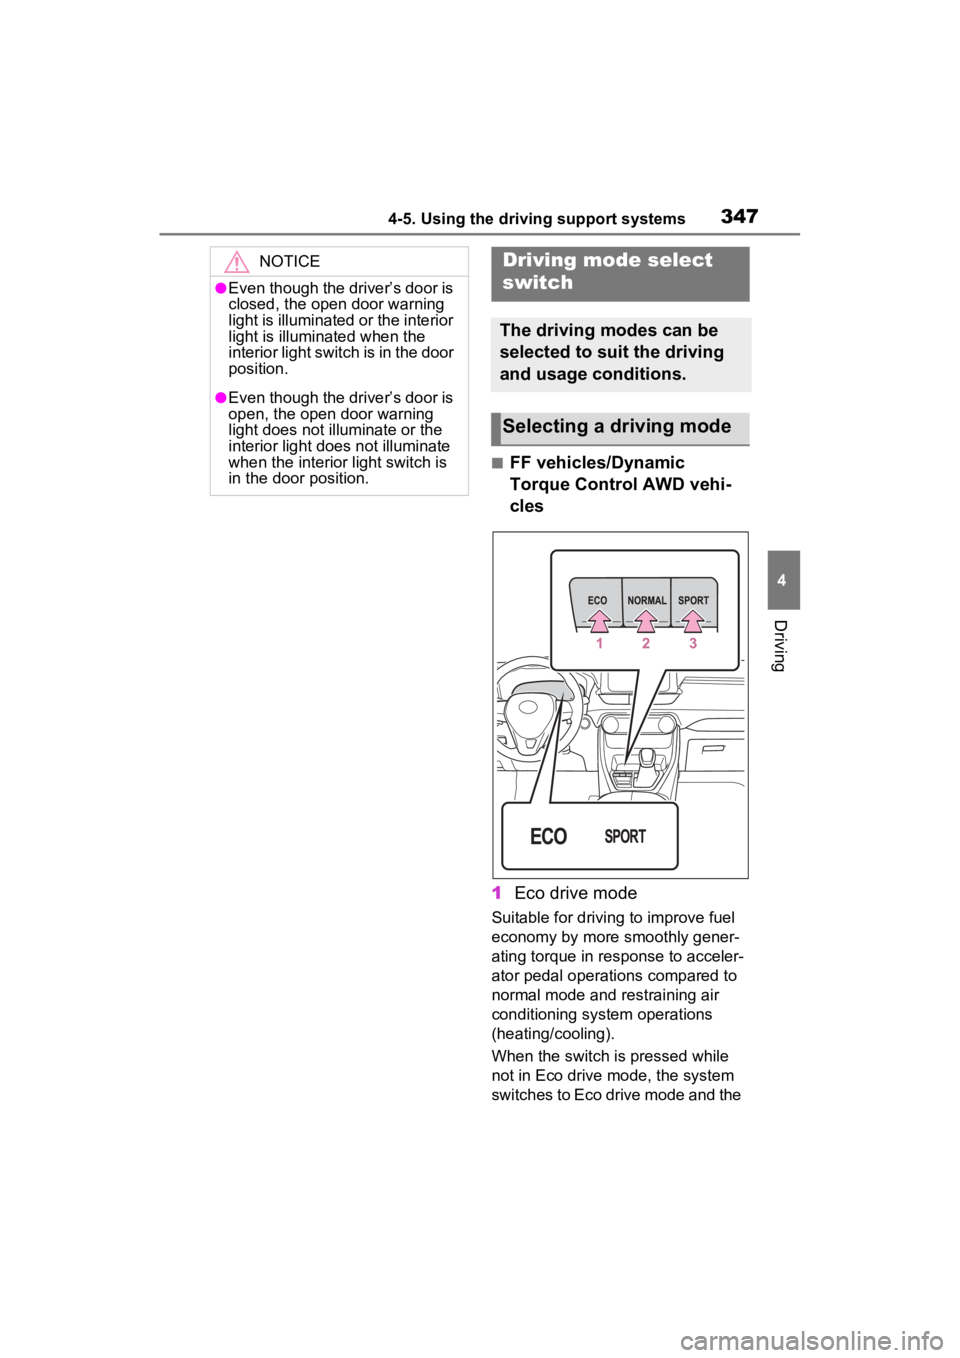
■FF vehicles/Dynamic
Torque Control AWD vehi-
cles
1 Eco drive mode
Suitable for driving to improve fuel
economy by more smoothly gener-
ating torque in response to acceler-
ator pedal operations compared to
normal mode and restraining air
conditioning system operations
(heating/cooling).
When the switch is pressed while
not in Eco drive mode, the system
switches to Eco drive mode and the
NOTICE
●Even though the driver’s door is
closed, the open door warning
light is illuminated or the interior
light is illuminated when the
interior light switch is in the door
position.
●Even though the driver’s door is
open, the open door warning
light does not illuminate or the
interior light does not illuminate
when the interior light switch is
in the door position.
Driving mode select
switch
The driving modes can be
selected to suit the driving
and usage conditions.
Selecting a driving mode
Page 348 of 748
3484-5. Using the driving support systems
Eco drive mode indicator illumi-
nates on the multi-information dis-
play.
2Normal mode
Suitable for normal driving.
The driving mode returns to normal
mode if the switch is pressed while
in Eco drive mode or sport mode.
3Sport mode
Controls the steering feeling and
engine to create an acceleration
response that is su itable for sporty
driving. Suitable for when crisp
handling is desired, such as when
driving on mountainous roads.
When the switch is pressed while
not in sport mode, the system
switches to sport mode and the
sport mode indicator illuminates on
the multi-inform ation display.
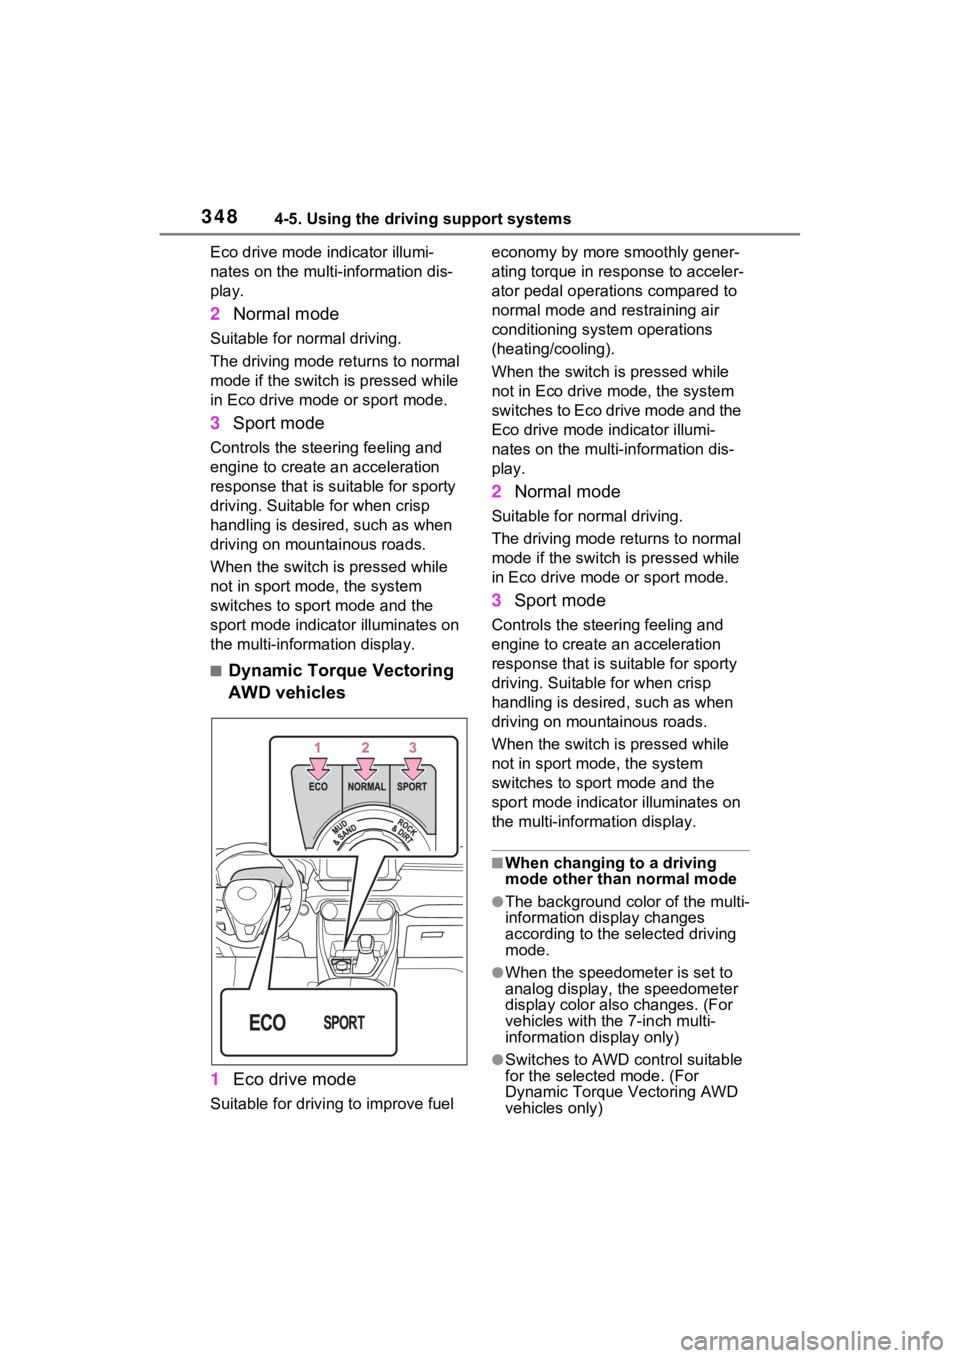
■Dynamic Torque Vectoring
AWD vehicles
1 Eco drive mode
Suitable for driving to improve fuel economy by more
smoothly gener-
ating torque in response to acceler-
ator pedal operations compared to
normal mode and restraining air
conditioning system operations
(heating/cooling).
When the switch is pressed while
not in Eco drive mode, the system
switches to Eco drive mode and the
Eco drive mode i ndicator illumi-
nates on the multi-information dis-
play.
2 Normal mode
Suitable for n ormal driving.
The driving mode returns to normal
mode if the switch i s pressed while
in Eco drive mode or sport mode.
3 Sport mode
Controls the steering feeling and
engine to create an acceleration
response that is suitable for sporty
driving. Suitable for when crisp
handling is desired, such as when
driving on mountainous roads.
When the switch is pressed while
not in sport mode, the system
switches to sport mode and the
sport mode indicat or illuminates on
the multi-information display.
■When changing to a driving
mode other than normal mode
●The background color of the multi-
information display changes
according to the selected driving
mode.
●When the speedometer is set to
analog display, the speedometer
display color also changes. (For
vehicles with the 7-inch multi-
information di splay only)
●Switches to AWD control suitable
for the selected mode. (For
Dynamic Torque Vectoring AWD
vehicles only)
Page 350 of 748
3504-5. Using the driving support systems
■Rock & Dirt mode
Suitable for driving on bumpy
roads, such as on unpaved for-
est roads.
■Normal mode
Suitable for normal driving. Use
Normal mode when not driving
off-road.
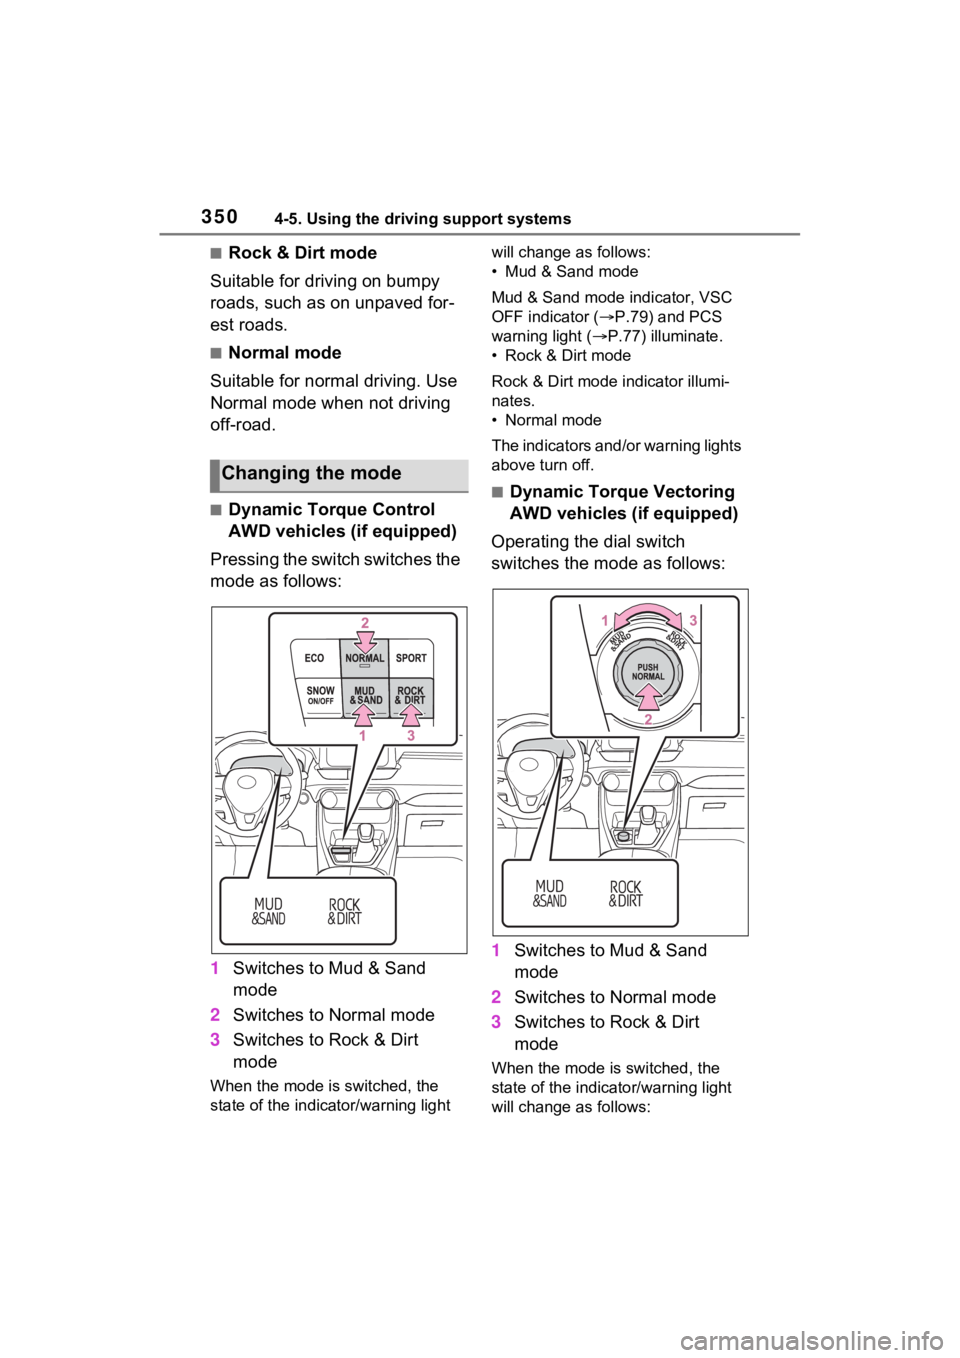
■Dynamic Torque Control
AWD vehicles (if equipped)
Pressing the switch switches the
mode as follows:
1 Switches to Mud & Sand
mode
2 Switches to Normal mode
3 Switches to Rock & Dirt
mode
When the mode is switched, the
state of the indica tor/warning light will change a
s follows:
• Mud & Sand mode
Mud & Sand mode indicator, VSC
OFF indicator ( P.79) and PCS
warning light ( P.77) illuminate.
• Rock & Dirt mode
Rock & Dirt mode indicator illumi-
nates.
• Normal mode
The indicators and /or warning lights
above turn off.
■Dynamic Torque Vectoring
AWD vehicles (if equipped)
Operating the dial switch
switches the mode as follows:
1 Switches to Mud & Sand
mode
2 Switches to Normal mode
3 Switches to Rock & Dirt
mode
When the mode is switched, the
state of the indicator/warning light
will change a s follows:
Changing the mode
Page 352 of 748
3524-5. Using the driving support systems
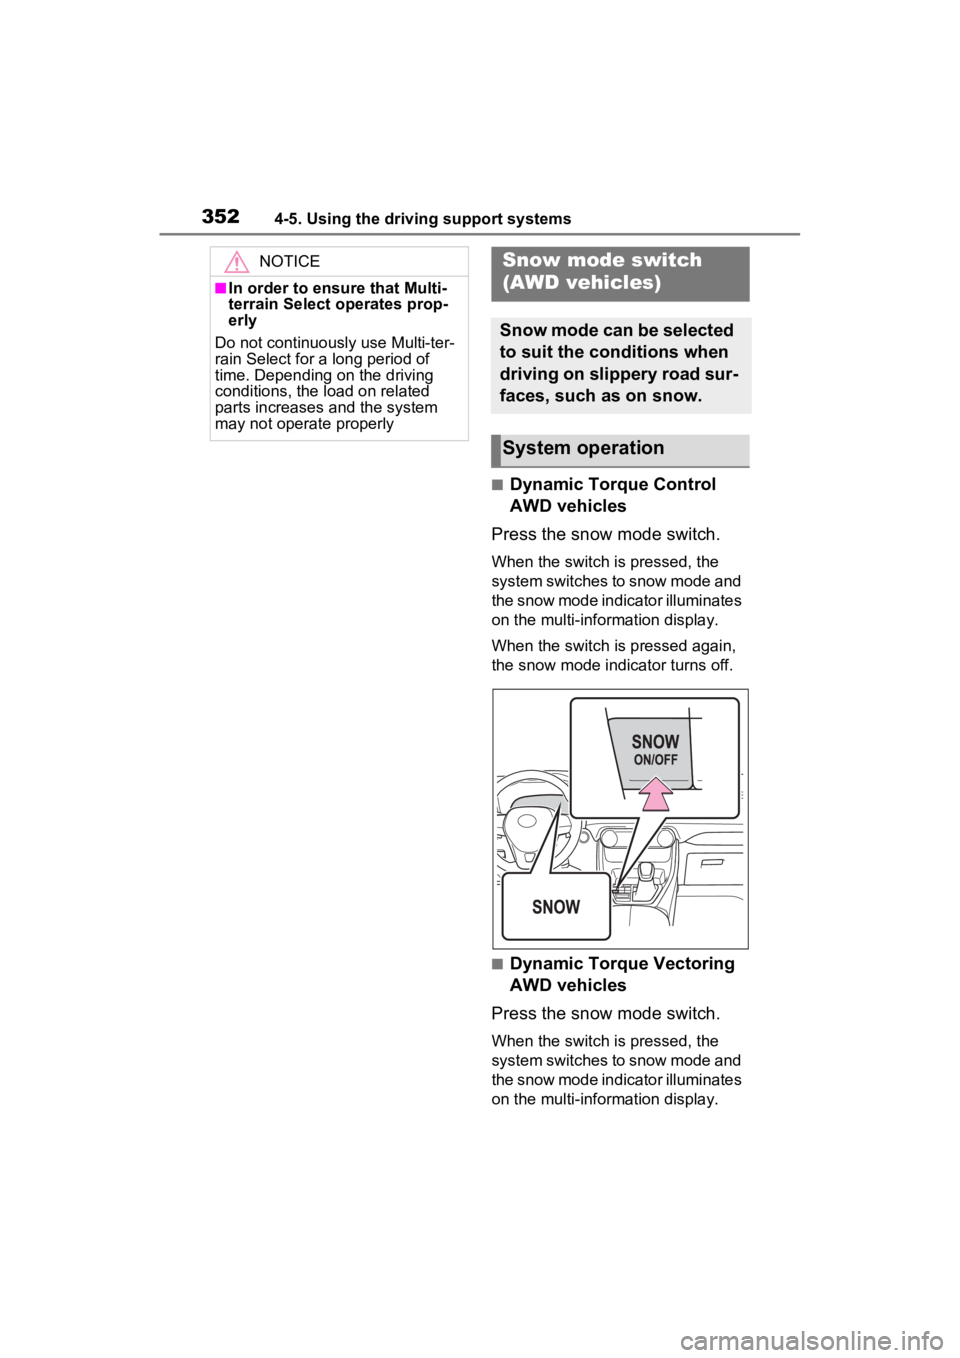
■Dynamic Torque Control
AWD vehicles
Press the snow mode switch.
When the switch is pressed, the
system switches to snow mode and
the snow mode indi cator illuminates
on the multi-information display.
When the switch is pressed again,
the snow mode indicator turns off.
■Dynamic Torque Vectoring
AWD vehicles
Press the snow mode switch.
When the switch is pressed, the
system switches to snow mode and
the snow mode indi cator illuminates
on the multi-information display.
NOTICE
■In order to ensure that Multi-
terrain Select operates prop-
erly
Do not continuously use Multi-ter-
rain Select for a long period of
time. Depending on the driving
conditions, the load on related
parts increases and the system
may not operate properly
Snow mode switch
(AWD vehicles)
Snow mode can be selected
to suit the conditions when
driving on slippery road sur-
faces, such as on snow.
System operation
Page 356 of 748

3564-5. Using the driving support systems
■Enhanced VSC (Enhanced
Vehicle Stability Control)
Provides cooperative control of
the ABS, TRAC, VSC and EPS.
Helps to maintai n directional
stability when swerving on slip-
pery road surfaces by con-
trolling steering performance.
■Trailer Sway Control
Helps the driver to control trailer
sway by selectively applying
brake pressure for individual
wheels and reducing driving
torque when trailer sway is
detected.
■TRAC (Traction Control)
Helps to maintain drive power
and prevent the drive wheels
from spinning when starting the
vehicle or accelerating on slip-
pery roads
■Active Cornering Assist
(ACA)
Helps to prevent the vehicle
from drifting to the outer side by
performing inner wheel brake
control when attempting to
accelerate while turning
■Hill-start assist control
Helps to reduce the backward
movement of the vehicle when
starting on an uphill
■EPS (Electric Power Steer-
ing)
Employs an electric motor to
reduce the amount of effort needed to turn the steering
wheel.
■Dynamic Torque Control
AWD system (AWD models)
(if equipped)
Automatically controls the drive
system such as to front-wheel
drive or AWD (all wheel drive)
according to various running
conditions including normal driv-
ing, during cornering, on a
uphill, when starting off, during
acceleration, on a slippery roads
due to snow or rain, thus con-
tributing to stable operability and
driving stability.
■Dynamic Torque Vectoring
AWD system (AWD models)
(if equipped)
Automatically controls the drive
system such as to front-wheel
drive or AWD (all wheel drive)
according to various running
conditions including normal driv-
ing, during cornering, on a
uphill, when starting off, during
acceleration, on a slippery roads
due to snow or rain, thus con-
tributing to stable operability and
driving stability.
Also, drive torque distribution is
precisely controlled during cor-
nering, contributing to improve-
ments in operability and
stability.
■The Secondary Collision
Brake
When the SRS airbag sensor
Page 360 of 748
3604-5. Using the driving support systems
WARNING
■TRAC/VSC may not operate
effectively when
Directional control and power may
not be achievable while driving on
slippery road surfaces, even if the
TRAC/VSC system is operating.
Drive the vehicle carefully in con-
ditions where stability and power
may be lost.
■Active Cornering Assist does
not operate effectively when
●Do not overly rely on Active
Cornering Assist. Active Corner-
ing Assist may not operate
effectively when accelerating
down slopes or driving on slip-
pery road surfaces.
●When Active Cornering Assist
frequently operates, Active Cor-
nering Assist may temporarily
stop operating to ensure proper
operation of the brakes, TRAC
and VSC.
■Hill-start assist control does
not operate effectively when
●Do not overly rely on hill-start
assist control. Hill-start assist
control may not operate effec-
tively on steep inclines and
roads covered with ice.
●Unlike the parking brake, hill-
start assist control is not
intended to hold the vehicle sta-
tionary for an extended period
of time. Do not attempt to use
hill-start assist control to hold
the vehicle on an incline, as
doing so may lead to an acci-
dent.
■When the TRAC/VSC/Trailer
Sway Control is activated
The slip indicator light flashes.
Always drive carefully. Reckless
driving may cause an accident.
Exercise particular care when the
indicator light flashes.
■When the TRAC/VSC/Trailer
Sway Control systems are
turned off
Be especially careful and drive at
a speed appropriate to the road
conditions. As these are the sys-
tems to help ensure vehicle stabil-
ity and driving force, do not turn
the TRAC/VSC/Tra iler Sway Con-
trol systems off unless necessary.
Trailer Sway Control is part of the
VSC system and will not operate
if VSC is turned off or experiences
a malfunction.
■Dynamic Torque Vectoring
AWD system (if equipped)
The cornering performance of the
newly developed AWD system
has been improved. However, do
not overly rely on the system and
drive with caution.
■Replacing tires
Make sure that all tires are of the
specified size, brand, tread pat-
tern and total load capacity. In
addition, make sure that the tires
are inflated to the recommended
tire inflation p ressure level.
The ABS, TRAC, Trailer Sway
Control and VSC systems will not
function correctly if different tires
are installed on the vehicle.
Contact your Toyota dealer for
further information when replacing
tires or wheels.
■Handling of tires and the sus-
pension
Using tires with any kind of prob-
lem or modifying the suspension
will affect the driving assist sys-
tems, and may cause a system to
malfunction.
Page 642 of 748
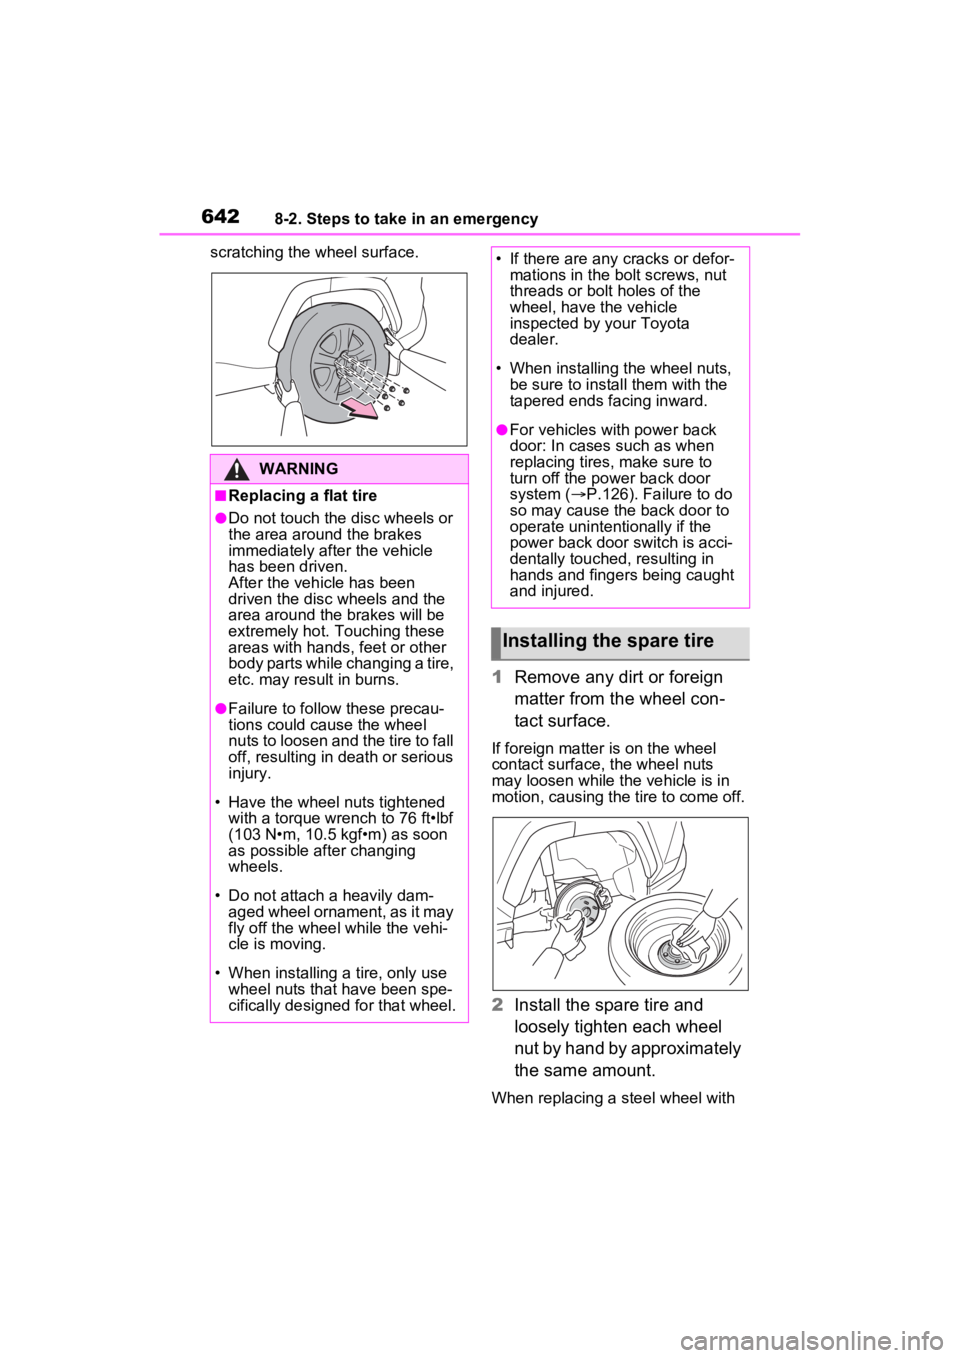
6428-2. Steps to take in an emergency
scratching the wheel surface.
1Remove any dirt or foreign
matter from the wheel con-
tact surface.
If foreign matter is on the wheel
contact surface, the wheel nuts
may loosen while the vehicle is in
motion, causing the tire to come off.
2 Install the spare tire and
loosely tighten each wheel
nut by hand by approximately
the same amount.
When replacing a steel wheel with
WARNING
■Replacing a flat tire
●Do not touch the disc wheels or
the area around the brakes
immediately after the vehicle
has been driven.
After the vehicle has been
driven the disc wheels and the
area around the brakes will be
extremely hot. Touching these
areas with hands , feet or other
body parts while changing a tire,
etc. may result in burns.
●Failure to follow these precau-
tions could cause the wheel
nuts to loosen and the tire to fall
off, resulting in death or serious
injury.
• Have the wheel nuts tightened with a torque wrench to 76 ft•lbf
(103 N•m, 10.5 kgf•m) as soon
as possible after changing
wheels.
• Do not attach a heavily dam- aged wheel ornament, as it may
fly off the whee l while the vehi-
cle is moving.
• When installing a tire, only use wheel nuts that have been spe-
cifically designed for that wheel.
• If there are any cracks or defor- mations in the bolt screws, nut
threads or bolt holes of the
wheel, have the vehicle
inspected by your Toyota
dealer.
• When installing the wheel nuts, be sure to install them with the
tapered ends facing inward.
●For vehicles with power back
door: In cases such as when
replacing tires, make sure to
turn off the po wer back door
system ( P.126). Failure to do
so may cause the back door to
operate unintentionally if the
power back door switch is acci-
dentally touched , resulting in
hands and fingers being caught
and injured.
Installing the spare tire