stop start TOYOTA RAV4 2023 Workshop Manual
[x] Cancel search | Manufacturer: TOYOTA, Model Year: 2023, Model line: RAV4, Model: TOYOTA RAV4 2023Pages: 574, PDF Size: 17.31 MB
Page 341 of 574
3415-1. Using the air conditioning system and defogger
5
Interior features
up, press the Stop & Start cancel
switch and refrain from using the
Stop & Start system.
■When an odor comes from the
air conditioning system while
the engine is stopped due to the
Stop & Start system (vehicles
with Stop & Start system)
Press the Stop & Start cancel switch
to restart the engine.
■Using the Intelligent Assistant
(if equipped)
Air conditioning system can be
operated using the Intelligent Assis-
tant.
For details regardi ng the Intelligent
Assistant, refer to the “MULTIME-
DIA OWNER’S MANUAL”.
■Air conditioning filter
P.420
■Air conditioning system refrig-
erant
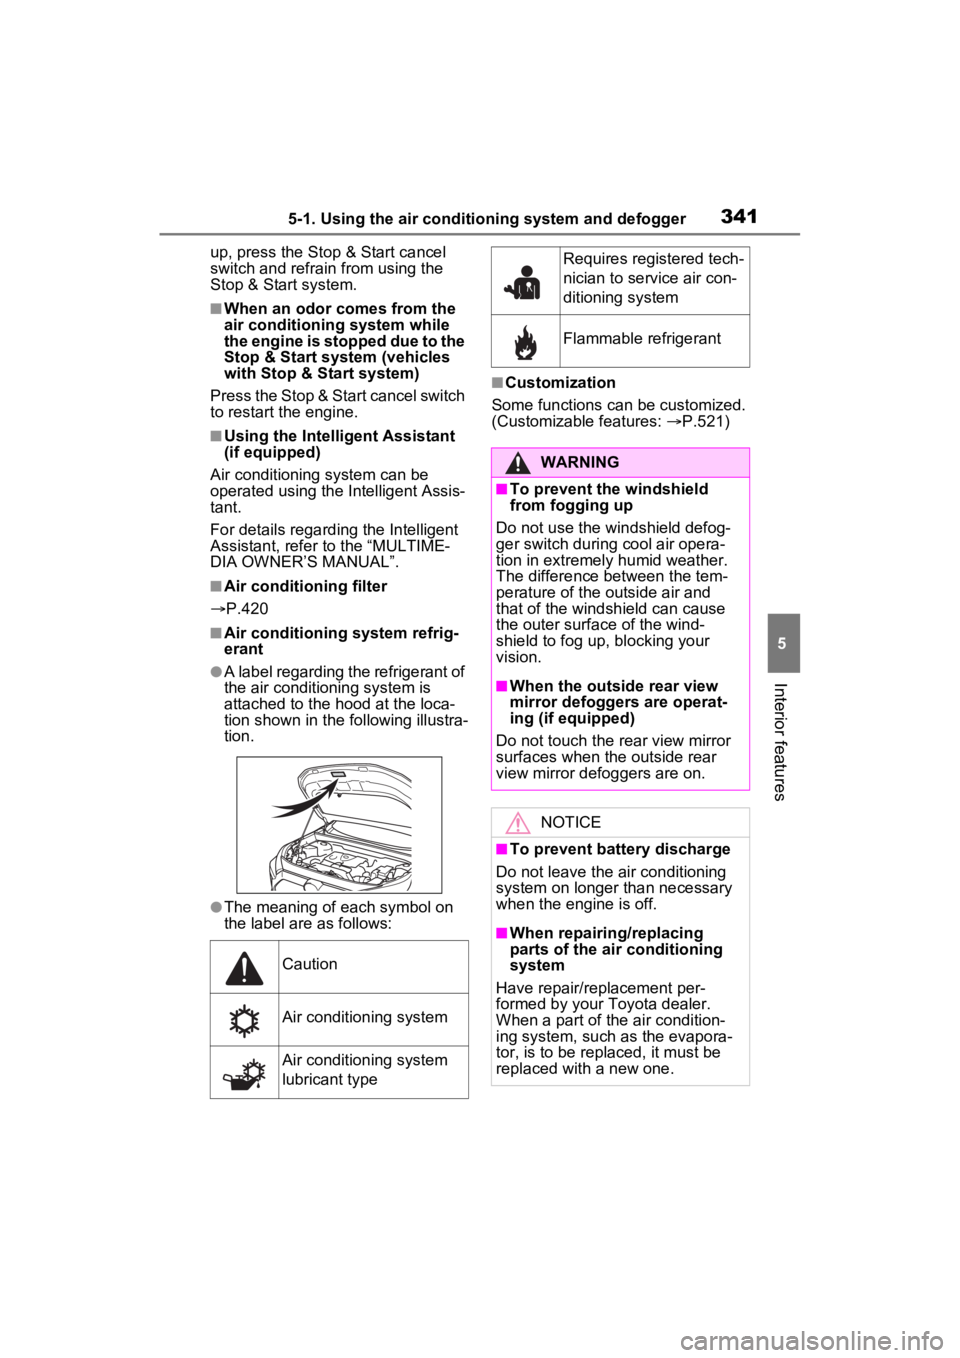
●A label regarding the refrigerant of
the air conditioning system is
attached to the ho od at the loca-
tion shown in the f ollowing illustra-
tion.
●The meaning of each symbol on
the label are as follows:
■Customization
Some functions can be customized.
(Customizable features: P.521)
Caution
Air conditioning system
Air conditioning system
lubricant type
Requires registered tech-
nician to service air con-
ditioning system
Flammable refrigerant
WARNING
■To prevent the windshield
from fogging up
Do not use the windshield defog-
ger switch during cool air opera-
tion in extremely humid weather.
The difference between the tem-
perature of the outside air and
that of the windshield can cause
the outer surface of the wind-
shield to fog up, blocking your
vision.
■When the outside rear view
mirror defoggers are operat-
ing (if equipped)
Do not touch the rear view mirror
surfaces when the outside rear
view mirror def oggers are on.
NOTICE
■To prevent battery discharge
Do not leave the air conditioning
system on longer than necessary
when the engine is off.
■When repairing/replacing
parts of the air conditioning
system
Have repair/replacement per-
formed by your To yota dealer.
When a part of the air condition-
ing system, such as the evapora-
tor, is to be repl aced, it must be
replaced with a new one.
Page 342 of 574
3425-1. Using the air conditioning system and defogger
1Press the “AUTO” switch.
The dehumidification function
begins to operate. Air outlets and
fan speed are automatically
adjusted according to the tempera-
ture setting and humidity.
2 Adjust the temperature set-
ting.
3 To stop the operation, press
the “OFF” switch.
If the fan speed setting or air
flow modes are operated, the
automatic mode indicator goes
off. However, automatic mode
for functions other than that
operated is maintained.
■Using automatic mode
Fan speed is adjusted automati-
cally according to the temperature
setting and the ambient conditions.
Therefore, the fan may stop for a
while until warm or cool air is ready
to flow immediately after the auto-
matic mode switch is pressed.
This function automatically con-
trols the air conditioning airflow
so that priority is given to the
front seats. Unnecessary air
conditioning is suppressed, con-
tributing to increased fuel effi-
ciency.
Front seat concentrated airflow
mode operates in the following
situations.
No passengers are detected
in the rear seats
The windshield defogger is
not operating
While operating, illumi-
nates.
■Manually turning front seat
concentrated airflow mode
on/off
In front seat concentrated air-
flow mode, directing airflow to
the front seats only and to all
seats can be switched via switch
operation. When the mode has
been switched manually, auto-
matic airflow control stops oper-
ating.
Press on the air condition-
ing operation panel and switch
the airflow.
Indicator illuminated: Airflow
to the front seats only
Indicator off: Airflow to all the
seats
■Operation of automatic airflow
control
●In order to maintain a comfortable
interior, airflow may be directed to
seats without passengers immedi-
ately after the engine is started
and at other times depending on
the outside temperature.
●After the engine is started, if pas-
sengers move around inside or
enter/exit the vehicle, the system
cannot accurately d etect the pres-
ence of passengers and auto-
matic airflow control will not
Using automatic mode
Front seat concentrated
airflow mode (S-FLOW)
Page 362 of 574
3625-4. Using the other interior features
charger will move toward it and
start charging. If the charging coil
inside a portable device moves
outside of the charge area,
charging will automatically stop.
If 2 or more porta ble devices are
placed on the charging tray, their
charging coils may not be prop-
erly detected and they may not
be charged.
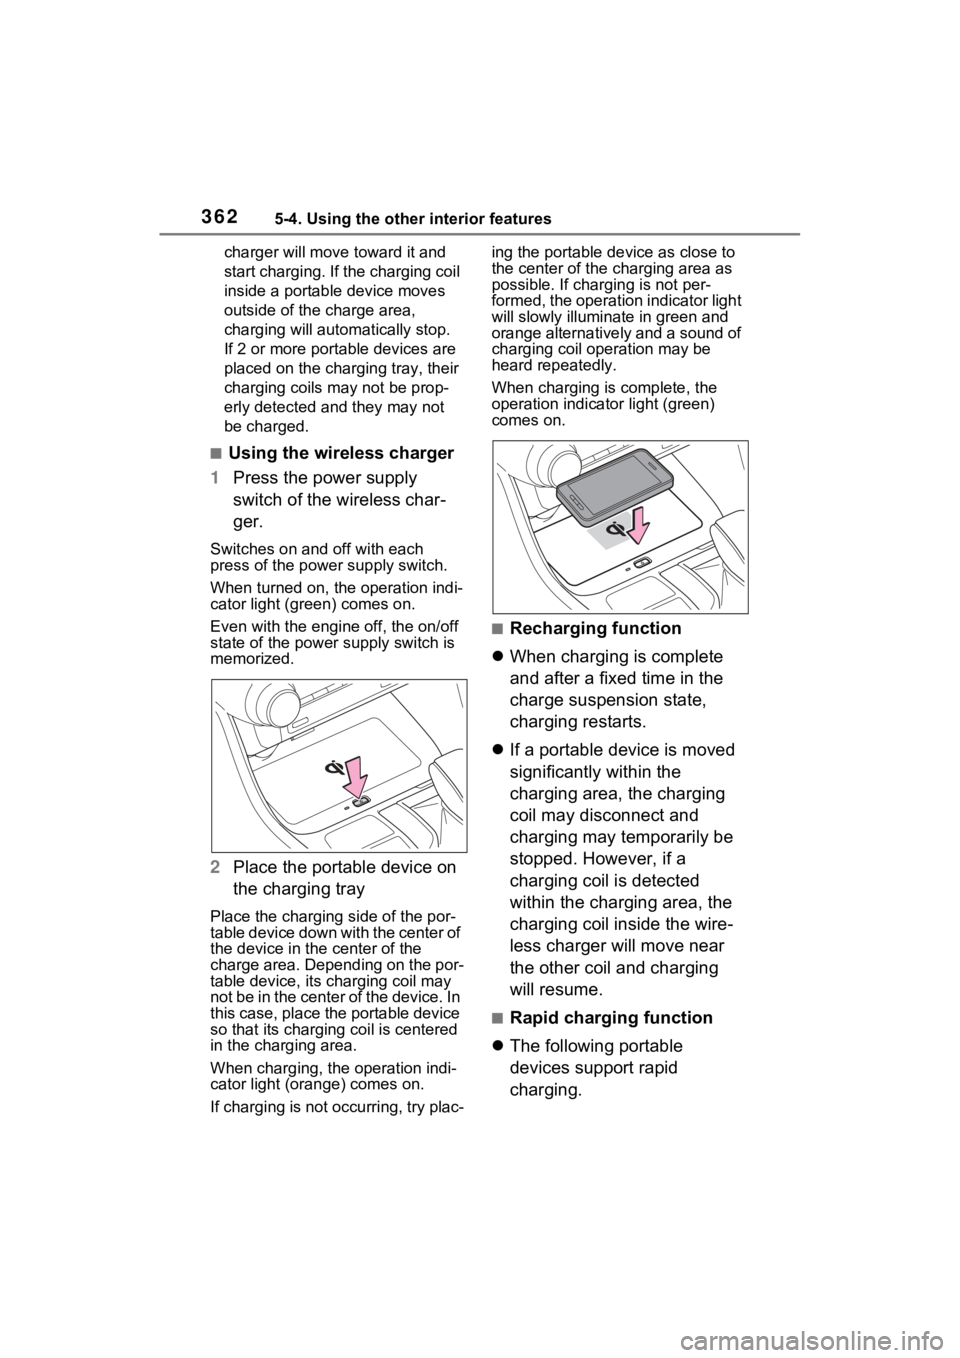
■Using the wireless charger
1 Press the power supply
switch of the wireless char-
ger.
Switches on and off with each
press of the power supply switch.
When turned on, the operation indi-
cator light (green) comes on.
Even with the engi ne off, the on/off
state of the power supply switch is
memorized.
2 Place the portable device on
the charging tray
Place the charging side of the por-
table device down with the center of
the device in the center of the
charge area. Depending on the por-
table device, its charging coil may
not be in the center of the device. In
this case, place the portable device
so that its chargi ng coil is centered
in the charging area.
When charging, the operation indi-
cator light (orange) comes on.
If charging is not occurring, try plac- ing the portable device as close to
the center of the charging area as
possible. If char
ging is not per-
formed, the operation indicator light
will slowly illuminate in green and
orange alternatively and a sound of
charging coil operation may be
heard repeatedly.
When charging is complete, the
operation indicator light (green)
comes on.
■Recharging function
When charging is complete
and after a fixed time in the
charge suspension state,
charging restarts.
If a portable device is moved
significantly within the
charging area, the charging
coil may disconnect and
charging may temporarily be
stopped. However, if a
charging coil is detected
within the charging area, the
charging coil inside the wire-
less charger will move near
the other coil and charging
will resume.
■Rapid charging function
The following portable
devices support rapid
charging.
Page 364 of 574
3645-4. Using the other interior features
Flashing repeatedly once
every second (Orange)
Repeatedly flashes 3 times
continuously (Orange)
Suspected
causesHandling method
Vehicle to char-
ger communica-
tion failure.
If the engine is
running, stop
and then restart
the engine. If the
engine switch is
in ACC, start the
engine.
( P.204)
Suspected
causesHandling method
Foreign sub-
stance detection:
A metallic for-
eign substance
is in the charge
area, and so the
abnormal heat-
ing prevention
function oper-
ated
Remove the for-
eign substance
from the charge
area.
Portable device
misaligned:
The charging coil
in the portable
device moved
outside of the
charge area, and
so the abnormal
heating preven-
tion function
operated
Remove the por-
table device from
the charging
tray, check that
the operation
indicator light
switches back to
green, and then
once again place
the device near
the center of the
charging tray. If
there is a case or
cover attached
to the portable
device, remove
it.
Page 365 of 574
3655-4. Using the other interior features
5
Interior features
Repeatedly flashes 4 times
continuously (Orange)
■The wireless charger can be
operated when
The engine switch is in ACC or ON.
■Usable portable devices
●Qi standard wireless charge stan-
dard can be used on compatible
devices. However, not all Qi stan-
dard devices and compatibility are
guaranteed.
●Starting with mobile phones and
smartphones, it is aimed for low
power electrically supplied porta-
ble devices of no more than 5W.
●However, chargin g exceeding 5 W
is supported by the following por-
table devices.
• Charging at 7.5 W or less is sup- ported by iPhone’s that support
7.5 W charging.
• Charging at 10 W or less is sup- ported by portable devices compli-
ant with EPP output as defined by
WPC standard Ver1.2.4.
■Using the smart key system
If the smart key system detects the
key while a device is being charged,
charging will be temporarily
stopped.
■When covers and accessories
are attached to portable devices
Do not charge in situations where cover and accessories not able to
handle Qi are attached to the porta-
ble device. Depending on the type
of cover (including the certain genu-
ine manufacture
parts) and acces-
sory, it may not be possible to
charge. When charging is not per-
formed even with the portable
device placed on the charge area,
remove the cover and accessories.
■While charging, noise enters
the AM radio
●Turn off the wireless charger and
confirm that the noise has
decreased. If the noise
decreases, continuously pushing
the power supply switch of the
wireless charger for 2 seconds,
the frequency of the charger can
be changed and the noise can be
reduced. Also, on that occasion,
the operation indicator light will
flash orange 2 times.
●iPhone’s use a particular fre-
quency for rapid charging.
Depending on the iOS version,
rapid charging may not be per-
formed while switching frequen-
cies.
■Important points of the wireless
charger
●If the electronic key cannot be
detected within the vehicle inte-
rior, charging c annot be done.
When the door is opened and
closed, charging may be tempo-
rarily suspended.
●When charging, the wireless
charging device and portable
device will get warmer, however
this is not a malfunction.
When a portable device gets
warm while char ging, charging
may stop due to the protection
function on the portable device
side. In this case, when the tem-
perature of the portable device
drops significantly, charge again.
The fan may start operating to lower
the temperature inside the wireless
charger, however this is not a mal-
Suspected causesHandling method
Safety shut-
down resulting
when the tem-
perature within
the wireless
charger
exceeded the set
valueStop charging,
remove the por-
table device from
the charging
tray, wait for the
temperature to
drop, and then
start charging
again.
Page 374 of 574
3745-4. Using the other interior features
if the garage door opener
motor is trained to
HomeLink
®, both garage
door operation indicators will
flash rapidly (green) and the
light on the garage door
opener motor will blink twice,
indicating that 2-way commu-
nication is enabled.
If the indicators do not flash, per-
form 2 and 3 within the first 10
presses of the HomeLink
® button
after programming has been com-
pleted.
2 Press a programmed
HomeLink
® button to oper-
ate a garage door.
3 Within 1 minute of pressing
the HomeLink
® button, after
the garage door operation
has stopped, press the
“Learn” or “Smart” button on
the garage door opener
motor. Within 5 seconds of
the establishment of 2-way
communication with the
garage door opener, both
garage door operation indica-
tors in the vehicle will flash
rapidly (green) and the light
on the garage door opener
motor will blink twice, indicat-
ing that 2-way communica-
tion is enabled.
■Reprogramming a single
HomeLink
® button
When the following procedure is
performed, buttons which
already have devices registered to them can be overwritten:
1
Press and hold the desired
HomeLink
® button.
2 When the HomeLink
® indica-
tor starts flashing orange,
release the HomeLink
® but-
ton and perform “Program-
ming HomeLink
®” 1 (it takes
20 seconds for the
HomeLink
® indicator to start
flashing).
■Before programming
●Install a new battery in the trans-
mitter.
●The battery side of the transmitter
must be pointed away from the
HomeLink
® buttons.
Press the appropriate
HomeLink® button. The
HomeLink® indicator light
should turn on.
The status of the opening and
closing of a garage door is
shown by the garage door oper-
ation indicators.
Operating HomeLink®
Page 408 of 574
4106-3. Do-it-yourself maintenance
■The tire pressure warning
system must be initialized
in the following circum-
stances:
When rotating the tires.
When changing the tire.
After registering the ID codes.
( P.413)
When the tire pressure warning
system is initialized, the current
tire inflation pressure is set as
the benchmark pressure.
■How to initialize the tire
pressure warning system
(with 7-inch display)
1 Park the vehicle in a safe
place and stop the engine for
20 minutes or more.
Initialization cannot be performed
while the vehicle is moving.
2Adjust the tire inflation pres-
sure to the specified cold tire
inflation pressure level.
( P.492)
Make sure to adjust the tire pres-
sure to the specifie d cold tire infla-
tion pressure level. The tire
pressure warning system will oper-
ate based on this pressure level.
3Start the engine.
4 Press or of the meter
control switches on the steer-
ing wheel and select .
5 Press or of the meter
control switches, select
“Vehicle Settings” and then
press and hold .
6 Press or of the meter
control switches, select
“TPWS” and then press .
7 Press or of the meter
control switches, select the
NOTICE
■Repairing or replacing tires,
wheels, tire pressure warn-
ing valves, transmitters and
tire valve caps
●When removing or fitting the
wheels, tires or the tire pressure
warning valves and transmit-
ters, contact your Toyota dealer
as the tire pr essure warning
valves and transmitters may be
damaged if not handled cor-
rectly.
●Make sure to install the tire
valve caps. If the tire valve caps
are not installed, water could
enter the tire pressure warning
valves and the tire pressure
warning valves could be bound.
●When replacing ti re valve caps,
do not use tire valve caps other
than those specified.
The cap may become stuck.
■To avoid damage to the tire
pressure warning valves and
transmitters
When a tire is repaired with liquid
sealants, the tire pressure warn-
ing valve and transmitter may not
operate properly. If a liquid seal-
ant is used, conta ct your Toyota
dealer as soon as possible. After
use of liquid sealant, make sure to
replace the tire pressure warning
valve and transmitter when repair-
ing or replacing the tire. ( P.409)
Initializing the tire pres-
sure warning system (if
equipped)
Page 409 of 574
4116-3. Do-it-yourself maintenance
6
Maintenance and care
“Set Pressure”. Then press
and hold .
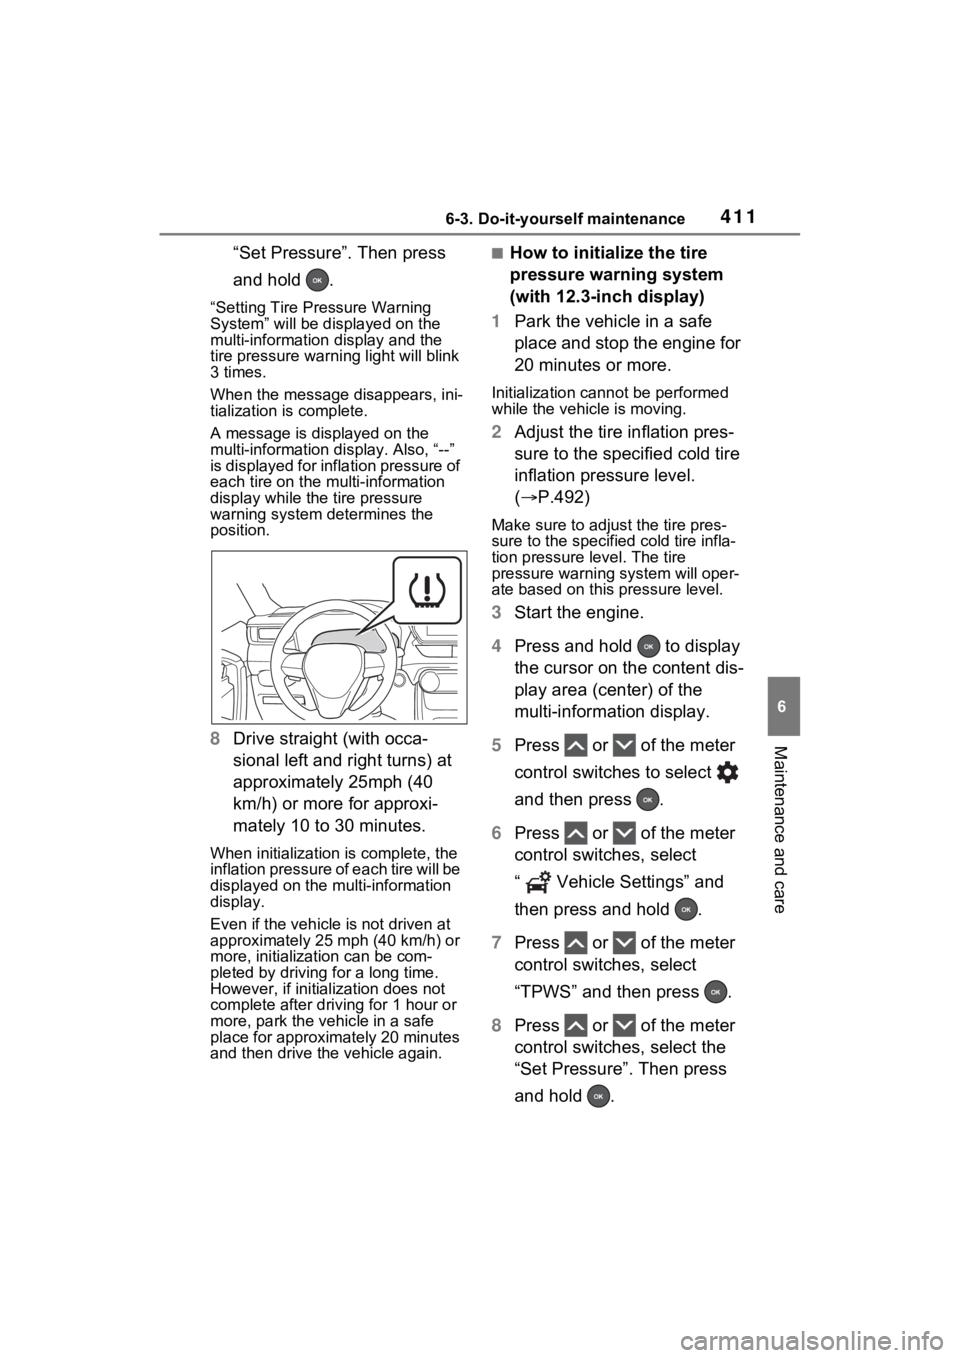
“Setting Tire Pressure Warning
System” will be displayed on the
multi-information display and the
tire pressure warni ng light will blink
3 times.
When the message disappears, ini-
tialization is complete.
A message is displayed on the
multi-information di splay. Also, “--”
is displayed for inflation pressure of
each tire on the multi-information
display while the tire pressure
warning system determines the
position.
8 Drive straight (with occa-
sional left and right turns) at
approximately 25mph (40
km/h) or more for approxi-
mately 10 to 30 minutes.
When initialization is complete, the
inflation pressure of each tire will be
displayed on the multi-information
display.
Even if the vehicle is not driven at
approximately 25 mph (40 km/h) or
more, initializat ion can be com-
pleted by driving for a long time.
However, if initia lization does not
complete after driving for 1 hour or
more, park the vehicle in a safe
place for approximately 20 minutes
and then drive th e vehicle again.
■How to initialize the tire
pressure warning system
(with 12.3-inch display)
1 Park the vehicle in a safe
place and stop the engine for
20 minutes or more.
Initialization cannot be performed
while the vehicle is moving.
2Adjust the tire inflation pres-
sure to the specified cold tire
inflation pressure level.
( P.492)
Make sure to adjust the tire pres-
sure to the specifie d cold tire infla-
tion pressure level. The tire
pressure warning system will oper-
ate based on this pressure level.
3Start the engine.
4 Press and hold to display
the cursor on the content dis-
play area (center) of the
multi-information display.
5 Press or of the meter
control switches to select
and then press .
6 Press or of the meter
control switches, select
“ Vehicle Settings” and
then press and hold .
7 Press or of the meter
control switches, select
“TPWS” and then press .
8 Press or of the meter
control switches, select the
“Set Pressure”. Then press
and hold .
Page 422 of 574
4246-3. Do-it-yourself maintenance
install them to the replace-
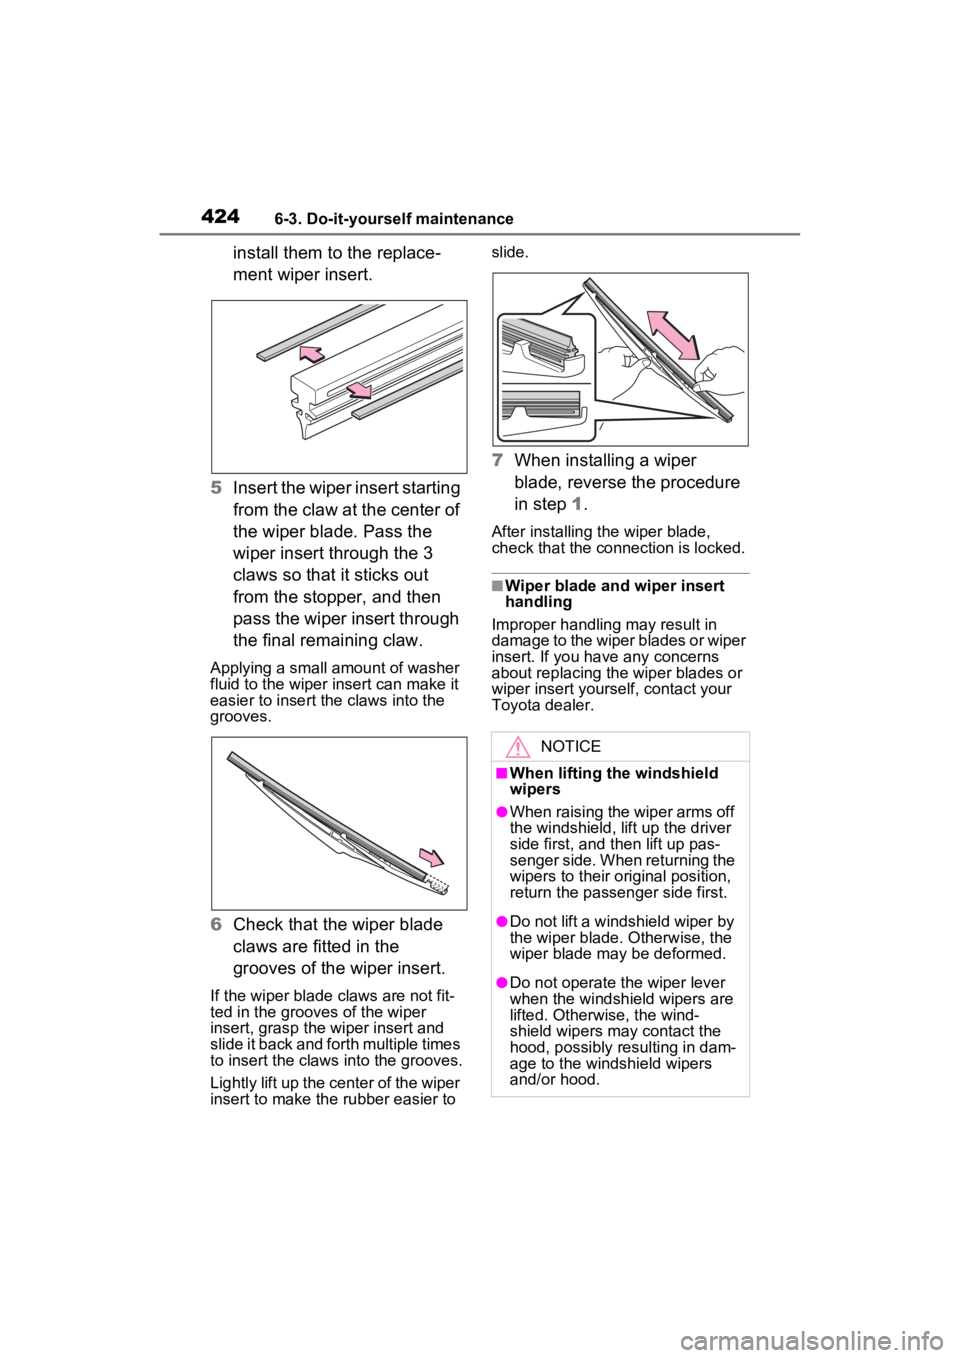
ment wiper insert.
5 Insert the wiper insert starting
from the claw at the center of
the wiper blade. Pass the
wiper insert through the 3
claws so that it sticks out
from the stopper, and then
pass the wiper insert through
the final remaining claw.
Applying a small amount of washer
fluid to the wiper insert can make it
easier to insert the claws into the
grooves.
6Check that the wiper blade
claws are fitted in the
grooves of the wiper insert.
If the wiper blade claws are not fit-
ted in the grooves of the wiper
insert, grasp the wiper insert and
slide it back and fo rth multiple times
to insert the claws into the grooves.
Lightly lift up the center of the wiper
insert to make the rubber easier to slide.
7
When installing a wiper
blade, reverse the procedure
in step 1.
After installing the wiper blade,
check that the connection is locked.
■Wiper blade and wiper insert
handling
Improper handling may result in
damage to the wiper blades or wiper
insert. If you have any concerns
about replacing the wiper blades or
wiper insert yourself, contact your
Toyota dealer.
NOTICE
■When lifting the windshield
wipers
●When raising the wiper arms off
the windshield, lift up the driver
side first, and then lift up pas-
senger side. When returning the
wipers to their original position,
return the passenger side first.
●Do not lift a windshield wiper by
the wiper blade. Otherwise, the
wiper blade may be deformed.
●Do not operate the wiper lever
when the windshield wipers are
lifted. Otherwise, the wind-
shield wipers may contact the
hood, possibly resulting in dam-
age to the windshield wipers
and/or hood.
Page 437 of 574
439
7
7
When trouble arises
When trouble arises
7-1. Essential informationEmergency flashers .... 440
If your vehicle has to be stopped in an emergency.................................. 440
If the vehicle is submerged or water on the road is ris-
ing ............................. 441
7-2. Steps to take in an emer- gency
If your vehicle needs to be towed......................... 443
If you think something is wrong ........................ 447
Fuel pump shut off system .................................. 448
If a warning light turns on or a warning buzzer sounds.................................. 449
If a warning message is dis- played........................ 459
If you have a flat tire.... 463
If the engine will not start .................................. 472
If you lose your keys ... 474
If the electronic key does not operate properly (vehi-
cles with smart key sys-
tem) ........................... 474
If the vehicle battery is dis- charged ..................... 476
If your vehicle overheats .................................. 480If the vehicle becomes
stuck .......................... 482