engine coolant TOYOTA RAV4 2023 Owners Manual
[x] Cancel search | Manufacturer: TOYOTA, Model Year: 2023, Model line: RAV4, Model: TOYOTA RAV4 2023Pages: 574, PDF Size: 17.31 MB
Page 79 of 574
792-1. Instrument cluster
2
Vehicle status information and indicators
*1: These lights turn on when the
engine switch is turned to ON to
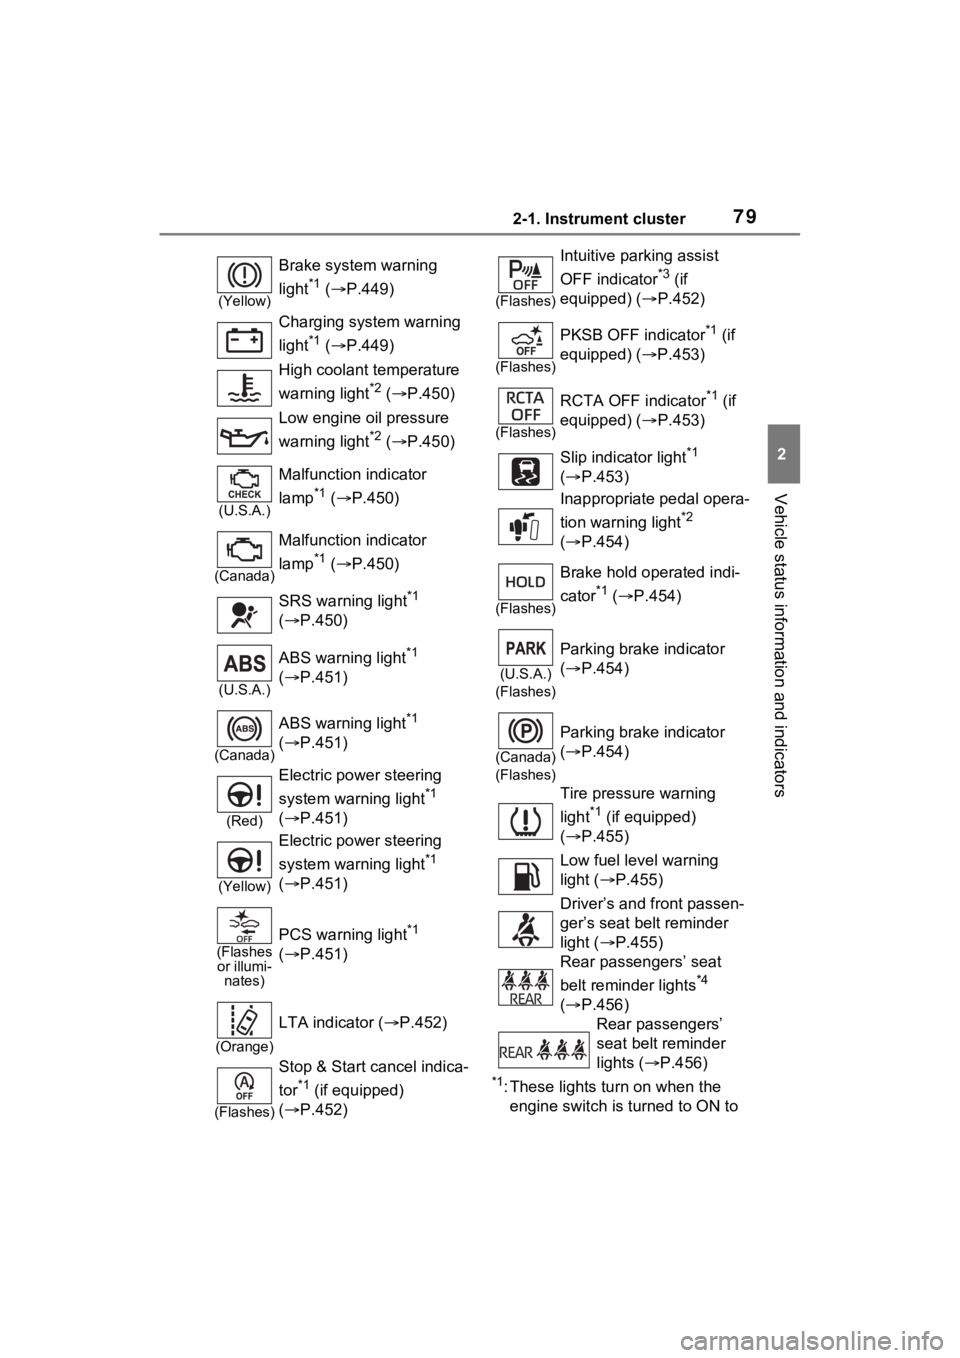
(Yellow)
Brake system warning
light
*1 ( P.449)
Charging system warning
light
*1 ( P.449)
High coolant temperature
warning light
*2 ( P.450)
Low engine oil pressure
warning light
*2 ( P.450)
(U.S.A.)
Malfunction indicator
lamp
*1 ( P.450)
(Canada)
Malfunction indicator
lamp
*1 ( P.450)
SRS warning light
*1
( P.450)
(U.S.A.)
ABS warning light*1
( P.451)
(Canada)
ABS warning light*1
( P.451)
(Red)
Electric power steering
system warning light
*1
( P.451)
(Yellow)
Electric power steering
system warning light
*1
( P.451)
(Flashes
or illumi- nates)
PCS warning light*1
( P.451)
(Orange)
LTA indicator ( P.452)
(Flashes)
Stop & Start cancel indica-
tor
*1 (if equipped)
( P.452)
(Flashes)
Intuitive parking assist
OFF indicator
*3 (if
equipped) ( P.452)
(Flashes)
PKSB OFF indicator*1 (if
equipped) ( P.453)
(Flashes)
RCTA OFF indicator*1 (if
equipped) ( P.453)
Slip indicator light
*1
( P.453)
Inappropriate pedal opera-
tion warning light
*2
( P.454)
(Flashes)
Brake hold operated indi-
cator
*1 ( P.454)
(U.S.A.)
(Flashes)
Parking brake indicator
( P.454)
(Canada)
(Flashes)
Parking brake indicator
( P.454)
Tire pressure warning
light
*1 (if equipped)
( P.455)
Low fuel level warning
light ( P.455)
Driver’s and front passen-
ger’s seat belt reminder
light ( P.455)
Rear passengers’ seat
belt reminder lights
*4
( P.456)
Rear passengers’
seat belt reminder
lights ( P.456)
Page 84 of 574
842-1. Instrument cluster
• A small amount of fuel is added.
• Fuel is added with the fuel gauge near or at “F”.
• The vehicle is stopped on an uneven surface, such as a slope.
• The vehicle is driven on a slope or around a curve.
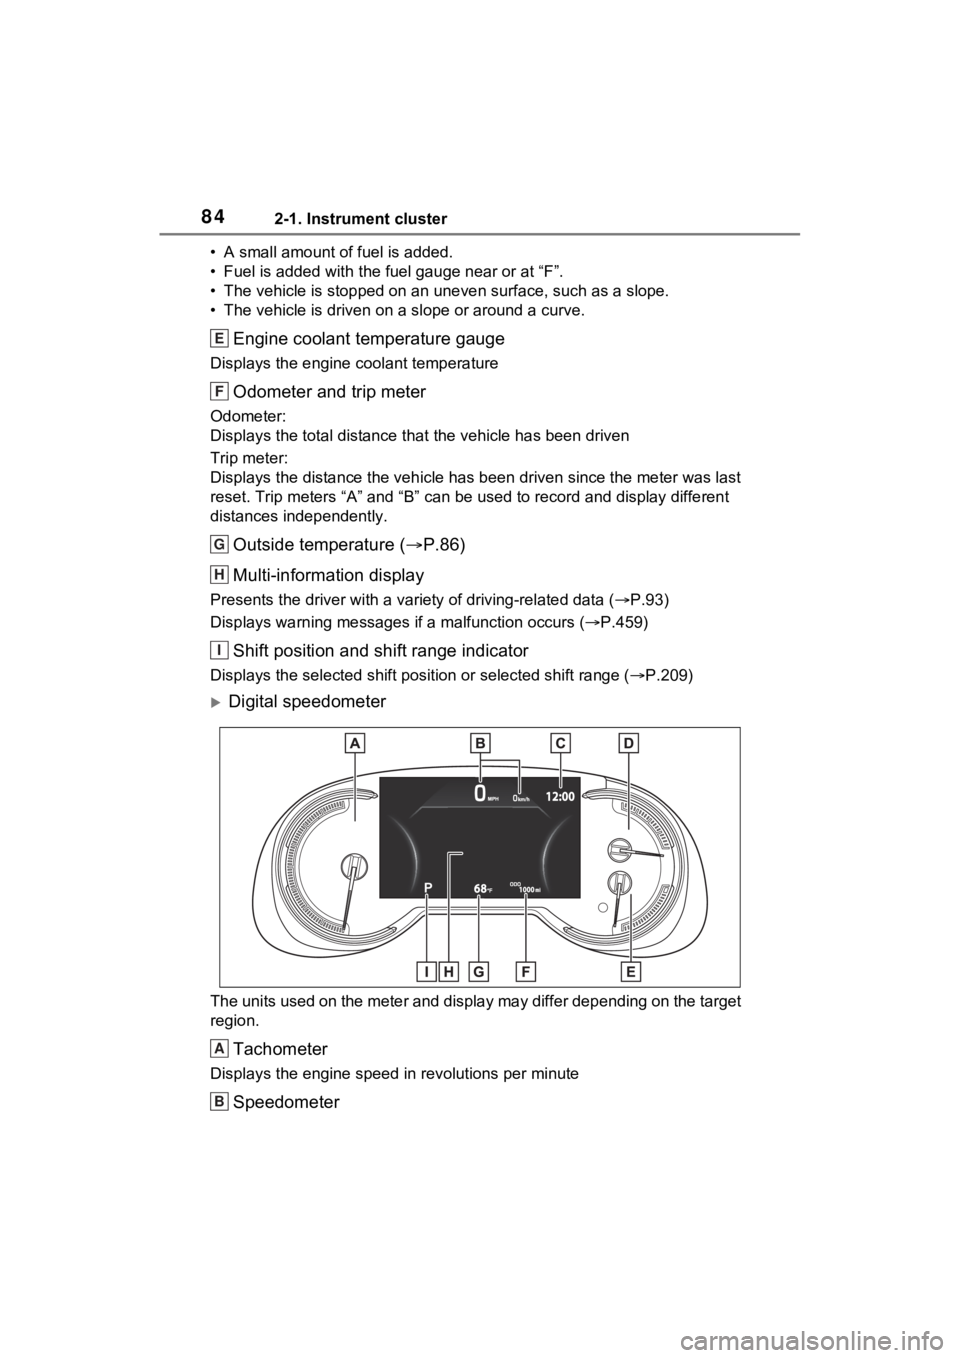
Engine coolant temperature gauge
Displays the engine coolant temperature
Odometer and trip meter
Odometer:
Displays the total distance th at the vehicle has been driven
Trip meter:
Displays the distance the vehicle has been driven since the meter was last
reset. Trip meters “A” and “B” c an be used to record and display different
distances independently.
Outside temperature ( P.86)
Multi-information display
Presents the driver with a variety of driving-related data ( P.93)
Displays warning messages if a malfunction occurs (P.459)
Shift position and shift range indicator
Displays the selected shift posit ion or selected shift range (P.209)
Digital speedometer
The units used on the meter and display may differ depending on the target
region.
Tachometer
Displays the engine speed in revolutions per minute
Speedometer
E
F
G
H
I
A
B
Page 85 of 574

852-1. Instrument cluster
2
Vehicle status information and indicators
Displays the vehicle speed
Clock
Automatically adjusts the time by using the GPS time information (GPS
clock).
For details, refer to “MULTIMEDIA OWNER’S MANUAL”.
Fuel gauge
Displays the quantity of fu el remaining in the tank.
In the following sit uations, the actual quantity of fuel remain ing in the tank
may not be displayed correctly. Refer to P.85 if the actual quantity of fuel
remaining in the tank is not displayed correctly.
• A small amount of fuel is added.
• Fuel is added with the fuel gauge near or at “F”.
• The vehicle is stopp ed on an uneven surface, such as a slope.
• The vehicle is driven on a slope or around a curve.
Engine coolant temperature gauge
Displays the engine coolant temperature
Odometer and trip meter
Odometer:
Displays the total distance th at the vehicle has been driven
Trip meter:
Displays the distance the vehicle has been driven since the meter was last
reset. Trip meters “A” and “B” c an be used to record and display different
distances independently.
Outside temperature ( P.86)
Multi-information display
Presents the driver with a variety of driving-related data ( P.93)
Displays warning messages if a malfunction occurs (P.459)
Shift position and shift range indicator
Displays the selected shift posit ion or selected shift range (P.209)
■The meters and display illumi-
nate when
The engine switch is in ON.
■When changing driving mode
●Speedometer color is changed fol-
lowing the select ed driving mode.
( P.310)
●AWD models: Speedometer color
is changed following the selected driving mode or
Multi-terrain
Select mode. ( P.310, 312)
■Manually updating the fuel
gauge and possible driving
range
The fuel gauge and the possible
driving range are linked. If the dis-
plays of the fuel gauge and possible
driving range do n ot update after
adding a small amount of fuel, the
displays can be updated by per-
C
D
E
F
G
H
I
Page 86 of 574
862-1. Instrument cluster
forming the following procedure.
1Stop the vehicle on a level sur-
face.
2 Press the “ODO TRIP” switch to
change the odometer and trip
meter display to odometer.
3 Turn the engine switch off.
4 While pressing and holding the
“ODO TRIP” switch, turn the
engine switch to ON.
5 Continue to hold the “ODO TRIP”
switch for approximately 5 sec-
onds, and then release it once
the odometer begins flashing.
Updating is complete once the
odometer flashes for approximately
5 seconds and th en the display
returns to normal.
■Outside temperature display
●In the following si tuations, the cor-
rect outside tempe rature may not
be displayed, or the display may
take longer than normal to
change.
• When stopped, or driving at low
speeds (less than 12 mph [20
km/h])
• When the outside temperature
has changed suddenly (at the
entrance/exit of a garage, tunnel,
etc.)
●When “--” or “E” is displayed, the
system may be malfunctioning.
Take your vehicle to your Toyota
dealer.
●Displays the outside temperature
within the range of -40°F (-40°C)
to 122°F (50°C).
●When the outside temperature is
approximately 37°F (3°C) or
lower, the indicator will flash
for approximately 10 seconds,
then stay on.
■Liquid crystal display
P.94
■Customization
Settings (e. g. meter display) can be changed on the screen of the
multi-informat
ion display. (P.98)
Switches the items of the odom-
eter, trip meter A and trip meter
B by pressing the “ODO TRIP”
WARNING
■The information display at
low temperatures
Allow the interior of the vehicle to
warm up before using the liquid
crystal information display. At
extremely low temperatures, the
display monitor may respond
slowly, and display changes may
be delayed.
For example, there is a lag
between the driver’s shifting and
the new gear number appearing
on the display. This lag could
cause the driver to downshift
again, causing rapid and exces-
sive engine braking and possibly
an accident resulting in death or
injury.
NOTICE
■To prevent damage to the
engine and its components
●Do not let the indicator needle
of the tachometer enter the red
zone, which indicates the maxi-
mum engine speed.
●The engine may be overheating
if the engine coolant tempera-
ture gauge is in the red zone
(“H”). In this case, immediately
stop the vehicle in a safe place,
and check the engine after it
has cooled completely.
( P.480)
Using the “ODO TRIP”
switch
Page 89 of 574

892-1. Instrument cluster
2
Vehicle status information and indicators
Digital speedometer
Displays the vehicle speed
Shift position and shift range
Displays the selected shift position or selected shift range (P.209)
Clock
Automatically adjusts the time by using the GPS time informatio n (GPS
clock).
For details, refer to “MULTIMEDIA OWNER’S MANUAL”.
Widget (Audio system-linked display)
Displays selection of an audio source or track on the meter. ( P.106)
If contents list is displayed on t he multi-information display, widget will not
be displayed. ( P.104)
Distance to empty
Displays driving range with remaining fuel. ( P.91)
Fuel gauge
Displays the quantity of fu el remaining in the tank.
In the following sit uations, the actual quantity of fuel remain ing in the tank
may not be displayed correctly. Refer to P.91 if the actual quantity of fuel
remaining in the tank is not displayed correctly.
• A small amount of fuel is added.
• Fuel is added with the fuel gauge near or at “F”.
• The vehicle is stopp ed on an uneven surface, such as a slope.
• The vehicle is driven on a slope or around a curve.
Widget (Fuel Economy)
Displays fuel economy information. ( P.105)
If contents list is displayed on t he multi-information display, widget will not
be displayed. ( P.104)
Engine coolant temperature gauge
Displays the engine c oolant temperature
Odometer and trip meter display ( P.92)
D
E
F
G
H
I
J
K
L
Page 91 of 574

912-1. Instrument cluster
2
Vehicle status information and indicators
• A small amount of fuel is added.
• Fuel is added with the fuel gauge near or at “F”.
• The vehicle is stopped on an uneven surface, such as a slope.
• The vehicle is driven on a slope or around a curve.
Engine coolant temperature gauge
Displays the engine coolant temperature
Odometer and trip meter display ( P.92)
■The meters and display illumi-
nate when
The engine switch is in ON.
■Distance to empty
●This distance is computed based
on your averag e fuel consump-
tion. As a result, the actual dis-
tance that can be driven may
differ from tha t displayed.
●When only a small amount of fuel
is added to the tank, the display
may not be updated. When refuel-
ing, turn the engine switch off. If
the vehicle is refueled without
turning the engi ne switch off, the
display may not be updated.
●When “Refuel” is displayed, the
remaining fuel amount is low and
the distance that can be driven
with the remaining fuel cannot be
calculated. Refuel immediately.
■Manually updating the fuel
gauge and possible driving
range
The fuel gauge and the possible
driving range are linked. If the dis-
plays of the fuel gauge and possible
driving range do not update after
adding a small amount of fuel, the
displays can be u pdated by per-
forming the following procedure.
1 Stop the vehicle on a level sur-
face.
2 Press the “ODO TRIP” switch to
change the odometer and trip
meter display to odometer.
3 Turn the engine switch off. 4
While pressing and holding the
“ODO TRIP” switch, turn the
engine switch to ON.
5 Continue to hold the “ODO TRIP”
switch for appro ximately 5 sec-
onds, and then release it once
the odometer begins flashing.
Updating is complete once the
odometer flashes for approximately
5 seconds and then the display
returns to normal.
■Outside temperature display
●Displays the outsi de temperature
within the range of -40°F (-40°C)
to 122°F (50°C).
●When the outside temperature is
approximately 37°F (3°C) or
lower, the indicator will flash
for approximately 10 seconds,
then stay on.
●In the following sit uations, the cor-
rect outside temperature may not
be displayed, or the display may
take longer than normal to
change:
• When stopped, or driving at low
speeds (less than 12 mph [20
km/h])
• When the outside temperature has changed suddenly (at the
entrance/exit of a garage, tunnel,
etc.)
●When “--” or “E” i s displayed, the
system may be malfunctioning.
Take your vehicle to your Toyota
dealer.
J
K
Page 92 of 574
922-1. Instrument cluster
■Free/Open Source Software
Information
This product contains Free/Open
Source Software (FOSS). The
license information and/or the
source code of such FOSS can be
found at the following URL.
https://www.denso.com/global/en/
opens ource/meter/toyota/
■Liquid crystal display
P.103
■Customization
The gauges and meters can be cus-
tomized on of the multi-informa-
tion display. ( P.509)
■Display items
Odometer
Displays the total distance the vehi-
cle has been driven.
Trip meter A/trip meter B
Displays the distance the vehicle
has been driven since the meter
was last reset. Trip meters A and B
can be used to record and display
different distances independently.
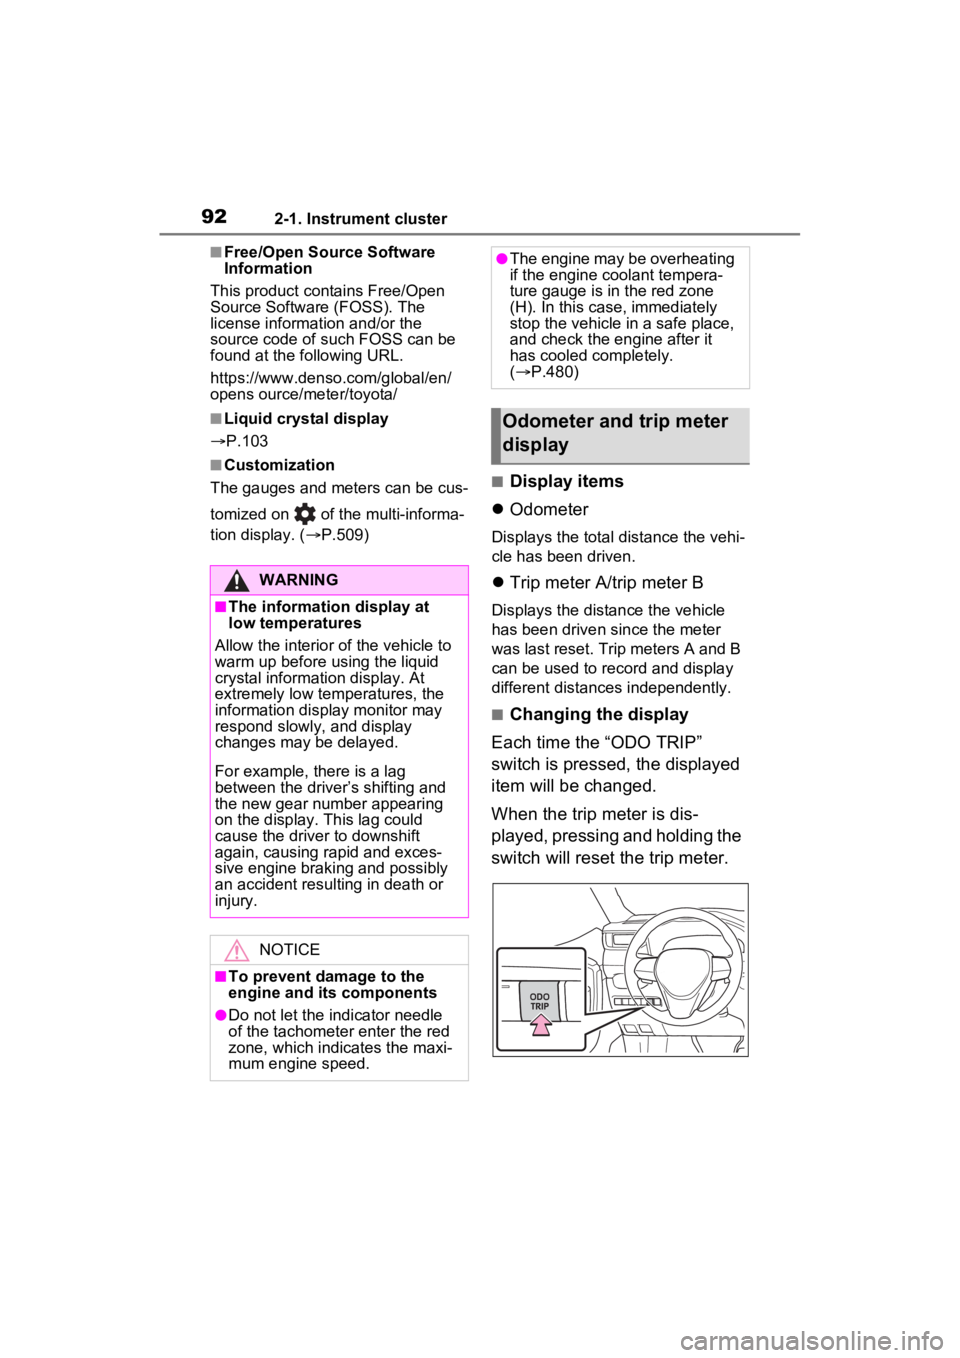
■Changing the display
Each time the “ODO TRIP”
switch is pressed, the displayed
item will be changed.
When the trip meter is dis-
played, pressing and holding the
switch will reset the trip meter.
WARNING
■The information display at
low temperatures
Allow the interior of the vehicle to
warm up before u sing the liquid
crystal informat ion display. At
extremely low temperatures, the
information display monitor may
respond slowly, and display
changes may be delayed.
For example, there is a lag
between the driver’s shifting and
the new gear number appearing
on the display. This lag could
cause the driver to downshift
again, causing rapid and exces-
sive engine braking and possibly
an accident resulting in death or
injury.
NOTICE
■To prevent damage to the
engine and its components
●Do not let the i ndicator needle
of the tachomete r enter the red
zone, which indicates the maxi-
mum engine speed.
●The engine may be overheating
if the engine coolant tempera-
ture gauge is in the red zone
(H). In this case, immediately
stop the vehicle in a safe place,
and check the engine after it
has cooled completely.
( P.480)
Odometer and trip meter
display
Page 199 of 574

1994-1. Before driving
4
Driving
vehicle control. This is espe-
cially true on wet or slippery
surfaces.
Avoid jerky starts or sudden
acceleration.
Avoid jerky steering and
sharp turns, and slow down
before making turn.
Note that when making a turn,
the trailer wheels will be
closer than the vehicle wheels
to the inside of the turn. Com-
pensate by making a wider
than normal turning radius.
Slow down before making a
turn, in cross winds, on wet or
slippery surfaces, etc.
Increasing vehicle speed can
destabilize the trailer.
Take care when passing other
vehicles. Passing requires
considerable distance. After
passing a vehicle, do not for-
get the length of your trailer,
and be sure you have plenty
of room before changing
lanes.
To maintain engine braking
efficiency and charging sys-
tem performance when using
engine braking, do not put the
transmission in D. If in the S
mode, the transmission shift
range position must be in 6 or
lower.
Instability happens more fre-
quently when descending
steep or long downhill grades. Before descending, slow
down and downshift. Do not
make sudden downshifts
while descending steep or
long downhill grades.
Avoid holding the brake pedal
down too long or applying the
brakes too frequently. This
could cause the brakes to
overheat and result in
reduced braking efficiency.
Due to the added load of the
trailer, your vehicle’s engine
may overheat on hot days (at
temperatures over 85°F
[30°C]) when driving up a long
or steep grade. If the engine
coolant temperature gauge
indicates overheating, imme-
diately turn off the air condi-
tioning (if in use), pull your
vehicle off the road and stop
in a safe spot. ( P.480)
Always place wheel blocks
under both the vehicle’s and
the trailer’s wheels when
parking. Apply the parking
brake firmly, and put the
transmission in P. Avoid park-
ing on a slope, but if unavoid-
able, do so only after
performing the following:
1 Apply the brakes and keep
them applied.
2 Have someone place wheel
blocks under both the vehi-
cle’s and trailer’s wheels.
Page 306 of 574

3064-5. Using the driving support systems
the vehicle is stopped by the
dynamic radar cruise control with
full-speed range when in vehicle-
to-vehicle distance control mode)
• The D shift position is selected.
• The driver’s seat belt is fastened.
• The driver’s door is closed.
• The selected driv ing mode is not
snow mode (AWD models).
• Mud & Sand or Rock & Dirt mode is not selected for Multi-terrain
Select (AWD models).
• The windshield defogger is off. (vehicles without a manual air
conditioning system)
• The accelerator pedal is not being depressed.
• The engine is adequately warmed
up.
• The outside temperature is 23°F (- 5°C) or higher.
• The hood is closed. ( P.307)
●In the following situations, the
engine may not be stopped by the
Stop & Start syste m. This is not a
malfunction of the Stop & Start
system.
• When the air conditioning system is being used.
• When the battery is undergoing a periodic recharge.
• When the battery is not sufficiently
charged, such as if the vehicle
has been parked for a long time
and the battery charge has
decreased, the e lectric load is
large, the battery fluid tempera-
ture is excessively low or the bat-
tery has deteriorated.
• When the brake booster vacuum is low.
• When the elapsed time since the engine was restarted is short.
• When the vehicle is stopped fre-
quently, such as when in a traffic
jam.
• When the engine coolant tem- perature or transmission fluid tem-
perature is extremely low or high.
• When the vehicle is stopped on a steep incline.
• When the steering wheel is being operated.
• When the vehicle is being driven in a high altitude area.
• When the battery fluid tempera- ture is extremely low or high.
• For a while after the battery termi- nals have been disconnected and
reconnected.
●When the engine is stopped by
the Stop & Star t system, the
engine will be restarted automati-
cally if any of the following condi-
tions are met:
(To enable the engine to be
stopped by the Stop & Start sys-
tem again, drive the vehicle.)
• The air conditioning system is turned on. (vehicles without a
manual air conditioning system)
• The windshield defogger is turned on. (vehicles without a manual air
conditioning system)
• The shift lever is shifted from D or P.
• The shift lever is shifted from P.
(When the engine is stopped by
the Stop & Start system when the
shift lever is in P.)
• The driver’s seat belt is unfas- tened.
• The driver’s door is opened.
• The driving mode is changed to
snow mode (AWD models).
• Mud & Sand or Rock & Dirt mode
is selected for Mult i-terrain Select
(AWD models).
• The Stop & Start cancel switch is
pressed.
• The steering wheel is operated.
• The accelerator pedal is depressed.
• The vehicle starts to roll on an incline.
●When the engine is stopped by
the Stop & Star t system, the
engine may restart automatically
in the following situations: (To
enable the engine to be stopped
by the Stop & Start system again,
drive the vehicle.)
• When the brake pedal is pumped
or strongly depressed.
• When the air conditioning system is being used.
• When a switch of the air condition-
Page 325 of 574
3254-6. Driving tips
4
Driving
4-6.Driving tips
Use fluids that are appropriate
to the prevailing outside tem-
peratures.
• Engine oil
• Engine coolant
• Washer fluid
Have a service technician
inspect the condition of the
battery.
Have the vehicle fitted with
four snow tires or purchase a
set of tire chains for the front
tires.
*
Ensure that all tires are the same
size and brand, and that chains
match the size of the tires.
*: Tire chains cannot be mounted
on vehicles with 235/55R19 tires.
Winter driving tips
Carry out the necessary
preparations and inspec-
tions before driving the
vehicle in winter. Always
drive the vehicle in a man-
ner appropriate to the pre-
vailing weather conditions.
Pre-winter preparations
WARNING
■Driving with snow tires
Observe the following precautions
to reduce the risk of accidents.
Failure to do so m ay result in a
loss of vehicle control and cause
death or serious injury.
●Use tires of the specified size.
●Maintain the recommended
level of air pressure.
●Do not drive in excess of 75
mph (120 km/h), regardless of
the type of snow tires being
used.
●Use snow tires on all, not just
some wheels.
■Driving with tire chains
(except 235/55R19 tires)
Observe the following precautions
to reduce the risk of accidents.
Failure to do so may result in the
vehicle being unable to be driven
safely, and may cause death or
serious injury.
●Do not drive in excess of the
speed limit specifi ed for the tire
chains being used, or 30 mph
(50 km/h), whichever is lower.
●Avoid driving on bumpy road
surfaces or over potholes.
●Avoid sudden acceleration,
abrupt steering, sudden brak-
ing and shifting operations that
cause sudden engine braking.
●Slow down sufficiently before
entering a curve to ensure that
vehicle control is maintained.
●Do not use LTA (Lane Tracing
Assist) system.
NOTICE
■Repairing or replacing snow
tires (vehicles with tire pres-
sure warning system)
Request repairs or replacement of
snow tires from your Toyota
dealer or legitimate tire retailers.
This is because the removal and
attachment of snow tires affects
the operation of the tire pressure
warning valves and transmitters.