steering wheel TOYOTA RAV4 EV 2012 1.G Navigation Manual
[x] Cancel search | Manufacturer: TOYOTA, Model Year: 2012, Model line: RAV4 EV, Model: TOYOTA RAV4 EV 2012 1.GPages: 296, PDF Size: 4.04 MB
Page 155 of 296
155
2. SETUP
4
PHONE
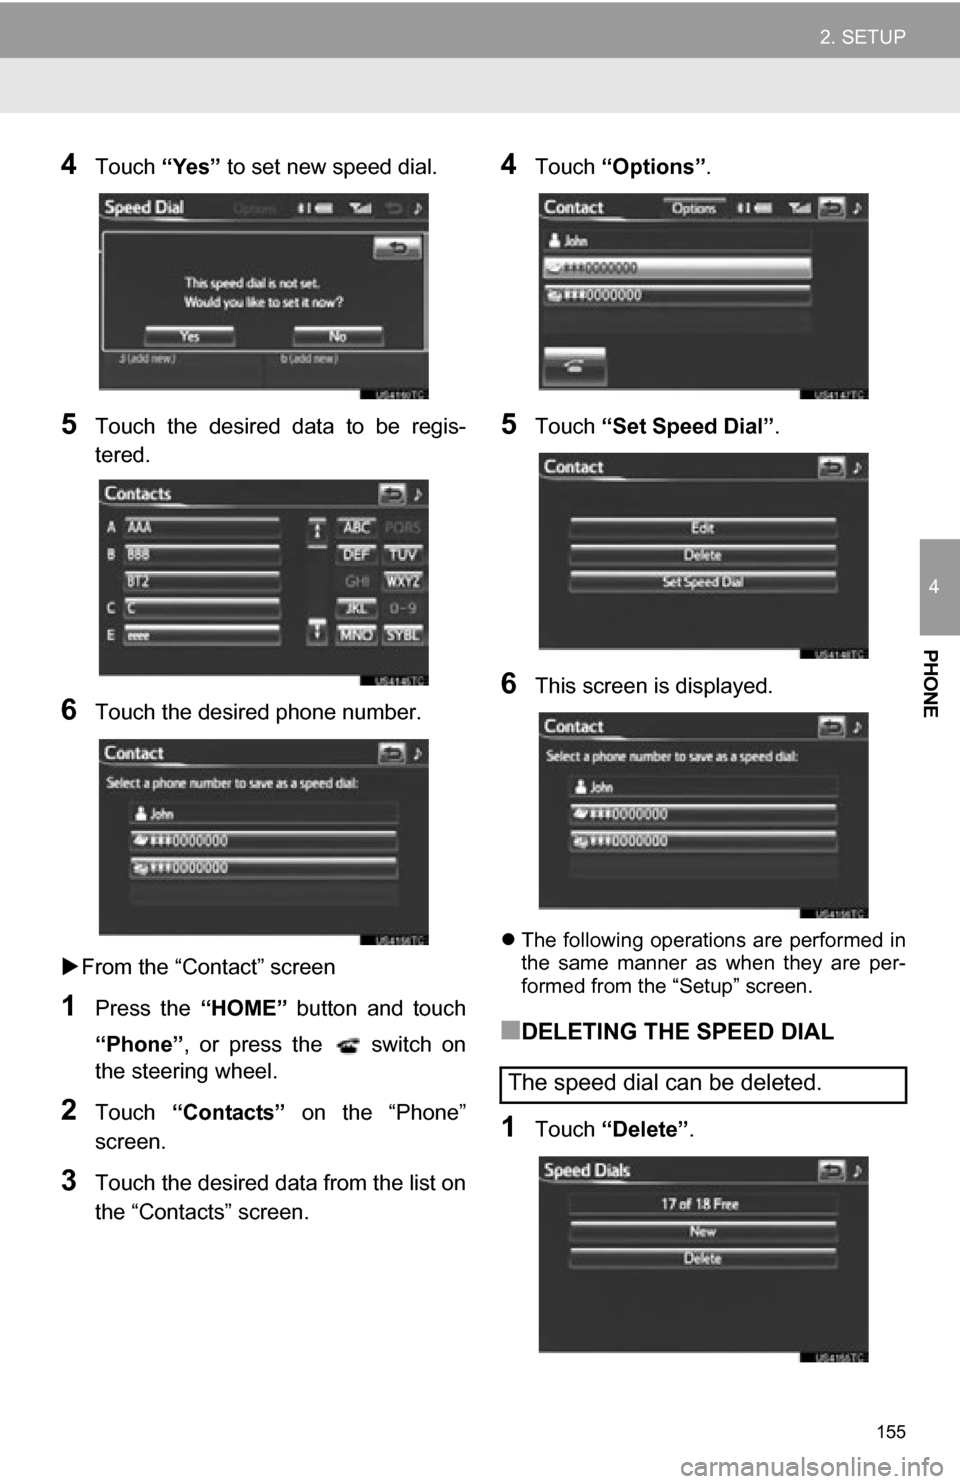
4Touch “Yes” to set new speed dial.
5Touch the desired data to be regis-
tered.
6Touch the desired phone number.
From the “Contact” screen
1Press the “HOME” button and touch
“Phone” , or press the switch on
the steering wheel.
2Touch “Contacts” on the “Phone”
screen.
3Touch the desired data from the list on
the “Contacts” screen.
4Touch “Options”.
5Touch “Set Speed Dial” .
6This screen is displayed.
The following operations are performed in
the same manner as when they are per-
formed from the “Setup” screen.
■DELETING THE SPEED DIAL
1Touch “Delete” .
The speed dial can be deleted.
Page 156 of 296
156
2. SETUP
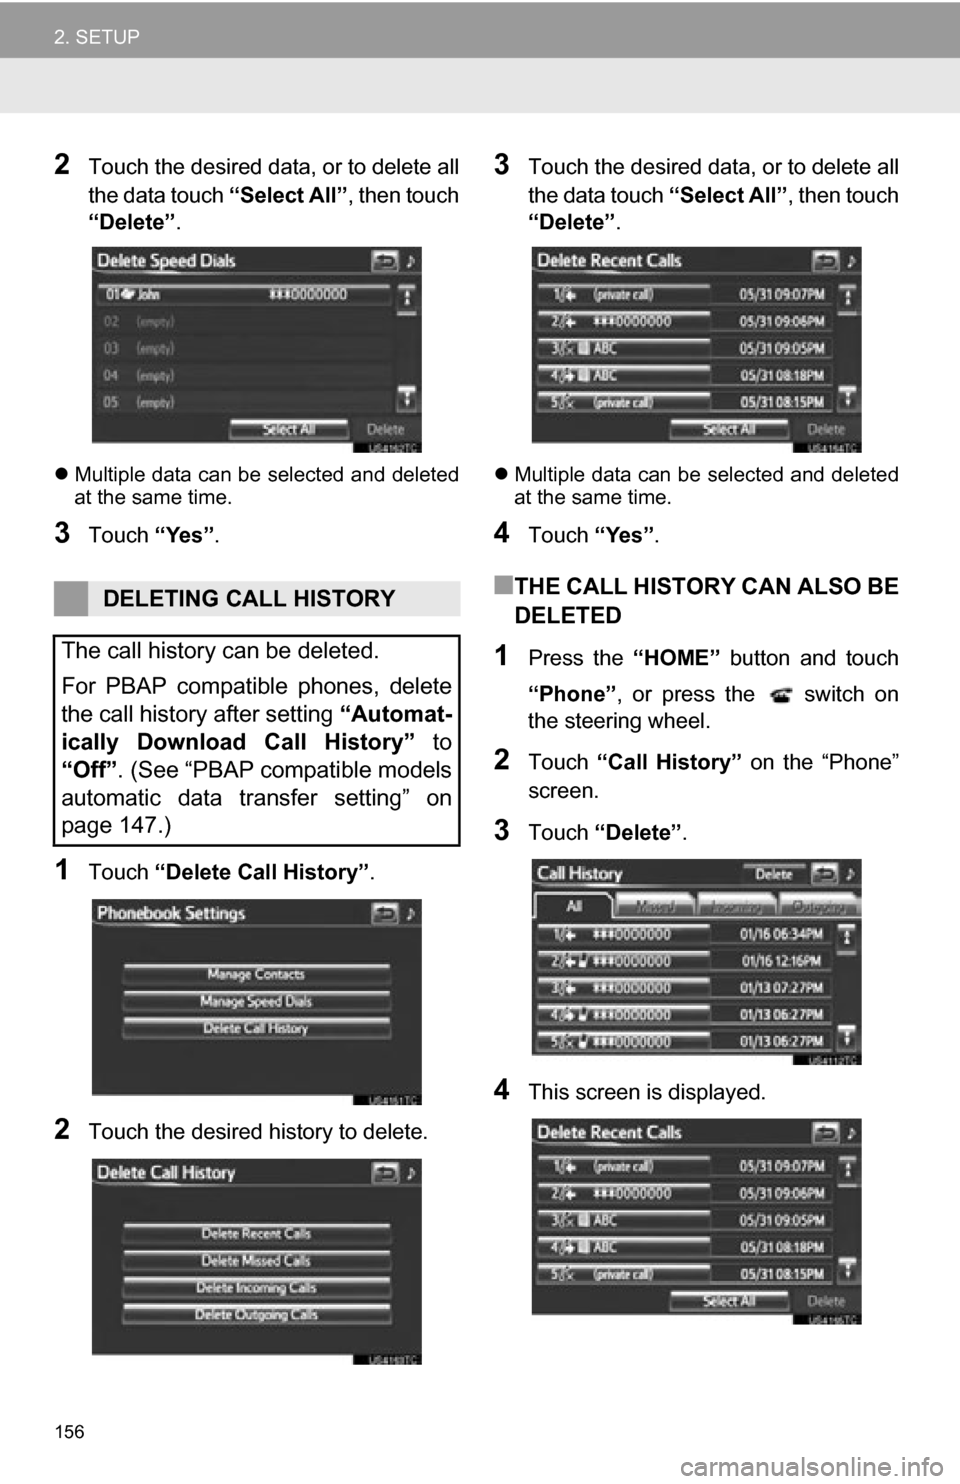
2Touch the desired data, or to delete all
the data touch “Select All”, then touch
“Delete” .
Multiple data can be selected and deleted
at the same time.
3Touch “Yes”.
1Touch “Delete Call History” .
2Touch the desired history to delete.
3Touch the desired data, or to delete all
the data touch “Select All”, then touch
“Delete” .
Multiple data can be selected and deleted
at the same time.
4Touch “Yes”.
■THE CALL HISTORY CAN ALSO BE
DELETED
1Press the “HOME” button and touch
“Phone” , or press the switch on
the steering wheel.
2Touch “Call History” on the “Phone”
screen.
3Touch “Delete” .
4This screen is displayed.
DELETING CALL HISTORY
The call history can be deleted.
For PBAP compatible phones, delete
the call history after setting “Automat-
ically Download Call History” to
“Off”. (See “PBAP compatible models
automatic data transfer setting” on
page 147.)
Page 157 of 296
157
2. SETUP
4
PHONE
The following operations are performed in
the same manner as when they are per-
formed from the “Setup” screen.
Other call history can be operated simi-
larly.
Deleting after call history has been dis-
played
1Press the “HOME” button and touch
“Phone” , or press the switch on
the steering wheel.
2Touch “Call History” on the “Phone”
screen.
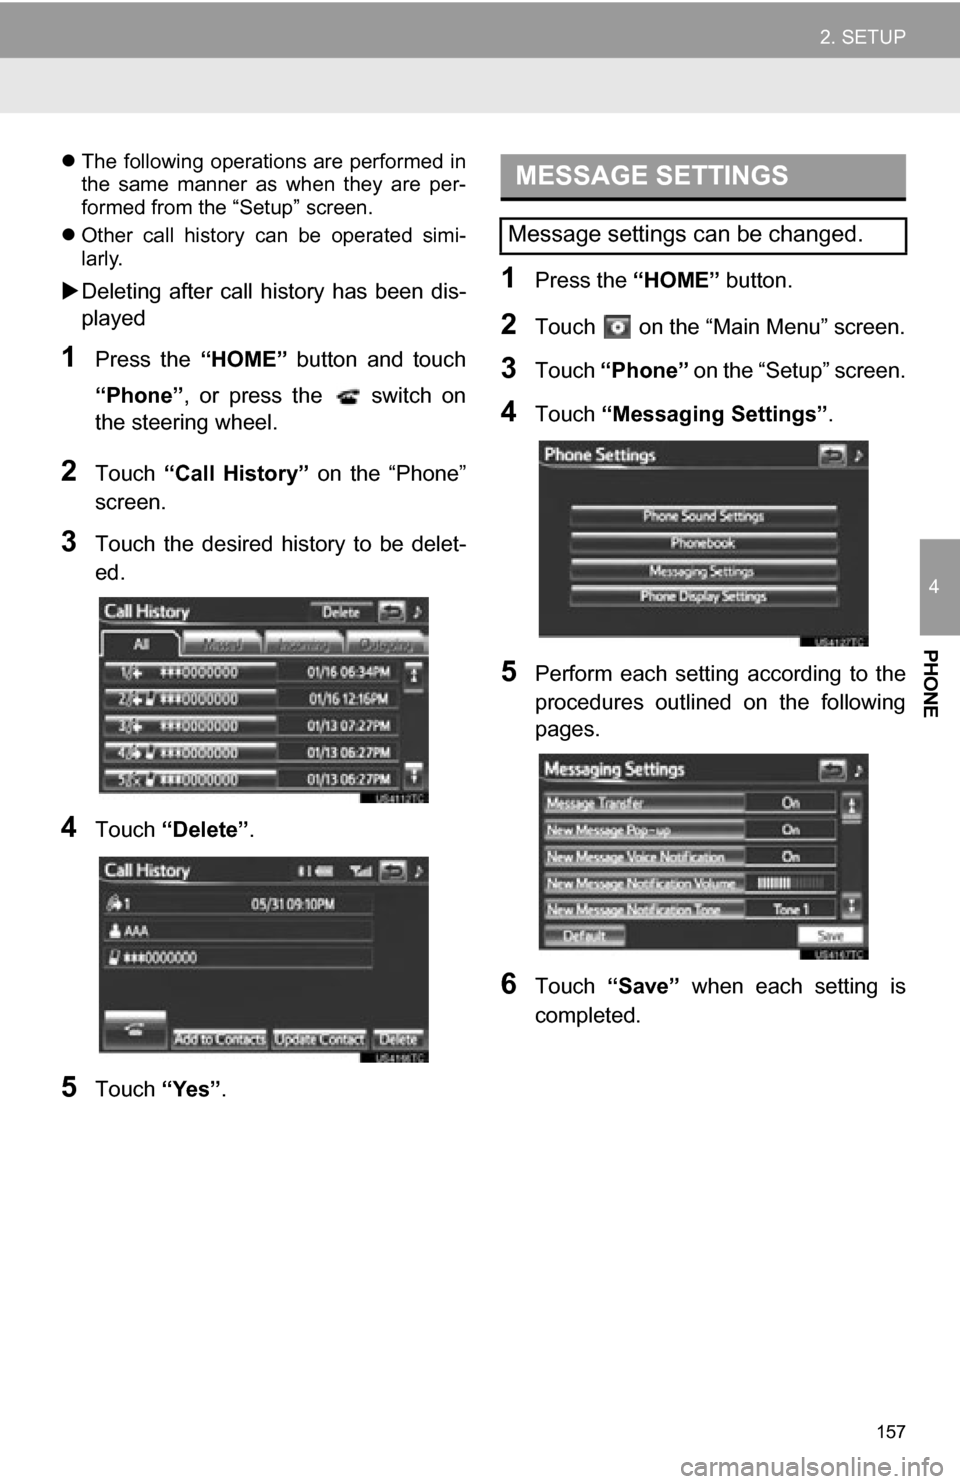
3Touch the desired history to be delet-
ed.
4Touch “Delete” .
5Touch “Yes”.
1Press the “HOME” button.
2Touch on the “Main Menu” screen.
3Touch “Phone” on the “Setup” screen.
4Touch “Messaging Settings” .
5Perform each setting according to the
procedures outlined on the following
pages.
6Touch “Save” when each setting is
completed.
MESSAGE SETTINGS
Message settings can be changed.
Page 158 of 296
158
2. SETUP
1Press the “HOME” button and touch
“Phone” , or press the switch on
the steering wheel.
2Touch “Messages” on the “Phone”
screen.
3Touch “Options”.
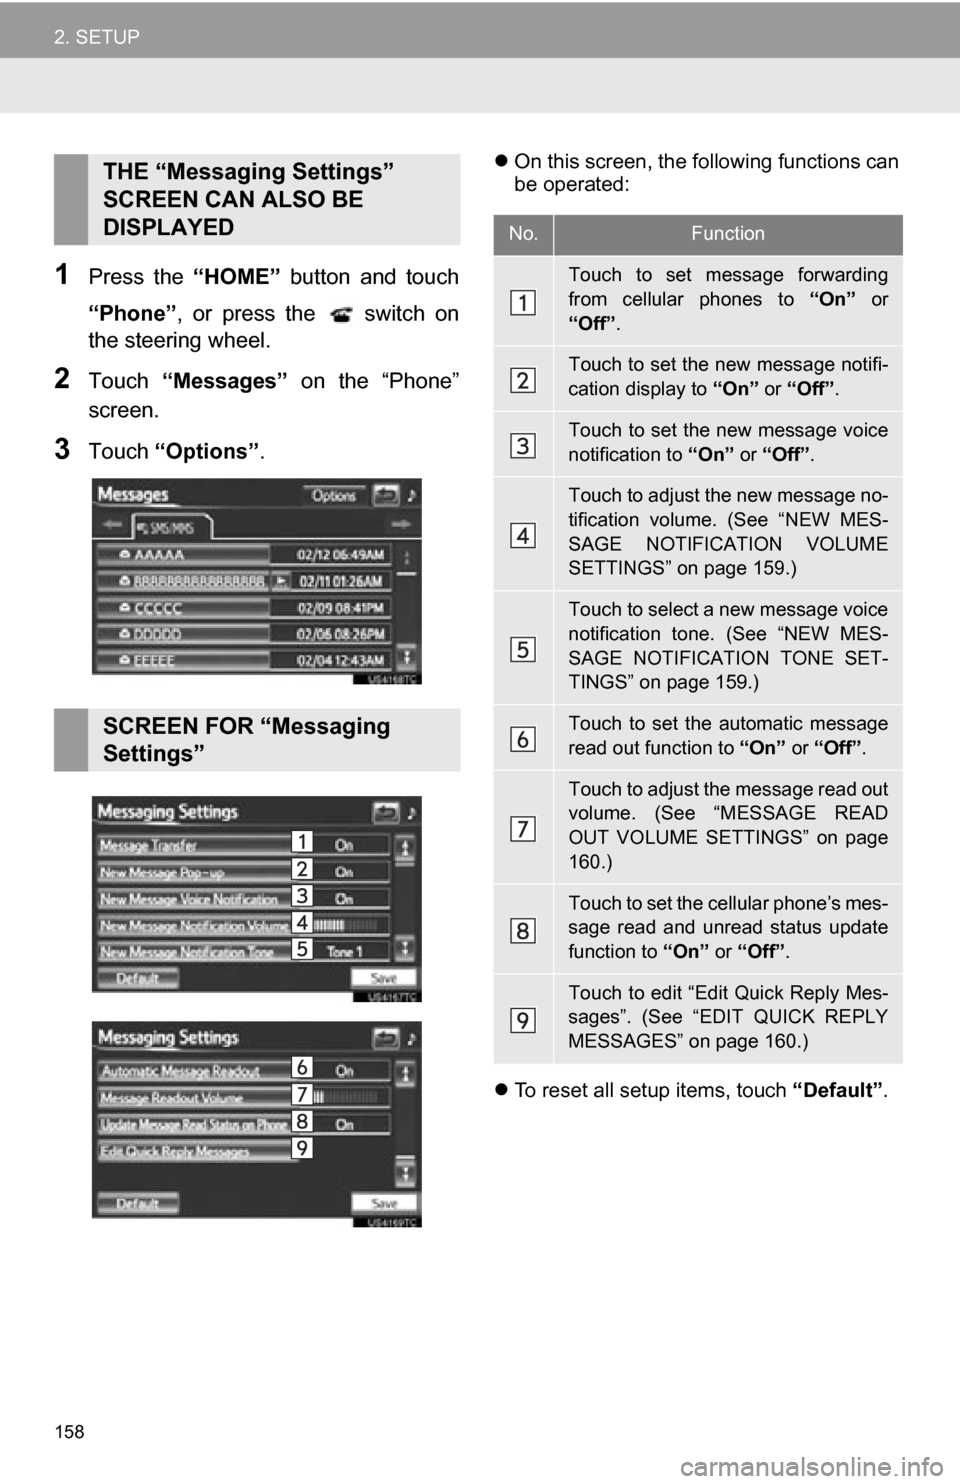
On this screen, the following functions can
be operated:
To reset all setup items, touch “Default”.THE “Messaging Settings”
SCREEN CAN ALSO BE
DISPLAYED
SCREEN FOR “Messaging
Settings”
No.Function
Touch to set message forwarding
from cellular phones to “On” or
“Off” .
Touch to set the new message notifi-
cation display to “On” or “Off”.
Touch to set the new message voice
notification to “On” or “Off” .
Touch to adjust the new message no-
tification volume. (See “NEW MES-
SAGE NOTIFICATION VOLUME
SETTINGS” on page 159.)
Touch to select a new message voice
notification tone. (See “NEW MES-
SAGE NOTIFICATION TONE SET-
TINGS” on page 159.)
Touch to set the automatic message
read out function to “On” or “Off”.
Touch to adjust the message read out
volume. (See “MESSAGE READ
OUT VOLUME SETTINGS” on page
160.)
Touch to set the cellular phone’s mes-
sage read and unread status update
function to “On” or “Off”.
Touch to edit “Edit Quick Reply Mes-
sages”. (See “EDIT QUICK REPLY
MESSAGES” on page 160.)
Page 162 of 296
162
2. SETUP
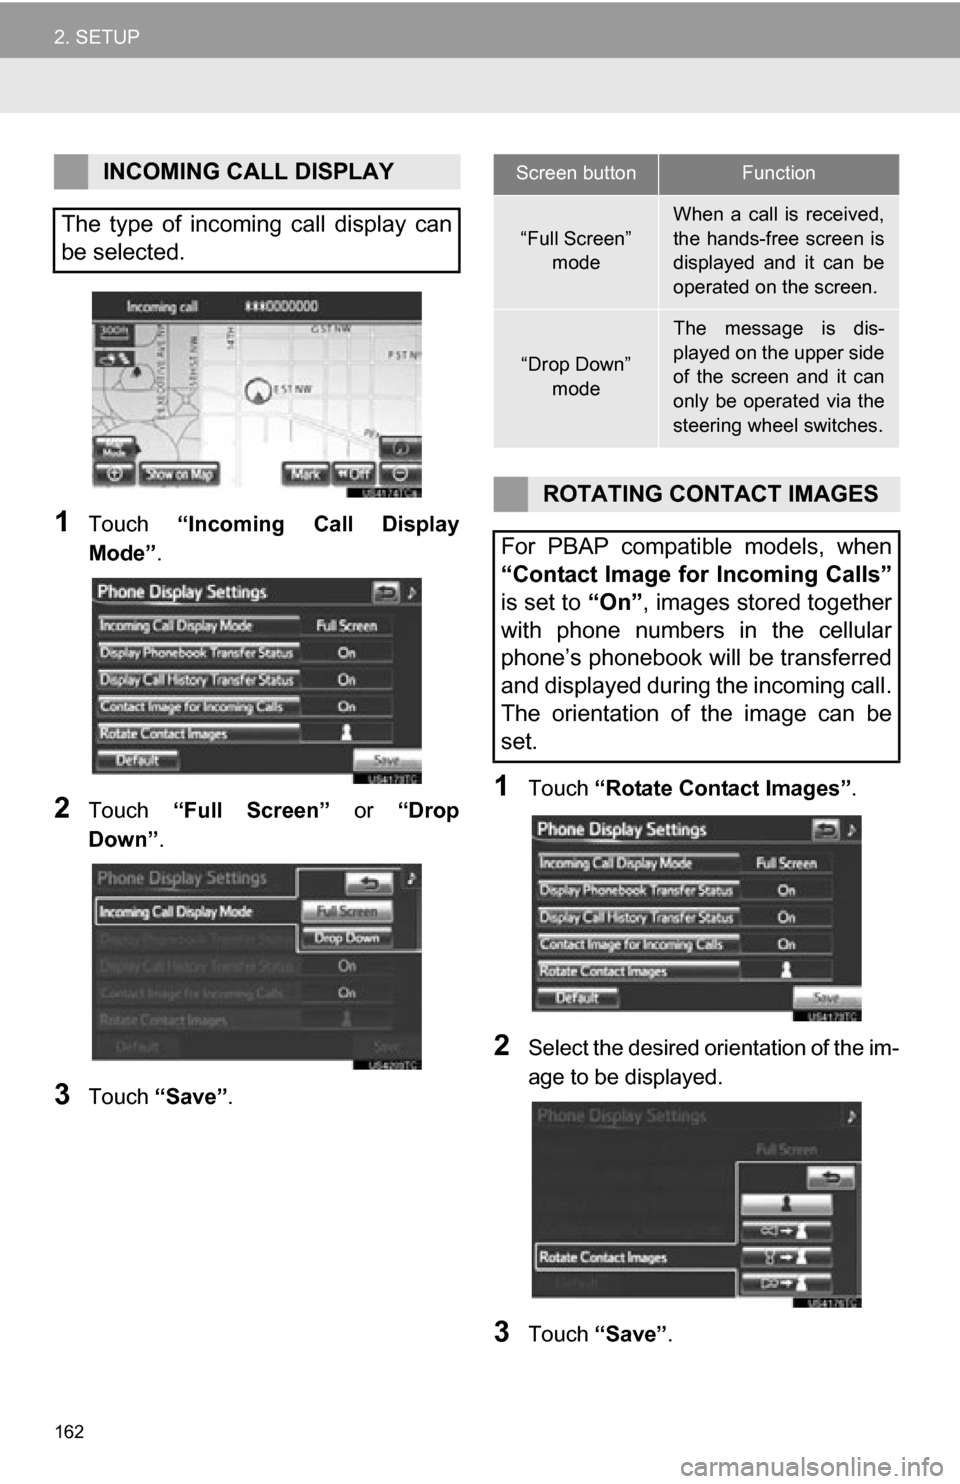
1Touch “Incoming Call Display
Mode” .
2Touch “Full Screen” or “Drop
Down”.
3Touch “Save” .
1Touch “Rotate Contact Images” .
2Select the desired orientation of the im-
age to be displayed.
3Touch “Save” .
INCOMING CALL DISPLAY
The type of incoming call display can
be selected.Screen buttonFunction
“Full Screen” mode
When a call is received,
the hands-free screen is
displayed and it can be
operated on the screen.
“Drop Down”
mode
The message is dis-
played on the upper side
of the screen and it can
only be operated via the
steering wheel switches.
ROTATING CONTACT IMAGES
For PBAP compatible models, when
“Contact Image for Incoming Calls”
is set to “On”, images stored together
with phone numbers in the cellular
phone’s phonebook will be transferred
and displayed during the incoming call.
The orientation of the image can be
set.
Page 195 of 296
195
1. AUDIO SYSTEM OPERATION
5
AUDIO SYSTEM
6. RADIO OPERATION (INTERNET RADIO BROADCAST)
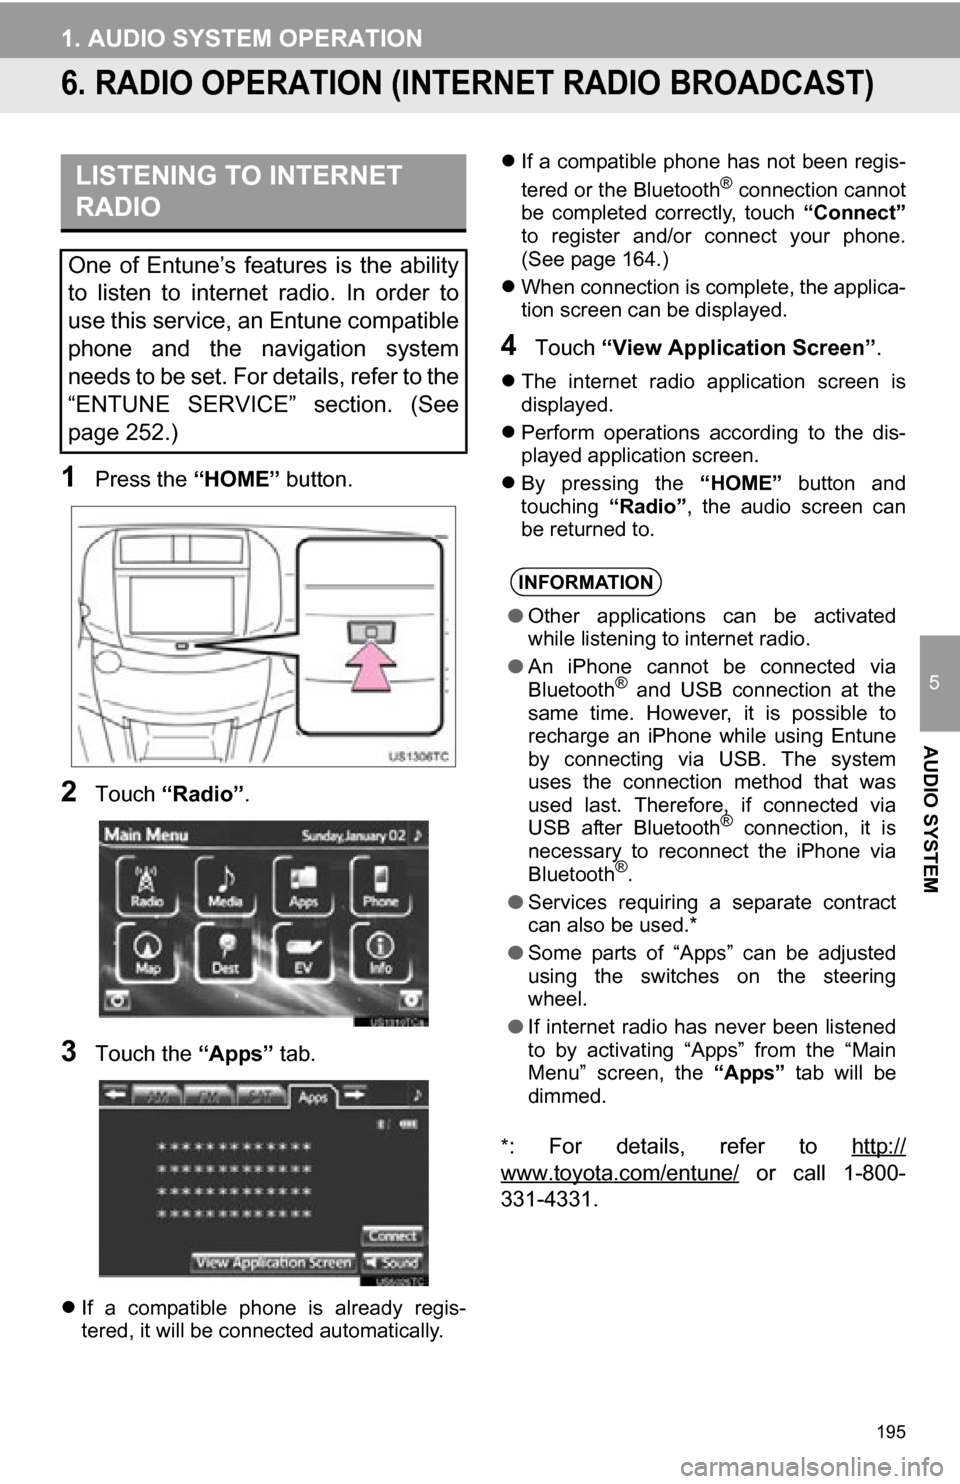
1Press the “HOME” button.
2Touch “Radio” .
3Touch the “Apps” tab.
If a compatible phone is already regis-
tered, it will be connected automatically.
If a compatible phone has not been regis-
tered or the Bluetooth
® connection cannot
be completed correctly, touch “Connect”
to register and/or connect your phone.
(See page 164.)
When connection is complete, the applica-
tion screen can be displayed.
4Touch “View Application Screen” .
The internet radio application screen is
displayed.
Perform operations according to the dis-
played application screen.
By pressing the “HOME” button and
touching “Radio”, the audio screen can
be returned to.
*
: For details, refer to http://
www.toyota.com/entune/ or call 1-800-
331-4331.
LISTENING TO INTERNET
RADIO
One of Entune’s features is the ability
to listen to internet radio. In order to
use this service, an Entune compatible
phone and the navigation system
needs to be set. For details, refer to the
“ENTUNE SERVICE” section. (See
page 252.)
INFORMATION
● Other applications can be activated
while listening to internet radio.
● An iPhone cannot be connected via
Bluetooth
® and USB connection at the
same time. However, it is possible to
recharge an iPhone while using Entune
by connecting via USB. The system
uses the connection method that was
used last. Therefore, if connected via
USB after Bluetooth
® connection, it is
necessary to reconnect the iPhone via
Bluetooth
®.
● Services requiring a separate contract
can also be used.*
● Some parts of “Apps” can be adjusted
using the switches on the steering
wheel.
● If internet radio has never been listened
to by activating “Apps” from the “Main
Menu” screen, the “Apps” tab will be
dimmed.
Page 213 of 296
213
1. AUDIO SYSTEM OPERATION
5
AUDIO SYSTEM
10. AUDIO REMOTE CONTROLS (STEERING SWITCHES)
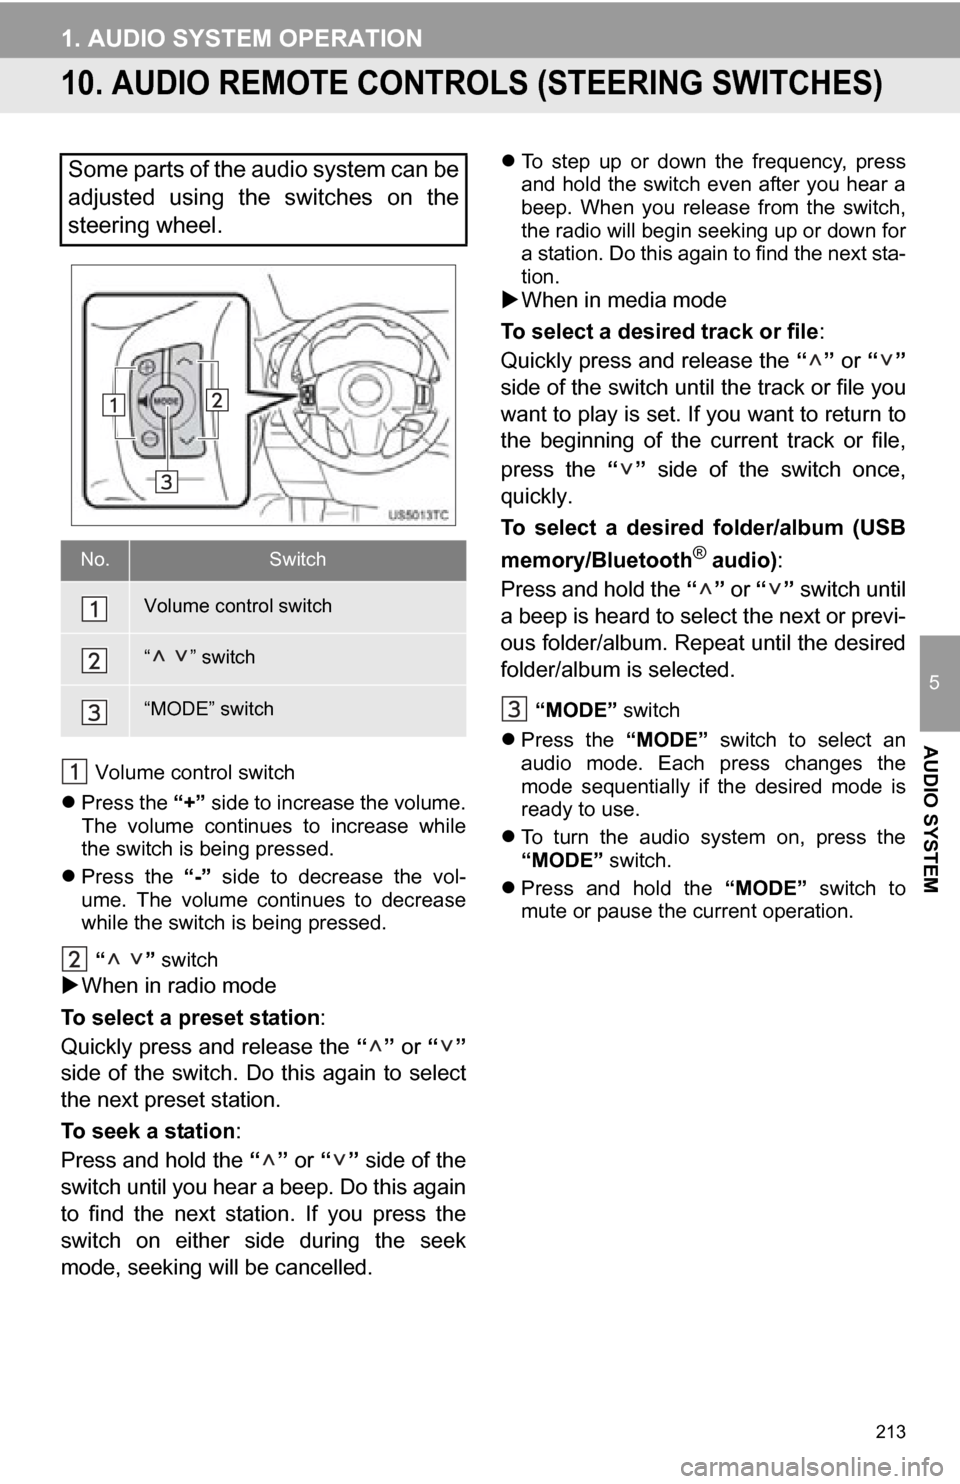
Volume control switch
Press the “+” side to increase the volume.
The volume continues to increase while
the switch is being pressed.
Press the “-” side to decrease the vol-
ume. The volume continues to decrease
while the switch is being pressed.
“ ” switch
When in radio mode
To select a preset station:
Quickly press and release the “” or “”
side of the switch. Do this again to select
the next preset station.
To seek a station :
Press and hold the “” or “” side of the
switch until you hear a beep. Do this again
to find the next station. If you press the
switch on either side during the seek
mode, seeking will be cancelled.
To step up or down the frequency, press
and hold the switch even after you hear a
beep. When you release from the switch,
the radio will begin seeking up or down for
a station. Do this again to find the next sta-
tion.
When in media mode
To select a desired track or file :
Quickly press and release the “” or “”
side of the switch until the track or file you
want to play is set. If you want to return to
the beginning of the current track or file,
press the “” side of the switch once,
quickly.
To select a desired folder/album (USB
memory/Bluetooth
® audio) :
Press and hold the “” or “” switch until
a beep is heard to select the next or previ-
ous folder/album. Repeat until the desired
folder/album is selected.
“MODE” switch
Press the “MODE” switch to select an
audio mode. Each press changes the
mode sequentially if the desired mode is
ready to use.
To turn the audio system on, press the
“MODE” switch.
Press and hold the “MODE” switch to
mute or pause the current operation.
Some parts of the audio system can be
adjusted using the switches on the
steering wheel.
No.Switch
Volume control switch
“ ” switch
“MODE” switch
Page 225 of 296
225
1. VOICE COMMAND SYSTEM OPERATION
6
VOICE COMMAND SYSTEM
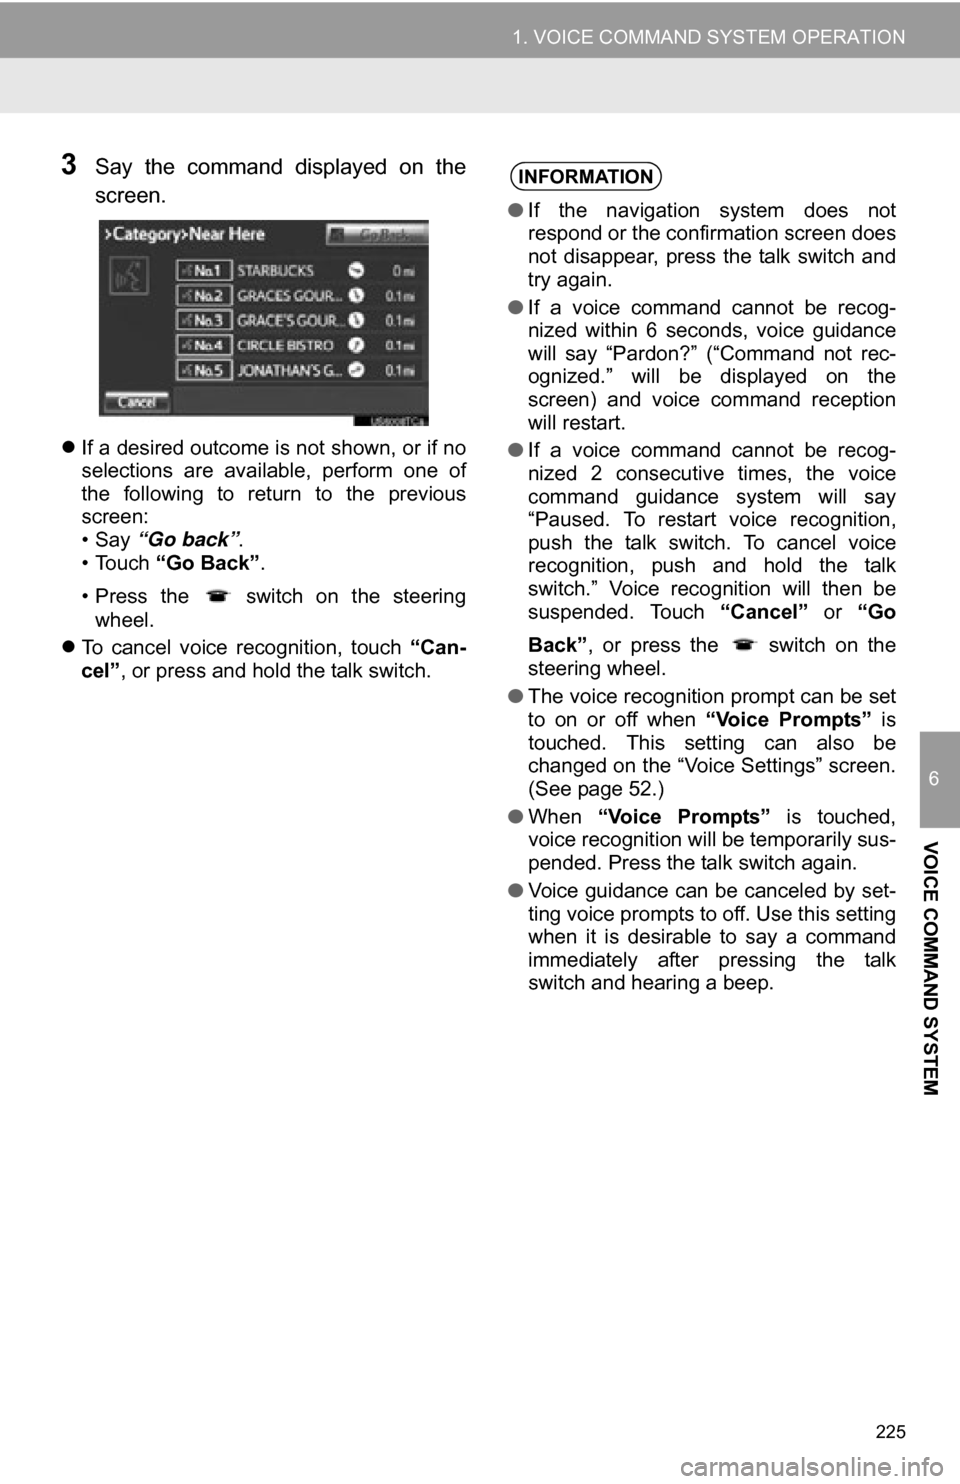
3Say the command displayed on the
screen.
If a desired outcome is not shown, or if no
selections are available, perform one of
the following to return to the previous
screen:
•Say “Go back” .
• Touch “Go Back” .
• Press the switch on the steering wheel.
To cancel voice recognition, touch “Can-
cel”, or press and hold the talk switch.
INFORMATION
● If the navigation system does not
respond or the confirmation screen does
not disappear, press the talk switch and
try again.
● If a voice command cannot be recog-
nized within 6 seconds, voice guidance
will say “Pardon?” (“Command not rec-
ognized.” will be displayed on the
screen) and voice command reception
will restart.
● If a voice command cannot be recog-
nized 2 consecutive times, the voice
command guidance system will say
“Paused. To restart voice recognition,
push the talk switch. To cancel voice
recognition, push and hold the talk
switch.” Voice recognition will then be
suspended. Touch “Cancel” or “Go
Back” , or press the switch on the
steering wheel.
● The voice recognition prompt can be set
to on or off when “Voice Prompts” is
touched. This setting can also be
changed on the “Voice Settings” screen.
(See page 52.)
● When “Voice Prompts” is touched,
voice recognition will be temporarily sus-
pended. Press the talk switch again.
● Voice guidance can be canceled by set-
ting voice prompts to off. Use this setting
when it is desirable to say a command
immediately after pressing the talk
switch and hearing a beep.
Page 258 of 296
258
2. ENTUNE OPERATION
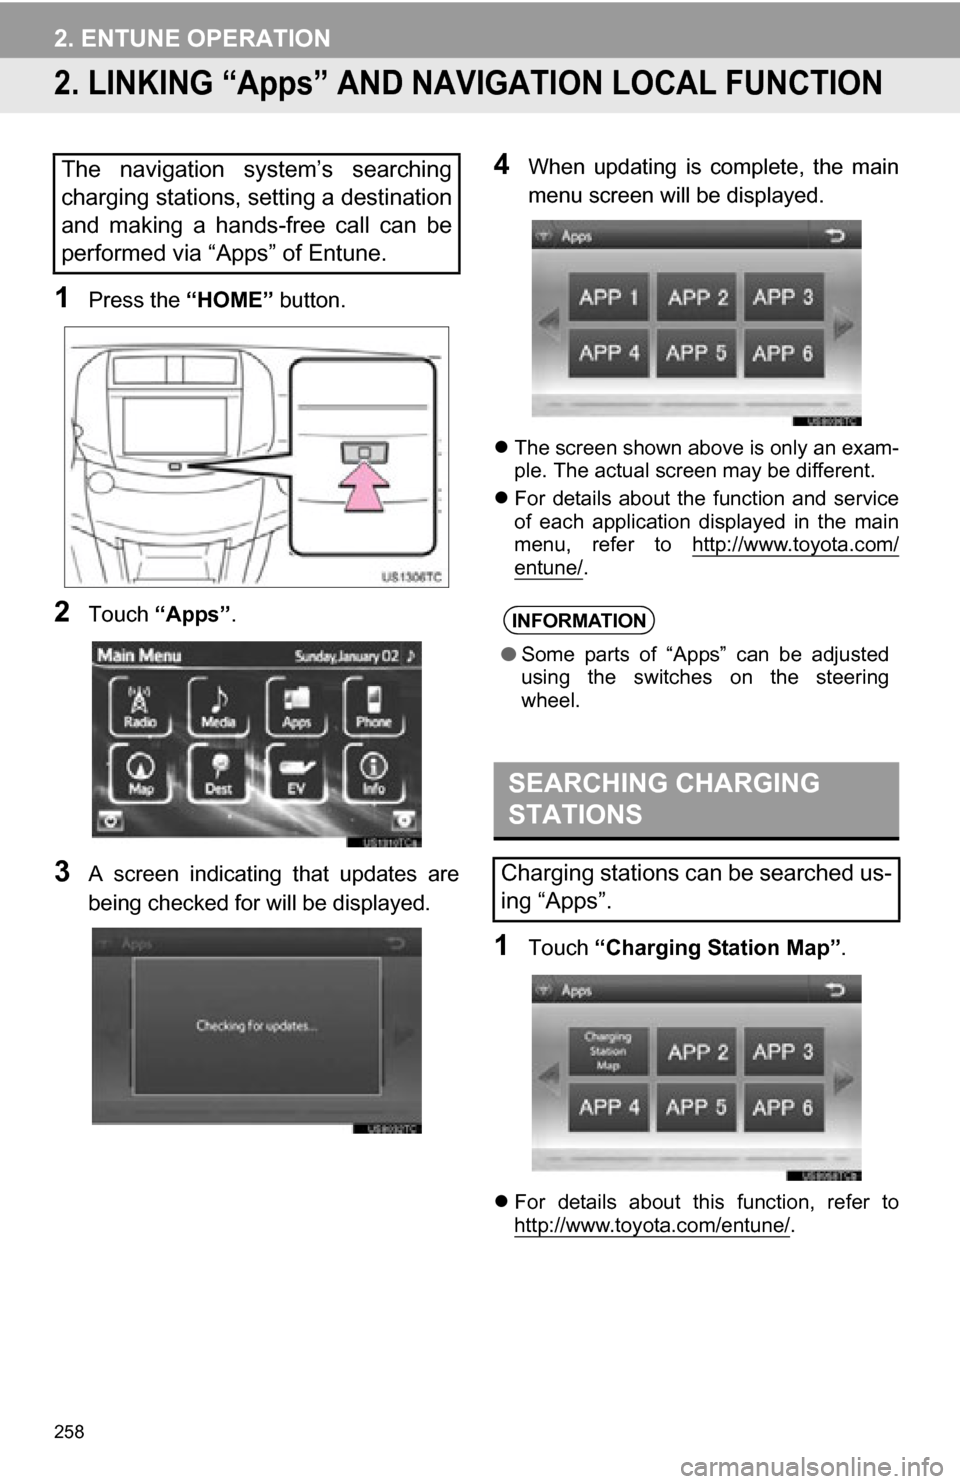
2. LINKING “Apps” AND NAVIGATION LOCAL FUNCTION
1Press the “HOME” button.
2Touch “Apps” .
3A screen indicating that updates are
being checked for will be displayed.
4When updating is complete, the main
menu screen will be displayed.
The screen shown above is only an exam-
ple. The actual screen may be different.
For details about the function and service
of each application displayed in the main
menu, refer to http://www.toyota.com/
entune/.
1Touch “Charging Station Map” .
For details about this function, refer to
http://www.toyota.com/entune/.
The navigation system’s searching
charging stations, setting a destination
and making a hands-free call can be
performed via “Apps” of Entune.
INFORMATION
●Some parts of “Apps” can be adjusted
using the switches on the steering
wheel.
SEARCHING CHARGING
STATIONS
Charging stations can be searched us-
ing “Apps”.