reset TOYOTA RAV4 HYBRID 2018 (in English) User Guide
[x] Cancel search | Manufacturer: TOYOTA, Model Year: 2018, Model line: RAV4 HYBRID, Model: TOYOTA RAV4 HYBRID 2018Pages: 680, PDF Size: 13.71 MB
Page 282 of 680

282
RAV4-HV_OM_OM42B81U_(U)
4-5. Using the driving support systems
■Cruise control can be set when
●The shift lever is in D or range 4 or higher of S has been selected.
● Vehicle speed is at or above approximately 25 mph (40 km/h).
■ Accelerating after setting the vehicle speed
●The vehicle can be accelerated normally. After acceleration, the set speed
resumes.
● Even without canceling the cruise control, the set speed can be increased
by first accelerating the vehicle to the desired speed and then pushing the
lever down to set the new speed.
■ Automatic cruise co ntrol cancelation
Cruise control will stop maintaining the vehicle speed in any of the following
situations.
● Actual vehicle speed falls more than approximately 10 mph (16 km/h) below
the preset vehicle speed.
At this time, the memorized set speed is not retained.
● Actual vehicle speed is at or below approximately 25 mph (40 km/h).
● VSC is activated.
● TRAC is activated for a period of time.
● When the VSC or TRAC system is turned off.
■ If the warning message for the crui se control is shown on the multi-
information display
Press the “ON-OFF” button once to deactivate the system, and then press
the button again to reactivate the system.
If the cruise control speed cannot be set or if the cruise control cancels imme-
diately after being activated, there may be a malfunction in the cruise control
system. Have the vehicle inspected by your Toyota dealer.
Page 337 of 680
337
RAV4-HV_OM_OM42B81U_(U)
5-1. Basic Operations
5
Audio system
Steering wheel audio switches
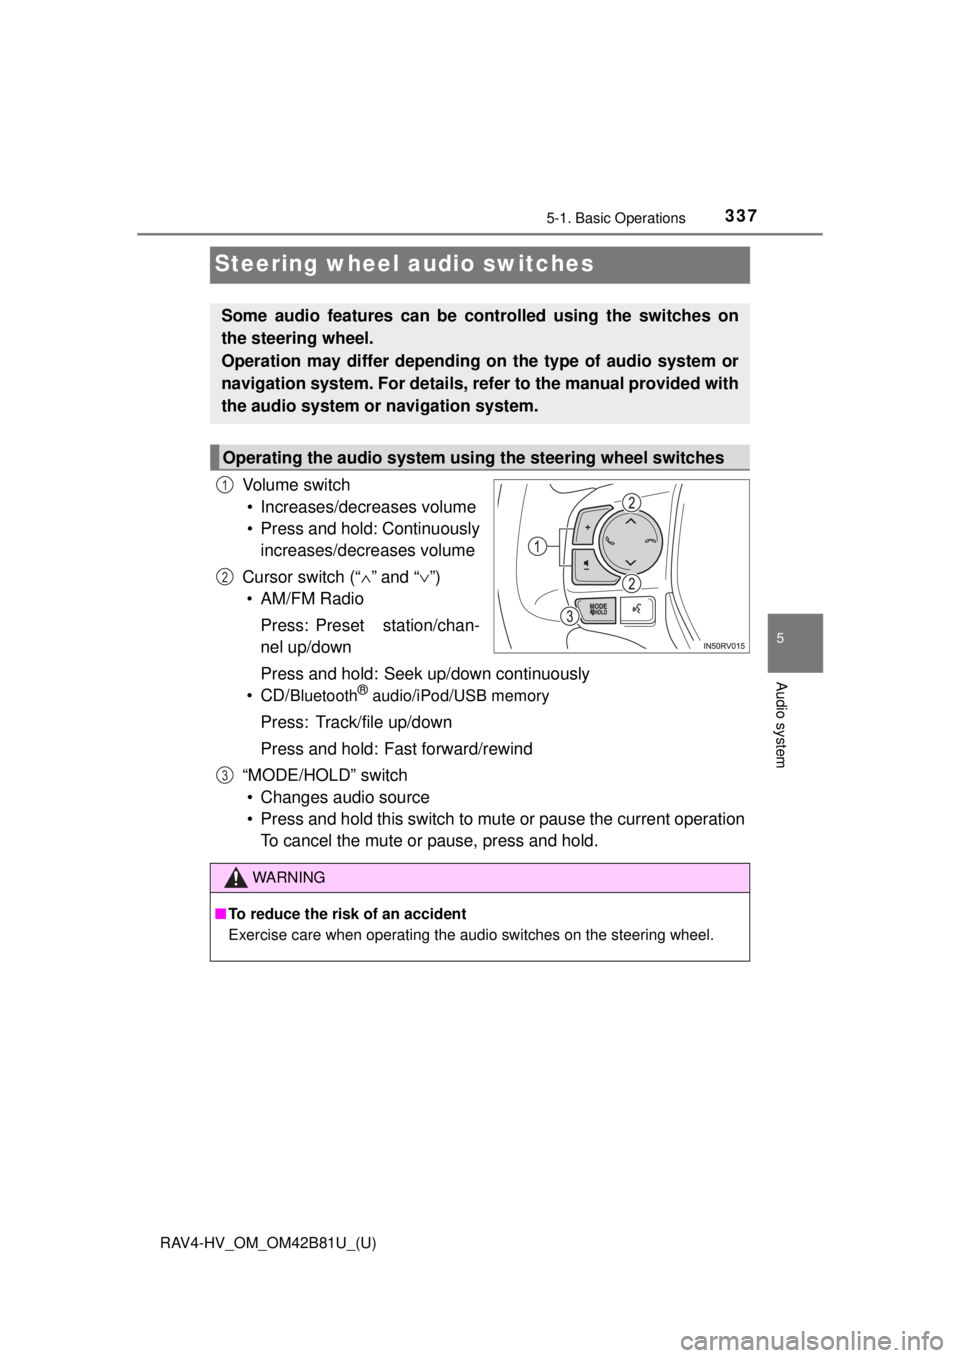
Vo l u m e s w i t c h• Increases/decreases volume
• Press and hold: Continuously increases/decreases volume
Cursor switch (“ ∧” and “ ∨”)
• AM/FM Radio
Press: Preset station/chan-
nel up/down
Press and hold: Seek up/down continuously
•CD/
Bluetooth® audio/iPod/USB memory
Press: Track/file up/down
Press and hold: Fast forward/rewind
“MODE/HOLD” switch • Changes audio source
• Press and hold this switch to mute or pause the current operation To cancel the mute or pause, press and hold.
Some audio features can be c ontrolled using the switches on
the steering wheel.
Operation may differ depending on the type of audio system or
navigation system. For details, refer to the manual provided with
the audio system or navigation system.
Operating the audio system using the steering wheel switches
1
2
3
WARNING
■ To reduce the risk of an accident
Exercise care when operating the audio switches on the steering wheel.
Page 345 of 680
345
RAV4-HV_OM_OM42B81U_(U)
5-2. Setup
5
Audio system
Audio settings
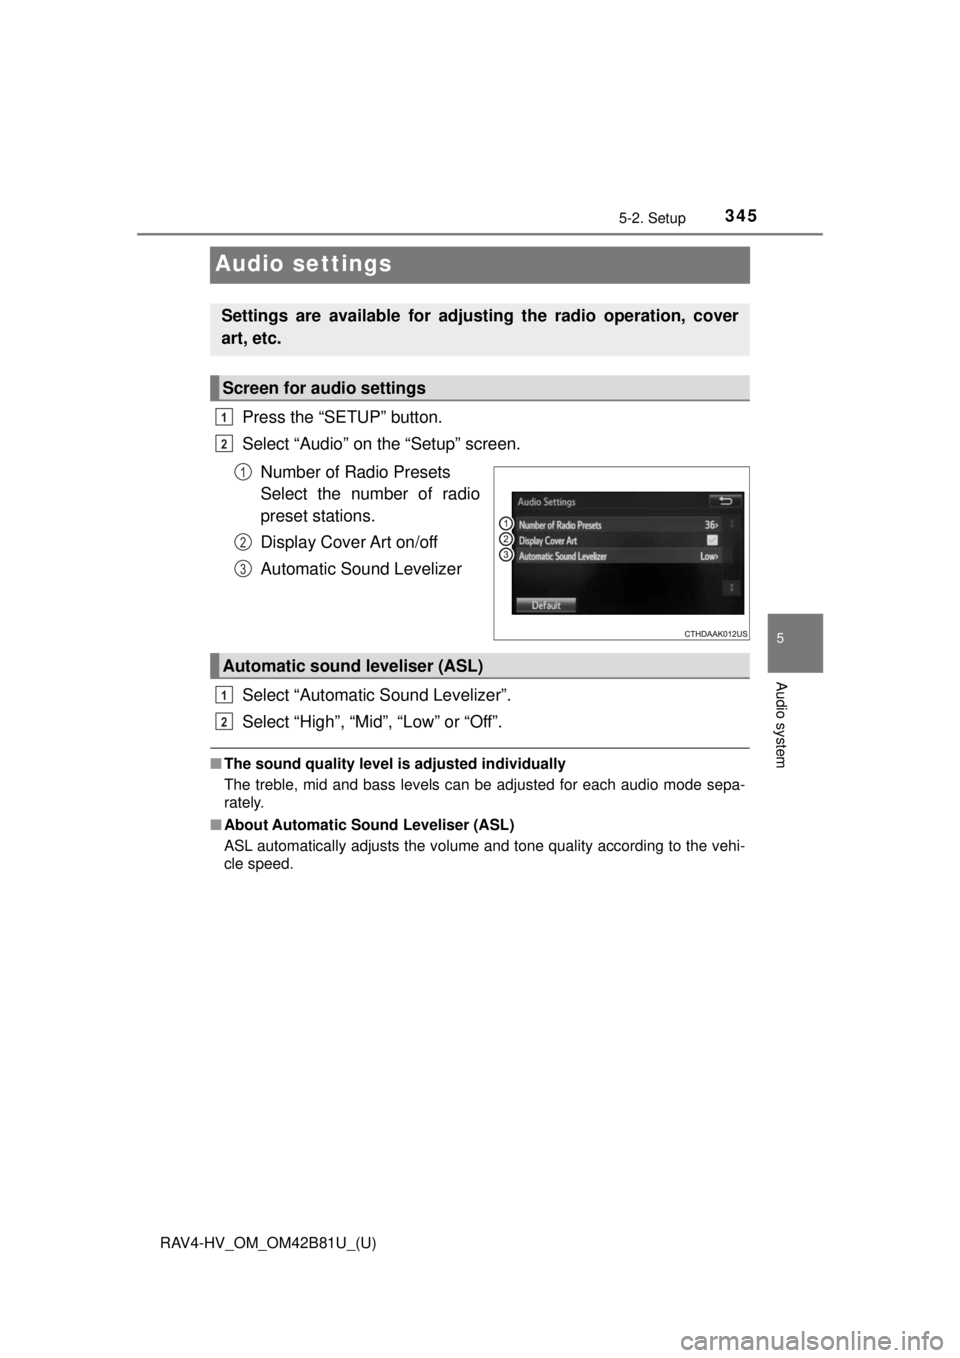
Press the “SETUP” button.
Select “Audio” on the “Setup” screen.Number of Radio Presets
Select the number of radio
preset stations.
Display Cover Art on/off
Automatic Sound Levelizer
Select “Automatic Sound Levelizer”.
Select “High”, “Mid”, “Low” or “Off”.
■ The sound quality level is adjusted individually
The treble, mid and bass levels can be adjusted for each audio mode sepa-
rately.
■ About Automatic Sou nd Leveliser (ASL)
ASL automatically adjusts the volume and tone quality according to the vehi-
cle speed.
Settings are available for adjusting the radio operation, cover
art, etc.
Screen for audio settings
1
2
1
2
3
Automatic sound leveliser (ASL)
1
2
Page 353 of 680
353
RAV4-HV_OM_OM42B81U_(U)
5-4. Using the radio
5
Audio system
Radio operation
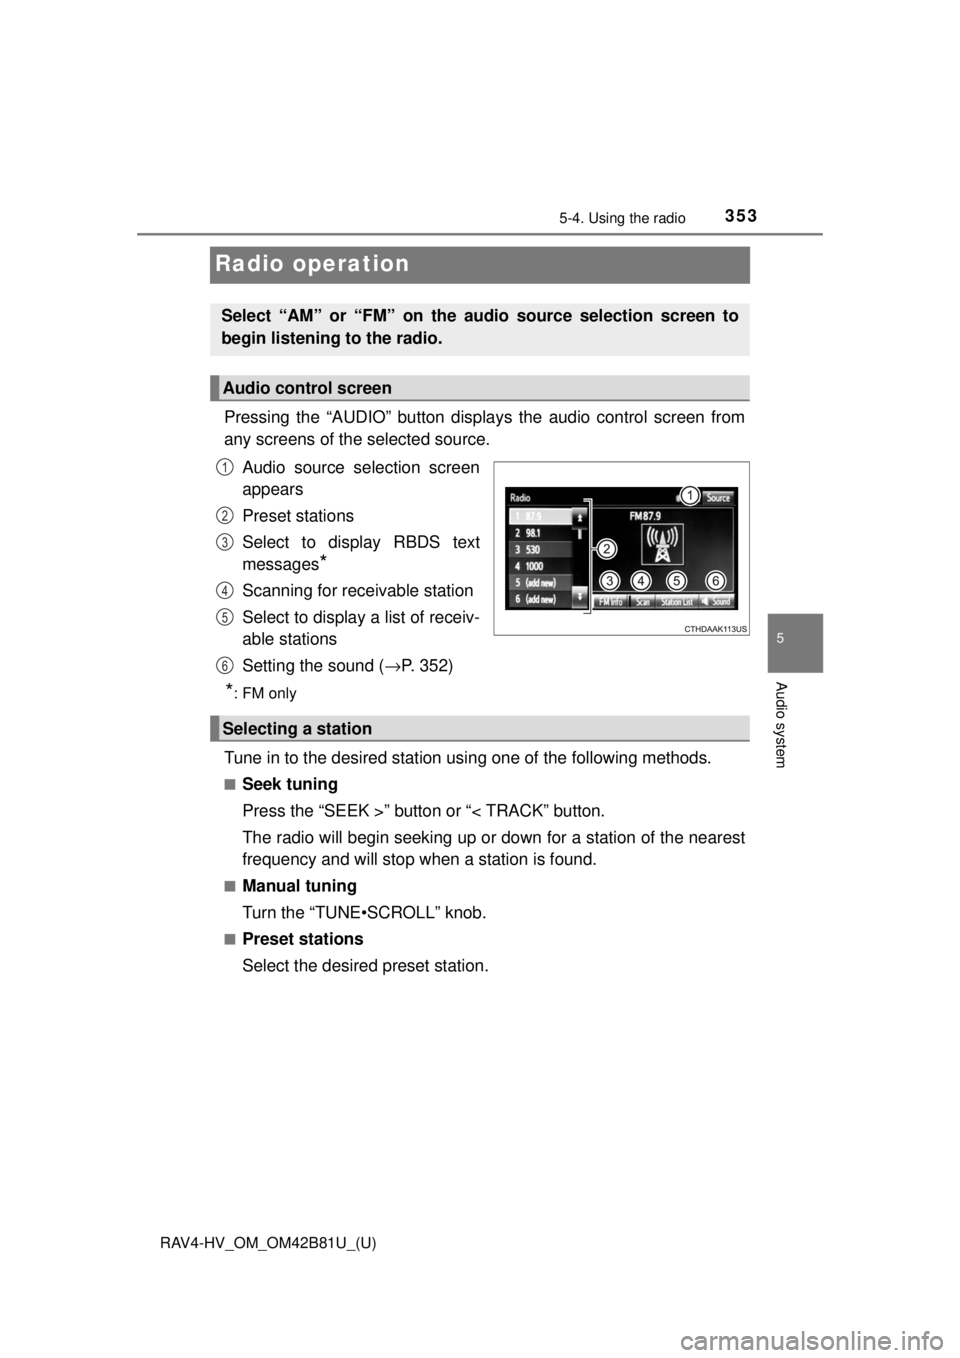
Pressing the “AUDIO” button displays the audio control screen from
any screens of the selected source.
Audio source selection screen
appears
Preset stations
Select to display RBDS text
messages
*
Scanning for receivable station
Select to display a list of receiv-
able stations
Setting the sound ( →P. 352)
*:FM only
Tune in to the desired station us ing one of the following methods.
■Seek tuning
Press the “SEEK >” button or “< TRACK” button.
The radio will begin seeking up or down for a station of the nearest
frequency and will stop when a station is found.
■Manual tuning
Turn the “TUNE•SCROLL” knob.
■Preset stations
Select the desired preset station.
Select “AM” or “FM” on the audio source selection screen to
begin listening to the radio.
Audio control screen
1
2
3
4
5
Selecting a station
6
Page 354 of 680

354
RAV4-HV_OM_OM42B81U_(U)
5-4. Using the radio
Search for desired stations by turning the “TUNE•SCROLL” knob or
pressing the “SEEK >” button or “< TRACK” button.
Select “(add new)”.
To change the preset station to a different one, select and hold the preset
station.
Select “Yes”.
Select “OK” after setting the new preset station.
■Refreshing the station listSelect “Refresh” on the “Station List” screen.
To cancel the refresh, select “Cancel Refresh”.
■Reception sensitivity
●Maintaining perfect radio reception at all times is difficult due to the continu-
ally changing position of the antenna, differences in signal strength and sur-
rounding objects, such as trains, transmitters, etc.
● The radio antenna is mounted on the roof.
Setting station presets
1
2
3
4
1
Page 365 of 680
RAV4-HV_OM_OM42B81U_(U)
3655-6. Using an external device
5
Audio system
■iPod problems
To resolve most problems encountered when using your iPod, disconnect
your iPod from the vehicle iPod connection and reset it. For instructions on
how to reset your iPod, refer to your iPod Owner’s Manual.
■ Error messages
If the following error messages appear on the screen, refer to the table and
take the appropriate measures. If the problem is not rectified, take the vehicle
to your Toyota dealer.
MessageCause/Correction procedures
“Connection error. Please
consult your Owner’s Man-
ual for instructions on how
to connect the iPod.”
This indicates a problem in the iPod or its con-
nection.
“No music files found.”This indicates that there is no music data in
the iPod.
“No videos found.”This indicates that no video files are included
in the iPod.
“Please check the iPod
firmware version.”
This indicates that the software version is not
compatible.
Please check the compatible models.
(→P. 366)
“iPod authorization unsuc-
cessful.”This indicates that the audio system failed to
authorize the iPod.
Please check your iPod.
Page 404 of 680
404
RAV4-HV_OM_OM42B81U_(U)
5-10. Phonebook
Contact/Call History Settings
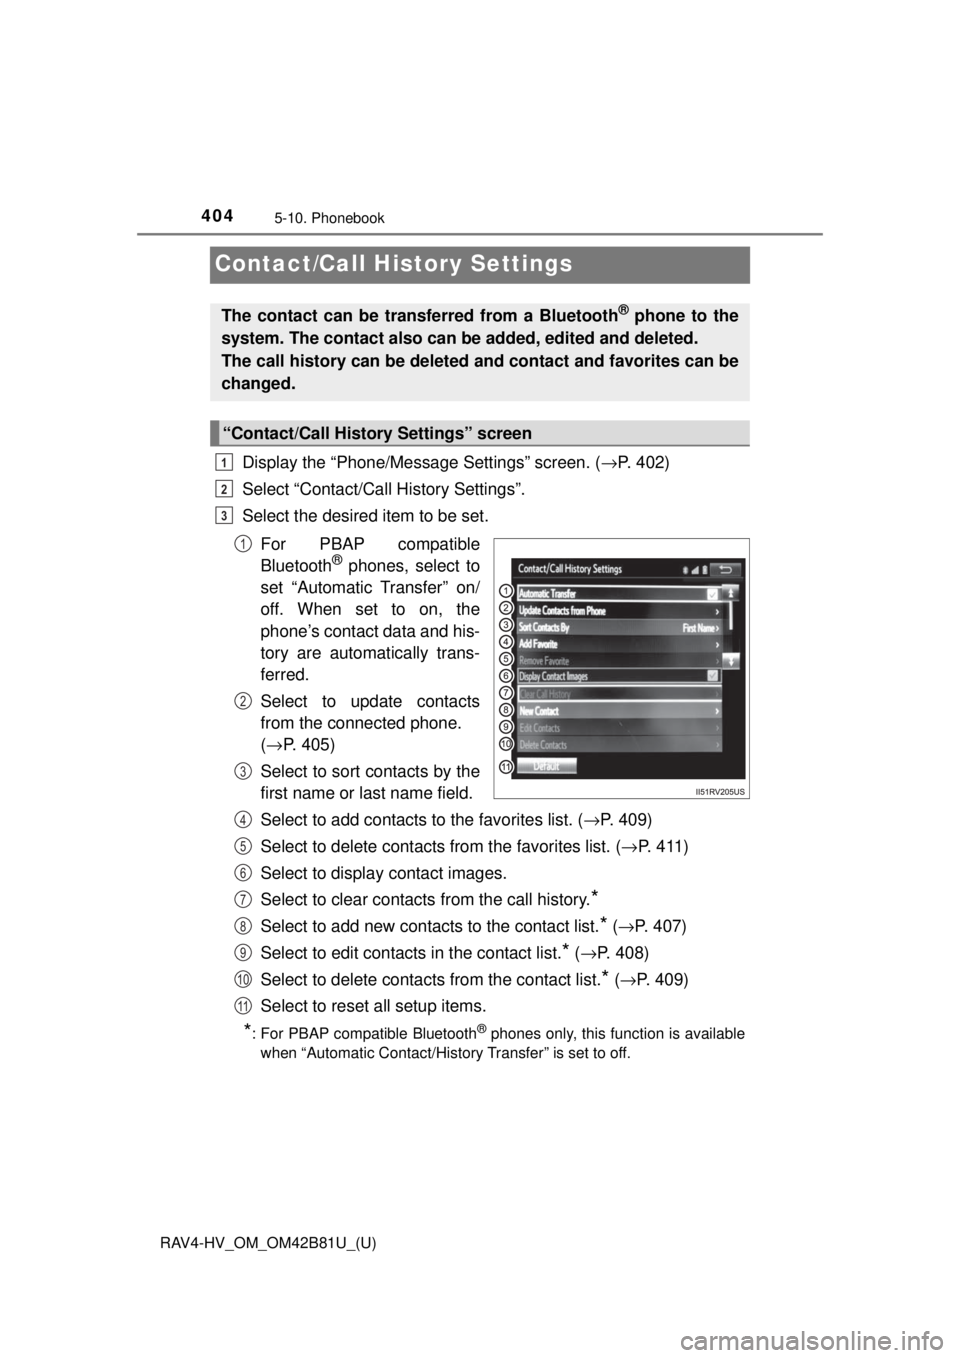
Display the “Phone/Message Settings” screen. (→P. 402)
Select “Contact/Call History Settings”.
Select the desired item to be set.
For PBAP compatible
Bluetooth
® phones, select to
set “Automatic Transfer” on/
off. When set to on, the
phone’s contact data and his-
tory are automatically trans-
ferred.
Select to update contacts
from the connected phone.
( → P. 405)
Select to sort contacts by the
first name or last name field.
Select to add contacts to the favorites list. ( →P. 409)
Select to delete contacts from the favorites list. ( →P. 411)
Select to display contact images.
Select to clear contacts from the call history.
*
Select to add new contacts to the contact list.* ( → P. 407)
Select to edit contacts in the contact list.
* (→ P. 408)
Select to delete contacts from the contact list.
* ( → P. 409)
Select to reset all setup items.
*: For PBAP compatible Bluetooth® phones only, this function is available
when “Automatic Contact/History Transfer” is set to off.
The contact can be transferred from a Bluetooth® phone to the
system. The contact also can be added, edited and deleted.
The call history can be deleted and contact and favorites can be
changed.
“Contact/Call History Settings” screen
1
2
3
1
2
3
4
5
6
7
8
9
10
11
Page 481 of 680

RAV4-HV_OM_OM42B81U_(U)
4817-2. Maintenance
7
Maintenance and care
■Repair and replacement
It is recommended that genuine Toyota parts be used for repairs to ensure
performance of each system. If non-Toyota parts are used in replacement or if
a repair shop other than a Toyota dealer performs repairs, confirm the war-
ranty coverage.
■ Resetting the message indicating maintenance is required (U.S.A. only)
After the required maintenance is performed according to the maintenance
schedule, please reset the message.
To reset the message, follow the procedure described below:
Press or of the meter control switch and select on the multi-
information display.
Press or of the meter control switch and select “Vehicle Settings”.
and then press .
Press or of the meter control switch and select “Scheduled Mainte-
nance”. and then press .
Select the “Yes” and press .
■ Allow inspection and repairs to be performed by a Toyota dealer
●Toyota technicians are well-trained specialists and are kept up to date with
the latest service information. They are well informed about the operations
of all systems on your vehicle.
● Keep a copy of the repair order. It proves that the maintenance that has
been performed is under warranty cove rage. If any problem should arise
while your vehicle is under warranty, your Toyota dealer will promptly take
care of it.
1
2
3
4
Page 507 of 680
RAV4-HV_OM_OM42B81U_(U)
5077-3. Do-it-yourself maintenance
7
Maintenance and care
◆Initializing the tire pressure warning system
When the tire size is changed, the tire pressure warning system
must be initialized.
When the tire pressure warning system is initialized, the current tire
inflation pressure is set as the benchmark pressure.
■How to initialize the tire pressure warning system
Park the vehicle in a safe place and turn the power switch off.
Initialization cannot be performed while the vehicle is moving.
Adjust the tire inflation pressure to the specified cold tire inflation
pressure level. ( →P. 617)
Make sure to adjust the tire pressu re to the specified cold tire infla-
tion pressure level. The tire pressure warning system will operate
based on this pressure level.
Turn the power switch to ON mode.
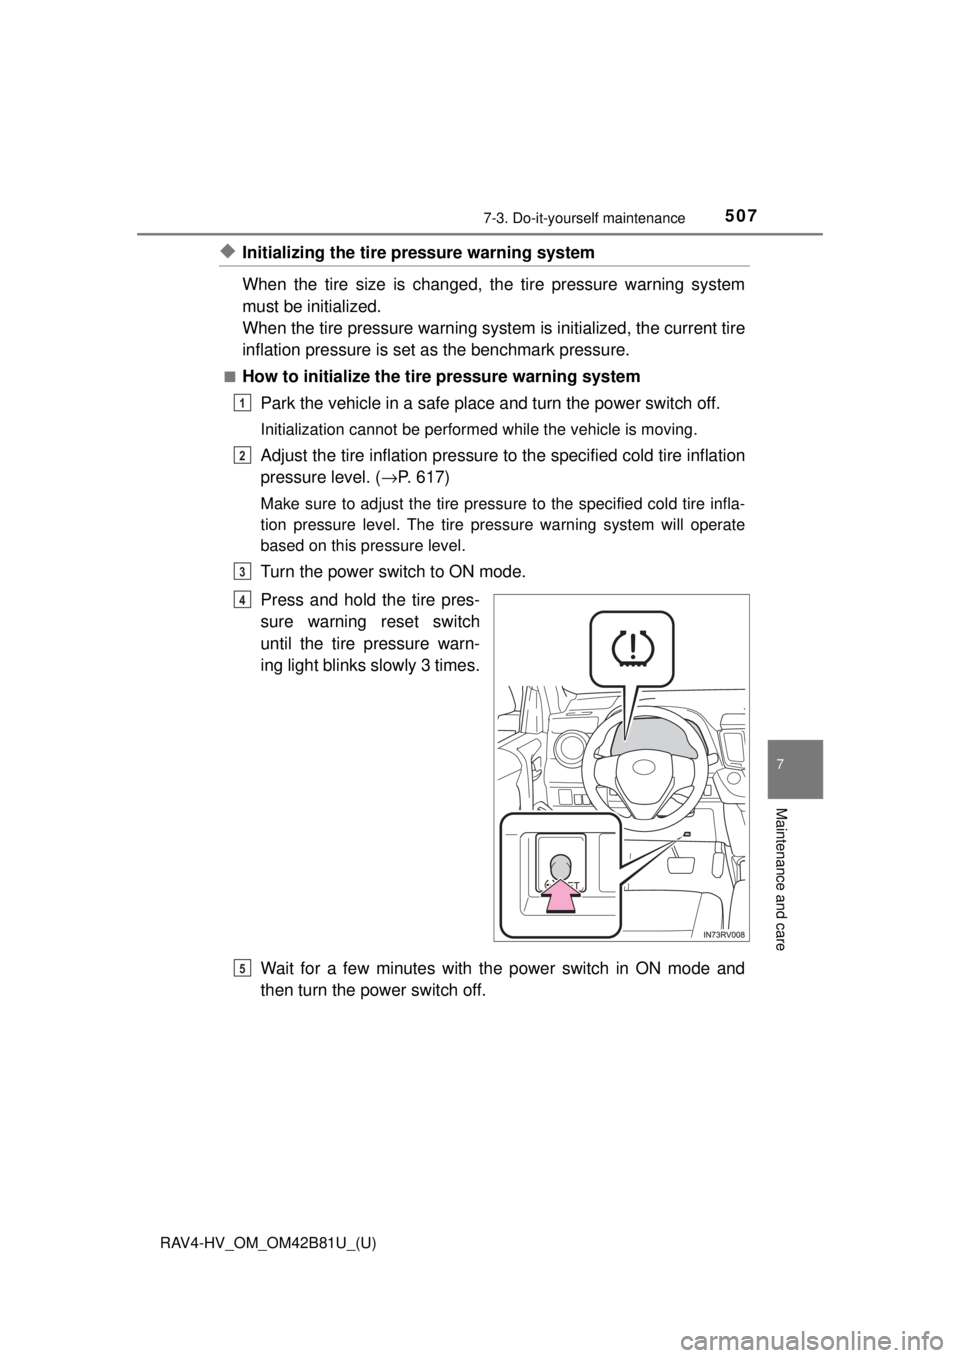
Press and hold the tire pres-
sure warning reset switch
until the tire pressure warn-
ing light blinks slowly 3 times.
Wait for a few minutes with the power switch in ON mode and
then turn the power switch off.
1
2
3
4
5
Page 511 of 680

RAV4-HV_OM_OM42B81U_(U)
5117-3. Do-it-yourself maintenance
7
Maintenance and care
■The initialization operation (vehicles with the tire pressure warning
system)
●Make sure to carry out in itialization after adjusting the tire inflation pres-
sure.
Also, make sure the tires are cold be fore carrying out initialization or tire
inflation pressure adjustment.
●If you have accidentally turned the po wer switch off during initialization,
it is not necessary to press the reset switch again as initialization will
restart automatically when the powe r switch has been turned to ON
mode for the next time.
●If you accidentally press the reset s witch when initialization is not neces-
sary, adjust the tire inflation pressu re to the specified level when the
tires are cold, and conduct initialization again.
■When initialization of the tire pressure warning system has failed (if
equipped)
Initialization can be completed in a few minutes. However, in the following
cases, the settings have not been recorded and the system will not oper-
ate properly. If repeated attempts to record tire inflation pressure settings
are unsuccessful, have the vehicle inspected by your Toyota dealer.
●When operating the tire pressure wa rning reset switch, the tire pressure
warning light does not blink 3 times.
●After driving for a certain period of time since the initialization has been
completed, the warning light comes on after blinking for 1 minute.
■Tire pressure warning system certification
For vehicles sold in the U.S.A.
FCC ID: PAXPMVC010
NOTE
This device complies with part 15 of the FCC Rules. Operation is subject
to the following two conditions: (1) This device may not cause harmful
interference, and (2) this device must accept any interference received,
including interference that may cause undesired operation.
FCC WARNING
Changes or modifications not ex pressly approved by the party
responsible for compliance could void the user’s authority to operate the
equipment.