display TOYOTA RAV4 HYBRID 2021 Owner's Guide
[x] Cancel search | Manufacturer: TOYOTA, Model Year: 2021, Model line: RAV4 HYBRID, Model: TOYOTA RAV4 HYBRID 2021Pages: 752, PDF Size: 31.25 MB
Page 114 of 752
1142-1. Instrument cluster
then press or to select
the energy monitor display.
Audio or Audio Plus (vehicles
without Data Communication
Module)
1 Press the “MENU” button.
2 Select “Info” on the “Menu”
screen.
If a screen other than “Energy mon-
itor” is displayed, select “Energy”.
Audio or Audio Plus (vehicles
with Data Communication
Module)/Premium Audio
1 Press the “MENU” button.
2 Select “Info” on the “Menu”
screen.
3 Select “ECO” on the “Infor-
mation” screen.
If a screen other than “Energy mon-
itor” is displayed, select “Energy”.
■Reading the display
The arrows will appear in accor-
dance with the energy flow.
When there is no energy flow,
arrows will not be displayed.
The color of the arrows will change
as follows
Green: When the hybrid battery
(traction battery) is regenerated or
charged.
Yellow: When the hybrid battery
(traction battery) is in use.
Red: When the gasoline engine is
in use.
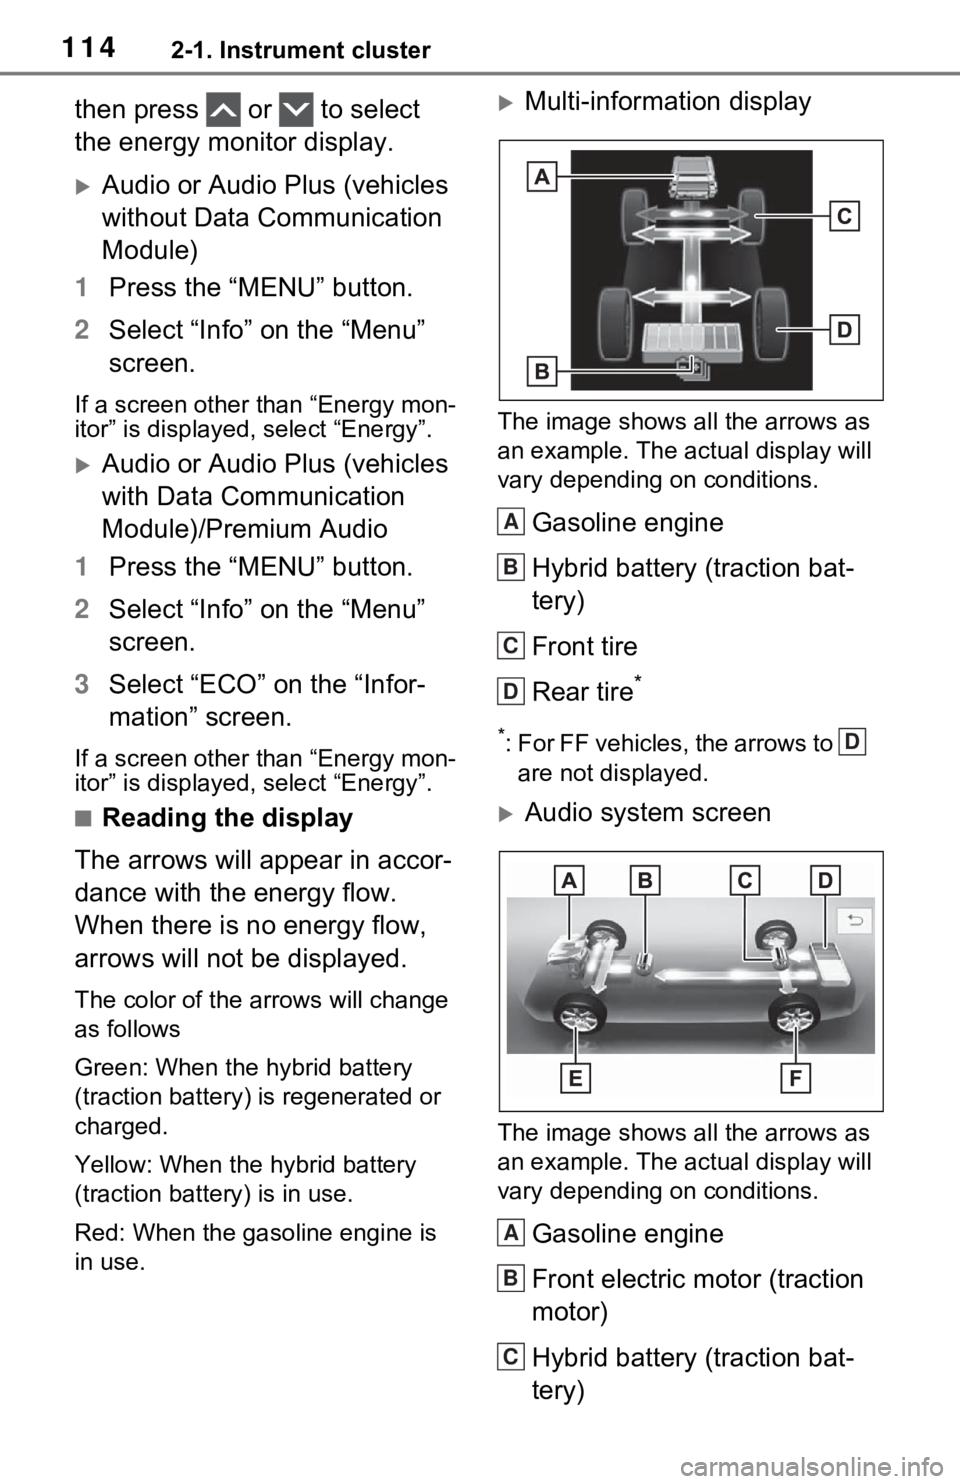
Multi-information display
The image shows all the arrows as
an example. The ac tual display will
vary depending on conditions.
Gasoline engine
Hybrid battery (traction bat-
tery)
Front tire
Rear tire
*
*: For FF vehicles, the arrows to
are not displayed.
Audio system screen
The image shows all the arrows as
an example. The ac tual display will
vary depending on conditions.
Gasoline engine
Front electric motor (traction
motor)
Hybrid battery (traction bat-
tery)
A
B
C
D
D
A
B
C
Page 115 of 752

1152-1. Instrument cluster
2
Vehicle status information and indicators
Rear electric motor (traction
motor)
Front tire
Rear tire
*
*: For FF vehicles, the arrows to
are not displayed.
Audio system screen (“Home”
screen)
The image shows all the arrows as
an example. The actual display will
vary depending on conditions.
Gasoline engine
Hybrid battery (traction bat-
tery)
Tire
■Hybrid battery (traction battery)
status
The display changes in 8 levels
according to the remaining charge
amount of the hybrid battery (trac-
tion battery).
●The figure shows the multi-infor-
mation display as an example for
explanation.
●These images are examples only,
and may vary slight ly from actual
conditions. Low
High
■Remaining charge amount
warning of hybri
d battery (trac-
tion battery)
●The buzzer sounds intermittently
when the hybrid battery (traction
battery) remains without charging
while the shift lever is in N, or the
remaining charge amount drops
below a certain level. If the
remaining charge amount drops
further, the buzz er sounds contin-
uously.
●When a warning message is
shown on the multi-information
display and the buzzer sounds,
follow the instruct ions displayed
on the screen to perform trouble-
shooting.
■Display
Audio or Audio Plus (vehicles
without Data Communication
Module)
1 Press the “MENU” button.
2 Select “Info” on the “Menu”
screen.
3 Select “Trip information” or
“History”.
D
E
F
F
A
B
CConsumption
A
B
Page 116 of 752
1162-1. Instrument cluster
Audio or Audio Plus (vehicles
with Data Communication
Module)/Premium Audio
1 Press the “MENU” button.
2 Select “Info” on the “Menu”
screen.
3 Select “ECO” on the “Infor-
mation” screen.
4 Select “Trip information” or
“History”.
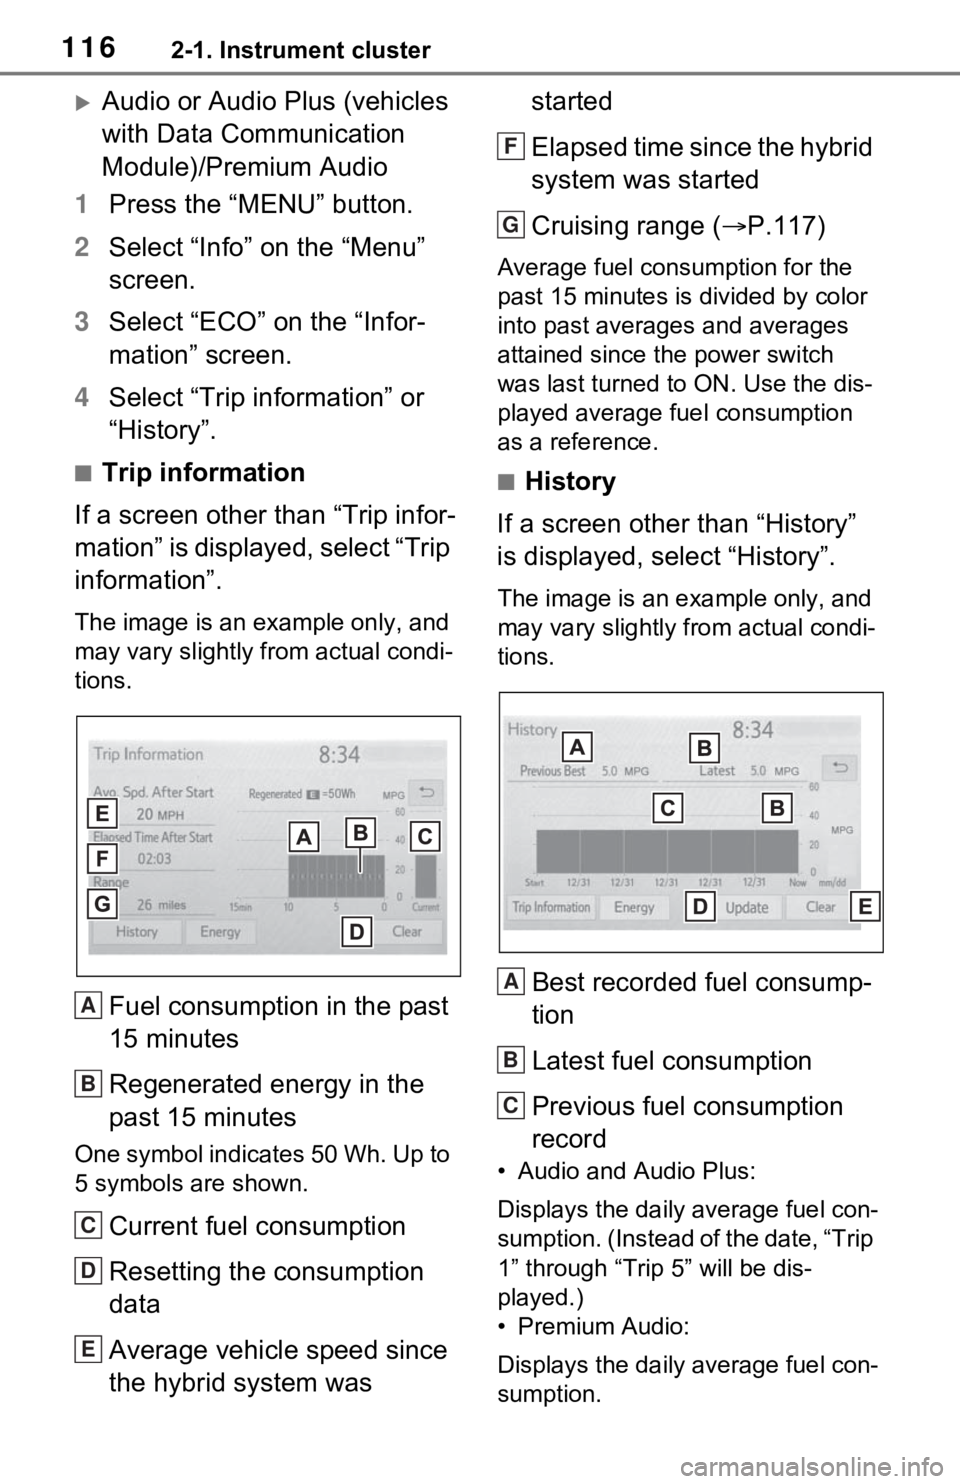
■Trip information
If a screen other than “Trip infor-
mation” is displayed, select “Trip
information”.
The image is an example only, and
may vary slightly f rom actual condi-
tions.
Fuel consumption in the past
15 minutes
Regenerated energy in the
past 15 minutes
One symbol indicates 50 Wh. Up to
5 symbols are shown.
Current fuel consumption
Resetting the consumption
data
Average vehicle speed since
the hybrid system was started
Elapsed time since the hybrid
system was started
Cruising range (
P.117)
Average fuel consumption for the
past 15 minutes is divided by color
into past averages and averages
attained since t he power switch
was last turned to ON. Use the dis-
played average fuel consumption
as a reference.
■History
If a screen other than “History”
is displayed, select “History”.
The image is an example only, and
may vary slightly from actual condi-
tions.
Best recorded fuel consump-
tion
Latest fuel consumption
Previous fuel consumption
record
• Audio and Audio Plus:
Displays the daily average fuel con-
sumption. (Instead of the date, “Trip
1” through “Trip 5” will be dis-
played.)
• Premium Audio:
Displays the daily average fuel con-
sumption.
A
B
C
D
E
F
G
A
B
C
Page 117 of 752

1172-1. Instrument cluster
2
Vehicle status information and indicators
Updating the latest fuel con-
sumption data
Resetting the history data
The average fuel consumption his-
tory is divided by color into past
averages and the average fuel con-
sumption since the last time
updated. Use the displayed aver-
age fuel consumption as a refer-
ence.
■Updating the history data
Update the latest fuel consumption
by selecting “Upda te” to measure
the current fuel consumption again.
■Resetting the data
The fuel consumption data can be
deleted by selecting “Clear”.
■Cruising range
Displays the estimated maximum
distance that can be driven with the
quantity of fuel remaining.
This distance is computed based on
your average fuel consumption. As
a result, the actual distance that can
be driven may differ from that dis-
played.
D
E
Page 120 of 752
1203-1. Key information
3-1.Key information
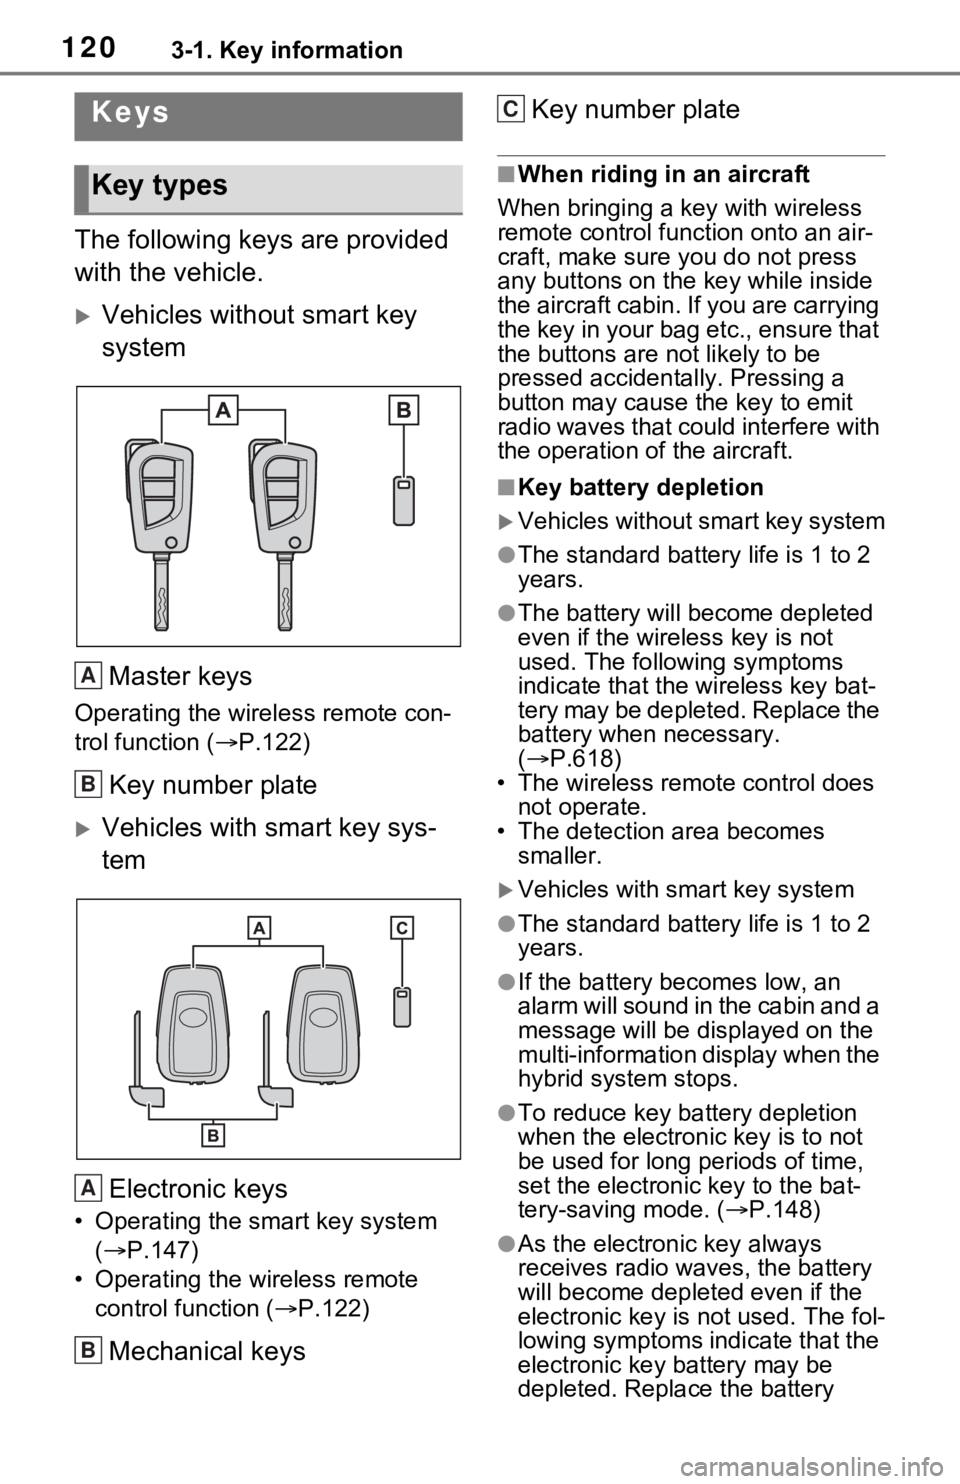
The following keys are provided
with the vehicle.
Vehicles without smart key
systemMaster keys
Operating the wireless remote con-
trol function ( P.122)
Key number plate
Vehicles with smart key sys-
tem
Electronic keys
• Operating the smart key system ( P.147)
• Operating the wireless remote control function ( P.122)
Mechanical keys Key number plate
■When riding in an aircraft
When bringing a ke y with wireless
remote control func tion onto an air-
craft, make sure you do not press
any buttons on the key while inside
the aircraft cabin. If you are carrying
the key in your bag etc., ensure that
the buttons are not likely to be
pressed accidentally. Pressing a
button may cause the key to emit
radio waves that could interfere with
the operation of the aircraft.
■Key battery depletion
Vehicles without smart key system
●The standard battery life is 1 to 2
years.
●The battery will be come depleted
even if the wireless key is not
used. The following symptoms
indicate that the wireless key bat-
tery may be depleted. Replace the
battery when necessary.
( P.618)
• The wireless remote control does not operate.
• The detection area becomes smaller.
Vehicles with smart key system
●The standard battery life is 1 to 2
years.
●If the battery bec omes low, an
alarm will sound in the cabin and a
message will be disp layed on the
multi-information display when the
hybrid system stops.
●To reduce key battery depletion
when the electronic key is to not
be used for long periods of time,
set the electronic key to the bat-
tery-saving mode. ( P.148)
●As the electronic key always
receives radio waves, the battery
will become depleted even if the
electronic key is not used. The fol-
lowing symptoms indicate that the
electronic key battery may be
depleted. Replace the battery
Keys
Key types
A
B
A
B
C
Page 121 of 752
1213-1. Key information
3
Before driving
when necessary.
• The smart key system or the wire- less remote control does not oper-
ate.
• The detection area becomes
smaller.
• The LED indicator on the key sur-
face does not turn on.
You can replace the battery by your-
self ( P.618). However, as there is
a danger that the electronic key may
be damaged, it is recommended
that replacement is carried out by
your Toyota dealer.
●To avoid serious deterioration, do
not leave the electronic key within
3 ft. (1 m) of the following electri-
cal appliances t hat produce a
magnetic field:
•TVs
• Personal computers
• Cellular phones, cordless phones and battery chargers
• Table lamps
• Induction cookers
■If a message regarding the state
of the electronic key or power
switch mode, etc. is shown
(vehicles with smart key sys-
tem)
To prevent trapping the electronic
key inside the vehicle, leaving the
vehicle carrying the electronic key
on your person without turning the
power switch to O FF or other pas-
sengers from unintentionally taking
the key out of the vehicle, etc., a
message that prompts the user to
confirm the state of the electronic
key or power switch mode may be
shown on the multi -information dis-
play. In those cases, follow the
instructions on the display immedi-
ately.
■If “Key Battery Low Replace
Key Battery” is displayed on
the multi-information display
(vehicles with smart key sys-
tem)
The electronic key has a low bat- tery. Replace the electronic key bat-
tery. (
P.618)
■Replacing the battery
P.618
■Confirmation of the registered
key number
The number of keys already regis-
tered to the vehi cle can be con-
firmed. Ask your Toyota dealer for
details.
■If “A New Key has been Regis-
tered Contact Your Dealer for
Details” is dis played on the
multi-information display (vehi-
cles with smart key system)
This message will be displayed
each time the driver’s door is
opened when the doors are
unlocked from the outside for
approximately 10 days after a new
electronic key has been registered.
If this message is displayed but you
have not had a new electronic key
registered, ask your Toyota dealer
to check if an unknown electronic
key (other than those in your pos-
session) has been registered.
NOTICE
■To prevent key damage
●Do not drop the keys, subject
them to strong shocks or bend
them.
●Do not expose the keys to high
temperatures for long periods of
time.
●Do not get the keys wet or wash
them in an ultrasonic washer,
etc.
●Do not attach m etallic or mag-
netic materials to the keys or
place the keys close to such
materials.
●Do not disassemble the keys.
Page 123 of 752
1233-1. Key information
3
Before driving
Opens and closes the power
back door
*2 ( P.137)
Sounds the alarm ( P.123)
*1: These settings must be custom-
ized at your Toyota dealer.
*2: If equipped
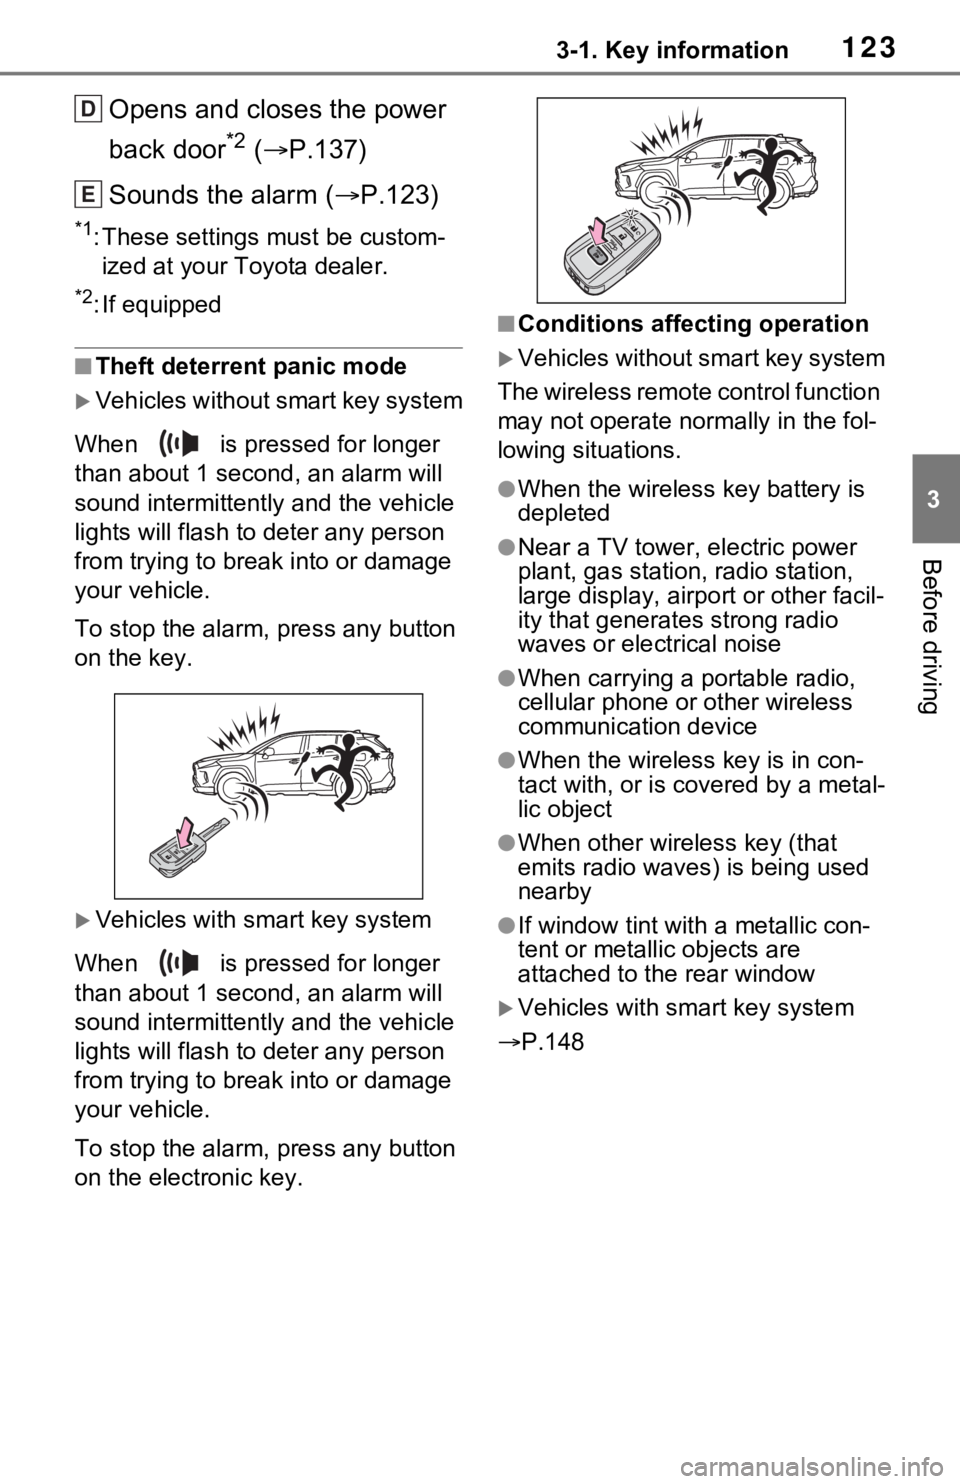
■Theft deterrent panic mode
Vehicles without smart key system
When is pressed for longer
than about 1 seco nd, an alarm will
sound intermittentl y and the vehicle
lights will flash to deter any person
from trying to break into or damage
your vehicle.
To stop the alarm, press any button
on the key.
Vehicles with smart key system
When is pressed for longer
than about 1 seco nd, an alarm will
sound intermittentl y and the vehicle
lights will flash to deter any person
from trying to break into or damage
your vehicle.
To stop the alarm, press any button
on the electronic key.
■Conditions affecting operation
Vehicles without smart key system
The wireless remote control function
may not operate normally in the fol-
lowing situations.
●When the wireles s key battery is
depleted
●Near a TV tower, electric power
plant, gas station, radio station,
large display, airpo rt or other facil-
ity that generates strong radio
waves or electrical noise
●When carrying a portable radio,
cellular phone or other wireless
communication device
●When the wireless key is in con-
tact with, or is c overed by a metal-
lic object
●When other wireless key (that
emits radio waves) is being used
nearby
●If window tint wit h a metallic con-
tent or metallic objects are
attached to the rear window
Vehicles with smart key system
P.148
D
E
Page 141 of 752
1413-2. Opening, closing and locking the doors
3
Before driving
the jam protection function, etc.,
while the back doo r is automati-
cally closing after a door reserve
lock operation is performed, the
door reserve lock function is can-
celed and all the doors will unlock.
●Before leaving the vehicle, make
sure that all the doors are closed
and locked.
■Hands Free Powe r Back Door
operating conditions (vehicles
with Hands Free Power Back
Door)
The Hands Free Power Back Door
will open/close automatically when
the following cond itions are met:
●The Hands Free Power Back Door
operation is enabled ( P.109)
●The power switch is in OFF.
●The electronic key is within the
operational range. ( P.147)
●A foot is put near the lower center
part of the rear bumper and
moved away from the rear
bumper.
The power back door may also be
operated by putting a hand, an
elbow, a knee, etc. near the lower
center part of the rear bumper and
moving it away from the rear
bumper. Make sure to put it close
enough to the center part of the
rear bumper.
■Situations in which the Hands
Free Power Back Door may not
operate properly (vehicles with
Hands Free Powe r Back Door)
In the following situations, the
Hands Free Power Back Door may
not operate properly:
●When a foot remains under the
rear bumper
●If the rear bumper is strongly hit
with a foot or is touched for a while
If the rear bumper has been touched
for a while, wait for a short time
before attempting to operate the
Hands Free Power Back Door again.
●When operated while a person is
too close to the rear bumper
●When an external radio wave
source interferes with the commu-
nication between the electronic
key and the vehicle (
P.148)
●When the vehicle is parked near
an electrical noise source which
affects the sensitivity of the Hands
Free Power Back Door, such as a
pay parking spot, gas station,
electrically heated road, or fluo-
rescent light
●When the vehicle is near a TV
tower, electric po wer plant, radio
station, large display, airport or
other facility that generates strong
radio waves or electrical noise
●When a large amount of water is
applied to the rea r bumper, such
as when the vehicle is being
washed or in heavy rain
●When mud, snow, ice, etc. is
attached to the rear bumper
●When the vehicle has been
parked for a while near objects
that may move and contact the
rear bumper, such as plants
●When an accessory i s installed to
the rear bumper
If an accessory has been installed,
turn the Hands F ree Power Back
Door operation setting off.
■Preventing unintentional opera-
tion of the Hands Free Power
Back Door (vehicles with Hands
Free Power Back Door)
When an electronic key is in the
operation range, the Hands Free
Power Back Door may operate unin-
tentionally, so be careful in the fol-
lowing situations.
●When a large amount of water is
applied to the rea r bumper, such
as when the vehicle is being
washed or in heavy rain
●When dirt is wip ed off the rear
Page 142 of 752
1423-2. Opening, closing and locking the doors
bumper
●When a small animal or small
object, such as a ball, moves
under the rear bumper
●When an object is moved from
under the rear bumper
●If someone is swinging their legs
while sitting on the rear bumper
●If the legs or another part of some-
one’s body contacts the rear
bumper while passing by the vehi-
cle
●When the vehicle is parked near
an electrical noise source which
affects the sensitivity of the Hands
Free Power Back Door, such as a
pay parking spot , gas station,
electrically heated road, or fluo-
rescent light
●When the vehicle is near a TV
tower, electric power plant, radio
station, large display, airport or
other facility that generates strong
radio waves or electrical noise
●When the vehicle is parked in a
place where objects such as
plants are near the rear bumper
●If luggage, etc. is s et near the rear
bumper
●If accessories or a vehicle cover is
installed/removed near the rear
bumper
●When the vehicle is being towed
To prevent unintentional operation,
turn the Hands Free Power Back
Door operation setting off. ( P.109)
■When reconnecting the 12-volt
battery
To enable the power back door to
operate properly, close the back
door manually.
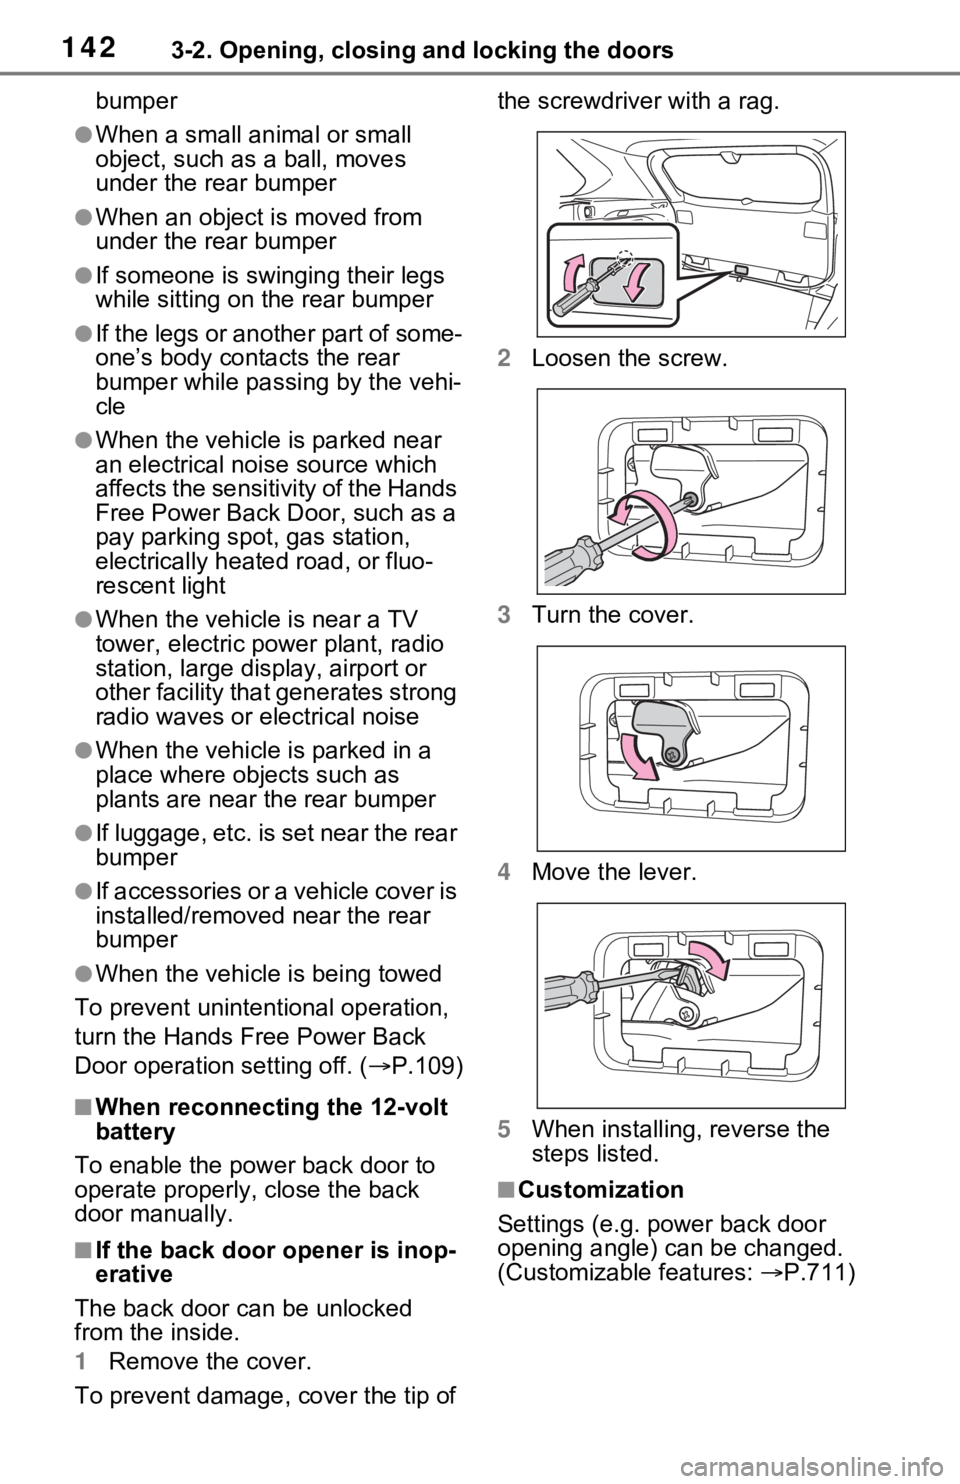
■If the back door opener is inop-
erative
The back door can be unlocked
from the inside.
1 Remove the cover.
To prevent damage, cover the tip of the screwdriver with a rag.
2
Loosen the screw.
3 Turn the cover.
4 Move the lever.
5 When installing, reverse the
steps listed.
■Customization
Settings (e.g. power back door
opening angle) can be changed.
(Customizable features: P.711)
Page 146 of 752
1463-2. Opening, closing and locking the doors
The settings of the power back
door system can be changed by
displaying the “Vehicle Set-
tings” - “PBD” screen from the screen of the multi-informa-
tion display. ( P.109)
The changed power back door set-
tings are not reset by turning the
power switch to OFF. In order to
restore the original settings, they
need to be chan ged back on the
screen of the multi-information
display.
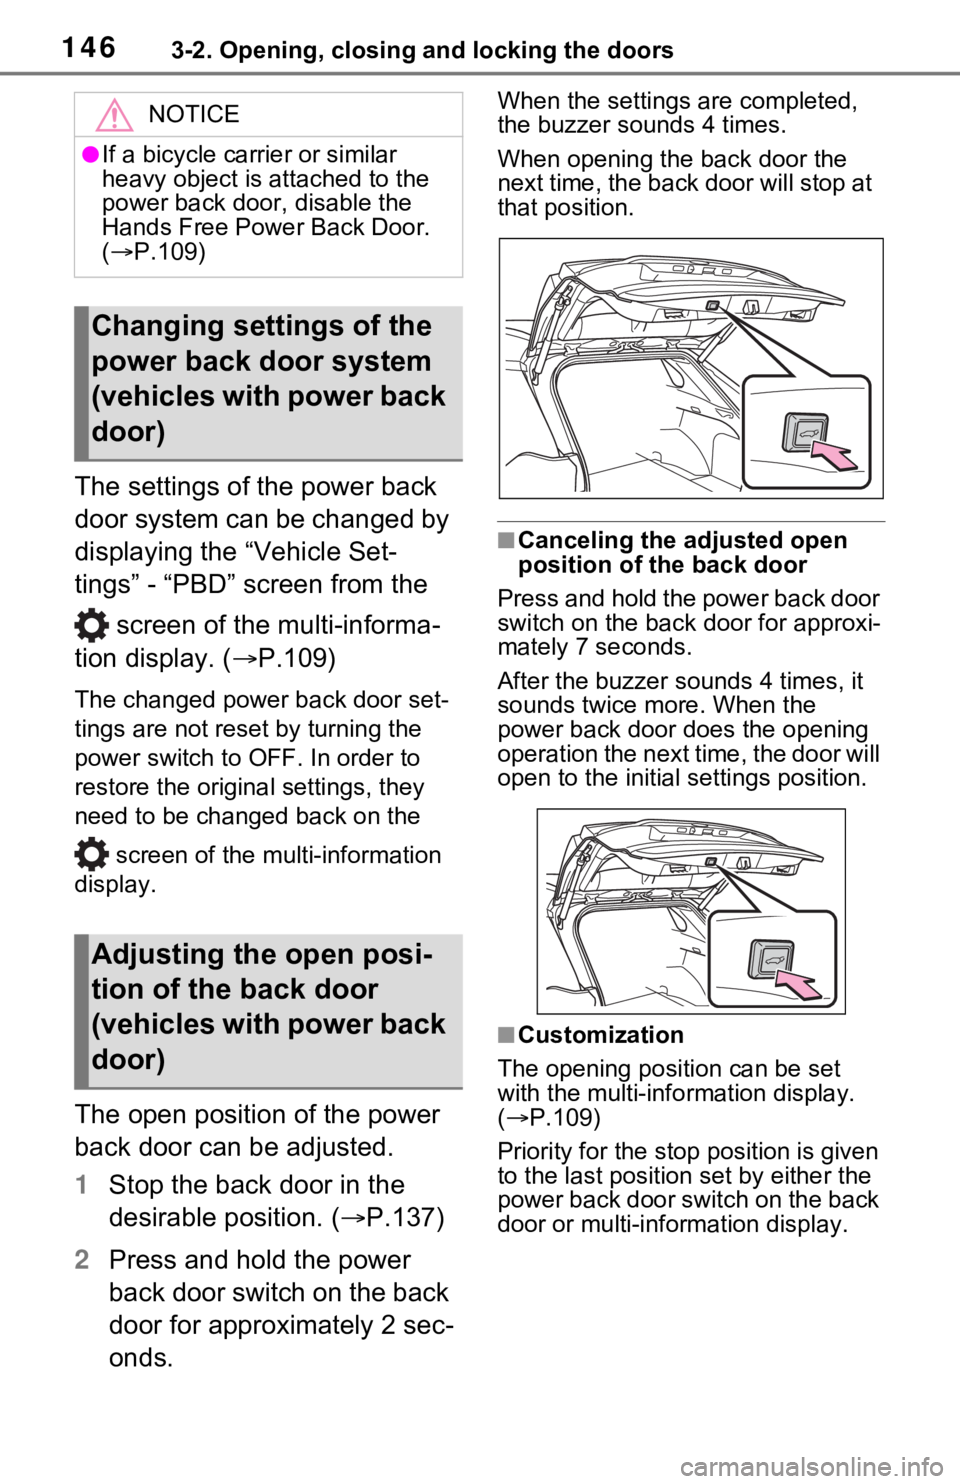
The open position of the power
back door can be adjusted.
1 Stop the back door in the
desirable position. ( P.137)
2 Press and hold the power
back door switch on the back
door for approximately 2 sec-
onds.
When the settings are completed,
the buzzer sounds 4 times.
When opening the back door the
next time, the back door will stop at
that position.
■Canceling the adjusted open
position of the back door
Press and hold the power back door
switch on the back door for approxi-
mately 7 seconds.
After the buzzer sounds 4 times, it
sounds twice more. When the
power back door does the opening
operation the next time, the door will
open to the initial settings position.
■Customization
The opening position can be set
with the multi-info rmation display.
( P.109)
Priority for the stop position is given
to the last position set by either the
power back door switch on the back
door or multi-information display.
NOTICE
●If a bicycle carrier or similar
heavy object is attached to the
power back door, disable the
Hands Free Power Back Door.
( P.109)
Changing settings of the
power back door system
(vehicles with power back
door)
Adjusting the open posi-
tion of the back door
(vehicles with power back
door)