display TOYOTA RAV4 HYBRID 2021 Repair Manual
[x] Cancel search | Manufacturer: TOYOTA, Model Year: 2021, Model line: RAV4 HYBRID, Model: TOYOTA RAV4 HYBRID 2021Pages: 752, PDF Size: 31.25 MB
Page 218 of 752

2184-2. Driving procedures
■Situations in which EV drive
mode cannot be turned on
It may not be po ssible to turn EV
drive mode on in t he following situa-
tions. If it cannot be turned on, a
buzzer will sound and a message
will be shown on the multi-informa-
tion display.
●The temperature of the hybrid sys-
tem is high.
The vehicle has been left in the
sun, driven on a hill, driven at high
speeds, etc.
●The temperature of the hybrid sys-
tem is low.
The vehicle has been left in tem-
peratures lower than about 32°F
(0°C) for a long period of time etc.
●The gasoline engine is warming
up.
●The hybrid battery (traction bat-
tery) is low.
The remaining batt ery level indi-
cated in the Energy monitor dis-
play is low. ( P.113)
●Vehicle speed is high.
●The accelerator pedal is
depressed firmly or the vehicle is
on a hill etc.
●The windshield defogger is in use.
Use the EV drive mode when it
becomes available.
■Switching to EV drive mode
when the gasoline engine is
cold
If the hybrid system is started while
the gasoline engine is cold, the gas-
oline engine will star t automatically
after a short peri od of time in order
to warm up.
In this case, you will become unable
t o s w i t c h t o E V d r i v e m o d e . A f t e r t h e
hybrid system has started and the
“READY” indicator has illuminated,
press the EV drive mode switch
before the gasoline engine starts to
switch to EV drive mode.
■Automatic cancelation of EV
drive mode
When driving in EV drive mode, the
gasoline engine may automatically
restart in the follo wing situations.
When EV drive mode is canceled, a
buzzer will sound, the EV drive
mode indicator will flash and go off
and a message will be shown on the
multi-informat ion display.
●The hybrid battery (traction bat-
tery) becomes low.
The remaining batt ery level indi-
cated in the Ener gy monitor dis-
play is low. ( P.113)
●Vehicle speed is high.
●The accelerator pedal is
depressed firmly or the vehicle is
on a hill etc.
Drive the vehicle for a while before
attempting to turn on the EV drive
mode again.
■Possible driving distance when
driving in EV drive mode
EV drive mode’s possible driving
distance ranges from a few hundred
meters to approximately 0.6 mile (1
km). However, depending on vehi-
cle conditions, there are situations
when EV drive mode cannot be
used.
(The distance tha t is possible
depends on the hybrid battery [trac-
tion battery] level a nd driving condi-
tions.)
■Fuel economy
The hybrid system is designed to
achieve the best possible fuel econ-
omy during normal driving (using
the gasoline engine and electric
motor [traction motor]). Driving in
EV drive mode more than neces-
sary may lower fuel economy.
Page 222 of 752
2224-2. Driving procedures
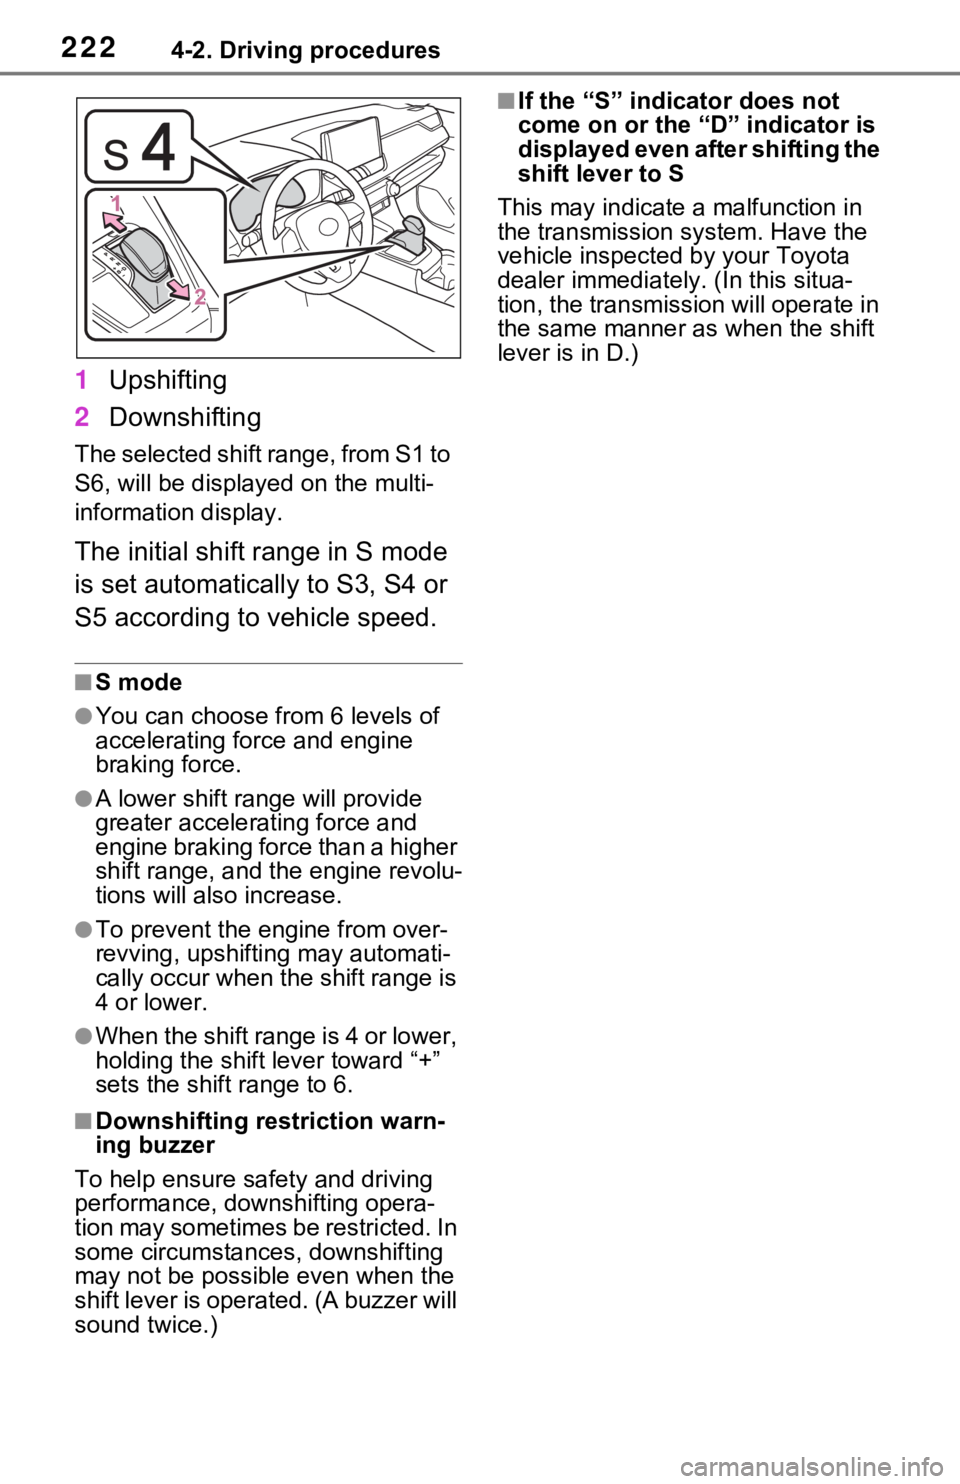
1Upshifting
2 Downshifting
The selected shift range, from S1 to
S6, will be displayed on the multi-
information display.
The initial shift range in S mode
is set automatically to S3, S4 or
S5 according to vehicle speed.
■S mode
●You can choose from 6 levels of
accelerating force and engine
braking force.
●A lower shift range will provide
greater accelerating force and
engine braking force than a higher
shift range, and t he engine revolu-
tions will also increase.
●To prevent the e ngine from over-
revving, upshifti ng may automati-
cally occur when the shift range is
4 or lower.
●When the shift range is 4 or lower,
holding the shift lever toward “+”
sets the shift range to 6.
■Downshifting restriction warn-
ing buzzer
To help ensure safety and driving
performance, downshifting opera-
tion may sometimes b e restricted. In
some circumstances, downshifting
may not be possible even when the
shift lever is operated. (A buzzer will
sound twice.)
■If the “S” indi cator does not
come on or the “D” indicator is
displayed even after shifting the
shift lever to S
This may indicate a malfunction in
the transmission system. Have the
vehicle inspected by your Toyota
dealer immediately. (In this situa-
tion, the transmission will operate in
the same manner as when the shift
lever is in D.)
Page 224 of 752
2244-2. Driving procedures
■Using the manual mode
The parking brake can be set
and released manually.
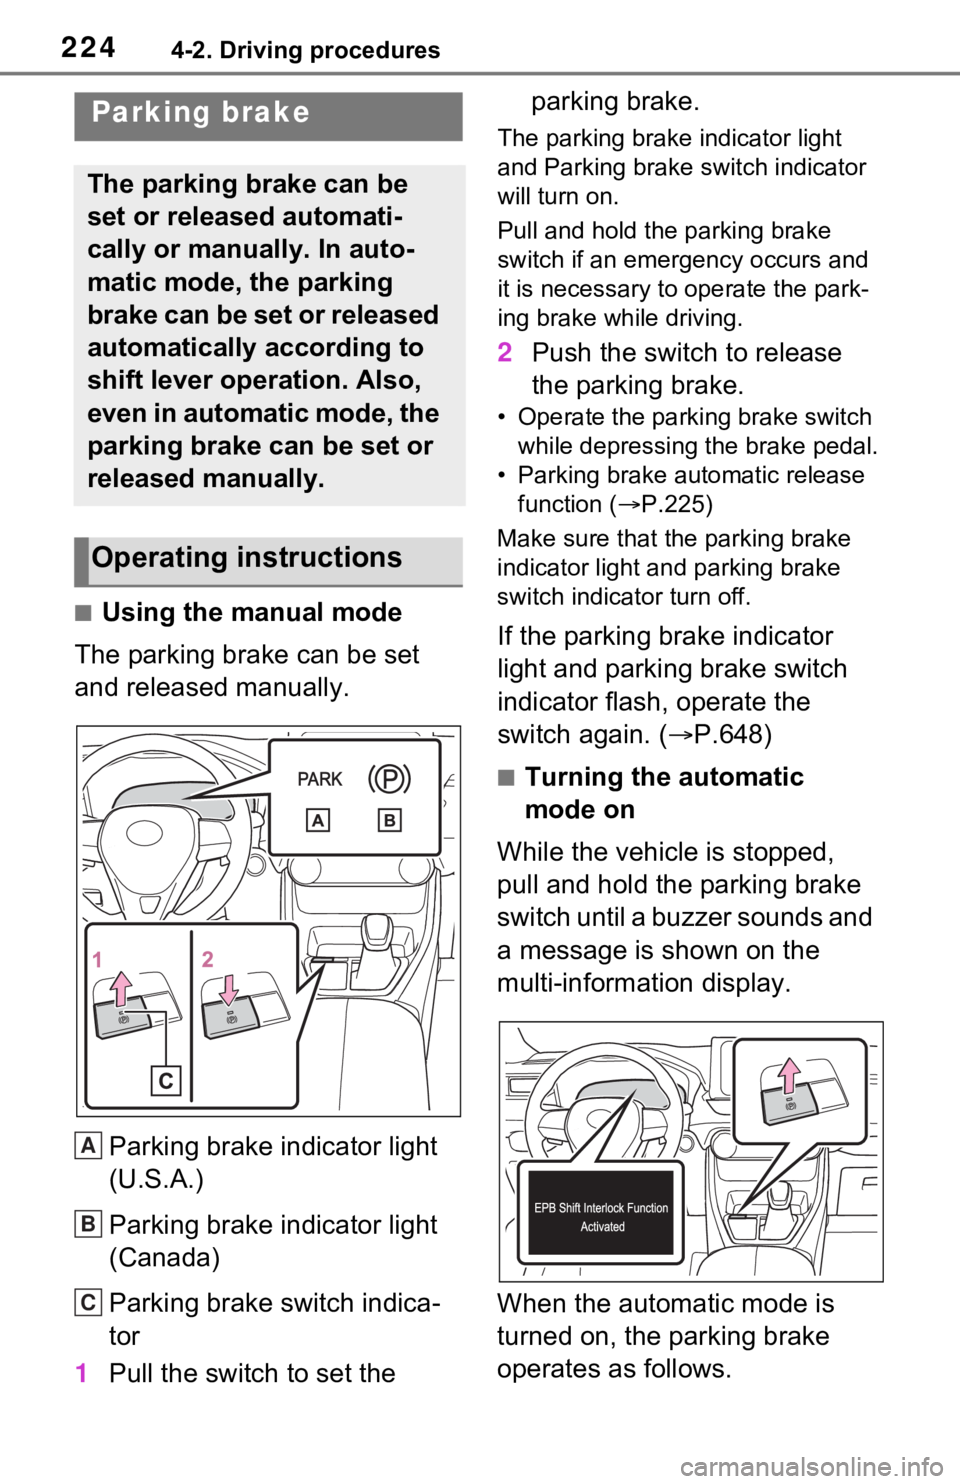
Parking brake indicator light
(U.S.A.)
Parking brake indicator light
(Canada)
Parking brake switch indica-
tor
1 Pull the switch to set the parking brake.
The parking brake indicator light
and Parking brake switch indicator
will turn on.
Pull and hold the parking brake
switch if an emergency occurs and
it is necessary to
operate the park-
ing brake while driving.
2 Push the switch to release
the parking brake.
• Operate the parking brake switch
while depressing the brake pedal.
• Parking brake automatic release function ( P.225)
Make sure that the parking brake
indicator light and parking brake
switch indicator turn off.
If the parking brake indicator
light and parking brake switch
indicator flash, operate the
switch again. ( P.648)
■Turning the automatic
mode on
While the vehicle is stopped,
pull and hold the parking brake
switch until a buzzer sounds and
a message is shown on the
multi-information display.
When the automatic mode is
turned on, the parking brake
operates as follows.
Parking brake
The parking brake can be
set or released automati-
cally or manually. In auto-
matic mode, the parking
brake can be set or released
automatically according to
shift lever operation. Also,
even in automatic mode, the
parking brake can be set or
released manually.
Operating instructions
A
B
C
Page 225 of 752
2254-2. Driving procedures
4
Driving
When the shift lever is shifted
from P, the parking brake will
be released, and the parking
brake indicator light and park-
ing brake switch indicator will
turn off.
When the shift lever is shifted
to P, the parking brake will be
set, and the parking brake
indicator light and parking
brake switch indicator will turn
on.
Operate the shift lever with the
vehicle stopped and the brake
pedal depressed.
■Turning the automatic
mode off
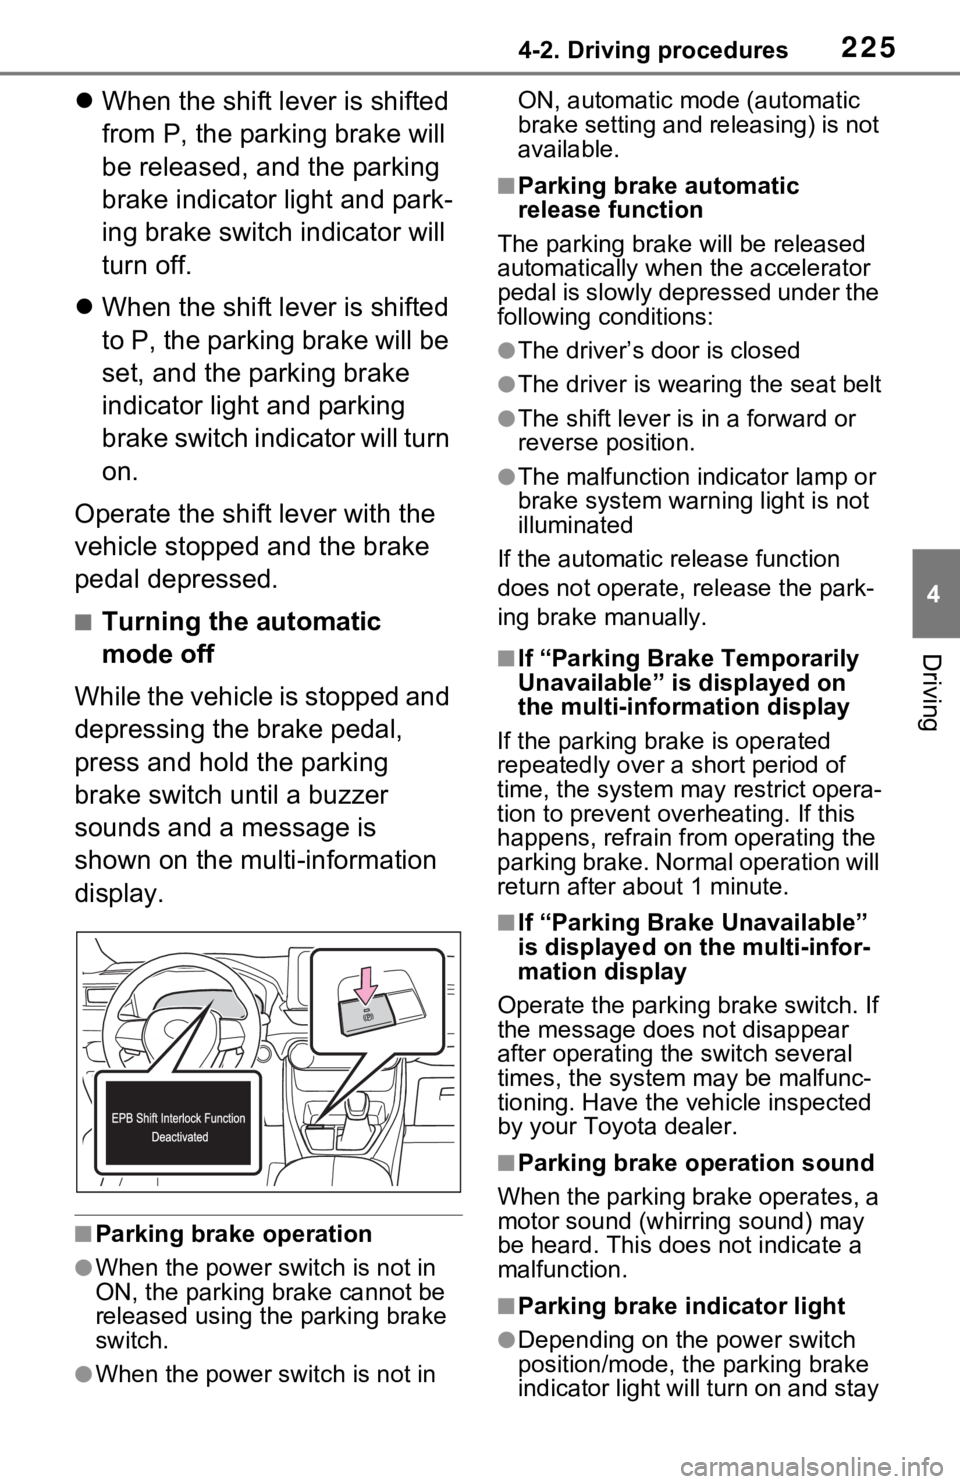
While the vehicle is stopped and
depressing the brake pedal,
press and hold the parking
brake switch until a buzzer
sounds and a message is
shown on the multi-information
display.
■Parking brake operation
●When the power s witch is not in
ON, the parking brake cannot be
released using the parking brake
switch.
●When the power s witch is not in ON, automatic mode (automatic
brake setting and releasing) is not
available.
■Parking brake automatic
release function
The parking brake will be released
automatically when the accelerator
pedal is slowly depressed under the
following conditions:
●The driver’s door is closed
●The driver is wearing the seat belt
●The shift lever is in a forward or
reverse position.
●The malfunction in dicator lamp or
brake system warning light is not
illuminated
If the automatic release function
does not operate, release the park-
ing brake manually.
■If “Parking Brake Temporarily
Unavailable” is displayed on
the multi-info rmation display
If the parking brake is operated
repeatedly over a short period of
time, the system may restrict opera-
tion to prevent ove rheating. If this
happens, refrain from operating the
parking brake. Normal operation will
return after about 1 minute.
■If “Parking Brake Unavailable”
is displayed on the multi-infor-
mation display
Operate the parking brake switch. If
the message does not disappear
after operating the switch several
times, the system may be malfunc-
tioning. Have the vehicle inspected
by your Toyo ta dealer.
■Parking brake operation sound
When the parking brake operates, a
motor sound (whirr ing sound) may
be heard. This does not indicate a
malfunction.
■Parking brake indicator light
●Depending on the power switch
position/mode, the parking brake
indicator light will turn on and stay
Page 227 of 752
2274-2. Driving procedures
4
Driving
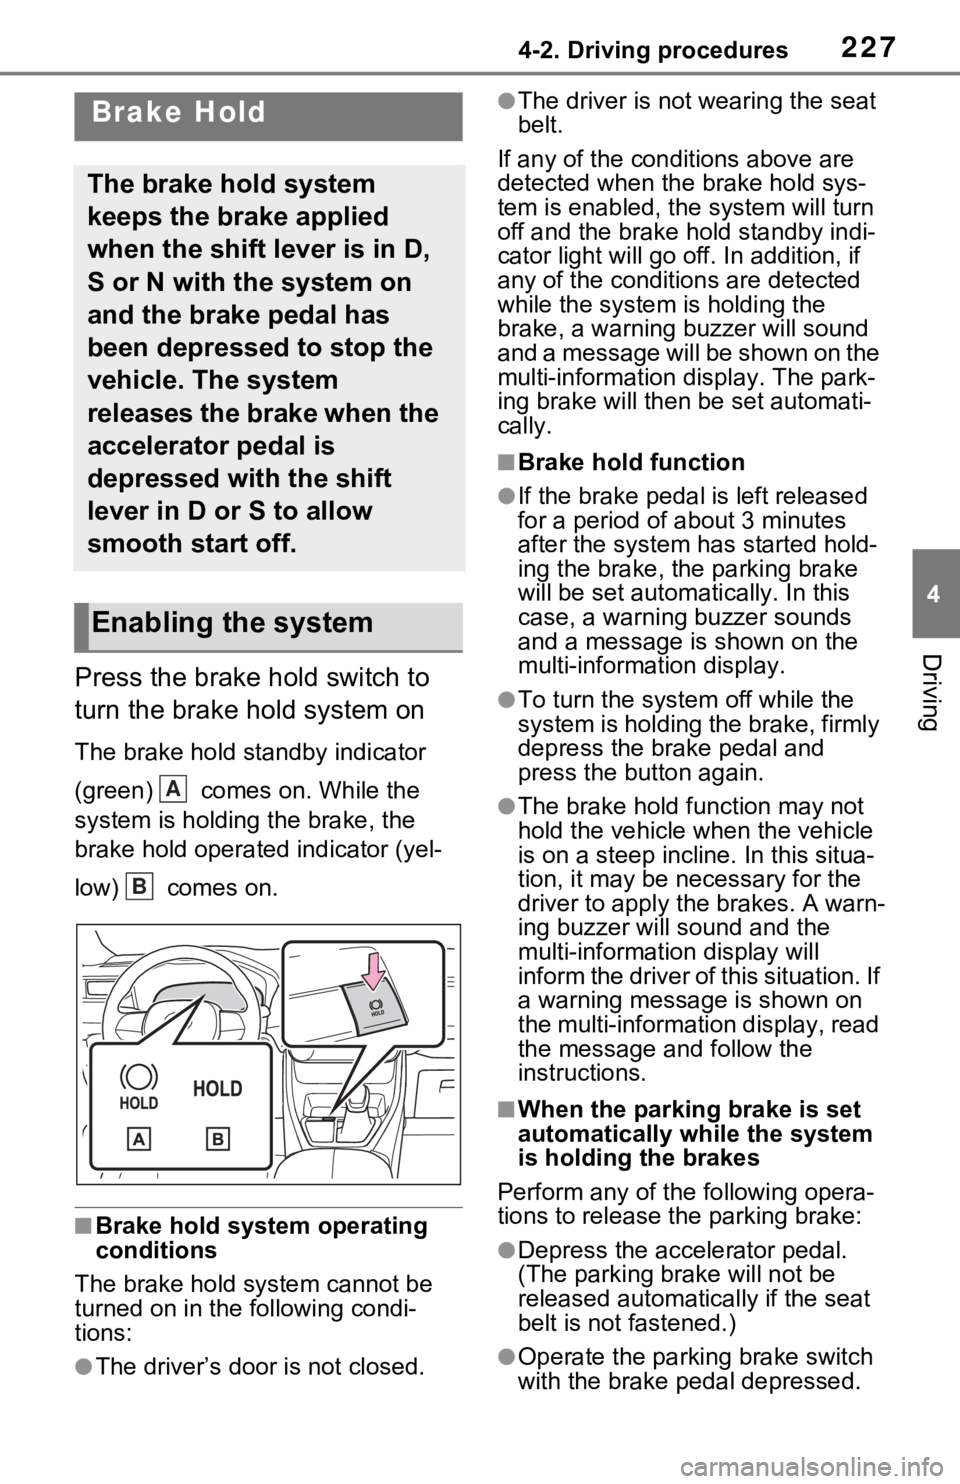
Press the brake hold switch to
turn the brake hold system on
The brake hold standby indicator
(green) comes on. While the
system is holding the brake, the
brake hold operated indicator (yel-
low) comes on.
■Brake hold system operating
conditions
The brake hold system cannot be
turned on in the following condi-
tions:
●The driver’s doo r is not closed.
●The driver is not wearing the seat
belt.
If any of the cond itions above are
detected when the brake hold sys-
tem is enabled, the system will turn
off and the brake hold standby indi-
cator light will go off. In addition, if
any of the conditions are detected
while the system is holding the
brake, a warning buzzer will sound
and a message will be shown on the
multi-information display. The park-
ing brake will then be set automati-
cally.
■Brake hold function
●If the brake pedal is left released
for a period of about 3 minutes
after the system has started hold-
ing the brake, the parking brake
will be set automatically. In this
case, a warning buzzer sounds
and a message is shown on the
multi-information display.
●To turn the syste m off while the
system is holding the brake, firmly
depress the brake pedal and
press the button again.
●The brake hold function may not
hold the vehicle when the vehicle
is on a steep incline. In this situa-
tion, it may be ne cessary for the
driver to apply the brakes. A warn-
ing buzzer will sound and the
multi-information display will
inform the driver of this situation. If
a warning message is shown on
the multi-information display, read
the message and follow the
instructions.
■When the parking brake is set
automatically while the system
is holding the brakes
Perform any of the following opera-
tions to release the parking brake:
●Depress the accelerator pedal.
(The parking brake will not be
released automatically if the seat
belt is not fastened.)
●Operate the parkin g brake switch
with the brake pedal depressed.
Brake Hold
The brake hold system
keeps the brake applied
when the shift lever is in D,
S or N with the system on
and the brake pedal has
been depressed to stop the
vehicle. The system
releases the brake when the
accelerator pedal is
depressed with the shift
lever in D or S to allow
smooth start off.
Enabling the system
A
B
Page 228 of 752
2284-2. Driving procedures
Make sure that the parking brake
indicator light goes off. ( P.224)
■When an inspection at your
Toyota dealer is necessary
When the brake hold standby indi-
cator (green ) does not illuminate
even when the brake hold switch is
pressed with the brake hold system
operating conditions met, the sys-
tem may be malfunctioning. Have
the vehicle inspected at your Toyota
dealer.
■If “Brake Hold Malfunction
Press Brake to Deactivate Visit
Your Dealer” or “Brake Hold
Malfunction Visit Your Dealer”
is displayed on the multi-infor-
mation display
The system may be malfunctioning.
Have the vehicle inspected by your
Toyota dealer.
■Warning messages and buzzers
Warning messages and buzzers are
used to indicate a system malfunc-
tion or to inform the driver of the
need for caution. If a warning mes-
sage is shown on th e multi-informa-
tion display, read the message and
follow the instructions.
■If the brake hold operated indi-
cator flashes
P.648
WARNING
■When the vehicle is on a
steep incline
When using the brake hold sys-
tem on a steep in cline, exercise
caution. The brake hold function
may not hold the vehicle in such a
situation.
■When stopped on a slippery
road
The system cannot stop the vehi-
cle when the gripping ability of the
tires has been exceeded. Do not
use the system w hen stopped on
a slippery road.
NOTICE
■When parking the vehicle
The brake hold system is not
designed for use when parking
the vehicle for a long period of
time. Turning the power switch to
OFF while the system is holding
the brake may release the brake,
which would cause the vehicle to
move. When operating the power
switch, depress the brake pedal,
shift the shift lever to P and set
the parking brake.
Page 231 of 752
2314-3. Operating the lights and wipers
4
Driving
lights turn off 30 seconds after the
power switch is turned to ACC or
OFF and a door is opened and
closed. (The lights turn off imme-
diately if on the key is
pressed after all the doors are
closed.)
●When only the tail lights are on:
The tail lights turn off automati-
cally if the power switch is turned
to ACC or OFF and the driver’s
door is opened.
To turn the lights on again, turn the
power switch to ON, or turn the light
switch off once and then back to
or position.
■Light reminder buzzer
Vehicles without smart key system
A buzzer sounds when the power
switch is turned to ACC or OFF, the
key is removed and the driver’s door
is opened while the lights are turned
on.
Vehicles with smart key system
A buzzer sounds when the power
switch is turned to ACC or OFF and
the driver’s door is opened while the
lights are turned on.
■Automatic headlight leveling
system (if equipped)
The level of the headlights is auto-
matically adjusted according to the
number of passengers and the load-
ing condition of the vehicle to
ensure that the headlights do not
interfere with other road users.
■Windshield wiper linked head-
light illumination (if equipped)
When driving during daytime with
the headlight switch turned to , if
the windshield wipers are used, the
headlights will turn on automatically
after several seconds to help
enhance the visibility of your vehi- cle.
■12-volt battery-saving function
In order to prevent the 12-volt bat-
tery of the vehicle from discharging,
if the headlights and/or tail lights are
on when the power switch is turned
to OFF, the battery saving function
will operate and au tomatically turn
off all the lights af ter approximately
20 minutes.
When any of the following are per-
formed, the battery-saving function
is canceled once and then reacti-
vated. All the light s will turn off auto-
matically 20 minutes after the
battery-saving function has been
reactivated:
●When the headlight switch is oper-
ated
●When a door is opened or closed
■If “Headlight System Malfunc-
tion Visit Your Dealer” is dis-
played on the multi-information
display
The system may be malfunctioning.
Have the vehicle inspected by your
Toyota dealer.
■Customization
Settings (e.g. light sensor sensitiv-
ity) can be changed.
(Customizable features: P.713)
NOTICE
■To prevent 12-volt battery dis-
charge
Do not leave the lights on longer
than necessary when the hybrid
system is not running.
Page 234 of 752
2344-3. Operating the lights and wipers
• The windshield is obscured by fog, mist, ice, dirt, etc.
• The windshield is cracked or dam- aged
• The front camera is deformed or
dirty
• When the temperature of the front
camera is extremely high
• Surrounding brightness levels are equal to those of h eadlights, tail
lights or fog lights
• When headlights or tail lights of vehicles ahead are turned off,
dirty, changing color, or not aimed
properly
• When the vehicle is hit by water,
snow, dust, etc. fr om a preceding
vehicle
• When driving thr ough an area of
intermittently changing brightness
and darkness
• When frequently and repeatedly driving ascending/descending
roads, or roads with rough, bumpy
or uneven surfaces (such as
stone-paved roads, gravel roads,
etc.)
• When frequently and repeatedly taking curves or driving on a wind-
ing road
• There is a highly reflective object
ahead of the vehicle, such as a
sign or mirror
• The back of a vehicle ahead is highly reflective, such as a con-
tainer on a truck
• The vehicle’s headlights are dam- aged or dirty, or are not aimed
properly
• The vehicle is listing or titling due to a flat tire, a trailer being towed,
etc.
• The high beam and low beam are repeatedly being switched
between in an abnormal manner
• The driver believes that the high beam may be causing problems
or distress to other drivers or
pedestrians nearby■If “Headlight System Malfunc-
tion Visit Your Dealer” is dis-
played on the multi-information
display
The system may be malfunctioning.
Have the vehicle inspected by your
Toyota dealer.
■Temporarily lowering sensor
sensitivity
The sensitivity of the sensor can be
temporarily lowered.
1 Turn the power switch to OFF
while the following conditions are
met.
●The headlight switch is in or
position.
●The headlight switch lever is in
high beam position.
●Automatic High Beam switch is
on.
2 Turn the power switch to ON.
3 Within 60 seconds after step 2,
repeat pulling the headlight
switch lever to the original posi-
tion then pushing it to the high
beam position qui ckly 10 times,
then leave the lever in high beam
position.
4 If the sensitivity is changed, the
Automatic High Beam indicator
is turn on and off 3 times.
Automatic High Beam (headlights)
may turn on even when the vehicle
is stopped.
■Switching to the low beam
Pull the lever to original position.
The Automatic High Beam indicator
will turn off.
Push the lever away from you to
activate the Automatic High Beam
system again.
Turning the high beam
on/off manually
Page 242 of 752
2424-4. Refueling
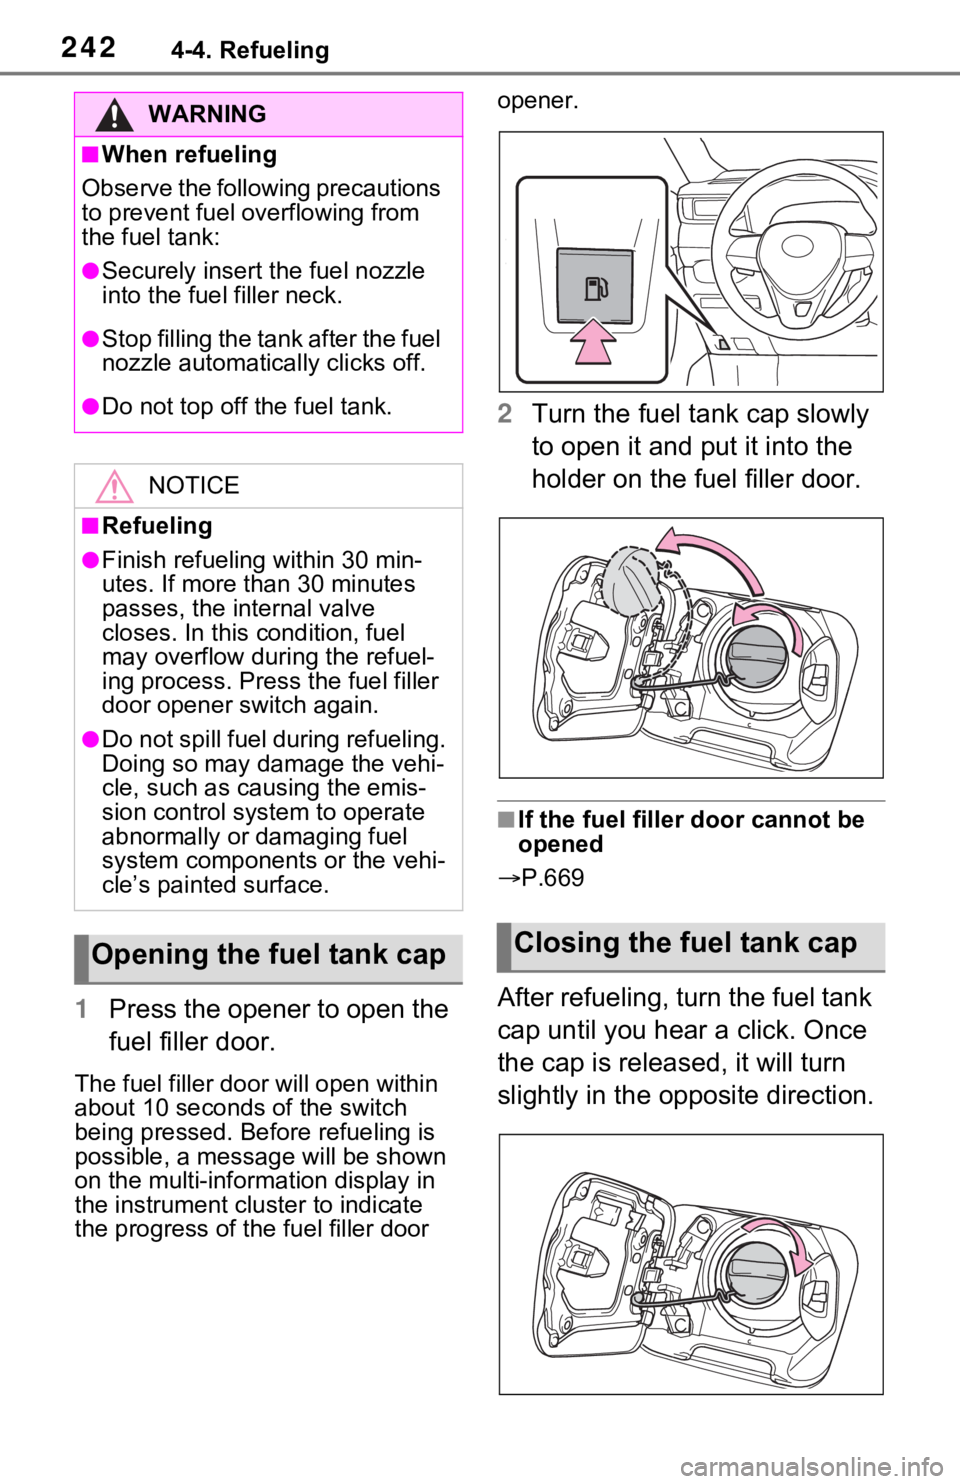
1Press the opener to open the
fuel filler door.
The fuel filler doo r will open within
about 10 seconds of the switch
being pressed. Before refueling is
possible, a messa ge will be shown
on the multi-information display in
the instrument cluster to indicate
the progress of the fuel filler door opener.
2
Turn the fuel tank cap slowly
to open it and put it into the
holder on the fuel filler door.
■If the fuel filler door cannot be
opened
P.669
After refueling, turn the fuel tank
cap until you hear a click. Once
the cap is released, it will turn
slightly in the opposite direction.
WARNING
■When refueling
Observe the following precautions
to prevent fuel overflowing from
the fuel tank:
●Securely insert the fuel nozzle
into the fuel filler neck.
●Stop filling the tank after the fuel
nozzle automatically clicks off.
●Do not top off the fuel tank.
NOTICE
■Refueling
●Finish refueling within 30 min-
utes. If more than 30 minutes
passes, the internal valve
closes. In this condition, fuel
may overflow during the refuel-
ing process. Press the fuel filler
door opener switch again.
●Do not spill fuel during refueling.
Doing so may damage the vehi-
cle, such as causing the emis-
sion control system to operate
abnormally or damaging fuel
system components or the vehi-
cle’s painted surface.
Opening the fuel tank capClosing the fuel tank cap
Page 243 of 752
2434-4. Refueling
4
Driving
■When “Check Fuel Cap” is dis-
played on the multi-information
display
The fuel tank cap may be unfas-
tened or loose. Turn the power
switch to OFF, check the cap and
tighten it securely. If the message
remains, wait a few seconds and
then turn the pow er switch to OFF
once again.
WARNING
■When replacing the fuel tank
cap
Do not use anything but a genu-
ine Toyota fuel tank cap designed
for your vehicle. Doing so may
cause a fire or other incident
which may result in death or seri-
ous injury.
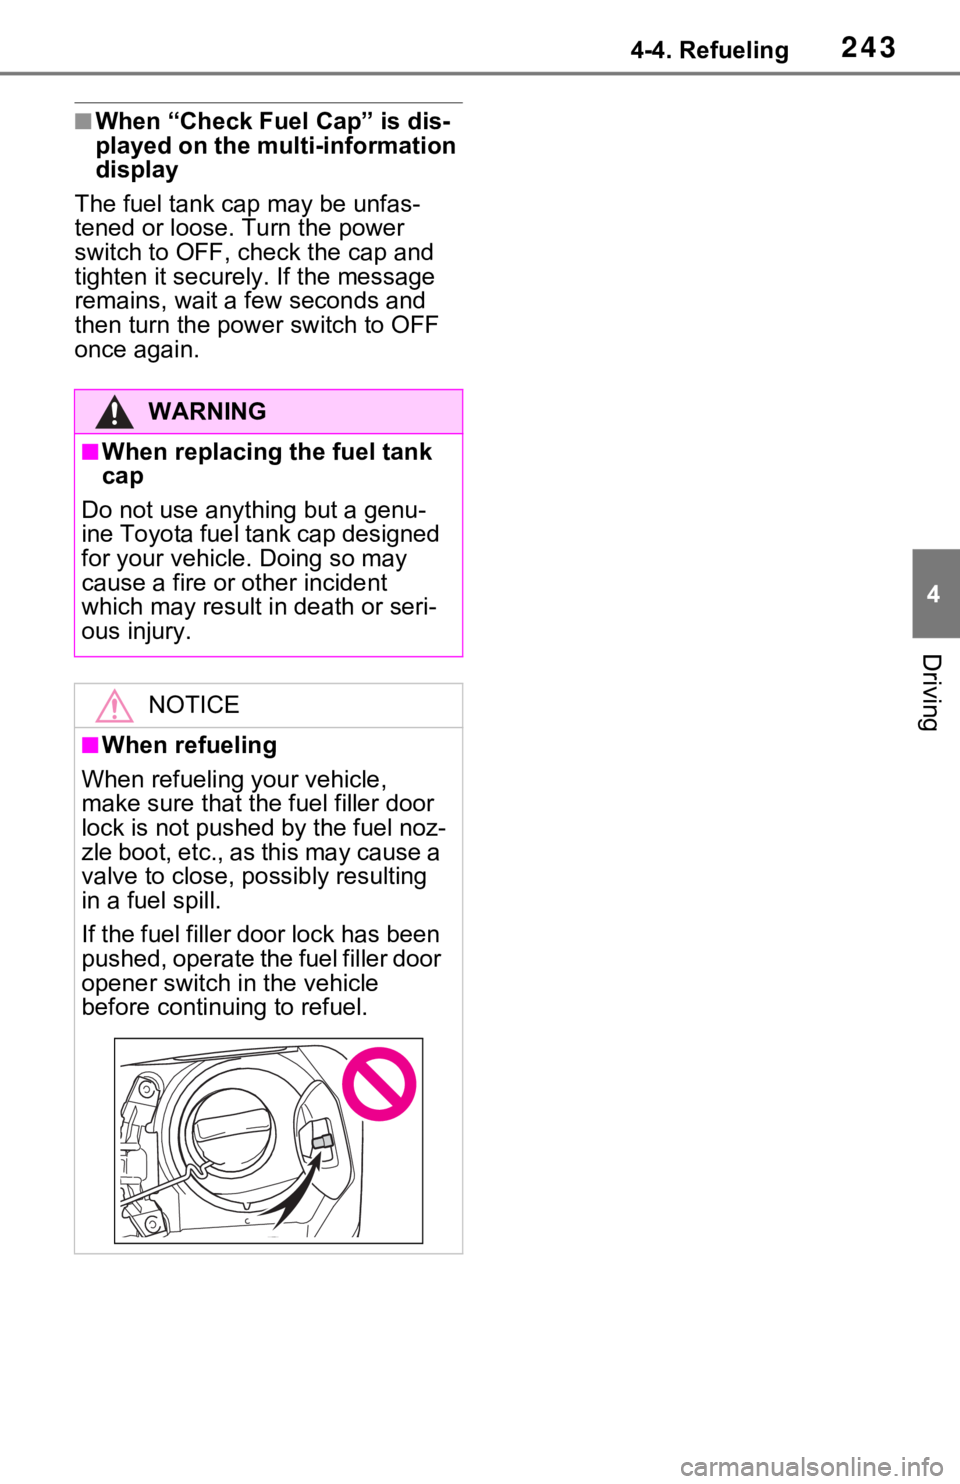
NOTICE
■When refueling
When refueling your vehicle,
make sure that the fuel filler door
lock is not pushed by the fuel noz-
zle boot, etc., as this may cause a
valve to close, possibly resulting
in a fuel spill.
If the fuel filler door lock has been
pushed, operate the fuel filler door
opener switch in the vehicle
before continu ing to refuel.