display TOYOTA RAV4 HYBRID 2021 Service Manual
[x] Cancel search | Manufacturer: TOYOTA, Model Year: 2021, Model line: RAV4 HYBRID, Model: TOYOTA RAV4 HYBRID 2021Pages: 752, PDF Size: 31.25 MB
Page 147 of 752
1473-2. Opening, closing and locking the doors
3
Before driving
*: If equipped
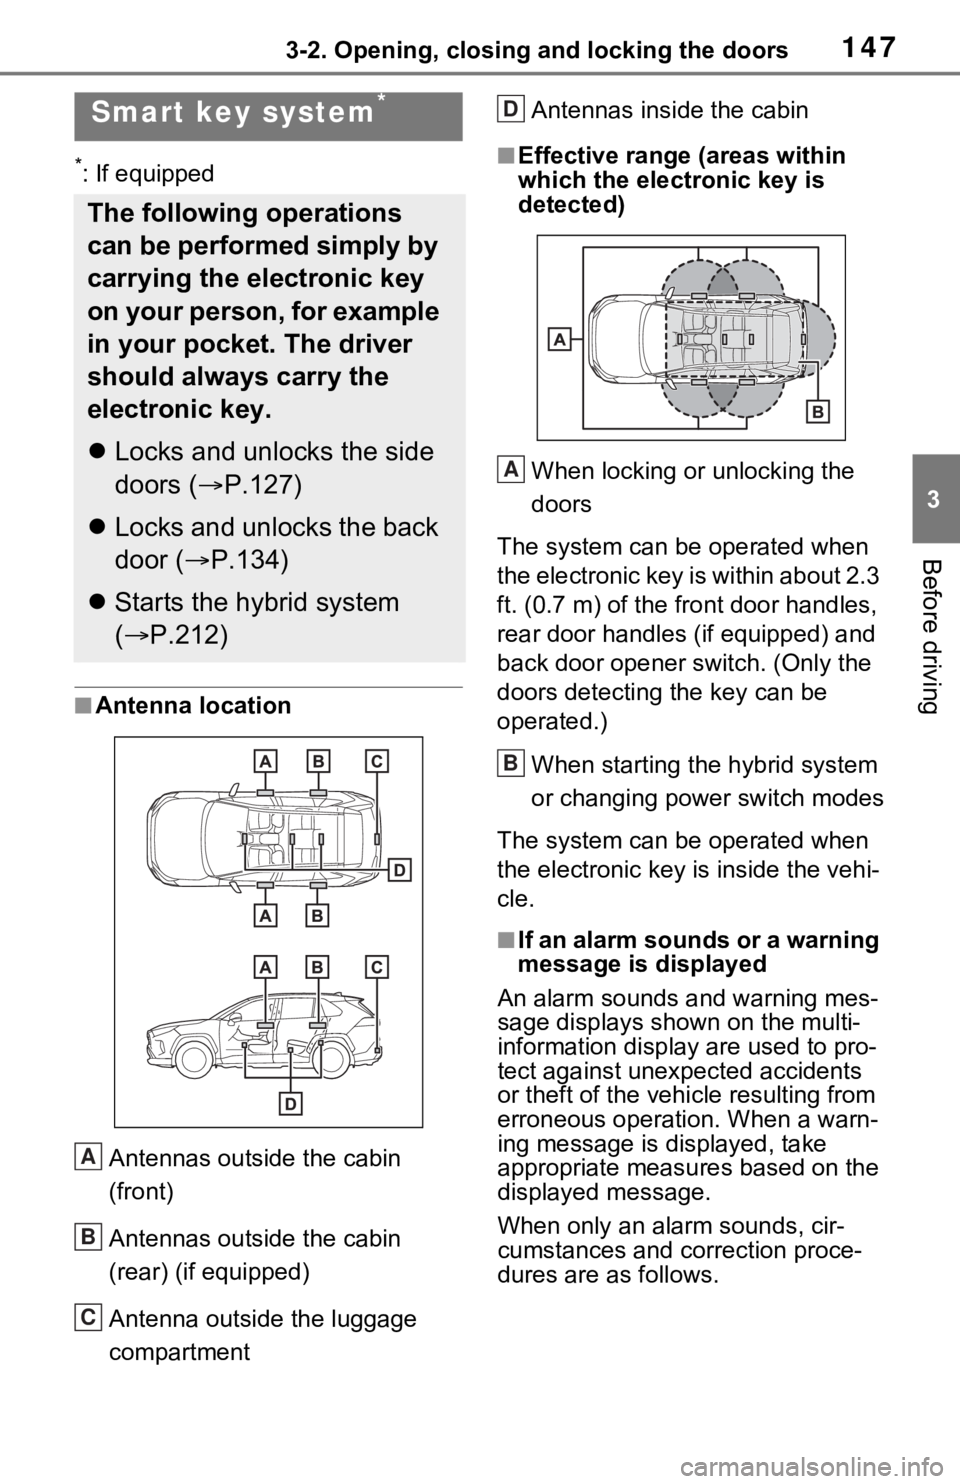
■Antenna location
Antennas outside the cabin
(front)
Antennas outside the cabin
(rear) (if equipped)
Antenna outside the luggage
compartment Antennas inside the cabin
■Effective range
(areas within
which the electronic key is
detected)
When locking or unlocking the
doors
The system can be operated when
the electronic key is within about 2.3
ft. (0.7 m) of the fro nt door handles,
rear door handles (if equipped) and
back door opener s witch. (Only the
doors detecting the key can be
operated.)
When starting the hybrid system
or changing power switch modes
The system can be operated when
the electronic key i s inside the vehi-
cle.
■If an alarm sounds or a warning
message is displayed
An alarm sounds and warning mes-
sage displays shown on the multi-
information display are used to pro-
tect against unexpected accidents
or theft of the vehicl e resulting from
erroneous operation. When a warn-
ing message is displayed, take
appropriate measures based on the
displayed message.
When only an alarm sounds, cir-
cumstances and correction proce-
dures are as follows.
Smart key system*
The following operations
can be performed simply by
carrying the electronic key
on your person, for example
in your pocket. The driver
should always carry the
electronic key.
Locks and unlocks the side
doors ( P.127)
Locks and unlocks the back
door ( P.134)
Starts the hybrid system
( P.212)
A
B
C
D
A
B
Page 148 of 752
1483-2. Opening, closing and locking the doors
●When an exterior alarm sounds
once for 5 seconds
●When an interior alarm pings con-
tinuously
■Battery-saving function
The battery-saving function will be
activated in order to prevent the
electronic key battery and the 12-
volt battery from being discharged
while the vehicle is not in operation
for a long time.
●In the following situations, the
smart key system may take some
time to unlock the doors.
• The electronic key has been left in an area of approximately 6 ft. (2
m) of the outside of the vehicle for
10 minutes or longer.
• The smart key system has not been used for 5 days or longer.
●If the smart key system has not
been used for 14 days or longer,
the doors canno t be unlocked at
any doors except the driver’s
door. In this case, take hold of the
driver’s door handle, or use the
wireless remote control or the mechanical key, to unlock the
doors.
■Turning an electronic key to
battery-saving mode
●When battery-saving mode is set,
battery depletion is minimized by
stopping the electronic key from
receiving radio waves.
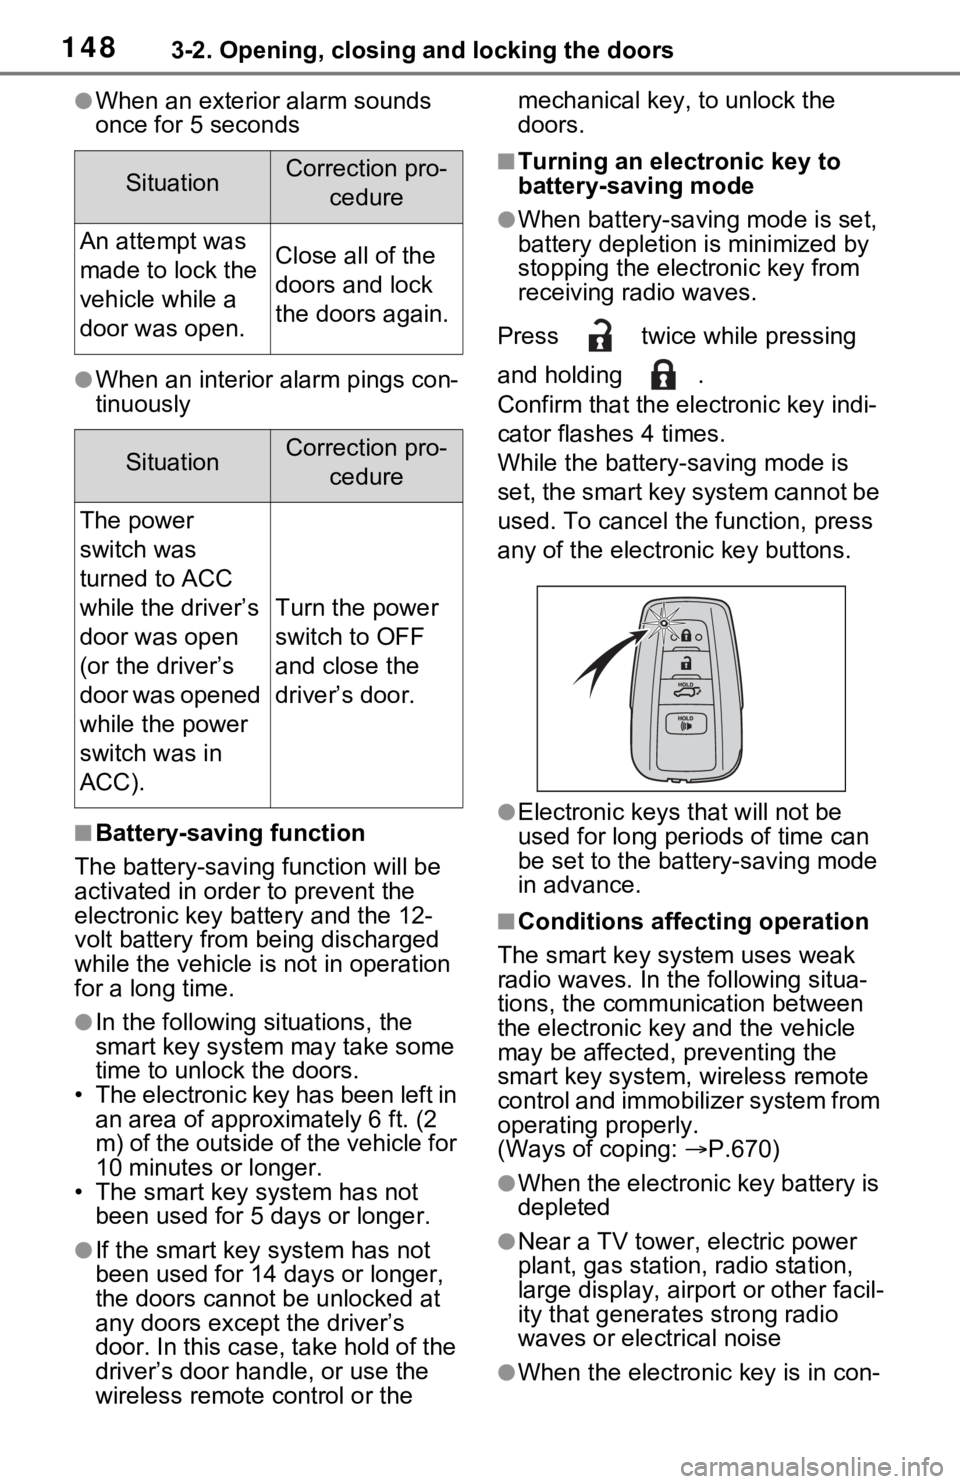
Press twice while pressing
and holding .
Confirm that the ele ctronic key indi-
cator flashes 4 times.
While the battery-saving mode is
set, the smart key system cannot be
used. To cancel the function, press
any of the electronic key buttons.
●Electronic keys that will not be
used for long periods of time can
be set to the battery-saving mode
in advance.
■Conditions affecting operation
The smart key system uses weak
radio waves. In the following situa-
tions, the communication between
the electronic key and the vehicle
may be affected, preventing the
smart key system, wireless remote
control and immobilizer system from
operating properly.
(Ways of coping: P.670)
●When the electronic key battery is
depleted
●Near a TV tower, electric power
plant, gas station, radio station,
large display, airpo rt or other facil-
ity that generates strong radio
waves or electrical noise
●When the electronic key is in con-
SituationCorrection pro-
cedure
An attempt was
made to lock the
vehicle while a
door was open.Close all of the
doors and lock
the doors again.
SituationCorrection pro-cedure
The power
switch was
turned to ACC
while the driver’s
door was open
(or the driver’s
door was opened
while the power
switch was in
ACC).
Turn the power
switch to OFF
and close the
driver’s door.
Page 150 of 752

1503-2. Opening, closing and locking the doors
the effective range, the door may
lock and unlock repeatedly. In that
case, follow the fo llowing correc-
tion procedures to wash the vehi-
cle:
• Place the electronic key in a loca- tion 6 ft. (2 m) or more away from
the vehicle. (Take care to ensure
that the key is not stolen.)
• Set the electronic key to battery-
saving mode to disable the smart
key system. ( P.148)
●If the electronic key is inside the
vehicle and a door handle
becomes wet during a car wash, a
message may be shown on the
multi-informatio n display and a
buzzer will sound outside the vehi-
cle. To turn off the alarm, lock all
the doors.
●The lock sensor may not work
properly if it com es into contact
with ice, snow, mud, etc. Clean
the lock sensor and attempt to
operate it again, or use the lock
sensor on the lower part of the
door handle.
●A sudden approac h to the effec-
tive range or door handle may pre-
vent the doors from being
unlocked. In this case, return the
door handle to the original position
and check that the doors unlock
before pulling the door handle
again.
●If there is another electronic key in
the detection area, it may take
slightly longer to unlock the doors
after the door handle is gripped.
■When the vehicle is not driven
for extended periods
●To prevent theft of the vehicle, do
not leave the electronic key within
6 ft. (2 m) of the vehicle.
●The smart key system can be
deactivated in advance. ( P.710)
●Battery-saving mode can reduce
the power consumption of elec-
tronic keys. ( P.148)
■To operate the system properly
Make sure to carry the electronic
key when operating the system. Do
not get the electronic key too close
to the vehicle when operating the
system from the out side of the vehi-
cle.
Depending on the position and hold-
ing condition of the electronic key,
the key may not be detected cor-
rectly and the system may not oper-
ate properly. (The alarm may go off
accidentally, or the door lock pre-
vention may not operate.)
■If the smart key system does
not operate properly
●Locking and unlocking the doors:
Use the mechanical key.
( P.670)
●Starting the hybrid system:
P.671
■Customization
Settings (e.g. smart key system)
can be changed.
(Customizable features: P.709)
If the smart key system has been
deactivated in a customized setting,
refer to the explanations for the fol-
lowing operations.
●Locking and unlocking the doors:
Use the wireless remote control or
mechanical key. ( P.127, 670)
●Starting the hybr id system and
changing power switch modes:
P.671
●Stopping the hybrid system:
P.214
Page 165 of 752
1653-4. Adjusting the steering wheel and mirrors
3
Before driving
*: If equipped
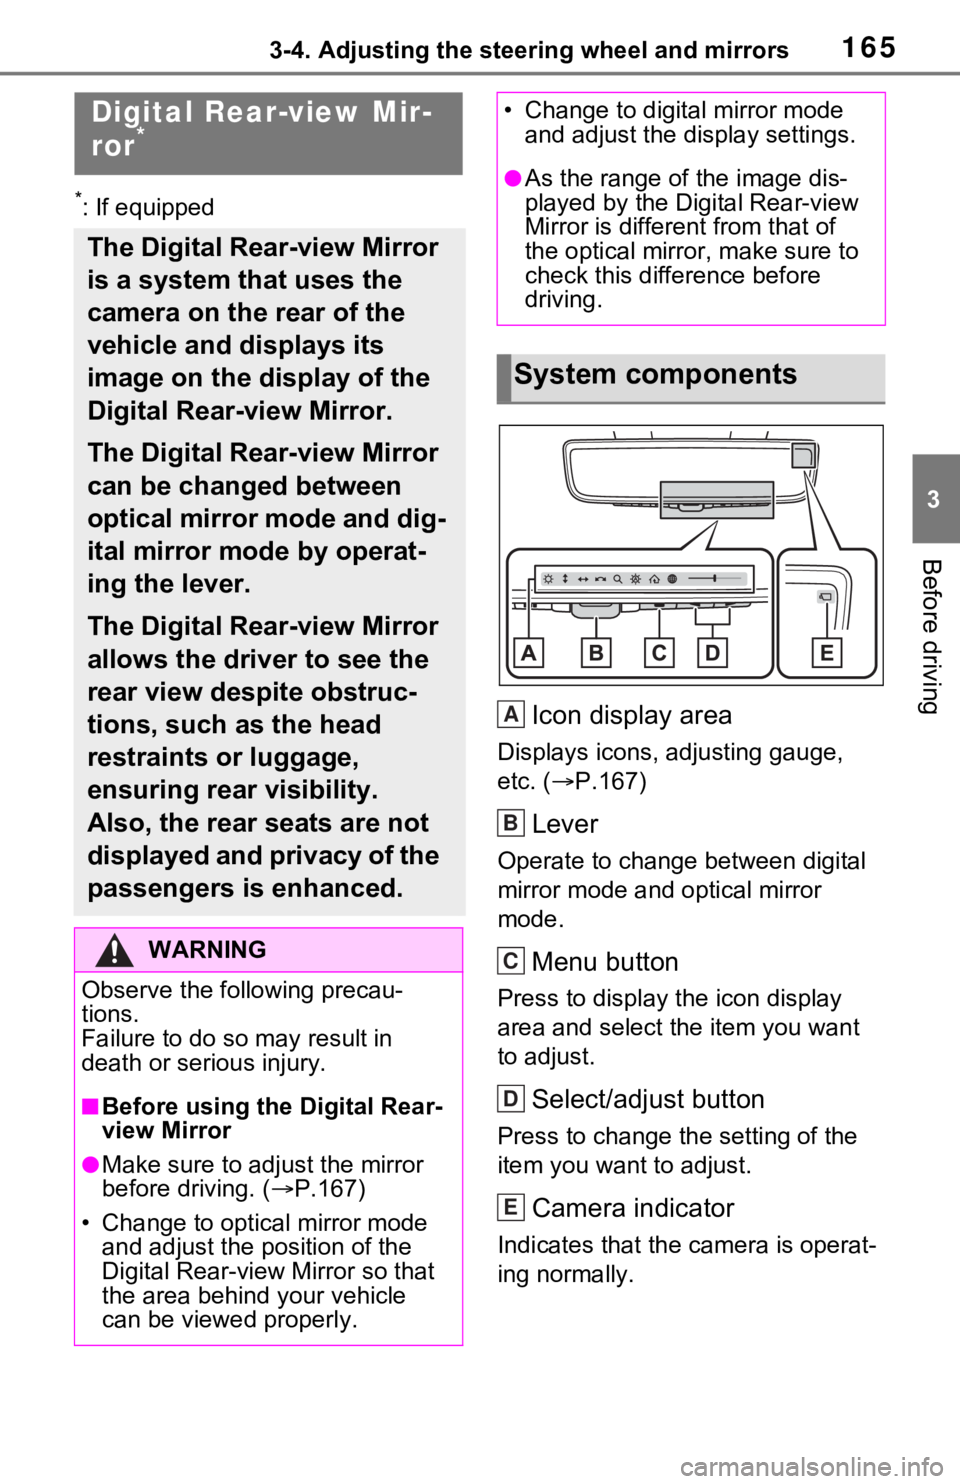
Icon display area
Displays icons, adjusting gauge,
etc. (P.167)
Lever
Operate to change between digital
mirror mode and optical mirror
mode.
Menu button
Press to display the icon display
area and select the item you want
to adjust.
Select/adjust button
Press to change the setting of the
item you want to adjust.
Camera indicator
Indicates that the camera is operat-
ing normally.
Digital Rear-view Mir-
ror*
The Digital Rear-view Mirror
is a system that uses the
camera on the rear of the
vehicle and displays its
image on the display of the
Digital Rear-view Mirror.
The Digital Rear-view Mirror
can be changed between
optical mirror mode and dig-
ital mirror mode by operat-
ing the lever.
The Digital Rear-view Mirror
allows the driver to see the
rear view despite obstruc-
tions, such as the head
restraints or luggage,
ensuring rear visibility.
Also, the rear seats are not
displayed and privacy of the
passengers is enhanced.
WARNING
Observe the following precau-
tions.
Failure to do so m ay result in
death or serious injury.
■Before using the Digital Rear-
view Mirror
●Make sure to adjust the mirror
before driving. ( P.167)
• Change to optical mirror mode and adjust the position of the
Digital Rear-view Mirror so that
the area behind your vehicle
can be viewed properly.
• Change to digital mirror mode and adjust the display settings.
●As the range of the image dis-
played by the Digital Rear-view
Mirror is different from that of
the optical mirror, make sure to
check this difference before
driving.
System components
A
B
C
D
E
Page 166 of 752

1663-4. Adjusting the steering wheel and mirrors
Operate the lever to change
between digital mirror mode and
optical mirror mode.
1Digital mirror mode
Displays an image of the area
behind the vehicle.
will illuminate in this mode.
2Optical mirror mode
Turns off the disp lay of the Digital
Rear-view Mirror allows it to be
used as an optical mirror.
■Digital mirror mode operating
condition
The power switch is turned to ON.
When the power switch is changed
from ON to OFF or ACC, the image
will disappear afte r several seconds.
■When using the Digital Rear-
view Mirror in digital mirror
mode
●If it is difficult to see the displayed
image due to light reflected off the
Digital Rear-view Mirror, the cam-
era being dirty or covered with
water droplets, or if lights of a
vehicle behind your vehicle or the
displayed image are bothering
you, change to optical mirror
mode.
●When the back door is open, the
Digital Rear-view Mirror image
may not display properly. Before driving, make sure the back door
is closed.
●If the display is difficult to see due
to reflected light
, close the sun-
shade for the moon roof (if
equipped) or the electronic sun-
shade for the panoramic moon
roof (if equipped).
●Any of the following conditions
may occur when driving in the
dark, such as at night. None of
them indicates that a malfunction
has occurred.
• Colors of objects in the displayed
image may differ from their actual
color.
• Depending on the height of the
lights of the vehicle behind, the
area around the vehicle may
appear white and blurry.
• Automatic image adjustment for
brighter surrounding image may
cause flickering.
If it is difficult to see the displayed
image or flickering bothers you,
change to optical mirror mode.
●The Digital Rear-view Mirror may
become hot while it is in digital
mirror mode.
This is not a malfunction.
●Depending on your physical con-
dition or age, it may take longer
than usual to fo cus on the dis-
played image. In this case,
change to optical mirror mode.
●Do not let passengers stare at the
displayed image when the vehicle
is being driven, as doing so may
cause motion sickness.
■When the system malfunctions
If the symbol shown in the illustra-
tion is displayed when using the
Digital Rear-view Mirror in digital
mirror mode, the system may be
malfunctioning. The symbol will dis-
appear in a few seconds. Operate
the lever, change to optical mirror
mode and have the vehicle
inspected by your Toyota dealer.
Changing modes
Page 167 of 752
1673-4. Adjusting the steering wheel and mirrors
3
Before driving
■Adjusting the mirror height
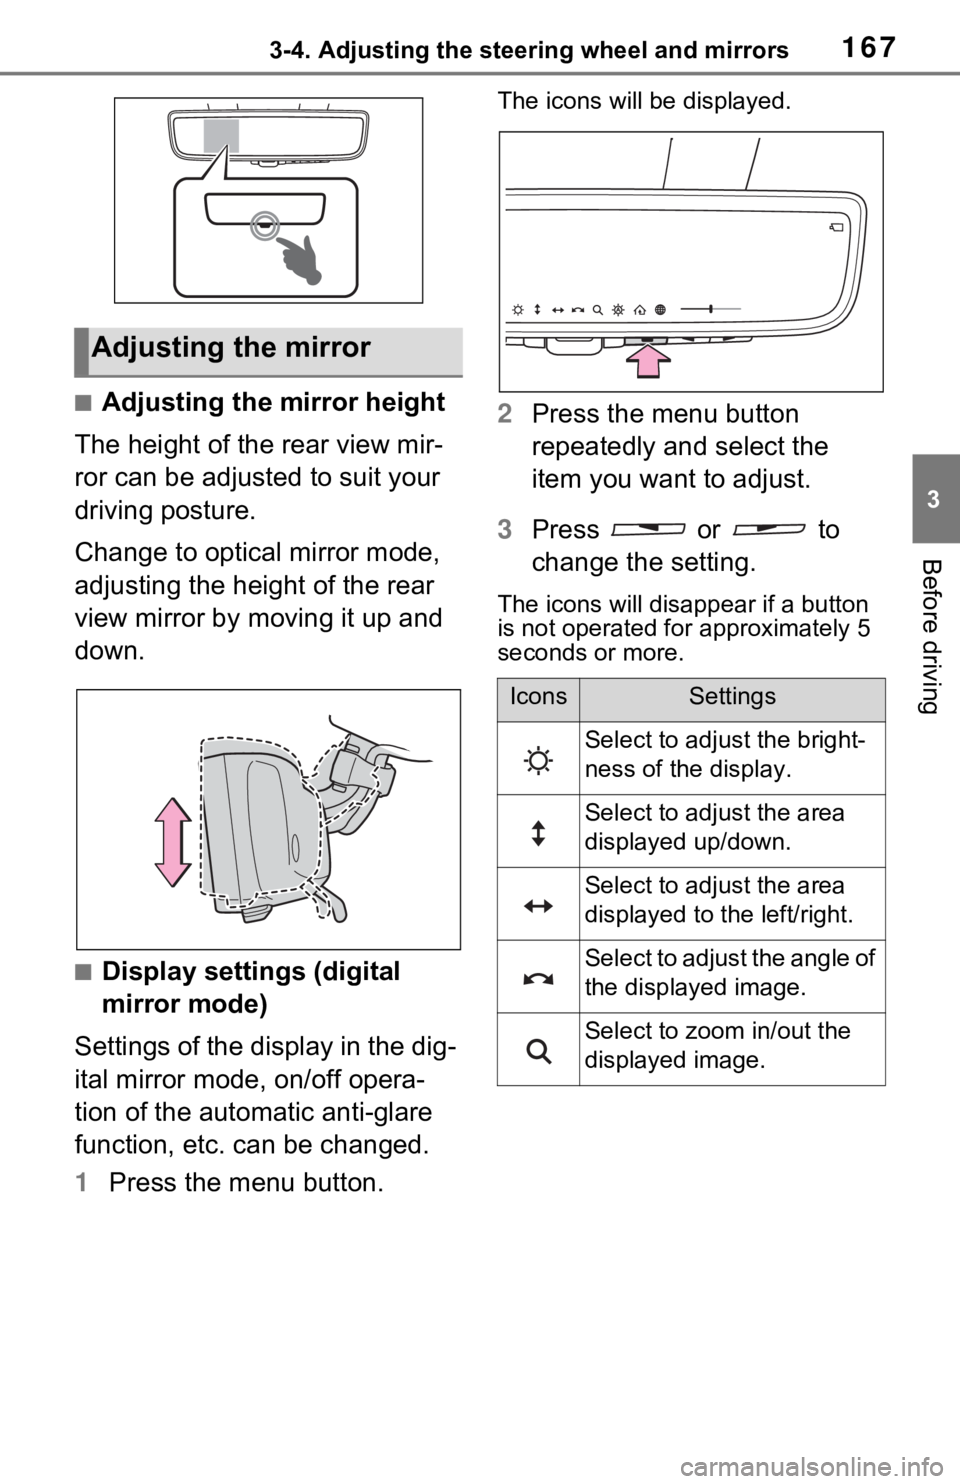
The height of the rear view mir-
ror can be adjusted to suit your
driving posture.
Change to optical mirror mode,
adjusting the height of the rear
view mirror by moving it up and
down.
■Display settings (digital
mirror mode)
Settings of the display in the dig-
ital mirror mode, on/off opera-
tion of the automatic anti-glare
function, etc. can be changed.
1 Press the menu button.
The icons will be displayed.
2Press the menu button
repeatedly and select the
item you want to adjust.
3 Press or to
change the setting.
The icons will disappear if a button
is not operated fo r approximately 5
seconds or more.
Adjusting the mirror
IconsSettings
Select to adjust the bright-
ness of the display.
Select to adjust the area
displayed up/down.
Select to adjust the area
displayed to the left/right.
Select to adjust the angle of
the displayed image.
Select to zoom in/out the
displayed image.
Page 168 of 752
1683-4. Adjusting the steering wheel and mirrors
*: This is a function for the optical
mirror mode, however, the setting
can also be changed while using
the digital mirror mode.
■Enabling/disabling the
automatic anti-glare func-
tion (optical mirror mode)
The automatic anti-glare func-
tion in the optical mirror mode
can be enabled/disabled. The
setting can be changed in both
the digital mirror mode and the
optical mirror mode.
When using the digital mirror
mode
P.167
When using the optical mirror
mode
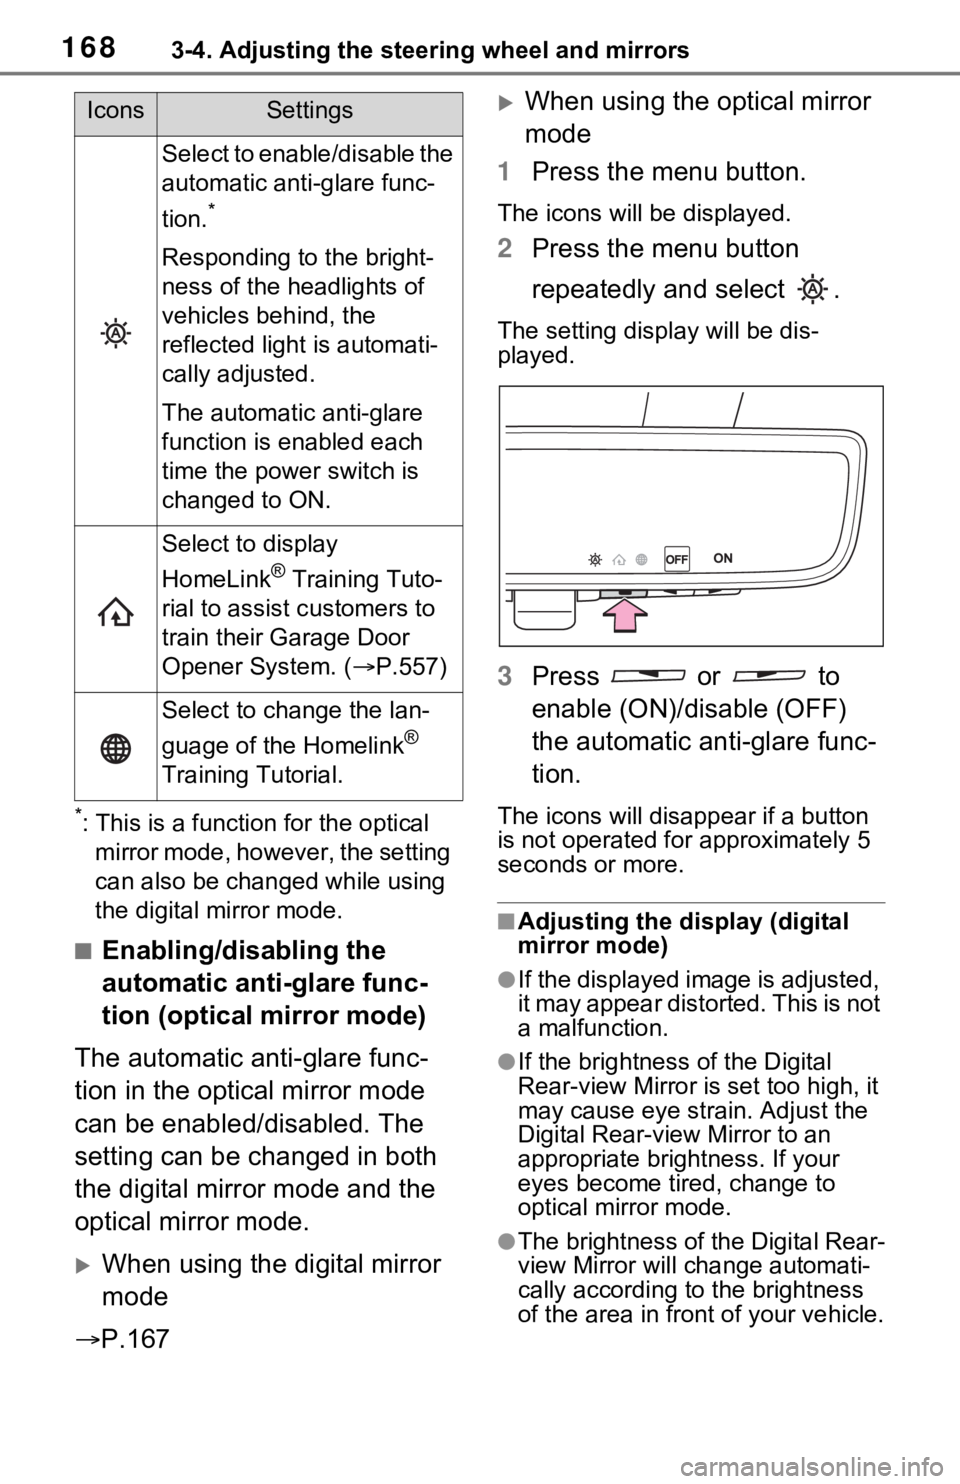
1 Press the menu button.
The icons will be displayed.
2Press the menu button
repeatedly and select .
The setting display will be dis-
played.
3Press or to
enable (ON)/disable (OFF)
the automatic anti-glare func-
tion.
The icons will disappear if a button
is not operated fo r approximately 5
seconds or more.
■Adjusting the display (digital
mirror mode)
●If the displayed image is adjusted,
it may appear distorted. This is not
a malfunction.
●If the brightness of the Digital
Rear-view Mirror is set too high, it
may cause eye strain. Adjust the
Digital Rear-view Mirror to an
appropriate brightness. If your
eyes become tired, change to
optical mirror mode.
●The brightness of the Digital Rear-
view Mirror will change automati-
cally according to the brightness
of the area in front of your vehicle.
Select to enable/disable the
automatic anti-glare func-
tion.
*
Responding to the bright-
ness of the headlights of
vehicles behind, the
reflected light is automati-
cally adjusted.
The automatic anti-glare
function is enabled each
time the power switch is
changed to ON.
Select to display
HomeLink
® Training Tuto-
rial to assist c ustomers to
train their Garage Door
Opener System. ( P.557)
Select to change the lan-
guage of the Homelink
®
Training Tutorial.
IconsSettings
Page 169 of 752
1693-4. Adjusting the steering wheel and mirrors
3
Before driving
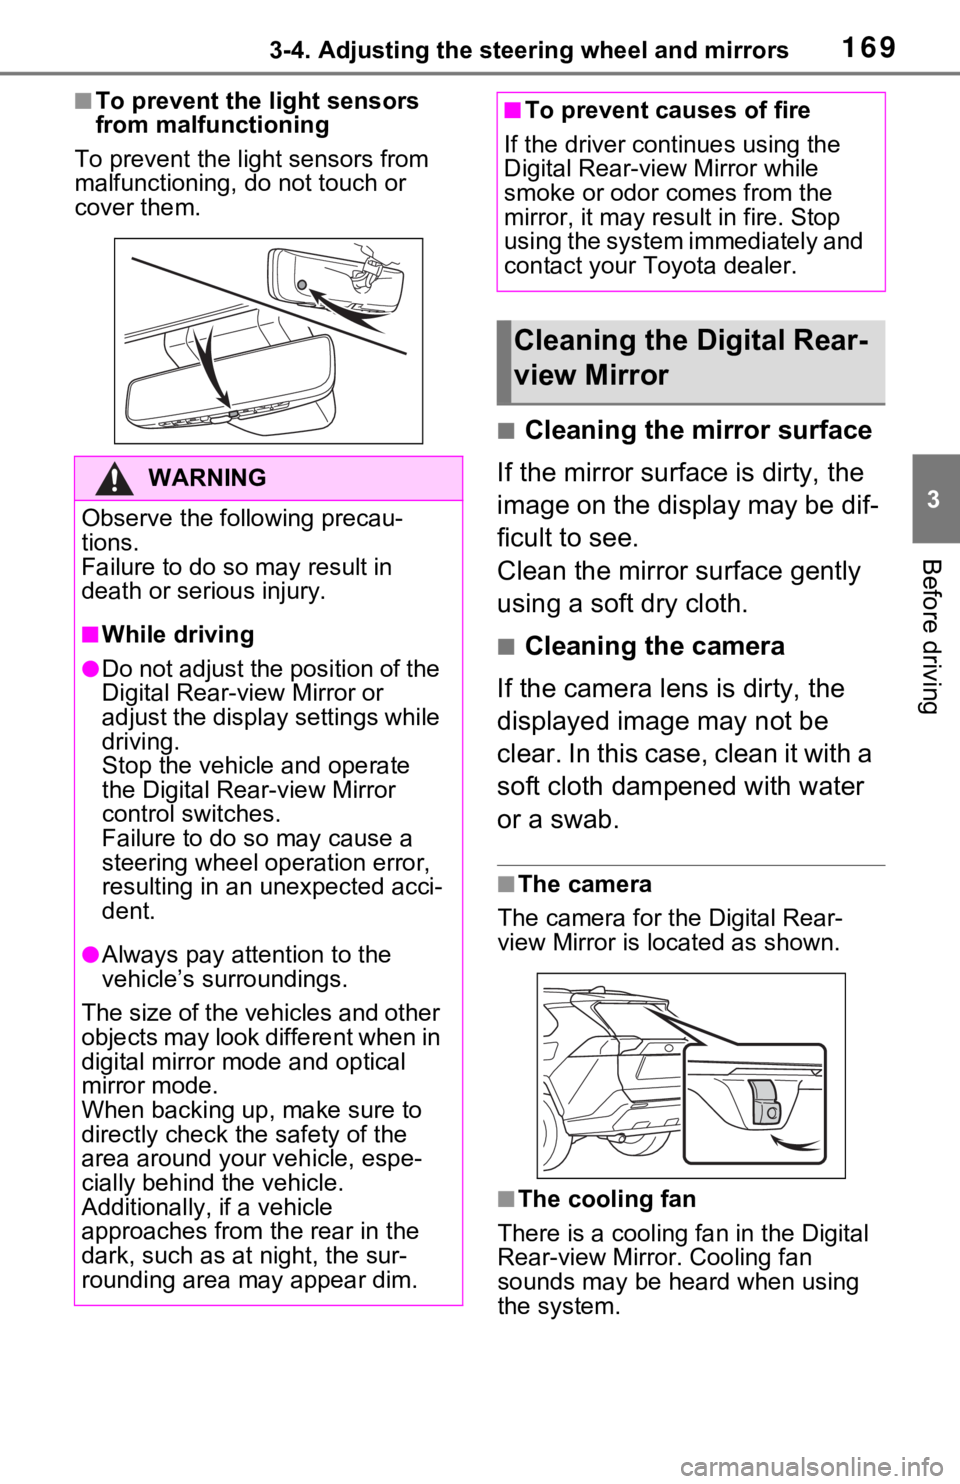
■To prevent the light sensors
from malfunctioning
To prevent the light sensors from
malfunctioning, do not touch or
cover them.
■Cleaning the mirror surface
If the mirror surface is dirty, the
image on the display may be dif-
ficult to see.
Clean the mirror surface gently
using a soft dry cloth.
■Cleaning the camera
If the camera lens is dirty, the
displayed image may not be
clear. In this case, clean it with a
soft cloth dampened with water
or a swab.
■The camera
The camera for the Digital Rear-
view Mirror is located as shown.
■The cooling fan
There is a cooling fan in the Digital
Rear-view Mirror. Cooling fan
sounds may be he ard when using
the system.
WARNING
Observe the following precau-
tions.
Failure to do so m ay result in
death or serious injury.
■While driving
●Do not adjust the position of the
Digital Rear-v iew Mirror or
adjust the display settings while
driving.
Stop the vehicle and operate
the Digital Rear -view Mirror
control switches.
Failure to do so may cause a
steering wheel operation error,
resulting in an unexpected acci-
dent.
●Always pay attention to the
vehicle’s surroundings.
The size of the vehicles and other
objects may look different when in
digital mirror mode and optical
mirror mode.
When backing up, make sure to
directly check the safety of the
area around your vehicle, espe-
cially behind the vehicle.
Additionally, if a vehicle
approaches from the rear in the
dark, such as at night, the sur-
rounding area may appear dim.
■To prevent causes of fire
If the driver continues using the
Digital Rear-view Mirror while
smoke or odor comes from the
mirror, it may result in fire. Stop
using the system immediately and
contact your Toyota dealer.
Cleaning the Digital Rear-
view Mirror
Page 172 of 752
1723-4. Adjusting the steering wheel and mirrors
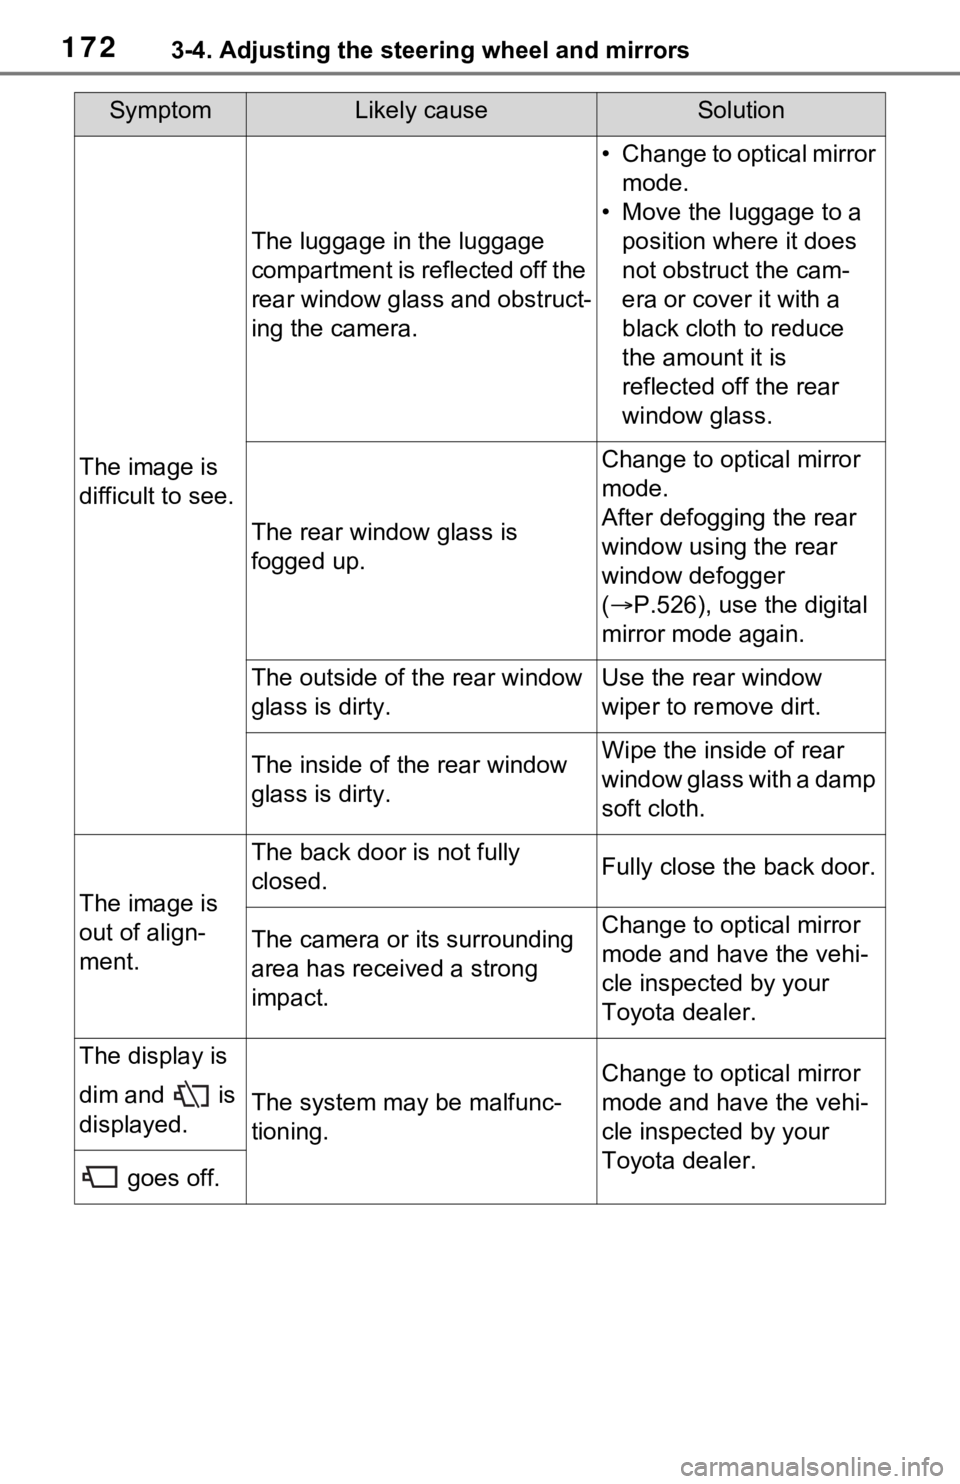
The image is
difficult to see.
The luggage in the luggage
compartment is reflected off the
rear window glass and obstruct-
ing the camera.
• Change to optical mirror mode.
• Move the luggage to a position where it does
not obstruct the cam-
era or cover it with a
black cloth to reduce
the amount it is
reflected off the rear
window glass.
The rear window glass is
fogged up.
Change to optical mirror
mode.
After defogging the rear
window using the rear
window defogger
( P.526), use the digital
mirror mode again.
The outside of the rear window
glass is dirty.Use the rear window
wiper to remove dirt.
The inside of the rear window
glass is dirty.Wipe the inside of rear
window glass with a damp
soft cloth.
The image is
out of align-
ment.
The back door is not fully
closed.Fully close the back door.
The camera or its surrounding
area has received a strong
impact.Change to optical mirror
mode and have the vehi-
cle inspected by your
Toyota dealer.
The display is
dim and is
displayed.
The system may be malfunc-
tioning.
Change to optical mirror
mode and have the vehi-
cle inspected by your
Toyota dealer.
goes off.
SymptomLikely causeSolution
Page 173 of 752
1733-4. Adjusting the steering wheel and mirrors
3
Before driving
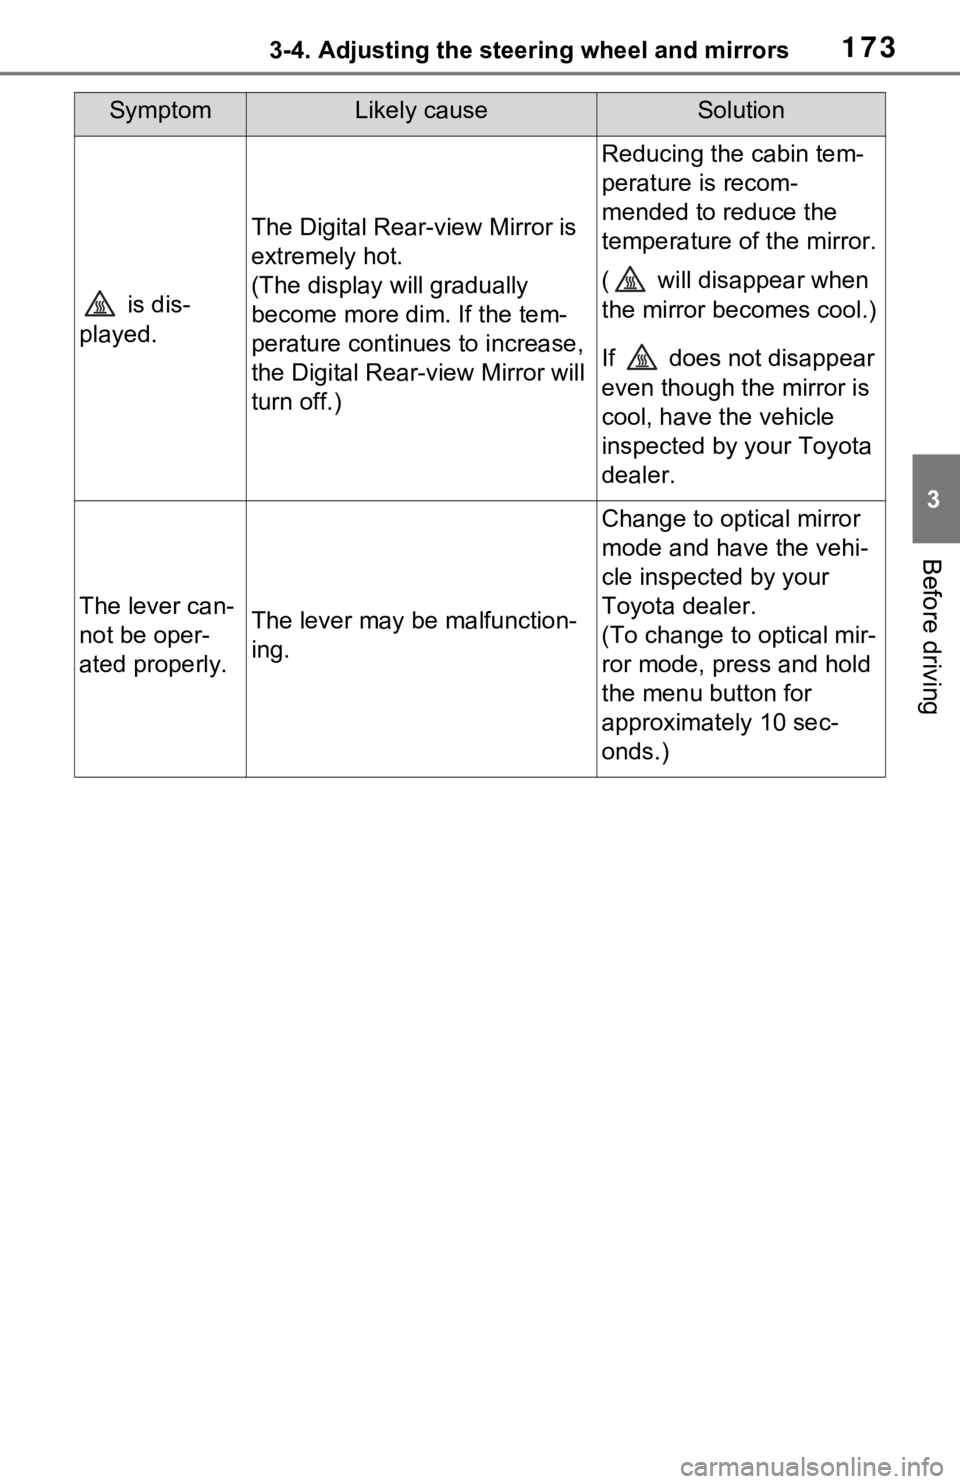
is dis-
played.
The Digital Rear-view Mirror is
extremely hot.
(The display will gradually
become more dim. If the tem-
perature continues to increase,
the Digital Rear-view Mirror will
turn off.)
Reducing the cabin tem-
perature is recom-
mended to reduce the
temperature of the mirror.
( will disappear when
the mirror becomes cool.)
If does not disappear
even though the mirror is
cool, have the vehicle
inspected by your Toyota
dealer.
The lever can-
not be oper-
ated properly.The lever may be malfunction-
ing.
Change to optical mirror
mode and have the vehi-
cle inspected by your
Toyota dealer.
(To change to optical mir-
ror mode, press and hold
the menu button for
approximately 10 sec-
onds.)
SymptomLikely causeSolution