flat tire TOYOTA RAV4 HYBRID 2022 Service Manual
[x] Cancel search | Manufacturer: TOYOTA, Model Year: 2022, Model line: RAV4 HYBRID, Model: TOYOTA RAV4 HYBRID 2022Pages: 752, PDF Size: 23.11 MB
Page 634 of 752
6348-2. Steps to take in an emergency
WARNING
■Maintenance of the tires
(vehicles with tire pressure
warning system)
Each tire, including the spare (if
provided), should be checked
monthly when cold and inflated to
the inflation pressure recom-
mended by the vehicle manufac-
turer on the vehicle placard or tire
inflation pressure label (tire and
load information label). (If your
vehicle has tires of a different size
than the size indicated on the
vehicle placard or tire inflation
pressure label [tire and load infor-
mation label], you should deter-
mine the proper tire inflation
pressure for those tires.)
As an added safe ty feature, your
vehicle has been equipped with a
tire pressure m onitoring system
(TPMS-tire pressure warning sys-
tem) that illuminates a low tire
pressure telltale (tire pressure
warning light) when one or more
of your tires is significantly under-
inflated. Accordingly, when the
low tire pressure telltale (tire pres-
sure warning light) illuminates,
you should stop and check your
tires as soon as possible, and
inflate them to the proper pres-
sure. Driving on a significantly
under-inflated tire causes the tire
to overheat and can lead to tire
failure. Under-inflation also
reduces fuel efficiency and tire
tread life, and may affect the vehi-
cle’s handling and stopping abil-
ity.
Please note that the TPMS (tire
pressure warning system) is not a
substitute for proper tire mainte-
nance, and it is the driver’s
responsibility to m aintain correct
tire pressure, even if under-infla-
tion has not reached the level to
trigger illumination of the TPMS
low tire pressure te lltale (tire pres-
sure warning light).
Your vehicle has also been
equipped with a TPMS (tire pres-
sure warning system) malfunc-
tion indicator to indicate when the
system is not operating properly.
The TPMS (tire pressure warning
system) malfunction indicator is
combined with the low tire pres-
sure telltale (tire pressure warning
light). When the system detects a
malfunction, the te lltale will flash
for approximately one minute and
then remain continuously illumi-
nated. This sequence will con-
tinue upon subsequent vehicle
start-ups as long as the malfunc-
tion exists. When the malfunction
indicator is illuminated, the sys-
tem may not be ab le to detect or
signal low tire pressure as
intended.
TPMS (tire pressure warning sys-
tem) malfunctions may occur for a
variety of reasons, including the
installation of replacement or
alternate tires or wheels on the
vehicle that prevent the TPMS
(tire pressure warning system)
from functioning properly. Always
check the TPMS (tire pressure
warning system) malfunction tell-
tale after replacing one or more
tires or wheels on your vehicle to
ensure that the replacement or
alternate tires and wheels allow
the TPMS (tire pressure warning
system) to continue to function
properly.
Page 640 of 752
6408-2. Steps to take in an emergency
Stop the vehicle in a safe place on a hard, flat surface.
Set the parking brake.
Shift the shift lever to P.
Stop the hybrid system.
Turn on the emergency flashers. ( P.616)
For vehicles with power back door: Turn off the power back door
system. ( P.142)
If you have a flat tire
Your vehicle is equipped with a spare tire. The flat tire can be
replaced with the spare tire.
For details about tires: P.578
WARNING
■If you have a flat tire
Do not continue driv ing with a flat tire.
Driving even a short distance with a flat tire can damage the t ire and the
wheel beyond repair, which could result in an accident.
Before jacking up the vehicle
Page 642 of 752
6428-2. Steps to take in an emergency
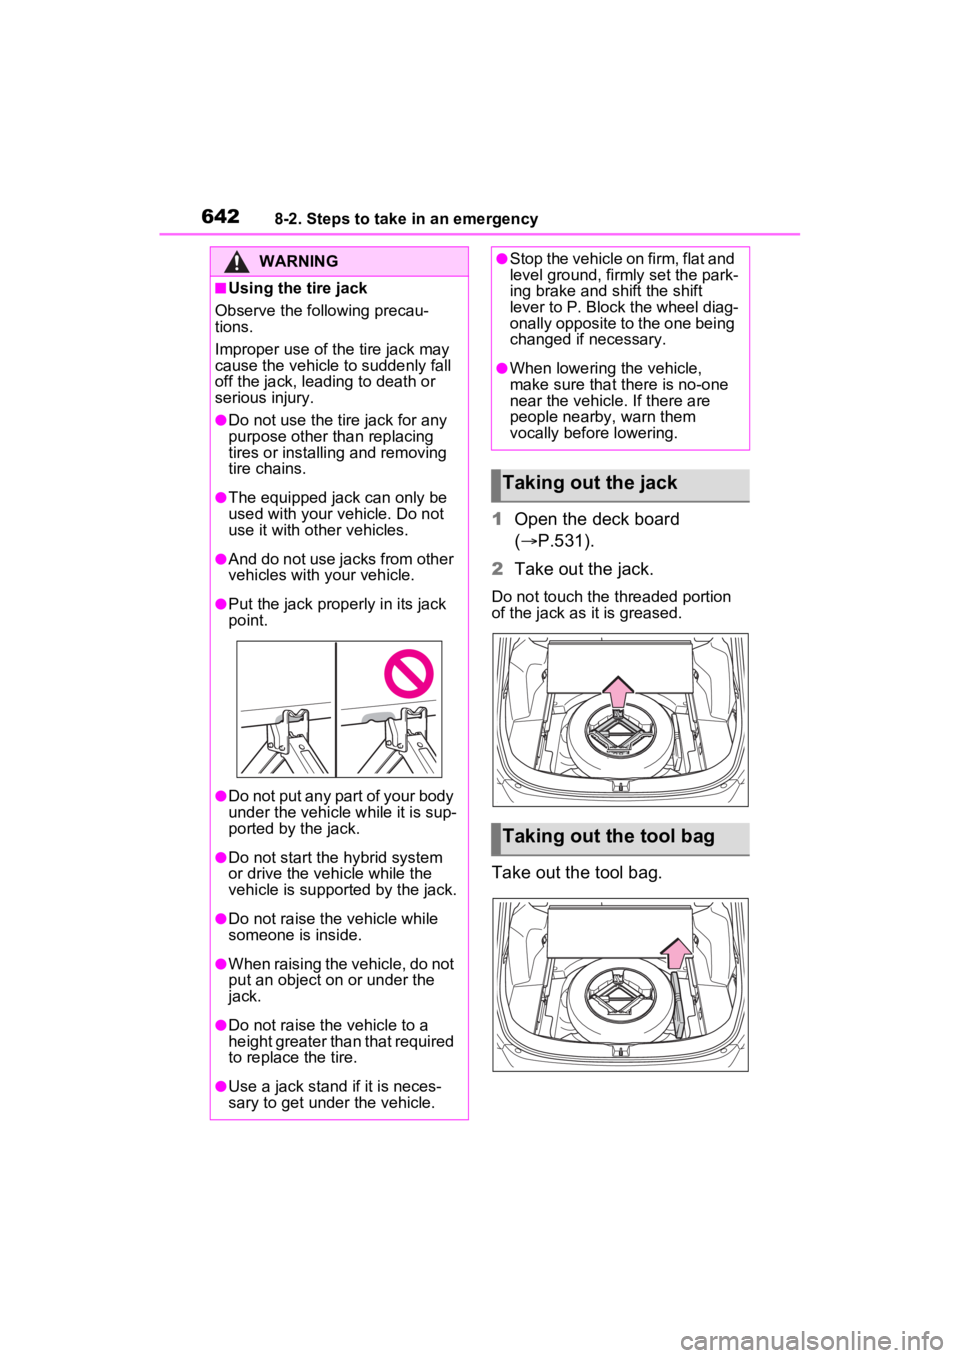
1Open the deck board
( P.531).
2 Take out the jack.
Do not touch the threaded portion
of the jack as it is greased.
Take out the tool bag.
WARNING
■Using the tire jack
Observe the following precau-
tions.
Improper use of the tire jack may
cause the vehicle to suddenly fall
off the jack, leading to death or
serious injury.
●Do not use the tire jack for any
purpose other than replacing
tires or installing and removing
tire chains.
●The equipped jack can only be
used with your vehicle. Do not
use it with other vehicles.
●And do not use jacks from other
vehicles with your vehicle.
●Put the jack prope rly in its jack
point.
●Do not put any part of your body
under the vehicle while it is sup-
ported by the jack.
●Do not start the hybrid system
or drive the vehicle while the
vehicle is suppor ted by the jack.
●Do not raise the vehicle while
someone is inside.
●When raising the vehicle, do not
put an object on or under the
jack.
●Do not raise the vehicle to a
height greater than that required
to replace the tire.
●Use a jack stand if it is neces-
sary to get under the vehicle.
●Stop the vehicle on firm, flat and
level ground, firmly set the park-
ing brake and shift the shift
lever to P. Block the wheel diag-
onally opposite to the one being
changed if necessary.
●When lowering the vehicle,
make sure that there is no-one
near the vehicle. If there are
people nearby, warn them
vocally before lowering.
Taking out the jack
Taking out the tool bag
Page 643 of 752
6438-2. Steps to take in an emergency
8
When trouble arises
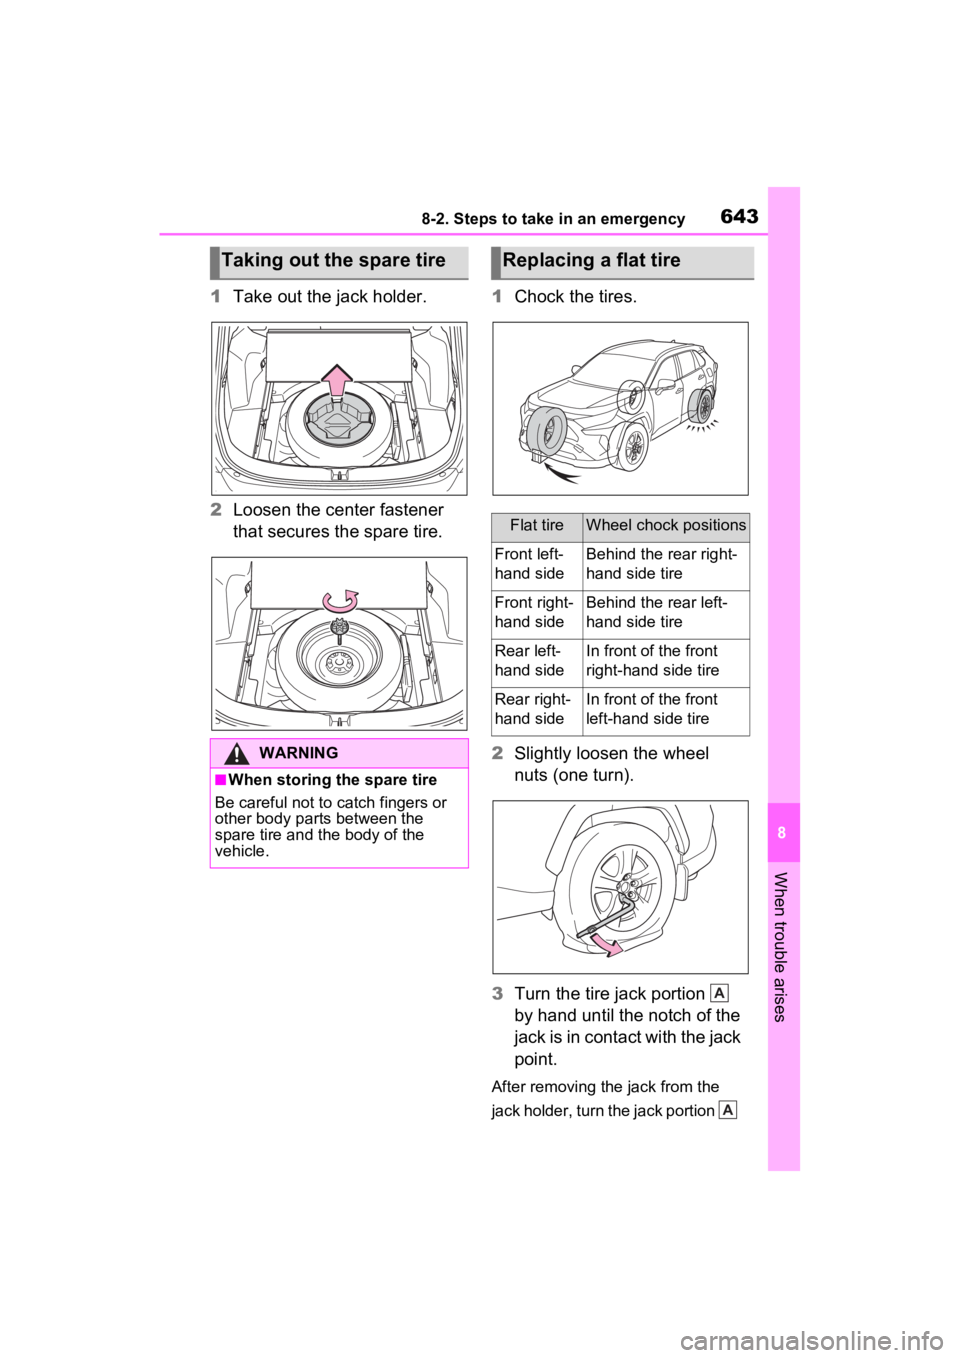
1Take out the jack holder.
2 Loosen the center fastener
that secures the spare tire. 1
Chock the tires.
2 Slightly loosen the wheel
nuts (one turn).
3 Turn the tire jack portion
by hand until the notch of the
jack is in contact with the jack
point.
After removing the jack from the
jack holder, turn the jack portion
Taking out the spare tire
WARNING
■When storing the spare tire
Be careful not to catch fingers or
other body parts between the
spare tire and the body of the
vehicle.
Replacing a flat tire
Flat tireWheel chock positions
Front left-
hand sideBehind the rear right-
hand side tire
Front right-
hand sideBehind the rear left-
hand side tire
Rear left-
hand sideIn front of the front
right-hand side tire
Rear right-
hand sideIn front of the front
left-hand side tire
A
A
Page 645 of 752
6458-2. Steps to take in an emergency
8
When trouble arises
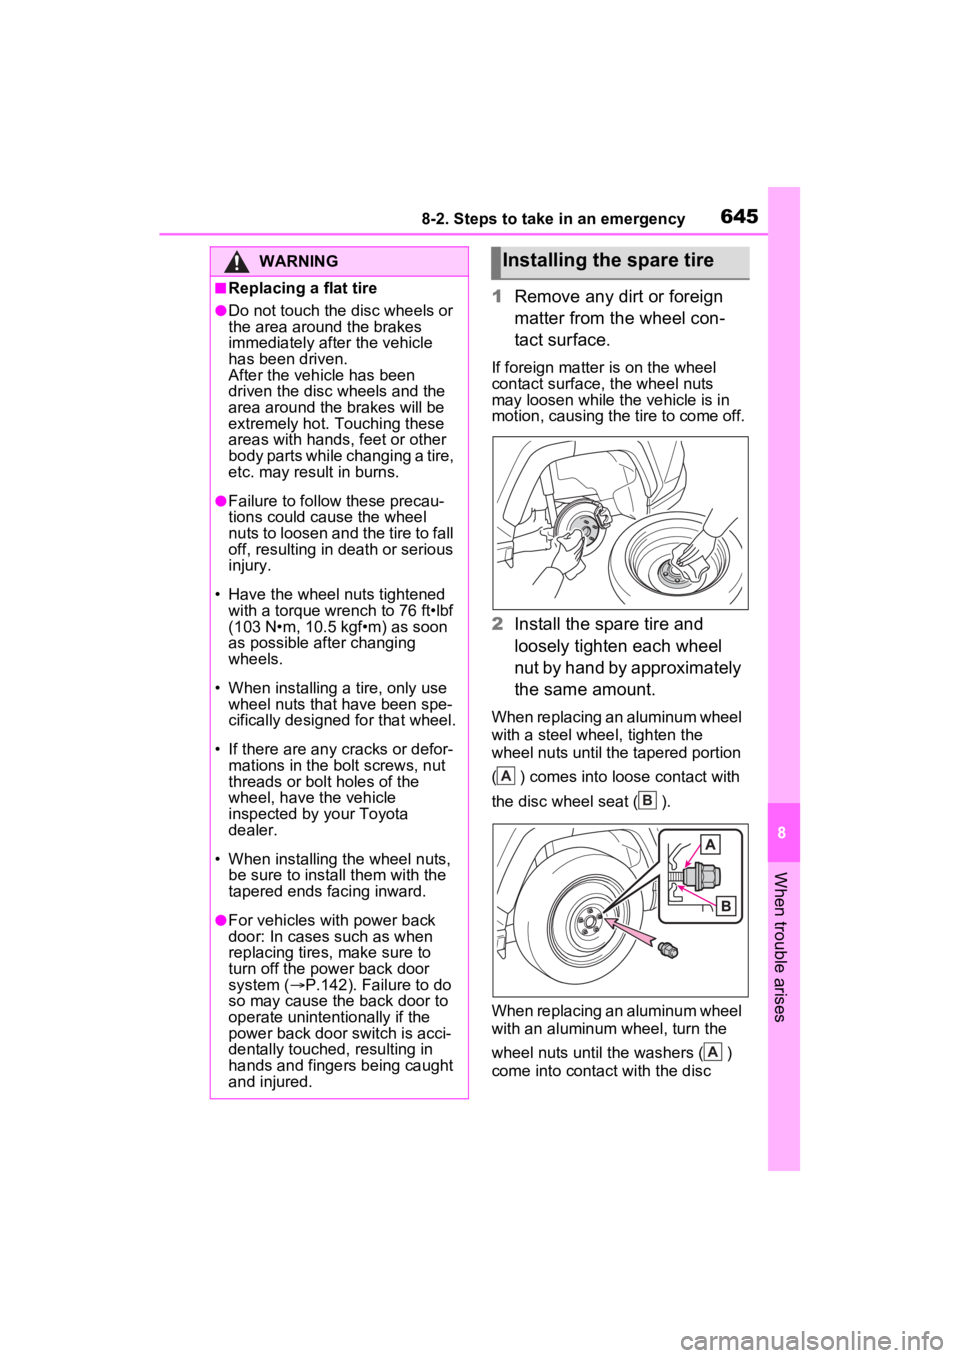
1Remove any dirt or foreign
matter from the wheel con-
tact surface.
If foreign matter is on the wheel
contact surface, the wheel nuts
may loosen while the vehicle is in
motion, causing the tire to come off.
2 Install the spare tire and
loosely tighten each wheel
nut by hand by approximately
the same amount.
When replacing an aluminum wheel
with a steel whee l, tighten the
wheel nuts until the tapered portion
( ) comes into loose contact with
the disc wheel seat ( ).
When replacing an aluminum wheel
with an aluminum wheel, turn the
wheel nuts until the washers ( )
come into contact with the disc
WARNING
■Replacing a flat tire
●Do not touch the disc wheels or
the area around the brakes
immediately after the vehicle
has been driven.
After the vehicle has been
driven the disc wheels and the
area around the brakes will be
extremely hot. Touching these
areas with hands , feet or other
body parts while changing a tire,
etc. may result in burns.
●Failure to follow these precau-
tions could cause the wheel
nuts to loosen and the tire to fall
off, resulting in death or serious
injury.
• Have the wheel nuts tightened with a torque wrench to 76 ft•lbf
(103 N•m, 10.5 kgf•m) as soon
as possible after changing
wheels.
• When installing a tire, only use wheel nuts that have been spe-
cifically designed for that wheel.
• If there are any cracks or defor- mations in the bolt screws, nut
threads or bolt holes of the
wheel, have the vehicle
inspected by your Toyota
dealer.
• When installing the wheel nuts,
be sure to install them with the
tapered ends facing inward.
●For vehicles with power back
door: In cases such as when
replacing tires, make sure to
turn off the power back door
system ( P.142). Failure to do
so may cause the back door to
operate unintentionally if the
power back door switch is acci-
dentally touched, resulting in
hands and fingers being caught
and injured.
Installing the spare tire
A
B
A
Page 646 of 752
6468-2. Steps to take in an emergency
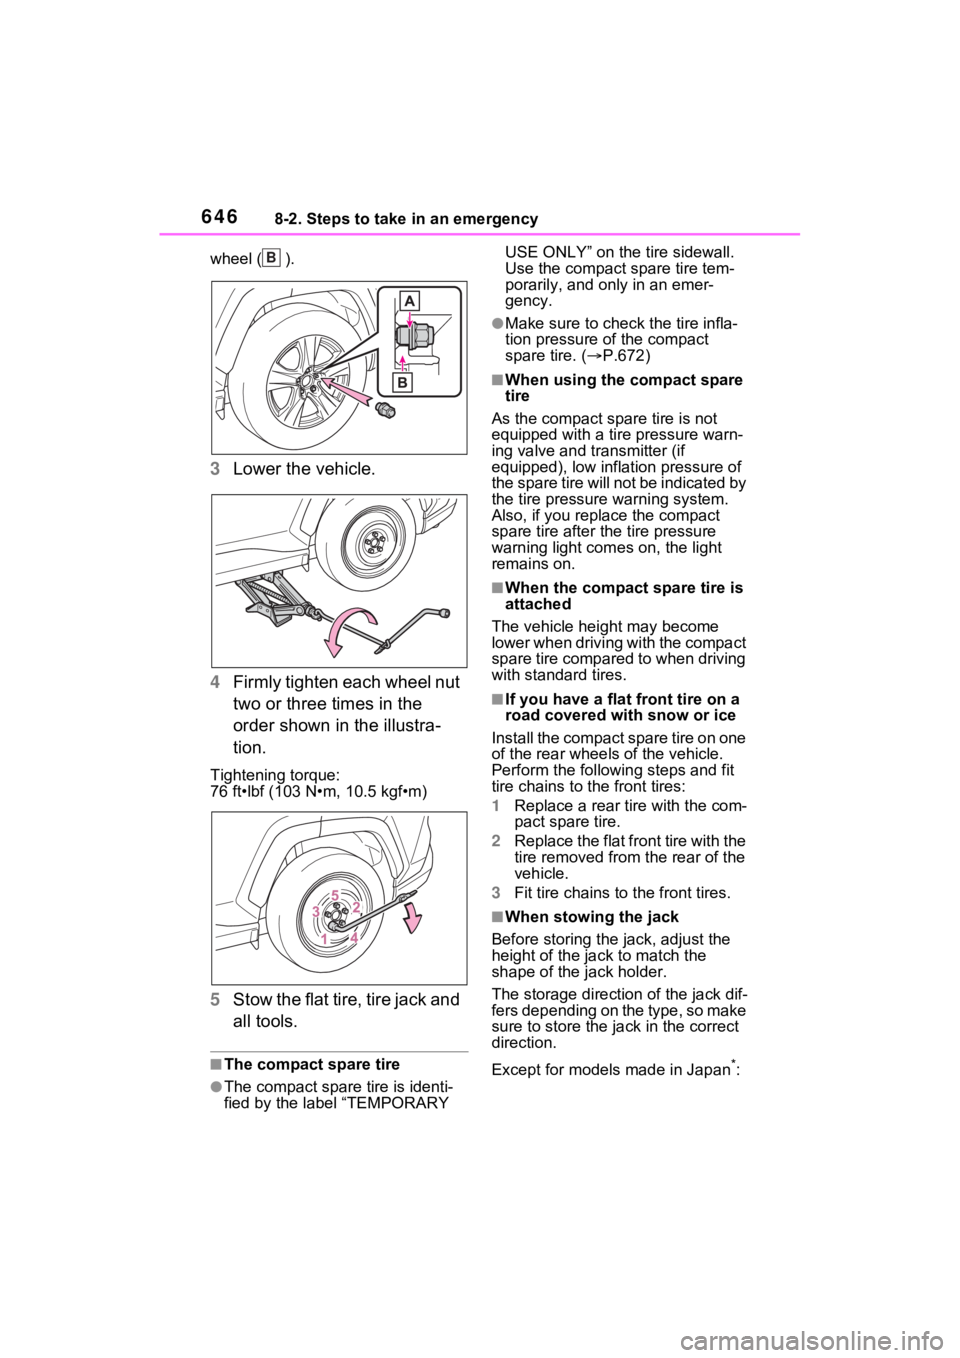
wheel ( ).
3Lower the vehicle.
4 Firmly tighten each wheel nut
two or three times in the
order shown in the illustra-
tion.
Tightening torque:
76 ft•lbf (103 N•m, 10.5 kgf•m)
5Stow the flat tire, tire jack and
all tools.
■The compact spare tire
●The compact spare tire is identi-
fied by the label “TEMPORARY USE ONLY” on the tire sidewall.
Use the compact spare tire tem-
porarily, and only in an emer-
gency.
●Make sure to check the tire infla-
tion pressure of the compact
spare tire. (
P.672)
■When using the compact spare
tire
As the compact spare tire is not
equipped with a tire pressure warn-
ing valve and transmitter (if
equipped), low inflation pressure of
the spare tire will not be indicated by
the tire pressure warning system.
Also, if you replace the compact
spare tire after the tire pressure
warning light com es on, the light
remains on.
■When the compact spare tire is
attached
The vehicle height may become
lower when driving with the compact
spare tire compared to when driving
with standard tires.
■If you have a flat front tire on a
road covered with snow or ice
Install the compact spare tire on one
of the rear wheels of the vehicle.
Perform the following steps and fit
tire chains to the front tires:
1 Replace a rear tire with the com-
pact spare tire.
2 Replace the flat front tire with the
tire removed from the rear of the
vehicle.
3 Fit tire chains to the front tires.
■When stowing the jack
Before storing the jack, adjust the
height of the ja ck to match the
shape of the jack holder.
The storage direction of the jack dif-
fers depending on the type, so make
sure to store the ja ck in the correct
direction.
Except for models made in Japan
*:
B
Page 672 of 752
6729-1. Specifications
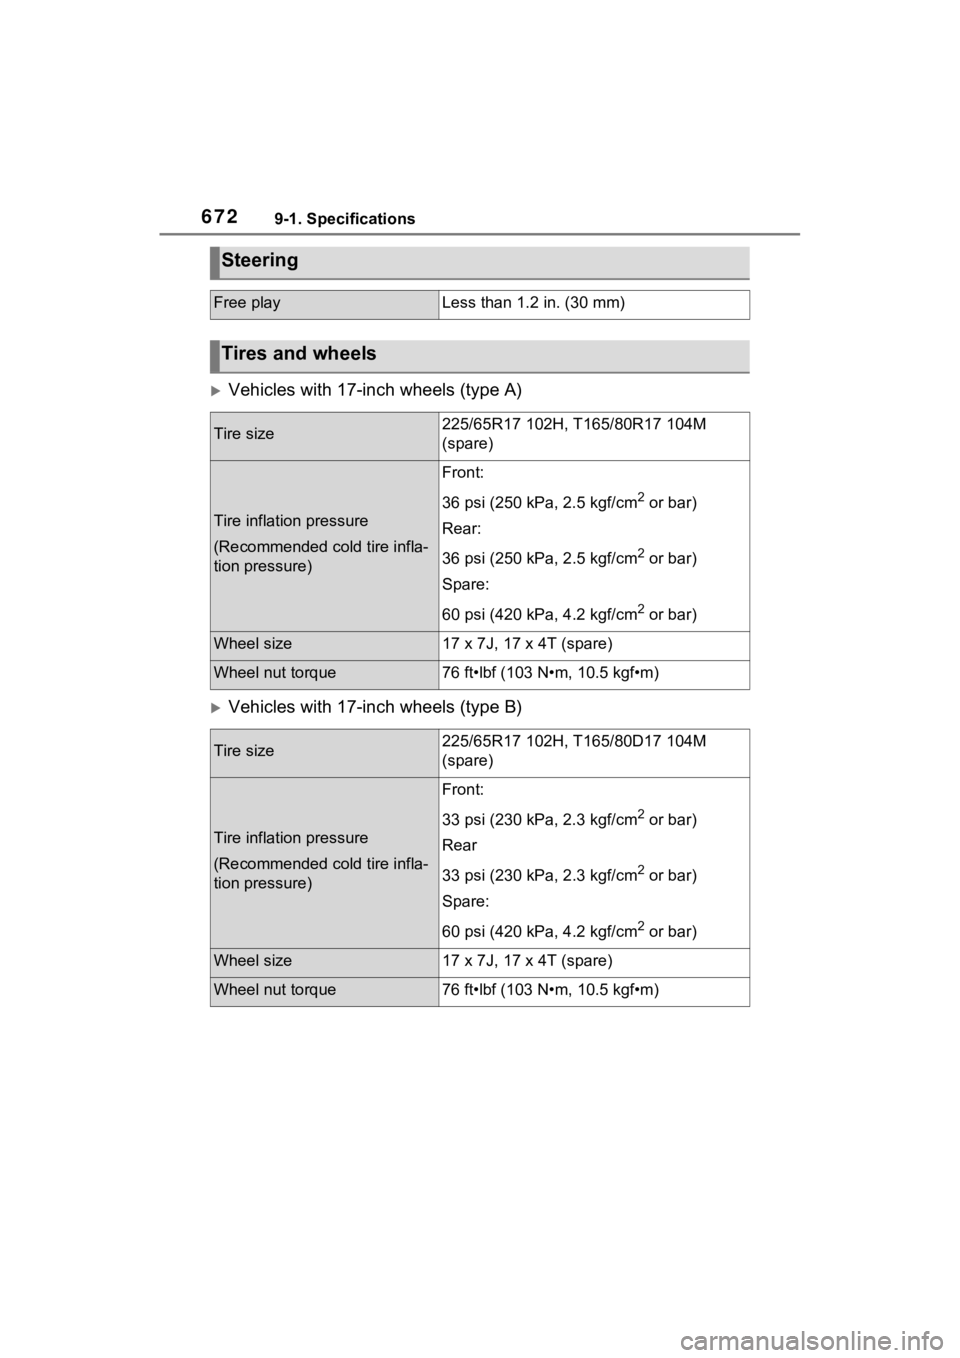
Vehicles with 17-inch wheels (type A)
Vehicles with 17-inch wheels (type B)
Steering
Free playLess than 1.2 in. (30 mm)
Tires and wheels
Tire size225/65R17 102H, T165/80R17 104M
(spare)
Tire inflation pressure
(Recommended cold tire infla-
tion pressure)
Front:
36 psi (250 kPa, 2.5 kgf/cm
2 or bar)
Rear:
36 psi (250 kPa, 2.5 kgf/cm
2 or bar)
Spare:
60 psi (420 kPa, 4.2 kgf/cm
2 or bar)
Wheel size17 x 7J, 17 x 4T (spare)
Wheel nut torque76 ft•lbf (103 N•m, 10.5 kgf•m)
Tire size225/65R17 102H, T165/80D17 104M
(spare)
Tire inflation pressure
(Recommended cold tire infla-
tion pressure)
Front:
33 psi (230 kPa, 2.3 kgf/cm
2 or bar)
Rear
33 psi (230 kPa, 2.3 kgf/cm
2 or bar)
Spare:
60 psi (420 kPa, 4.2 kgf/cm
2 or bar)
Wheel size17 x 7J, 17 x 4T (spare)
Wheel nut torque76 ft•lbf (103 N•m, 10.5 kgf•m)
Page 673 of 752
6739-1. Specifications
9
Vehicle specifications
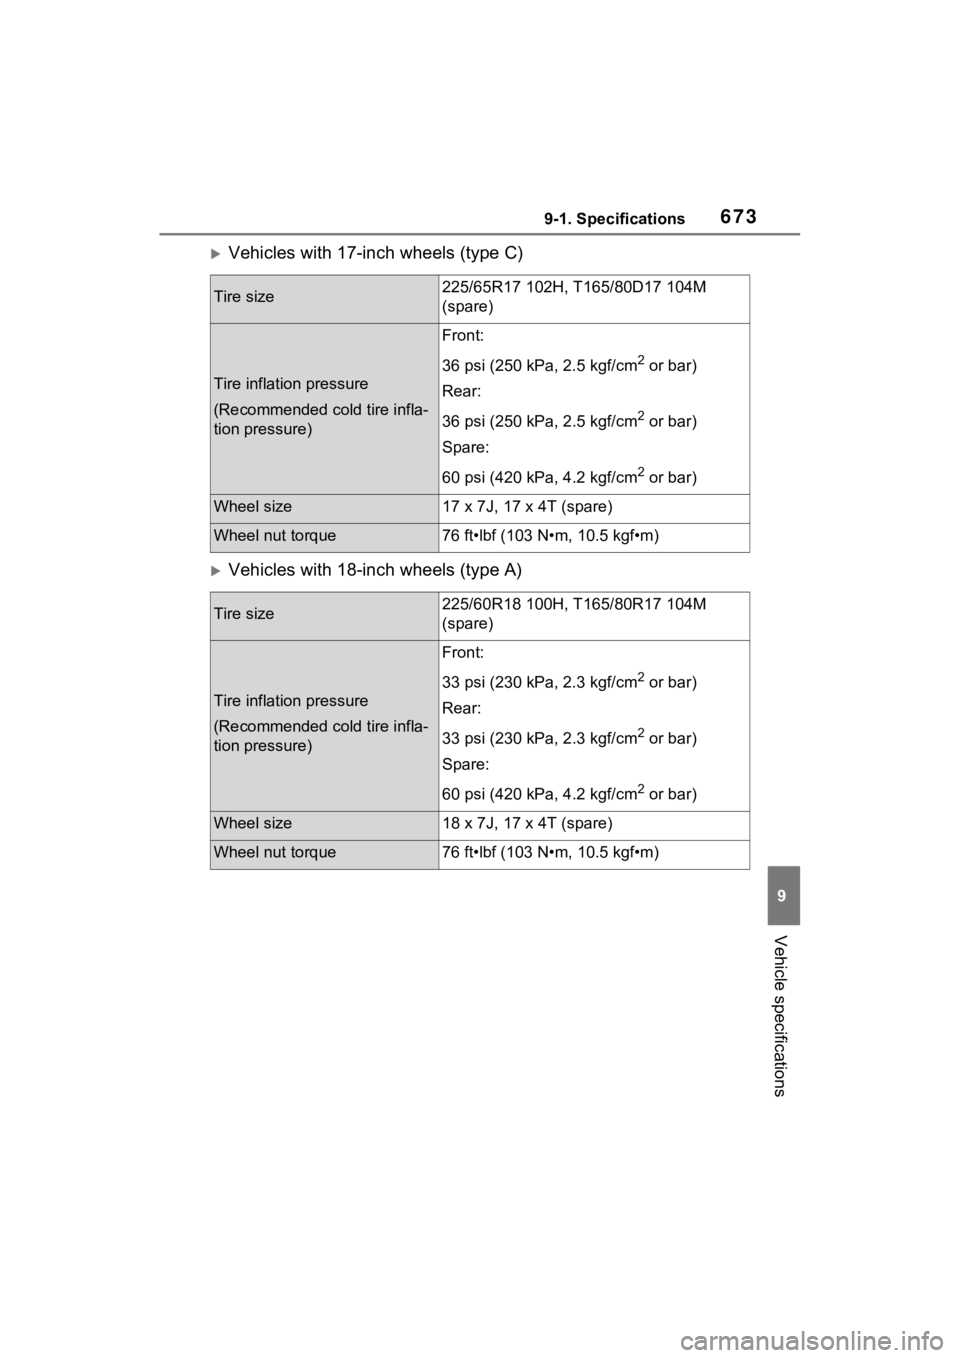
Vehicles with 17-inch wheels (type C)
Vehicles with 18-inch wheels (type A)
Tire size225/65R17 102H, T165/80D17 104M
(spare)
Tire inflation pressure
(Recommended cold tire infla-
tion pressure)
Front:
36 psi (250 kPa, 2.5 kgf/cm
2 or bar)
Rear:
36 psi (250 kPa, 2.5 kgf/cm
2 or bar)
Spare:
60 psi (420 kPa, 4.2 kgf/cm
2 or bar)
Wheel size17 x 7J, 17 x 4T (spare)
Wheel nut torque76 ft•lbf (103 N•m, 10.5 kgf•m)
Tire size225/60R18 100H, T165/80R17 104M
(spare)
Tire inflation pressure
(Recommended cold tire infla-
tion pressure)
Front:
33 psi (230 kPa, 2.3 kgf/cm
2 or bar)
Rear:
33 psi (230 kPa, 2.3 kgf/cm
2 or bar)
Spare:
60 psi (420 kPa, 4.2 kgf/cm
2 or bar)
Wheel size18 x 7J, 17 x 4T (spare)
Wheel nut torque76 ft•lbf (103 N•m, 10.5 kgf•m)
Page 674 of 752

6749-1. Specifications
Vehicles with 18-inch wheels (type B)
A: Wedge base bulbs (clear)
B: Wedge base bulbs (amber)
*1: If equipped
*2: The 28/8 W bulb is used. Howev er, only the 28 W filament illuminates.
Tire size225/60R18 100H, T165/80D17 104M
(spare)
Tire inflation pressure
(Recommended cold tire infla-
tion pressure)
Front:
33 psi (230 kPa, 2.3 kgf/cm
2 or bar)
Rear:
33 psi (230 kPa, 2.3 kgf/cm
2 or bar)
Spare:
60 psi (420 kPa, 4.2 kgf/cm
2 or bar)
Wheel size18 x 7J, 17 x 4T (spare)
Wheel nut torque76 ft•lbf (103 N•m, 10.5 kgf•m)
Light bulbs
Light bulbsBulb No.WType
Front side marker lights (bulb type)W5W5A
Front turn signal/parking lights (type A:
P.607)7444NA28/8B
Front turn signal lights (type B: P.607) (bulb
type)7444NA28/8*2B
Rear turn signal lightsWY21W21B
Back-up lightsW16W16A
Outer foot lights*15A
Page 678 of 752
6789-1. Specifications
Radial tires or bias-ply tires
A radial tire has “RADIAL” on the sidewall. A tire not marked “RADIAL” is a
bias-ply tire.
TUBELESS or TUBE TYPE
A tubeless tire d oes not have a tube and air is directly put in to the tire. A
tube type tire has a tube inside t he tire and the tube maintains the air pres-
sure.
Load limit at maximum cold tire inflation pressure (P.681)
Maximum cold tire inflation pressure ( P.672)
This means the pressure to w hich a tire may be inflated.
Uniform tire quality grading
For details, see “Uniform Tire Quality Grading” that follows.
Summer tires or all season tires ( P.579)
An all season tire has “M+S” on the sidewal l. A tire not marked “M+S” is a
summer tire.
“TEMPORARY USE ONLY”
A compact spare tire is identifi ed by the phrase “TEMPORARY USE ONLY”
molded on its sidewall. This tire is designed for temporary emergency use
only.
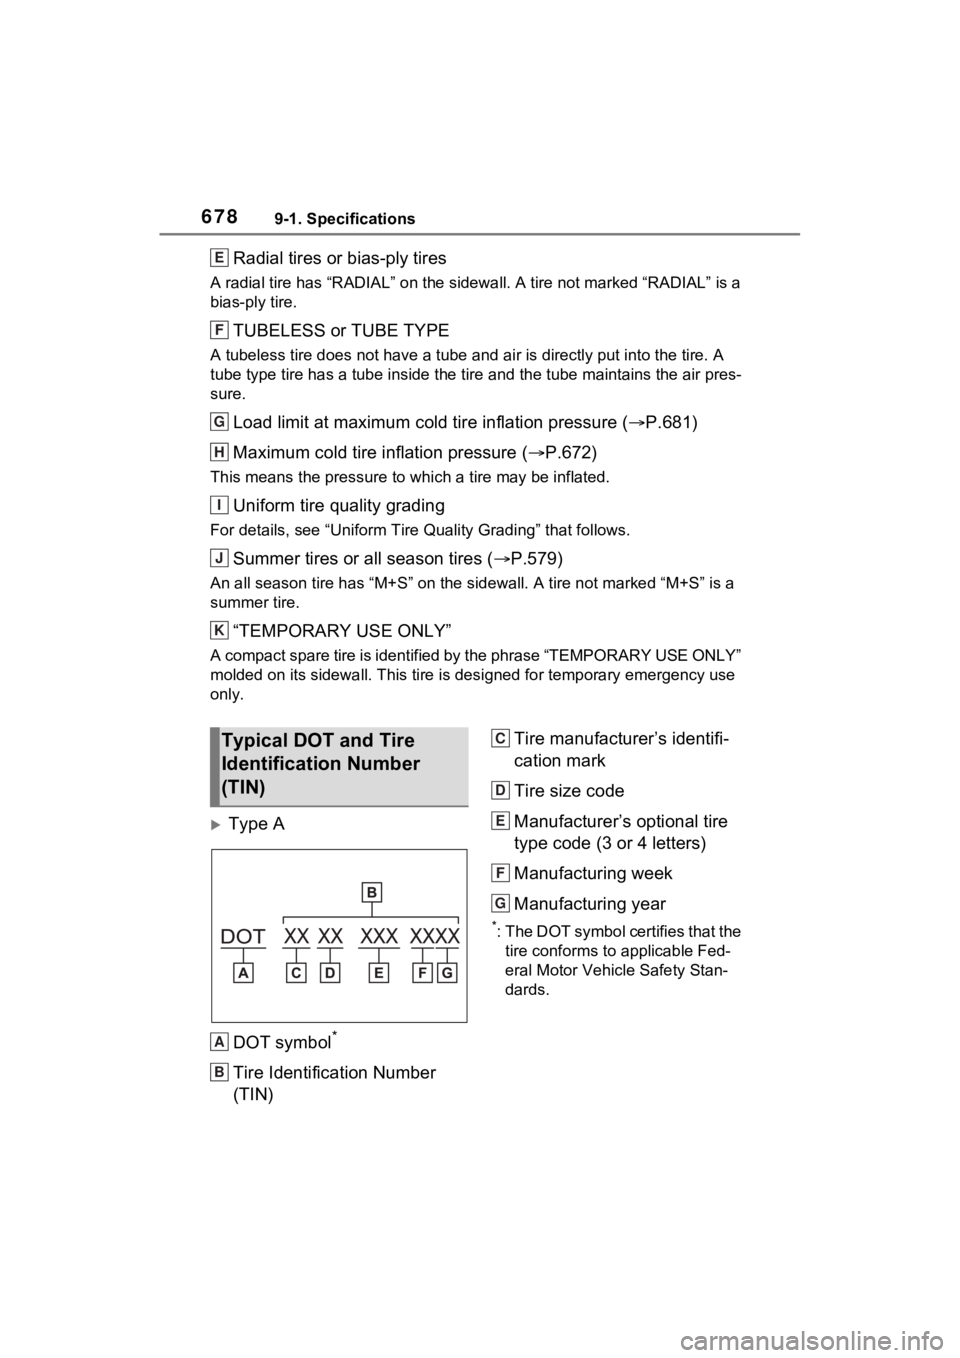
Type A
DOT symbol
*
Tire Identification Number
(TIN) Tire manufacturer’s identifi-
cation mark
Tire size code
Manufacturer’s optional tire
type code (3 or 4 letters)
Manufacturing week
Manufacturing year
*: The DOT symbol certifies that the
tire conforms to applicable Fed-
eral Motor Vehicle Safety Stan-
dards.
E
F
G
H
I
J
K
Typical DOT and Tire
Identification Number
(TIN)
A
B
C
D
E
F
G