TOYOTA RAV4 PHEV 2021 Owners Manual
Manufacturer: TOYOTA, Model Year: 2021, Model line: RAV4 PHEV, Model: TOYOTA RAV4 PHEV 2021Pages: 666, PDF Size: 161.28 MB
Page 121 of 666
119
2
2-2. Charging
Plug-in hybrid system
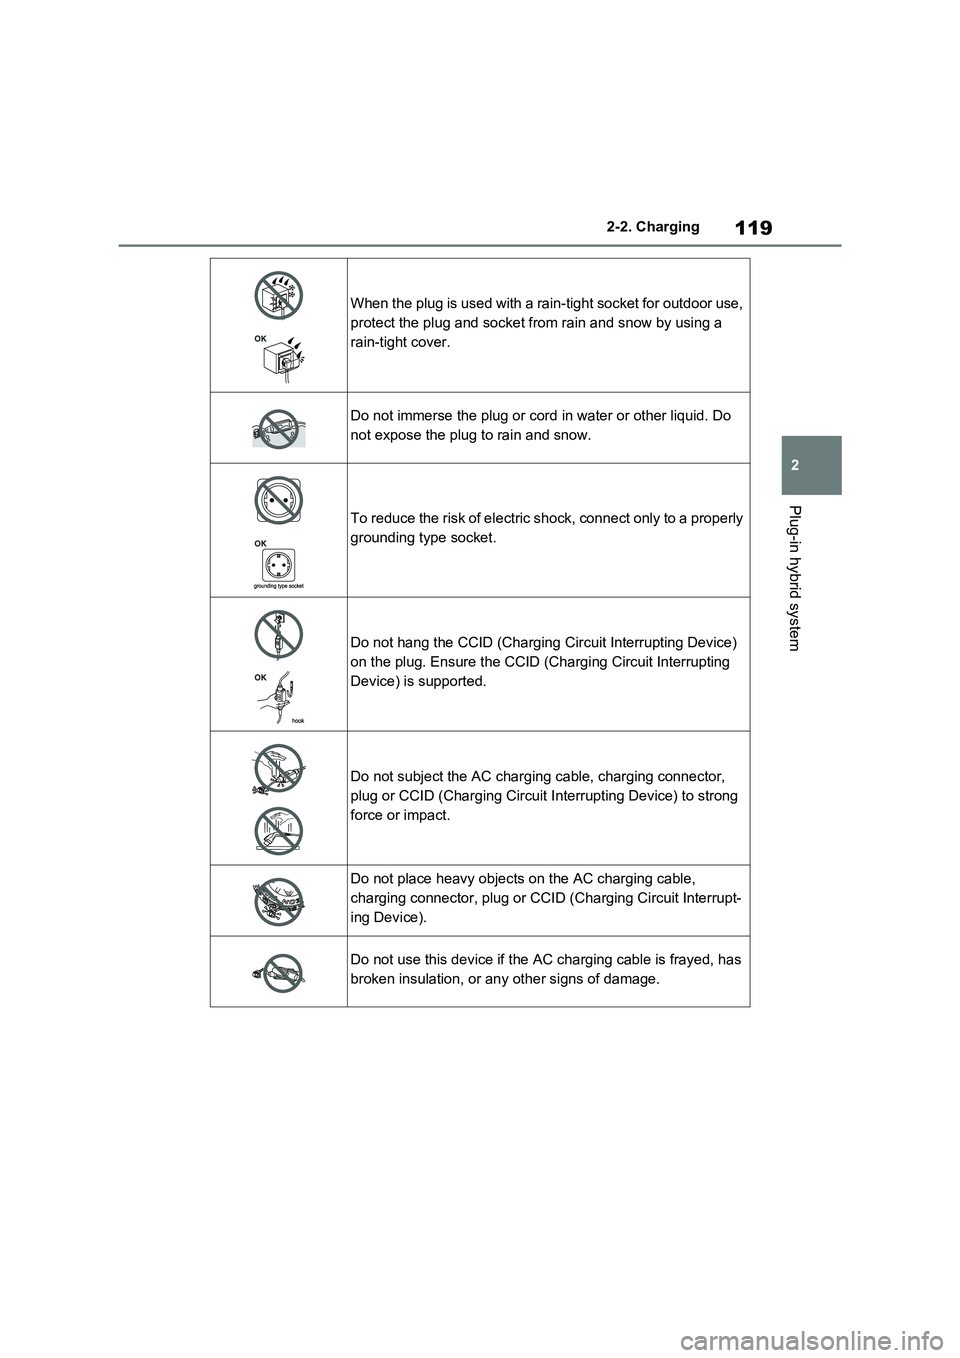
When the plug is used with a rain-tight socket for outdoor use,
protect the plug and socket fr om rain and snow by using a
rain-tight cover.
Do not immerse the plug or cor d in water or other liquid. Do
not expose the plug to rain and snow.
To reduce the risk of electric sh ock, connect only to a properly
grounding type socket.
Do not hang the CCID (Charging Circuit Interrupting Device)
on the plug. Ensure t he CCID (Charging Circuit Interrupting
Device) is supported.
Do not subject the AC charging cable, charging connector,
plug or CCID (Charging Circuit I nterrupting Device) to strong
force or impact.
Do not place heavy objects on the AC charging cable,
charging connector, plug or CCI D (Charging Circuit Interrupt-
ing Device).
Do not use this device if the AC charging cable is frayed, has
broken insulation, or an y other signs of damage.
Page 122 of 666
1202-2. Charging
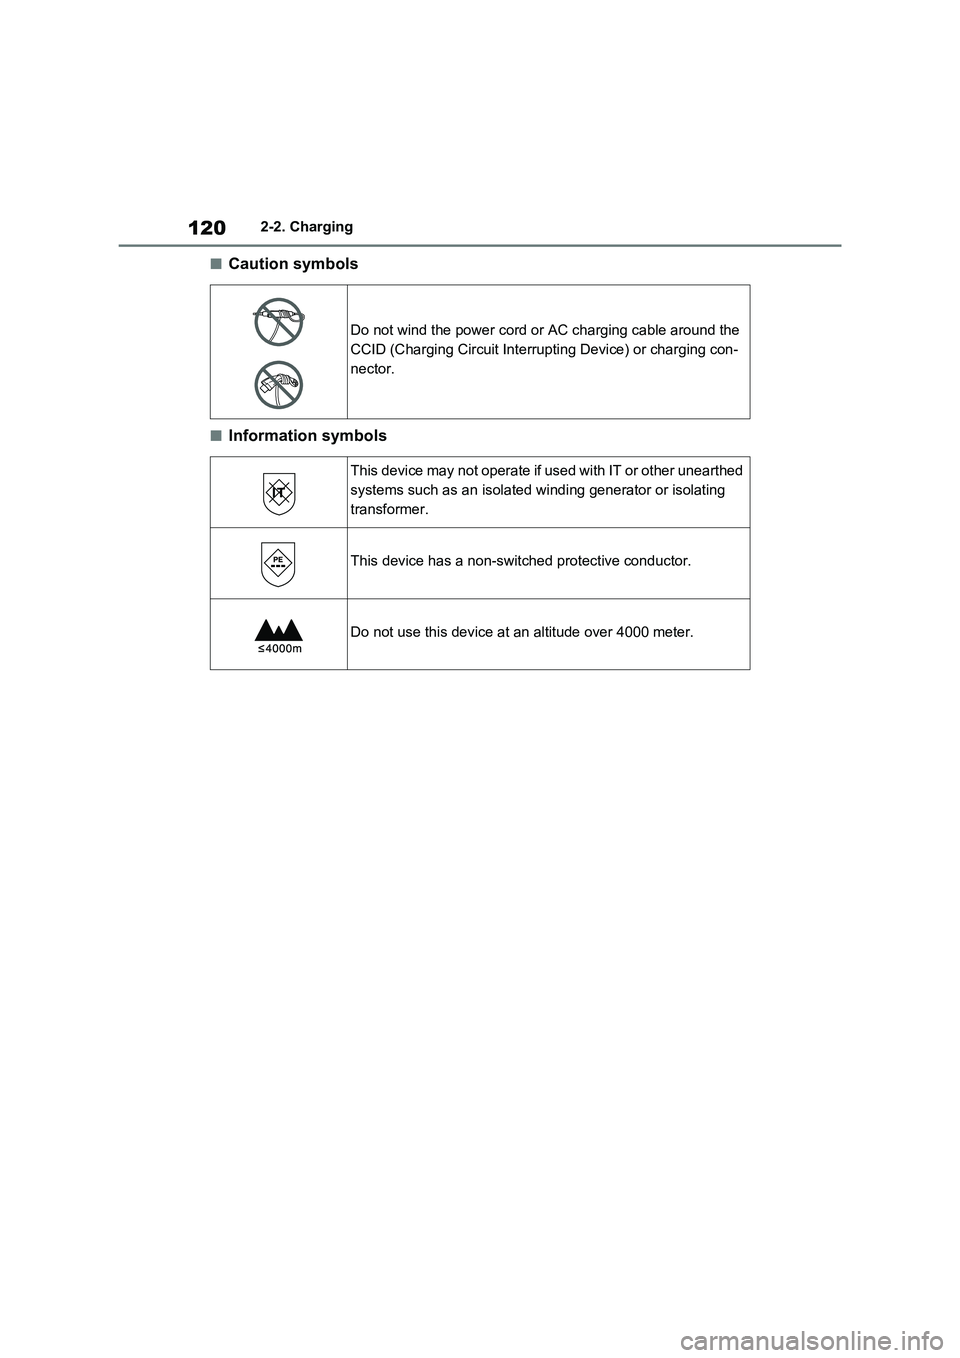
■Caution symbols
■Information symbols
Do not wind the power cord or AC charging cable around the
CCID (Charging Circuit Interrupting Device) or charging con -
nector.
This device may not operate if u sed with IT or other unearthed
systems such as an i solated winding generator or isolating
transformer.
This device has a non-switc hed protective conductor.
Do not use this device at an altitude over 4000 meter.
Page 123 of 666
121
2
2-2. Charging
Plug-in hybrid system
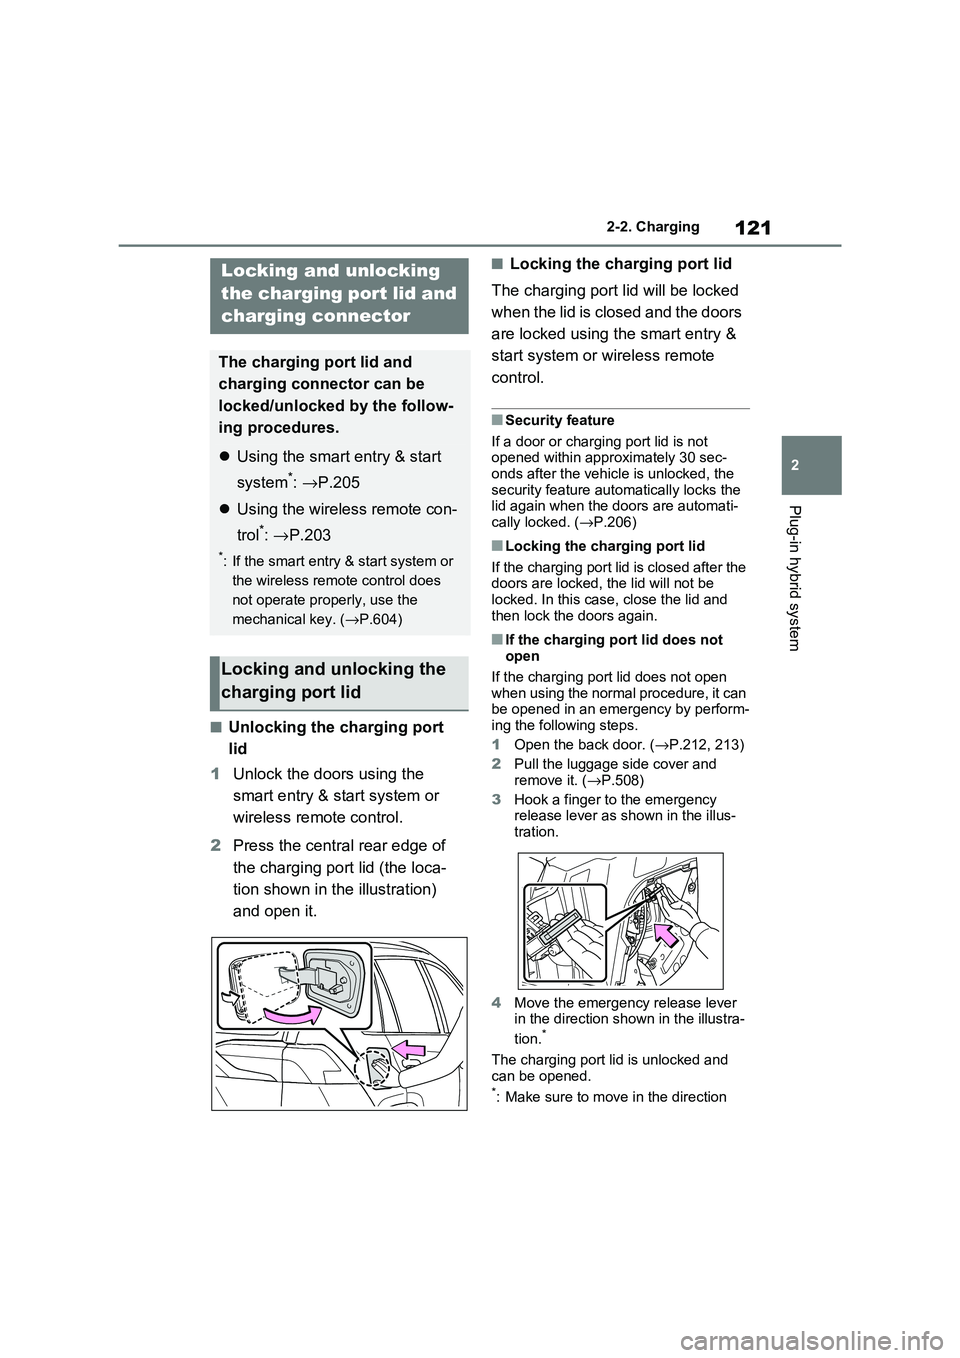
■Unlocking the charging port
lid
1 Unlock the doors using the
smart entry & start system or
wireless remote control.
2 Press the central rear edge of
the charging port lid (the loca -
tion shown in the illustration)
and open it.
■Locking the charging port lid
The charging port lid will be locked
when the lid is closed and the doors
are locked using the smart entry &
start system or wir eless remote
control.
■Security feature
If a door or charging port lid is not opened within appr oximately 30 sec-
onds after the vehicle is unlocked, the
security feature aut omatically locks the lid again when the doors are automati -
cally locked. ( →P.206)
■Locking the charging port lid
If the charging port lid is closed after the doors are locked, the lid will not be
locked. In this case , close the lid and
then lock the doors again.
■If the charging port lid does not open
If the charging por t lid does not open
when using the normal procedure, it can be opened in an emergency by perform -
ing the following steps.
1 Open the back door. (→P.212, 213)
2 Pull the luggage side cover and
remove it. ( →P.508)
3 Hook a finger to the emergency
release lever as shown in the illus - tration.
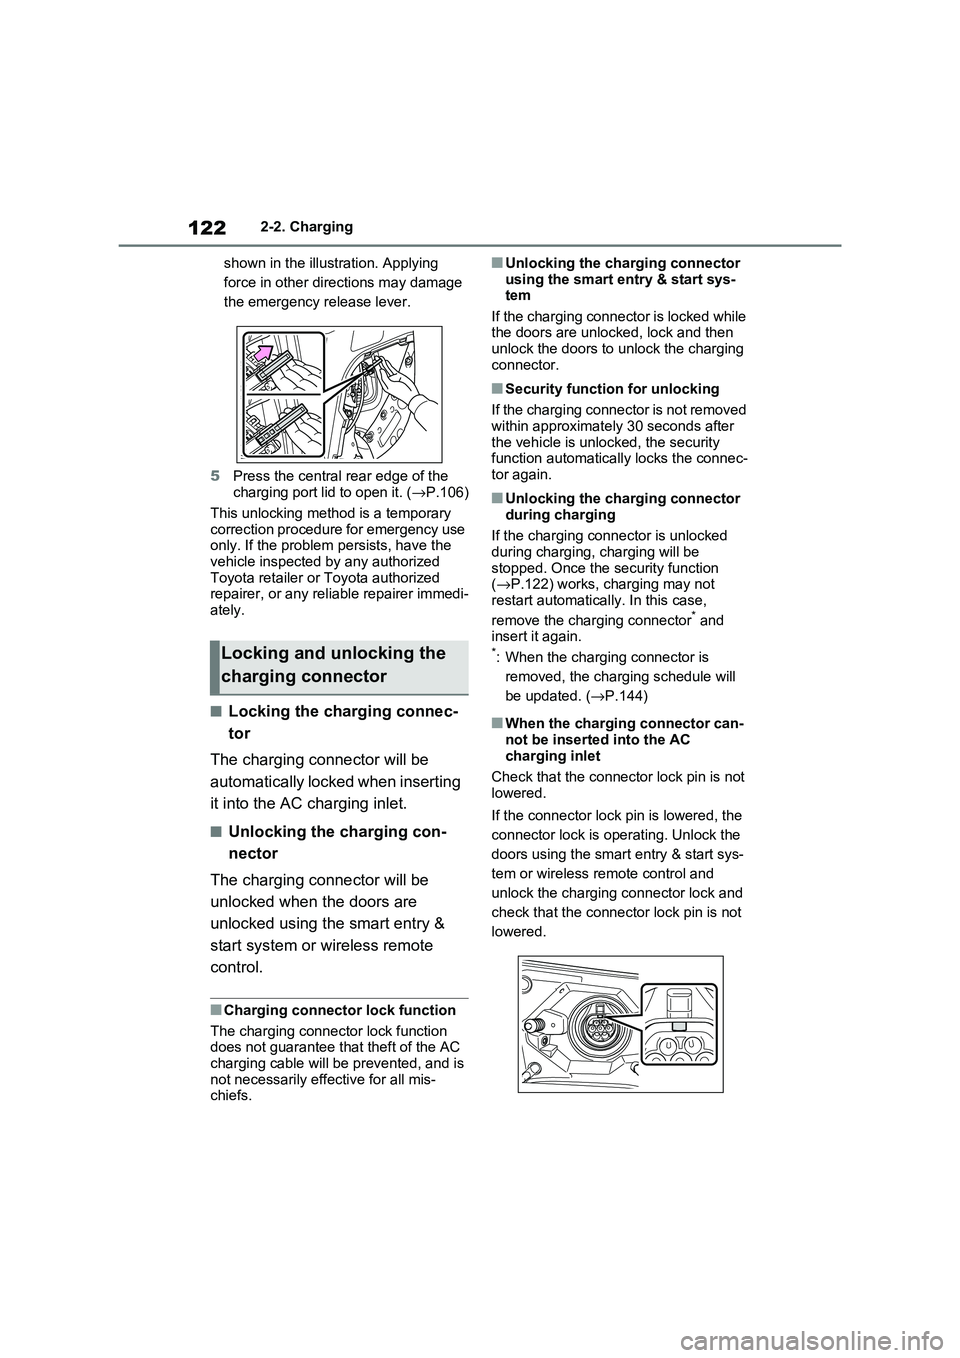
4 Move the emergency release lever in the direction shown in the illustra -
tion.*
The charging port lid is unlocked and can be opened.*: Make sure to move in the direction
Locking and unlocking
the charging port lid and
charging connector
The charging port lid and
charging connector can be
locked/unlocked by the follow -
ing procedures.
Using the smart entry & start
system*: →P.205
Using the wireless remote con-
trol*: →P.203
*: If the smart entry & start system or
the wireless remote control does
not operate properly, use the
mechanical key. ( →P.604)
Locking and unlocking the
charging port lid
Page 124 of 666
1222-2. Charging
shown in the illustration. Applying
force in other directions may damage
the emergency release lever.
5 Press the central rear edge of the charging port lid to open it. ( →P.106)
This unlocking method is a temporary
correction procedure for emergency use only. If the problem persists, have the
vehicle inspected by any authorized
Toyota retailer or Toyota authorized repairer, or any reli able repairer immedi-
ately.
■Locking the charging connec -
tor
The charging connector will be
automatically locked when inserting
it into the AC c harging inlet.
■Unlocking the charging con-
nector
The charging connector will be
unlocked when the doors are
unlocked using the smart entry &
start system or wireless remote
control.
■Charging connector lock function
The charging connector lock function
does not guarantee t hat theft of the AC
charging cable will be prevented, and is not necessari ly effective for all mis-
chiefs.
■Unlocking the charging connector
using the smart entry & start sys- tem
If the charging connector is locked while
the doors are unlocked, lock and then unlock the doors to u nlock the charging
connector.
■Security function for unlocking
If the charging connector is not removed within approximately 30 seconds after
the vehicle is unloc ked, the security
function automatica lly locks the connec- tor again.
■Unlocking the charging connector
during charging
If the charging connector is unlocked during charging, charging will be
stopped. Once the security function
( →P.122) works, charging may not restart automatically. In this case,
remove the charging connector* and
insert it again.*: When the charging connector is
removed, the charging schedule will
be updated. ( →P.144)
■When the charging connector can- not be inserted into the AC
charging inlet
Check that the connect or lock pin is not lowered.
If the connector lock pin is lowered, the
connector lock is operating. Unlock the
doors using the smar t entry & start sys-
tem or wireless re mote control and
unlock the charging connector lock and
check that the connect or lock pin is not
lowered.
Locking and unlocking the
charging connector
Page 125 of 666
123
2
2-2. Charging
Plug-in hybrid system
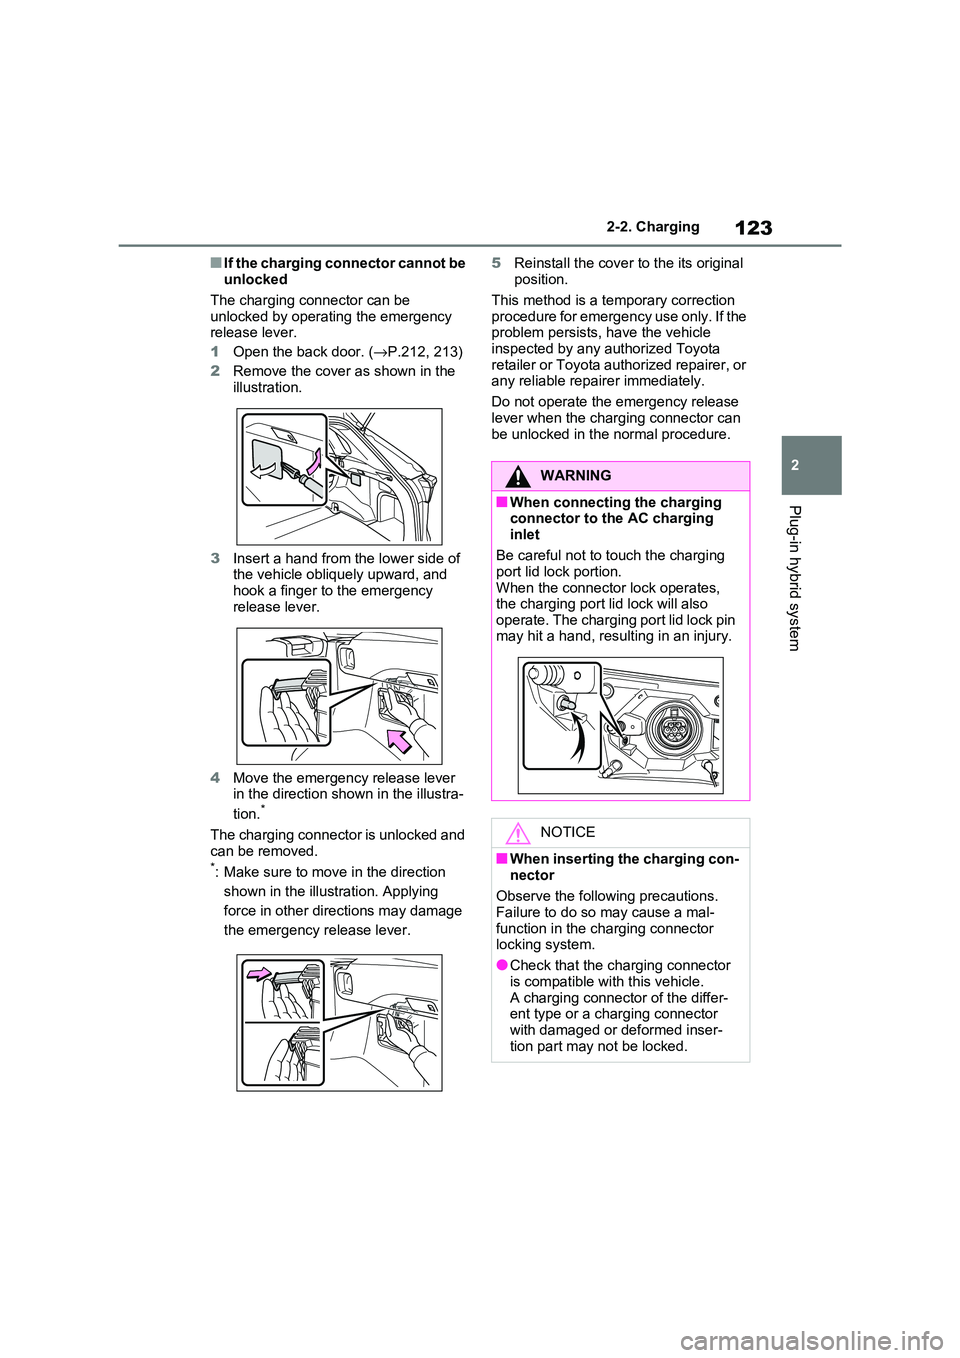
■If the charging connector cannot be
unlocked
The charging connector can be
unlocked by operating the emergency
release lever.
1 Open the back door. (→P.212, 213)
2 Remove the cover as shown in the illustration.
3 Insert a hand from the lower side of the vehicle obliquely upward, and
hook a finger to the emergency
release lever.
4 Move the emergency release lever
in the direction shown in the illustra -
tion.*
The charging connector is unlocked and
can be removed.*: Make sure to move in the direction
shown in the illustration. Applying
force in other directions may damage
the emergency release lever.
5 Reinstall the cover to the its original
position.
This method is a temporary correction
procedure for emergency use only. If the
problem persists, h ave the vehicle inspected by any a uthorized Toyota
retailer or Toyota authorized repairer, or
any reliable repairer immediately.
Do not operate the e mergency release
lever when the charging connector can
be unlocked in the normal procedure.
WARNING
■When connecting the charging connector to the AC charging
inlet
Be careful not to touch the charging port lid lock portion.
When the connector lock operates,
the charging port lid lock will also operate. The charging port lid lock pin
may hit a hand, resulting in an injury.
NOTICE
■When inserting the charging con - nector
Observe the following precautions.
Failure to do so may cause a mal - function in the charging connector
locking system.
●Check that the charging connector is compatible with this vehicle.
A charging connector of the differ -
ent type or a charging connector with damaged or deformed inser -
tion part may not be locked.
Page 126 of 666
1242-2. Charging
Connect to an AC 220 V - 240 V
socket with a Residual Current
Circuit-Breaker (RCCB) and a
circuit breaker. Use of a 13A
individual circuit is strongly rec -
ommended to ensure AC
charging cable will operate prop-
erly.
We strongly recommend that you
use an exclusive connection
from the junction box for
charging. If you connect on a
socket that is on a shared circuit,
and other electrical appliances
are used on other sockets on the
same circuit, then the circuit
breaker might trip.*
Ensure that the junction box is
NOTICE
●Do not apply excessive force to the
charging connector after the
charging connector is inserted. When removing the charging con -
nector, make sure to unlock the
charging connector.
Power sources that can
be used
An external power source that
fulfills the follow ing criteria is
necessary for charging this
vehicle. Confirm this before
charging.
WARNING
■Warnings for electrical faults
Make sure to observe the precautions
in this Owner’s Manual when
charging the vehicle.
Failure to use a power source that ful -
fills the requirements, or failure to
observe regulations while charging could lead to an accident, possibly
resulting in death or serious injury.
Power sources
Page 127 of 666
125
2
2-2. Charging
Plug-in hybrid system
equipped with a Residual Cur -
rent Circuit-Breaker (RCCB). If it
is not, have one installed by a
duly qualified professional.
When charging outdoors, make
sure to connect to a rain-tight
socket that is certified for outdoor
use. Checking Residual Current
Circuit-Breaker (RCCB) opera -
tion before its use is recom -
mended.
Check whether there are any
local EV-charging regulations in
place, and adhere to them.
*: For detailed informa tion, consult an
electrician.
■The charging environment
For safe charging, the following charging equipment and settings are
recommended.
●Rain-tight socket
When charging outdoors, connect the
plug to a rain-tight socket, and ensure
that the plug remains waterproof while
the plug is connected.
●Dedicated circuit
• To reduce the risk of fire, connect only to an at least 13A branch circuit with
an over-current protection.
• To reduce the risk of electric shock when working with the plug, connect
to a socket that has a Residual Cur-
rent Circuit-Breaker (RCCB) installed.
●Remote switch
Allows the electricity from the socket to
be interrupted by operating a switch,
thus allowing safe removal and insertion
of the plug on rainy days.
■When your circuit breaker trips
during charging
The upper limit of the charging current
can be changed in “Vehicle Settings” on
the multi-information display.
1 Press or of the meter control
switches to select .
2 Press or of the meter control
switches to select “ Vehicle Settings”,
and then press and hold .
3 Press or of the meter control
switches to select “Charging Set -
tings”, and then press .
The “Charging Settings” screen will
be displayed.
4 Press or of the meter control
switches to select “Charging Cur -
rent”, and then press .
The “Charging Current” screen will
be displayed.
5 Press or of the meter control
switches to select “16A”*1 or “8A”,
and then press .
The maximum charging current
during charging will be restricted to
16A*1 or 8A.*2
If the breaker still tri ps while charging,
even after changing the upper limit of
the charging current , check if the con- nected power sourc e meets the speci-
fied charging conditions. ( →P.124)*1: Vehicles with 6.6 kW onboard trac-
tion battery charger only
*2: Restricting the charging current will
lengthen the charging time.
WARNING
■Power sources precautions
Observe the following precautions.
If you do not follow them, fire, electri-
cal shock and/or damages may occur,
possibly resulting in death or serious injury.
Page 128 of 666
1262-2. Charging
WARNING
●Connect to an AC 220 V - 240 V
socket with a Residual Current Cir -
cuit-Breaker (RCCB) and supplied by a circuit breaker in line with local
regulations. Use of an individual cir -
cuit provided with at least 13A is strongly recommended.
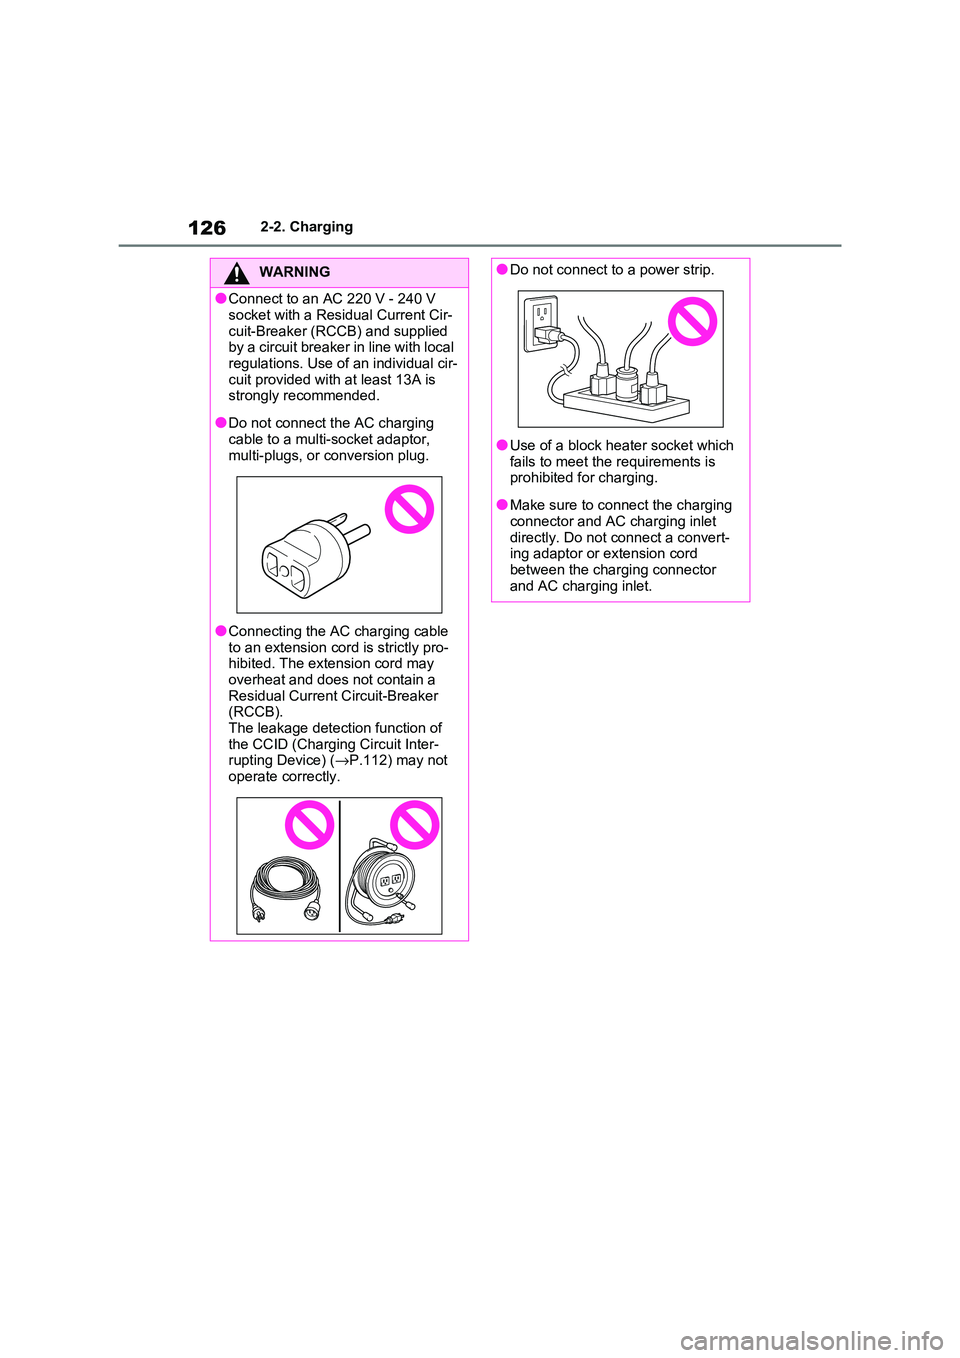
●Do not connect the AC charging
cable to a multi -socket adaptor, multi-plugs, or conversion plug.
●Connecting the AC charging cable to an extension co rd is strictly pro-
hibited. The extension cord may
overheat and does not contain a Residual Current Circuit-Breaker
(RCCB).
The leakage detection function of the CCID (Charging Circuit Inter -
rupting Device) ( →P.112) may not
operate correctly.
●Do not connect to a power strip.
●Use of a block heater socket which
fails to meet the requirements is prohibited for charging.
●Make sure to connect the charging connector and AC charging inlet
directly. Do not connect a convert -
ing adaptor or extension cord between the charging connector
and AC charging inlet.
Page 129 of 666
127
2
2-2. Charging
Plug-in hybrid system
■Charging from an external
power source ( →P.135)
This is a charging method used
when charging from an AC socket
(220 V - 240 V) with the AC
charging cable equipped to the
vehicle or charging at a public
charging station.
The charging start time (or departure
time) and day can be set to carry out
charging using the charging schedule
at the desired date and time. ( →P.144)
■Using the hybrid battery (trac-
tion battery) charge mode
( →P.87)
The plug-in hybrid system can be
switched to hybrid battery (traction
battery) charge mode to charge the
hybrid battery (traction battery)
using electricity generated by gaso-
line engine operation.
The maximum charge amount in the
hybrid battery (traction battery) charge
mode is approximately 80% of the fully
charged capacity for the charging from
an external power source.
The time required to charge the
hybrid battery (traction battery) dif -
fers according to t he charging volt-
age and charging current.
Home power source (except for
France, Finland and Switzerland)
Charging voltage*1: AC 230 V
Charging current*2: 10A
Estimated charging time*3, 4: Approxi -
mately 7 hours 30 minutes
Home power source (for France,
Finland and Switzerland)
Charging voltage*1: AC 230 V
Charging current*2: 8A
Estimated charging time*3, 4: Approxi -
mately 9 hours
Charging station (3.3 kW
onboard traction battery charger)
Charging voltage*1: AC 230 V
Charging current*2: 16A
Estimated charging time*3, 4: Approxi -
mately 5 hours
Charging station (6.6 kW
onboard traction battery char -
ger*5)
Charging voltage*1: AC 230 V
Charging current*2: 32A
Estimated charging time*3, 4: Approxi -
mately 2 hours 30 minutes
*1: The charging voltage may differ
depending on the target region.
*2: This is the maximum value. Further -
more, the upper limit of the charging
current can be changed in “Vehicle
Settings”. ( →P.125)
*3: The time required to complete
charging depends on conditions
Charging methods
The following methods can be
used to charge the hybrid bat -
tery (traction battery).
Types of charging methods
Estimated charging time
Page 130 of 666
1282-2. Charging
such as the remaining charge of the
hybrid battery (traction battery), the
outside temperature and specifica -
tions of a charger (charging station).
*4: When using “My Room Mode”
( →P.153), the time required for
charging to complete may be longer
or the charging may not be com -
pleted.
*5: If equipped
■Charging time may increase
In the following situations, charging time may become longer than normal:
●In very hot or very cold temperatures.
●When the hybrid bat tery (traction bat-
tery) becomes ho t, such as immedi- ately after high-load driving.
●The vehicle is consuming a lot of elec - tricity, for example, when the head -
lights are on etc.
●When using “My Room Mode”.
( →P.153)
●There is a power outage during
charging.
●There is an interrup tion in the electri-
cal supply.
●There is a drop in t he voltage of exter- nal power source.
●The charge in the 12-volt battery is low, for example due to the vehicle
being left unused fo r a long period of
time.
●The maximum charging current is set
to 8A or 16A* through “Vehicle Set -
tings”. ( →P.125)
●When the “Battery Heater” operates.
( →P.128)
●When the “Battery Cooler” is operated
before charging. ( →P.129)
●When the plug generates heat due to
a loose socket connection etc.*: Vehicles with 6.6 kW onboard traction
battery charger only
■Using a DC Charger
DC Chargers cannot be used with this vehicle.
■Charging electricity
This vehicle can be charged up to
approximately 3. 3 kW or 6.6 kW*.
However, depending on the used char -
ger or AC charging cable, charging elec -
tricity may be limited.*: Vehicles with 6.6 kW onboard traction
battery charger only
This vehicle is equipped with sev -
eral functions that are linked with
charging.
■“My Room Mode” ( →P.153)
When the AC charging cable is
connected to the vehicle, electrical
components such as the air condi -
tioning system or audio system can
be used using the external power
source*.
*: The power of the hybrid battery (trac -
tion battery) may be used depending
on the situation.
■“Battery Heater”
When the outside temperature is
low and the AC cha rging cable is
connected to the vehicle, this func -
tion automatically warms the hybrid
battery (traction battery) until it
reaches or exceeds a certain tem -
perature.
“Battery Heater” will operate when
the “Battery Heater” of the
“Charging Settings” on the multi-
information display is on. ( →P.187)
Charging-linked functions