airbag TOYOTA RAV4 PHEV 2021 Owner's Manual
[x] Cancel search | Manufacturer: TOYOTA, Model Year: 2021, Model line: RAV4 PHEV, Model: TOYOTA RAV4 PHEV 2021Pages: 666, PDF Size: 161.28 MB
Page 59 of 666
57
1
1-2. Child safety
For safety and security
*3: If the head restraint interferes with
your child restrai nt system, and the
head restraint can be removed,
remove the head restraint.
Otherwise, put the head restraint in
the upper most position.
*4: Use only a front-facing child restraint
system when the airbag manual on-
off switch is on.
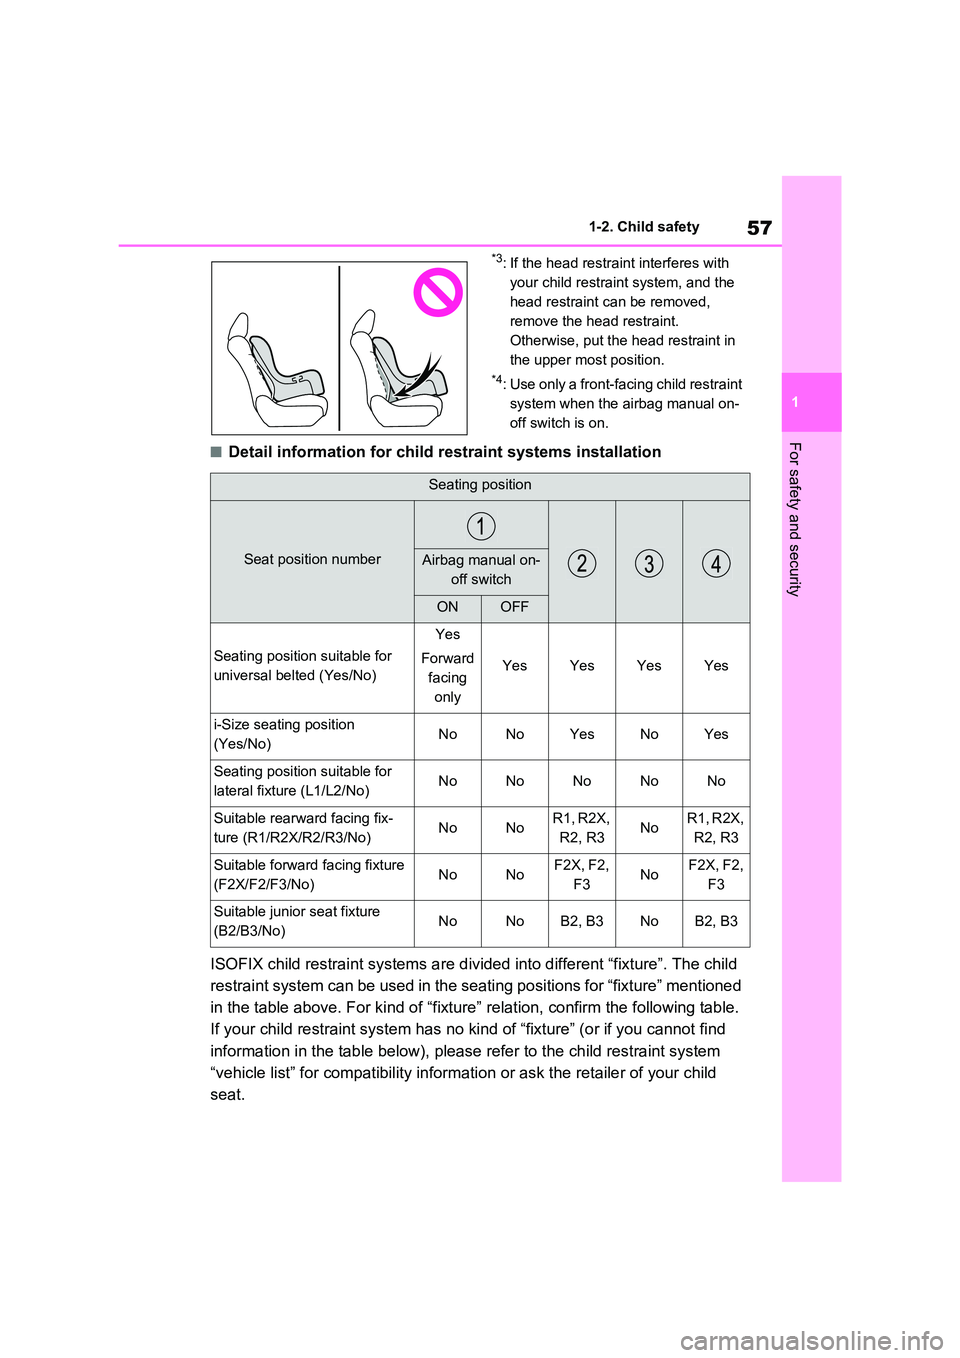
■Detail information for child r estraint systems installation
ISOFIX child restraint systems a re divided into different “fixture”. The child
restraint system can be used in the seating positions for “fixt ure” mentioned
in the table above. For kind of “ fixture” relation, confirm the following table.
If your child restraint system has no kind of “fixture” (or if you cannot find
information in the tab le below), please refer to the child restraint system
“vehicle list” for compatibilit y information or ask the retailer of your child
seat.
Seating position
Seat position numberAirbag manual on-
off switch
ONOFF
Seating position suitable for
universal belted (Yes/No)
Yes
Forward
facing
only
YesYesYesYes
i-Size seating position
(Yes/No)NoNoYesNoYes
Seating position suitable for
lateral fixture (L1/L2/No)NoNoNoNoNo
Suitable rearward facing fix -
ture (R1/R2X/R2/R3/No)NoNoR1, R2X,
R2, R3NoR1, R2X,
R2, R3
Suitable forward facing fixture
(F2X/F2/F3/No)NoNoF2X, F2,
F3NoF2X, F2,
F3
Suitable junior seat fixture
(B2/B3/No)NoNoB2, B3NoB2, B3
Page 60 of 666
581-2. Child safety
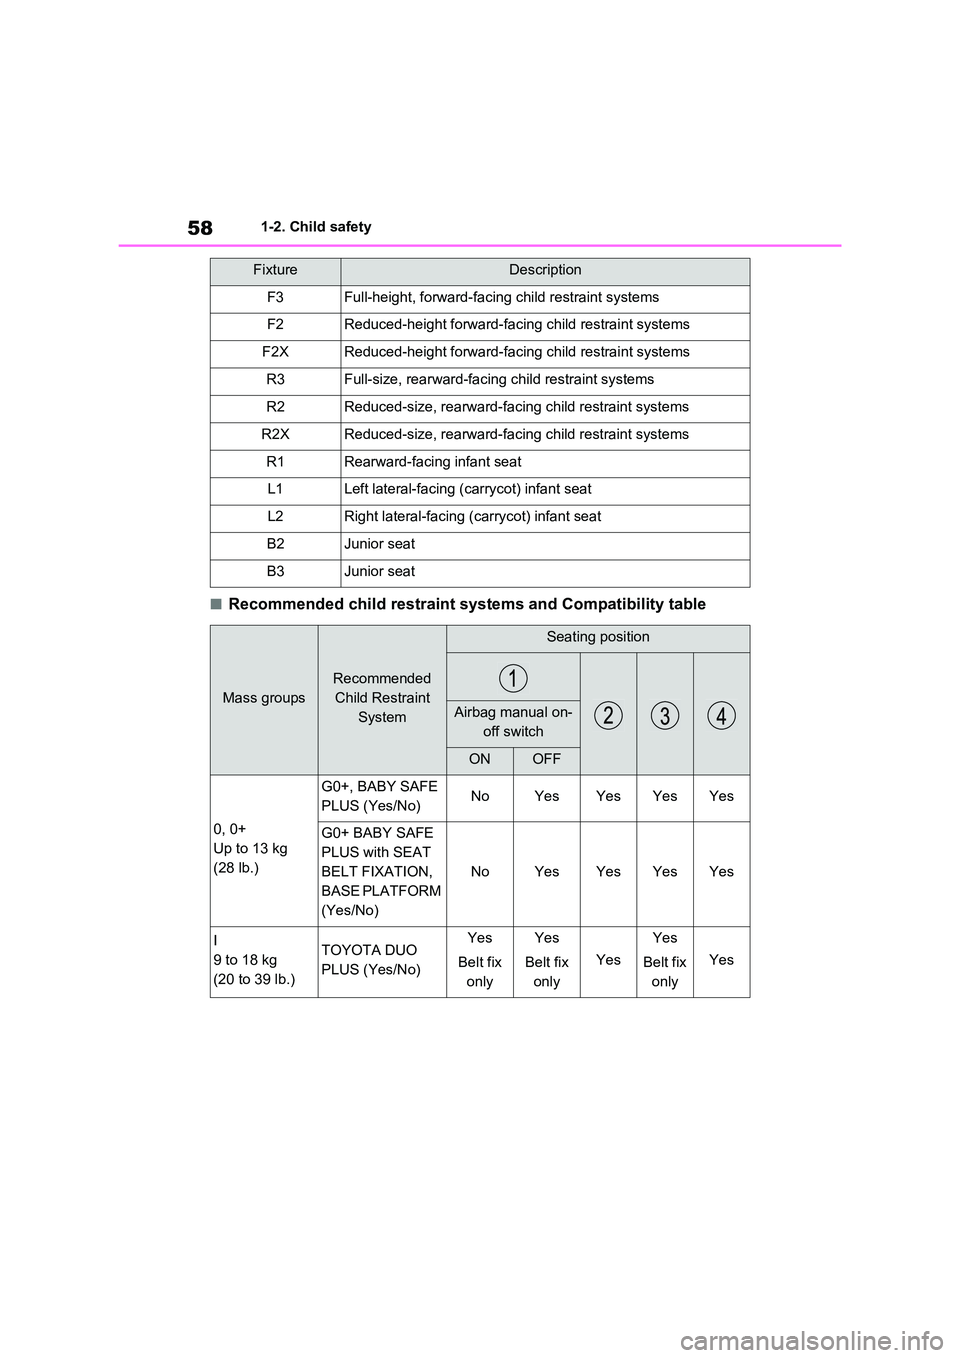
■Recommended child restraint systems and Compatibility table
FixtureDescription
F3Full-height, forward-facing child restraint systems
F2Reduced-height forward-facing child restraint systems
F2XReduced-height forward-facing child restraint systems
R3Full-size, rearward-facing child restraint systems
R2Reduced-size, rearward-facing child restraint systems
R2XReduced-size, rearward-facing child restraint systems
R1Rearward-facing infant seat
L1Left lateral-facing (carrycot) infant seat
L2Right lateral-facing (carrycot) infant seat
B2Junior seat
B3Junior seat
Mass groups
Recommended
Child Restraint
System
Seating position
Airbag manual on-
off switch
ONOFF
0, 0+
Up to 13 kg
(28 lb.)
G0+, BABY SAFE
PLUS (Yes/No)NoYesYesYesYes
G0+ BABY SAFE
PLUS with SEAT
BELT FIXATION,
BASE PLATFORM
(Yes/No)
NoYesYesYesYes
I
9 to 18 kg
(20 to 39 lb.)
TOYOTA DUO
PLUS (Yes/No)
Yes
Belt fix
only
Yes
Belt fix
only
Yes
Yes
Belt fix
only
Yes
Page 61 of 666
59
1
1-2. Child safety
For safety and security
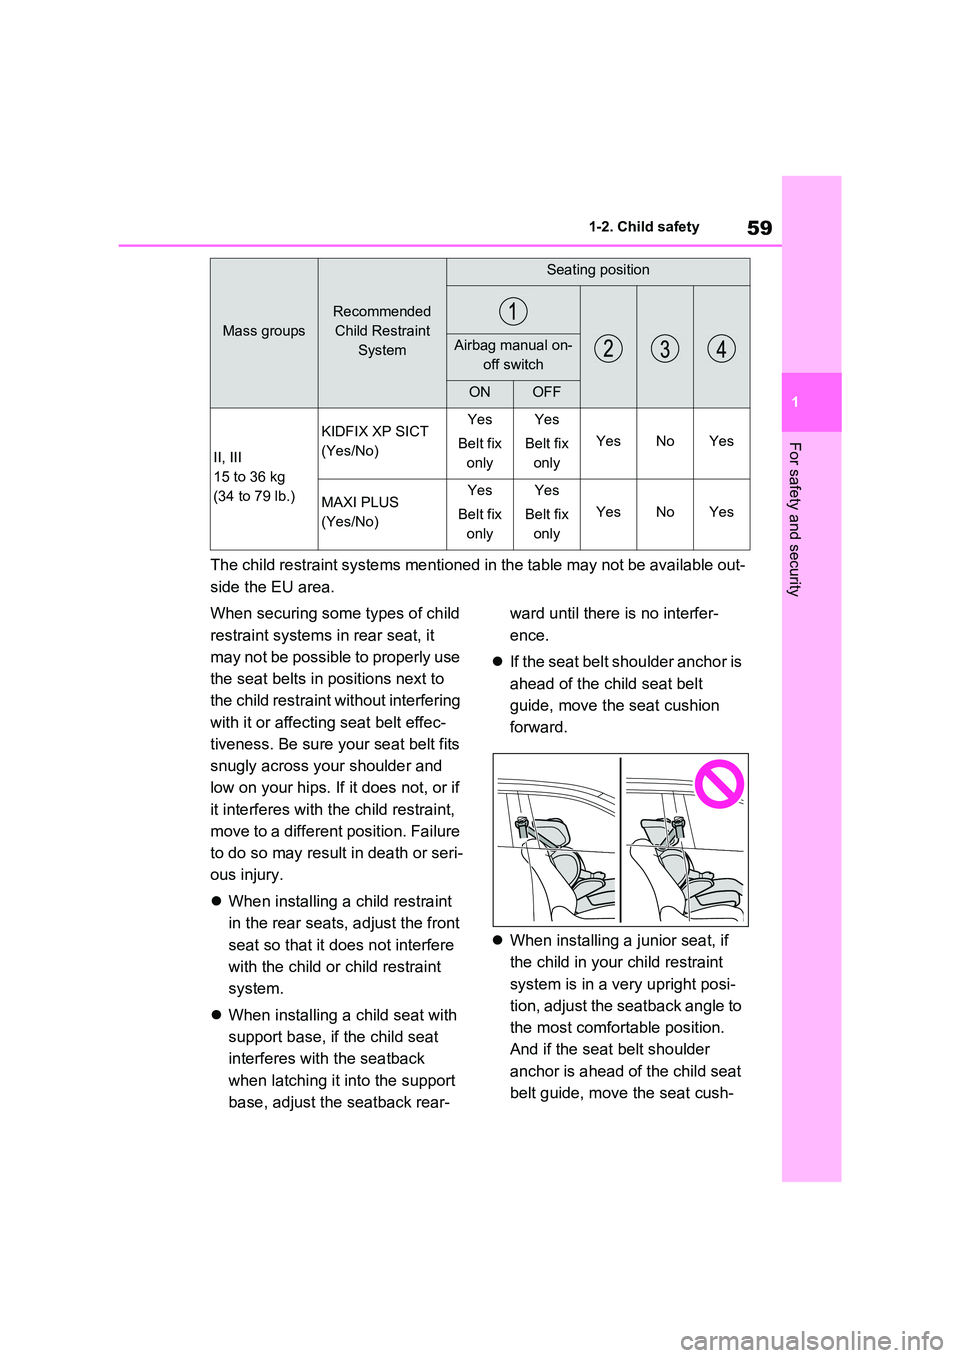
The child restraint systems mentioned in the table may not be a vailable out-
side the EU area.
When securing some types of child
restraint systems in rear seat, it
may not be possible to properly use
the seat belts in positions next to
the child restraint without interfering
with it or affecti ng seat belt effec-
tiveness. Be sure you r seat belt fits
snugly across your shoulder and
low on your hips. If it does not, or if
it interferes with the child restraint,
move to a different position. Failure
to do so may result in death or seri -
ous injury.
When installing a child restraint
in the rear seats, adjust the front
seat so that it does not interfere
with the child or child restraint
system.
When installing a child seat with
support base, if the child seat
interferes with the seatback
when latching it into the support
base, adjust the seatback rear -
ward until there is no interfer -
ence.
If the seat belt shoulder anchor is
ahead of the child seat belt
guide, move the seat cushion
forward.
When installing a junior seat, if
the child in your child restraint
system is in a very upright posi -
tion, adjust the seatback angle to
the most comfortable position.
And if the seat belt shoulder
anchor is ahead of the child seat
belt guide, move the seat cush -
II, III
15 to 36 kg
(34 to 79 lb.)
KIDFIX XP SICT
(Yes/No)
Yes
Belt fix
only
Yes
Belt fix
only
YesNoYes
MAXI PLUS
(Yes/No)
Yes
Belt fix
only
Yes
Belt fix
only
YesNoYes
Mass groups
Recommended
Child Restraint
System
Seating position
Airbag manual on-
off switch
ONOFF
Page 67 of 666
65
1
1-3. Emergency assistance
For safety and security
1-3.Emergency assistance
*: Operates within the eCall coverage.
The system name differs depending
on the country.
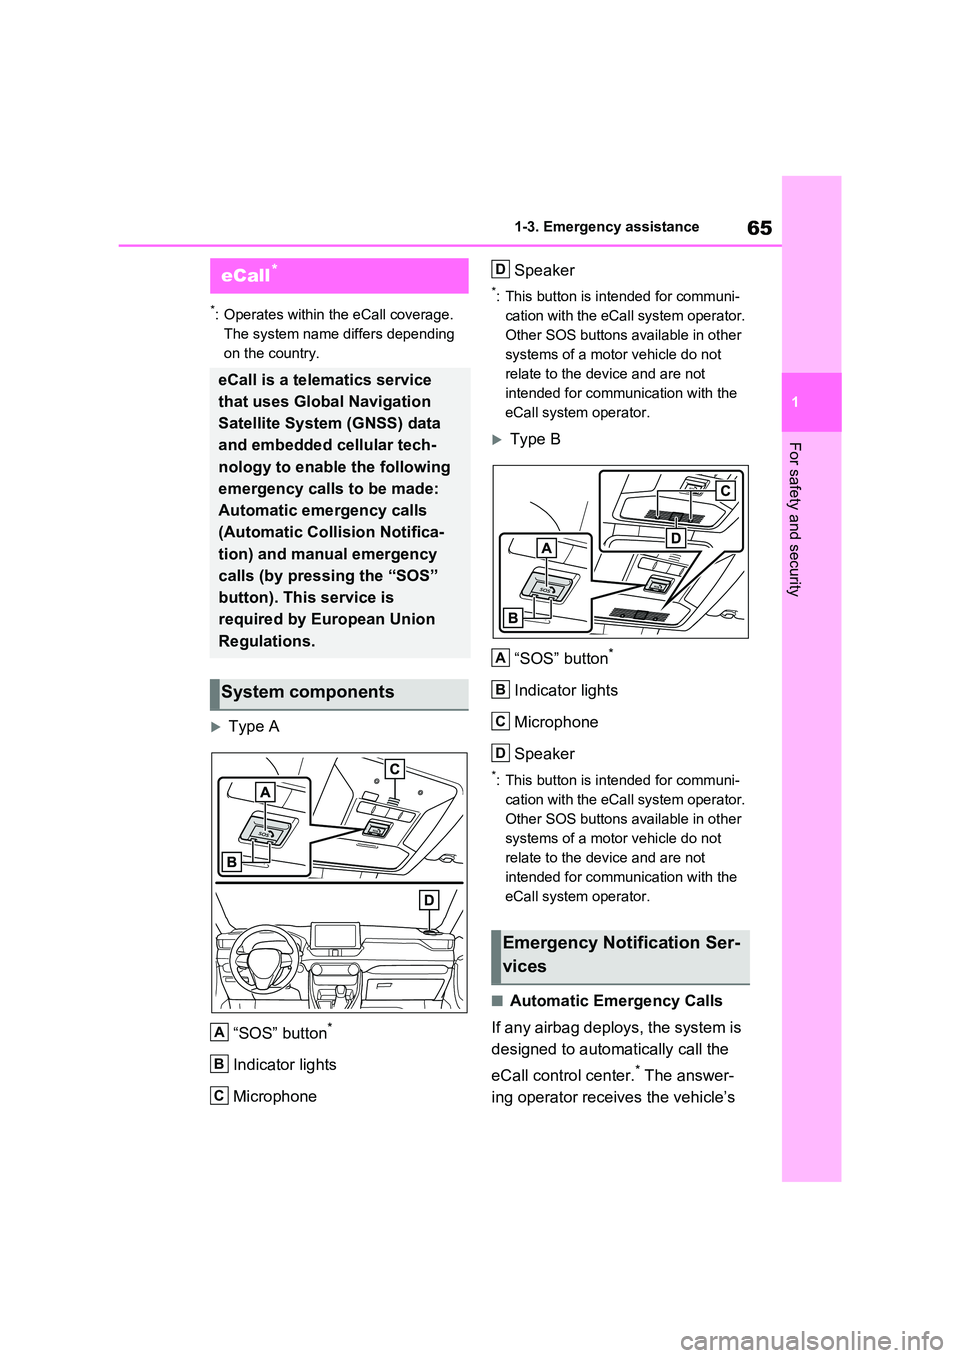
Type A
“SOS” button*
Indicator lights
Microphone
Speaker
*: This button is intended for communi -
cation with the eCal l system operator.
Other SOS buttons available in other
systems of a motor vehicle do not
relate to the dev ice and are not
intended for communication with the
eCall system operator.
Type B
“SOS” button*
Indicator lights
Microphone
Speaker
*: This button is intended for communi -
cation with the eCal l system operator.
Other SOS buttons available in other
systems of a motor vehicle do not
relate to the dev ice and are not
intended for communication with the
eCall system operator.
■Automatic Emergency Calls
If any airbag deploys, the system is
designed to automatically call the
eCall control center.* The answer -
ing operator receives the vehicle’s
eCall*
eCall is a telematics service
that uses Global Navigation
Satellite System (GNSS) data
and embedded cellular tech -
nology to enable the following
emergency calls to be made:
Automatic emergency calls
(Automatic Collision Notifica -
tion) and manual emergency
calls (by pressing the “SOS”
button). This service is
required by European Union
Regulations.
System components
A
B
C
Emergency Notification Ser -
vices
D
A
B
C
D
Page 69 of 666
67
1
1-3. Emergency assistance
For safety and security
at the following URL.
http://www.opensourceautomotive.com/dcm/toyota/
WARNING
■When the Emergency Call may
not be made
●It may not be possible to make
Emergency Calls in any of the fol-
lowing situations. In such cases,
report to emergen cy services pro- vider (112 system etc.) by other
means such as nearby public
phones.
• Even when the vehicle is in the cel -
lular phone service area, it may be
difficult to connec t to the eCall con- trol center if the reception is poor or
the line is busy. In such cases,
even though the system attempts to connect to the eCall control center,
you may not be able to connect to
the eCall control center to make Emergency Calls and contact emer -
gency services.
• When the vehicle is out of the cellu -
lar phone service area, the Emer -
gency Calls cannot be made.
• When any related equipment (such
as the “SOS” button panel, indicator lights, microphone, speaker, DCM,
antenna, or any wires connecting
the equipment) is malfunctioning, damaged or broken, the Emer -
gency Call cannot be made.
• During an Emergency Call, the sys -
tem makes repeated attempts to
connect to the eCall control center. However, if it cannot connect to the
eCall control center due to poor
radio wave reception, the system may not be able to connect to the
cellular network and the call may
finish without connecting. The red indicator light will blink for approxi -
mately 30 seconds to indicate this
disconnection.
●If the 12-volt battery’s voltage decreases or there is a disconnec -
tion, the system may not be able to
connect to the eCa ll control center.
■When the Emergency Call sys-
tem is replaced with a new one
The Emergency Call system should
be registered. Contact any authorized
Toyota retailer or Toyota authorized repairer, or any reliable repairer.
■For your safety
●Please drive safely.
The function of t his system is to
assist you in making the Emer - gency Call in case of accidents
such as traffic a ccidents or sudden
medical emergenc ies, and it does not protect the driver or passengers
in any way. Please drive safely and
fasten your seatbelts at all times for your safety.
●In case of an emergency, make lives the top priority.
●If you smell anything burning or other unusual smells, leave the
vehicle and evacuate to a safe area
immediately.
●If the airbags dep loy when the sys-
tem is operating normally, the sys- tem makes emerge ncy call. The
system also makes emergency call
when the vehicle is struck from the rear or rolls over , even if the air-
bags do not deploy.
●For safety, do not make the Emer -
gency Call while driving.
Making calls during driving may cause mishandling of the steering
wheel, which may lead to unex -
pected accidents.
Stop the vehicle and confirm the safety of your su rroundings before
making the Emergency Call.
Page 441 of 666
439
5
5-5. Using the driving support systems
Driving
■E-Four (Electronic On-Demand
AWD system)
Automatically switches from front
wheel drive to all-wheel drive
(AWD) according to the driving con -
ditions, helping to ensure reliable
handling and stability. Examples of
conditions where the system will
switch to AWD are when cornering,
going uphill, start ing off or acceler-
ating, and when the road surface is
slippery due to snow, rain, etc.
■Emergency brake signal
When the brakes are applied sud -
denly, the emergency flashers
automatically flash to alert the vehi -
cle behind.
■The Secondary Collision
Brake (if equipped)
When the SRS airbag sensor
detects a collision and the system
operates, the brakes and brake
lights are automatically controlled
to reduce the v ehicle speed and
help reduce the possibility of further
damage due to a secondary colli -
sion.
■When the TRC/VSC/ABS/Trailer Sway Control syst ems are operat-
ing
The slip indicator light will flash while the TRC/VSC/ABS/Traile r Sway Control
systems are operating.
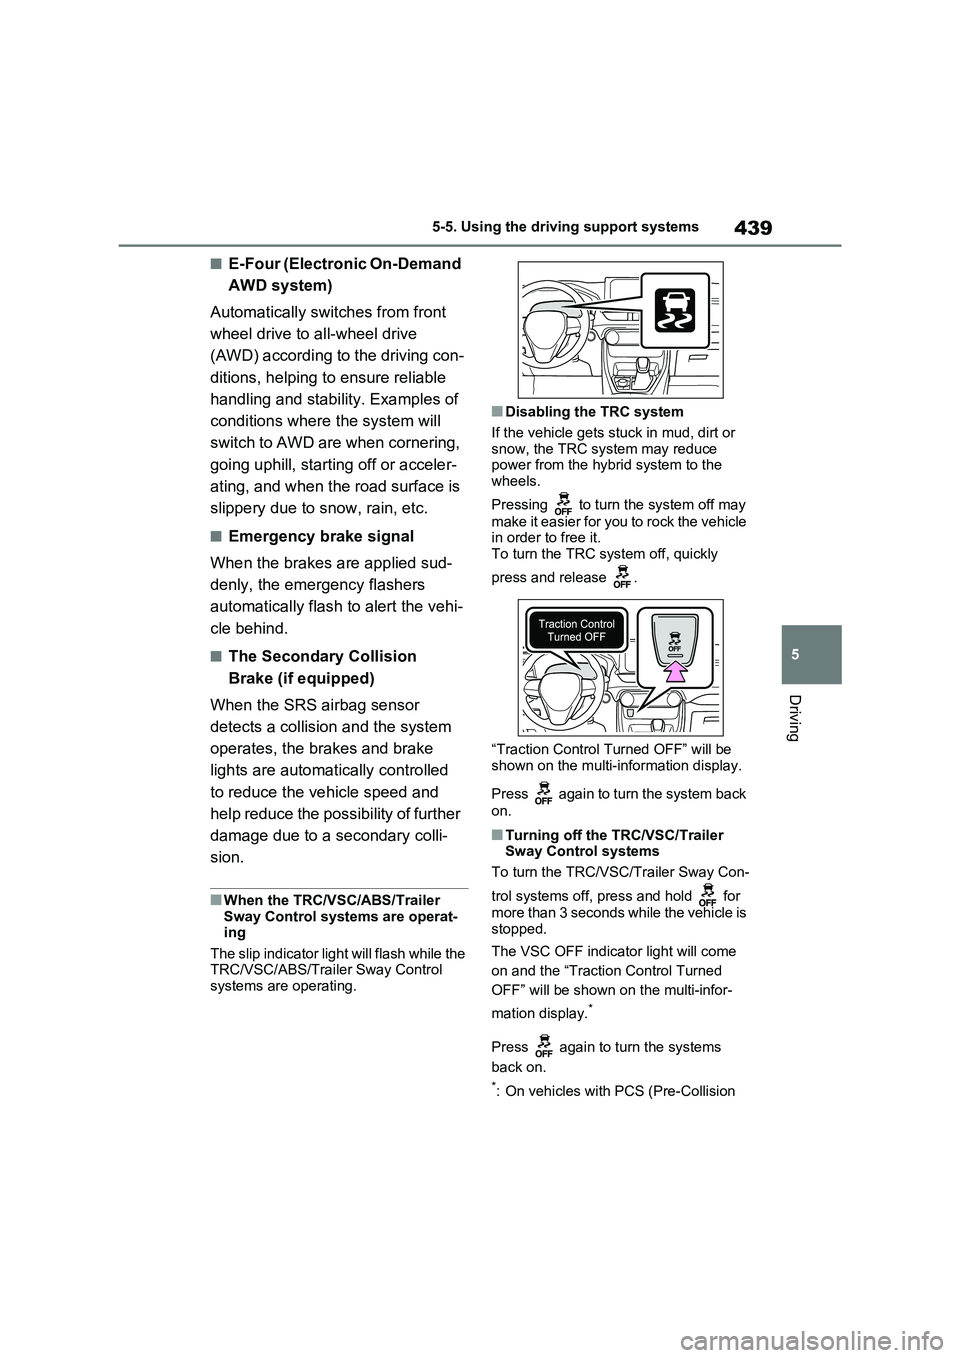
■Disabling the TRC system
If the vehicle gets stuck in mud, dirt or snow, the TRC system may reduce
power from the hyb rid system to the
wheels.
Pressing to turn t he system off may
make it easier for you to rock the vehicle
in order to free it.
To turn the TRC system off, quickly
press and release .
“Traction Control Tu rned OFF” will be
shown on the multi-information display.
Press again to turn the system back
on.
■Turning off the TRC/VSC/Trailer
Sway Control systems
To turn the TRC/VS C/Trailer Sway Con-
trol systems off, press and hold for
more than 3 seconds wh ile the vehicle is
stopped.
The VSC OFF indicator light will come
on and the “Tractio n Control Turned
OFF” will be shown on the multi-infor-
mation display.*
Press again to turn the systems
back on.
*: On vehicles with PCS (Pre-Collision
Page 468 of 666
4666-2. Using the interior lights
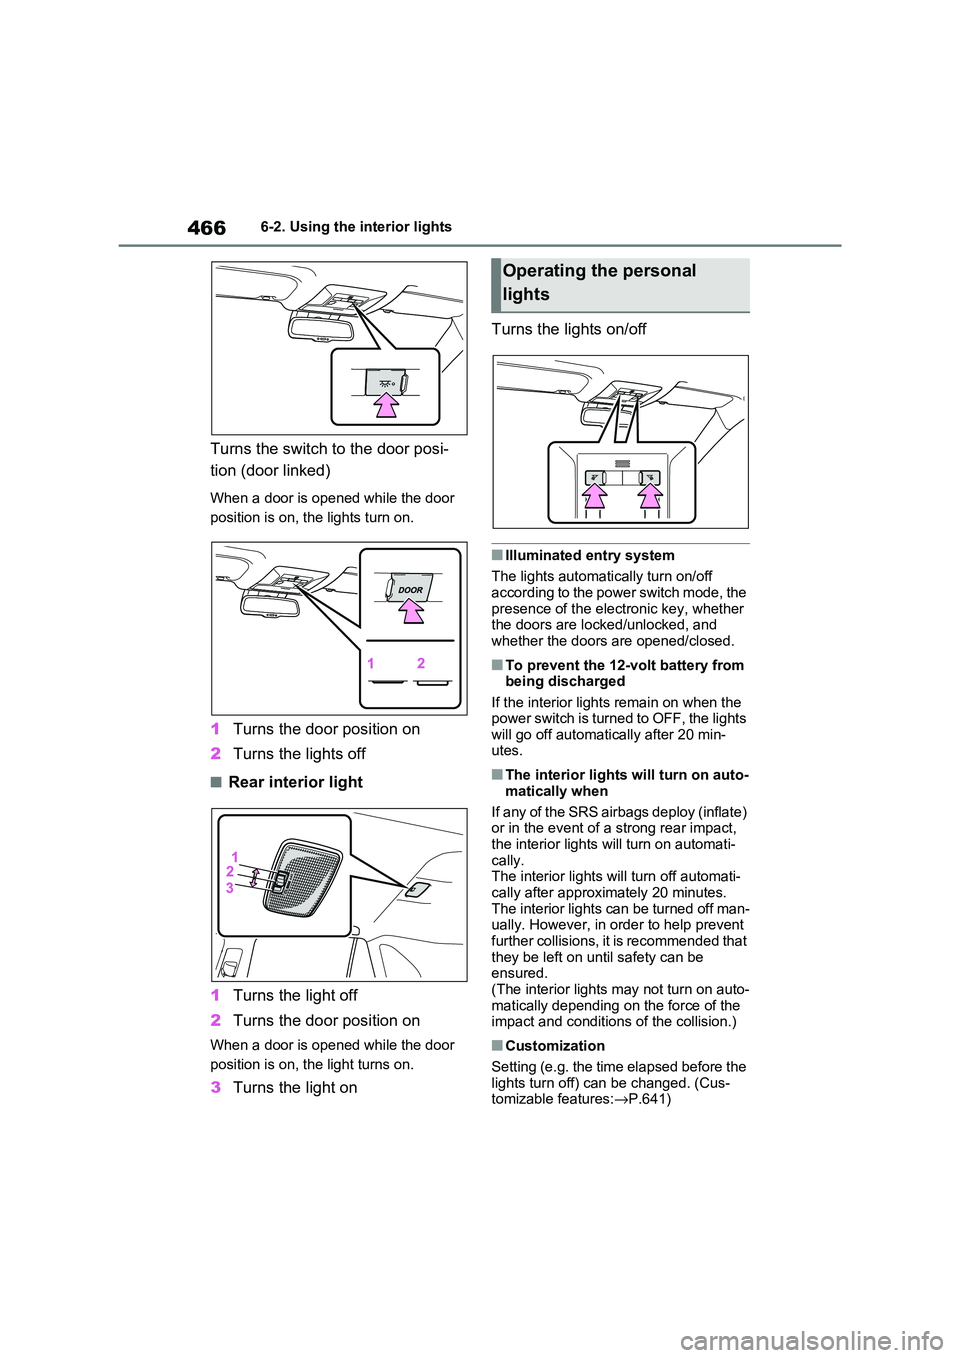
Turns the switch to the door posi-
tion (door linked)
When a door is opened while the door
position is on, the lights turn on.
1 Turns the door position on
2 Turns the lights off
■Rear interior light
1 Turns the light off
2 Turns the door position on
When a door is opened while the door
position is on, t he light turns on.
3Turns the light on
Turns the lights on/off
■Illuminated entry system
The lights automati cally turn on/off
according to the power switch mode, the presence of the electronic key, whether
the doors are locked/unlocked, and
whether the doors are opened/closed.
■To prevent the 12-volt battery from being discharged
If the interior lights remain on when the
power switch is turned to OFF, the lights will go off automati cally after 20 min-
utes.
■The interior lights will turn on auto -
matically when
If any of the SRS airbags deploy (inflate)
or in the event of a strong rear impact,
the interior lights will turn on automati- cally.
The interior lights w ill turn off automati-
cally after approximately 20 minutes. The interior lights can be turned off man -
ually. However, in order to help prevent
further collisions, it is recommended that
they be left on un til safety can be ensured.
(The interior lights may not turn on auto -
matically depending on the force of the impact and conditions of the collision.)
■Customization
Setting (e.g. the time elapsed before the
lights turn off) can be changed. (Cus - tomizable features: →P.641)
Operating the personal
lights
Page 487 of 666
485
6
6-4. Using the other interior features
Interior features
WARNING
■Items that must not be hanged
on the hook
Do not hang coat hangers or other hard or sharp objects on the hook. If
the SRS curtain shield airbags
deploy, these item s may become pro- jectiles, causing death or serious
injury.
Page 494 of 666
4927-1. Maintenance and care
WARNING
■Water in the vehicle
●Do not splash or spill liquid in the
vehicle, such as on the floor, on the rear seats, in the DC/DC Converter
air intake vent, junction box or in
the luggage compartment. ( →P.98) Doing so may cause the DC/DC
Converter, electrical components,
etc. to malfunction or catch fire.
●Do not get any o f the SRS compo-
nents or wiring in the vehicle interior
wet. ( →P.40) An electrical malfunction may
cause the airbags to deploy or not
function properly, resulting in death or serious injury.
●Vehicles with wireless charger:Do not let the wir eless charger
( →P.479) get wet. Failure to do so
may cause the charger to become hot and cause burns or could cause
electric shock resu lting in death or
serious injury.
■Cleaning the interior (especially
instrument panel)
Do not use a polish wax or polish
cleaner. The instrument panel may
reflect off the windshield, obstructing the driver’s view and leading to an
accident, resulting in death or serious
injury.
NOTICE
■Cleaning detergents
●Do not use the fol lowing types of
detergent, as they may discolor the vehicle interior or cause streaks or
damage to paint ed surfaces:
• Non-seat portions: Organic sub - stances such as benzene or gaso -
line, alkaline or a cidic solutions,
dye, and bleach
• Seats: Alkaline or acidic solutions,
such as thinner, benzene, and alco -
hol
●Do not use a polish wax or polish cleaner. The instrument panel’s or
other interior part’ s painted surface
may be damaged.
■Preventing damage to leather
surfaces
Observe the following precautions to
avoid damage to and deterioration of
leather surfaces:
●Remove any dust or dirt from
leather surfaces immediately.
●Do not expose the vehicle to direct
sunlight for extended periods of
time. Park the vehicle in the shade, especially during summer.
●Do not place items made of vinyl, plastic, or containing wax on the
upholstery, as they may stick to the
leather surface if the vehicle interior heats up significantly.
■Water on the floor
Do not wash the vehicle floor with
water.
Vehicle systems such as the audio system may be damaged if water
comes into contact with electrical
components such as the audio sys - tem above or under the floor of the
vehicle. Water may also cause the
body to rust.
■When cleaning the inside of the
windshield (vehicles with Toyota Safety Sense)
Do not allow glass cleaner to contact
the lens. Also, do not touch the lens. ( →P.344)
■Cleaning the inside of the rear
window
●Do not use a glass cleaner to clean
the rear window, as this may cause
damage to the rear window defog - ger heater wires. Use a cloth damp -
ened with lukewarm water to gently
wipe the window clean. Wipe the window in strokes running parallel
to the heater wires.
Page 562 of 666
5608-1. Essential information
8-1.Essential information
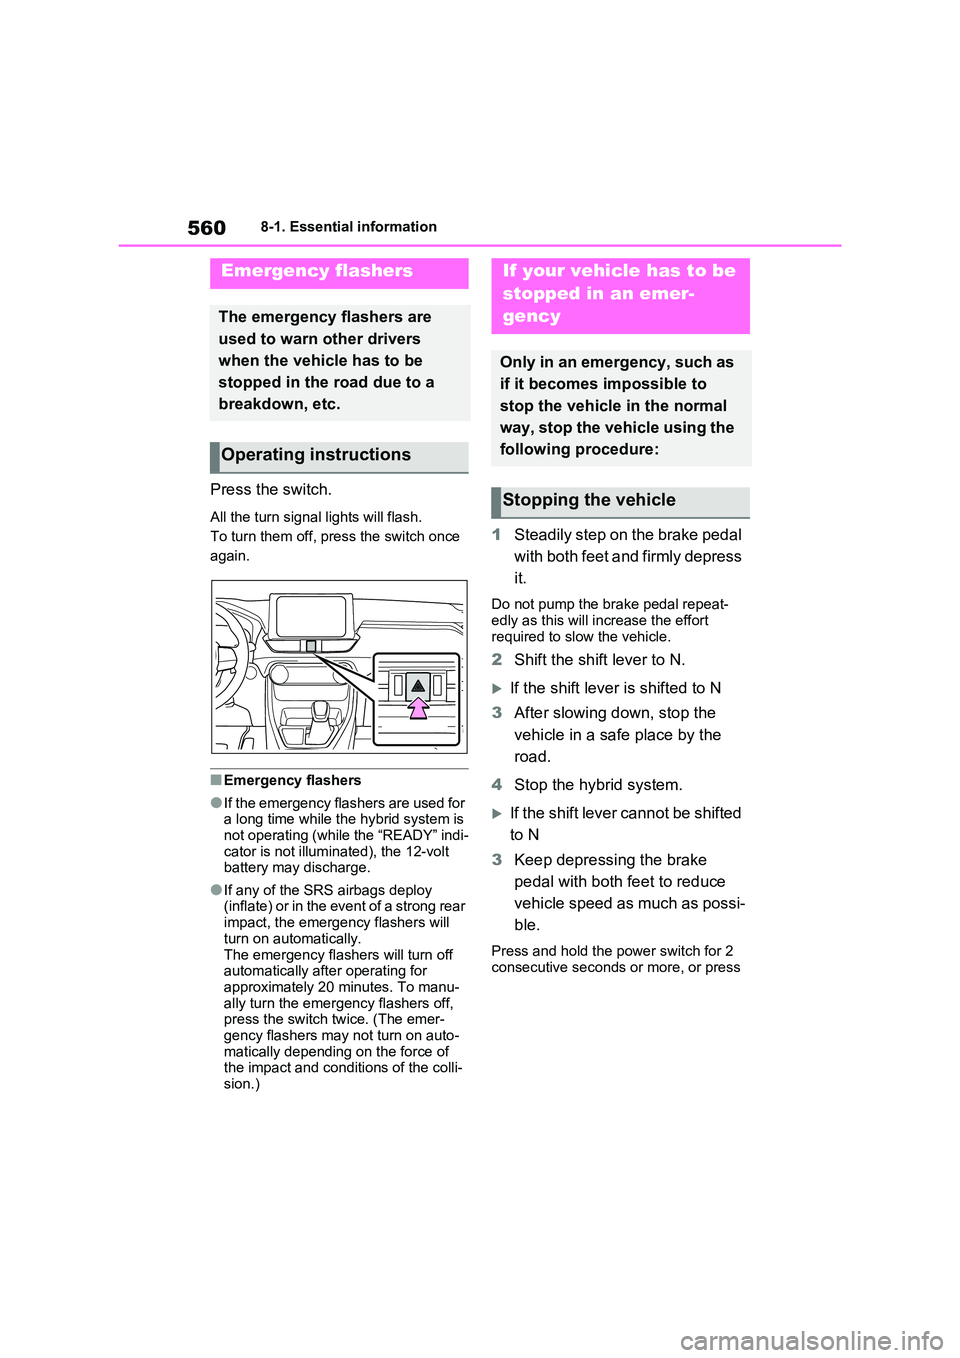
Press the switch.
All the turn signal lights will flash.
To turn them off, press the switch once
again.
■Emergency flashers
●If the emergency flashers are used for a long time while the hybrid system is
not operating (while the “READY” indi -
cator is not illumi nated), the 12-volt battery may discharge.
●If any of the SRS airbags deploy (inflate) or in the event of a strong rear
impact, the emergency flashers will
turn on automatically.
The emergency flashers will turn off automatically after operating for
approximately 20 m inutes. To manu-
ally turn the emerg ency flashers off, press the switch twice. (The emer -
gency flashers may not turn on auto -
matically depending on the force of the impact and co nditions of the colli-
sion.)
1 Steadily step on the brake pedal
with both feet and firmly depress
it.
Do not pump the brake pedal repeat -
edly as this will in crease the effort required to slow the vehicle.
2 Shift the shift lever to N.
If the shift lever is shifted to N
3 After slowing down, stop the
vehicle in a saf e place by the
road.
4 Stop the hybrid system.
If th e s hif t le ver ca nn o t b e s hif te d
to N
3 Keep depressing the brake
pedal with both feet to reduce
vehicle speed as much as possi -
ble.
Press and hold the power switch for 2
consecutive seconds or more, or press
Emergency flashers
The emergency flashers are
used to warn other drivers
when the vehicle has to be
stopped in the road due to a
breakdown, etc.
Operating instructions
If your vehicle has to be
stopped in an emer-
gency
Only in an emergency, such as
if it becomes impossible to
stop the vehicle in the normal
way, stop the vehicle using the
following procedure:
Stopping the vehicle