wheel TOYOTA RAV4 PRIME 2021 (in English) User Guide
[x] Cancel search | Manufacturer: TOYOTA, Model Year: 2021, Model line: RAV4 PRIME, Model: TOYOTA RAV4 PRIME 2021Pages: 616, PDF Size: 34.66 MB
Page 94 of 616
942-1. Plug-in hybrid system
HV mode while on the free-
way and change to EV mode
or AUTO EV/HV mode after
leaving the freeway. (P.78)
Turn the “A/C” switch off
when it is not needed. Doing
so can help reduce excessive
electricity and fuel consump-
tion.
In summer: When the ambient tem-
perature is high, use the recircu-
lated air mode. Doing so will help to
reduce the burden on the air condi-
tioning system and reduce electric-
ity and fuel consumption as well.
In winter: Avoid excessive and
unnecessary use o f the heater.
Usage of the heated steering wheel
(if equipped) ( P.407) and seat
heaters ( P.408) are effective.
Using the Remote Air Condi-
tioning System ( P.405)
while the AC charging cable is
connected to the vehicle can
reduce electricity consump-
tion immediately after starting
off by operating air condition-
ing mainly using electricity
from an external power
source.
When setting the charging
schedule, setting the charging
mode to “Departure” and “Cli-
mate Prep” to on can reduce
electricity consumption imme-
diately after starting off by
operating air conditioning before charging is completed.
(
P.130)
Make sure to check the tire infla-
tion pressure frequently. If there
is improper tire inflation pres-
sure in the tires, the EV driving
range will become shorter, and
fuel consumption when in HV
mode will increase.
Also, as snow tires can cause
large amounts of friction, their
use on dry roads can lead to
increased fuel and electricity
consumption.
Carrying heavy luggage will lead
to poor fuel economy. Avoid car-
rying unnecessary luggage.
Installing a large roof rack will
also cause poor fuel economy.
Since the gasoline engine starts
up and cuts out automatically,
warming up is not necessary.
Air conditioning
Checking tire inflation
pressure
Luggage
Warming up before driv-
ing
Page 96 of 616

962-1. Plug-in hybrid system
of occupants.
The distance that EV driving is
possible can be extended if the
following is performed:
■When starting off, depress
the accelerator pedal
smoothly to accelerate
As a guide, accelerate up to
approximately 12mph (20 km/h)
in the first 5 seconds.
Electrical and fuel efficiency can
be improved just by using the
ECO Accelerator Guidance dis-
played on the multi-information
display and taking care to start
off gently. ( P.173)
When the driving mode is set to
Eco drive mode, depressing the
accelerator pedal generates
smooth torque that makes it easier
to operate the accelerator gently.
At the same time, the air condition-
ing control is switched to eco air
conditioning mode ( P.397) to
reduce the strength of the air condi-
tioning operation.
■Maintain sufficient vehicle-
to-vehicle distance and do
not accelerate or decelerate
unnecessarily
Try to maintain a fixed speed
while driving. Driving at a short
vehicle-to-vehicle distance will
result in repeating wasteful
acceleration and deceleration,
which will worsen the electrical
and fuel efficiency.
■Release the accelerator
pedal early before stopping
the vehicle, such as at a
traffic light
The regenerative brake will
operate to convert the kinetic
energy of the vehicle into electri-
cal energy, which will charge the
hybrid battery (traction battery).
The regeneration status can be
checked from the Hybrid Sys-
tem Indicator. ( P.167)
When the brake pedal is
depressed lightly during decel-
eration, the regeneration
amount increases, enabling
more electrical energy to be
recovered.
If the brake pedal is depressed too
strongly, the recovered amount
indicator will reac h the maximum
level and the upper limit of the
recoverable energy will be
exceeded. Theref ore, be sure to
operate the brak e pedal early.
■Use the air conditioning
system appropriately, and
also utilize the heated steer-
ing wheel (if equipped) and
seat heaters
In EV mode, the vehicle is
cooled and heated by electrical
energy. (Except in extremely
cold temperatures of approxi-
mately 14°F (-10°C) or less.)
Preventing excessive cooling or
heating of the vehicle will reduce
power consumption and
improve electrical efficiency.
Page 97 of 616
972-1. Plug-in hybrid system
2
Plug-in hybrid system
When eco air conditioning mode
is used, the air conditioning con-
trol is switched automatically to
a lower setting. (P.397)
The heated steering wheel (if
equipped) and seat heaters are
efficient heating device that
directly warm the body using
less electric power.
When used togethe r with the air
conditioning system, a low tem-
perature setting can be used to
improve electrical and fuel effi-
ciency.
■Check the tire pressure
If the tire pressure is lower than
the specified value, it will
worsen the electrical and fuel
efficiency.
A pressure level 7 psi (50 kPa, 0.5
kgf/cm
2 or bar) lower than the spec-
ified value will cause a worsening of
several percentage points.
■When driving on highways,
use the EV/HV mode selec-
tion switch to drive in HV
mode
The power consumption will
increase significantly if the vehi-
cle is driven in EV mode on
highways.
■Do not load unnecessary
objects in the vehicle
Driving with objects weighing
220 lb. (100 kg) in the vehicle
will worsen the electrical and
fuel efficiency by approximately
3%. Air resistance also greatly
affects electrical and fuel effi-
ciency. Remove any exterior
accessories such as a roof lug-
gage carrier when they are not
being used.
The running resistance of snow
tires is high and they will worsen
electrical and fuel efficiency.
Replace them with standard
tires as soon as they are no lon-
ger needed.
■Know your vehicle’s electri-
cal and fuel efficiency
If you know your vehicle’s daily
electrical and fuel efficiency, you
will understand the benefits of
Eco drive.
Use the Power Consump-
tion/Fuel Economy, ECO Accel-
erator Guidance/“Eco Score”
and other data displayed on the
multi-information display.
The following indicate that
charging has been carried out
properly.
The charging indicator of the
charging port turns off
“Charging Complete” is dis-
played on the multi-informa-
tion display when a door is
opened with the power switch
off ( P.119)
Regardless of the type of power
Display when c harging is
completed
Page 126 of 616
1262-2. Charging
WARNING
■When charging
Observe the following precau-
tions.
Failure to do so may cause an
unexpected accident, resulting in
death or serious injury.
●Connect to a power source suit-
able for charging. ( P.111)
●Check that the AC charging
cable, plug and outlet are free of
foreign matter.
●Before charging, check that the
AC charging inlet is not
deformed, damaged or cor-
roded, and check that the inlet
is free of foreign matter such as
dirt, snow and ice.
If there is dirt or dust in these
areas, remove completely
before inserting the charging
connector.
●Do not get the terminals of the
AC charging inlet wet.
●Only use outlets where the plug
can be securely inserted.
●Do not bundle or wind the AC
charging cable while charging,
as doing so may result in over-
heating.
●Do not touch the terminals of
the charging connector and AC
charging inlet with a sharp metal
objects (needles etc.) or hands,
or short them with foreign
objects.
●When charging outdoors, make
sure to connect to a weather-
proof outlet for outdoor use.
Ensure the weatherproof outlet
cover closes completely. If the
weatherproof outlet cover can-
not be closed, install a weather-
proof outlet cover that will close.
●In order to stop charging at the
charging station, follow the
instructions of the charger.
●If any heat, smoke, odors, noise
or other abnormalities are
noticed during charging, stop
charging immediately.
●Do not insert the plug if the out-
let is submerge d in water or
snow.
●When charging while it is raining
or snowing, do not connect or
disconnect the plug if your
hands are wet. Also, do not get
the plug or outlet wet.
●Do not charge the vehicle
during a lightning storm.
●Prevent the AC charging cable
from being caught in the door or
back door.
●Do not let the wheels on the AC
charging cable, plug, charging
connector and CCID (Charging
Circuit Interru pting Device).
●Firmly insert the plug into the
outlet.
●Do not use an extension cord
and converting adaptor.
●Close the hood before using the
charging system. The cooling
fan may start operating sud-
denly. Touching or getting close
to rotating parts such as the fan
may cause your hands or
clothes (especially a necktie or
scarf) to becom e caught and
result in a serious injury.
●If the power indicator on the
CCID (Charging Circuit Inter-
rupting Device) does not illumi-
nate after plugging the AC
charging cable into the socket-
outlet, unplug it immediately.
Page 171 of 616
1713-1. Instrument cluster
3
Vehicle status information and indicators
Information display area
A variety of information can be dis-
played by selecting a menu icon.
Additionally, warning or sugges-
tion/advice pop-up displays will be
displayed in some situations.
Menu icons ( P.171)
■The multi-information display is
displayed when
The power swit ch is in ON.
■When changing driving mode
Background color of the multi-infor-
mation display is changed following
the selected drivi ng mode or when
Trail Mode is turned on. ( P.377,
379)
■Liquid crystal display
Small spots or light spots may
appear on the display. This phe-
nomenon is character istic of liquid
crystal displays, and there is no
problem continuing to use the dis-
play.
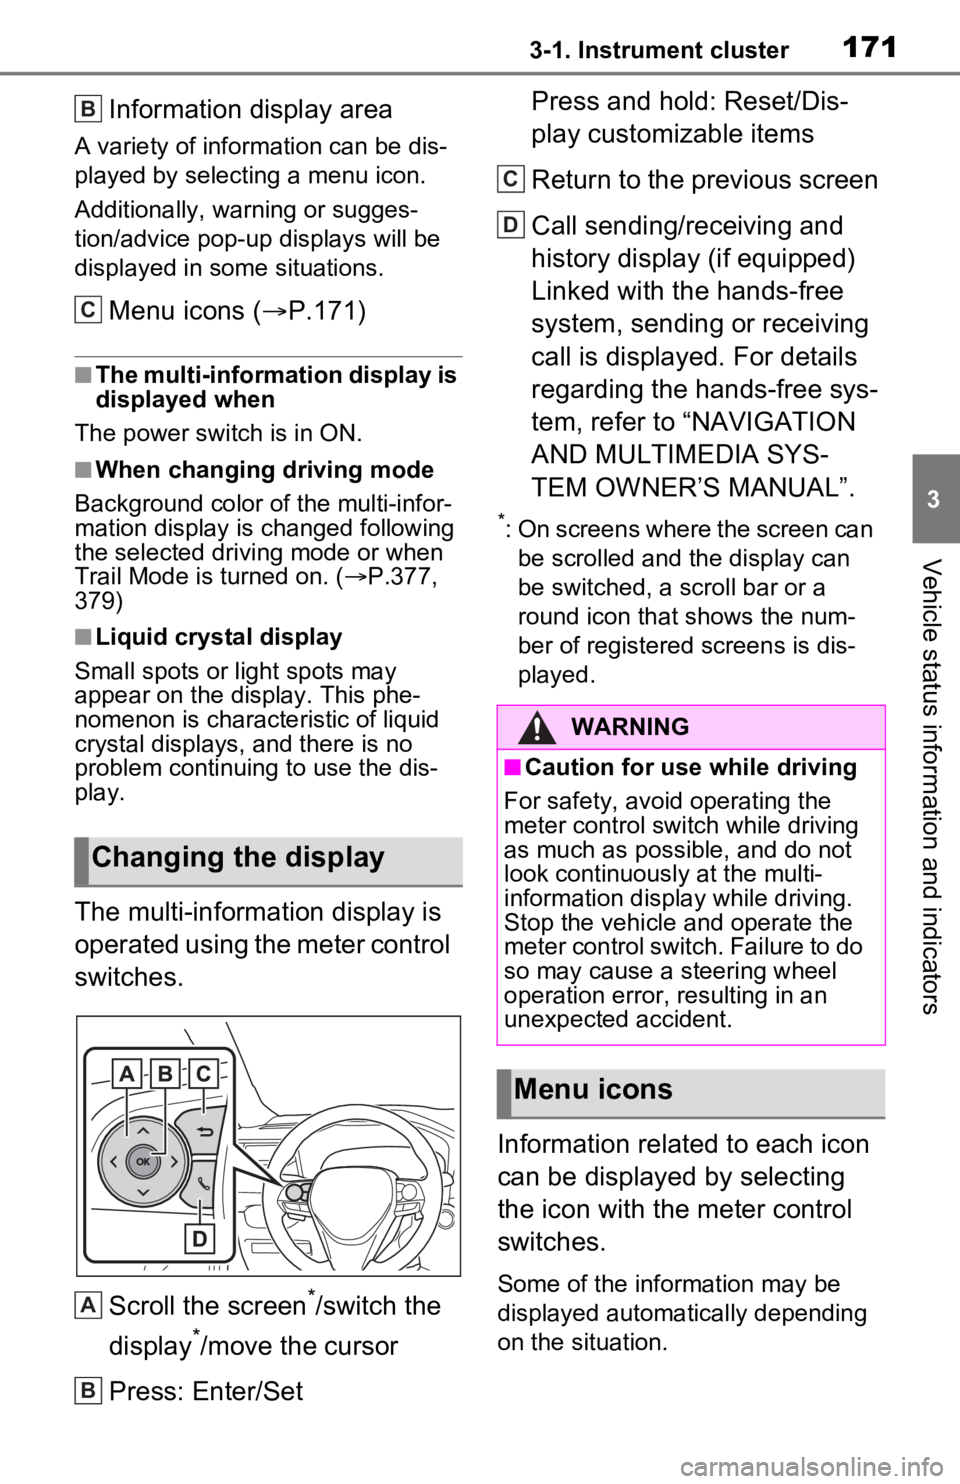
The multi-information display is
operated using the meter control
switches.
Scroll the screen
*/switch the
display
*/move the cursor
Press: Enter/Set Press and hold: Reset/Dis-
play customizable items
Return to the previous screen
Call sending/receiving and
history display (if equipped)
Linked with the hands-free
system, sending or receiving
call is displayed. For details
regarding the hands-free sys-
tem, refer to “NAVIGATION
AND MULTIMEDIA SYS-
TEM OWNER’S MANUAL”.
*: On screens where the screen can
be scrolled and the display can
be switched, a scroll bar or a
round icon that shows the num-
ber of registered screens is dis-
played.
Information related to each icon
can be displayed by selecting
the icon with the meter control
switches.
Some of the information may be
displayed automatically depending
on the situation.
Changing the display
B
C
A
B
�:�$�5�1�,�1�*
■Caution for use while driving
For safety, avoid operating the
meter control switch while driving
as much as possible, and do not
look continuously at the multi-
information display while driving.
Stop the vehicle and operate the
meter control switch. Failure to do
so may cause a steering wheel
operation error, resulting in an
unexpected accident.
Menu icons
C
D
Page 176 of 616
1763-1. Instrument cluster
audio source or track on the dis-
play.
■Drive information
2 items that are selected using
the “Drive Info Items” setting
(average speed, distance and
total time) can be displayed ver-
tically.
The displayed information
changes according to the “Drive
Info Type” setting (since the sys-
tem was started or between
resets). ( P.177)
Use the displayed information as a
reference only.
Following items will be displayed.
“Trip”
• “Average Speed”: Displays the
average vehicl e speed since
hybrid system start
*
• “Distance”: Displ ays the distance
driven since hybrid system start
*
• “Total Time”: Displays the elapsed time since hybrid system
start
*
*
: These items are reset each time the hybrid system stops.
“Total”
• “Average Speed”: Displays the
average vehicle speed since the
display was reset
*
• “Distance”: Displ ays the distance
driven since the display was
reset
*
• “Total Time”: Displays the elapsed time since the display
was reset
*
*
: To reset, display the desired item and press and hold .
■Energy monitor
P.187
■Tire pressure
P.471
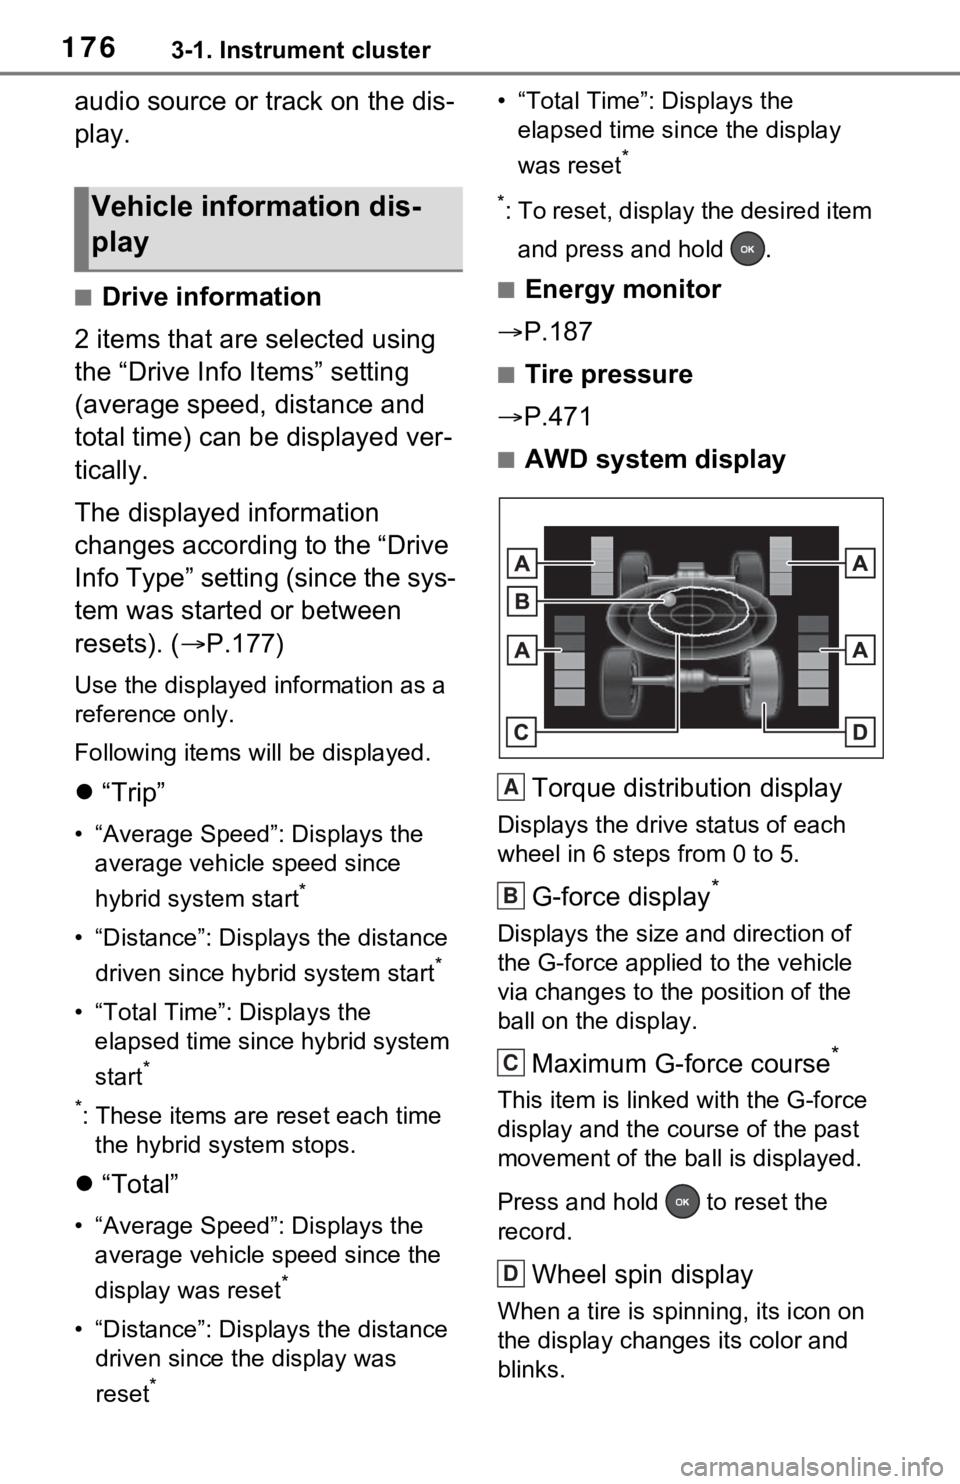
■AWD system display
Torque distribution display
Displays the drive status of each
wheel in 6 steps from 0 to 5.
G-force display*
Displays the size a nd direction of
the G-force applied to the vehicle
via changes to the position of the
ball on the display.
Maximum G-force course*
This item is linke d with the G-force
display and the co urse of the past
movement of the ba ll is displayed.
Press and hold to reset the
record.
Wheel spin display
When a tire is spi nning, its icon on
the display changes its color and
blinks.
Vehicle information dis-
play
A
B
C
D
Page 177 of 616
1773-1. Instrument cluster
3
Vehicle status information and indicators
*: This item is displayed only when
driving mode is set to sport mode.
Vehicle settings and the content
displayed on the screen can be
changed by using the meter
control switches.
■Setting procedure
1 Operate or of the
meter control switches and
select .
2 Operate or of the
meter control switches and
select the desired item.
• If the function is turned on and off or the volume, etc. is
changed on the setting
screen, the setting is changed
each time is pressed.
• For functions that allow oper- ation contents, display con-
tents, etc., of function to be
selected, the setting screen is
displayed by pressing and
holding . When the setting
screen is displayed, select the
setting or desired value (time,
etc.) with .
3 After changing the settings,
press of the meter control
switches.
■ LTA (Lane Tracing
Assist) ( P.323)
Select to set up the following
items.
“Lane Center”
Select to enable /disable the lane
centering function.
“Steering Assist”
Select to enable/d isable steering
wheel assistance.
“Alert”
Select to change each notification
method of the lane departure alert.
“Sensitivity”
Select to set the lane departure
alert sensitivity.
“Sway Warning”
Select to enable/disable the vehicle
sway warning.
“Sway Sensitivity”
Select to set the vehicle sway warn-
ing sensitivity.
■ PCS (Pre-Collision Sys-
tem) ( P.315)
Select to set up the following
items.
PCS on/off
Select to enable/disable the pre-
collision system.
“Sensitivity”
Select to change the pre-collision
warning timing.
■ BSM (Blind Spot Moni-
tor) ( P.347)
Select to set up the following
items.
BSM (Blind Spot Monitor)
on/off
Select to enable/disable the BSM
Settings display
Page 179 of 616
1793-1. Instrument cluster
3
Vehicle status information and indicators
Select to set up the following items.
• “Charging Schedule”
Select to register or change the
charging schedule. ( P.130)
• “Charging Current”
Select to change the charging cur-
rent. ( P.112)
• “Connector Lock”
Select to change the charging con-
nector lock settings. ( P.109)
• “Battery Heater”
Select to enable/disable the bat-
tery heater. ( P.115)
• “Battery Cooler”
Select to enable/disable the bat-
tery cooler. ( P.116)
PBD (Power Back Door)
(if equipped) ( P.207)
Select to set up the following items.
• System settings
Select to enable/disable the power
back door system.
• “Hands Free”
*
Select to enable/disable the Hands
Free Power Back Door.
• “Opening Adjustment”
Select the open position when
power back door is fully open.
•“Volume”
Select to set the volume of the
buzzer which sounds when the
power back door system operates.
*: Vehicles with Hands Free Power
Back Door
“TPWS” (Tire Pressure Warn-
ing System) ( P.471)
• “Setting Pressure”
Select to initialize the tire pressure
warning system.
• “Identify Wheel”
Select to register the ID codes of
the tire pressure se nsors to the tire
pressure warning system.
• “Setting Unit”
Select to change the units of mea-
sure displayed.
“Scheduled Maintenance”
( P.451)
Select to reset the scheduled main-
tenance information (message indi-
cating maintenance is required and
distance until the next mainte-
nance) after all ma intenance is per-
formed.
“Rear Seat Reminder”
( P.200)
Select to enable/disable the rear
seat reminder.
■ Settings
“Language”
Select to change the language on
the multi-information display.
“Units”
Select to change the units of mea-
sure displayed.
“Meter Type”
Select to change the speedometer
display.
(EV indicator) ( P.82)
Select to enable/disable the EV
indicator.
(Driving information dis-
play settings)
Page 186 of 616
1863-1. Instrument cluster
that displayed on the multi-informa-
tion display. For details, refer to the
explanations of each system.
■Audio system operation
status (if equipped)
Displayed when an audio
remote control switch on the
steering wheel is operated.
■Hands-free system status
(if equipped)
Displayed when the hands-free
system is operated.
■Outside temperature dis-
play
Displayed when the power
switch is turned to ON or when
the low outside temperature
indicator is flashing.
■When a pop-up display is dis-
played
When a pop-up display is displayed,
a current display may no longer be
displayed. In this case, the display
will return after the pop-up display
disappears.
■Outside temperature display
●When the ambient temperature is
approximately 3°C (37°F) or
lower, will flash for approxi-
mately 10 seconds and the out-
side temperature display will turn
off.
●In the following si tuations, the cor-
rect outside tempe rature may not
be displayed, or the display may
take longer than normal to
change:
• When stopped (including when
using “My Room Mode”), or driv-
ing at low speeds (less than 20
km/h [12 mph])
• When the outside temperature has changed suddenly (at the
entrance/exit of a
garage, tunnel,
etc.)
●When “--” or “E” i s displayed, the
system may be malfunctioning.
Take your vehicle to your Toyota
dealer.
Display content selected by
“HUD Driving Support” on the
screen is displayed.
( P.184)
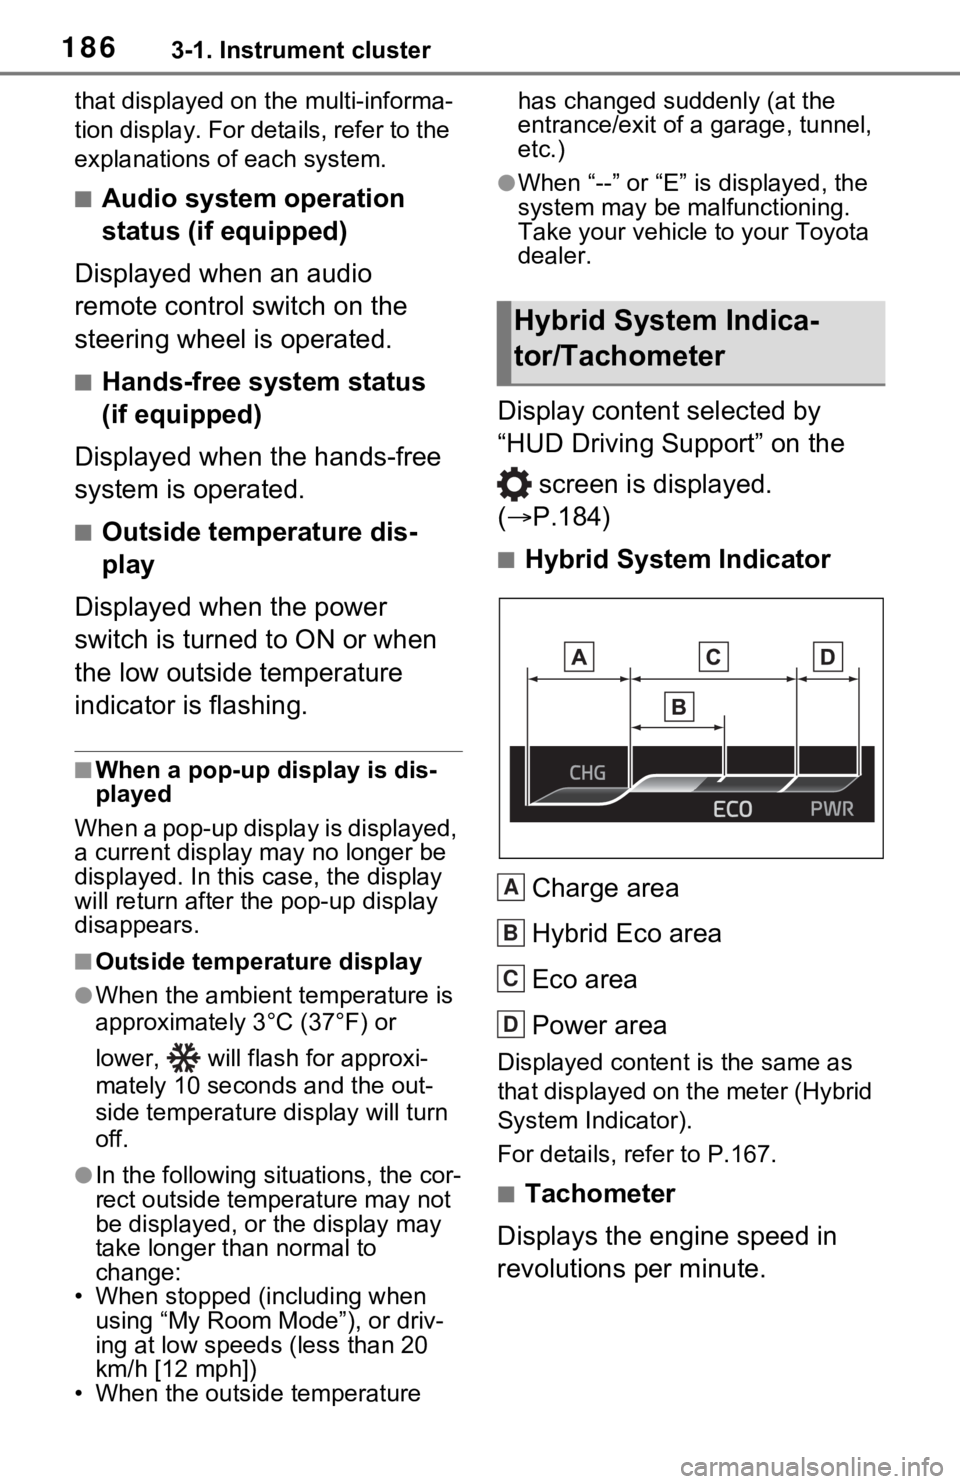
■Hybrid System Indicator
Charge area
Hybrid Eco area
Eco area
Power area
Displayed content is the same as
that displayed on the meter (Hybrid
System Indicator).
For details, refer to P.167.
■Tachometer
Displays the engine speed in
revolutions per minute.
Hybrid System Indica-
tor/Tachometer
A
B
C
D
Page 187 of 616
1873-1. Instrument cluster
3
Vehicle status information and indicators
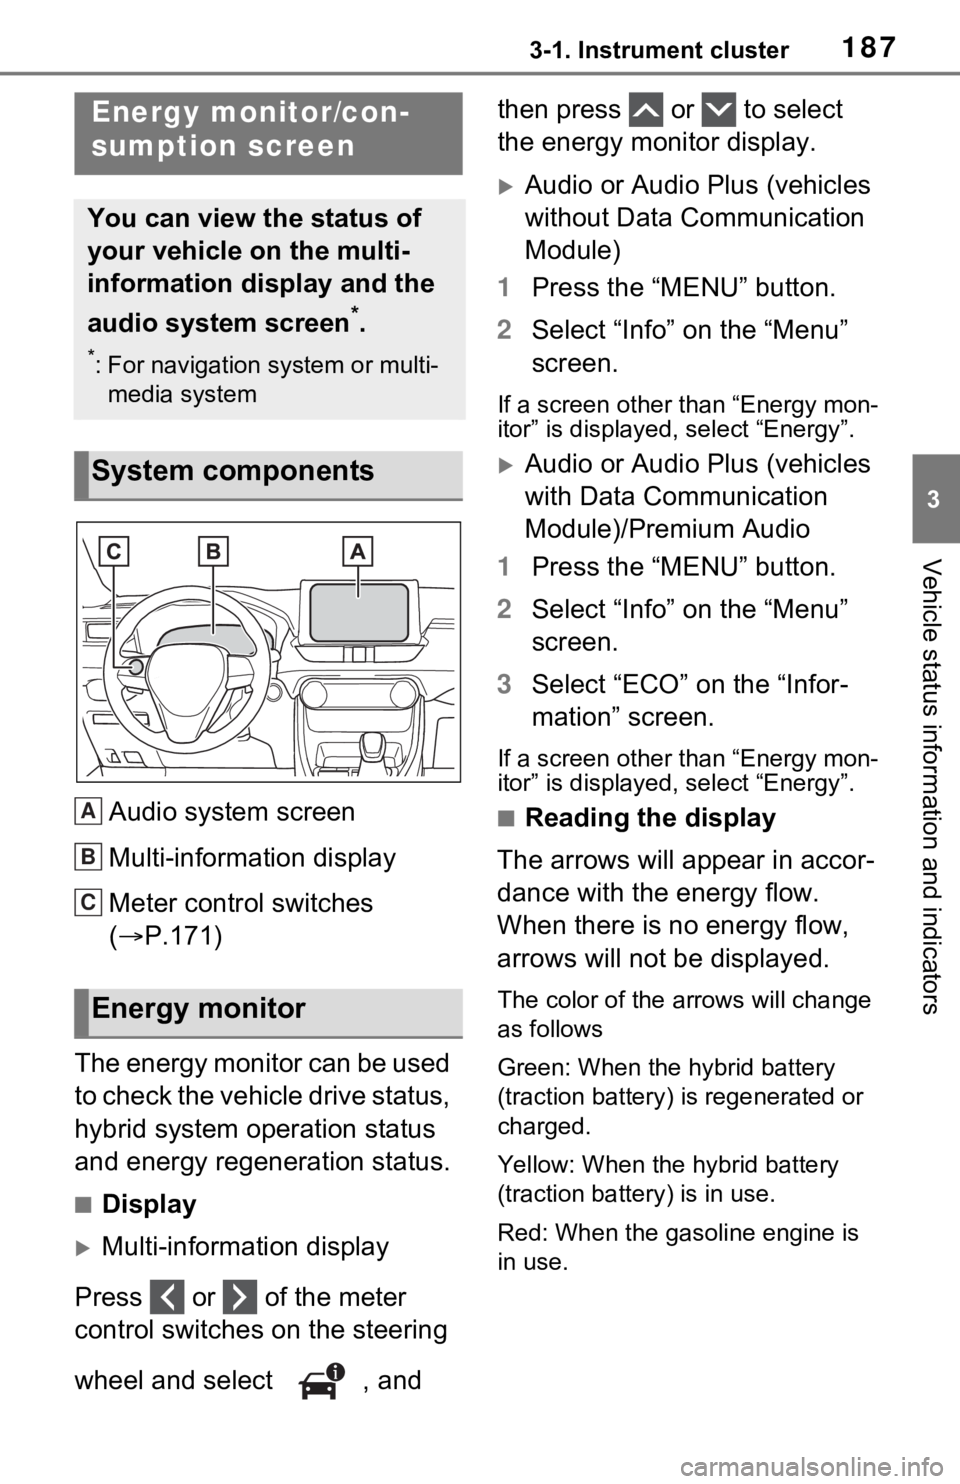
Audio system screen
Multi-information display
Meter control switches
(P.171)
The energy monitor can be used
to check the vehicle drive status,
hybrid system operation status
and energy regeneration status.
■Display
Multi-information display
Press or of the meter
control switches on the steering
wheel and select , and then press or to select
the energy monitor display.
Audio or Audio Plus (vehicles
without Data Communication
Module)
1 Press the “MENU” button.
2 Select “Info” on the “Menu”
screen.
If a screen other than “Energy mon-
itor” is displayed, select “Energy”.
Audio or Audio Plus (vehicles
with Data Communication
Module)/Premium Audio
1 Press the “MENU” button.
2 Select “Info” on the “Menu”
screen.
3 Select “ECO” on the “Infor-
mation” screen.
If a screen other than “Energy mon-
itor” is displayed, select “Energy”.
■Reading the display
The arrows will appear in accor-
dance with the energy flow.
When there is no energy flow,
arrows will not be displayed.
The color of the arrows will change
as follows
Green: When the hybrid battery
(traction battery) is regenerated or
charged.
Yellow: When the hybrid battery
(traction battery) is in use.
Red: When the gasoline engine is
in use.
Energy monitor/con-
sumption screen
You can view the status of
your vehicle on the multi-
information display and the
audio system screen
*.
*: For navigation system or multi- media system
System components
Energy monitor
A
B
C