change time TOYOTA RAV4 PRIME 2021 (in English) Workshop Manual
[x] Cancel search | Manufacturer: TOYOTA, Model Year: 2021, Model line: RAV4 PRIME, Model: TOYOTA RAV4 PRIME 2021Pages: 616, PDF Size: 34.66 MB
Page 339 of 616
3395-5. Using the driving support systems
5
Driving
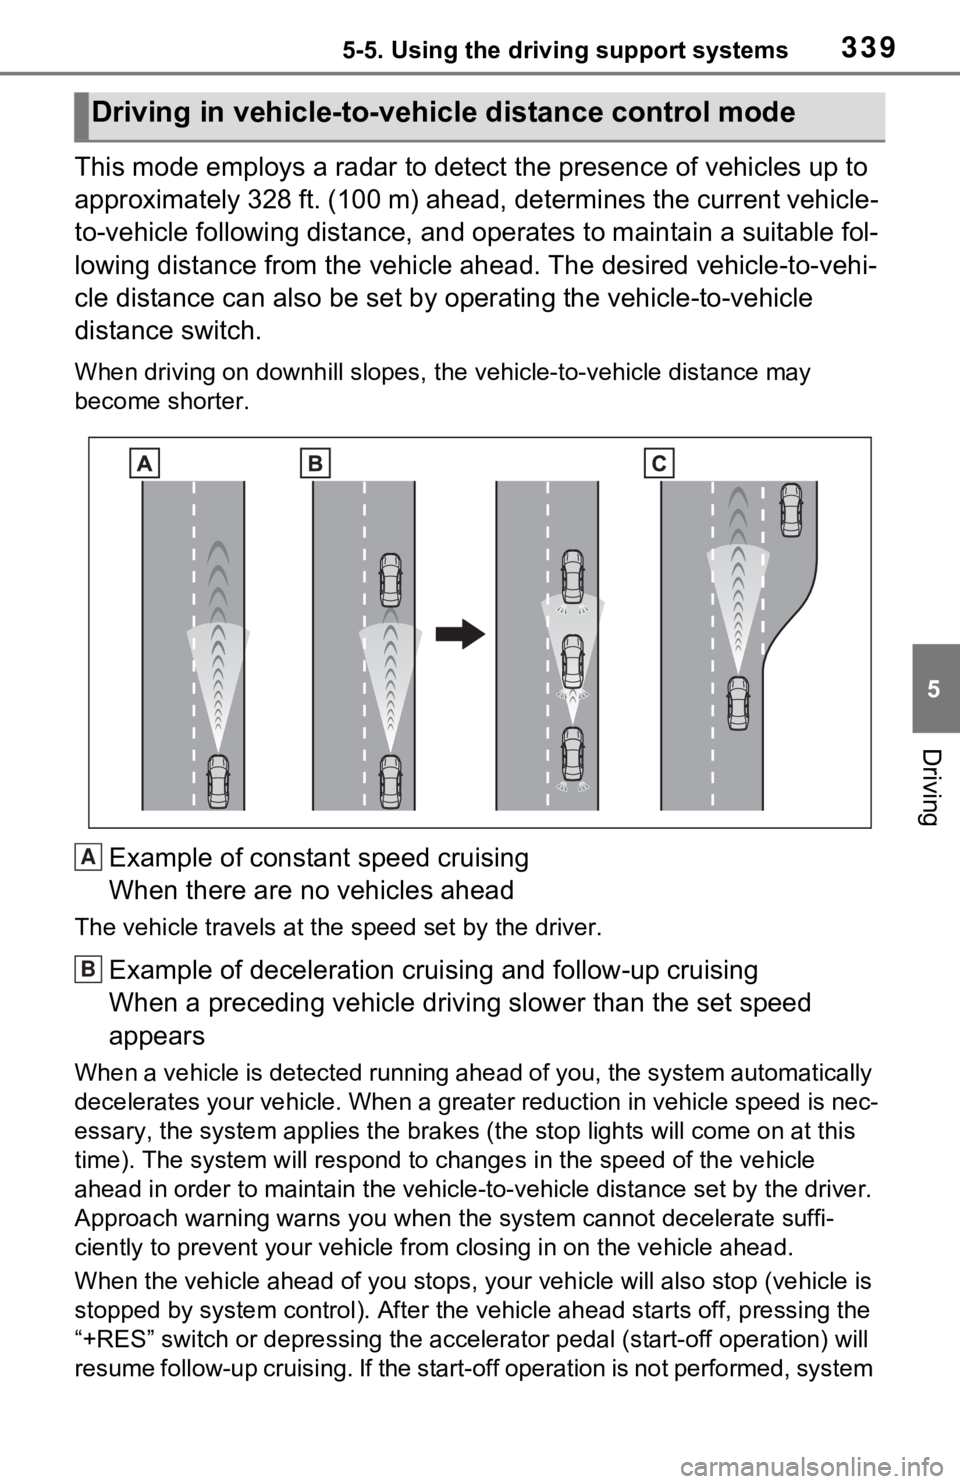
This mode employs a radar to detect the presence of vehicles up to
approximately 328 ft. (100 m) ahead, determines the current vehicle-
to-vehicle following distance, and operates to maintain a suitable fol-
lowing distance from the vehicle ahead. The desired vehicle-to- vehi-
cle distance can also be set by operating the vehicle-to-vehicl e
distance switch.
When driving on downhill slopes, t he vehicle-to-vehicle distance may
become shorter.
Example of constant speed cruising
When there are no vehicles ahead
The vehicle travels at the speed set by the driver.
Example of deceleration crui sing and follow-up cruising
When a preceding vehicle driving slower than the set speed
appears
When a vehicle is detected runni ng ahead of you, the system automatically
decelerates your vehicle. When a greater reduction in vehicle s peed is nec-
essary, the system applies the brakes (the stop lights will come on at this
time). The system will respond to changes i n the speed of the vehicle
ahead in order to maintain the ve hicle-to-vehicle distance set by the driver.
Approach warning warns you when the system cannot decelerate suffi-
ciently to prevent your vehicle from closing in on the vehicle ahead.
When the vehicle ahead of you st ops, your vehicle will also stop (vehicle is
stopped by system control). Afte r the vehicle ahead starts off, pressing the
“+RES” switch or depressing the accelerator pedal (start-off operation) will
resume follow-up cruising. If the start-off operation is not performed, system
Driving in vehicle-to-vehicle distance control mode
A
B
Page 341 of 616
3415-5. Using the driving support systems
5
Driving
set speed.
Adjusting the set speed by the
switch
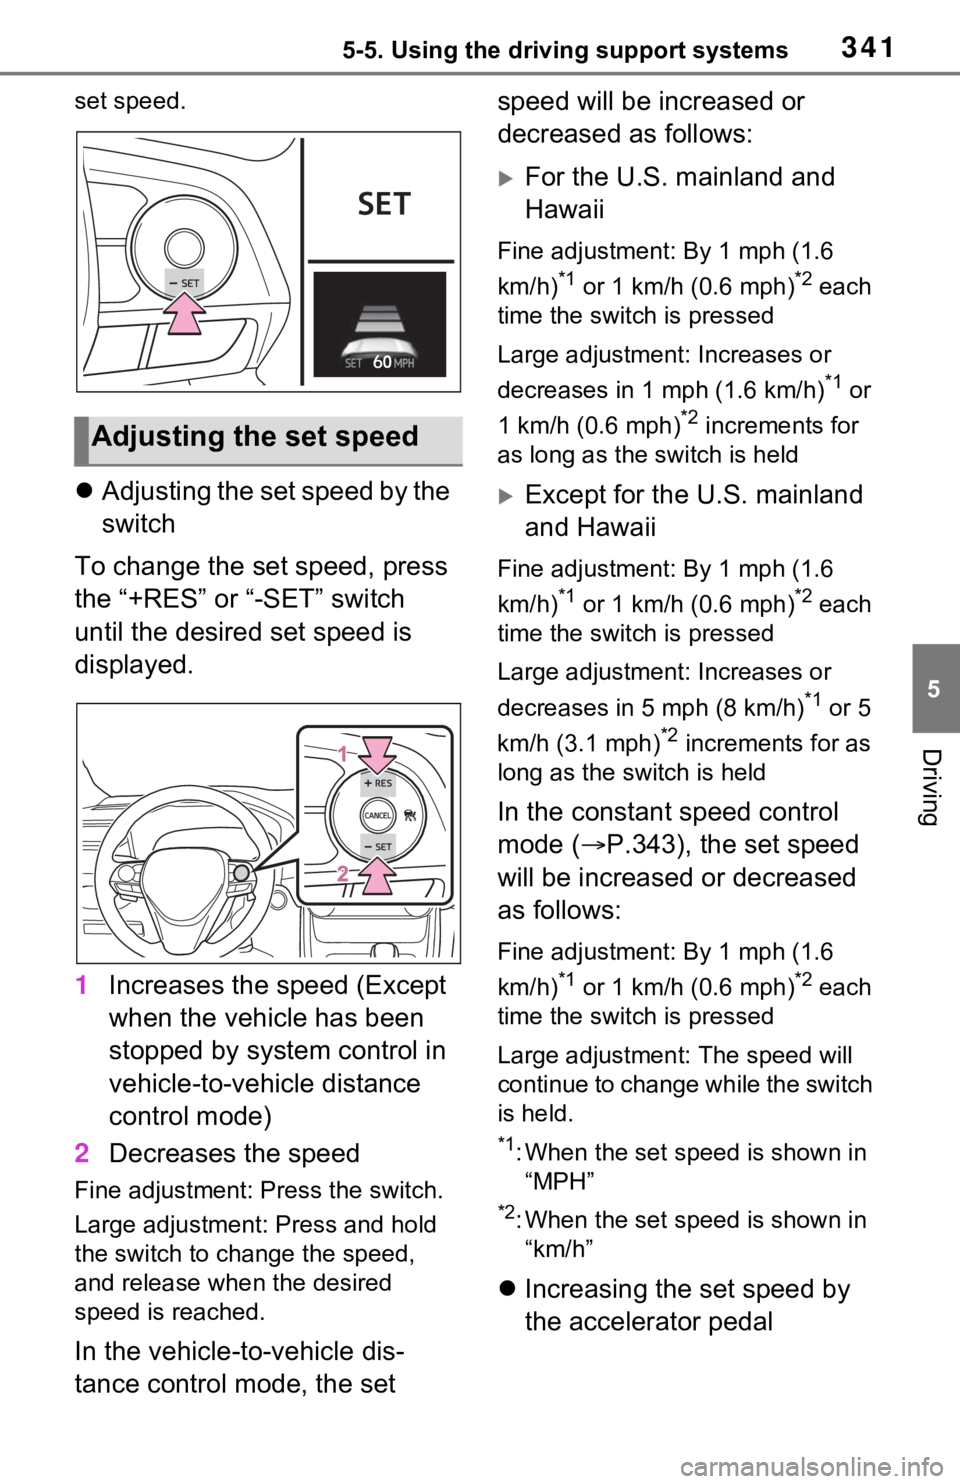
To change the set speed, press
the “+RES” or “-SET” switch
until the desired set speed is
displayed.
1 Increases the speed (Except
when the vehicle has been
stopped by system control in
vehicle-to-vehicle distance
control mode)
2 Decreases the speed
Fine adjustment: Press the switch.
Large adjustment: Press and hold
the switch to change the speed,
and release when the desired
speed is reached.
In the vehicle-to-vehicle dis-
tance control mode, the set speed will be increased or
decreased as follows:
For the U.S. mainland and
Hawaii
Fine adjustment: By 1 mph (1.6
km/h)
*1 or 1 km/h (0.6 mph)*2 each
time the switch is pressed
Large adjustment: Increases or
decreases in 1 mph (1.6 km/h)
*1 or
1 km/h (0.6 mph)
*2 increments for
as long as the switch is held
Except for the U.S. mainland
and Hawaii
Fine adjustment: By 1 mph (1.6
km/h)
*1 or 1 km/h (0.6 mph)*2 each
time the switch is pressed
Large adjustment: Increases or
decreases in 5 mph (8 km/h)
*1 or 5
km/h (3.1 mph)
*2 increments for as
long as the switch is held
In the constant speed control
mode ( P.343), the set speed
will be increased or decreased
as follows:
Fine adjustment: By 1 mph (1.6
km/h)
*1 or 1 km/h (0.6 mph)*2 each
time the switch is pressed
Large adjustmen t: The speed will
continue to change while the switch
is held.
*1: When the set speed is shown in “MPH”
*2: When the set speed is shown in “km/h”
Increasing the set speed by
the accelerator pedal
Adjusting the set speed
Page 345 of 616

3455-5. Using the driving support systems
5
Driving
resumed.
■Automatic cancelation of vehi-
cle-to-vehicle distance control
mode
Vehicle-to-vehicle distance control
mode is automatically canceled in
the following situations.
●VSC is activated.
●TRAC is activated for a period of
time.
●When the VSC or TRAC system is
turned off.
●The sensor cannot detect cor-
rectly because i t is covered in
some way.
●Pre-collision braking is activated.
●The parking brake is operated.
●The vehicle is stopped by system
control on a steep incline.
●The following are detected when
the vehicle has been stopped by
system control:
• The driver is not wearing a seat belt.
• The driver’s door is opened.
• The vehicle has been stopped for about 3 minutes
If vehicle-to-vehicle distance control
mode is automatically canceled for
any reasons other than the above,
there may be a malfunction in the
system. Contact your Toyota dealer.
■Automatic cancelation of con-
stant speed control mode
Constant speed control mode is
automatically cance led in the follow-
ing situations:
●Actual vehicle speed is more than
approximately 10 mph (16 km/h)
below the set vehicle speed.
●Actual vehicle speed falls below
approximately 20 mph (30 km/h).
●VSC is activated.
●TRAC is activated for a period of
time.
●When the VSC or TRAC system is turned off.
●Pre-collision braking is activated.
●The parking brake is operated.
If constant speed control mode is
automatically canceled for any rea-
sons other than the above, there
may be a malfunction in the system.
Contact your Toyota dealer.
■Brake operation
A brake operation sound may be
heard and the brake pedal response
may change, but these are not mal-
functions.
■Warning messages and buzzers
for dynamic radar cruise con-
trol with full-speed range
Warning messages and buzzers are
used to indicate a system malfunc-
tion or to inform the driver of the
need for caution while driving. If a
warning message is shown on the
multi-information display, read the
message and follow the instructions.
( P.313, 523)
■When the sensor may not be
correctly detecting the vehicle
ahead
In the case of the following and
depending on the conditions, oper-
ate the brake pedal when decelera-
tion of the system is insufficient or
operate the accelerator pedal when
acceleration is required.
As the sensor may not be able to
correctly detect th ese types of vehi-
cles, the approach warning
( P.343) may not be activated.
●Vehicles that cut in suddenly
●Vehicles traveling at low speeds
●Vehicles that are not moving in
the same lane
●Vehicles with small rear ends
(trailers with no load on board,
etc.)
Page 361 of 616
3615-5. Using the driving support systems
5
Driving
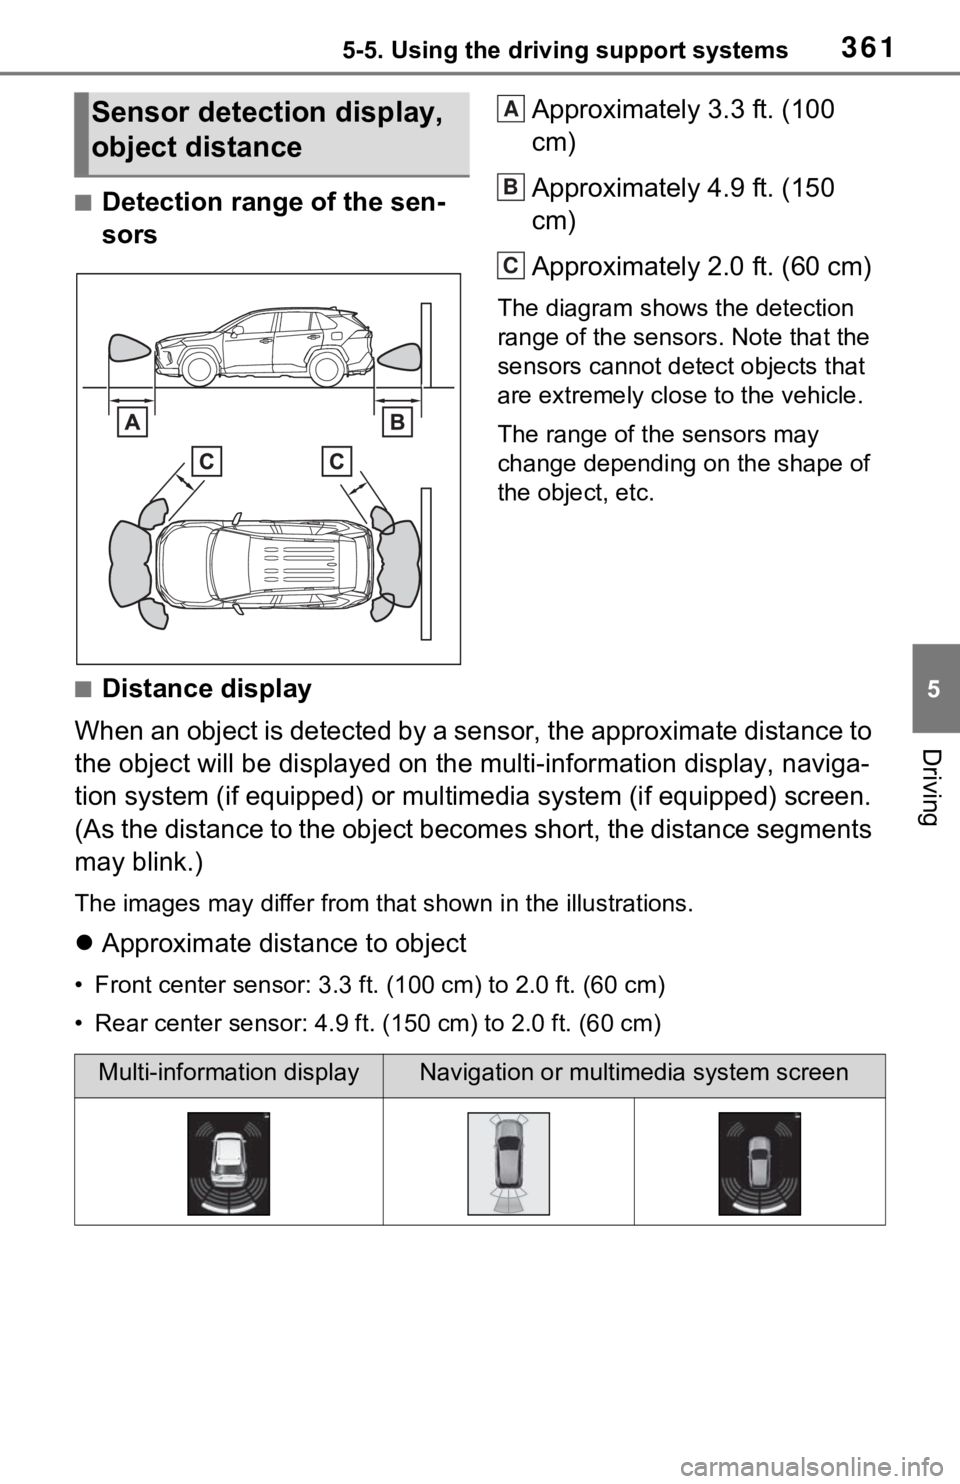
■Detection range of the sen-
sorsApproximately 3.3 ft. (100
cm)
Approximately 4.9 ft. (150
cm)
Approximately 2.0 ft. (60 cm)
The diagram shows the detection
range of the sensors. Note that the
sensors cannot detect objects that
are extremely clos
e to the vehicle.
The range of the sensors may
change depending on the shape of
the object, etc.
■Distance display
When an object is detected by a sensor, the approximate distance to
the object will be displayed on the multi-information display, naviga-
tion system (if equipped) or multimedia system (if equipped) sc reen.
(As the distance to the object becomes short, the distance segm ents
may blink.)
The images may differ from that shown in the illustrations.
Approximate distance to object
• Front center sensor: 3.3 ft . (100 cm) to 2.0 ft. (60 cm)
• Rear center sensor : 4.9 ft. (150 cm) to 2.0 ft. (60 cm)
Sensor detection display,
object distanceA
B
C
Multi-information displayNavigation or multimedia system screen
Page 364 of 616
3645-5. Using the driving support systems
The Parking Support Brake can
be enabled/disabled on the
screen of the multi-information
display. All of the Parking Sup-
port Brake functions (static
objects and rear-crossing vehi-
cles) are enabled/disabled
simultaneously. (P.177)
When the Parking Support Brake is
disabled, the PKSB OFF indicator
( P.163) illuminates on the multi-
information display.
To re-enable the system, select
on the multi-information display,
select and turn it on.
If the system is disabled, it will
remain off even if the power switch
is turned to ON after the power
switch has been turned off.
WARNING
■Limitations of the Parking
Support Brake system
Do not overly rely on the system,
as doing so may lead to an acci-
dent.
Always drive while checking the
safety of the surroundings of the
vehicle.
Depending on the vehicle and
road conditions, weather, etc., the
system may not operate.
The detection capa bilities of sen-
sors and radars are limited.
Always drive while checking the
safety of the surroundings of the
vehicle.
●The driver is solely responsible
for safe driving. Always drive
carefully, taking care to observe
your surroundings. The Parking
Support Brake system is
designed to provide support to
lessen the severity of collisions.
However, it may not operate in
some situations.
●The Parking Support Brake sys-
tem is not designed to stop the
vehicle completely. Addition-
ally, even if the system has
stopped the vehicle, it is neces-
sary to depress the brake pedal
immediately as brake control
will be canceled after approxi-
mately 2 seconds.
●Do not attempt to test the oper-
ation of the Parking Support
Brake system yourself such as
intentionally driving to a vehicle
or wall.
Depending on the situations,
the system may not operate
properly, possibly leading to an
accident.
NOTICE
■If “Parking Support Brake
Unavailable” is displayed on
the multi-information display
and the PKSB OFF indicator
illuminates
If this message is displayed
immediately after the power
switch is changed to ON, operate
the vehicle carefully, paying atten-
tion to your surroundings. It may
be necessary to drive the vehicle
for a certain amount of time
before the system returns to nor-
mal. (If the system does not return
to normal after dr iving for a while,
clean the sensors and their sur-
rounding area on the bumpers.)
Enabling/Disabling the
Parking Support Brake
Page 379 of 616
3795-5. Using the driving support systems
5
Driving
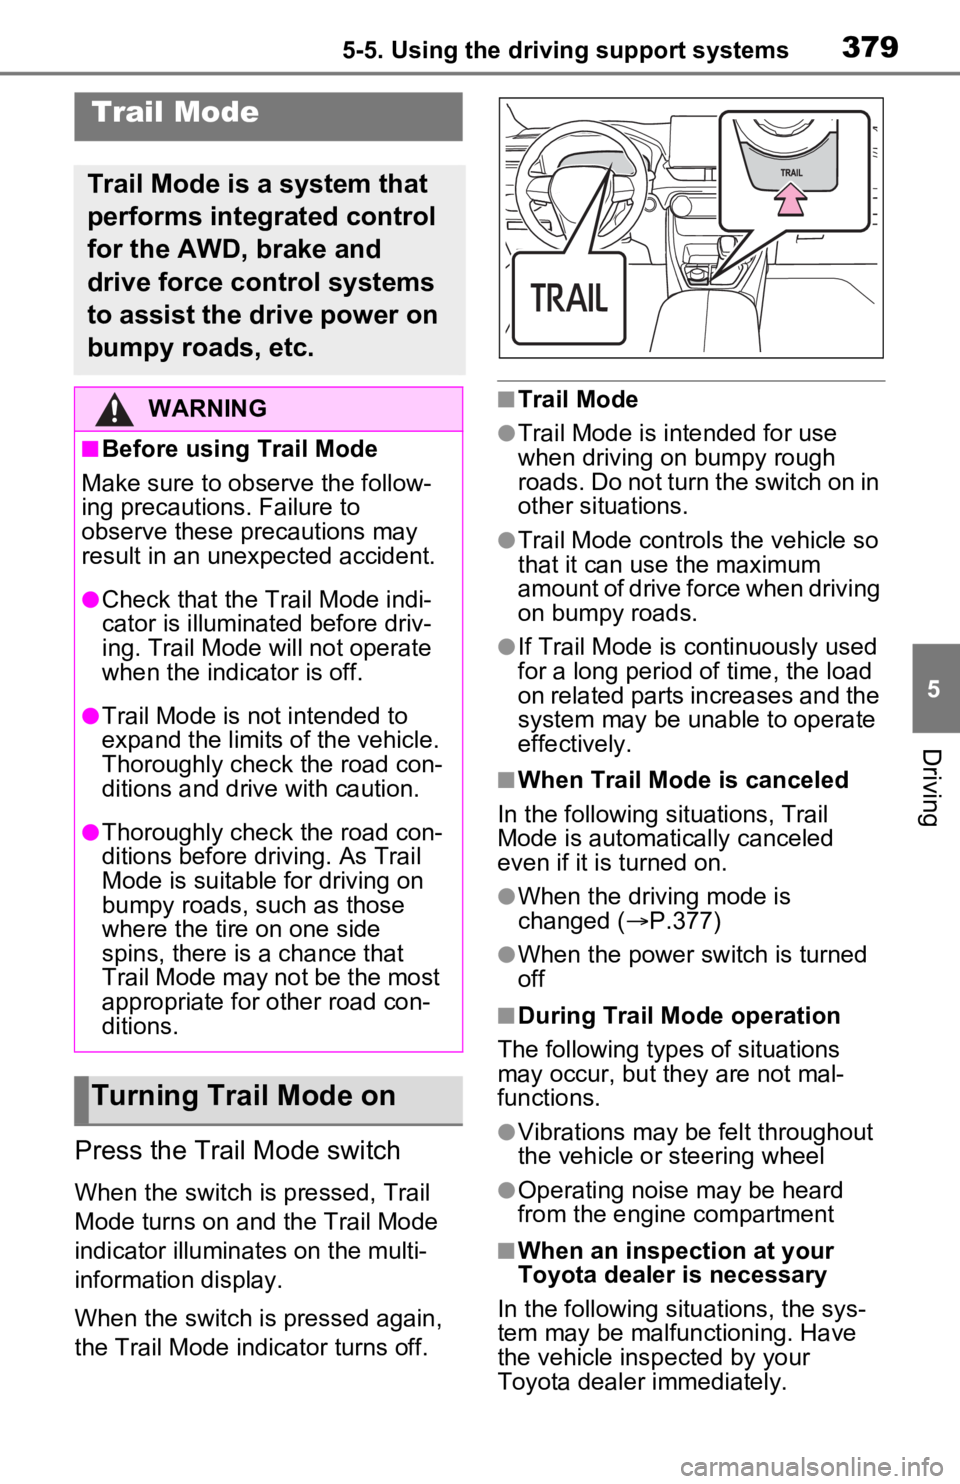
Press the Trail Mode switch
When the switch is pressed, Trail
Mode turns on and the Trail Mode
indicator illuminates on the multi-
information display.
When the switch is pressed again,
the Trail Mode indicator turns off.
■Trail Mode
●Trail Mode is intended for use
when driving on bumpy rough
roads. Do not turn the switch on in
other situations.
●Trail Mode controls the vehicle so
that it can use the maximum
amount of drive force when driving
on bumpy roads.
●If Trail Mode is continuously used
for a long period of time, the load
on related parts increases and the
system may be unable to operate
effectively.
■When Trail Mode is canceled
In the following situations, Trail
Mode is automatically canceled
even if it is turned on.
●When the driving mode is
changed ( P.377)
●When the power switch is turned
off
■During Trail Mode operation
The following types of situations
may occur, but they are not mal-
functions.
●Vibrations may be felt throughout
the vehicle or steering wheel
●Operating noise may be heard
from the engine compartment
■When an inspection at your
Toyota dealer is necessary
In the following situ ations, the sys-
tem may be malf unctioning. Have
the vehicle insp ected by your
Toyota dealer immediately.
Trail Mode
Trail Mode is a system that
performs integrated control
for the AWD, brake and
drive force control systems
to assist the drive power on
bumpy roads, etc.
WARNING
■Before using Trail Mode
Make sure to observe the follow-
ing precautions. Failure to
observe these precautions may
result in an unexpected accident.
●Check that the Trail Mode indi-
cator is illumina ted before driv-
ing. Trail Mode will not operate
when the indicator is off.
●Trail Mode is not intended to
expand the limits of the vehicle.
Thoroughly check the road con-
ditions and drive with caution.
●Thoroughly check the road con-
ditions before driving. As Trail
Mode is suitable for driving on
bumpy roads, such as those
where the tire on one side
spins, there is a chance that
Trail Mode may not be the most
appropriate for other road con-
ditions.
Turning Trail Mode on
Page 397 of 616
3976-1. Using the air conditioning system and defogger
6
Interior features
decreases the temperature.
The air conditioning system
switches between individual and
simultaneous modes each time the
“SYNC” switch is pressed.
Simultaneous mode (the indicator
on the “SYNC” switch is on):
The driver’s side temperature con-
trol dial can be used to adjust the
temperature for the driver’s and
passenger’s side. At this time,
operate the passenger’s side tem-
perature control dial to enter indi-
vidual mode.
Individual mode (t he indicator on
the “SYNC” switch is off):
The temperature for the driver’s
and passenger’s side can be
adjusted separately.
■Setting the fan speed
Press the fan speed increase
switch to increase the fan speed
and the fan speed decrease
switch to decrease the fan
speed.
Pressing the “OFF” switch turns off
the fan.
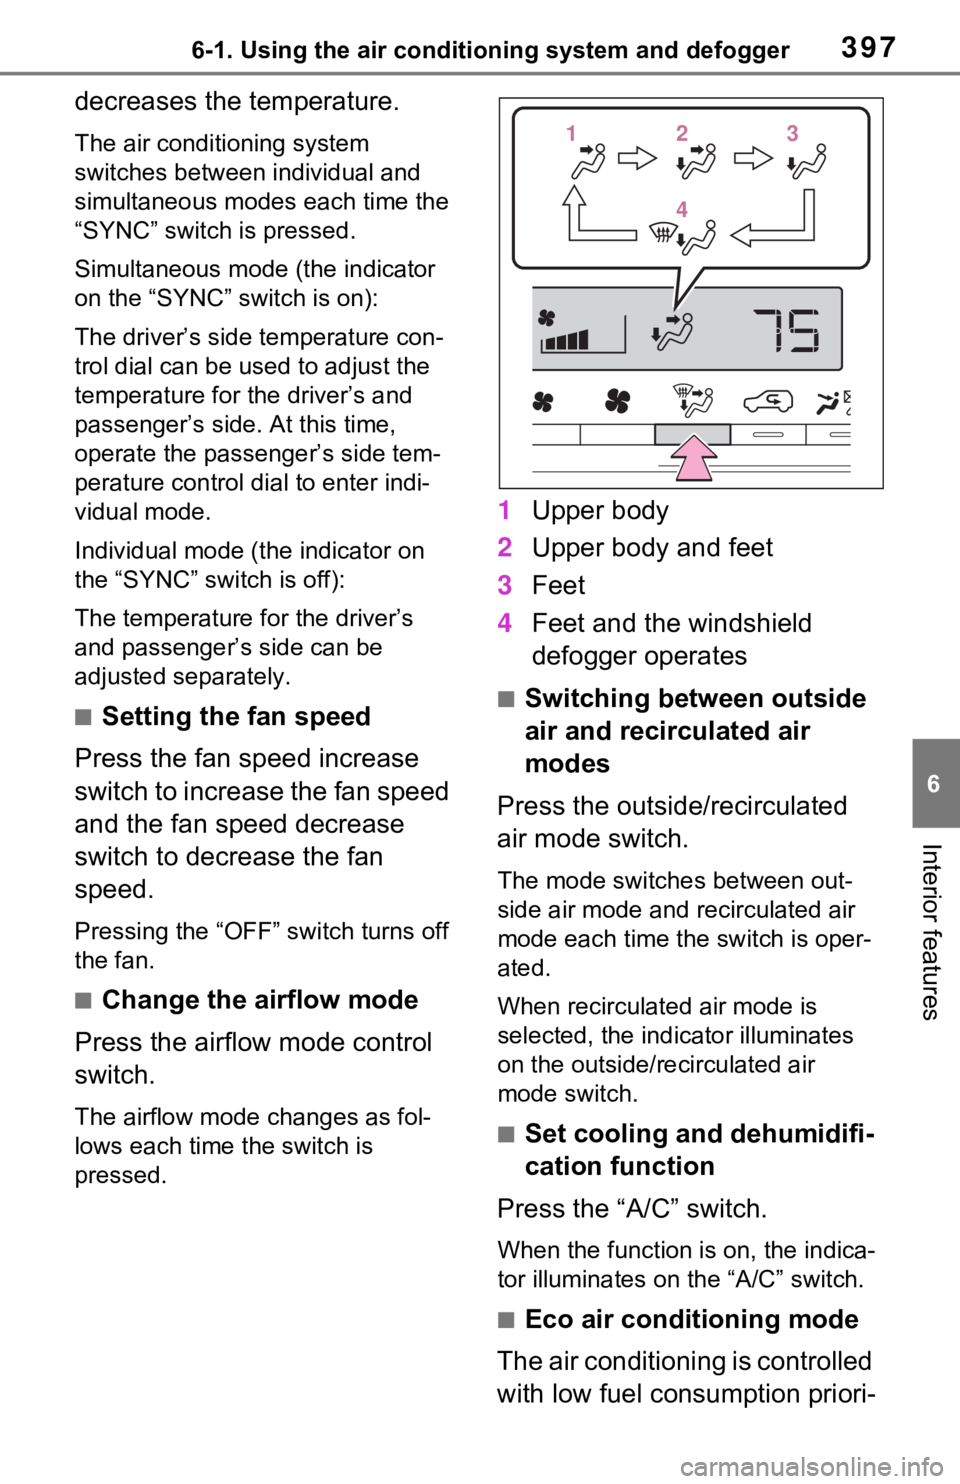
■Change the airflow mode
Press the airflow mode control
switch.
The airflow mode changes as fol-
lows each time the switch is
pressed.
1 Upper body
2 Upper body and feet
3 Feet
4 Feet and the windshield
defogger operates
■Switching between outside
air and recirculated air
modes
Press the outside/recirculated
air mode switch.
The mode switches between out-
side air mode and recirculated air
mode each time the switch is oper-
ated.
When recirculated air mode is
selected, the indicator illuminates
on the outside/recirculated air
mode switch.
■Set cooling and dehumidifi-
cation function
Press the “A/C” switch.
When the function is on, the indica-
tor illuminates on the “A/C” switch.
■Eco air conditioning mode
The air conditioning is controlled
with low fuel consumption priori-
112233
44
Page 403 of 616
4036-1. Using the air conditioning system and defogger
6
Interior features
■To return to automatic airflow
control
1 With the indicator off, turn the
power switch off.
2 After 60 minutes or more elapse,
turn the power switch to ON.
This feature is used to prevent
ice from building up on the wind-
shield and wiper blades.
Press the switch to turn the sys-
tem on/off.
The indicator comes on when the
system is on.
The windshield wiper de-icer will
automatically turn o ff after a period
of time.
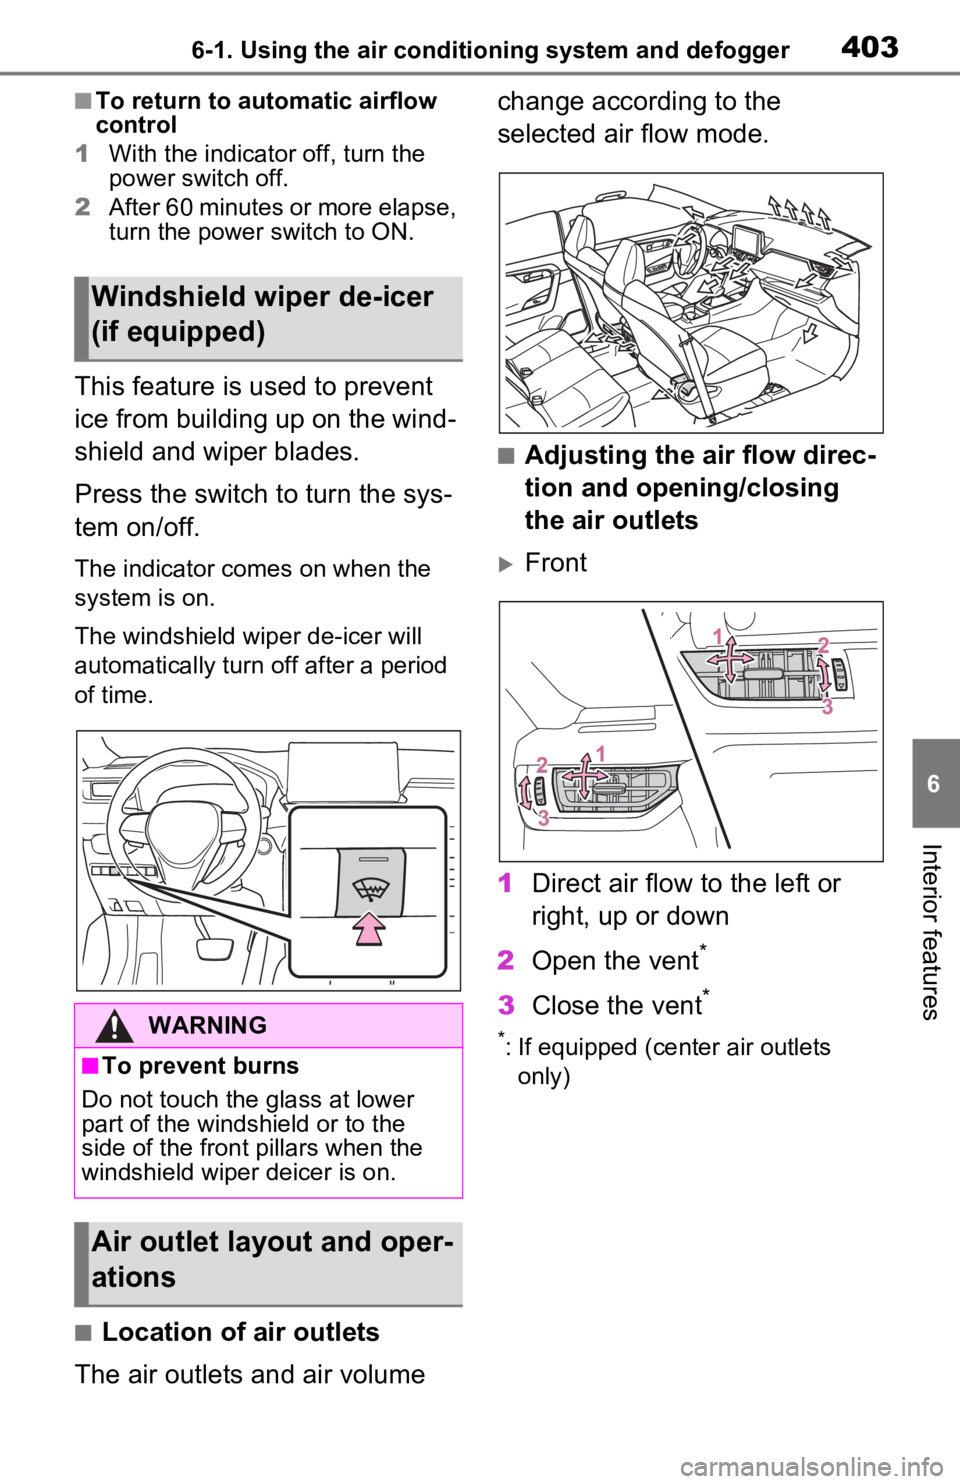
■Location of air outlets
The air outlets and air volume change according to the
selected air flow mode.
■Adjusting the air flow direc-
tion and opening/closing
the air outlets
Front
1 Direct air flow to the left or
right, up or down
2 Open the vent
*
3Close the vent*
*: If equipped (cent er air outlets
only)
Windshield wiper de-icer
(if equipped)
WARNING
■To prevent burns
Do not touch the glass at lower
part of the windshield or to the
side of the fron t pillars when the
windshield wiper deicer is on.
Air outlet layout and oper-
ations
Page 408 of 616
4086-1. Using the air conditioning system and defogger
■Operation condition
The power swit ch is in ON.
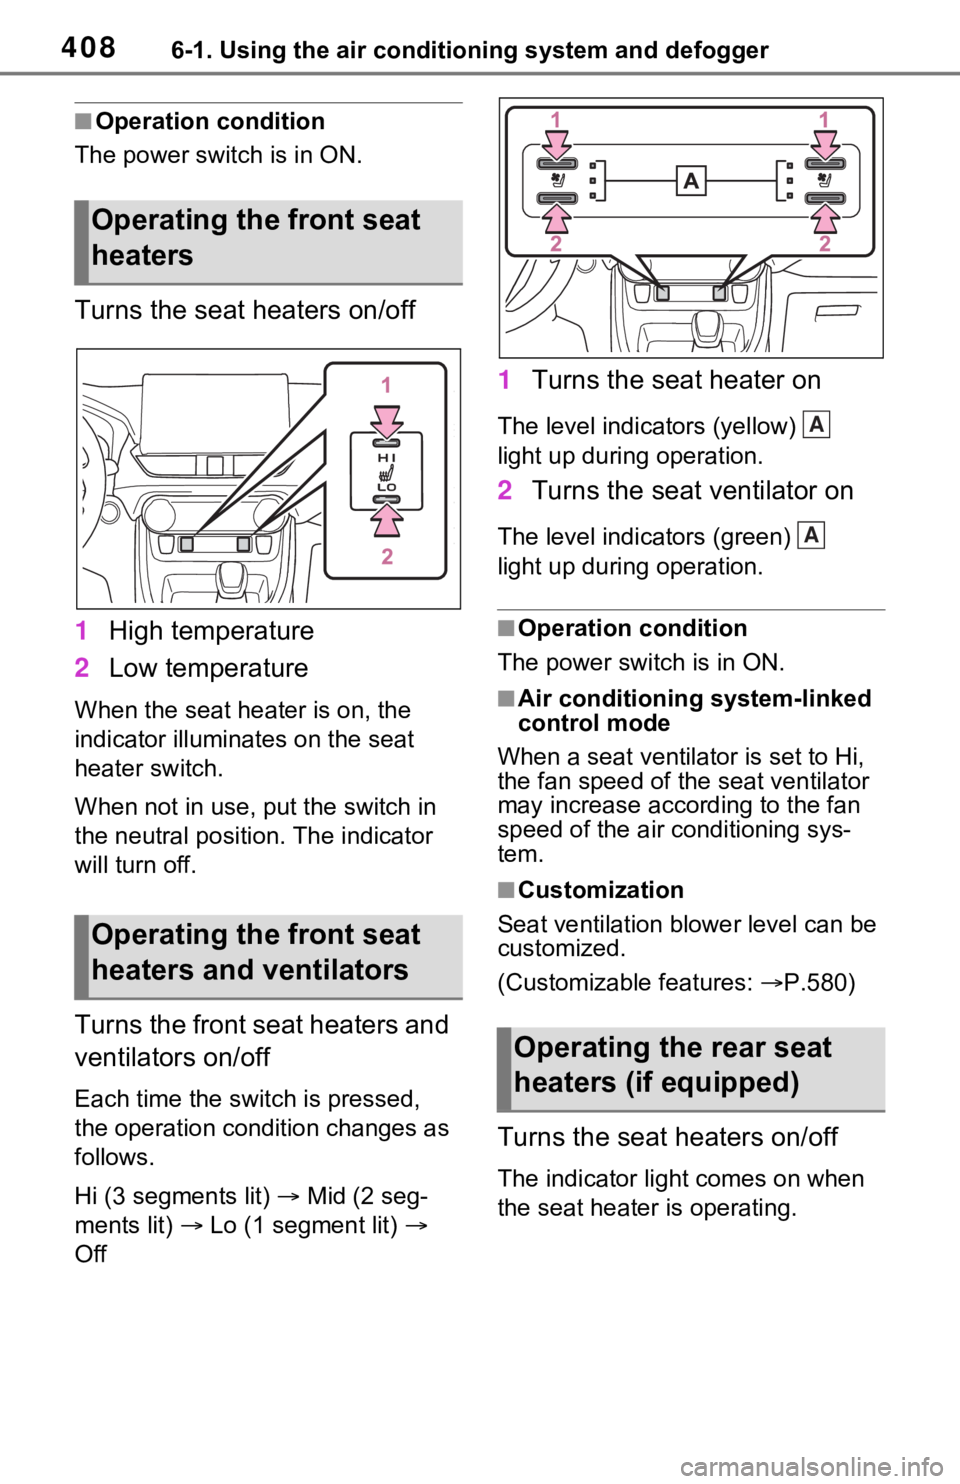
Turns the seat heaters on/off
1High temperature
2 Low temperature
When the seat hea ter is on, the
indicator illumina tes on the seat
heater switch.
When not in use, put the switch in
the neutral position. The indicator
will turn off.
Turns the front seat heaters and
ventilators on/off
Each time the switch is pressed,
the operation condition changes as
follows.
Hi (3 segments lit) Mid (2 seg-
ments lit) Lo (1 segment lit)
Off
1 Turns the seat heater on
The level indicators (yellow)
light up during operation.
2Turns the seat ventilator on
The level indicators (green)
light up during operation.
■Operation condition
The power switch is in ON.
■Air conditioning system-linked
control mode
When a seat ventilator is set to Hi,
the fan speed of the seat ventilator
may increase according to the fan
speed of the air conditioning sys-
tem.
■Customization
Seat ventilation blower level can be
customized.
(Customizable features: P.580)
Turns the seat heaters on/off
The indicator light comes on when
the seat heater is operating.
Operating the front seat
heaters
Operating the front seat
heaters and ventilators
Operating the rear seat
heaters (if equipped)
A
A
Page 411 of 616
4116-2. Using the interior lights
6
Interior features
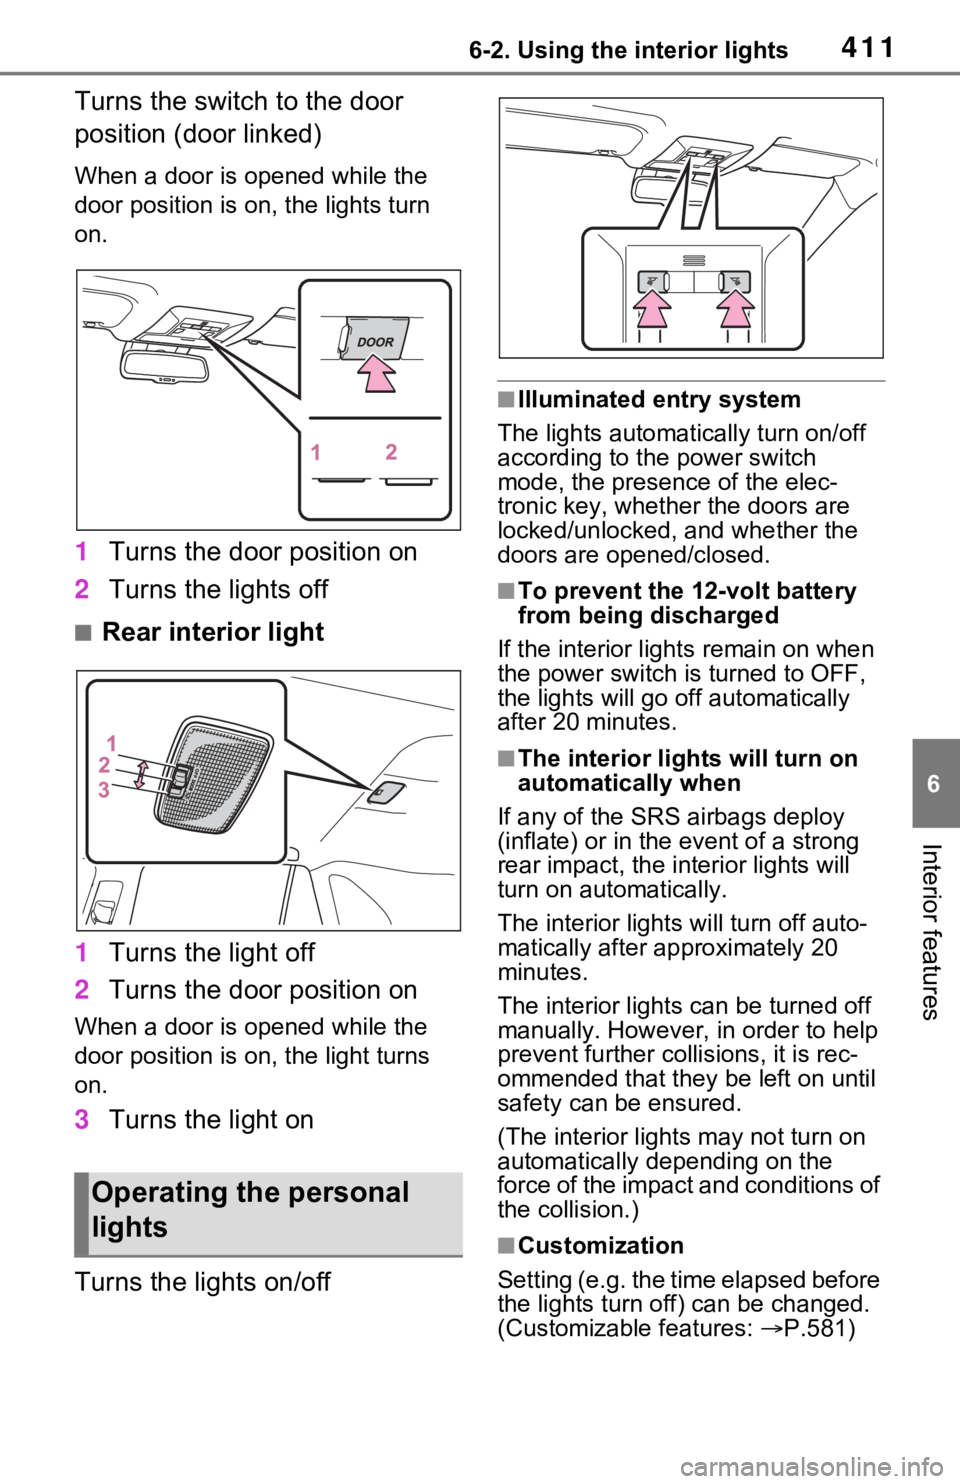
Turns the switch to the door
position (door linked)
When a door is opened while the
door position is on, the lights turn
on.
1Turns the door position on
2 Turns the lights off
■Rear interior light
1 Turns the light off
2 Turns the door position on
When a door is opened while the
door position is on, the light turns
on.
3Turns the light on
Turns the lights on/off
■Illuminated entry system
The lights automatically turn on/off
according to the power switch
mode, the presence of the elec-
tronic key, whether the doors are
locked/unlocked, and whether the
doors are opened/closed.
■To prevent the 12-volt battery
from being discharged
If the interior light s remain on when
the power switch is turned to OFF,
the lights will go off automatically
after 20 minutes.
■The interior lights will turn on
automatically when
If any of the SRS airbags deploy
(inflate) or in the event of a strong
rear impact, the in terior lights will
turn on automatically.
The interior lights will turn off auto-
matically after approximately 20
minutes.
The interior lights can be turned off
manually. However, in order to help
prevent further co llisions, it is rec-
ommended that they be left on until
safety can be ensured.
(The interior lights may not turn on
automatically depending on the
force of the impact and conditions of
the collision.)
■Customization
Setting (e.g. the time elapsed before
the lights turn off) can be changed.
(Customizable features: P.581)
Operating the personal
lights