height TOYOTA RAV4 PRIME 2021 Owners Manual (in English)
[x] Cancel search | Manufacturer: TOYOTA, Model Year: 2021, Model line: RAV4 PRIME, Model: TOYOTA RAV4 PRIME 2021Pages: 616, PDF Size: 34.66 MB
Page 31 of 616
311-1. For safe use
1
For safety and security
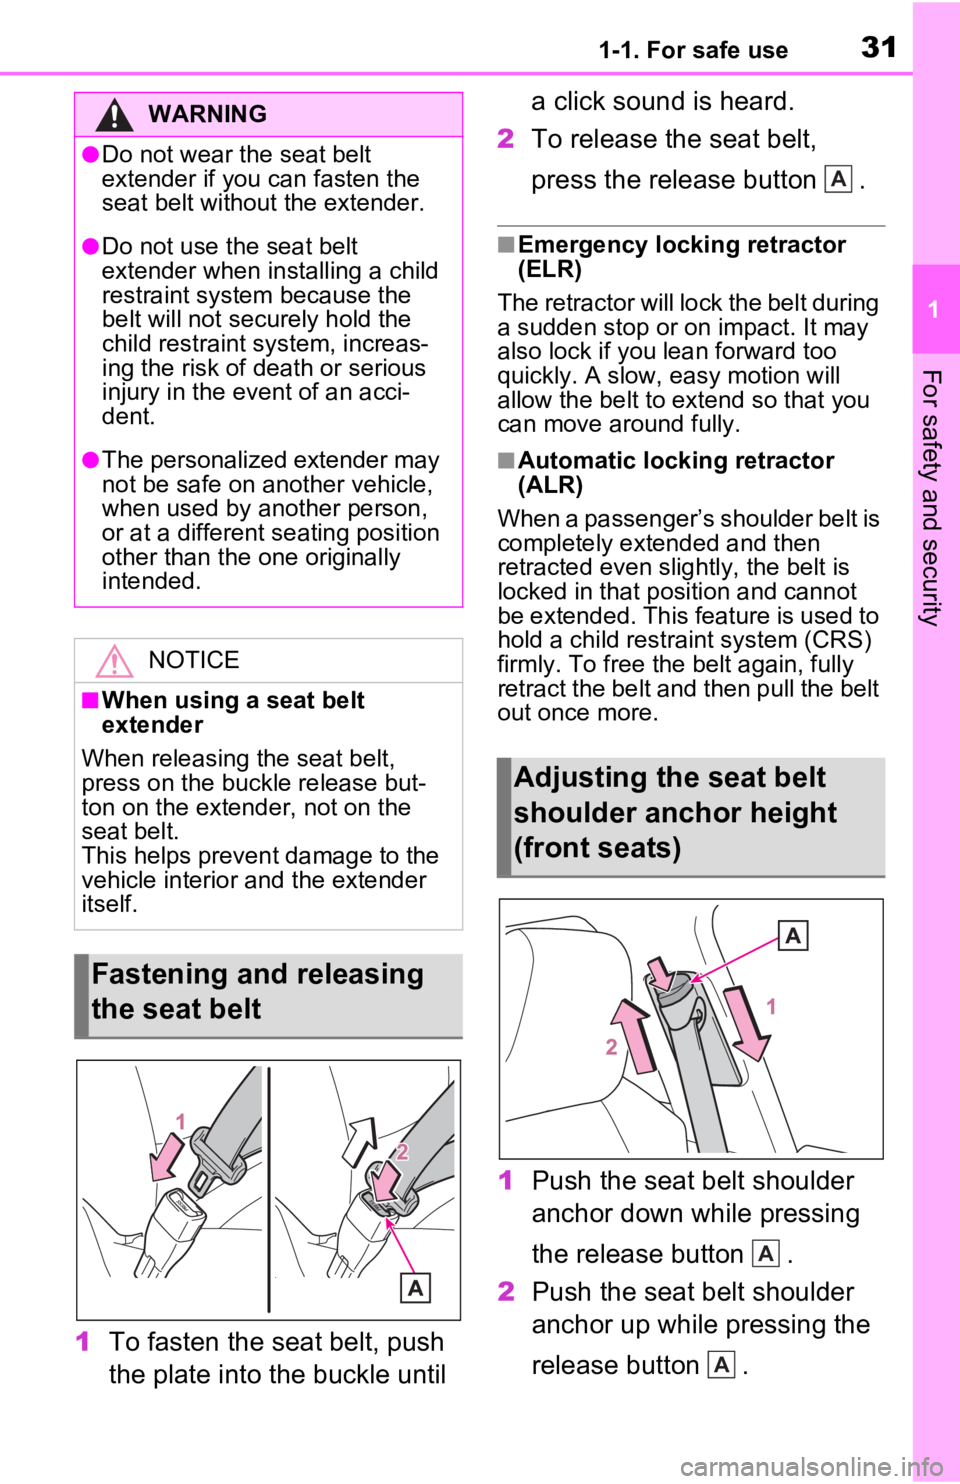
1To fasten the seat belt, push
the plate into the buckle until a click sound is heard.
2 To release the seat belt,
press the release button .
■Emergency locking retractor
(ELR)
The retractor will lock the belt during
a sudden stop or on impact. It may
also lock if you lean forward too
quickly. A slow, easy motion will
allow the belt to extend so that you
can move around fully.
■Automatic locking retractor
(ALR)
When a passenger’s shoulder belt is
completely extended and then
retracted even slightly, the belt is
locked in that position and cannot
be extended. This feature is used to
hold a child restraint system (CRS)
firmly. To free the belt again, fully
retract the belt and then pull the belt
out once more.
1 Push the seat belt shoulder
anchor down while pressing
the release button .
2 Push the seat belt shoulder
anchor up while pressing the
release button .
WARNING
●Do not wear the seat belt
extender if you can fasten the
seat belt without the extender.
●Do not use the seat belt
extender when installing a child
restraint system because the
belt will not securely hold the
child restraint system, increas-
ing the risk of death or serious
injury in the event of an acci-
dent.
●The personalized extender may
not be safe on another vehicle,
when used by another person,
or at a different seating position
other than the one originally
intended.
NOTICE
■When using a seat belt
extender
When releasing the seat belt,
press on the buckle release but-
ton on the extender, not on the
seat belt.
This helps prevent damage to the
vehicle interior and the extender
itself.
Fastening and releasing
the seat belt
Adjusting the seat belt
shoulder anchor height
(front seats)
A
A
A
Page 32 of 616
321-1. For safe use
Move the height adjuster up and
down as needed until you hear a
click.
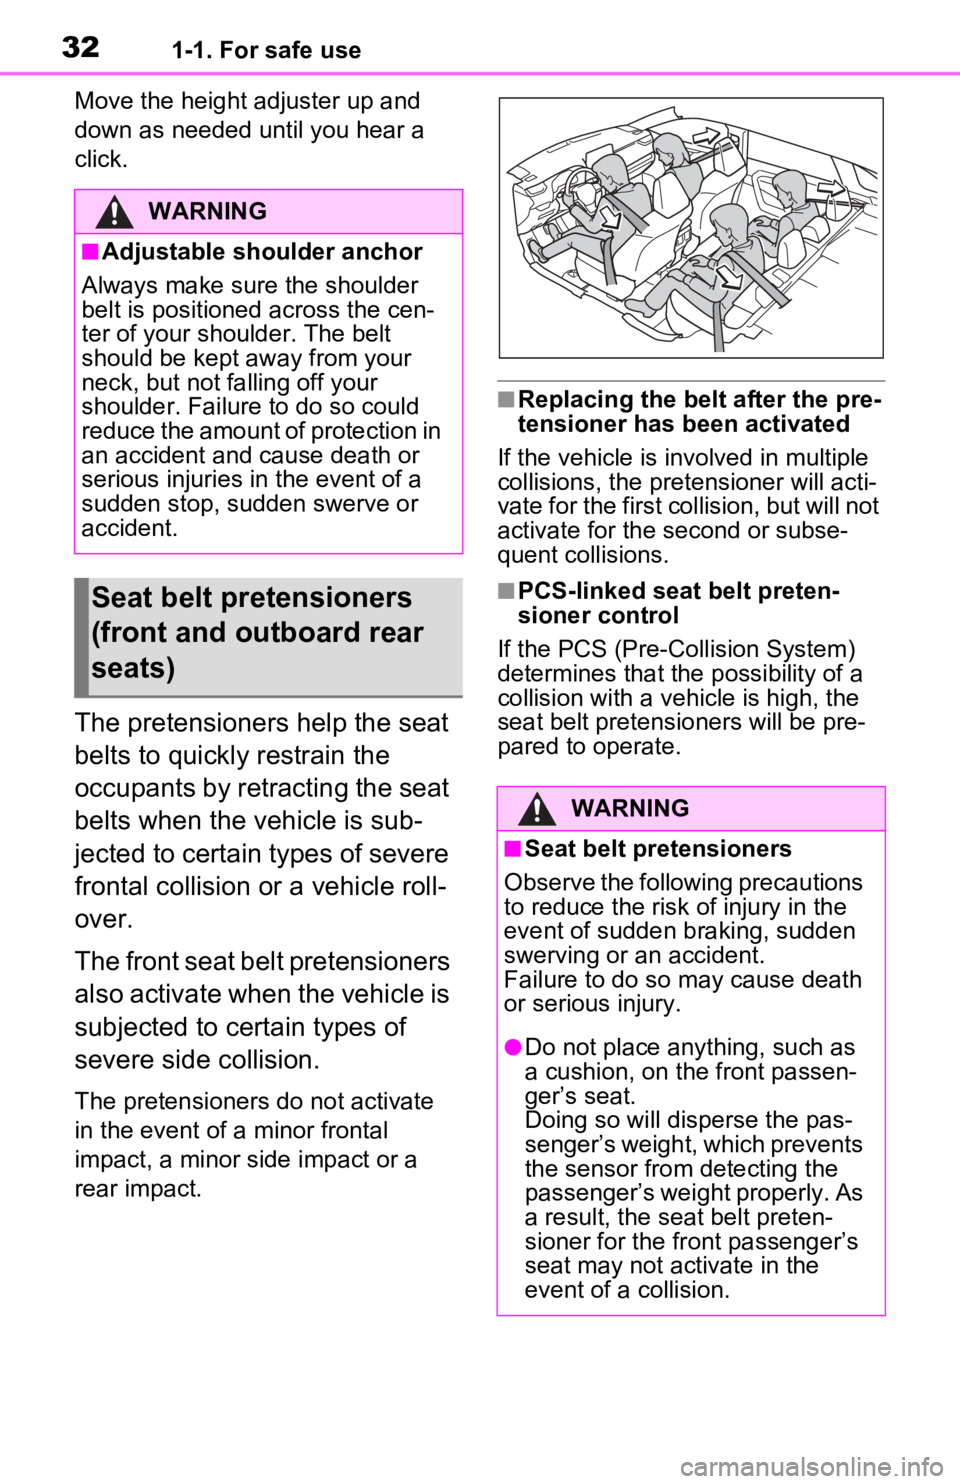
The pretensioners help the seat
belts to quickly restrain the
occupants by retracting the seat
belts when the vehicle is sub-
jected to certain types of severe
frontal collision or a vehicle roll-
over.
The front seat belt pretensioners
also activate when the vehicle is
subjected to certain types of
severe side collision.
The pretensioners do not activate
in the event of a minor frontal
impact, a minor side impact or a
rear impact.
■Replacing the belt after the pre-
tensioner has been activated
If the vehicle is involved in multiple
collisions, the pretensioner will acti-
vate for the first collision, but will not
activate for the second or subse-
quent collisions.
■PCS-linked seat belt preten-
sioner control
If the PCS (Pre-Collision System)
determines that the possibility of a
collision with a vehi cle is high, the
seat belt pretensioners will be pre-
pared to operate.
WARNING
■Adjustable shoulder anchor
Always make sure the shoulder
belt is positioned across the cen-
ter of your shoulder. The belt
should be kept away from your
neck, but not falling off your
shoulder. Failure to do so could
reduce the amount of protection in
an accident and cause death or
serious injuries in the event of a
sudden stop, sudden swerve or
accident.
Seat belt pretensioners
(front and outboard rear
seats)
WARNING
■Seat belt pretensioners
Observe the following precautions
to reduce the risk of injury in the
event of sudden braking, sudden
swerving or an accident.
Failure to do so may cause death
or serious injury.
●Do not place anything, such as
a cushion, on the front passen-
ger’s seat.
Doing so will disperse the pas-
senger’s weight, which prevents
the sensor from detecting the
passenger’s weight properly. As
a result, the seat belt preten-
sioner for the fr ont passenger’s
seat may not activate in the
event of a collision.
Page 90 of 616
902-1. Plug-in hybrid system
WARNING
●Carefully inspect the ground
under the vehicle. If you find
that liquid has leaked onto the
ground, the fuel system may
have been damaged. Leave the
vehicle as soon as possible.
■Hybrid battery (traction bat-
tery)
●Your vehicle contains a sealed
lithium-ion battery.
●Never resell, hand over or mod-
ify the hybrid battery. To prevent
accidents, hybrid batteries that
have been removed from a dis-
posed vehicle are collected
through Toyota dealer. Do not
dispose of the battery yourself.
Unless the battery is properly
collected, the following may
occur, resulting in death or seri-
ous injury:
• The hybrid battery may be ille- gally disposed of or dumped,
and it is hazardous to the envi-
ronment or someone may touch
a high voltage part, resulting in
an electric shock.
• The hybrid battery is intended to be used exclusively with your
hybrid vehicle. If the hybrid bat-
tery is used outside of your
vehicle or modifi ed in any way,
accidents such as electric
shock, heat generation, smoke
generation, an explosion and
electrolyte leakage may occur.
When reselling or handing over
your vehicle, the possibility of
an accident is extremely high
because the person receiving
the vehicle may not be aware of
these dangers.
●If your vehicle is disposed of
without the hybrid battery hav-
ing been removed, there is a
danger of serious electric shock
if high voltage parts, cables and
their connectors are touched. In
the event that your vehicle must
be disposed of, the hybrid bat-
tery must be disposed of by
your Toyota dealer or a qualified
service shop. If the hybrid bat-
tery is not disposed of properly,
it may cause electric shock that
can result in dea th or serious
injury.
■Caution while driving
If the vehicle under floor area
receives strong shock or impact
while driving, stop the vehicle in a
safe area and check around the
bottom of the vehicle. If there is
damage to the hybrid battery
(traction battery) or liquid leakage,
it may lead to a vehicle fire, etc.
Do not touch the vehicle and
immediately contact your Toyota
dealer.
■Modifications
Do not modify the vehicle to make
the height lower.
It is easier for the hybrid battery
(traction battery) in the under floor
area to come in contact with the
ground when the vehicle is low-
ered. If the hybrid battery (traction
battery) is damaged, a vehicle fire
may occur which could lead to
death or serious injury.
Page 224 of 616
2244-3. Adjusting the seats
4-3.Adjusting the seats
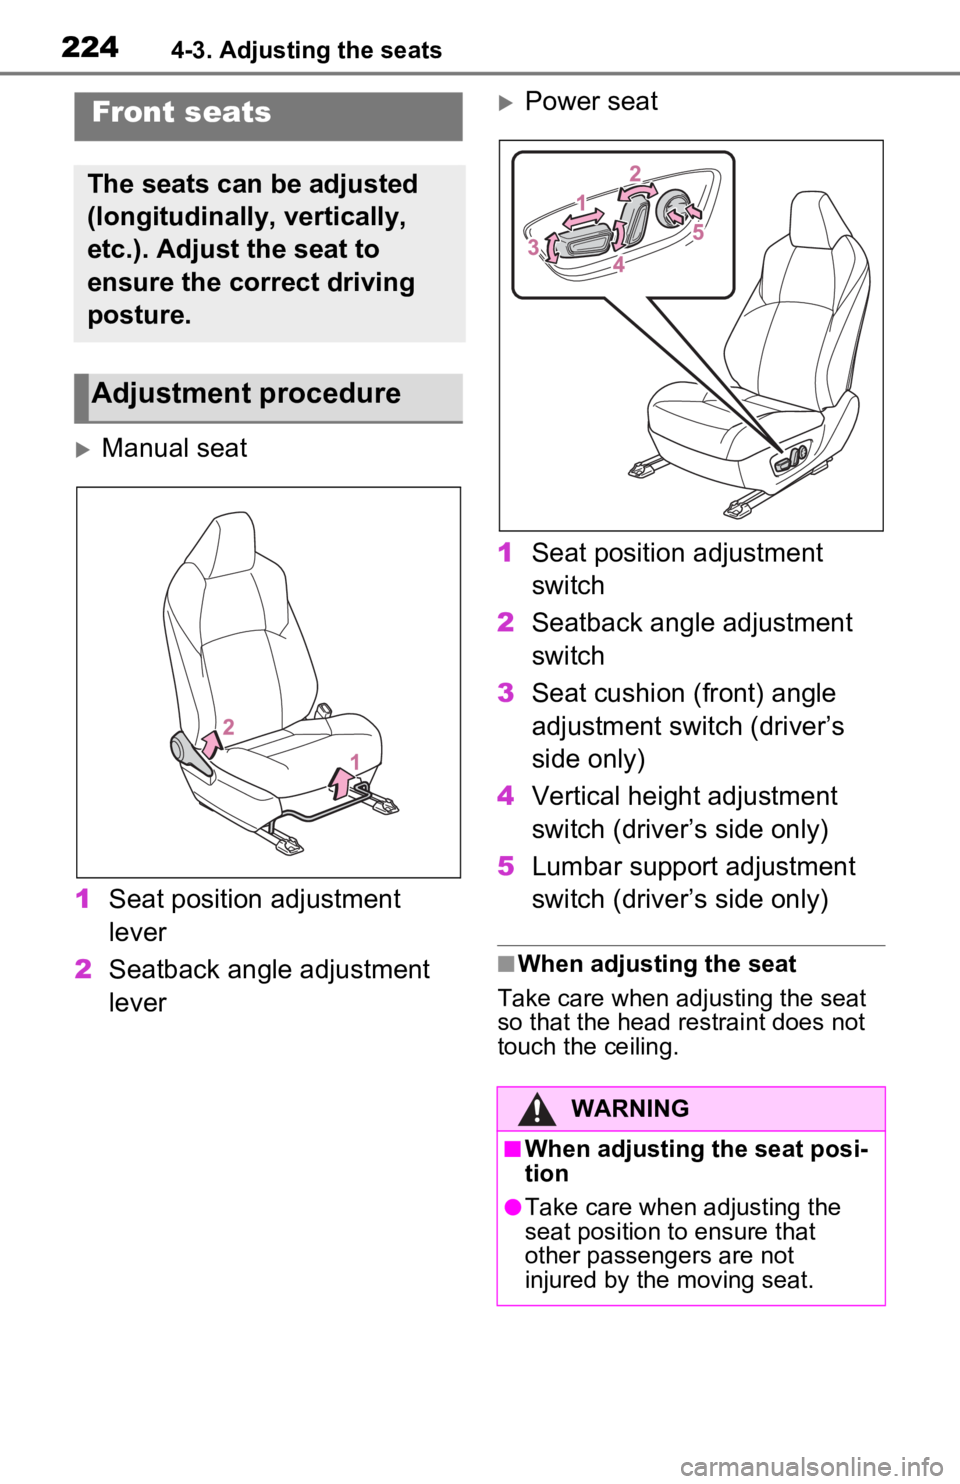
Manual seat
1 Seat position adjustment
lever
2 Seatback angle adjustment
lever
Power seat
1 Seat position adjustment
switch
2 Seatback angle adjustment
switch
3 Seat cushion (front) angle
adjustment switch (driver’s
side only)
4 Vertical height adjustment
switch (driver’s side only)
5 Lumbar support adjustment
switch (driver’s side only)
■When adjusting the seat
Take care when adjusting the seat
so that the head restraint does not
touch the ceiling.
Front seats
The seats can be adjusted
(longitudinally, vertically,
etc.). Adjust the seat to
ensure the correct driving
posture.
Adjustment procedure
WARNING
■When adjusting the seat posi-
tion
●Take care when adjusting the
seat position to ensure that
other passengers are not
injured by the moving seat.
Page 230 of 616
2304-3. Adjusting the seats
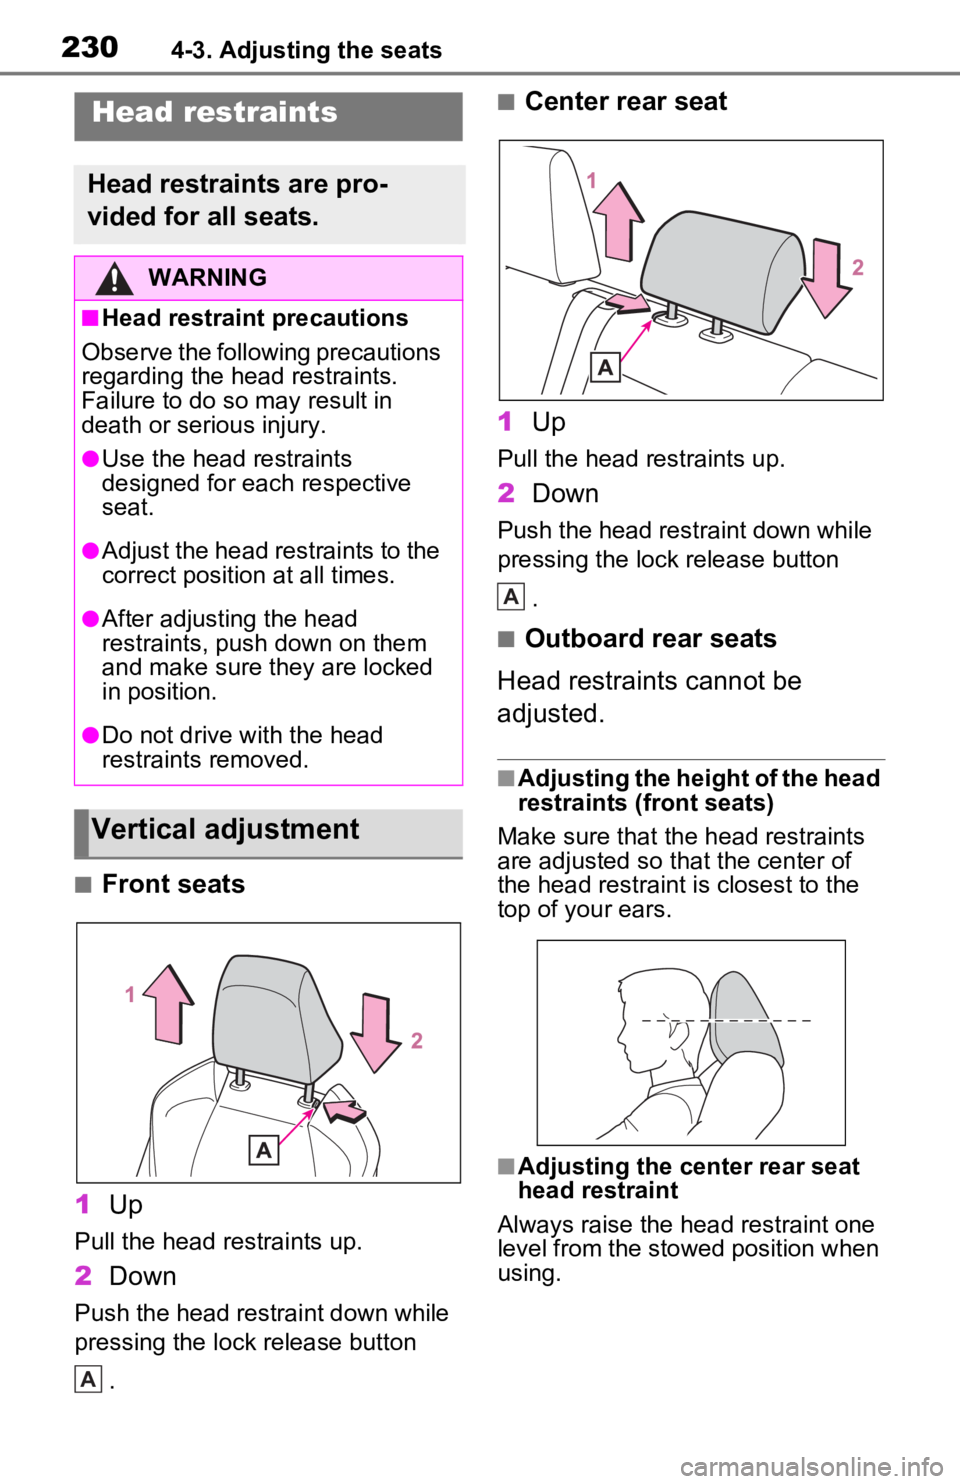
■Front seats
1 Up
Pull the head restraints up.
2Down
Push the head restraint down while
pressing the lock release button
.
■Center rear seat
1 Up
Pull the head restraints up.
2Down
Push the head restraint down while
pressing the lock release button
.
■Outboard rear seats
Head restraints cannot be
adjusted.
■Adjusting the height of the head
restraints (front seats)
Make sure that the head restraints
are adjusted so that the center of
the head restraint i s closest to the
top of your ears.
■Adjusting the center rear seat
head restraint
Always raise the head restraint one
level from the stowed position when
using.
Head restraints
Head restraints are pro-
vided for all seats.
WARNING
■Head restraint precautions
Observe the following precautions
regarding the head restraints.
Failure to do so m ay result in
death or serious injury.
●Use the head restraints
designed for each respective
seat.
●Adjust the head restraints to the
correct position at all times.
●After adjusting the head
restraints, push down on them
and make sure they are locked
in position.
●Do not drive with the head
restraints removed.
Vertical adjustment
A
A
Page 231 of 616
2314-3. Adjusting the seats
4
Before driving
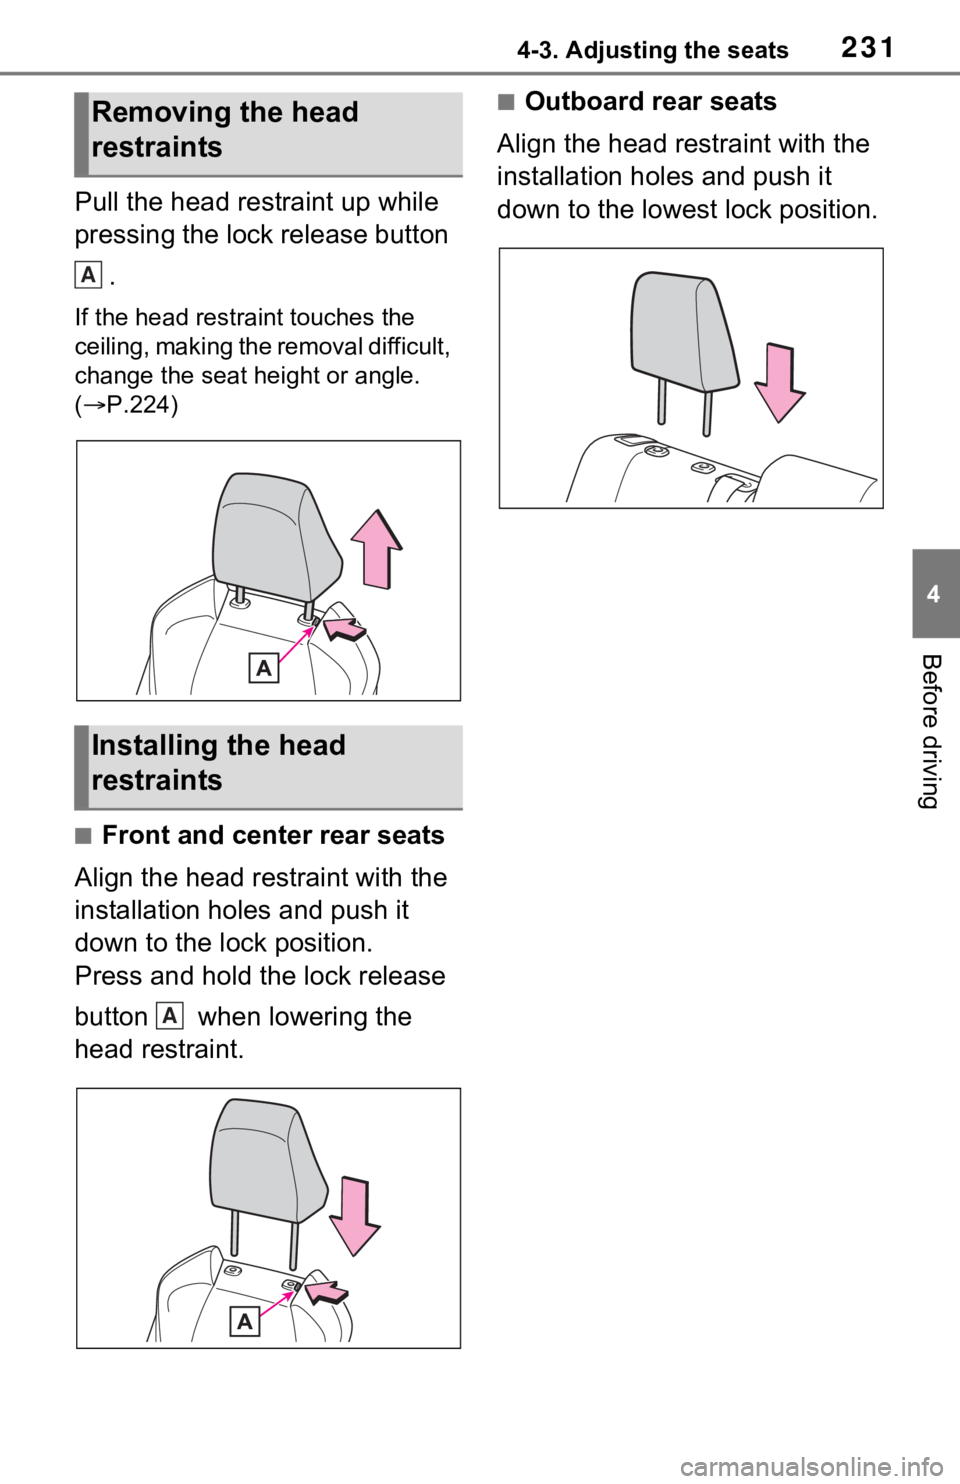
Pull the head restraint up while
pressing the lock release button .
If the head restraint touches the
ceiling, making the removal difficult,
change the seat height or angle.
( P.224)
■Front and center rear seats
Align the head restraint with the
installation holes and push it
down to the lock position.
Press and hold the lock release
button when lowering the
head restraint.
■Outboard rear seats
Align the head restraint with the
installation holes and push it
down to the lowest lock position.Removing the head
restraints
Installing the head
restraints
A
A
Page 233 of 616
2334-4. Adjusting the steering wheel and mirrors
4
Before driving
*: If equipped
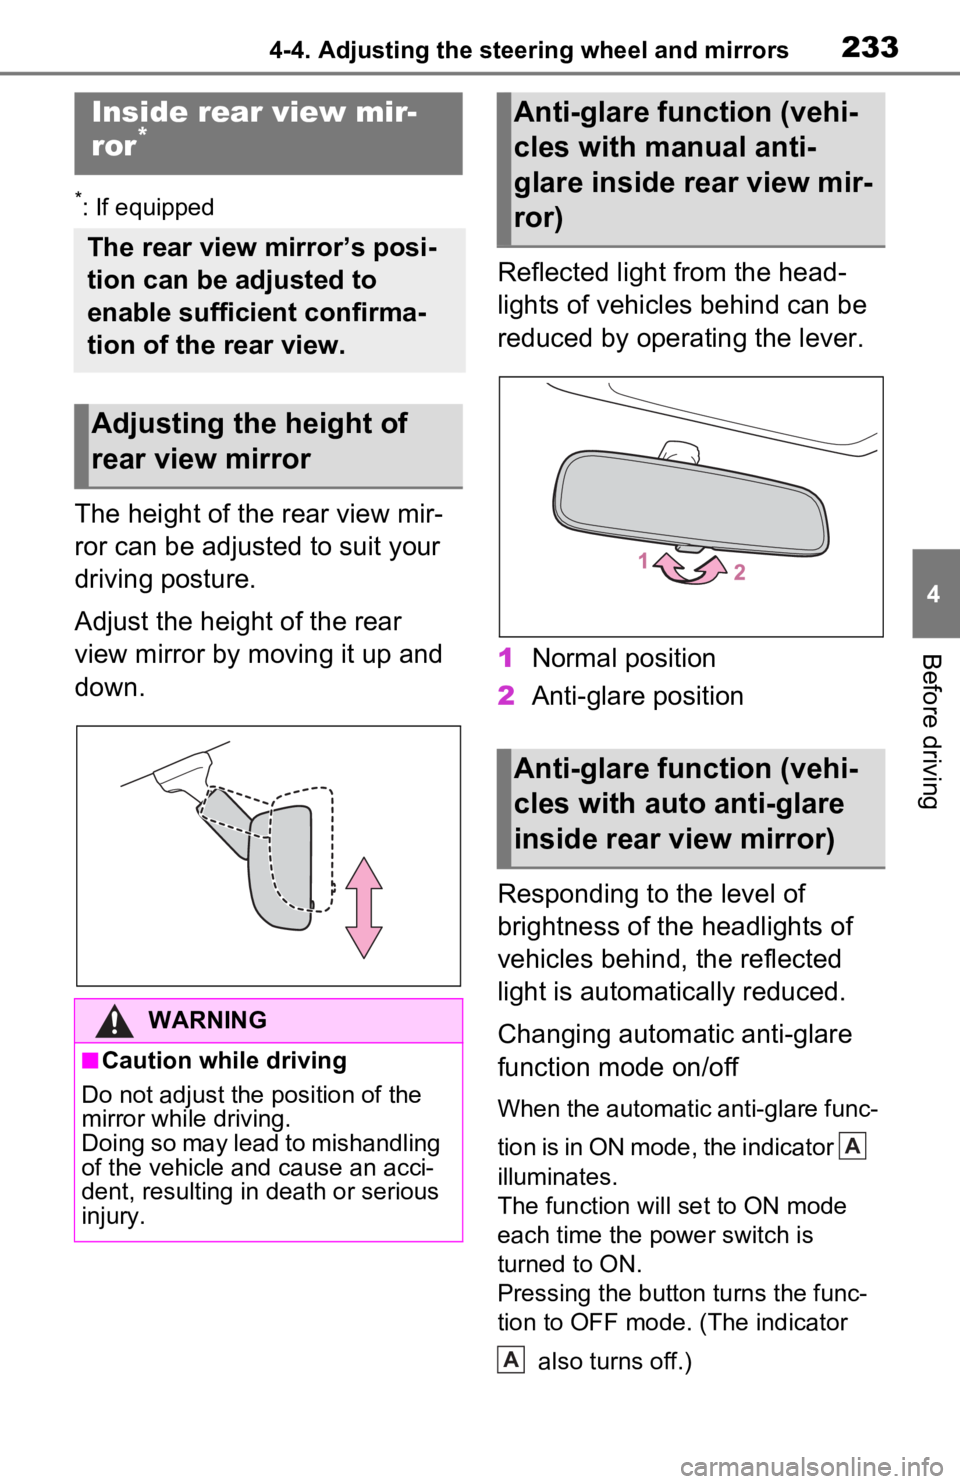
The height of the rear view mir-
ror can be adjusted to suit your
driving posture.
Adjust the height of the rear
view mirror by moving it up and
down.Reflected light from the head-
lights of vehicles behind can be
reduced by operating the lever.
1
Normal position
2 Anti-glare position
Responding to the level of
brightness of the headlights of
vehicles behind, the reflected
light is automatically reduced.
Changing automatic anti-glare
function mode on/off
When the automatic anti-glare func-
tion is in ON mode, the indicator
illuminates.
The function will set to ON mode
each time the power switch is
turned to ON.
Pressing the button turns the func-
tion to OFF mode. (The indicator also turns off.)
Inside rear view mir-
ror*
The rear view mirror’s posi-
tion can be adjusted to
enable sufficient confirma-
tion of the rear view.
Adjusting the height of
rear view mirror
WARNING
■Caution while driving
Do not adjust the position of the
mirror while driving.
Doing so may lead to mishandling
of the vehicle and cause an acci-
dent, resulting in death or serious
injury.
Anti-glare function (vehi-
cles with manual anti-
glare inside rear view mir-
ror)
Anti-glare function (vehi-
cles with auto anti-glare
inside rear view mirror)
A
A
Page 236 of 616
2364-4. Adjusting the steering wheel and mirrors
driving, make sure the back door
is closed.
●If the display is difficult to see due
to reflected light, close the sun-
shade for the moon roof (if
equipped) or the electronic sun-
shade for the panoramic moon
roof (if equipped).
●Any of the following conditions
may occur when driving in the
dark, such as at night. None of
them indicates that a malfunction
has occurred.
• Colors of objects in the displayed
image may differ from their actual
color.
• Depending on the height of the
lights of the vehicle behind, the
area around the vehicle may
appear white and blurry.
• Automatic image adjustment for
brighter surrounding image may
cause flickering.
If it is difficult to see the displayed
image or flickering bothers you,
change to optical mirror mode.
●The Digital Rear-view Mirror may
become hot while it is in digital
mirror mode.
This is not a malfunction.
●Depending on your physical con-
dition or age, it may take longer
than usual to focus on the dis-
played image. In this case,
change to optical mirror mode.
●Do not let passengers stare at the
displayed image when the vehicle
is being driven, as doing so may
cause motion sickness.
■When the system malfunctions
If the symbol show n in the illustra-
tion is displayed when using the
Digital Rear-view Mirror in digital
mirror mode, the system may be
malfunctioning. Th e symbol will dis-
appear in a few seconds. Operate
the lever, change to optical mirror
mode and have the vehicle
inspected by your Toyota dealer.
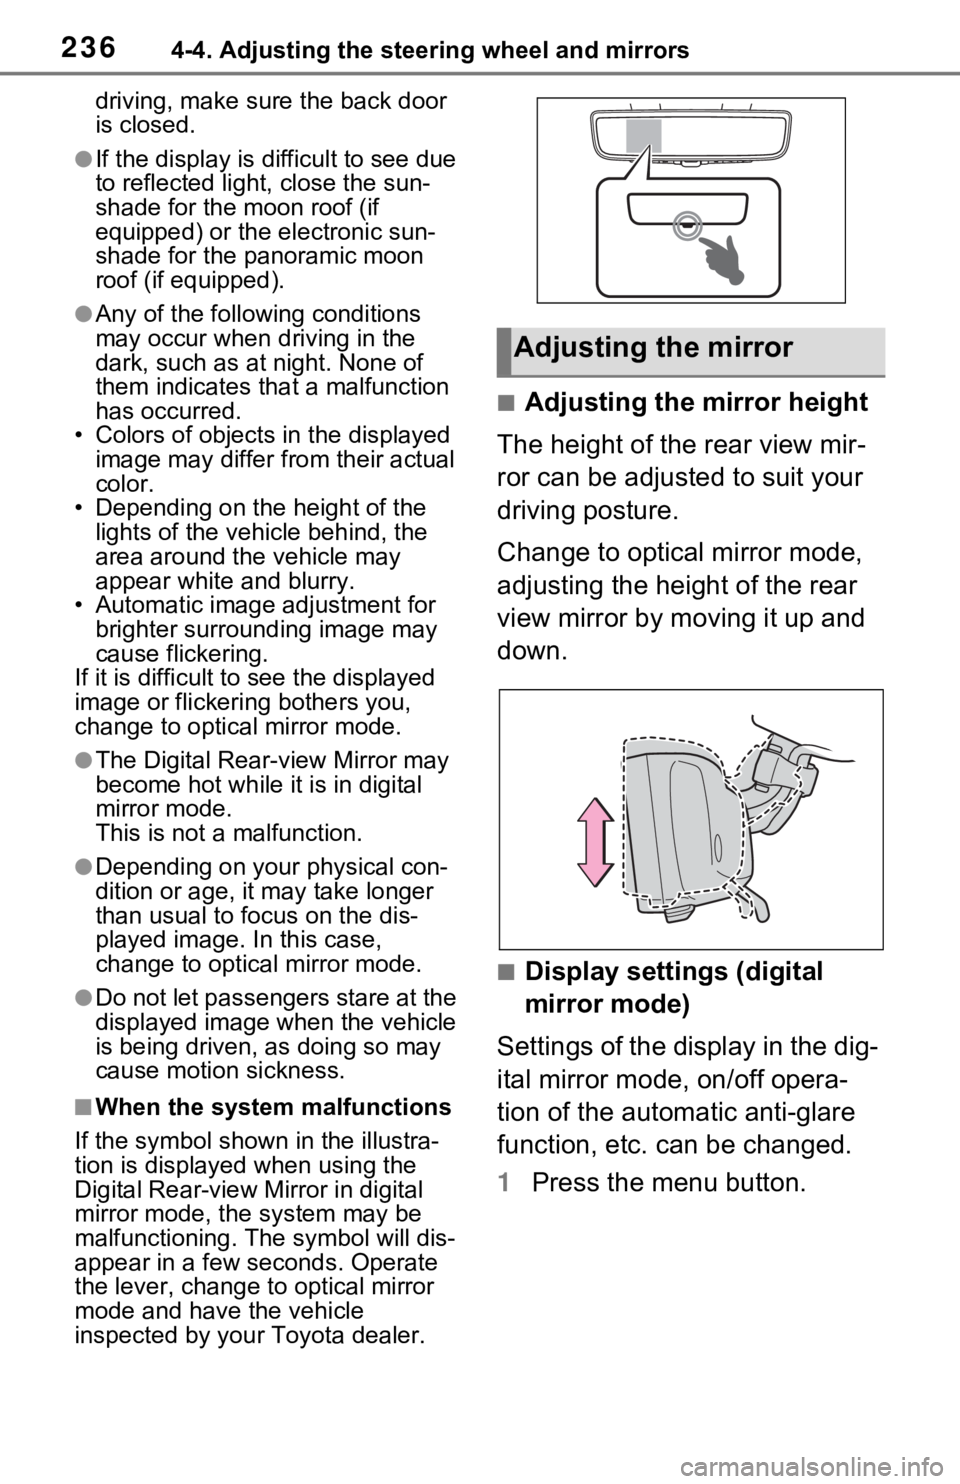
■Adjusting the mirror height
The height of the rear view mir-
ror can be adjusted to suit your
driving posture.
Change to optical mirror mode,
adjusting the height of the rear
view mirror by moving it up and
down.
■Display settings (digital
mirror mode)
Settings of the display in the dig-
ital mirror mode, on/off opera-
tion of the automatic anti-glare
function, etc. can be changed.
1 Press the menu button.
Adjusting the mirror
Page 269 of 616
2695-1. Before driving
5
Driving
■Before towing
Check that the fo llowing conditions
are met:
●Ensure that your vehicle’s tires
are properly inflated. ( P.555)
●Trailer tires are inflated according
to the trailer manufacturer’s rec-
ommendation.
●All trailer lights work as required
by law.
●All lights work each time you con-
nect them.
●The trailer ball is set at the proper
height for the coupler on the
trailer.
●The trailer is level when it is
hitched.
Do not drive if th e trailer is not
level, and check for improper
tongue weight, overloading, worn
suspension, or other possible
causes.
●The trailer cargo is securely
loaded.
●The rear view mirr ors conform to
all applicable fede ral, state/provin-
cial or local regulations. If they do
not, install rear view mirrors
appropriate for towing purposes.
Trailer towing
Your vehicle is designed
primarily as a passenger-
and-load-carrying vehicle.
Towing a trailer can have an
adverse impact on handling,
performance, braking, dura-
bility, and fuel consump-
tion. For your safety and the
safety of others, you must
not overload your vehicle or
trailer. You must also
ensure that you are using
appropriate towing equip-
ment, that the towing equip-
ment has been installed
correctly and used properly,
and that you employ the
requisite driving habits.
Vehicle-trailer stability and
braking performance are
affected by trailer stability,
brake performance and set-
ting, trailer brakes, the hitch
and hitch systems (if
equipped).
To tow a trailer safely, use
extreme care and drive the
vehicle in accordance with
your trailer’s characteris-
tics and operating condi-
tions.
Toyota warranties do not
apply to damage or mal-
function caused by towing a
trailer for commercial pur-
poses.
Contact your Toyota dealer for
further information about addi-
tional requirements such as a
towing kit, etc.
Page 274 of 616
2745-1. Before driving
by the hitch manufacturer.
Lubricate the hitch ball with a
light coating of grease.
Remove the hitch ball when-
ever you are not towing a
trailer. Remove the trailer
hitch if you do not need it.
After removing the hitch, seal
any mounting holes in the
vehicle body to prevent entry
of any substances into the
vehicle.
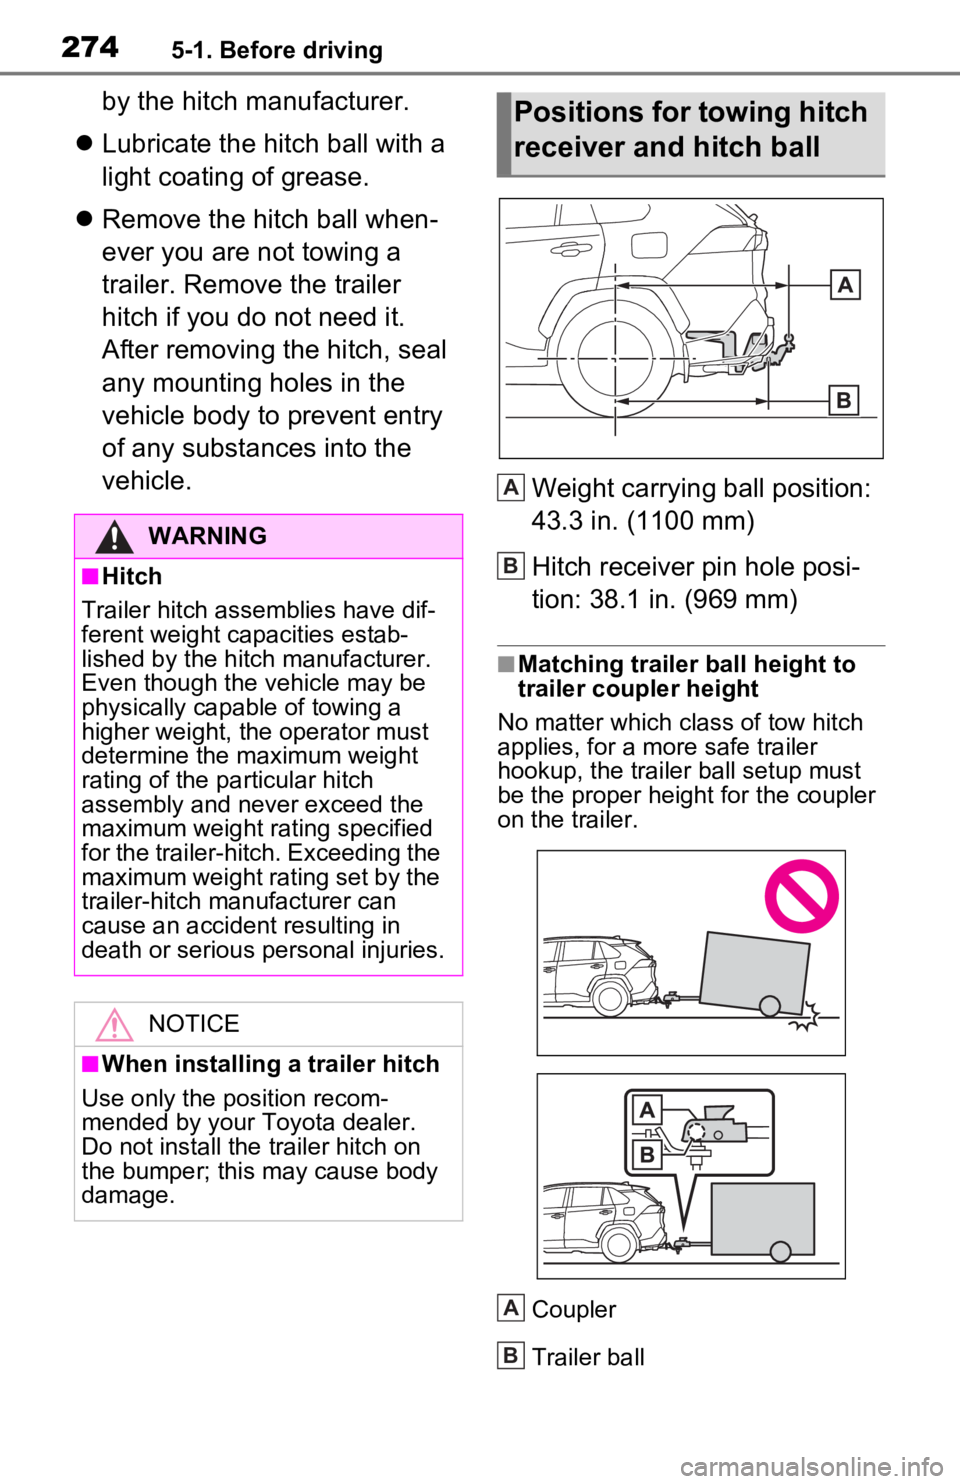
Weight carrying ball position:
43.3 in. (1100 mm)
Hitch receiver pin hole posi-
tion: 38.1 in. (969 mm)
■Matching trailer ball height to
trailer coupler height
No matter wh ich class of tow hitch
applies, for a more safe trailer
hookup, the trailer ball setup must
be the proper height for the coupler
on the trailer.
Coupler
Trailer ball
WARNING
■Hitch
Trailer hitch assemblies have dif-
ferent weight capacities estab-
lished by the hitch manufacturer.
Even though the vehicle may be
physically capable of towing a
higher weight, the operator must
determine the maximum weight
rating of the pa rticular hitch
assembly and never exceed the
maximum weight rating specified
for the trailer-hitch. Exceeding the
maximum weight rating set by the
trailer-hitch manufacturer can
cause an accident resulting in
death or serious personal injuries.
NOTICE
■When installing a trailer hitch
Use only the position recom-
mended by your Toyota dealer.
Do not install the trailer hitch on
the bumper; this may cause body
damage.
Positions for towing hitch
receiver and hitch ball
A
B
A
B