warning TOYOTA RAV4 PRIME 2021 Owners Manual
[x] Cancel search | Manufacturer: TOYOTA, Model Year: 2021, Model line: RAV4 PRIME, Model: TOYOTA RAV4 PRIME 2021Pages: 618, PDF Size: 24.18 MB
Page 525 of 618
5258-2. Steps to take in an emergency
8
When trouble arises
recharge the 12-volt battery.
■If “Engine Oil Level Low Add or
Replace” is displayed
The engine oil level may be low.
Check the level of the engine oil,
and add engine oil if necessary.
This message may be displayed if
the vehicle is sto pped on a slope.
Move the vehicle to a level surface
and check if the message disap-
pears.
■If “Maintenance Required
Soon” is shown
Indicates that all maintenance
according to the dr iven distance on
the maintenance schedule
* should
be performed soon.
Comes on approximately 4500
miles (7200 km) after the message
has been reset.
If necessary, perf orm maintenance.
Please reset the message after the
maintenance is performed.
( P.451)
*: Refer to the separate “Scheduled
Maintenance Guide” or “Owner’
Manual Supplement” for the main-
tenance interval applicable to your
vehicle.
■If “Maintenance Required Visit
Your Dealer” is shown
Indicates that all maintenance is
required to correspond to the driven
distance on the maintenance sched-
ule
*.
Comes on approximately 5000
miles (8000 km) after the message
has been reset. (The indicator will
not work properly unless the mes-
sage has been reset.)
Perform the necessary mainte-
nance. Please reset the message
after the maintenance is performed.
( P.451)
*: Refer to the separate “Scheduled
Maintenance Guide” or “Owner’
Manual Supplement” for the main- tenance interval applicable to your
vehicle.
■If a message that indicates the
malfunction of front camera is
displayed
The following systems may be sus-
pended until the problem shown in
the message is resolved. (P.313,
511)
●PCS (Pre-Collision System)
●LTA (Lane Tracing Assist)
●Automatic High Beam
●RSA (Road Sign Assist)*
●Dynamic radar cruise control with
full-speed range
*: If equipped
■If “Radar Cruise Control
Unavailable See Owner’s Man-
ual” is shown
The dynamic radar cruise control
with full-speed range system is sus-
pended temporarily or until the prob-
lem shown in the message is
resolved. (causes and coping meth-
ods: P.313)
■If “Radar Cruise Control
Unavailable” is shown
The dynamic radar cruise control
with full-speed range system cannot
be used temporarily. Use the sys-
tem when it becomes available
again.
■Warning buzzer
P.519
WARNING
■If a warning light comes on or
a warning buzzer sounds
when a warning message is
shown on the multi-informa-
tion display
P.521
Page 527 of 618

5278-2. Steps to take in an emergency
8
When trouble arises
Stop the vehicle in a safe place on a hard, flat surface.
Set the parking brake.
Shift the shift lever to P.
Stop the hybrid system.
Turn on the emergency flashers. ( P.504)
For vehicles with power back door: Turn off the power back door
system. ( P.216)
If you have a flat tire
Your vehicle is equipped with a spare tire. The flat tire can b e
replaced with the spare tire.
For details about tires: P.468
WARNING
■If you have a flat tire
Do not continue driv ing with a flat tire.
Driving even a short distance with a flat tire can damage the t ire and the
wheel beyond repair, which could result in an accident.
Before jacking up the vehicle
Page 529 of 618
5298-2. Steps to take in an emergency
8
When trouble arises
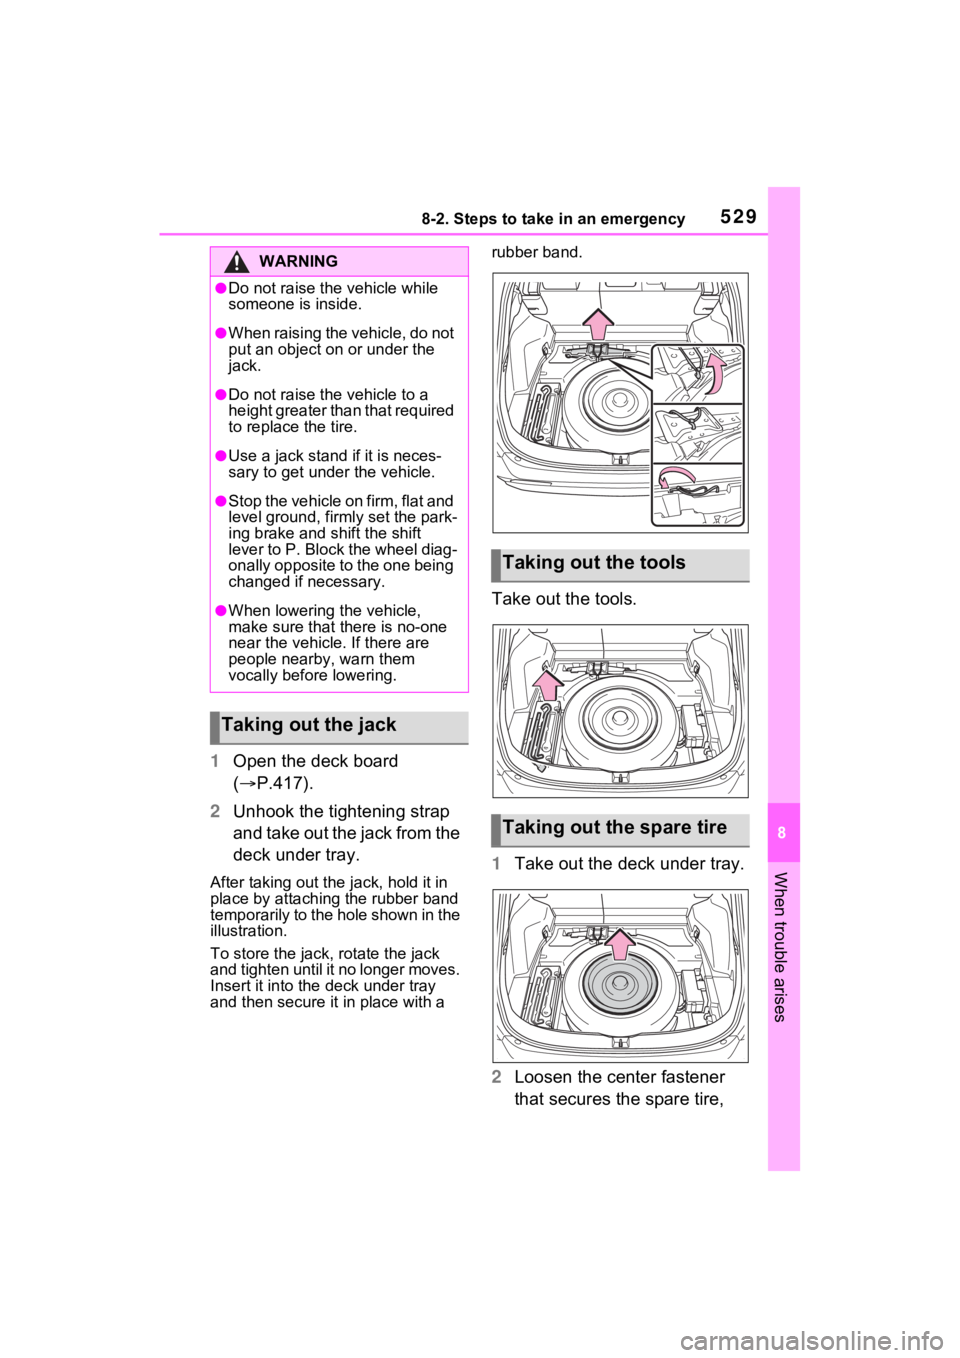
1Open the deck board
( P.417).
2 Unhook the tightening strap
and take out the jack from the
deck under tray.
After taking out the jack, hold it in
place by attaching the rubber band
temporarily to the hole shown in the
illustration.
To store the jack, rotate the jack
and tighten until it no longer moves.
Insert it into the deck under tray
and then secure it in place with a rubber band.
Take out the tools.
1
Take out the deck under tray.
2 Loosen the center fastener
that secures the spare tire,
WARNING
●Do not raise the vehicle while
someone is inside.
●When raising the vehicle, do not
put an object on or under the
jack.
●Do not raise the vehicle to a
height greater than that required
to replace the tire.
●Use a jack stand if it is neces-
sary to get under the vehicle.
●Stop the vehicle on firm, flat and
level ground, firm ly set the park-
ing brake and shift the shift
lever to P. Block the wheel diag-
onally opposite to the one being
changed if necessary.
●When lowering the vehicle,
make sure that there is no-one
near the vehicle. If there are
people nearby, warn them
vocally before lowering.
Taking out the jack
Taking out the tools
Taking out the spare tire
Page 530 of 618
5308-2. Steps to take in an emergency
and then take out the spare
tire.
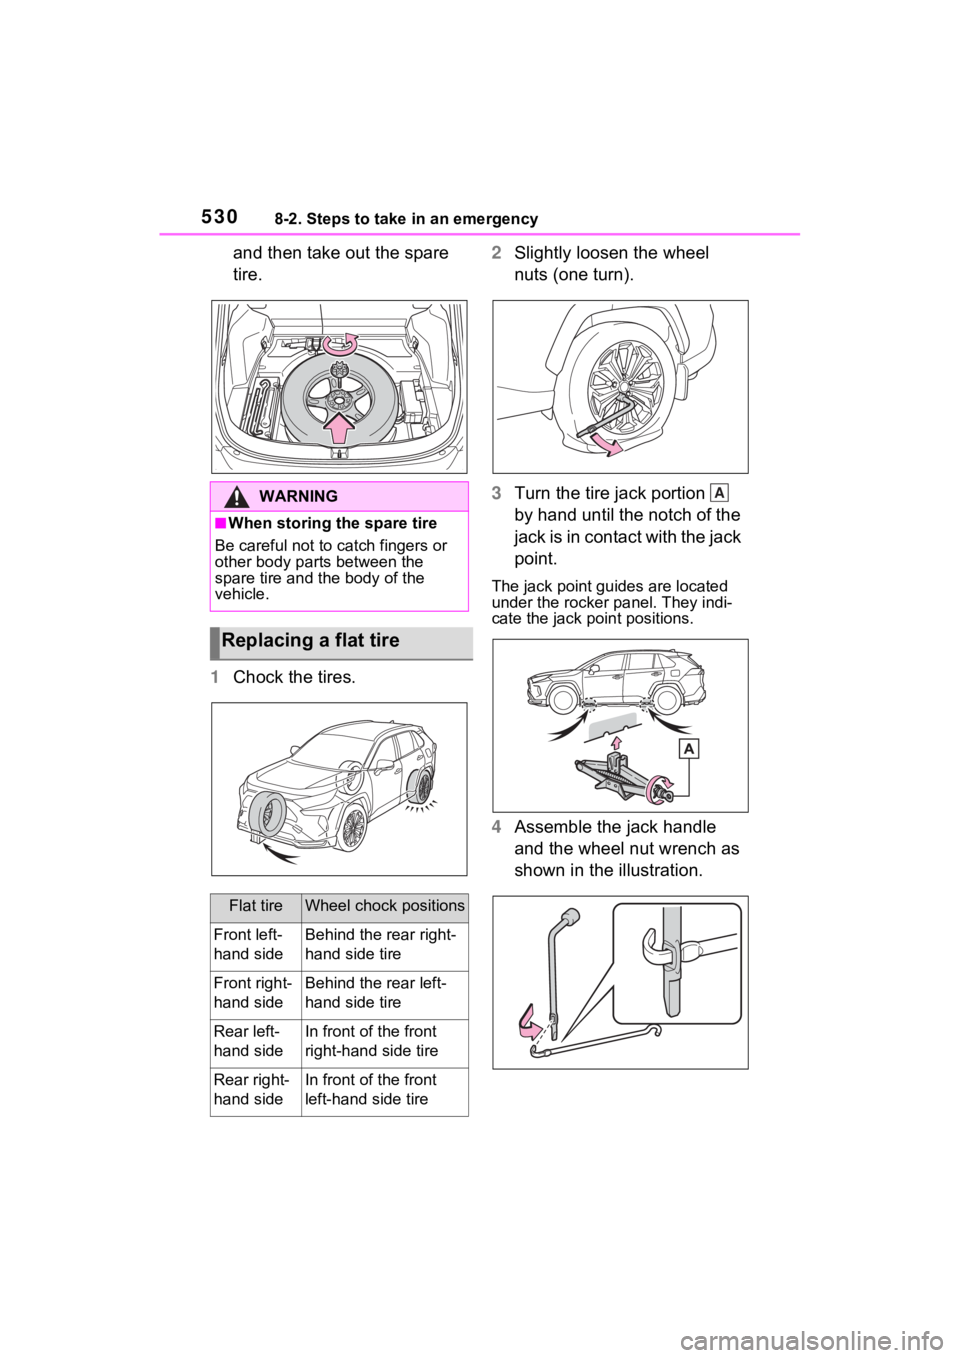
1 Chock the tires. 2
Slightly loosen the wheel
nuts (one turn).
3 Turn the tire jack portion
by hand until the notch of the
jack is in contact with the jack
point.
The jack point guides are located
under the rocker panel. They indi-
cate the jack po int positions.
4Assemble the jack handle
and the wheel nut wrench as
shown in the illustration.
WARNING
■When storing the spare tire
Be careful not to catch fingers or
other body parts between the
spare tire and the body of the
vehicle.
Replacing a flat tire
Flat tireWheel chock positions
Front left-
hand sideBehind the rear right-
hand side tire
Front right-
hand sideBehind the rear left-
hand side tire
Rear left-
hand sideIn front of the front
right-hand side tire
Rear right-
hand sideIn front of the front
left-hand side tire
A
Page 531 of 618
5318-2. Steps to take in an emergency
8
When trouble arises
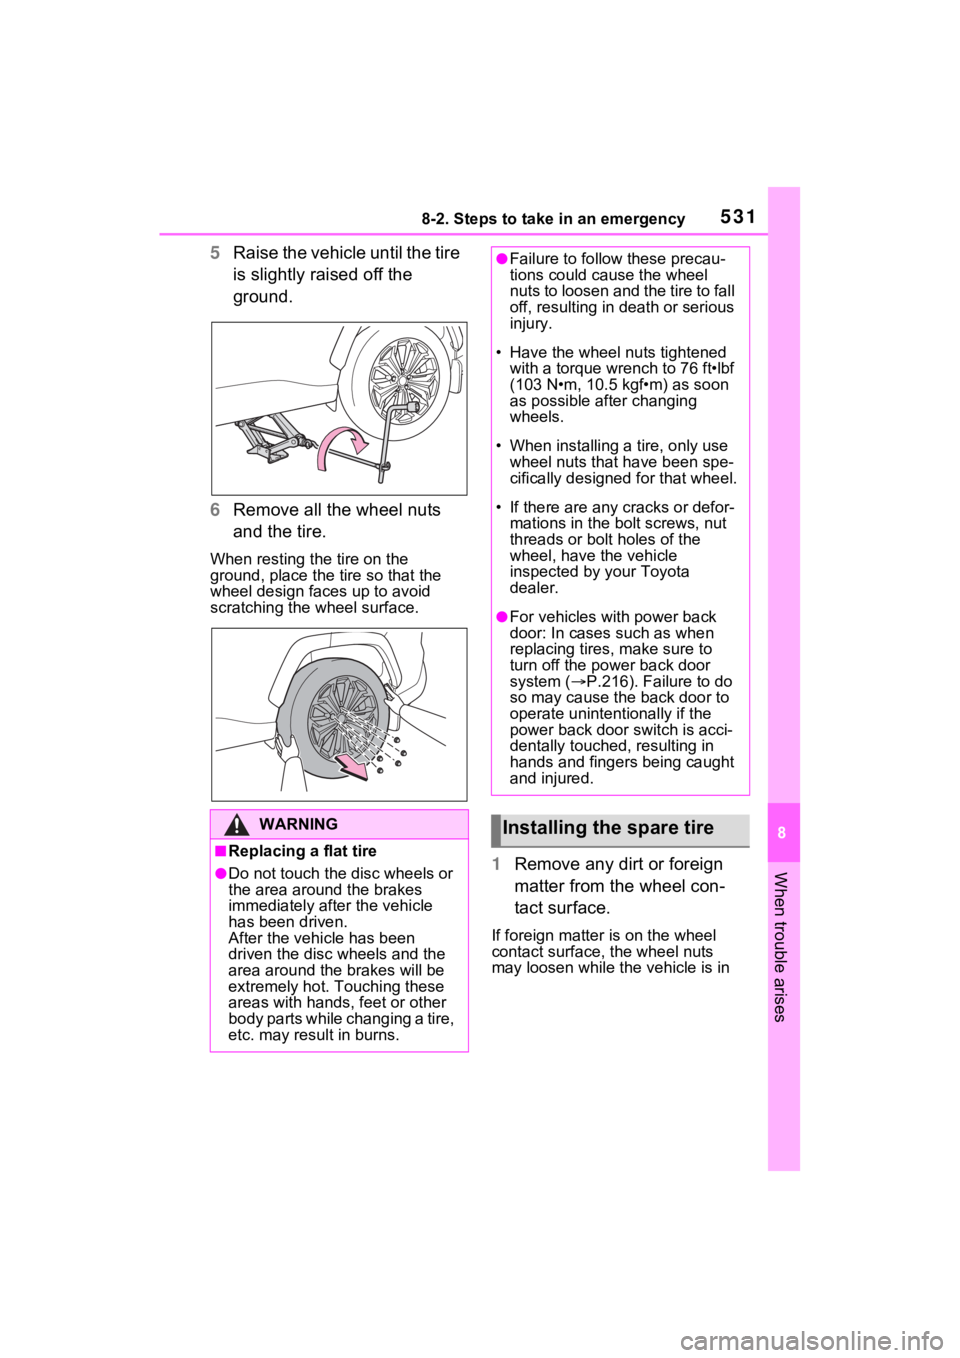
5Raise the vehicle until the tire
is slightly raised off the
ground.
6 Remove all the wheel nuts
and the tire.
When resting the tire on the
ground, place the tire so that the
wheel design faces up to avoid
scratching the wheel surface.
1 Remove any dirt or foreign
matter from the wheel con-
tact surface.
If foreign matter is on the wheel
contact surface, the wheel nuts
may loosen while the vehicle is in
WARNING
■Replacing a flat tire
●Do not touch the disc wheels or
the area around the brakes
immediately after the vehicle
has been driven.
After the vehicle has been
driven the disc wheels and the
area around the brakes will be
extremely hot. Touching these
areas with hands , feet or other
body parts while changing a tire,
etc. may result in burns.
●Failure to follow these precau-
tions could cause the wheel
nuts to loosen and the tire to fall
off, resulting in death or serious
injury.
• Have the wheel nuts tightened
with a torque wrench to 76 ft•lbf
(103 N•m, 10.5 kgf•m) as soon
as possible after changing
wheels.
• When installing a tire, only use wheel nuts that have been spe-
cifically designed for that wheel.
• If there are any cracks or defor- mations in the bolt screws, nut
threads or bolt holes of the
wheel, have the vehicle
inspected by your Toyota
dealer.
●For vehicles with power back
door: In cases such as when
replacing tires, make sure to
turn off the po wer back door
system ( P.216). Failure to do
so may cause the back door to
operate unintentionally if the
power back door switch is acci-
dentally touched, resulting in
hands and fingers being caught
and injured.
Installing the spare tire
Page 532 of 618
5328-2. Steps to take in an emergency
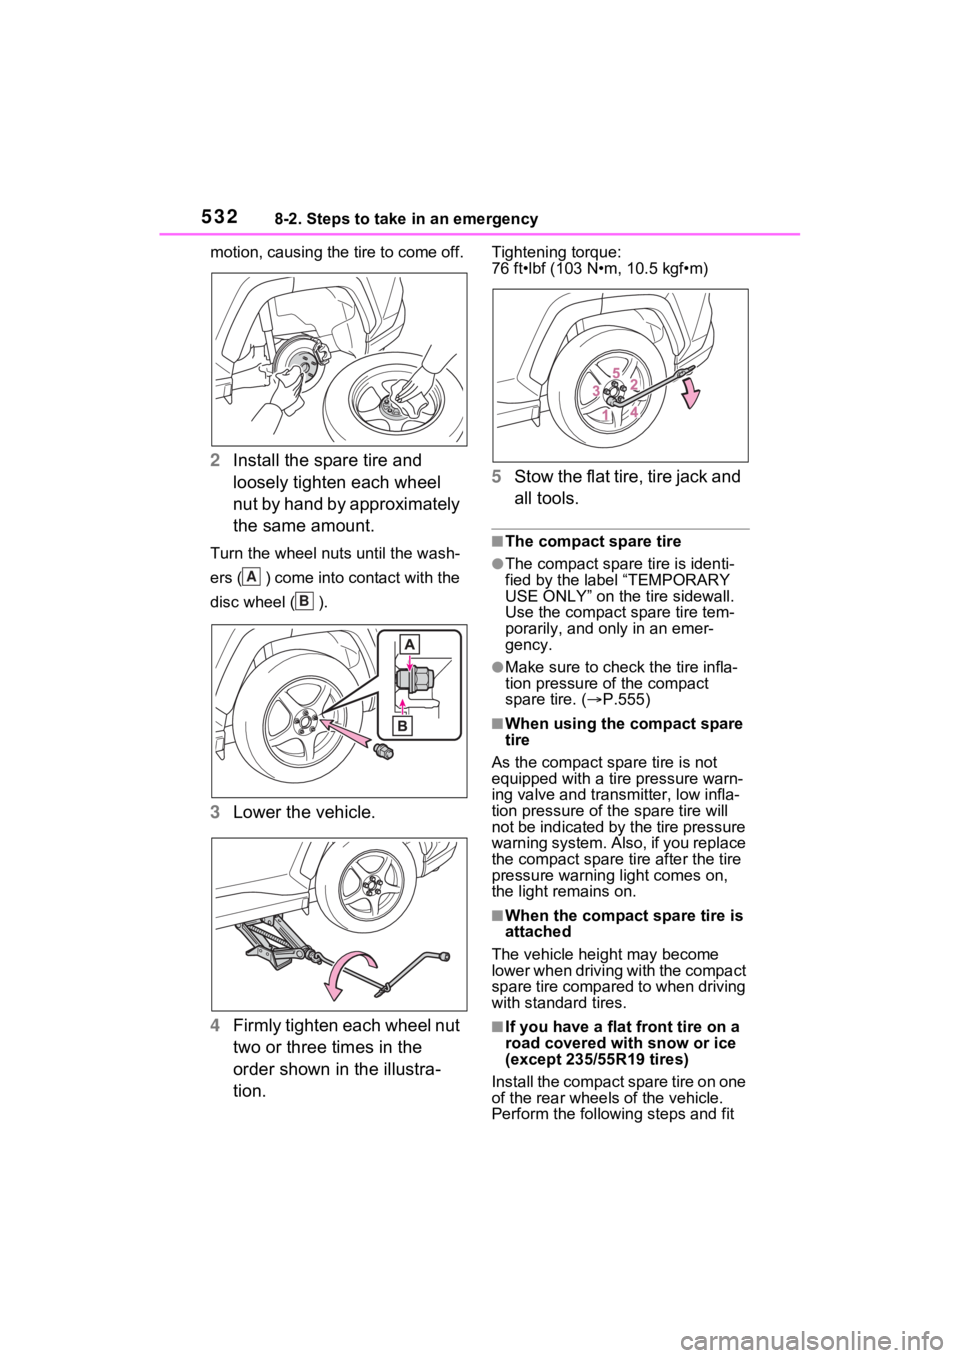
motion, causing the tire to come off.
2Install the spare tire and
loosely tighten each wheel
nut by hand by approximately
the same amount.
Turn the wheel nuts until the wash-
ers ( ) come into contact with the
disc wheel ( ).
3Lower the vehicle.
4 Firmly tighten each wheel nut
two or three times in the
order shown in the illustra-
tion.
Tightening torque:
76 ft•lbf (103 N•m, 10.5 kgf•m)
5Stow the flat tire, tire jack and
all tools.
■The compact spare tire
●The compact spare tire is identi-
fied by the label “TEMPORARY
USE ONLY” on the tire sidewall.
Use the compact spare tire tem-
porarily, and only in an emer-
gency.
●Make sure to check the tire infla-
tion pressure of the compact
spare tire. ( P.555)
■When using the compact spare
tire
As the compact spare tire is not
equipped with a tire pressure warn-
ing valve and transm itter, low infla-
tion pressure of t he spare tire will
not be indicated by the tire pressure
warning system. Also , if you replace
the compact spare ti re after the tire
pressure warning light comes on,
the light remains on.
■When the compact spare tire is
attached
The vehicle height may become
lower when driving with the compact
spare tire compared to when driving
with standard tires.
■If you have a flat front tire on a
road covered wit h snow or ice
(except 235/55R19 tires)
Install the compact spare tire on one
of the rear wheels of the vehicle.
Perform the following steps and fit
A
B
Page 533 of 618
5338-2. Steps to take in an emergency
8
When trouble arises
tire chains to the front tires:
1Replace a rear tire with the com-
pact spare tire.
2 Replace the flat front tire with the
tire removed from the rear of the
vehicle.
3 Fit tire chains to the front tires.
WARNING
■When using the compact
spare tire
●Remember that the compact
spare tire provided is specifi-
cally designed for use with your
vehicle. Do not use your com-
pact spare tire on another vehi-
cle.
●Do not use more than one com-
pact spare tire simultaneously.
●Replace the compact spare tire
with a standard tire as soon as
possible.
●Avoid sudden acceleration,
abrupt steering, sudden brak-
ing and shifting operations that
cause sudden engine braking.
■When the compact spare tire
is attached
The vehicle speed may not be
correctly detecte d, and the follow-
ing systems may not operate cor-
rectly:
• ABS & Brake assist
• VSC/Trailer Sway Control
•TRAC
• Dynamic radar cruise control with full-speed range
• PCS (Pre-Collision System)
•EPS
• LTA (Lane Tracing Assist)
• Tire pressure warning system
• AHB (Automatic High Beam)
• AFS (Adaptive Front-lighting System) (if equipped)
• BSM (Blind Spot Monitor)
• Rear view monitor system (if equipped)
• Panoramic view monitor (if equipped)
• Toyota parking assist monitor (if equipped)
• Intuitive parking assist (if equipped)
• PKSB (Parking Support Brake) (if equipped)
• Navigation system (if equipped)
Also, not only c an the following
system not be utilized fully, but it
may actually negatively affect the
drive-train components:
• E-Four (Electronic On-Demand
AWD system)
■Speed limit when using the
compact spare tire
Do not drive at speeds in excess
of 50 mph (80 km /h) when a com-
pact spare tire is installed on the
vehicle.
The compact spare tire is not
designed for driving at high
speeds. Failure to observe this
precaution may lead to an acci-
dent causing death or serious
injury.
■After using the tools and jack
Before driving, ma ke sure all the
tools and jack are securely in
place in their storage location to
reduce the possibility of personal
injury during a collision or sudden
braking.
Page 534 of 618
5348-2. Steps to take in an emergency
One of the following may be the
cause of the problem:
The AC charging cable may
be attached to the vehicle.
( P.123)
The electronic key may not be
functioning properly.
( P.537)
There may not be sufficient
fuel in the vehicle’s tank.
Refuel the vehicle. ( P.306)
There may be a malfunction
in the immobilizer system.
( P.72)
There may be a malfunction
in the steering lock system.
The hybrid system may be
malfunctioning due to an elec-
trical problem such as elec-
tronic key battery depletion or
a blown fuse. However,
depending on the type of mal-
NOTICE
■Be careful when driving over
bumps with the compact
spare tire installed on the
vehicle
The vehicle height may become
lower when driving with the com-
pact spare tire compared to when
driving with standard tires. Be
careful when driving over uneven
road surfaces.
■Driving with tire chains and
the compact spare tire
Do not fit tire chains to the com-
pact spare tire.
Tire chains may damage the vehi-
cle body and adversely affect driv-
ing performance.
■When replacing the tires
When removing or fitting the
wheels, tires or the tire pressure
warning valve and transmitter,
contact your Toyota dealer as the
tire pressure warning valve and
transmitter may be damaged if not
handled correctly.
If the hybrid system
will not start
Reasons for the hybrid sys-
tem not starting vary
depending on the situation.
Check the following and
perform the appropriate
procedure:
The hybrid system will not
start even though the cor-
rect starting procedure is
being followed ( P.279)
Page 538 of 618
5388-2. Steps to take in an emergency
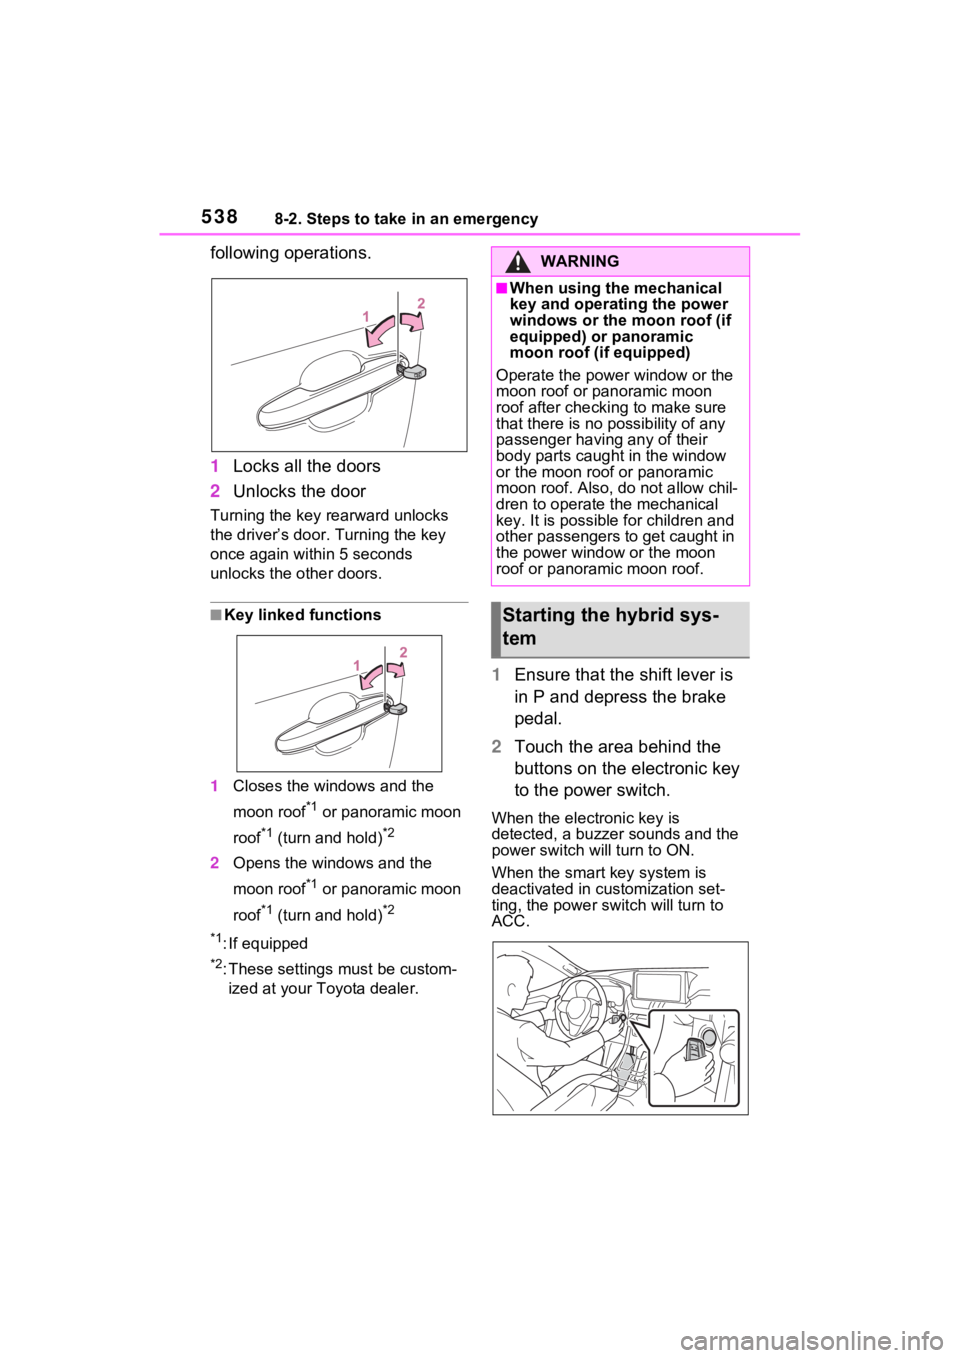
following operations.
1Locks all the doors
2 Unlocks the door
Turning the key rearward unlocks
the driver’s door. Turning the key
once again within 5 seconds
unlocks the other doors.
■Key linked functions
1 Closes the windows and the
moon roof
*1 or panoramic moon
roof
*1 (turn and hold)*2
2 Opens the windows and the
moon roof
*1 or panoramic moon
roof
*1 (turn and hold)*2
*1
: If equipped
*2: These settings must be custom- ized at your Toyota dealer.
1 Ensure that the shift lever is
in P and depress the brake
pedal.
2 Touch the area behind the
buttons on the electronic key
to the power switch.
When the electronic key is
detected, a buzzer sounds and the
power switch will turn to ON.
When the smart key system is
deactivated in customization set-
ting, the power s witch will turn to
ACC.
WARNING
■When using the mechanical
key and operating the power
windows or the moon roof (if
equipped) or panoramic
moon roof (if equipped)
Operate the power window or the
moon roof or panoramic moon
roof after checking to make sure
that there is no p ossibility of any
passenger having any of their
body parts caught in the window
or the moon roof or panoramic
moon roof. Also, d o not allow chil-
dren to operate t he mechanical
key. It is possible for children and
other passengers to get caught in
the power window or the moon
roof or panoramic moon roof.
Starting the hybrid sys-
tem
Page 542 of 618
5428-2. Steps to take in an emergency
●The power switch mode is memo-
rized by the vehicle. When the 12-
volt battery is reconnected, the
system will return to the mode it
was in before the 12-volt battery
was discharged. Before discon-
necting the 12-volt battery, turn
the power switch off.
If you are unsure what mode the
power switch was in before the
12-volt battery discharged, be
especially careful when recon-
necting the 12-volt battery.
●Some systems may require initial-
ization. ( P.582)
■When replacing the 12-volt bat-
tery
●Use a 12-volt battery that con-
forms to European regulations.
●Use a 12-volt battery that the case
size is same as the previous one
(LN2), 20 hours rate capacity
(20HR) is equiva lent (55Ah) or
greater, and performance rating
(CCA) is equivalent (345A) or
greater.
• If the sizes differ, the 12-volt bat- tery cannot be pr operly secured.
• If the 20 hour rate capacity is low,
even if the time period where the
vehicle is not used is a short time,
the 12-volt battery may discharge
and hybrid system may not be
able to start.
●Use a ventilation t ype calcium bat-
tery
●Use a 12-volt battery with a han-
dle. If a 12-volt b attery without a
handle is used, removal is more
difficult.
●When removing the 12-volt bat-
tery: P.467
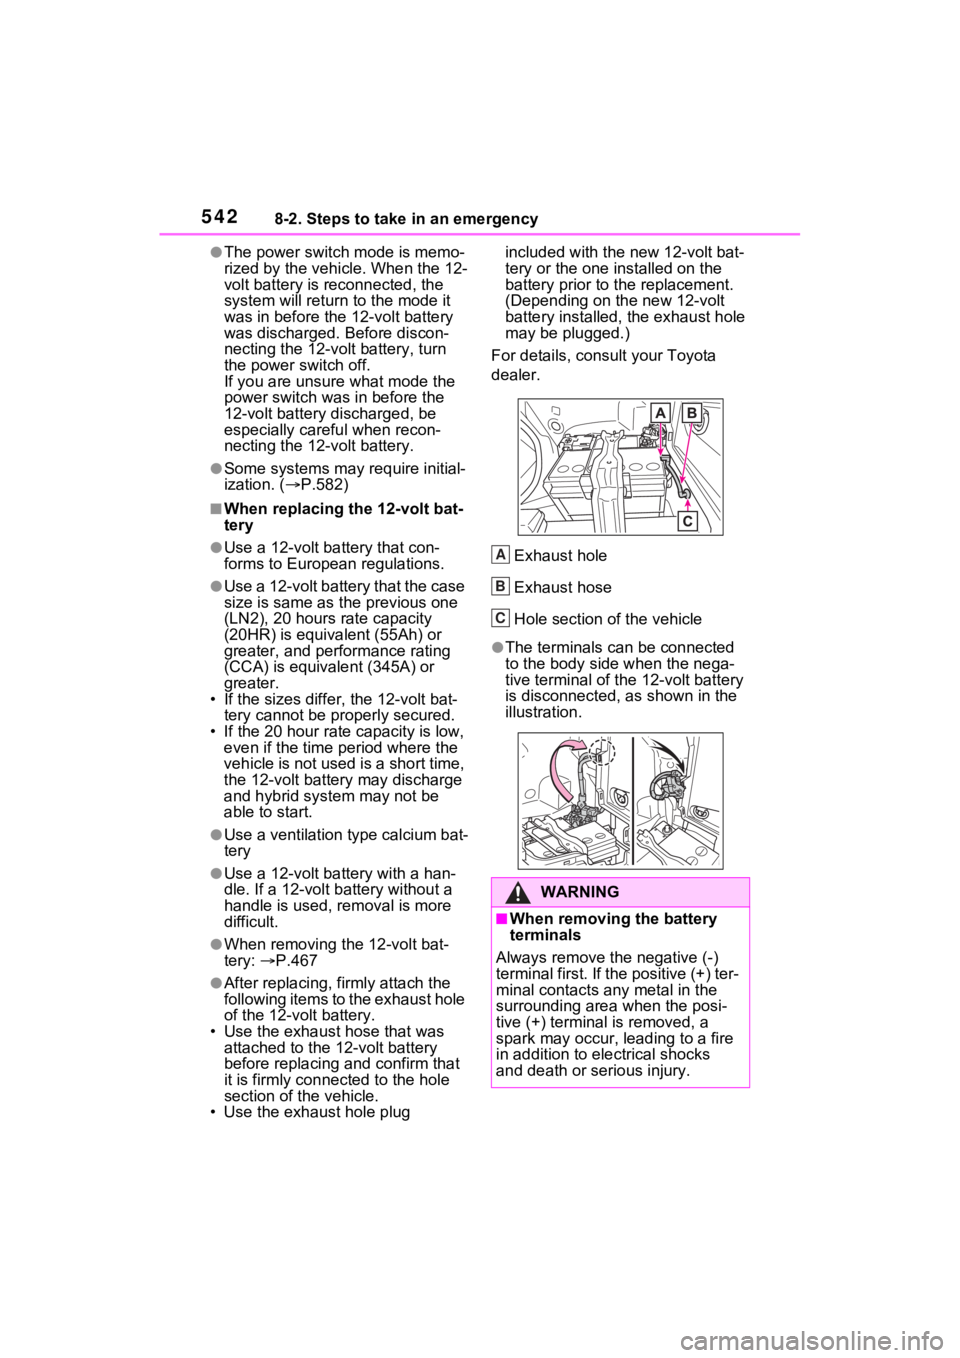
●After replacing, firmly attach the
following items to the exhaust hole
of the 12-volt battery.
• Use the exhaust hose that was
attached to the 12-volt battery
before replacing an d confirm that
it is firmly connected to the hole
section of t he vehicle.
• Use the exhaust hole plug included with the new 12-volt bat-
tery or the one installed on the
battery prior to the replacement.
(Depending on the new 12-volt
battery installed, the exhaust hole
may be plugged.)
For details, consu lt your Toyota
dealer.
Exhaust hole
Exhaust hose
Hole section of the vehicle
●The terminals can be connected
to the body side when the nega-
tive terminal of the 12-volt battery
is disconnected, as shown in the
illustration.
WARNING
■When removing the battery
terminals
Always remove the negative (-)
terminal first. If the positive (+) ter-
minal contacts any metal in the
surrounding area when the posi-
tive (+) terminal is removed, a
spark may occur, leading to a fire
in addition to ele ctrical shocks
and death or serious injury.
A
B
C