engine TOYOTA SEQUOIA 2008 2.G Manual PDF
[x] Cancel search | Manufacturer: TOYOTA, Model Year: 2008, Model line: SEQUOIA, Model: TOYOTA SEQUOIA 2008 2.GPages: 596, PDF Size: 12.93 MB
Page 234 of 596
234 2-5. Driving information
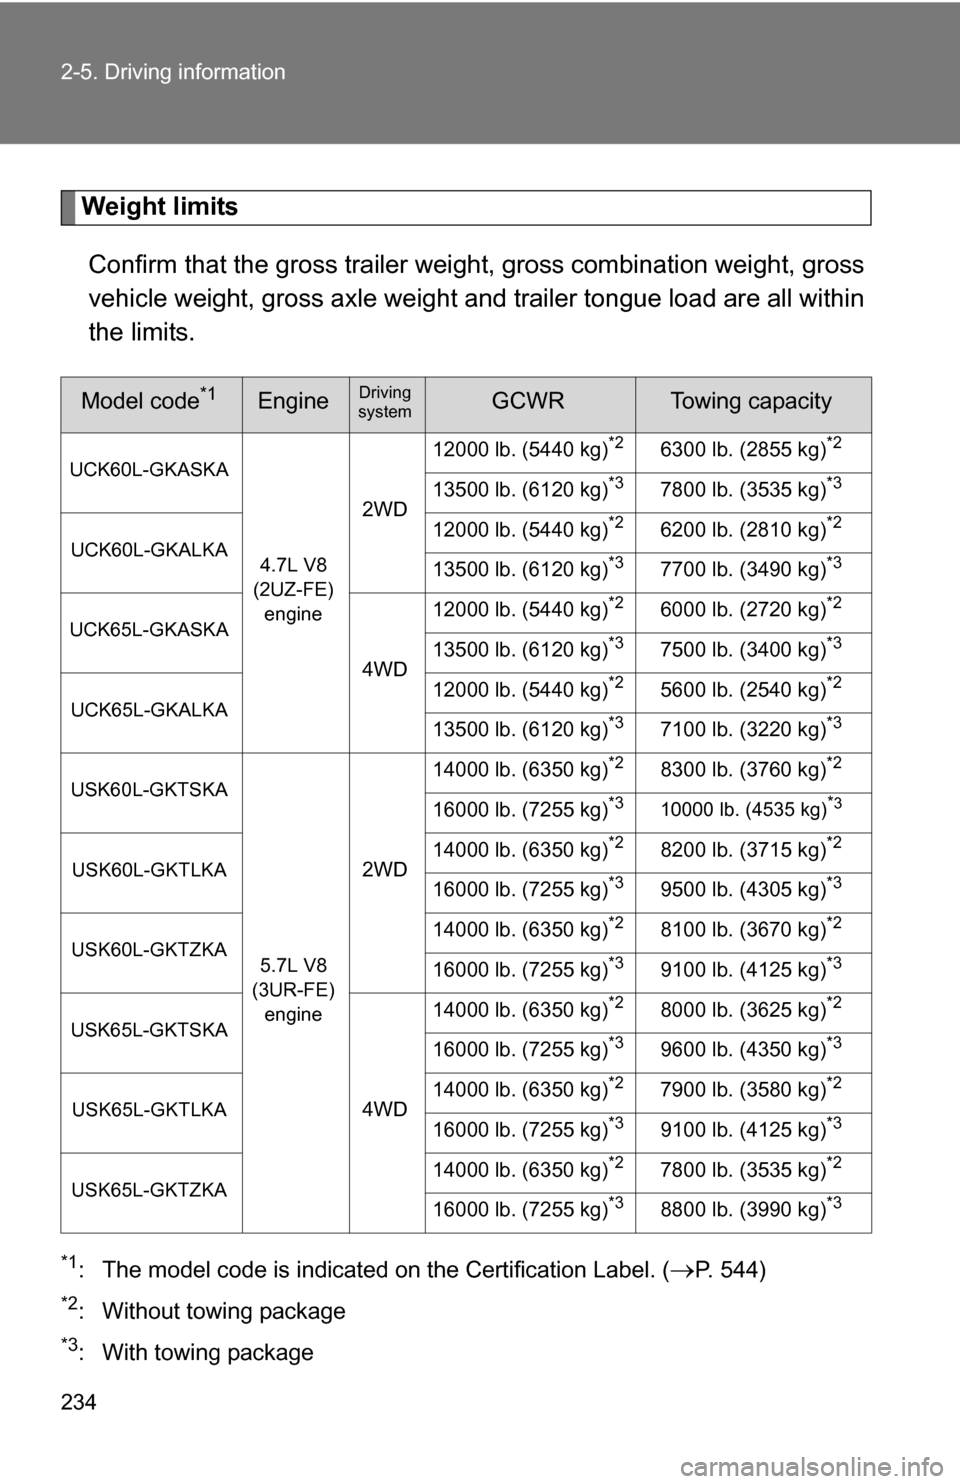
Weight limitsConfirm that the gross trailer weight, gross combination weight, gross
vehicle weight, gross axle weight and trailer tongue load are all within
the limits.
*1: The model code is indicated on the Certification Label. (P. 544)
*2: Without towing package
*3: With towing package
Model code*1EngineDriving
systemGCWRTowing capacity
UCK60L-GKASKA
4.7L V8
(2UZ-FE) engine
2WD 12000 lb. (5440 kg)
*26300 lb. (2855 kg)*2
13500 lb. (6120 kg)*37800 lb. (3535 kg)*3
UCK60L-GKALKA12000 lb. (5440 kg)*26200 lb. (2810 kg)*2
13500 lb. (6120 kg)*37700 lb. (3490 kg)*3
UCK65L-GKASKA
4WD12000 lb. (5440 kg)
*26000 lb. (2720 kg)*2
13500 lb. (6120 kg)*37500 lb. (3400 kg)*3
UCK65L-GKALKA12000 lb. (5440 kg)*25600 lb. (2540 kg)*2
13500 lb. (6120 kg)*37100 lb. (3220 kg)*3
USK60L-GKTSKA
5.7L V8
(3UR-FE) engine
2WD 14000 lb. (6350 kg)
*28300 lb. (3760 kg)*2
16000 lb. (7255 kg)*310000 lb. (4535 kg)*3
USK60L-GKTLKA14000 lb. (6350 kg)*28200 lb. (3715 kg)*2
16000 lb. (7255 kg)*39500 lb. (4305 kg)*3
USK60L-GKTZKA14000 lb. (6350 kg)*28100 lb. (3670 kg)*2
16000 lb. (7255 kg)*39100 lb. (4125 kg)*3
USK65L-GKTSKA
4WD14000 lb. (6350 kg)
*28000 lb. (3625 kg)*2
16000 lb. (7255 kg)*39600 lb. (4350 kg)*3
USK65L-GKTLKA14000 lb. (6350 kg)*27900 lb. (3580 kg)*2
16000 lb. (7255 kg)*39100 lb. (4125 kg)*3
USK65L-GKTZKA14000 lb. (6350 kg)*27800 lb. (3535 kg)*2
16000 lb. (7255 kg)*38800 lb. (3990 kg)*3
Page 241 of 596
241
2-5. Driving information
2
When driving
●
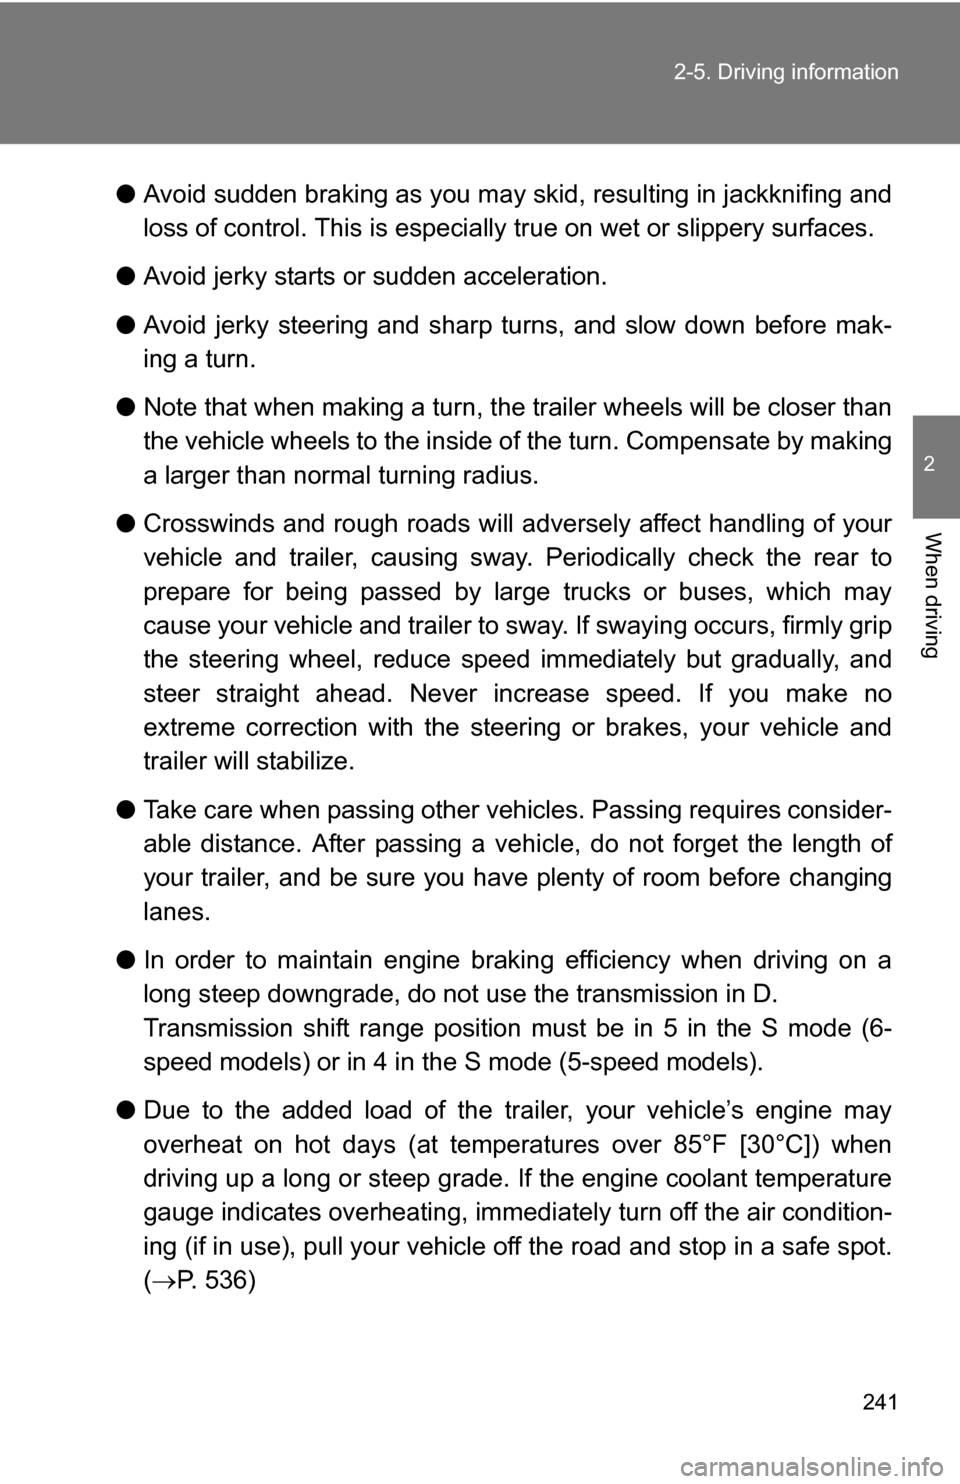
Avoid sudden braking as you may skid, resulting in jackknifing and
loss of control. This is especiall y true on wet or slippery surfaces.
● Avoid jerky starts or sudden acceleration.
● Avoid jerky steering and sharp turns, and slow down before mak-
ing a turn.
● Note that when making a turn, th e trailer wheels will be closer than
the vehicle wheels to the inside of the turn. Compensate by making
a larger than normal turning radius.
● Crosswinds and rough roads will adversely affect handling of your
vehicle and trailer, causing sway . Periodically check the rear to
prepare for being passed by large trucks or buses, which may
cause your vehicle and trailer to sway. If swaying occurs, firmly grip
the steering wheel, reduce speed immediately but gradually, and
steer straight ahead. Never increase speed. If you make no
extreme correction with the stee ring or brakes, your vehicle and
trailer will stabilize.
● Take care when passing other vehicles. Passing requires consider-
able distance. After passing a vehicle, do not forget the length of
your trailer, and be sure you hav e plenty of room before changing
lanes.
● In order to maintain engine braking efficiency when driving on a
long steep downgrade, do not use the transmission in D.
Transmission shift range position must be in 5 in the S mode (6-
speed models) or in 4 in the S mode (5-speed models).
● Due to the added load of the trailer, your vehicle’s engine may
overheat on hot days (at temperatures over 85°F [30°C]) when
driving up a long or steep grade. If the engine coolant temperature
gauge indicates overheating, immedi ately turn off the air condition-
ing (if in use), pull your vehicle off the road and stop in a safe spot.
( P. 536)
Page 242 of 596
242 2-5. Driving information
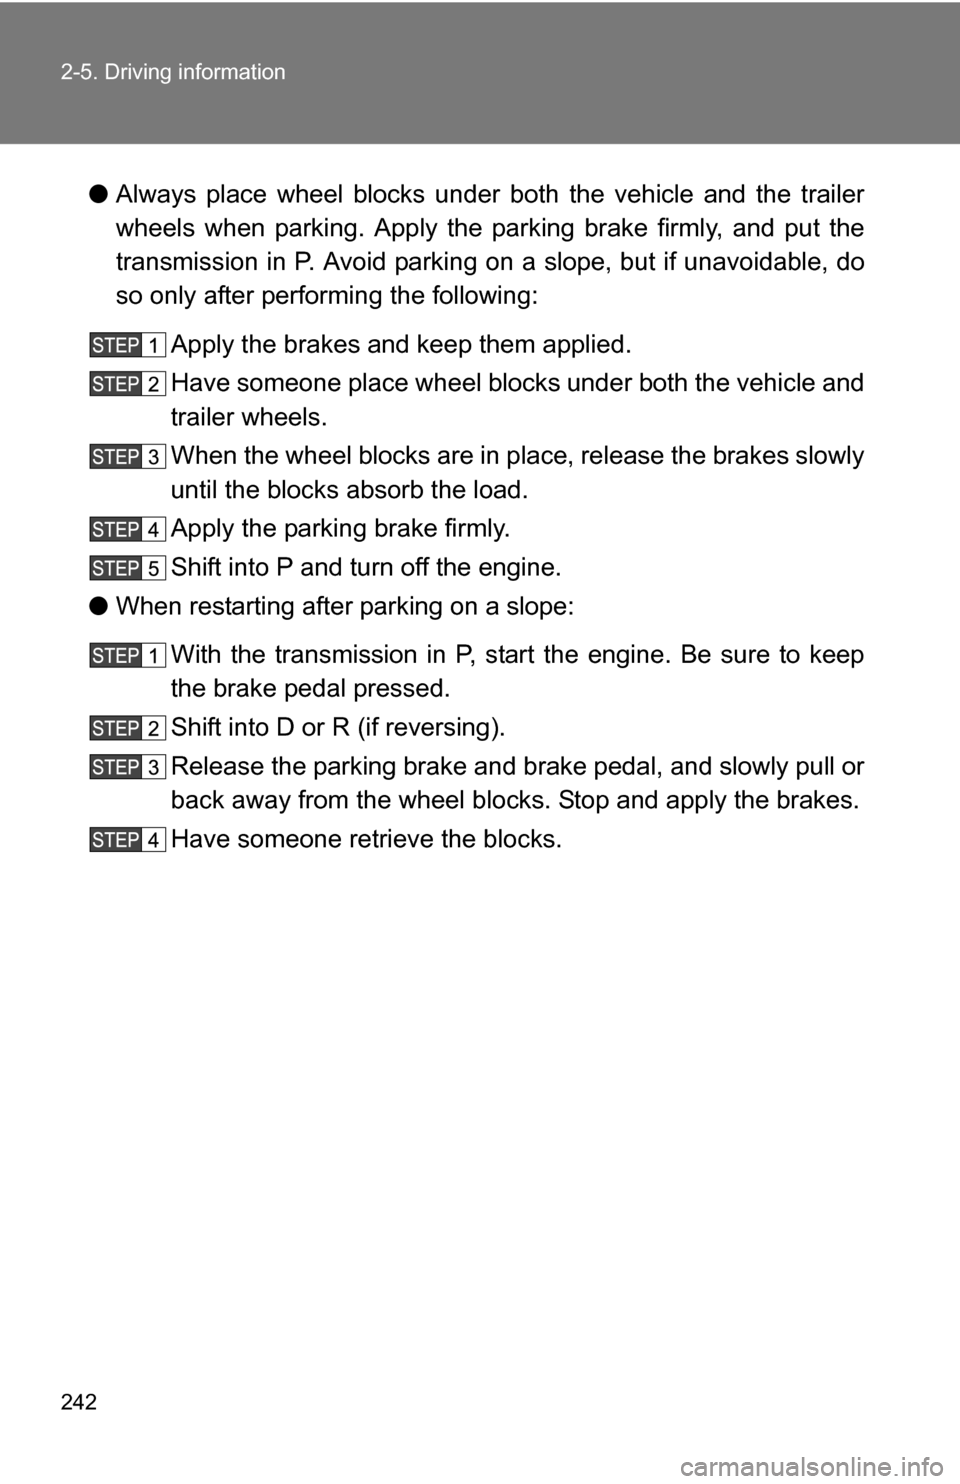
●Always place wheel blocks under both the vehicle and the trailer
wheels when parking. Apply the parking brake firmly, and put the
transmission in P. Avoid parking on a slope, but if unavoidable, do
so only after performing the following:
Apply the brakes and keep them applied.
Have someone place wheel bloc ks under both the vehicle and
trailer wheels.
When the wheel blocks are in place, release the brakes slowly
until the blocks absorb the load.
Apply the parking brake firmly.
Shift into P and turn off the engine.
● When restarting after parking on a slope:
With the transmission in P, start the engine. Be sure to keep
the brake pedal pressed.
Shift into D or R (if reversing).
Release the parking brake and brake pedal, and slowly pull or
back away from the wheel blocks. Stop and apply the brakes.
Have someone retrieve the blocks.
Page 243 of 596
243
2-5. Driving information
2
When driving
■
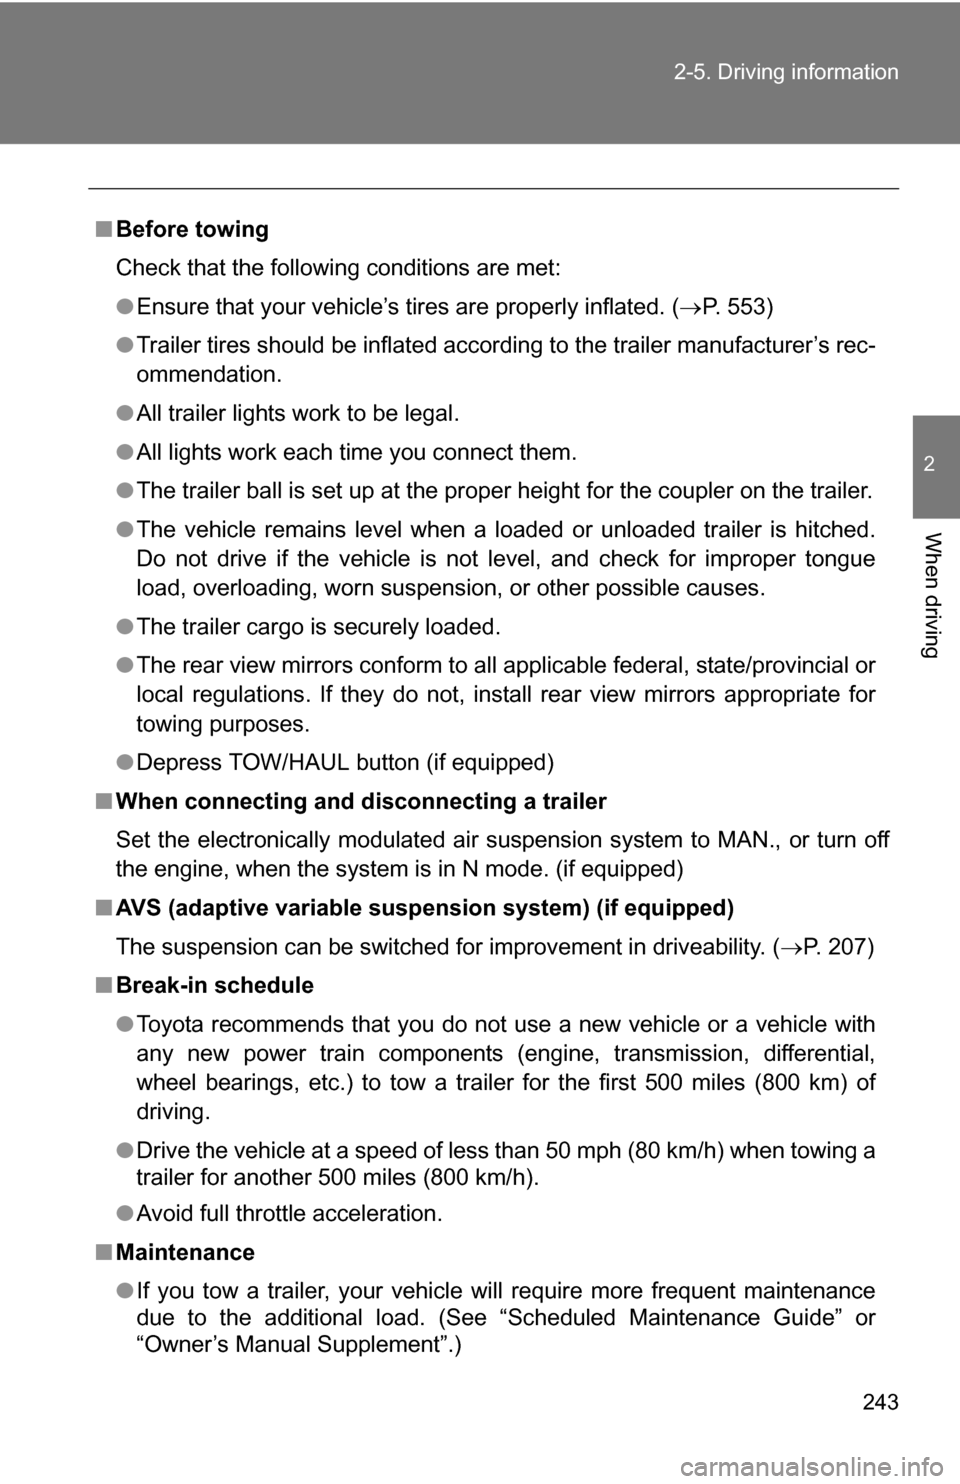
Before towing
Check that the following conditions are met:
●Ensure that your vehicle’s tires are properly inflated. ( P. 553)
● Trailer tires should be inflated according to the trailer manufacturer’s rec-
ommendation.
● All trailer lights work to be legal.
● All lights work each time you connect them.
● The trailer ball is set up at the proper height for the coupler on the t\
railer.
● The vehicle remains level when a loaded or unloaded trailer is hitched.
Do not drive if the vehicle is not level, and check for improper tongue
load, overloading, worn suspension, or other possible causes.
● The trailer cargo is securely loaded.
● The rear view mirrors conform to all applicable federal, state/provincial or
local regulations. If they do not, instal l rear view mirrors appropriate for
towing purposes.
● Depress TOW/HAUL button (if equipped)
■ When connecting and disconnecting a trailer
Set the electronically modulated air suspension system to MAN., or turn off
the engine, when the system is in N mode. (if equipped)
■ AVS (adaptive variable suspension system) (if equipped)
The suspension can be switched for improvement in driveability. ( P. 207)
■ Break-in schedule
●Toyota recommends that you do not use a new vehicle or a vehicle with
any new power train components (engine, transmission, differential,
wheel bearings, etc.) to tow a trailer for the first 500 miles (800 km) of
driving.
● Drive the vehicle at a speed of less than 50 mph (80 km/h) when towing a
trailer for another 500 miles (800 km/h).
● Avoid full throttle acceleration.
■ Maintenance
●If you tow a trailer, your vehicle will require more frequent maintenance
due to the additional load. (See “Scheduled Maintenance Guide” or
“Owner’s Manual Supplement”.)
Page 257 of 596
257
3-1. Using the air conditioning system
and defogger
3
Interior features
■When outside temperature approaches 32 F (0 C)
The air conditioning system may not operate even when is pressed.
■ When the indicator on
flashes
Press
and turn off the air conditioning system before turning it on
once more. There may be a problem in the air conditioning system if the indi-
cator continues to flash. Turn the air conditioning system off and have it
inspected by your Toyota dealer.
CAUTION
■ To prevent the windshield from fogging up
Do not use during cool air operation in extremely humid weather. The
difference between the temperature of the outside air and that of the wind-
shield can cause the outer surface of the windshield to fog up, blocking your
vision.
NOTICE
■To prevent battery discharge
Do not leave the air conditioning system on longer than necessary when the
engine is stopped.
Page 261 of 596
261
3-1. Using the air conditioning system
and defogger
3
Interior features
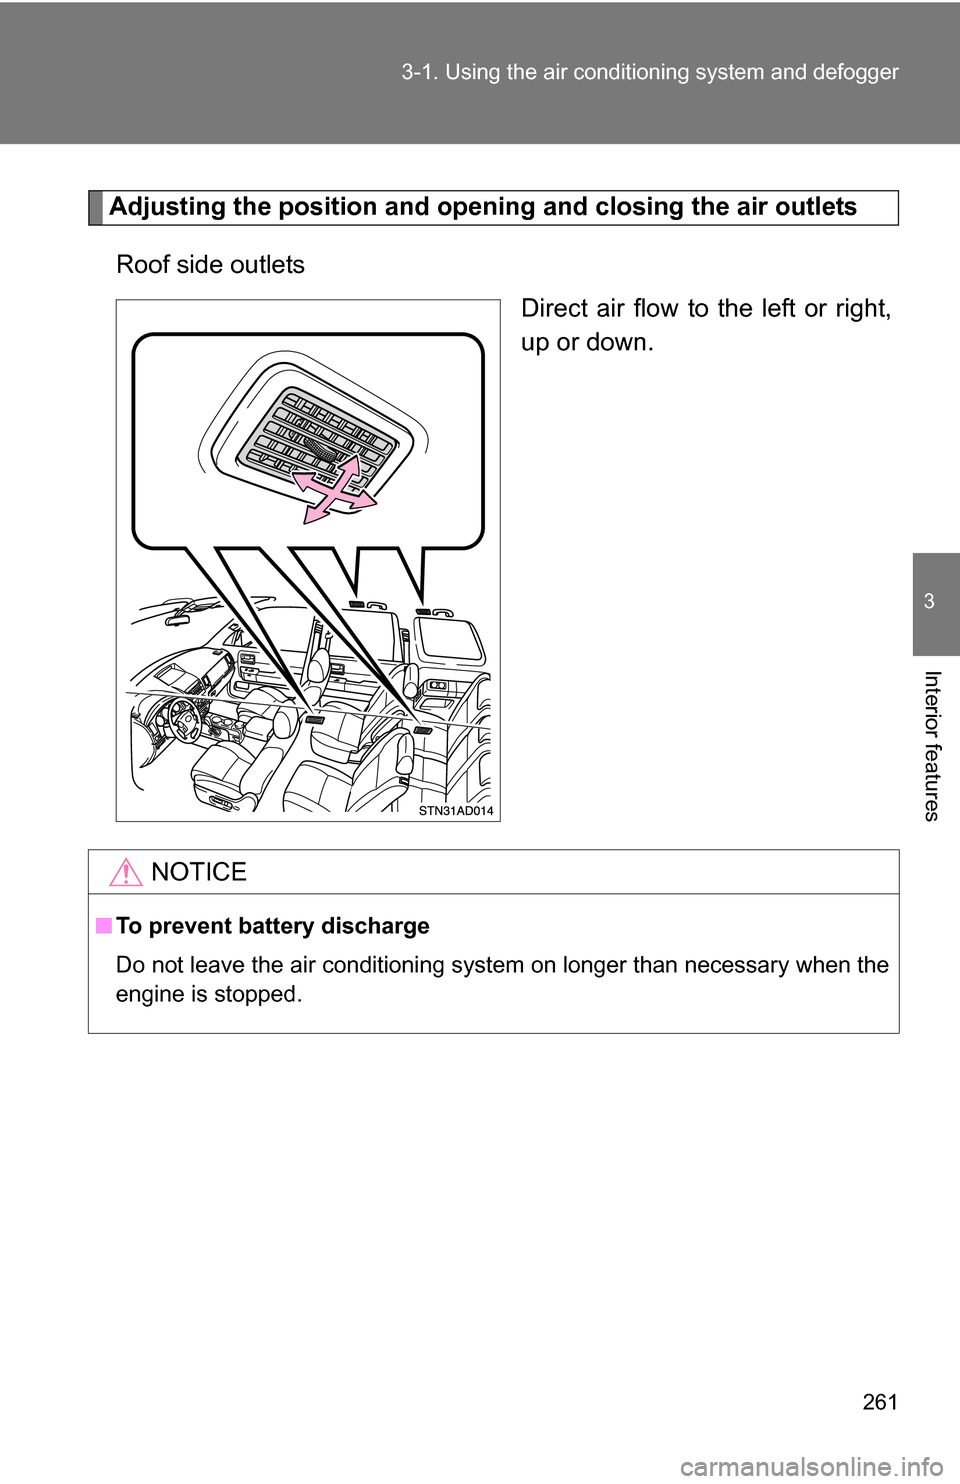
Adjusting the position and opening and closing the air outlets
Roof side outlets Direct air flow to the left or right,
up or down.
NOTICE
■To prevent battery discharge
Do not leave the air conditioning system on longer than necessary when the
engine is stopped.
Page 262 of 596
262
3-1. Using the air conditioning system and defogger
Rear window and outside rear view mirror defoggers
■The defogger can be operated when
The engine switch is in the ON position.
■ Outside rear view mirror defoggers (if equipped)
Turning the rear window defogger on will turn the outside rear view mirror
defoggers on.
CAUTION
■Outside rear view mirror defoggers (if equipped)
The surfaces of the outside rear view mirrors become hot. Do not touch
them to prevent from burning yourself.
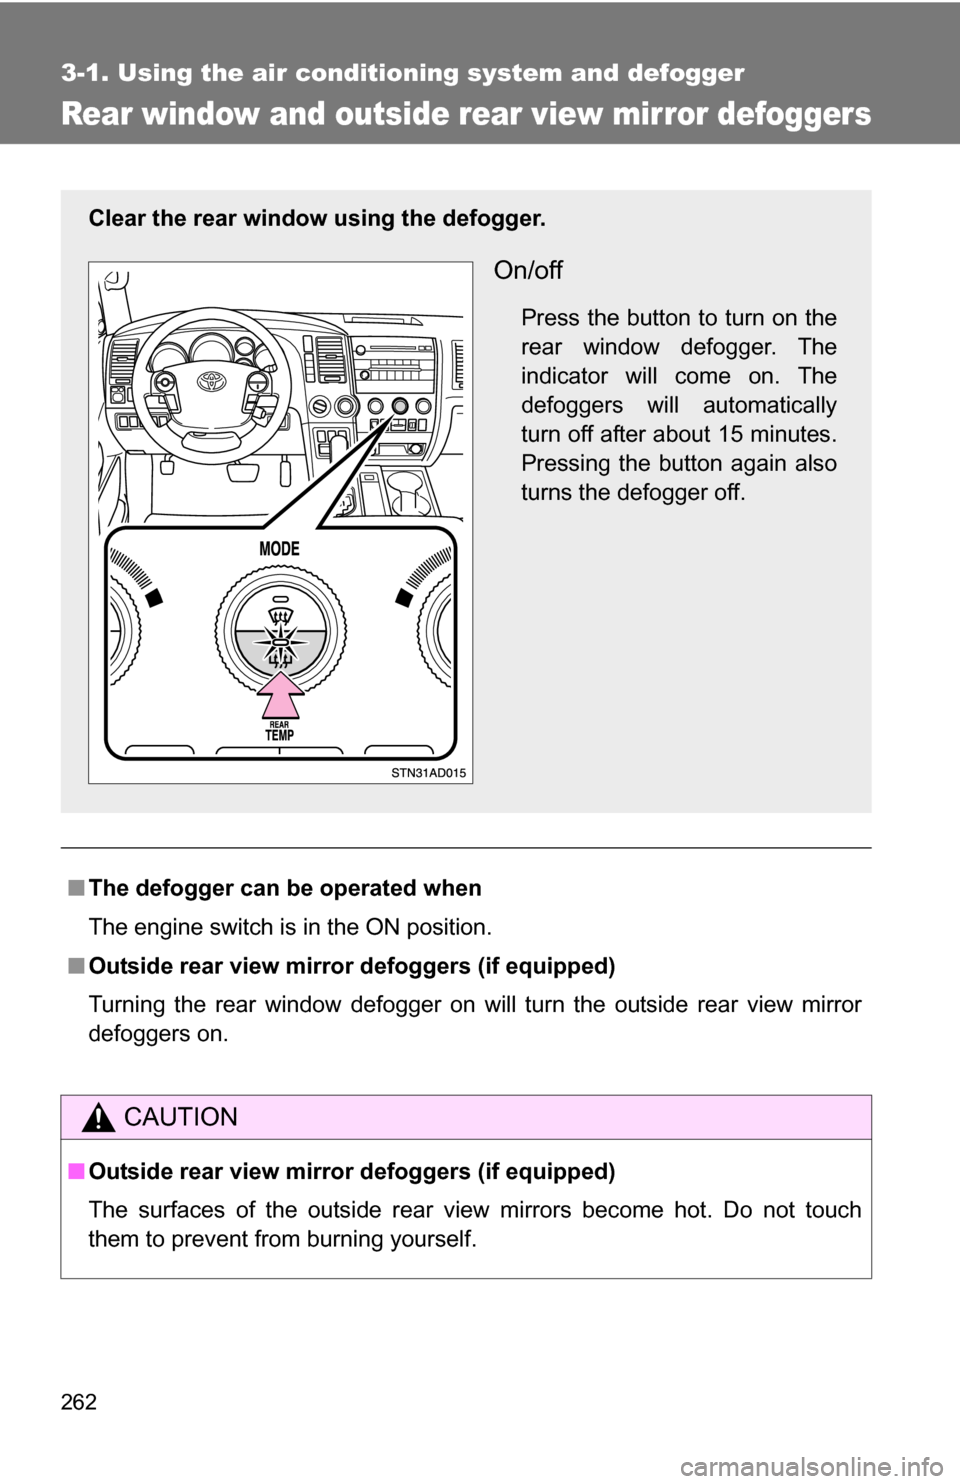
Clear the rear window using the defogger.
On/off
Press the button to turn on the
rear window defogger. The
indicator will come on. The
defoggers will automatically
turn off after about 15 minutes.
Pressing the button again also
turns the defogger off.
Page 263 of 596
263
3-1. Using the air conditioning system and defogger
3
Interior features
Windshield wiper de-icer (if equipped)
■The de-icer can be operated when
The engine switch is in the ON position.
CAUTION
■When the windshield wiper de-icer is on
Do not touch the glass at the lower part of the windshield or to the side of the
front pillars as the surfaces can become very hot and burn you.
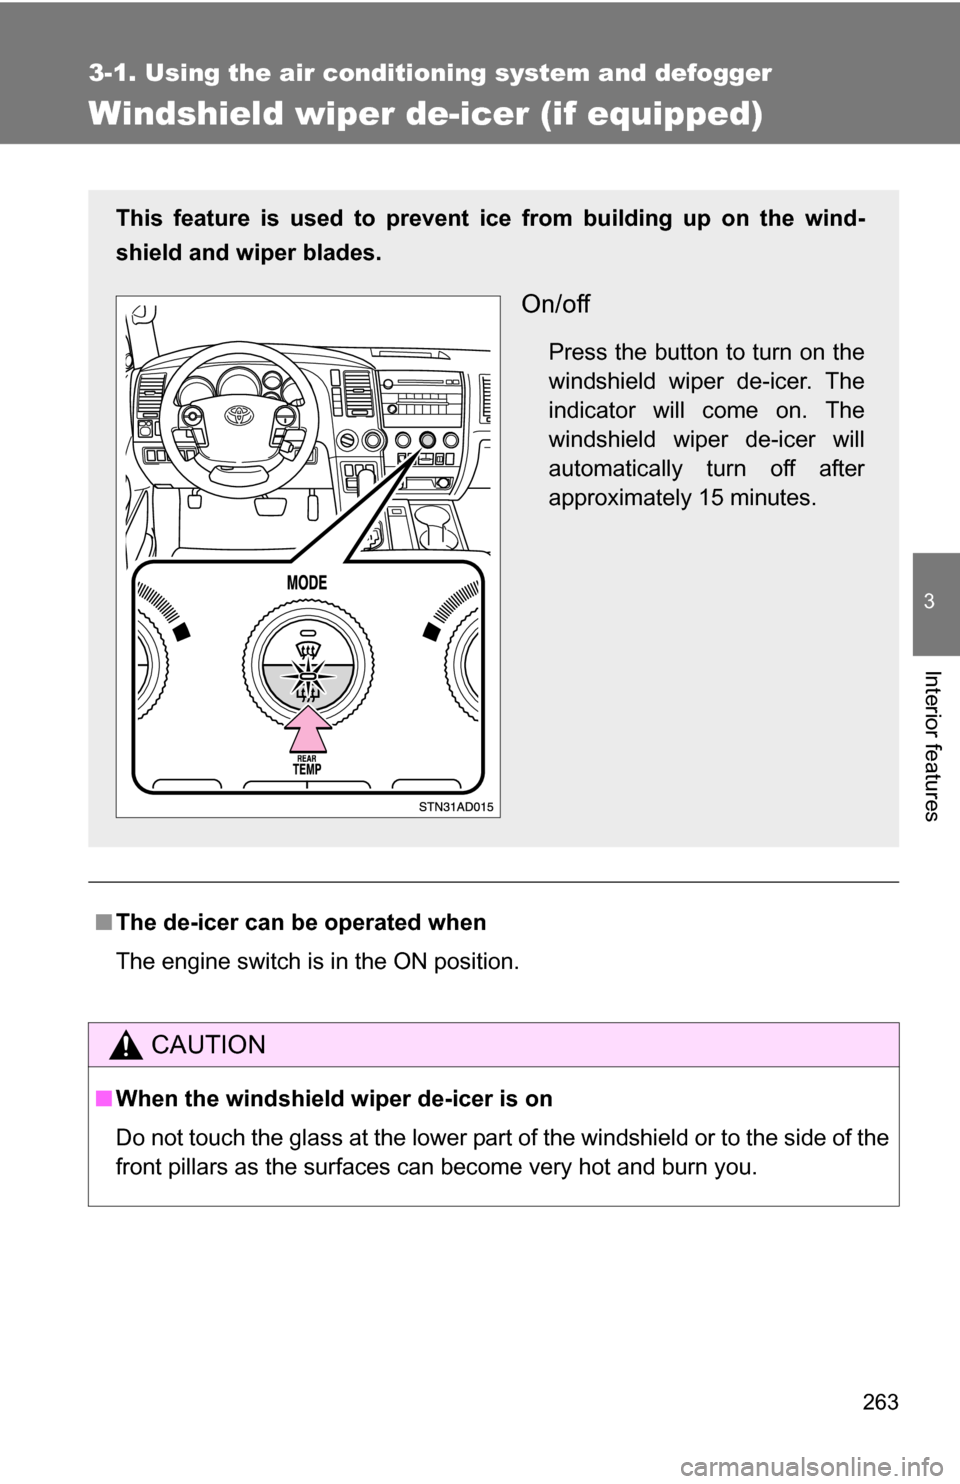
This feature is used to prevent ice from building up on the wind-
shield and wiper blades.
On/off
Press the button to turn on the
windshield wiper de-icer. The
indicator will come on. The
windshield wiper de-icer will
automatically turn off after
approximately 15 minutes.
Page 268 of 596
268 3-2. Using the audio system
CAUTION
■For vehicles sold in U.S.A. and Canada
●Part 15 of the FCC Rules
FCC Warning:
Any unauthorized changes or modifications to this equipment will void the
user’s authority to operate this device.
● Laser products
• Do not take this unit apart or attempt to make any changes yourself.
This is an intricate unit that uses a laser pickup to retrieve information
from the surface of compact discs. The laser is carefully shielded so
that its rays remain inside the cabinet. Therefore, never try to disas-
semble the player or alter any of its parts since you may be exposed to
laser rays and dangerous voltages.
• This product utilizes a laser. Use of controls or adjustments or performance of procedures other
than those specified herein may result in hazardous radiation expo-
sure.
NOTICE
■ To prevent battery discharge
Do not leave the audio system on longer than necessary with the engine is
off.
■ To avoid damaging the audio system
Take care not to spill drinks or other fluids over the audio system.
Page 293 of 596
293
3-2. Using the audio system
3
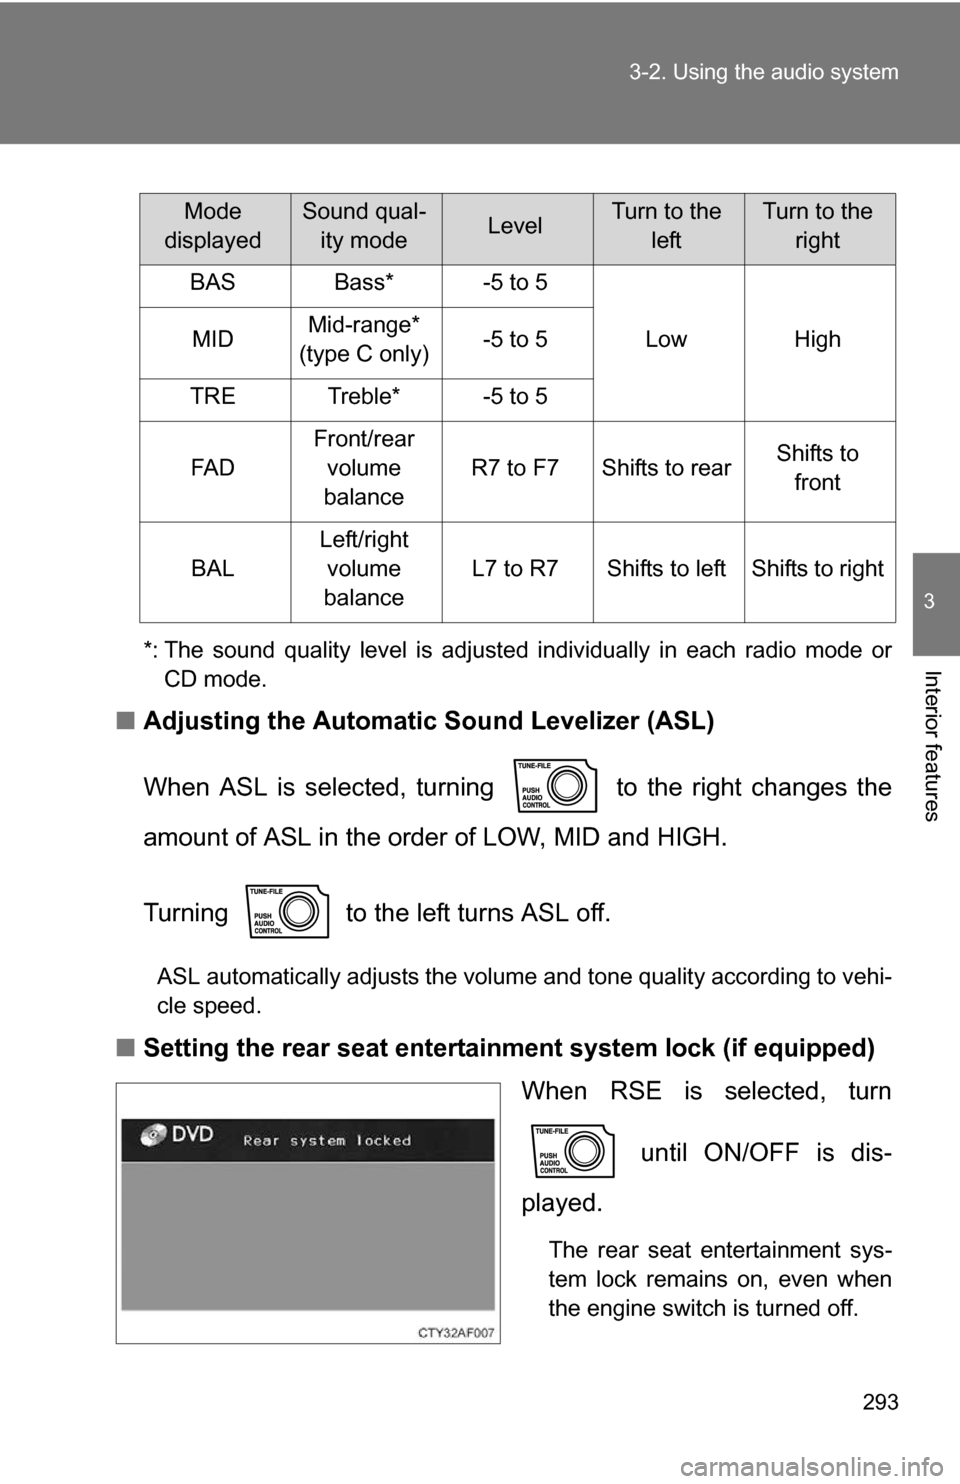
Interior features*: The sound quality level is adjusted individually in each radio mode or
CD mode.
■ Adjusting the Automatic Sound Levelizer (ASL)
When ASL is selected, turning to the right changes the
amount of ASL in the order of LOW, MID and HIGH.
Turning to the left turns ASL off.
ASL automatically adjusts the volume and tone quality according to vehi-
cle speed.
■Setting the rear seat entertainment system lock (if equipped)
When RSE is selected, turn
until ON/OFF is dis-
played.
The rear seat entertainment sys-
tem lock remains on, even when
the engine switch is turned off.
Mode
displayedSound qual- ity modeLevelTurn to the leftTurn to the right
BASBass*-5 to 5
LowHighMIDMid-range*
(type C only)-5 to 5
TRETreble*-5 to 5
FA D
Front/rear volume
balance
R7 to F7Shifts to rearShifts to front
BAL
Left/right volume
balance
L7 to R7Shifts to leftShifts to right