lights TOYOTA SEQUOIA 2009 2.G Workshop Manual
[x] Cancel search | Manufacturer: TOYOTA, Model Year: 2009, Model line: SEQUOIA, Model: TOYOTA SEQUOIA 2009 2.GPages: 612
Page 500 of 612
500 4-3. Do-it-yourself maintenance
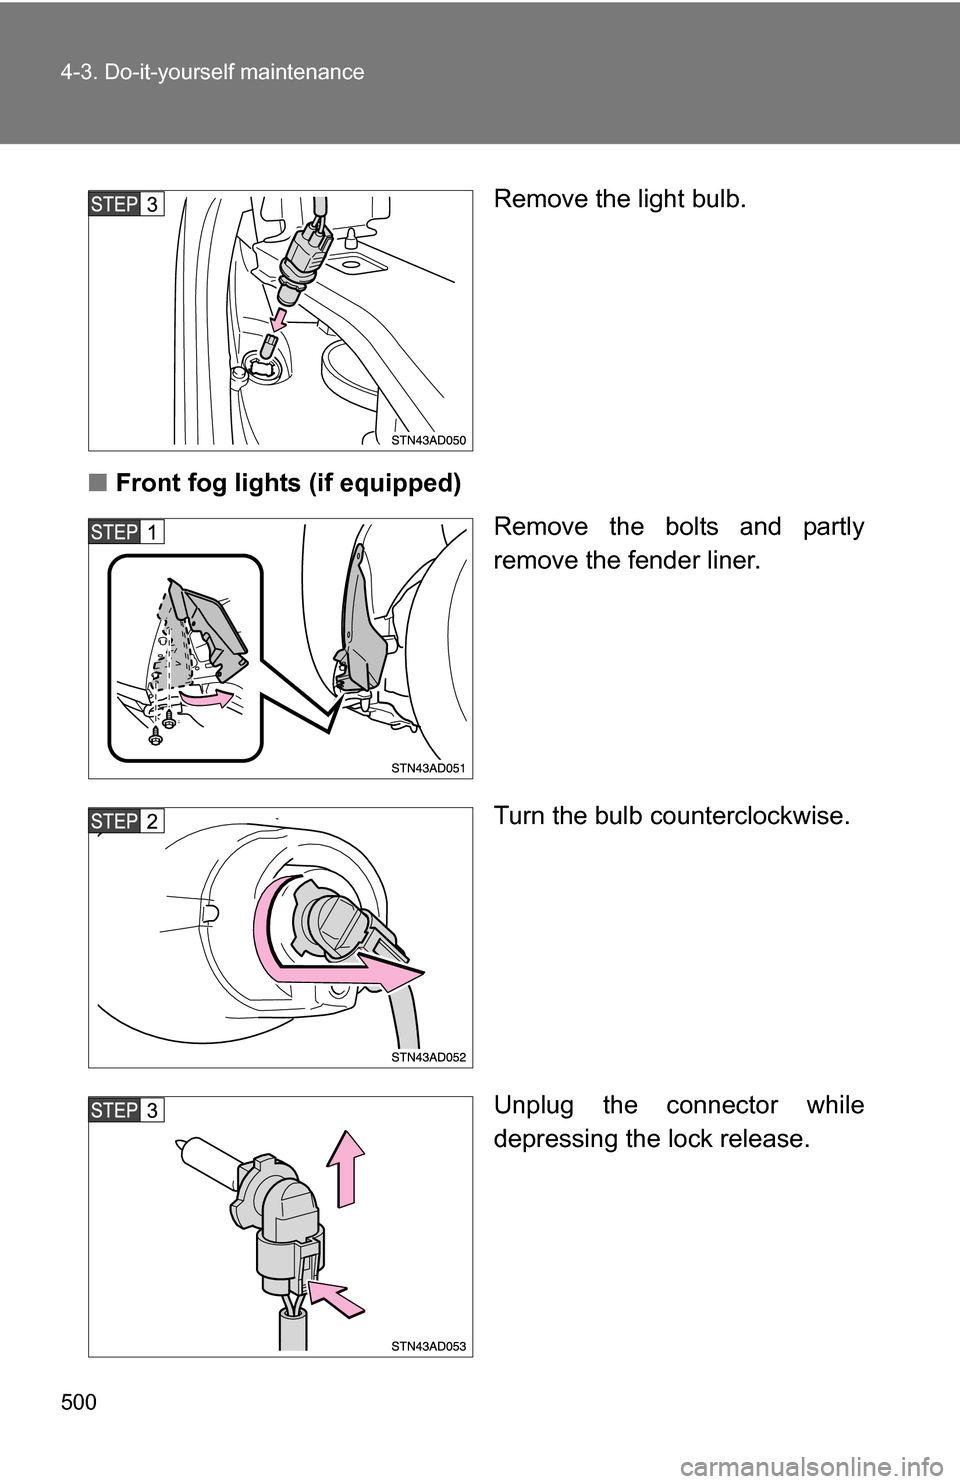
Remove the light bulb.
■ Front fog lights (if equipped)
Remove the bolts and partly
remove the fender liner.
Turn the bulb counterclockwise.
Unplug the connector while
depressing the lock release.
Page 501 of 612
501
4-3. Do-it-yourself maintenance
4
Maintenance and care
■
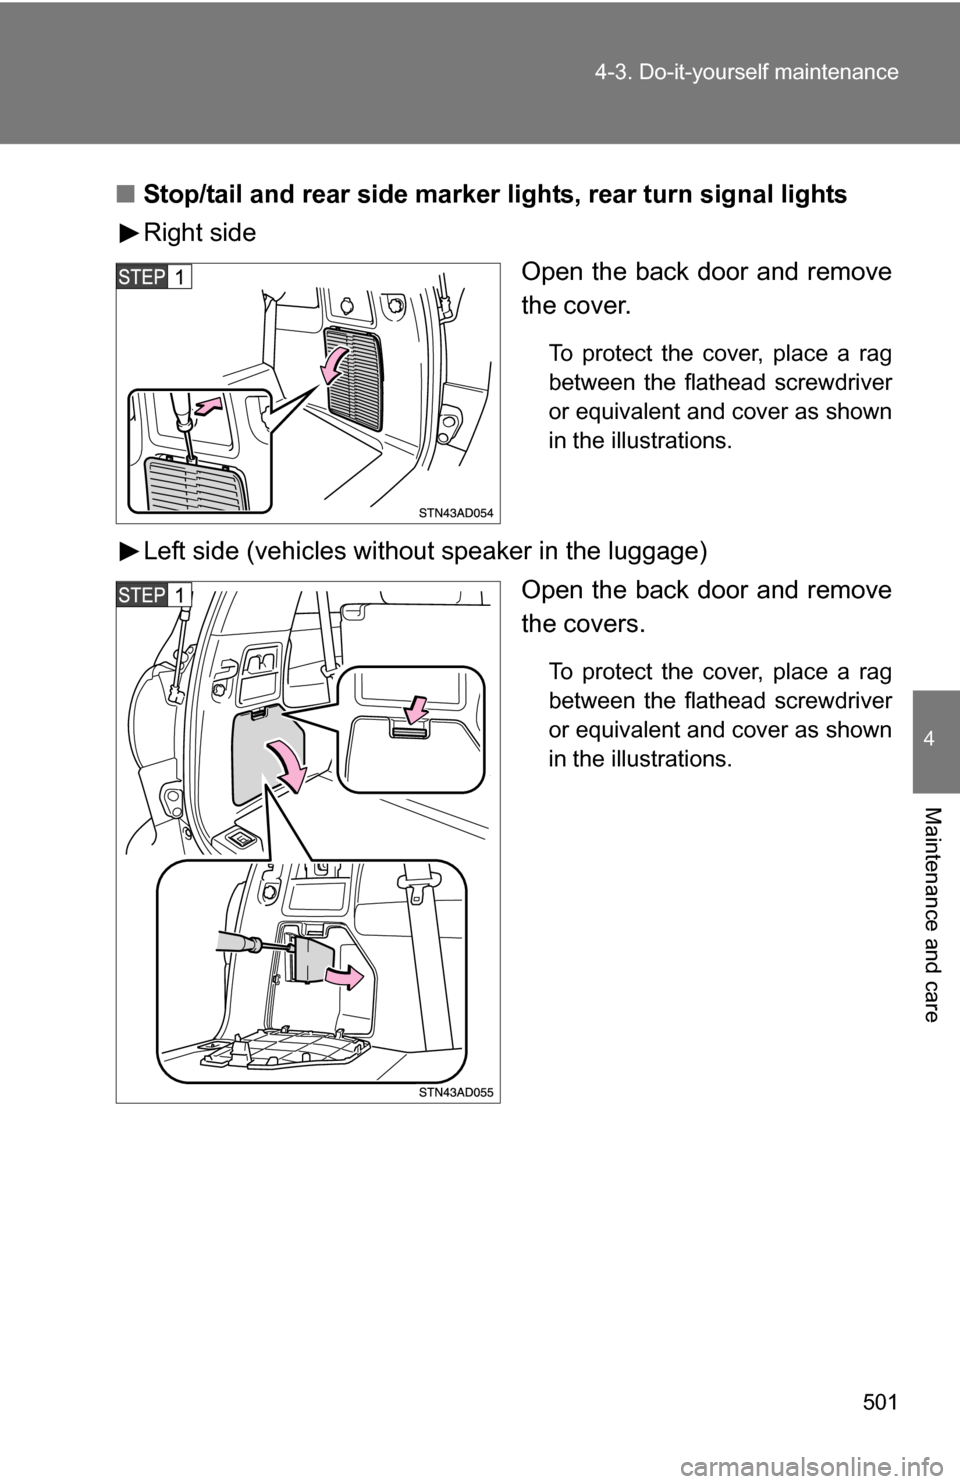
Stop/tail and rear side marker lights, rear turn signal lights
Right side
Open the back door and remove
the cover.
To protect the cover, place a rag
between the flathead screwdriver
or equivalent and cover as shown
in the illustrations.
Left side (vehicles without speaker in the luggage)Open the back door and remove
the covers.
To protect the cover, place a rag
between the flathead screwdriver
or equivalent and cover as shown
in the illustrations.
Page 503 of 612
503
4-3. Do-it-yourself maintenance
4
Maintenance and care
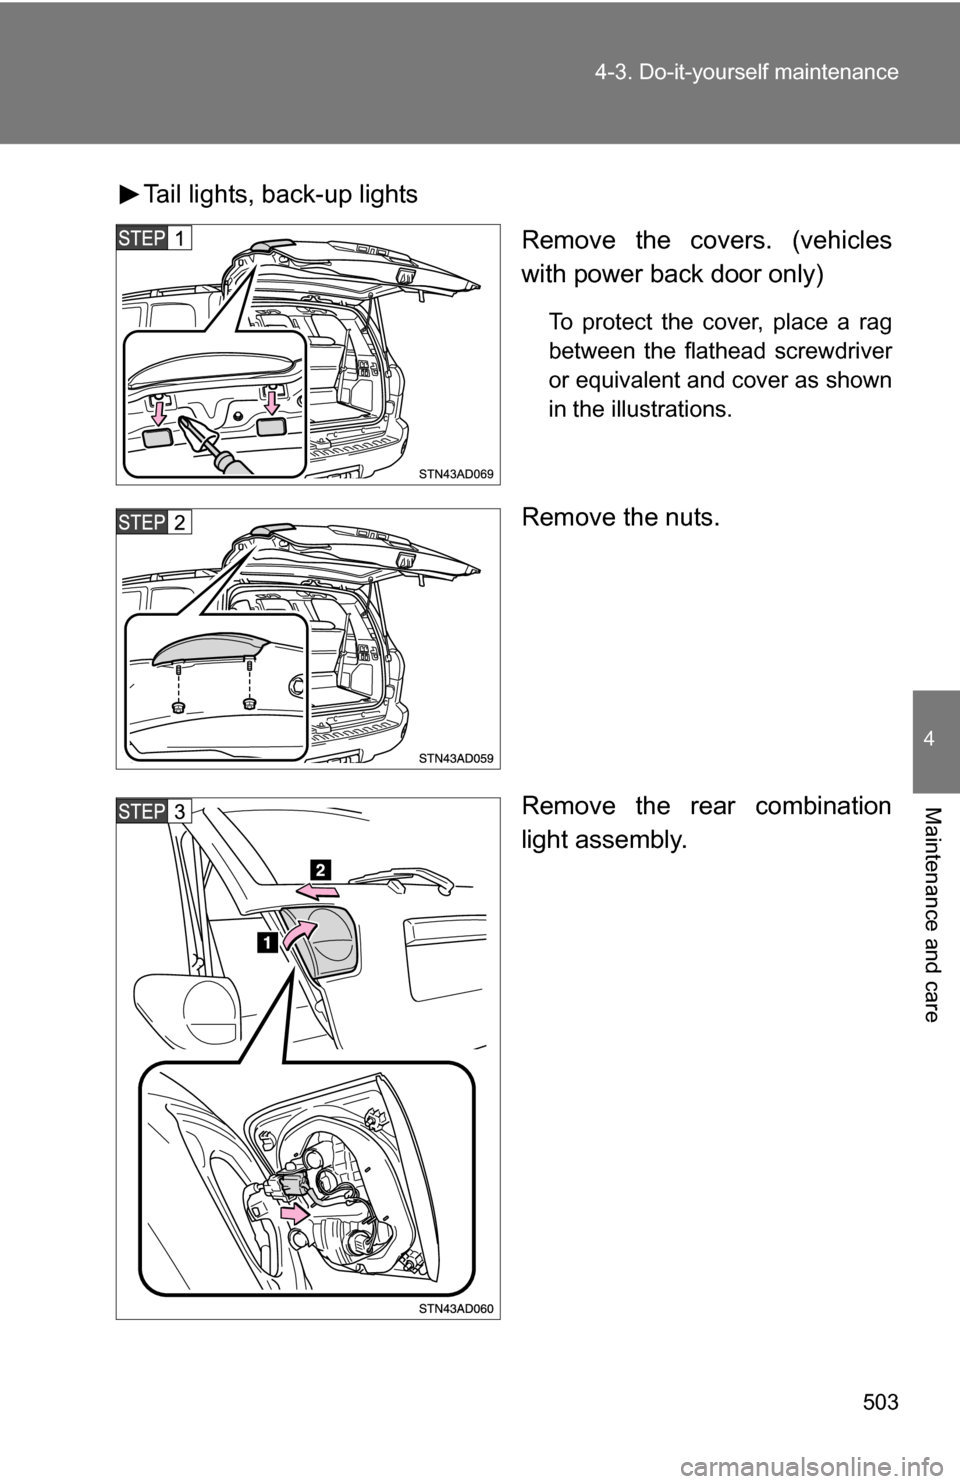
Tail lights, back-up lights
Remove the covers. (vehicles
with power back door only)
To protect the cover, place a rag
between the flathead screwdriver
or equivalent and cover as shown
in the illustrations.
Remove the nuts.
Remove the rear combination
light assembly.
Page 504 of 612
504 4-3. Do-it-yourself maintenance
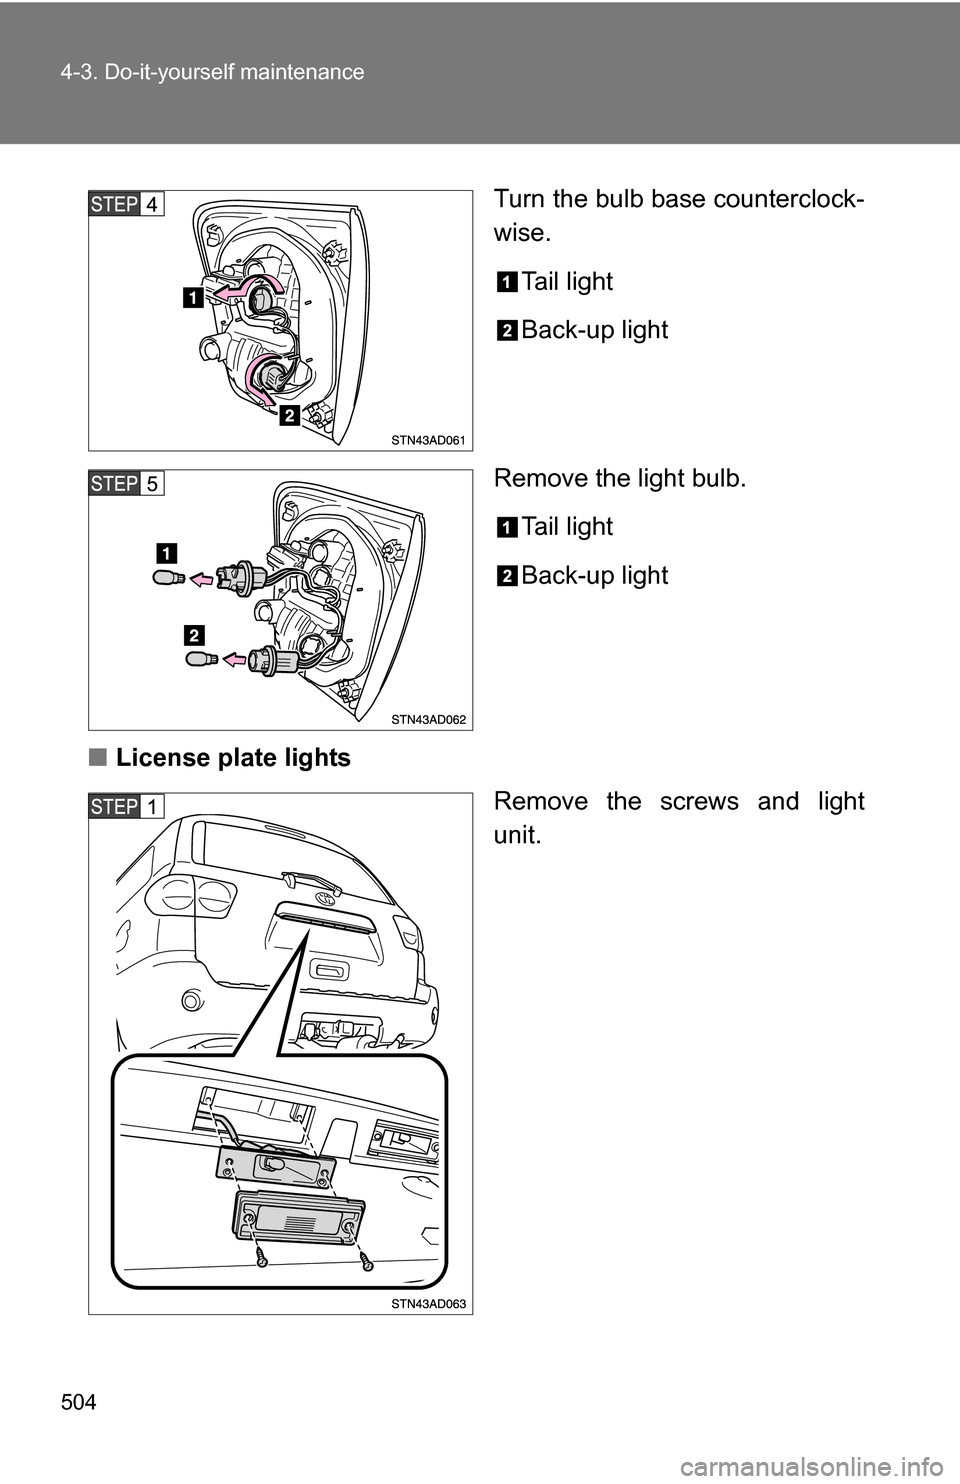
Turn the bulb base counterclock-
wise.Tail light
Back-up light
Remove the light bulb. Tail light
Back-up light
■ License plate lights
Remove the screws and light
unit.
Page 505 of 612
505
4-3. Do-it-yourself maintenance
4
Maintenance and care
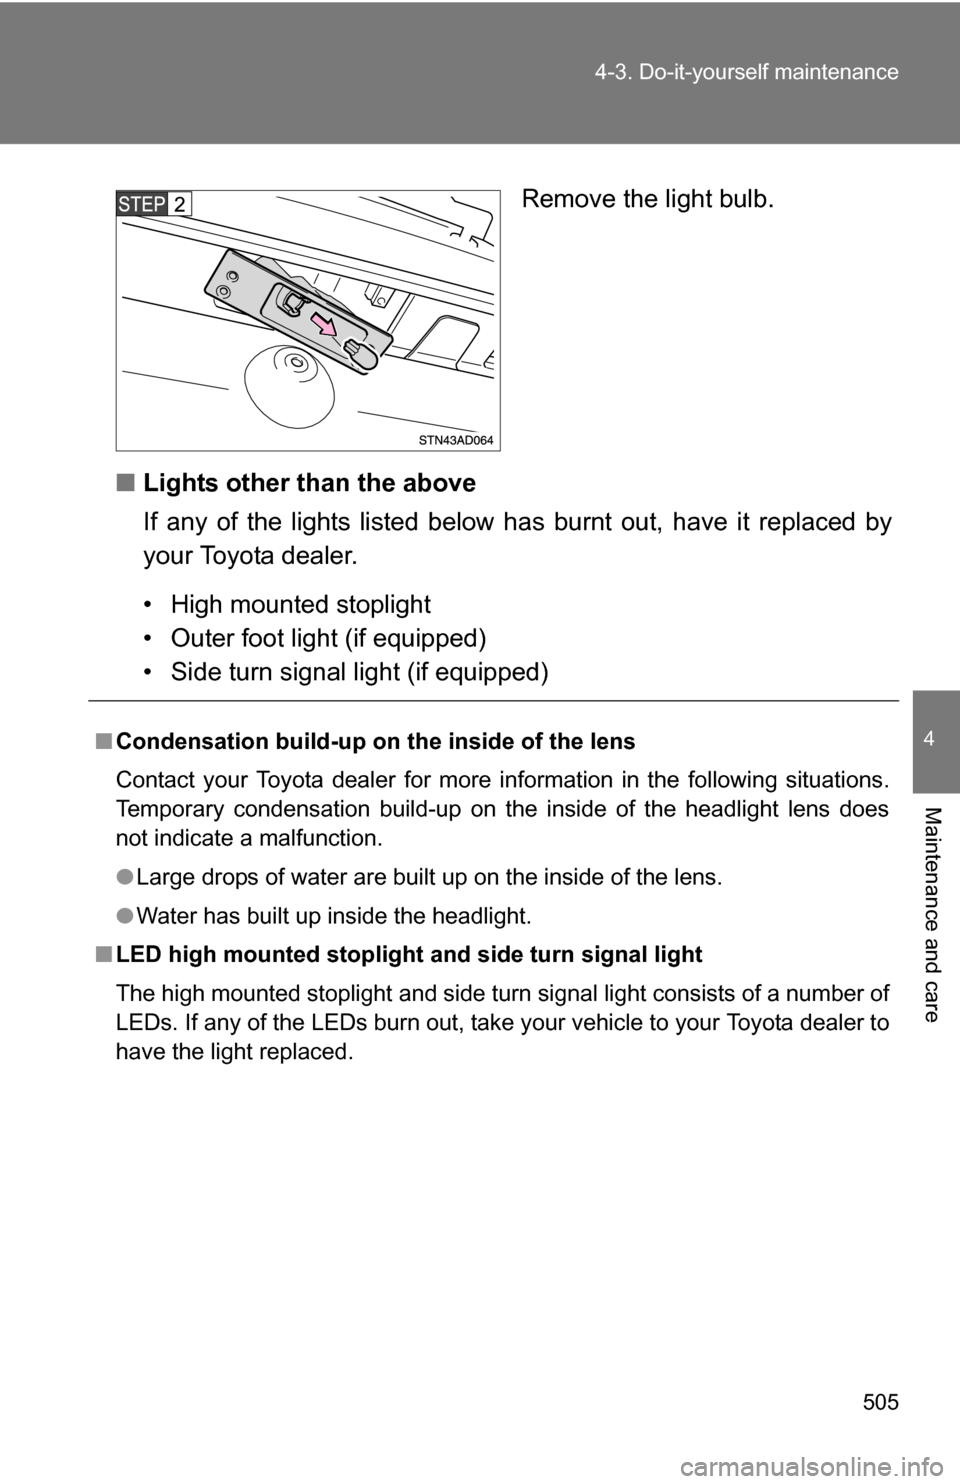
Remove the light bulb.
■ Lights other than the above
If any of the lights listed below has burnt out, have it replaced by
your Toyota dealer.
• High mounted stoplight
• Outer foot light (if equipped)
• Side turn signal light (if equipped)
■ Condensation build-up on th e inside of the lens
Contact your Toyota dealer for more information in the following situations.
Temporary condensation build-up on the inside of the headlight lens does
not indicate a malfunction.
● Large drops of water are built up on the inside of the lens.
● Water has built up inside the headlight.
■ LED high mounted stoplight and side turn signal light
The high mounted stoplight and side turn signal light consists of a number of
LEDs. If any of the LEDs burn out, take your vehicle to your Toyota dealer to
have the light replaced.
Page 506 of 612
506 4-3. Do-it-yourself maintenance
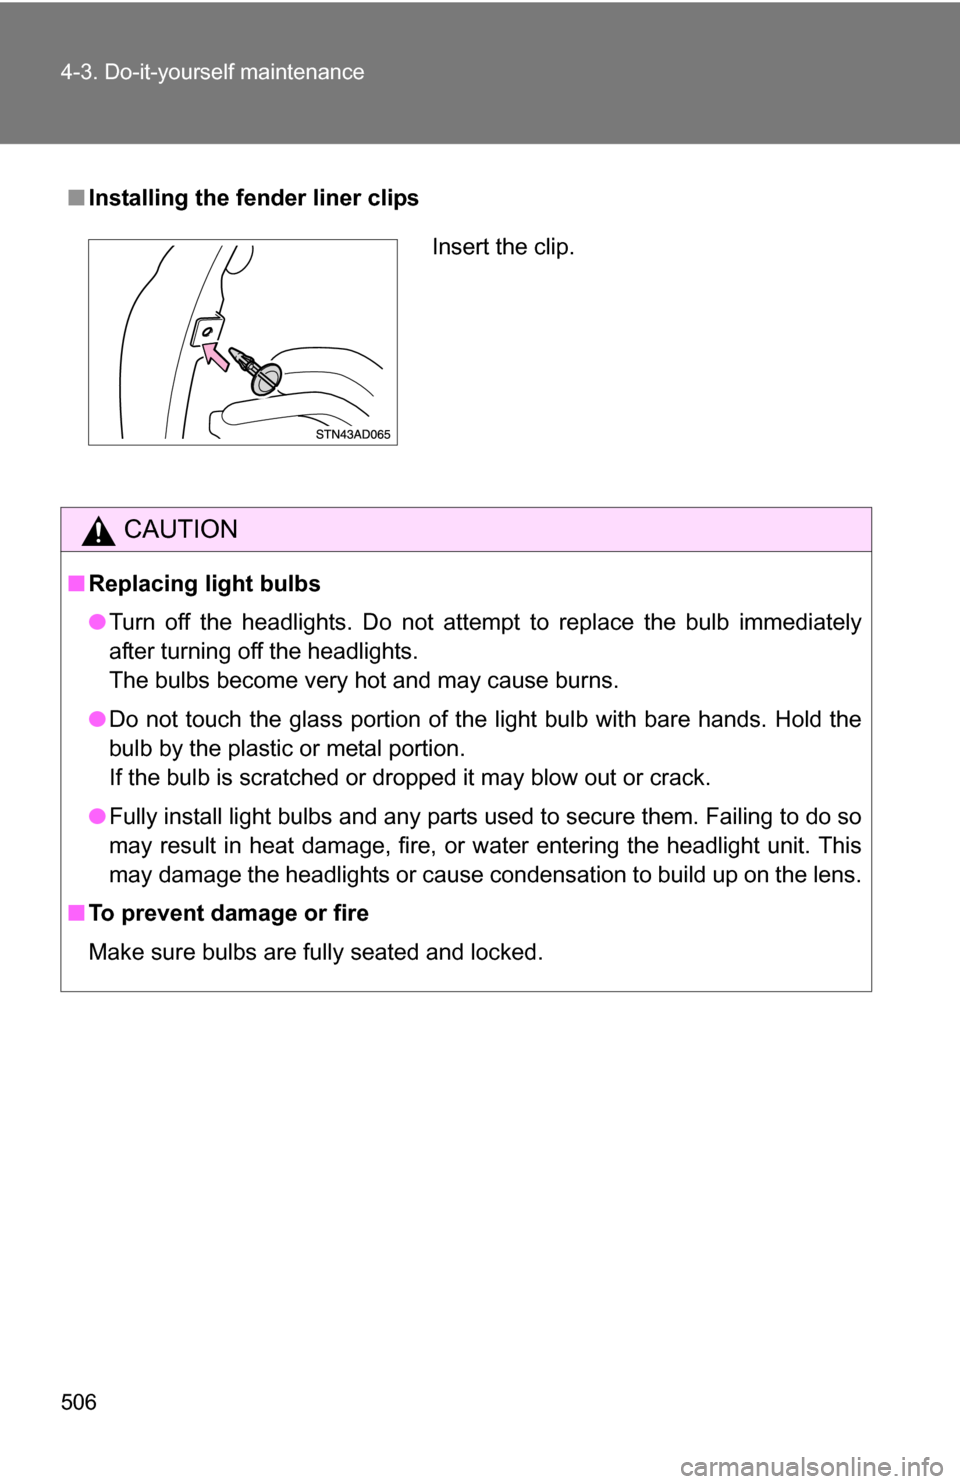
■Installing the fender liner clips
CAUTION
■Replacing light bulbs
●Turn off the headlights. Do not attempt to replace the bulb immediately
after turning off the headlights.
The bulbs become very hot and may cause burns.
● Do not touch the glass portion of the light bulb with bare hands. Hold the
bulb by the plastic or metal portion.
If the bulb is scratched or dropped it may blow out or crack.
● Fully install light bulbs and any parts used to secure them. Failing to do so
may result in heat damage, fire, or water entering the headlight unit. This
may damage the headlights or cause condensation to build up on the lens.
■ To prevent damage or fire
Make sure bulbs are fully seated and locked.
Insert the clip.
Page 508 of 612
508
5-1. Essential information
Emergency flashers
NOTICE
■To prevent battery discharge
Do not leave the emergency flashers on longer than necessary when the
engine is not running.
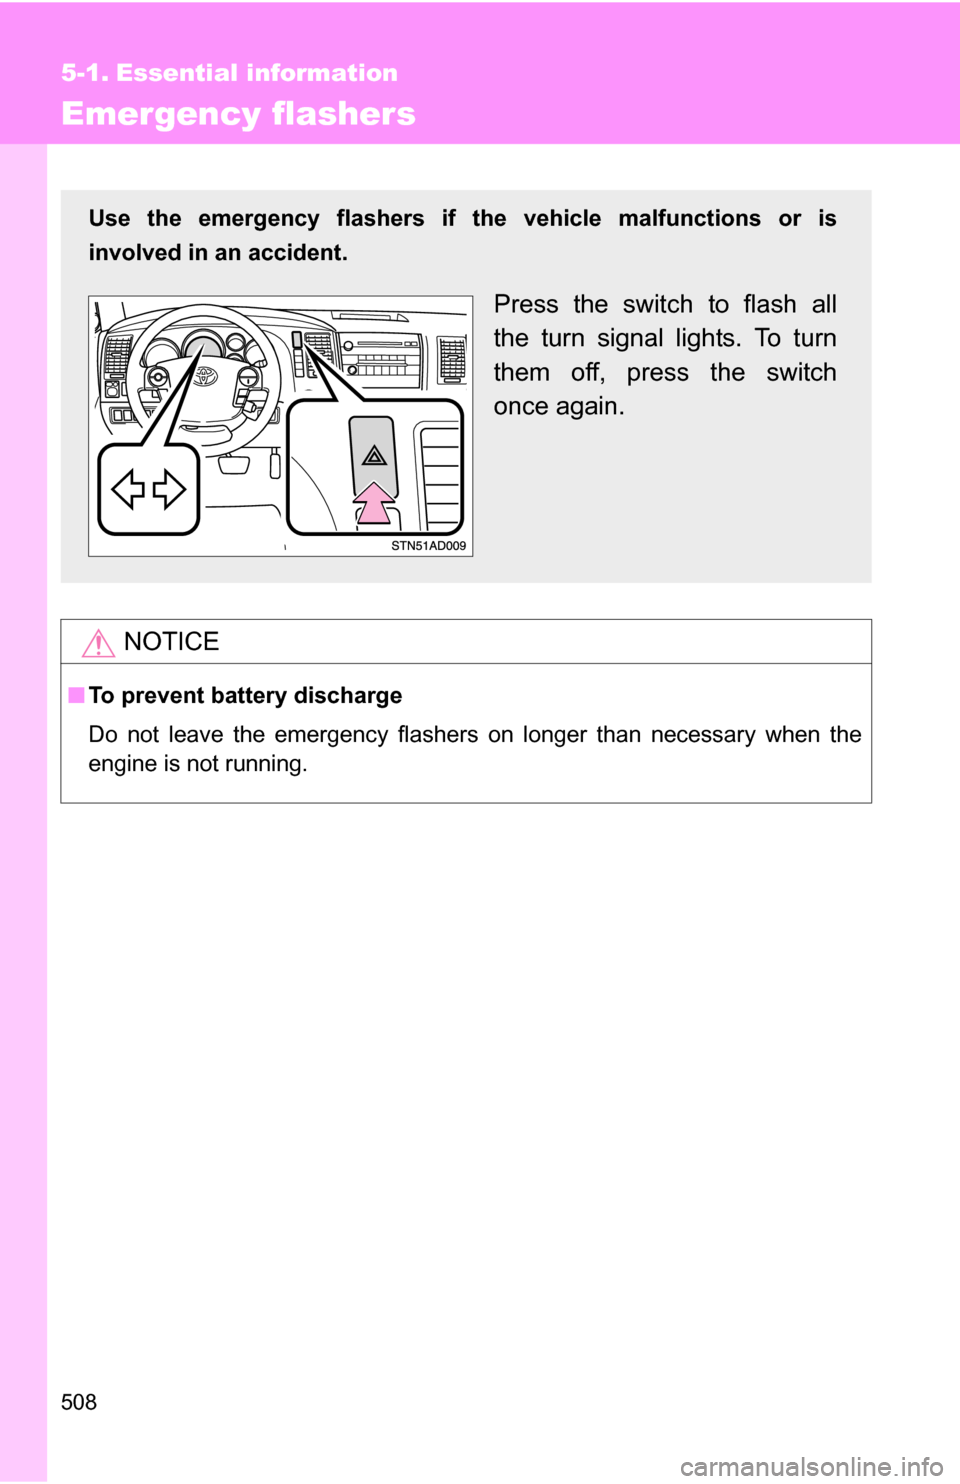
Use the emergency flashers if th e vehicle malfunctions or is
involved in an accident.
Press the switch to flash all
the turn signal lights. To turn
them off, press the switch
once again.
Page 518 of 612
518
5-2. Steps to take in an emergency
If a war ning light tur ns on or a war ning buzzer sounds...
Stop the vehicle immediately. Continuing to drive the vehicle may be dangerous.
The following warning indicates a possible problem in the brake sys-
tem. Immediately stop the vehicle in a safe place and contact your
Toyota dealer.
*: Parking brake engaged warning buzzer:
The buzzer sounds to indicate that parking brake is still engaged (with the
vehicle having reached a speed of 3 mph [5 km/h])
Stop the vehicle immediately.
The following warnings indicate the possibility of damage to the vehi-
cle that may lead to an accident. Immediately stop the vehicle in a
safe place and contact your Toyota dealer.
Warning lightWarning light/Details
(U.S.A.)
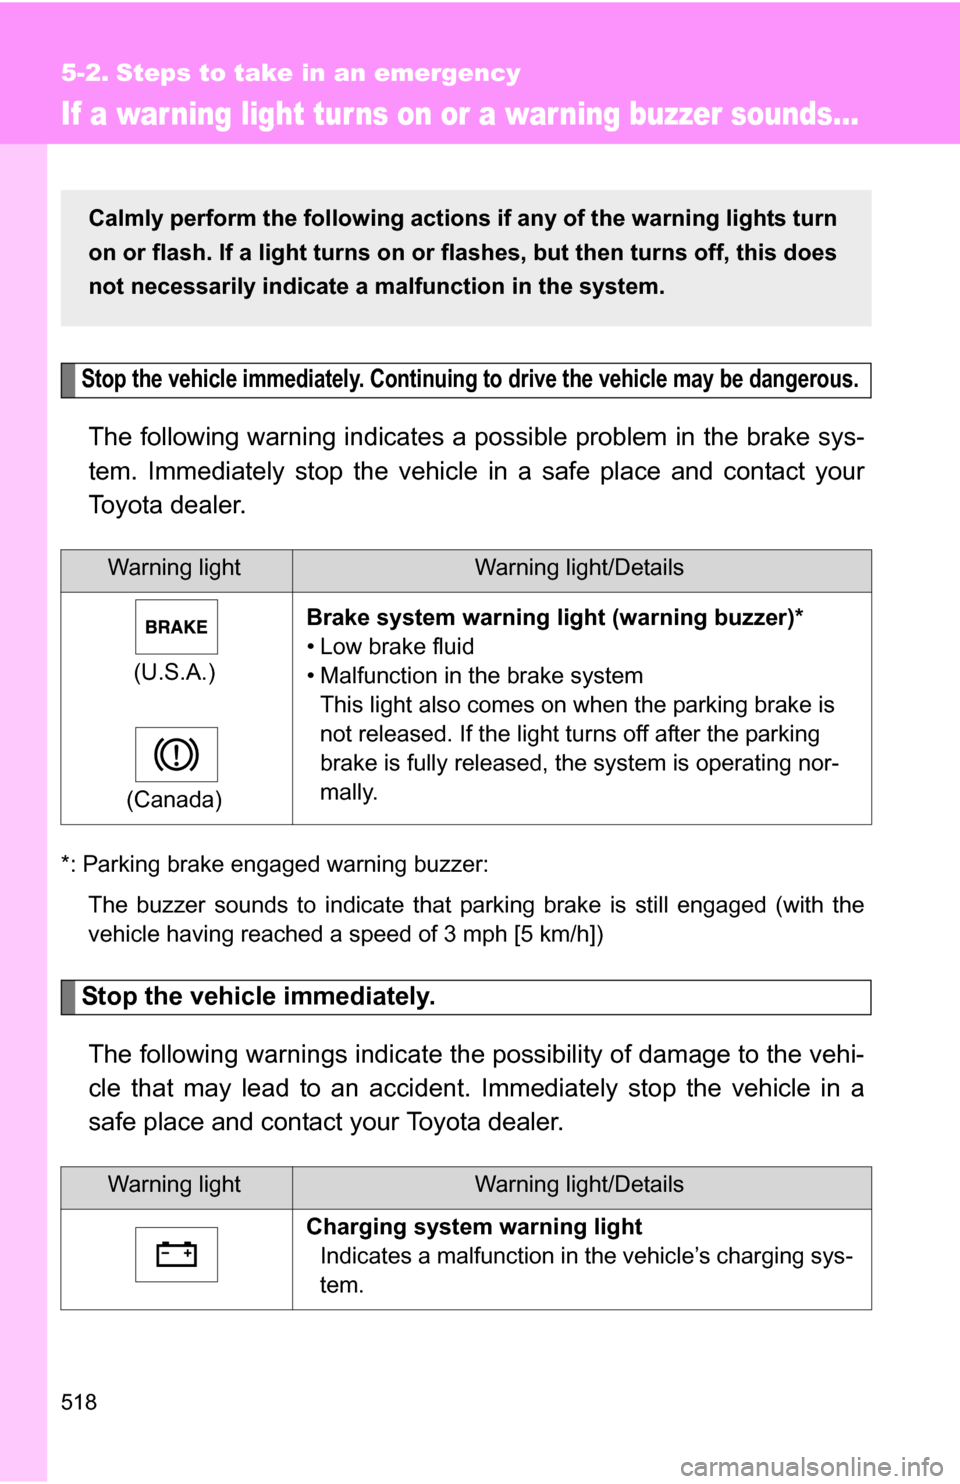
(Canada) Brake system warning li
ght (warning buzzer)*
• Low brake fluid
• Malfunction in the brake system This light also comes on when the parking brake is
not released. If the light turns off after the parking
brake is fully released, the system is operating nor-
mally.
Warning lightWarning light/Details
Charging system warning light Indicates a malfunction in the vehicle’s charging sys-
tem.
Calmly perform the following actions if any of the warning lights turn
on or flash. If a light turns on or flashes, but then turns off, this does
not necessarily indicate a malfunction in the system.
Page 527 of 612
5
When trouble arises
527
5-2. Steps to take in an emergency
If a war ning message is displayed (vehicles with multi-infor mation display)
Stop the vehicle immediately.The following warnings indicate the possibility of damage to the vehi-
cle that may lead to an accident. Immediately stop the vehicle in a
safe place and contact your Toyota dealer.
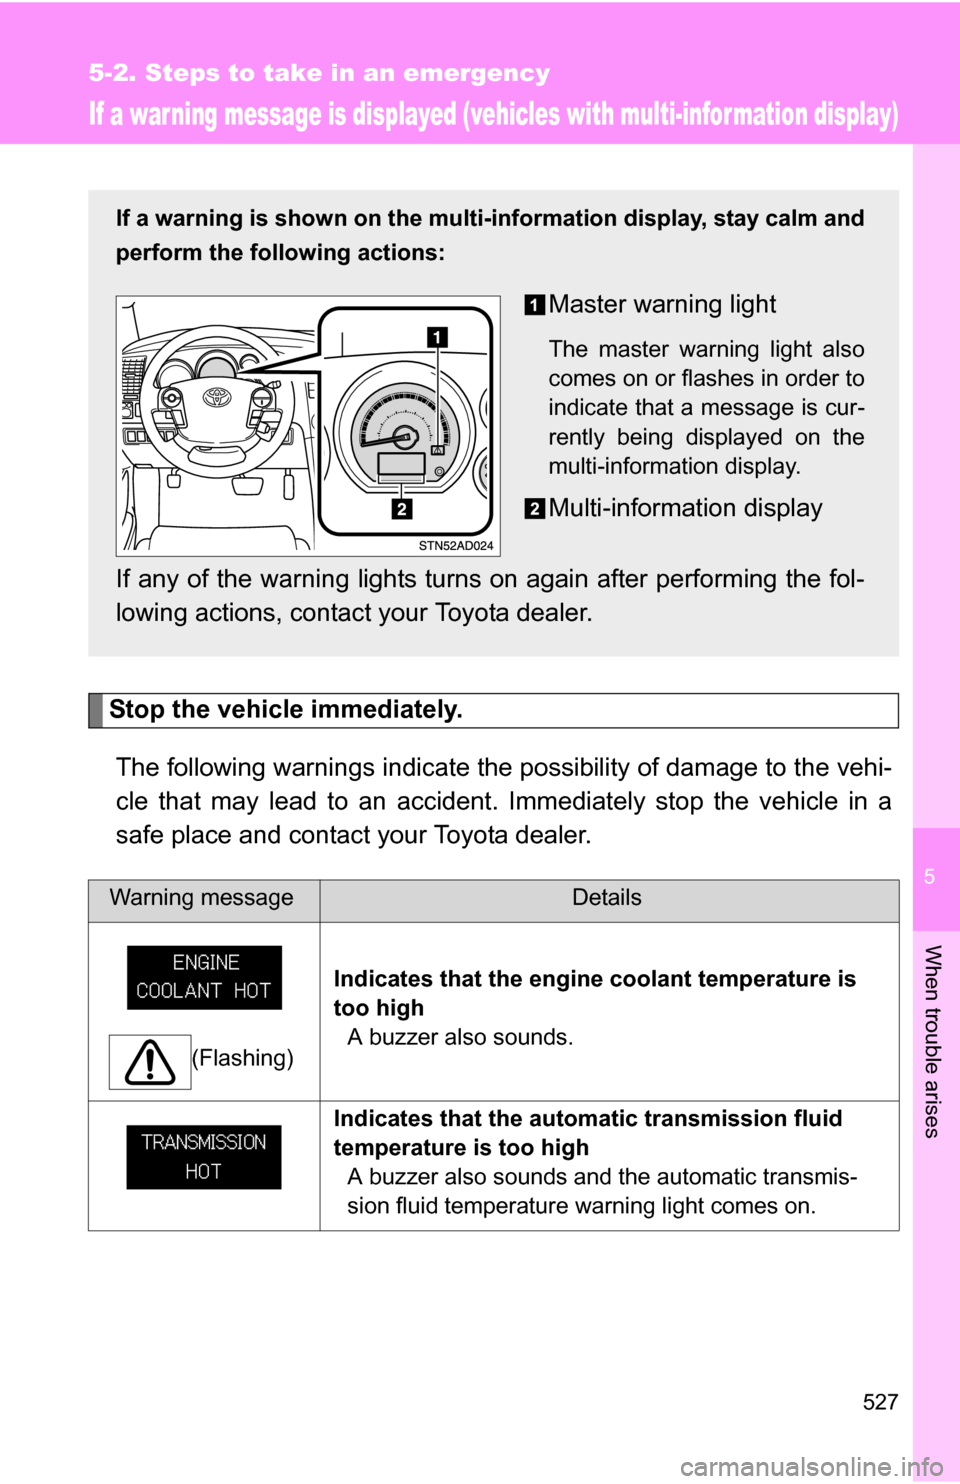
Warning messageDetails
(Flashing) Indicates that the engine coolant temperature is
too high
A buzzer also sounds.
Indicates that the automatic transmission fluid
temperature is too high A buzzer also sounds and the automatic transmis-
sion fluid temperature warning light comes on.
If a warning is shown on the multi- information display, stay calm and
perform the following actions:
Master warning light
The master warning light also
comes on or flashes in order to
indicate that a message is cur-
rently being displayed on the
multi-information display.
Multi-information display
If any of the warning lights turns on again after performing the fol-
lowing actions, contact your Toyota dealer.
Page 542 of 612
542
5-2. Steps to take in an emergency
If the engine will not star t
If the engine still does not start after following the correct starting
procedure ( P. 151) or releasing the steering lock (P. 152), confirm
the following points.
■ The engine will not start even when the starter motor oper-
ates normally.
One of the following may be the cause of the problem.
●There may not be sufficient fuel in the vehicle’s tank.
Refuel the vehicle. ( P. 9 5 )
Flex-fuel vehicles: The type of fuel may be different. When
refueling, add the same type of fuel, if available.
After adding a different type of fuel, the engine may run
roughly and driving performance may be reduced for a while
when the engine is first started. In this case, wait until the
engine runs normally.
● The engine may be flooded.
Try to restart the engine once more following correct starting
procedures.
● There may be a malfunction in the engine immobilizer system.
( P. 100)
■ The starter motor turns over slowly, the interior lights and
headlights are dim, or the horn does not sound or sounds at
a low volume.
One of the following may be the cause of the problem.
●The battery may be discharged. ( P. 546)
● The battery terminal connec tions may be loose or corroded.