TOYOTA SEQUOIA 2013 2.G Navigation Manual
Manufacturer: TOYOTA, Model Year: 2013, Model line: SEQUOIA, Model: TOYOTA SEQUOIA 2013 2.GPages: 328, PDF Size: 8.3 MB
Page 51 of 328
3
51
1
2
3
4
5
6
7
8
9
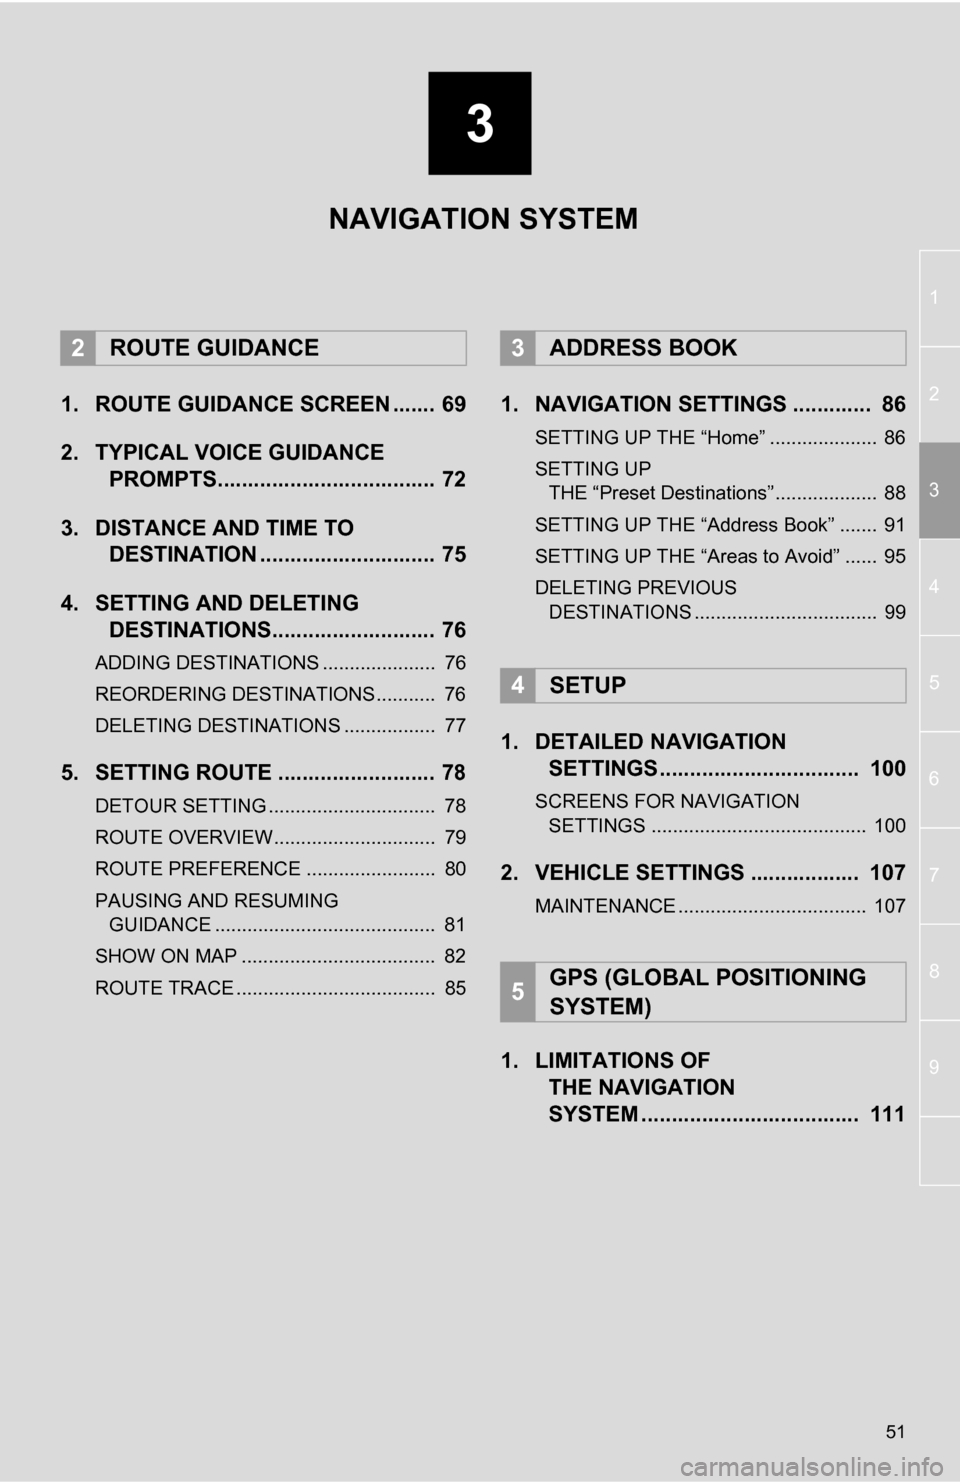
1. ROUTE GUIDANCE SCREEN ....... 69
2. TYPICAL VOICE GUIDANCE PROMPTS.................................... 72
3. DISTANCE AND TIME TO DESTINATION ............................. 75
4. SETTING AND DELETING DESTINATIONS........................... 76
ADDING DESTINATIONS ..................... 76
REORDERING DESTINATIONS ........... 76
DELETING DESTINATIONS ................. 77
5. SETTING ROUTE .......................... 78
DETOUR SETTING ............................... 78
ROUTE OVERVIEW.............................. 79
ROUTE PREFERENCE ........................ 80
PAUSING AND RESUMING
GUIDANCE ......................................... 81
SHOW ON MAP .................................... 82
ROUTE TRACE ..................................... 85
1. NAVIGATION SETTINGS ............. 86
SETTING UP THE “Home” .................... 86
SETTING UP THE “Preset Destinations” ................... 88
SETTING UP THE “Address Book” ....... 91
SETTING UP THE “Areas to Avoid” ...... 95
DELETING PREVIOUS DESTINATIONS .................................. 99
1. DETAILED NAVIGATION SETTINGS ................................. 100
SCREENS FOR NAVIGATION
SETTINGS ........................................ 100
2. VEHICLE SETTINGS .................. 107
MAINTENANCE ................................... 107
1. LIMITATIONS OF THE NAVIGATION
SYSTEM .......... ....................... ... 111
2ROUTE GUIDANCE3ADDRESS BOOK
4SETUP
5GPS (GLOBAL POSITIONING
SYSTEM)
NAVIGATION SYSTEM
Page 52 of 328
52
1. DESTINATION SEARCH
1. DESTINATION SEARCH
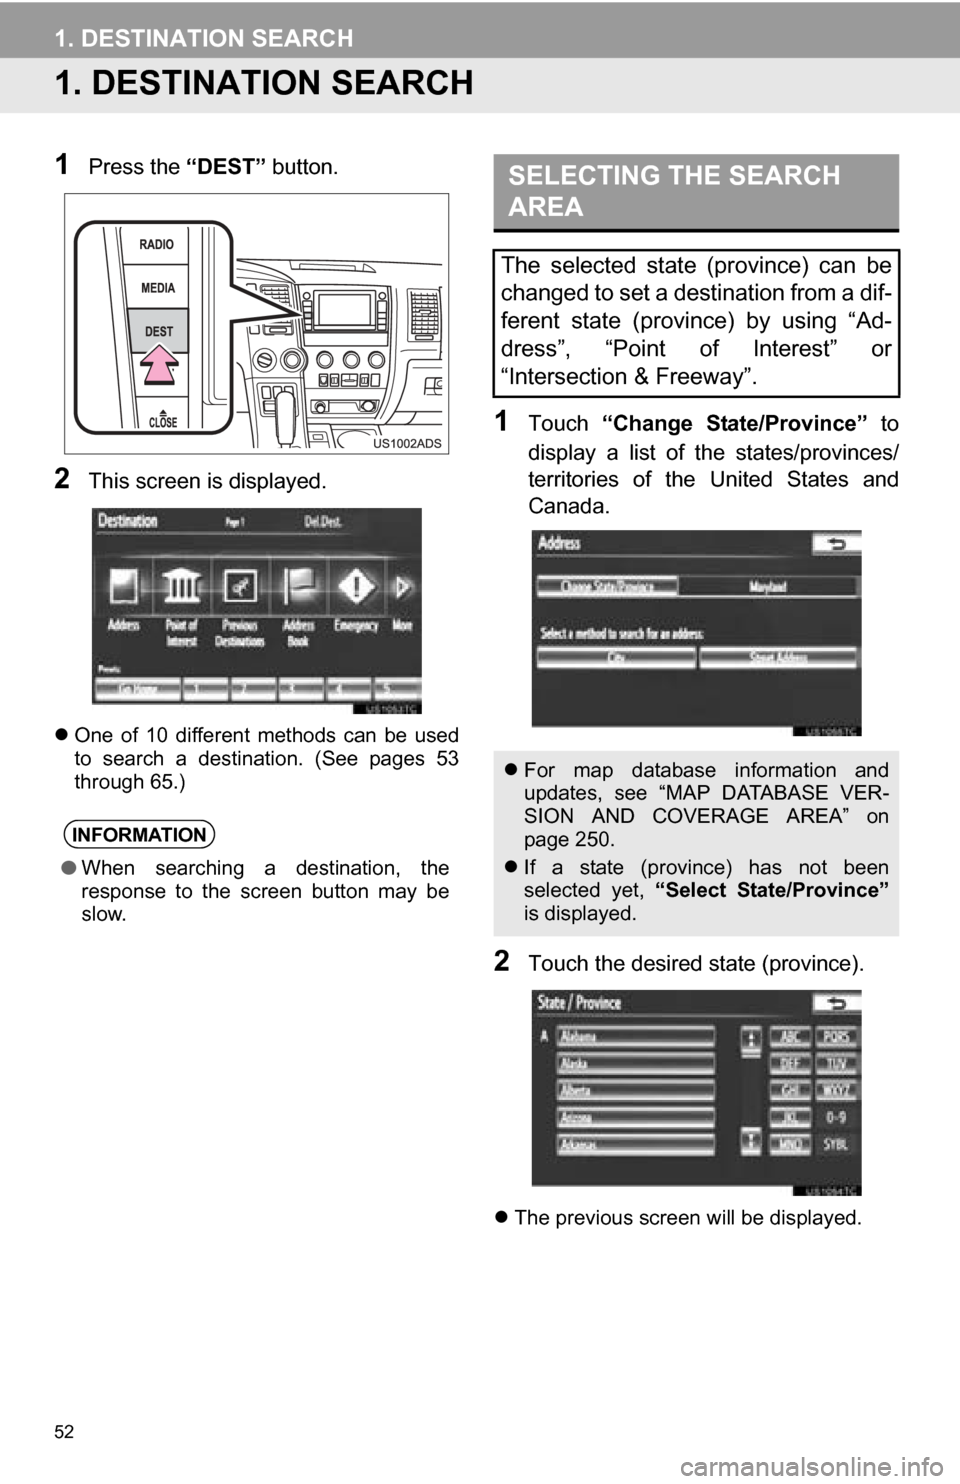
1Press the “DEST” button.
2This screen is displayed.
One of 10 different methods can be used
to search a destination. (See pages 53
through 65.)
1Touch “Change State/Province” to
display a list of the states/provinces/
territories of the United States and
Canada.
2Touch the desired state (province).
The previous screen will be displayed.
INFORMATION
●When searching a destination, the
response to the screen button may be
slow.
SELECTING THE SEARCH
AREA
The selected state (province) can be
changed to set a destination from a dif-
ferent state (province) by using “Ad-
dress”, “Point of Interest” or
“Intersection & Freeway”.
For map database information and
updates, see “MAP DATABASE VER-
SION AND COVERAGE AREA” on
page 250.
If a state (province) has not been
selected yet, “Select State/Province”
is displayed.
Page 53 of 328
53
1. DESTINATION SEARCH
3
NAVIGATION SYSTEM
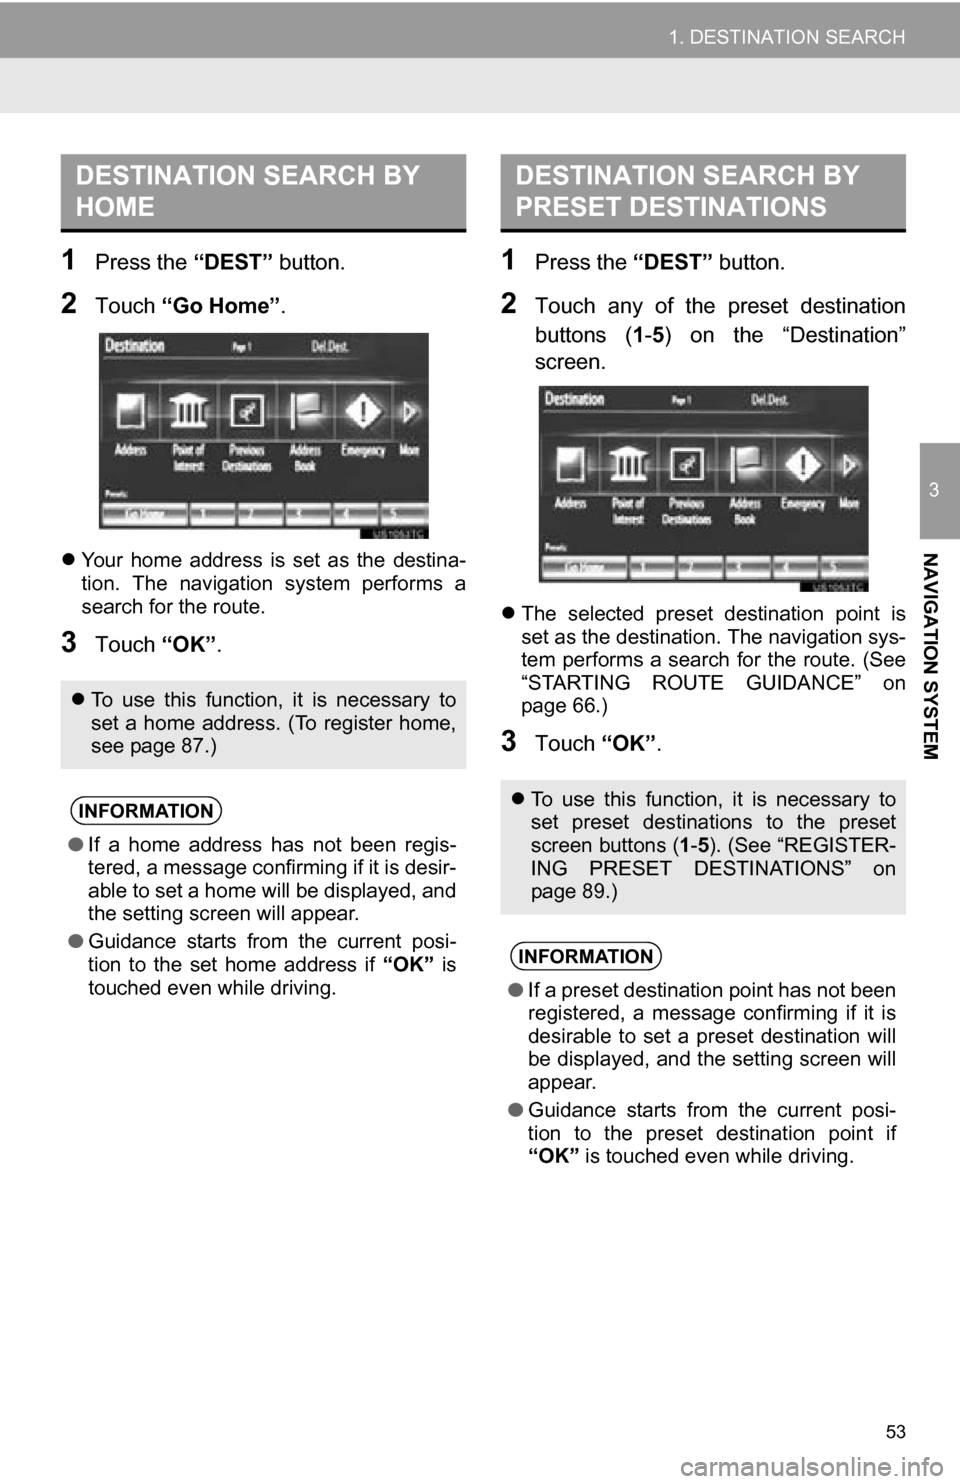
1Press the “DEST” button.
2Touch “Go Home” .
Your home address is set as the destina-
tion. The navigation system performs a
search for the route.
3Touch “OK”.
1Press the “DEST” button.
2Touch any of the preset destination
buttons (1-5 ) on the “Destination”
screen.
The selected preset destination point is
set as the destination. The navigation sys-
tem performs a search for the route. (See
“STARTING ROUTE GUIDANCE” on
page 66.)
3Touch “OK”.
DESTINATION SEARCH BY
HOME
To use this function, it is necessary to
set a home address. (To register home,
see page 87.)
INFORMATION
● If a home address has not been regis-
tered, a message confirming if it is desir-
able to set a home will be displayed, and
the setting screen will appear.
● Guidance starts from the current posi-
tion to the set home address if “OK” is
touched even while driving.
DESTINATION SEARCH BY
PRESET DESTINATIONS
To use this function, it is necessary to
set preset destinations to the preset
screen buttons ( 1-5 ). (See “REGISTER-
ING PRESET DESTINATIONS” on
page 89.)
INFORMATION
● If a preset destination point has not been
registered, a message confirming if it is
desirable to set a preset destination will
be displayed, and the setting screen will
appear.
● Guidance starts from the current posi-
tion to the preset destination point if
“OK” is touched even while driving.
Page 54 of 328
54
1. DESTINATION SEARCH
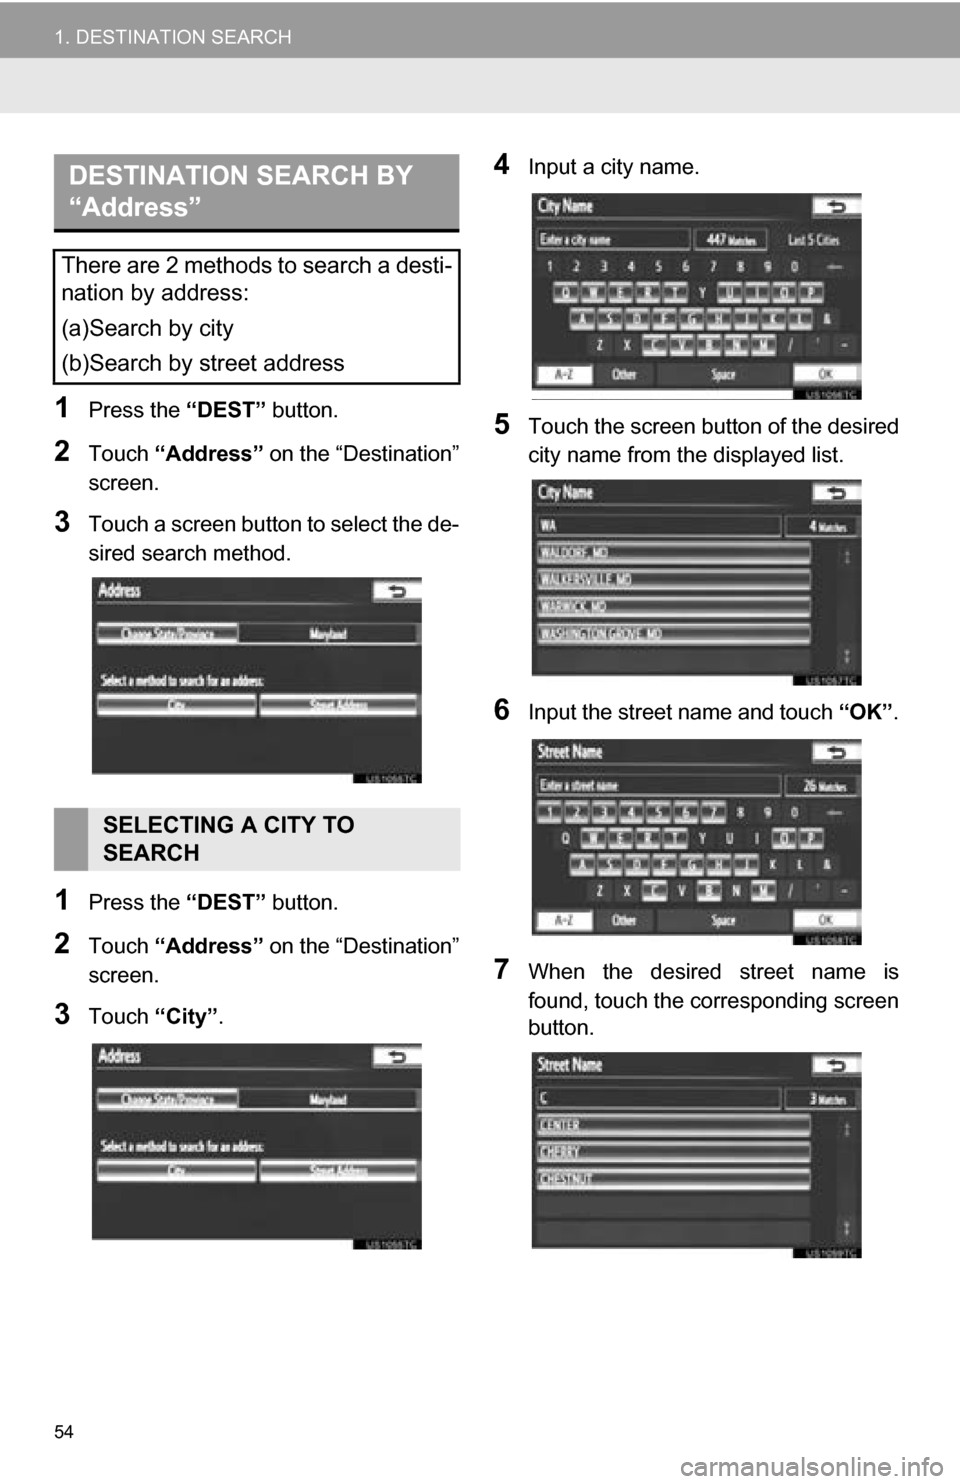
1Press the “DEST” button.
2Touch “Address” on the “Destination”
screen.
3Touch a screen button to select the de-
sired search method.
1Press the “DEST” button.
2Touch “Address” on the “Destination”
screen.
3Touch “City”.
4Input a city name.
5Touch the screen button of the desired
city name from the displayed list.
6Input the street name and touch “OK”.
7When the desired street name is
found, touch the corresponding screen
button.
DESTINATION SEARCH BY
“Address”
There are 2 methods to search a desti-
nation by address:
(a)Search by city
(b)Search by street address
SELECTING A CITY TO
SEARCH
Page 55 of 328
55
1. DESTINATION SEARCH
3
NAVIGATION SYSTEM
When the desired street name is selected,
the “Confirm Destination” screen may be
displayed. If “Go” is touched on the “Con-
firm Destination” screen, the navigation
system performs a search for the route.
(See “STARTING ROUTE GUIDANCE” on
page 66.)
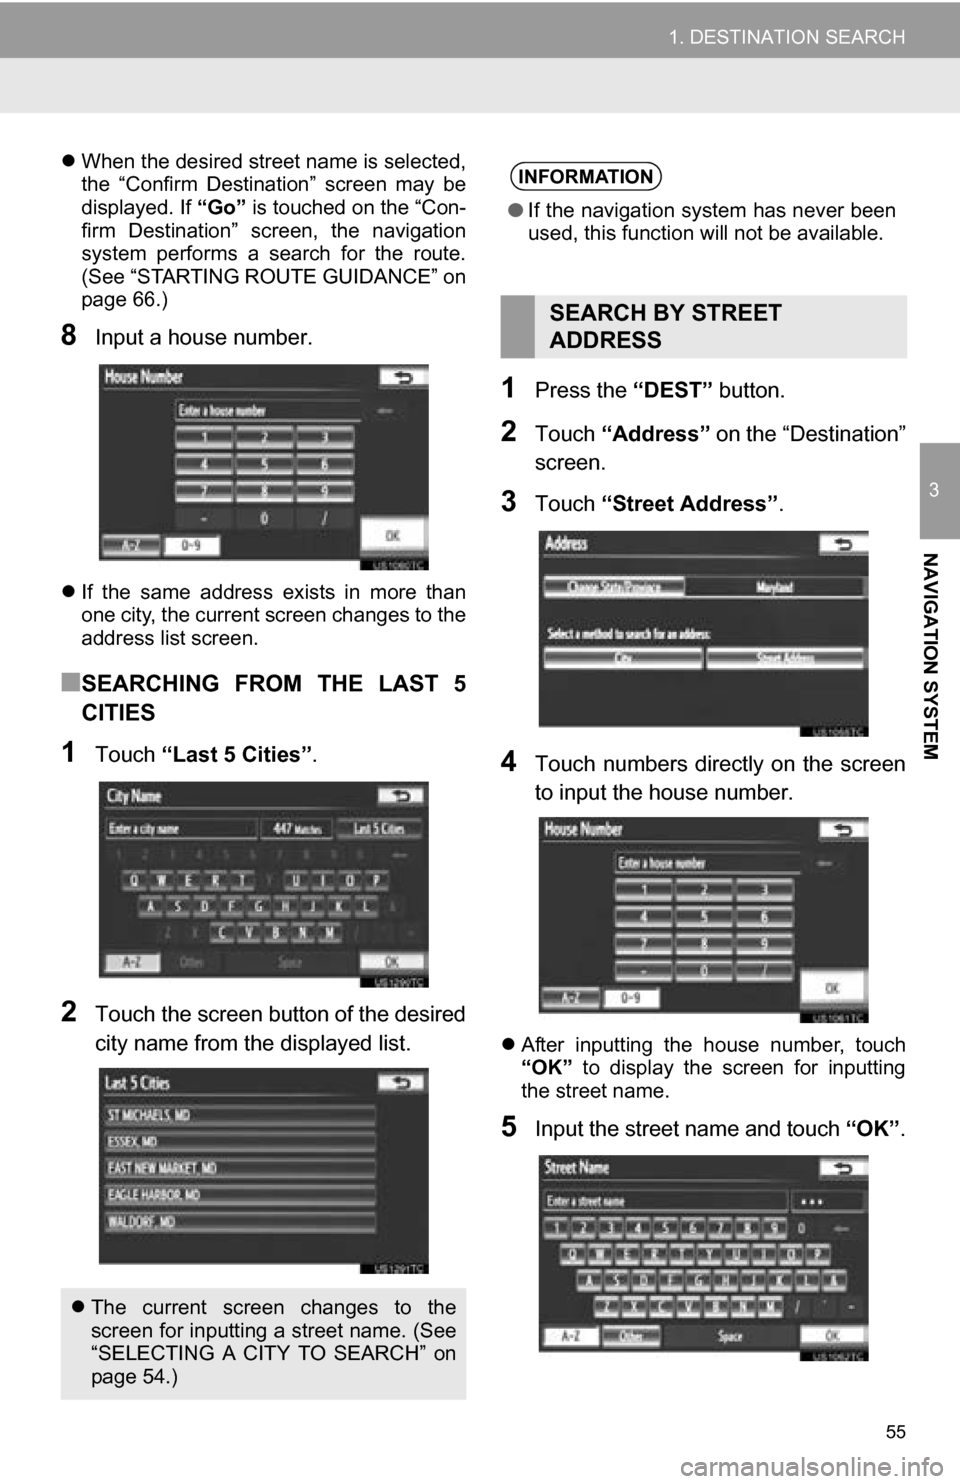
8Input a house number.
If the same address exists in more than
one city, the current screen changes to the
address list screen.
■SEARCHING FROM THE LAST 5
CITIES
1Touch “Last 5 Cities” .
2Touch the screen button of the desired
city name from the displayed list.
1Press the “DEST” button.
2Touch “Address” on the “Destination”
screen.
3Touch “Street Address”.
4Touch numbers directly on the screen
to input the house number.
After inputting the house number, touch
“OK” to display the screen for inputting
the street name.
5Input the street name and touch “OK”.
The current screen changes to the
screen for inputting a street name. (See
“SELECTING A CITY TO SEARCH” on
page 54.)
INFORMATION
● If the navigation system has never been
used, this function will not be available.
SEARCH BY STREET
ADDRESS
Page 56 of 328
56
1. DESTINATION SEARCH
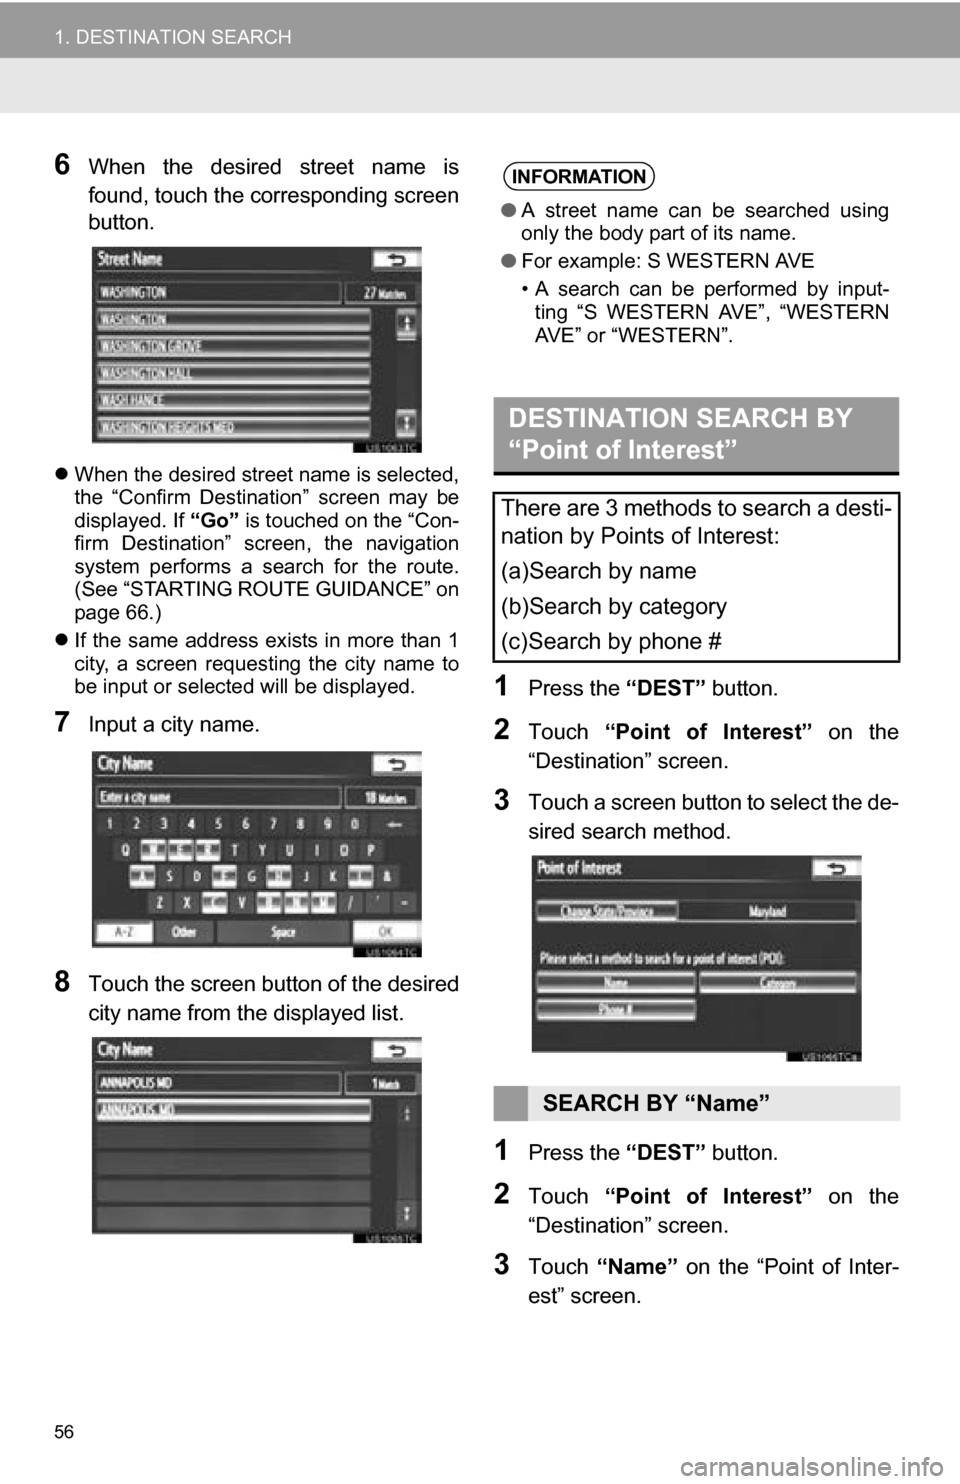
6When the desired street name is
found, touch the corresponding screen
button.
When the desired street name is selected,
the “Confirm Destination” screen may be
displayed. If “Go” is touched on the “Con-
firm Destination” screen, the navigation
system performs a search for the route.
(See “STARTING ROUTE GUIDANCE” on
page 66.)
If the same address exists in more than 1
city, a screen requesting the city name to
be input or selected will be displayed.
7Input a city name.
8Touch the screen button of the desired
city name from the displayed list.
1Press the “DEST” button.
2Touch “Point of Interest” on the
“Destination” screen.
3Touch a screen button to select the de-
sired search method.
1Press the “DEST” button.
2Touch “Point of Interest” on the
“Destination” screen.
3Touch “Name” on the “Point of Inter-
est” screen.
INFORMATION
● A street name can be searched using
only the body part of its name.
● For example: S WESTERN AVE
• A search can be performed by input-
ting “S WESTERN AVE”, “WESTERN
AVE” or “WESTERN”.
DESTINATION SEARCH BY
“Point of Interest”
There are 3 methods to search a desti-
nation by Points of Interest:
(a)Search by name
(b)Search by category
(c)Search by phone #
SEARCH BY “Name”
Page 57 of 328
57
1. DESTINATION SEARCH
3
NAVIGATION SYSTEM
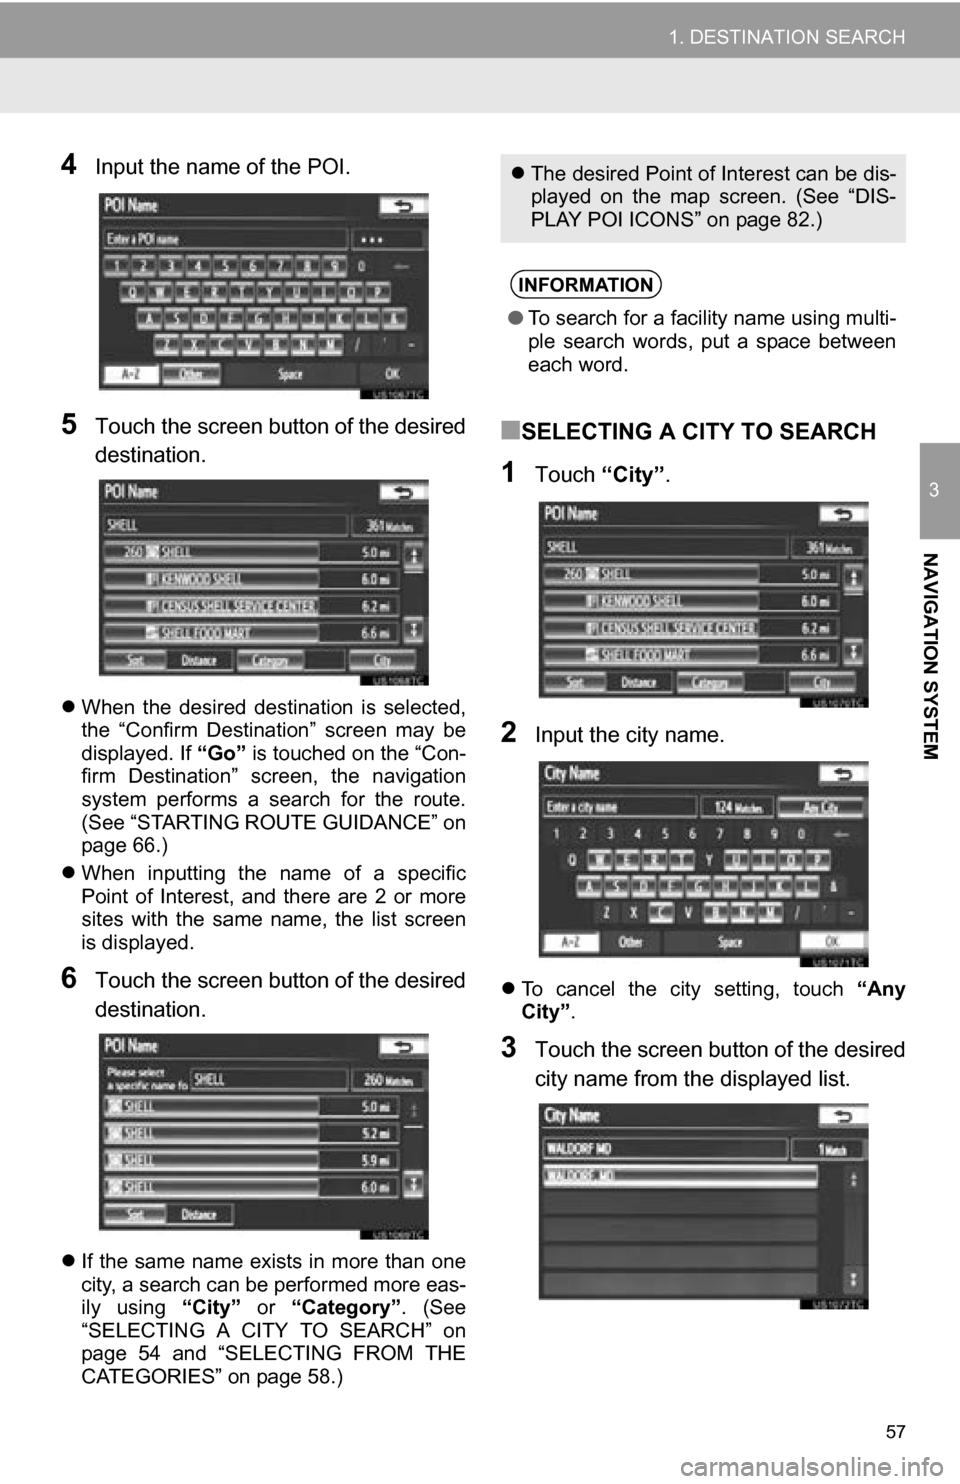
4Input the name of the POI.
5Touch the screen button of the desired
destination.
When the desired destination is selected,
the “Confirm Destination” screen may be
displayed. If “Go” is touched on the “Con-
firm Destination” screen, the navigation
system performs a search for the route.
(See “STARTING ROUTE GUIDANCE” on
page 66.)
When inputting the name of a specific
Point of Interest, and there are 2 or more
sites with the same name, the list screen
is displayed.
6Touch the screen button of the desired
destination.
If the same name exists in more than one
city, a search can be performed more eas-
ily using “City” or “Category” . (See
“SELECTING A CITY TO SEARCH” on
page 54 and “SELECTING FROM THE
CATEGORIES” on page 58.)
■SELECTING A CITY TO SEARCH
1Touch “City”.
2Input the city name.
To cancel the city setting, touch “Any
City” .
3Touch the screen button of the desired
city name from the displayed list.
The desired Point of Interest can be dis-
played on the map screen. (See “DIS-
PLAY POI ICONS” on page 82.)
INFORMATION
●To search for a facility name using multi-
ple search words, put a space between
each word.
Page 58 of 328
58
1. DESTINATION SEARCH
■SELECTING FROM THE CATEGO-
RIES
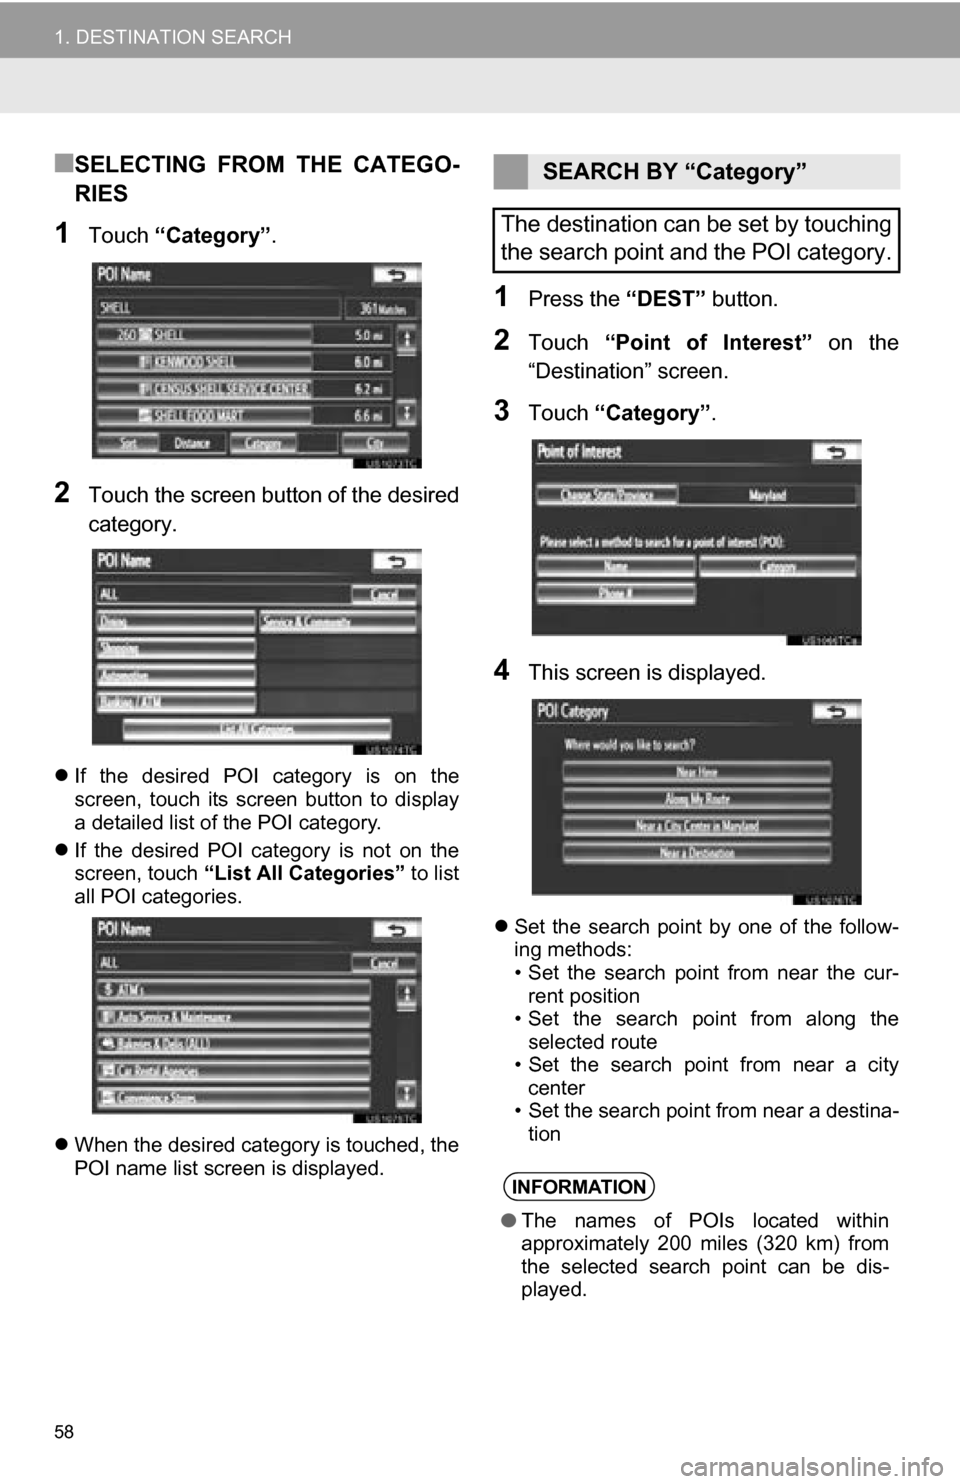
1Touch “Category” .
2Touch the screen button of the desired
category.
If the desired POI category is on the
screen, touch its screen button to display
a detailed list of the POI category.
If the desired POI category is not on the
screen, touch “List All Categories” to list
all POI categories.
When the desired category is touched, the
POI name list screen is displayed.
1Press the “DEST” button.
2Touch “Point of Interest” on the
“Destination” screen.
3Touch “Category” .
4This screen is displayed.
Set the search point by one of the follow-
ing methods:
• Set the search point from near the cur-
rent position
• Set the search point from along the selected route
• Set the search point from near a city center
• Set the search point from near a destina-
tion
SEARCH BY “Category”
The destination can be set by touching
the search point and the POI category.
INFORMATION
● The names of POIs located within
approximately 200 miles (320 km) from
the selected search point can be dis-
played.
Page 59 of 328
59
1. DESTINATION SEARCH
3
NAVIGATION SYSTEM
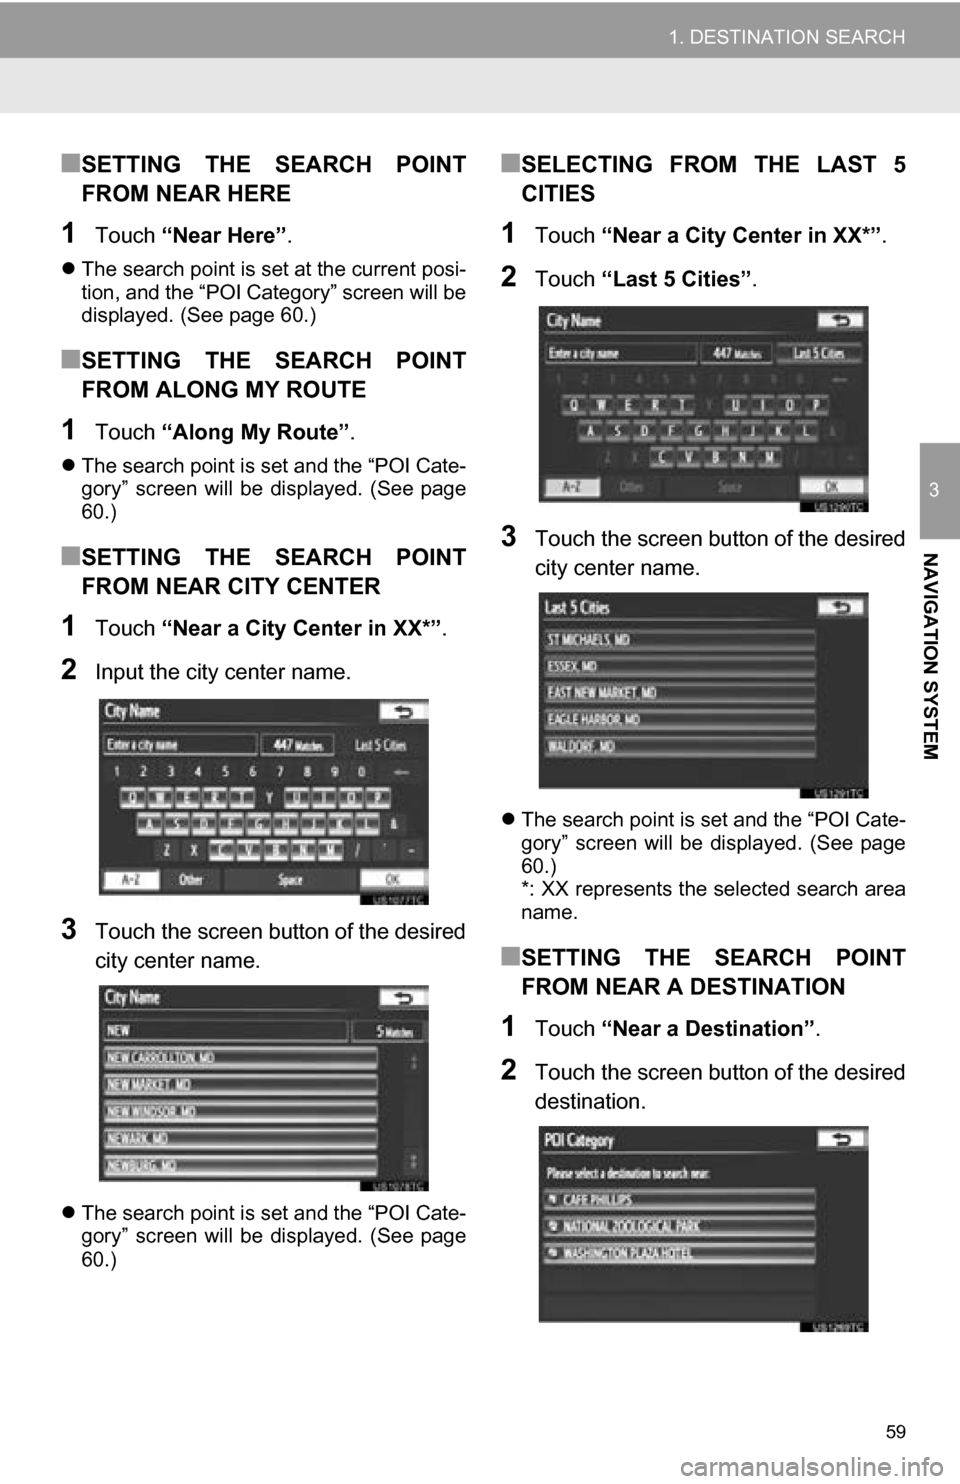
■SETTING THE SEARCH POINT
FROM NEAR HERE
1Touch “Near Here” .
The search point is set at the current posi-
tion, and the “POI Category” screen will be
displayed. (See page 60.)
■SETTING THE SEARCH POINT
FROM ALONG MY ROUTE
1Touch “Along My Route” .
The search point is set and the “POI Cate-
gory” screen will be displayed. (See page
60.)
■SETTING THE SEARCH POINT
FROM NEAR CITY CENTER
1Touch “Near a City Center in XX*” .
2Input the city center name.
3Touch the screen button of the desired
city center name.
The search point is set and the “POI Cate-
gory” screen will be displayed. (See page
60.)
■SELECTING FROM THE LAST 5
CITIES
1Touch “Near a City Center in XX*” .
2Touch “Last 5 Cities” .
3Touch the screen button of the desired
city center name.
The search point is set and the “POI Cate-
gory” screen will be displayed. (See page
60.)
*: XX represents the selected search area
name.
■SETTING THE SEARCH POINT
FROM NEAR A DESTINATION
1Touch “Near a Destination” .
2Touch the screen button of the desired
destination.
Page 60 of 328
60
1. DESTINATION SEARCH
The search point is set and the “POI Cate-
gory” screen will be displayed. (See page
60.)
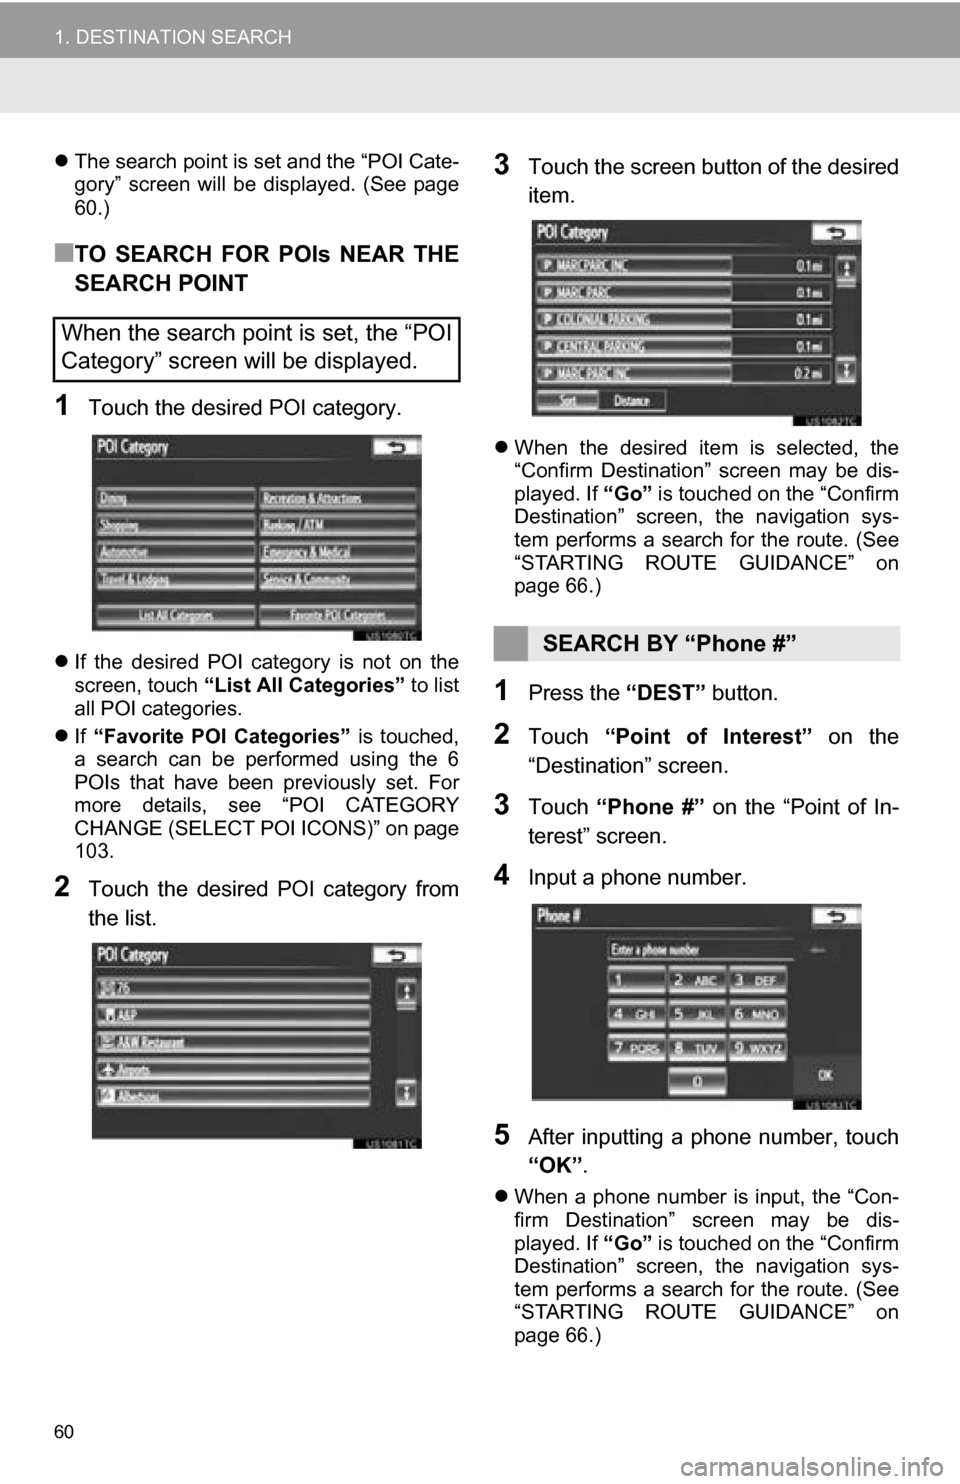
■TO SEARCH FOR POIs NEAR THE
SEARCH POINT
1Touch the desired POI category.
If the desired POI category is not on the
screen, touch “List All Categories” to list
all POI categories.
If “Favorite POI Categories” is touched,
a search can be performed using the 6
POIs that have been previously set. For
more details, see “POI CATEGORY
CHANGE (SELECT POI ICONS)” on page
103.
2Touch the desired POI category from
the list.
3Touch the screen button of the desired
item.
When the desired item is selected, the
“Confirm Destination” screen may be dis-
played. If “Go” is touched on the “Confirm
Destination” screen, the navigation sys-
tem performs a search for the route. (See
“STARTING ROUTE GUIDANCE” on
page 66.)
1Press the “DEST” button.
2Touch “Point of Interest” on the
“Destination” screen.
3Touch “Phone #” on the “Point of In-
terest” screen.
4Input a phone number.
5After inputting a phone number, touch
“OK” .
When a phone number is input, the “Con-
firm Destination” screen may be dis-
played. If “Go” is touched on the “Confirm
Destination” screen, the navigation sys-
tem performs a search for the route. (See
“STARTING ROUTE GUIDANCE” on
page 66.)
When the search point is set, the “POI
Category” screen will be displayed.
SEARCH BY “Phone #”