remote control TOYOTA SEQUOIA 2013 2.G User Guide
[x] Cancel search | Manufacturer: TOYOTA, Model Year: 2013, Model line: SEQUOIA, Model: TOYOTA SEQUOIA 2013 2.GPages: 740, PDF Size: 15.34 MB
Page 42 of 740
42
1-2. Opening, closing and locking the doors
Back door
The back door can be locked/unlocked and opened by the following
procedures.
■Locking and unlocking the back door
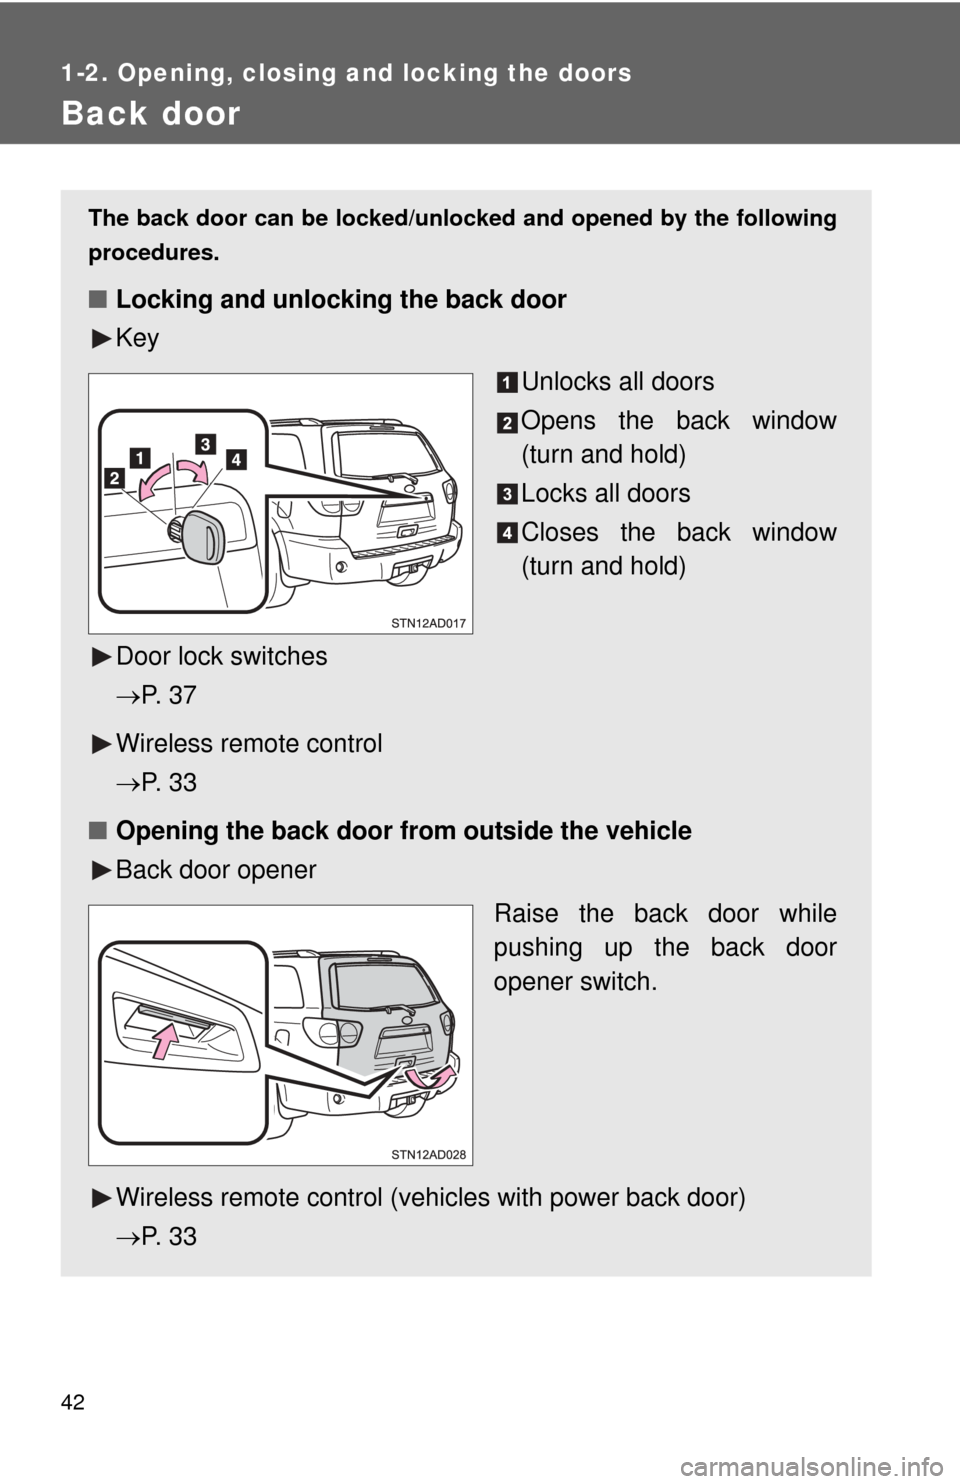
Key
Unlocks all doors
Opens the back window
(turn and hold)
Locks all doors
Closes the back window
(turn and hold)
Door lock switches
P. 3 7
Wireless remote control
P. 3 3
■ Opening the back door from outside the vehicle
Back door opener
Raise the back door while
pushing up the back door
opener switch.
Wireless remote control (vehicles with power back door)
P. 3 3
Page 66 of 740
66 1-3. Adjustable components (seats, mirrors, steering wheel)
Linking driving position memory with door unlock operation
Memorized driving positions can be recalled when you unlock the
driver’s door using the wireless remote control and open the driver’s
door.
■ Setting the linked door unlock operation
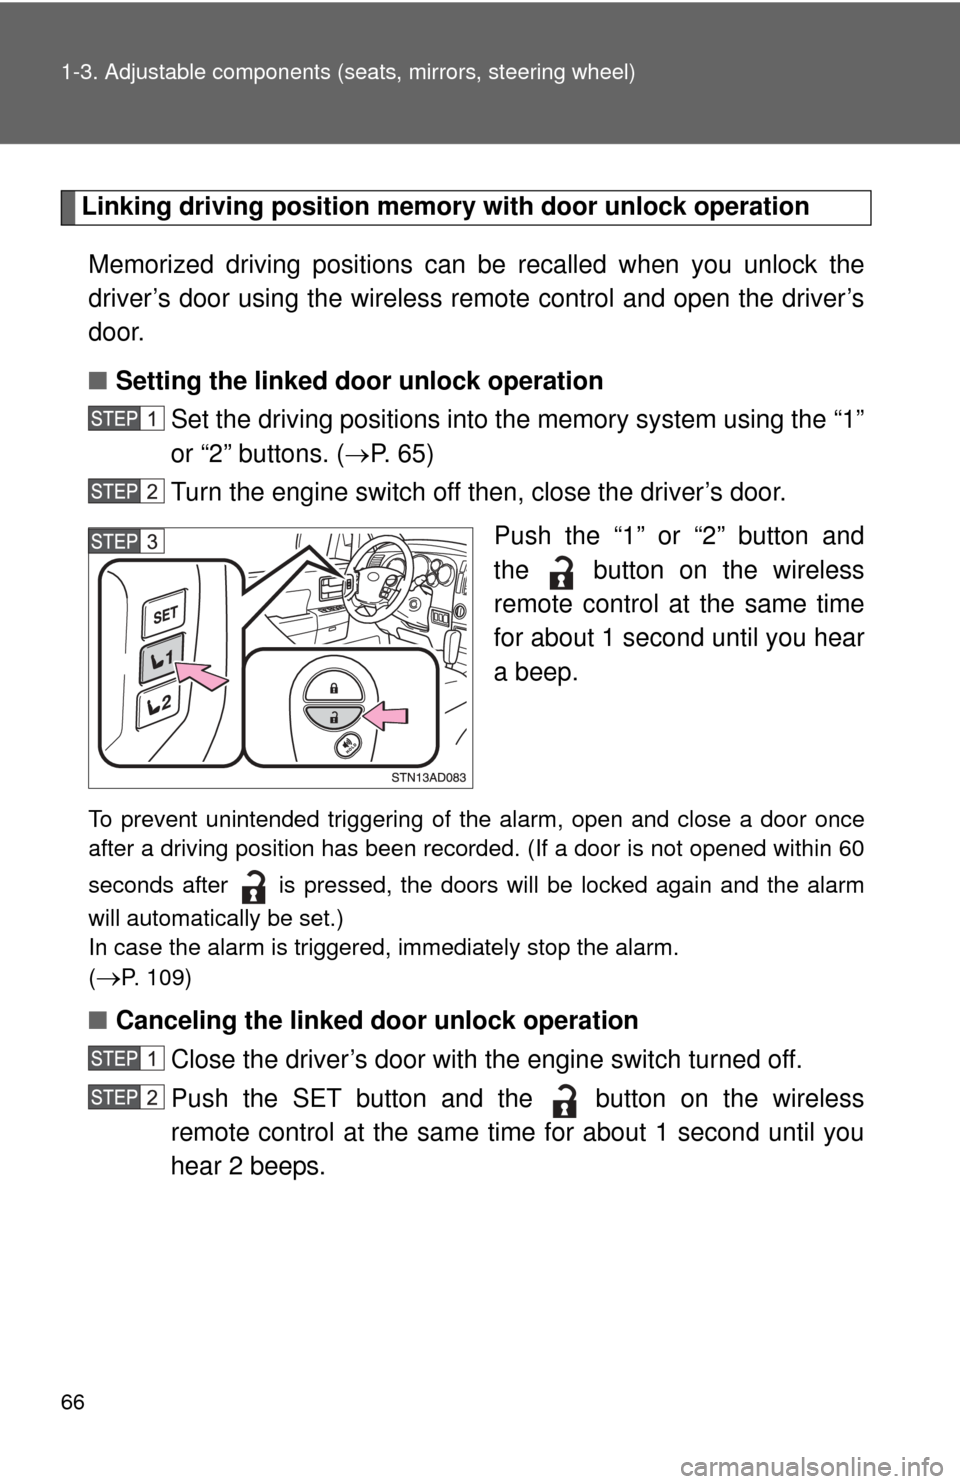
Set the driving positions into the memory system using the “1”
or “2” buttons. ( P. 6 5 )
Turn the engine switch off then, close the driver’s door.
Push the “1” or “2” button and
the button on the wireless
remote control at the same time
for about 1 second until you hear
a beep.
To prevent unintended triggering of the alarm, open and close a door once
after a driving position has been recorded. (If a door is not opened within 60
seconds after is pressed, the doors will be locked again and the alarm
will automatically be set.)
In case the alarm is triggered, immediately stop the alarm.
(
P. 109)
■Canceling the linked door unlock operation
Close the driver’s door with the engine switch turned off.
Push the SET button and the button on the wireless
remote control at the same time for about 1 second until you
hear 2 beeps.
Page 109 of 740

109
1
1-6. Theft deterrent system
Before driving
Alarm
The system sounds the alarm and flashes lights when forcible entry
is detected.
■ Triggering of the alarm
The alarm is triggered in the fo llowing situations when the alarm
is set.
● A locked door is unlocked or opened in any way other than
using the wireless remote control door lock function or key.
The doors will lock again automatically.
● The hood is opened.
● Vehicles with the glass breakage sensor (if equipped): The
side windows are tapped or broken.
● The battery is reconnected.
■ Setting the alarm system
Close the doors and hood,
and lock all the doors. The
system will be set automati-
cally after 30 seconds.
The indicator light changes
from being on to flashing when
the system is set.
■Deactivating or stopping the alarm
●Unlock the doors.
● Turn the engine switch to the ACC or ON position, or start the
engine.
(The alarm will be deactivated or stopped after a few sec-
onds.)
Page 193 of 740
193
2-3. Operating the lights and wipers
2
When driving
■
Automatic light off system
●When the headlights come on: The headlights and tail lights automati-
cally turn off after 30 seconds when all doors are closed with the engine
switch turned to the ACC or LOCK position. (The lights turn off immedi-
ately if the button on the wireless remote control is pressed after all
doors are locked.)
● When only the tail lights come on: The tail lights turn off automatically
with the engine switch turned to the ACC or LOCK position and the
driver’s door is opened.
To turn the lights on again, turn the engine switch to the ON position, or turn
the headlight switch off once and then back to the or position.
■ Customization
●That can be configured at Toyota dealer. (vehicles without multi-informa-
tion display)
Settings (automatic light off system) can be changed. (Customizable
features P. 703)
● It is possible to change the settings. (vehicles with multi-information dis-
play) (Feature customization P. 182)
NOTICE
■To prevent battery discharge
Do not leave the lights on longer than necessary when the engine is not run-
ning.
Page 300 of 740
300
3-1. Using the air conditioning system and defogger
Front air conditioning system ........................... 302
Rear air conditioning system ........................... 310
Rear window and outside rear view mirror
defoggers ....................... 314
Windshield wiper de-icer ............................ 316
Using the steering wheel climate remote control
switches ......................... 317
3-2. Using the audio system Audio system ................... 319
Using the radio ................. 323
Using the CD player ......... 331
Playing MP3 and WMA discs ..................... 340
Operating an iPod ............ 348
Operating a USB memory .......................... 355
Optimal use of the audio system ........................... 362
Using the AUX port .......... 366
Using the steering wheel audio switches ............... 368 3-3. Using the Bluetooth® audio
system
Bluetooth
® audio
system ........................... 371
Using the Bluetooth
®
audio system.................. 374
Operating a Bluetooth
®
enabled portable
player ............................. 379
Setting up a Bluetooth
®
enabled portable
player ............................. 381
Bluetooth
® audio system
setup .............................. 386
3-4. Using the rear seat entertainment system
Rear seat entertainment system features ............. 387
Playing a Blu-ray Disc™ (BD) and DVD disc ........ 405
Playing an audio CD and MP3/WMA discs ............ 431
Playing an SD card .......... 438
Using the video mode ...... 446
Interior features3
Page 317 of 740
317
3-1. Using the air conditioning system and defogger
3
Interior features
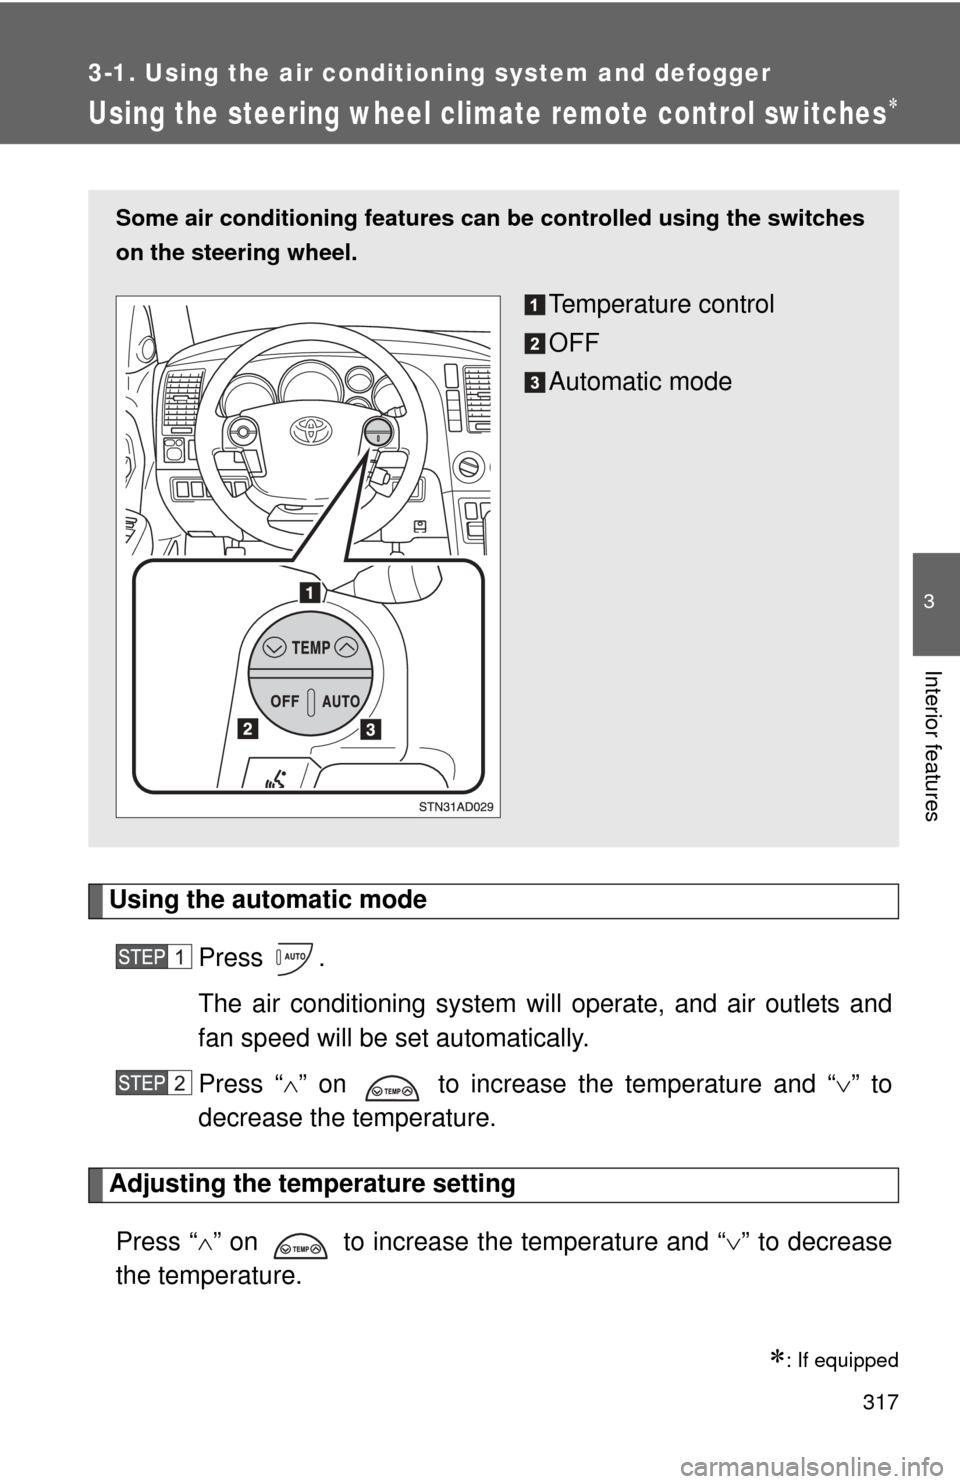
Using the steering wheel climate remote control switches
Using the automatic modePress .
The air conditioning system will operate, and air outlets and
fan speed will be set automatically.
Press “ ” on to increase the temperature and “ ” to
decrease the temperature.
Adjusting the temperature setting
Press “ ” on to increase the temperature and “ ” to decrease
the temperature.
: If equipped
Some air conditioning features can be controlled using the switches
on the steering wheel.
Temperature control
OFF
Automatic mode
Page 372 of 740
372 3-3. Using the Bluetooth
® audio system
■About Bluetooth®
■Compatible models
●Bluetooth
® specifications:
Ve r. 1 . 2
● Following Profiles:
• A2DP (Advanced Audio Distribution Profile) Ver. 1.0
• AVRCP (Audio/Video Remote Control Profile) Ver. 1.0 or higher (Ver.
1.3 or higher recommended)
Portable players must correspond to the above specifications in order to be
connected to the Bluetooth
® audio system. However, please note that some
functions may be limited depending on the type of portable player.
■ Certification for the Bluetooth
® audio system
FCC ID: ACJ932C5ZZZ035
IC ID: 216J-C5ZZZ035
MADE IN JAPAN
This device complies with Part 15 of the FCC Rules and RSS-210 Rules.
Operation is subject to the following two conditions; (1) This device may not
cause harmful interference, and (2) This device must accept any interfer-
ence received, including interference that may cause undesired operation\
.
Bluetooth is a registered trademark of
Bluetooth SIG. Inc.
Page 387 of 740
387
3
Interior features
3-4. Using the rear seat entertainment system
Rear seat enter tainment system features
: If equipped
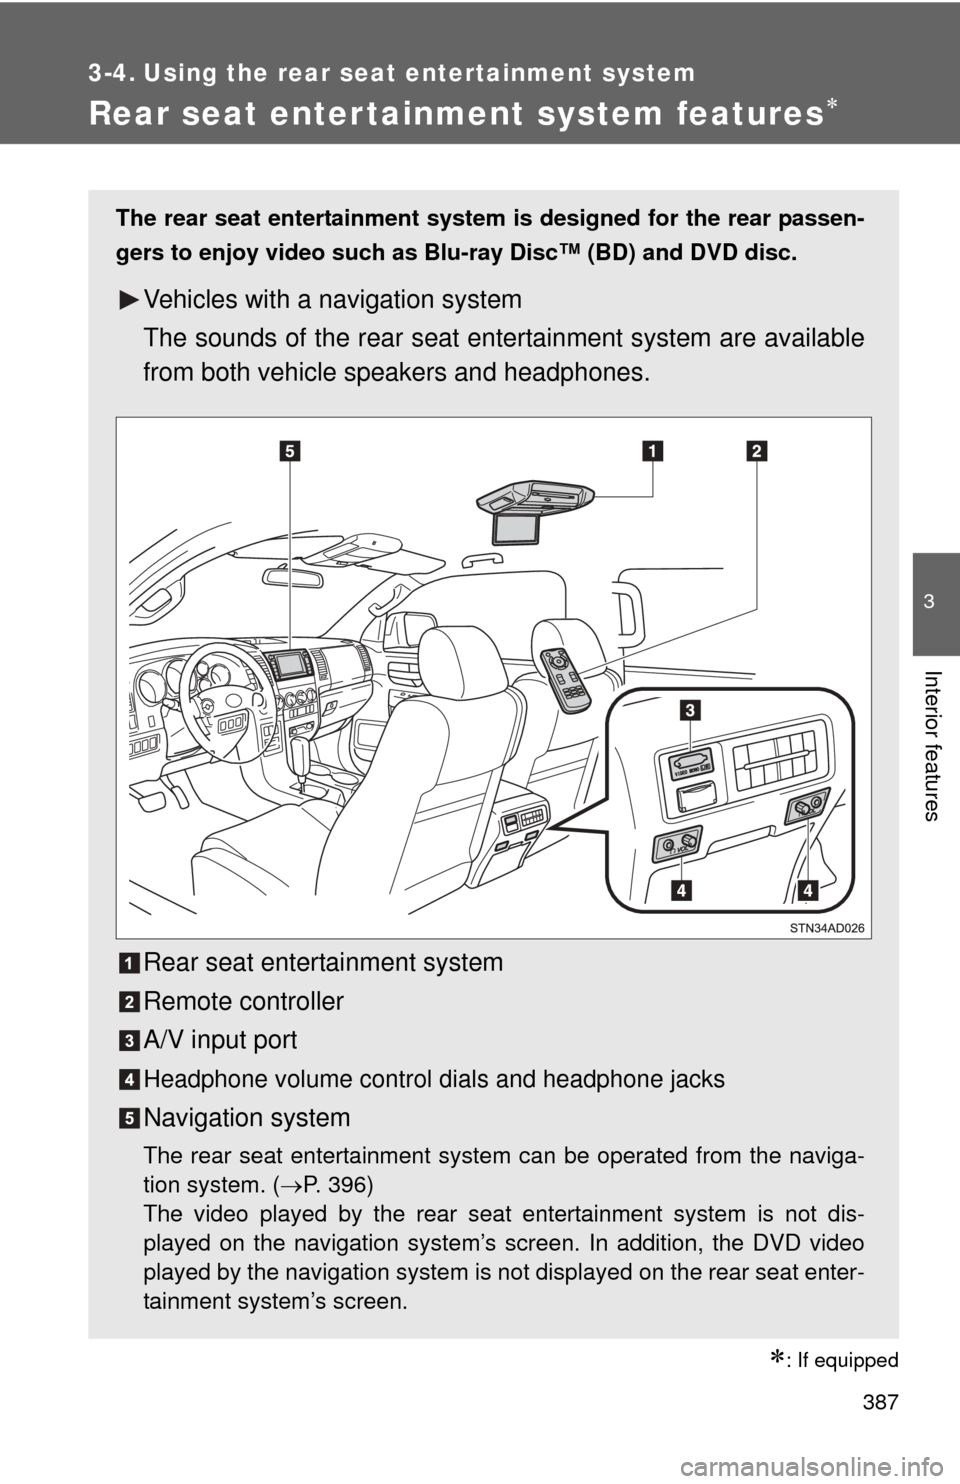
The rear seat entertainment system is designed for the rear passen-
gers to enjoy video such as Blu-ray Disc™ (BD) and DVD disc.
Vehicles with a navigation system
The sounds of the rear seat en tertainment system are available
from both vehicle speakers and headphones.
Rear seat entertainment system
Remote controller
A/V input port
Headphone volume control dials and headphone jacks
Navigation system
The rear seat entertainment system can be operated from the naviga-
tion system. (P. 396)
The video played by the rear seat entertainment system is not dis-
played on the navigation system’s screen. In addition, the DVD video
played by the navigation system is not displayed on the rear seat enter-
tainment system’s screen.
Page 388 of 740
388 3-4. Using the rear seat entertainment system
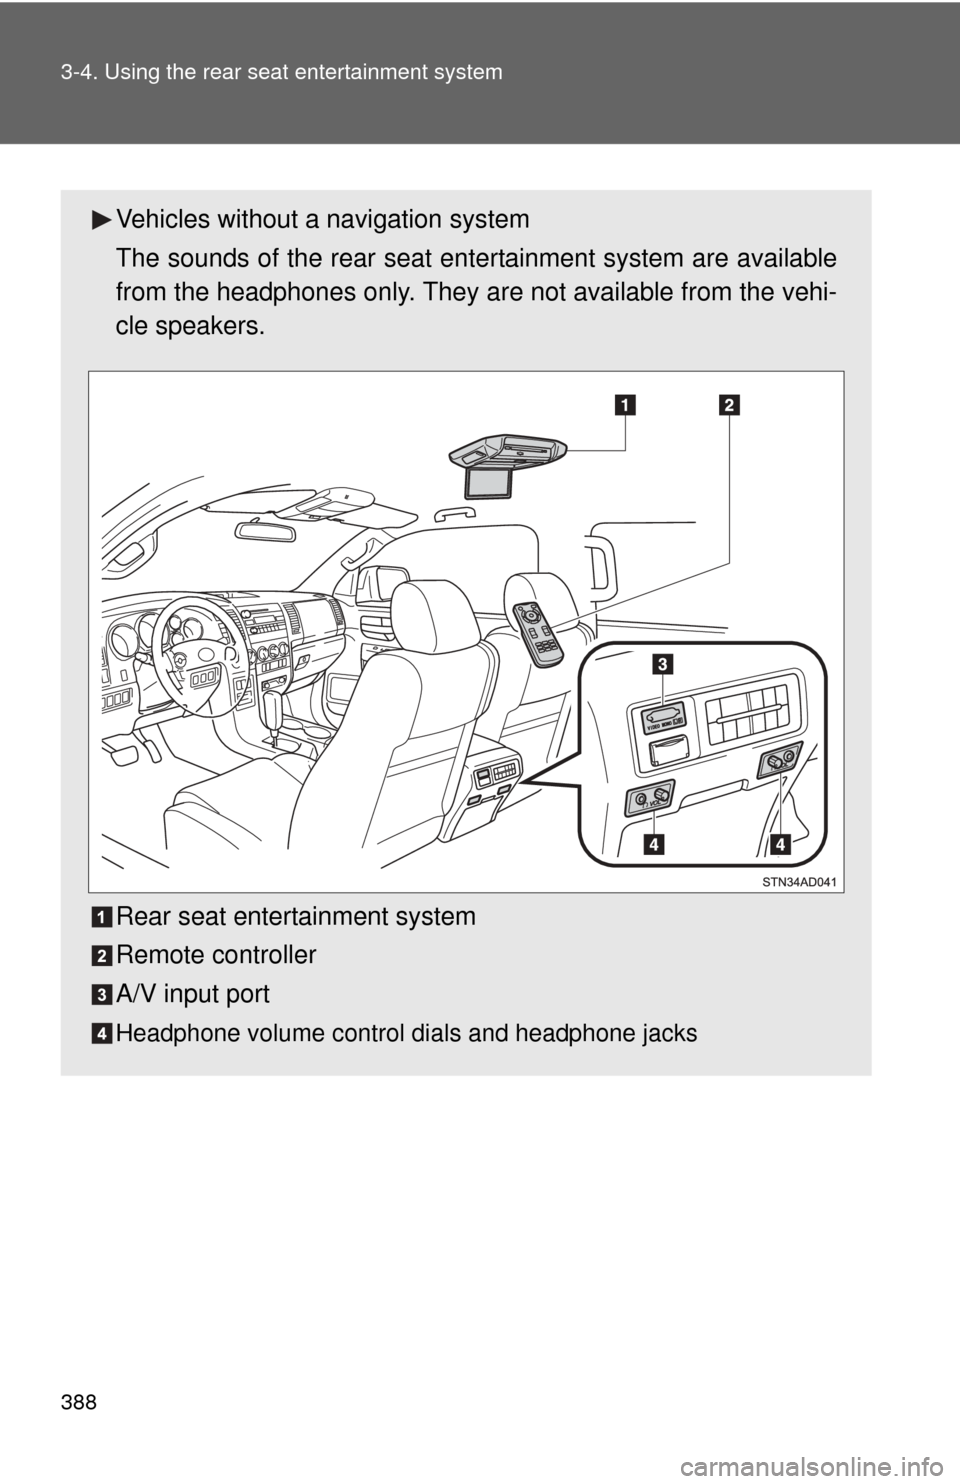
Vehicles without a navigation system
The sounds of the rear seat en tertainment system are available
from the headphones only. They ar e not available from the vehi-
cle speakers.
Rear seat entertainment system
Remote controller
A/V input port
Headphone volume control dials and headphone jacks
Page 391 of 740
391
3-4. Using the rear seat entertainment system
3
Interior features
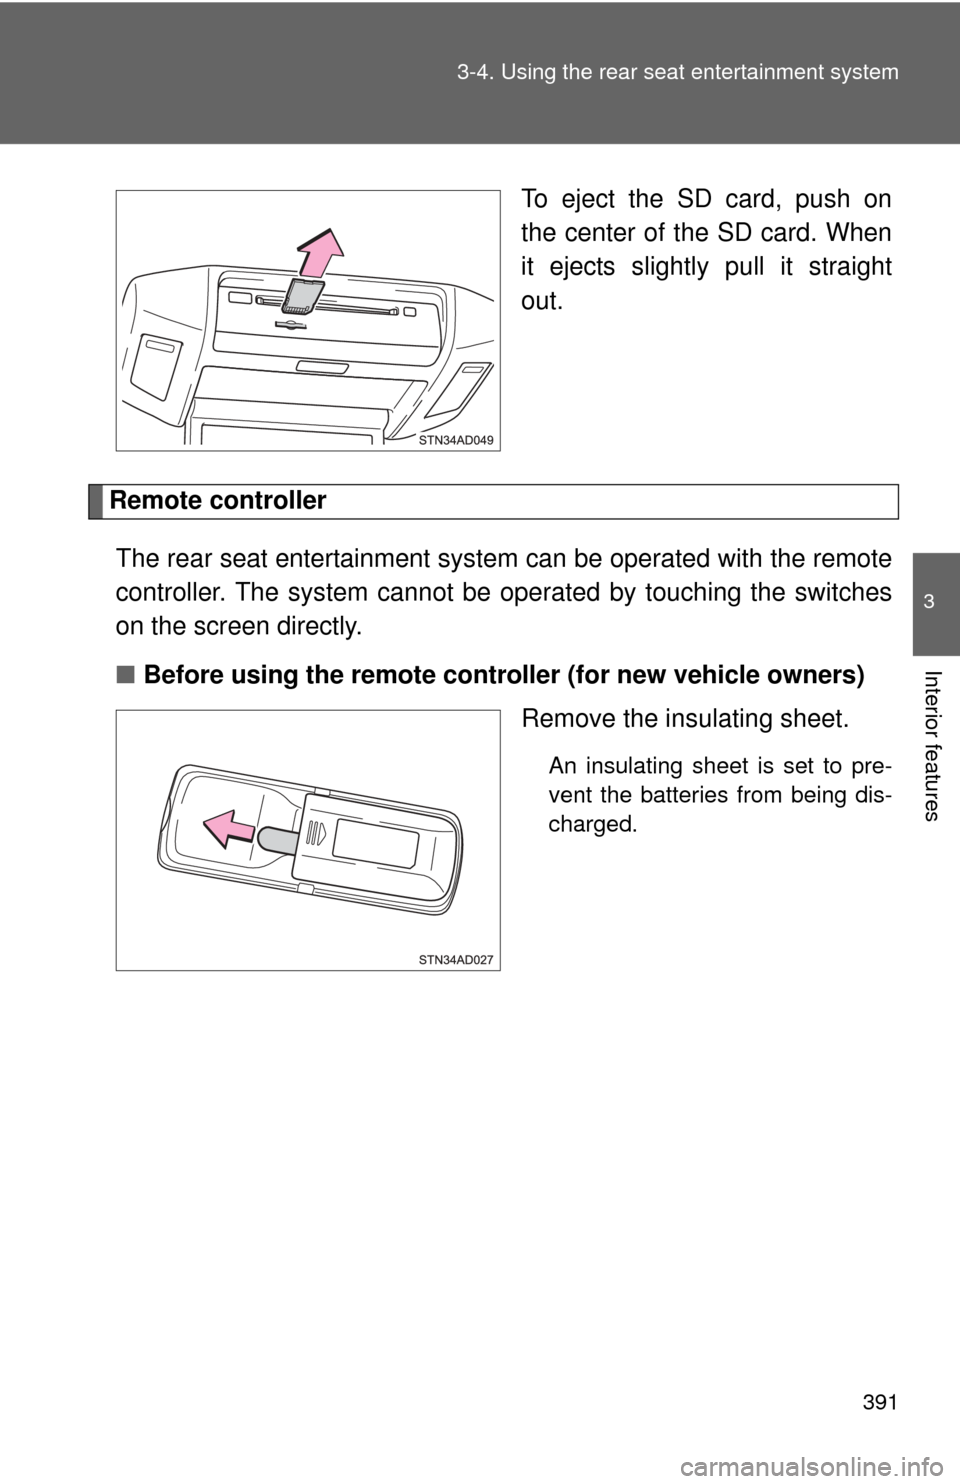
To eject the SD card, push on
the center of the SD card. When
it ejects slightly pull it straight
out.
Remote controller
The rear seat entertainment syst em can be operated with the remote
controller. The system cannot be operated by touching the switches
on the screen directly.
■ Before using the remote cont roller (for new vehicle owners)
Remove the insulating sheet.
An insulating sheet is set to pre-
vent the batteries from being dis-
charged.