display TOYOTA SEQUOIA 2014 2.G Service Manual
[x] Cancel search | Manufacturer: TOYOTA, Model Year: 2014, Model line: SEQUOIA, Model: TOYOTA SEQUOIA 2014 2.GPages: 668, PDF Size: 13.86 MB
Page 306 of 668
306 3-1. Using the air conditioning system and defogger
Adjusting the settings
■ Adjusting the temperature setting
Turn the temperature control dial clockwise (warm) or counter-
clockwise (cool).
The air conditioning system sw itches between individual and
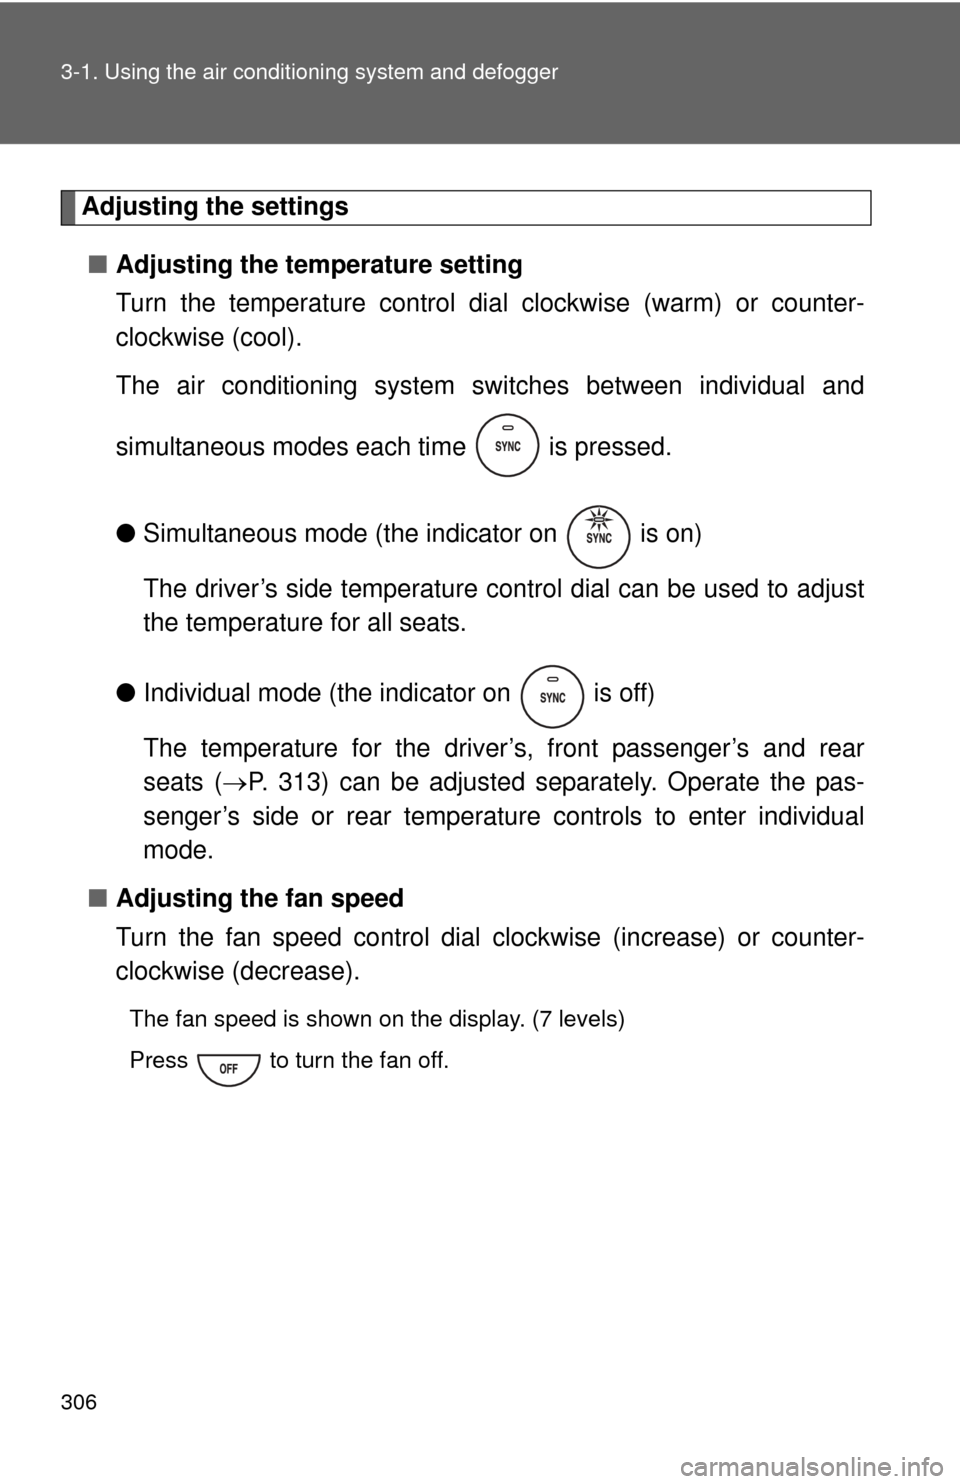
simultaneous modes each time is pressed.
● Simultaneous mode (the indicator on is on)
The driver’s side temperature control dial can be used to adjust
the temperature for all seats.
● Individual mode (the indicator on is off)
The temperature for the driver’s, front passenger’s and rear
seats ( P. 313) can be adjusted separately. Operate the pas-
senger’s side or rear temperature controls to enter individual
mode.
■ Adjusting the fan speed
Turn the fan speed control dial clockwise (increase) or counter-
clockwise (decrease).
The fan speed is shown on the display. (7 levels)
Press to turn the fan off.
Page 313 of 668
313
3-1. Using the air conditioning system and defogger
3
Interior features
Rear air conditioning system
■Button lock function
During Simultaneous mode (the indicator on is on), the rear air condi-
tioning system buttons will be automatically locked. ( P. 306)
appears on the display when the buttons are locked.
To unlock the buttons, choose the Individual mode (the indicator on
is off). ( P. 306)
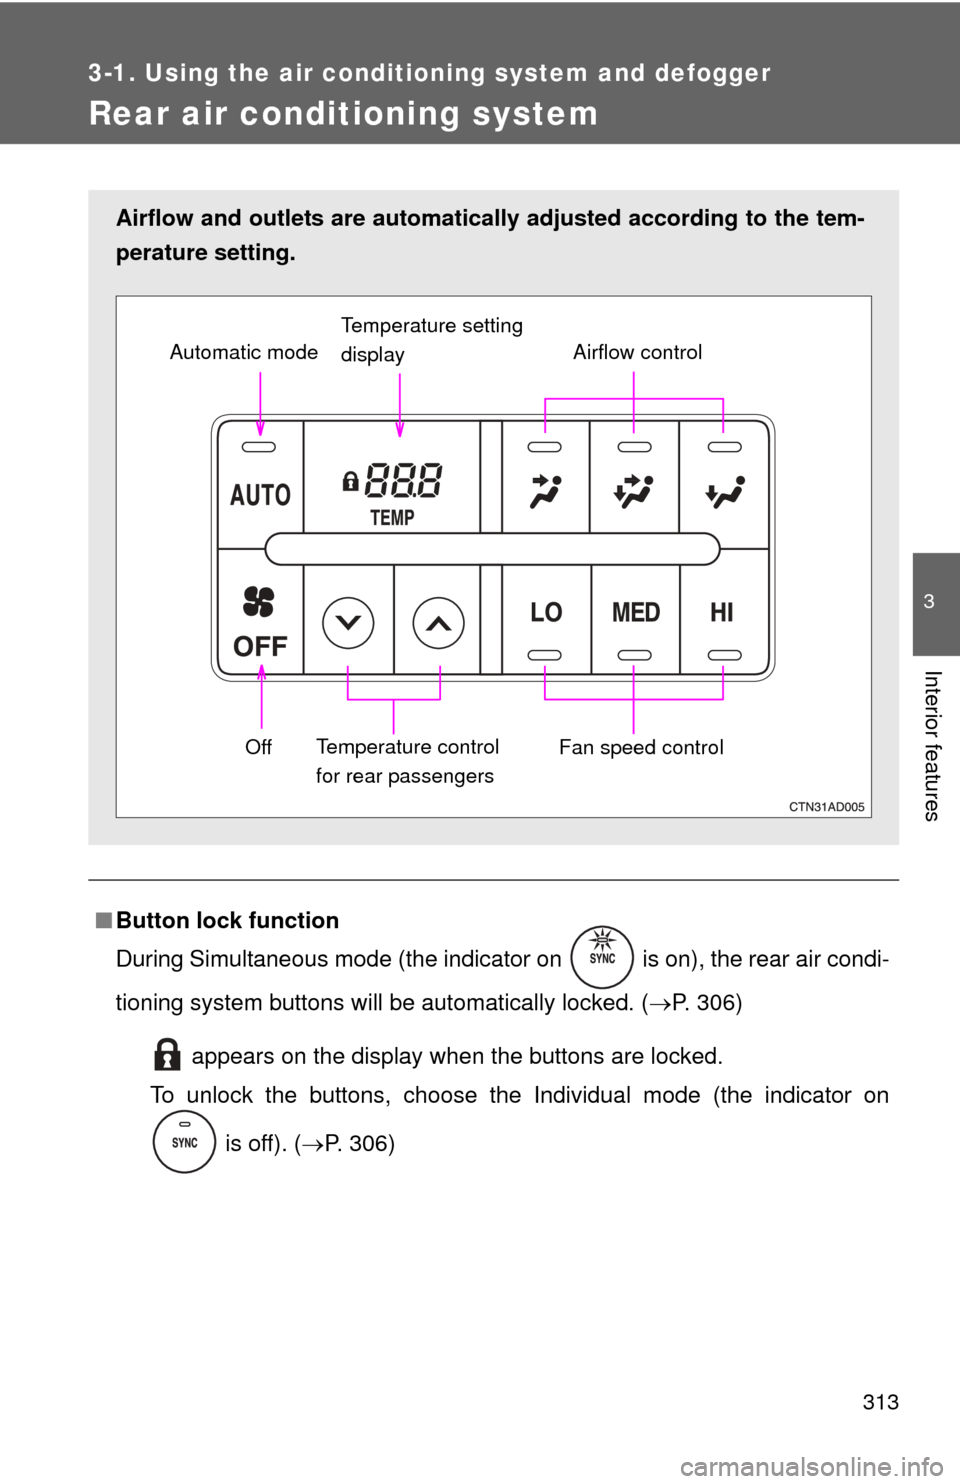
Airflow and outlets are automatically adjusted according to the tem-
perature setting.
Airflow control
Temperature setting
display
Fan speed control
Off
Automatic mode
Temperature control
for rear passengers
Page 322 of 668
322
3-2. Using the multimedia system
Entune Audio
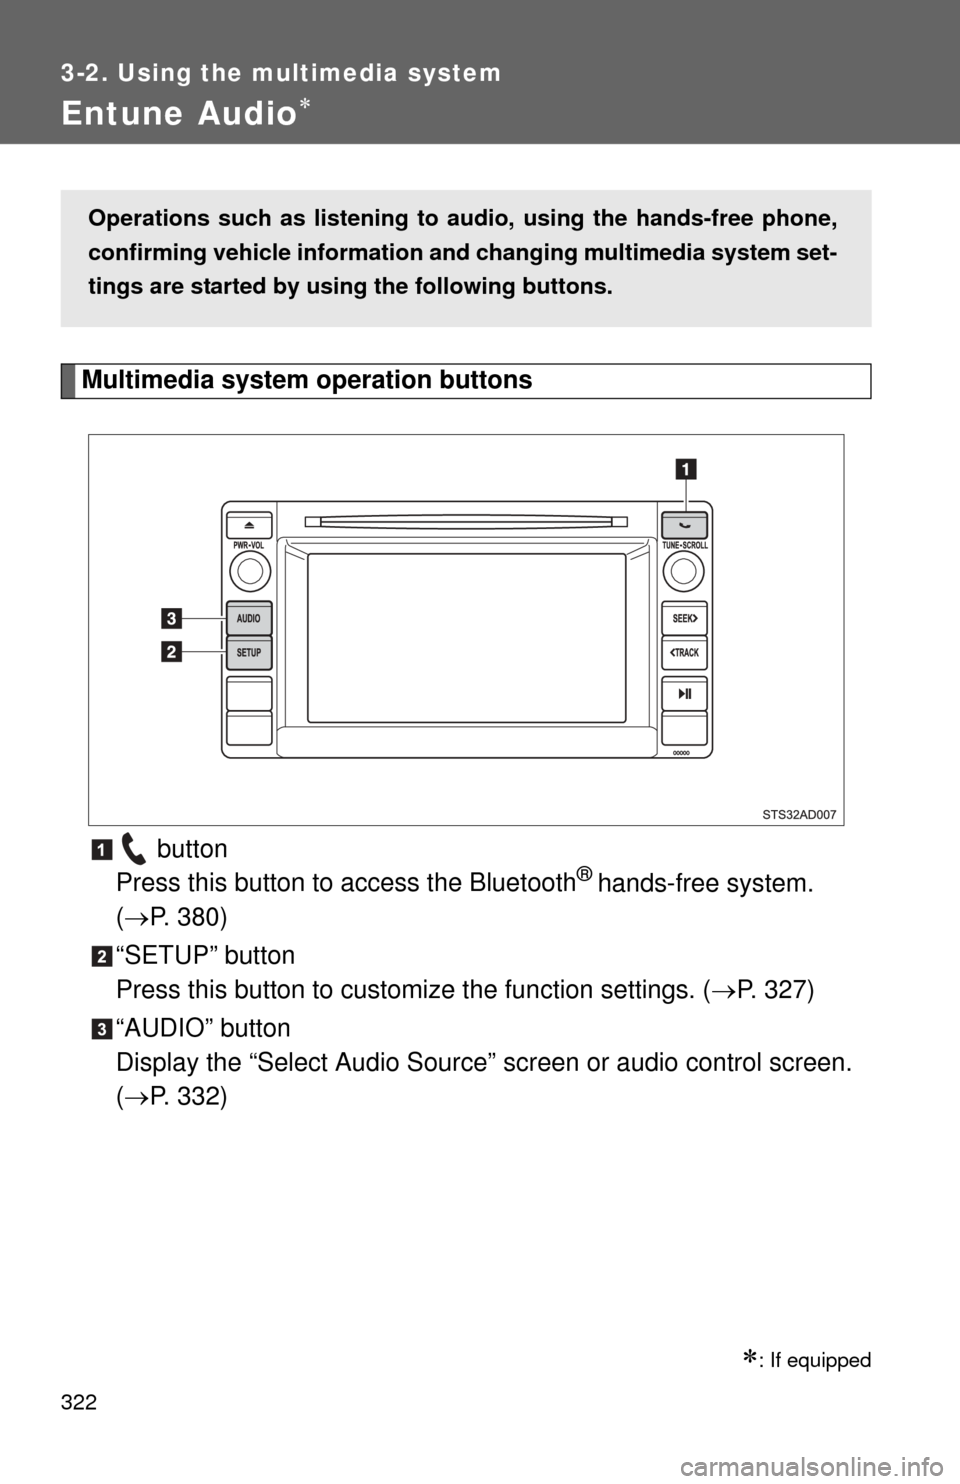
Multimedia system operation buttons button
Press this button to access the Bluetooth
® hands-free system.
( P. 380)
“SETUP” button
Press this button to custom ize the function settings. (P. 327)
“AUDIO” button
Display the “Select Audio Source” screen or audio control screen.
( P. 332)
: If equipped
Operations such as listening to audio, using the hands-free phone,
confirming vehicle information and changing multimedia system set-
tings are started by using the following buttons.
Page 323 of 668
323
3-2. Using the multimedia system
3
Interior features
Operating the touch screen
By touching the screen with your finger, you can control the Audio,
hands-free system, etc.
■ Drag
*
Touch the screen with your finger and move the screen to the
desired position.
●Scrolling the lists
● Using scroll bar in lists
■ Flick
*
Touch the screen with your finger and then quickly move the
screen.
●Scrolling the main screen page
● Returning to the menu scr een from the sub-menu screen
(screen one level below)
*: The above operations may not be performed on all screens.
■ When using the touch screen
●If the screen is cold, the display may be dark, or the system may seem to
be operating slightly slower than normal.
● The screen may seem dark and hard to see when viewed through sun-
glasses. Change your angle of viewing, adjust the display on the “Dis\
play
Settings” screen ( P. 330) or remove your sunglasses.
■ Using cellular phones
Interference may be heard through the multimedia system’s speakers if a
cellular phone is being used inside or close to the vehicle while the multime-
dia system is operating.
Page 327 of 668
327
3-2. Using the multimedia system
3
Interior features
Setup menu
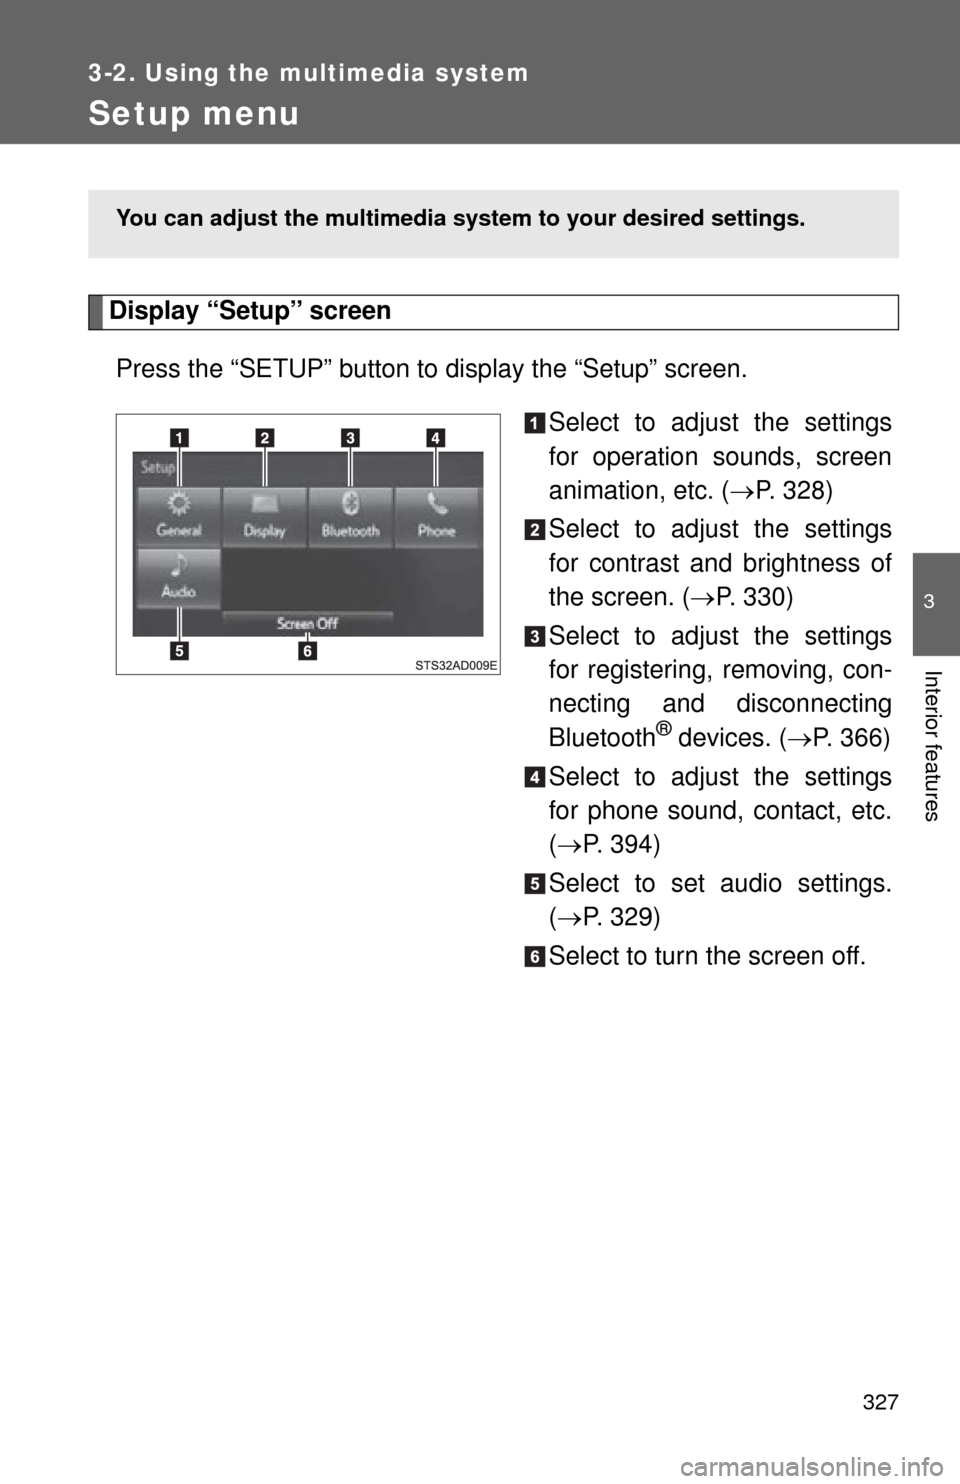
Display “Setup” screenPress the “SETUP” button to display the “Setup” screen. Select to adjust the settings
for operation sounds, screen
animation, etc. (P. 328)
Select to adjust the settings
for contrast and brightness of
the screen. ( P. 330)
Select to adjust the settings
for registering, removing, con-
necting and disconnecting
Bluetooth
® devices. ( P. 366)
Select to adjust the settings
for phone sound, contact, etc.
( P. 394)
Select to set audio settings.
( P. 329)
Select to turn the screen off.
You can adjust the multimedia s ystem to your desired settings.
Page 328 of 668
328 3-2. Using the multimedia system
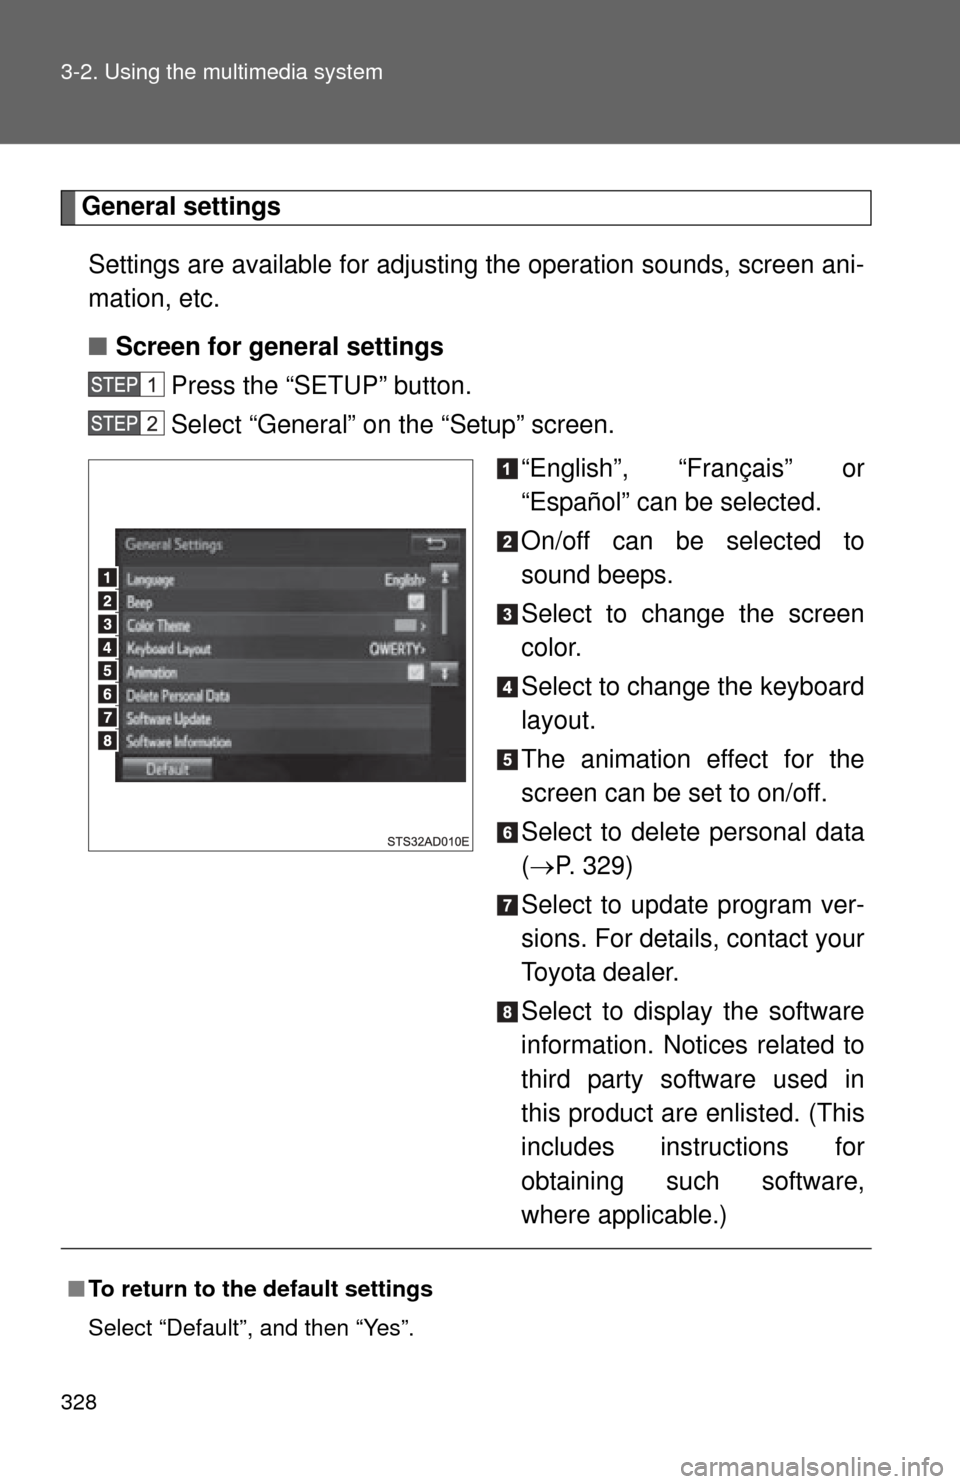
General settingsSettings are available for adjusting the operation sounds, screen ani-
mation, etc.
■ Screen for general settings
Press the “SETUP” button.
Select “General” on the “Setup” screen.
“English”, “Français” or
“Español” can be selected.
On/off can be selected to
sound beeps.
Select to change the screen
color.
Select to change the keyboard
layout.
The animation effect for the
screen can be set to on/off.
Select to delete personal data
( P. 329)
Select to update program ver-
sions. For details, contact your
Toyota dealer.
Select to display the software
information. Notices related to
third party software used in
this product are enlisted. (This
includes instructions for
obtaining such software,
where applicable.)
■ To return to the default settings
Select “Default”, and then “Yes”.
Page 329 of 668
329
3-2. Using the multimedia system
3
Interior features
■
Delete personal data
Select “Delete Personal Data” on the “General Settings”
screen.
Select “Delete”.
Check carefully beforehand, as data cannot be retrieved once
deleted.
A confirmation screen will be displayed. Select “Yes”.
The following personal data will be deleted or changed to its
default settings.
• General settings
• Audio settings
• Phone settings
Audio settings
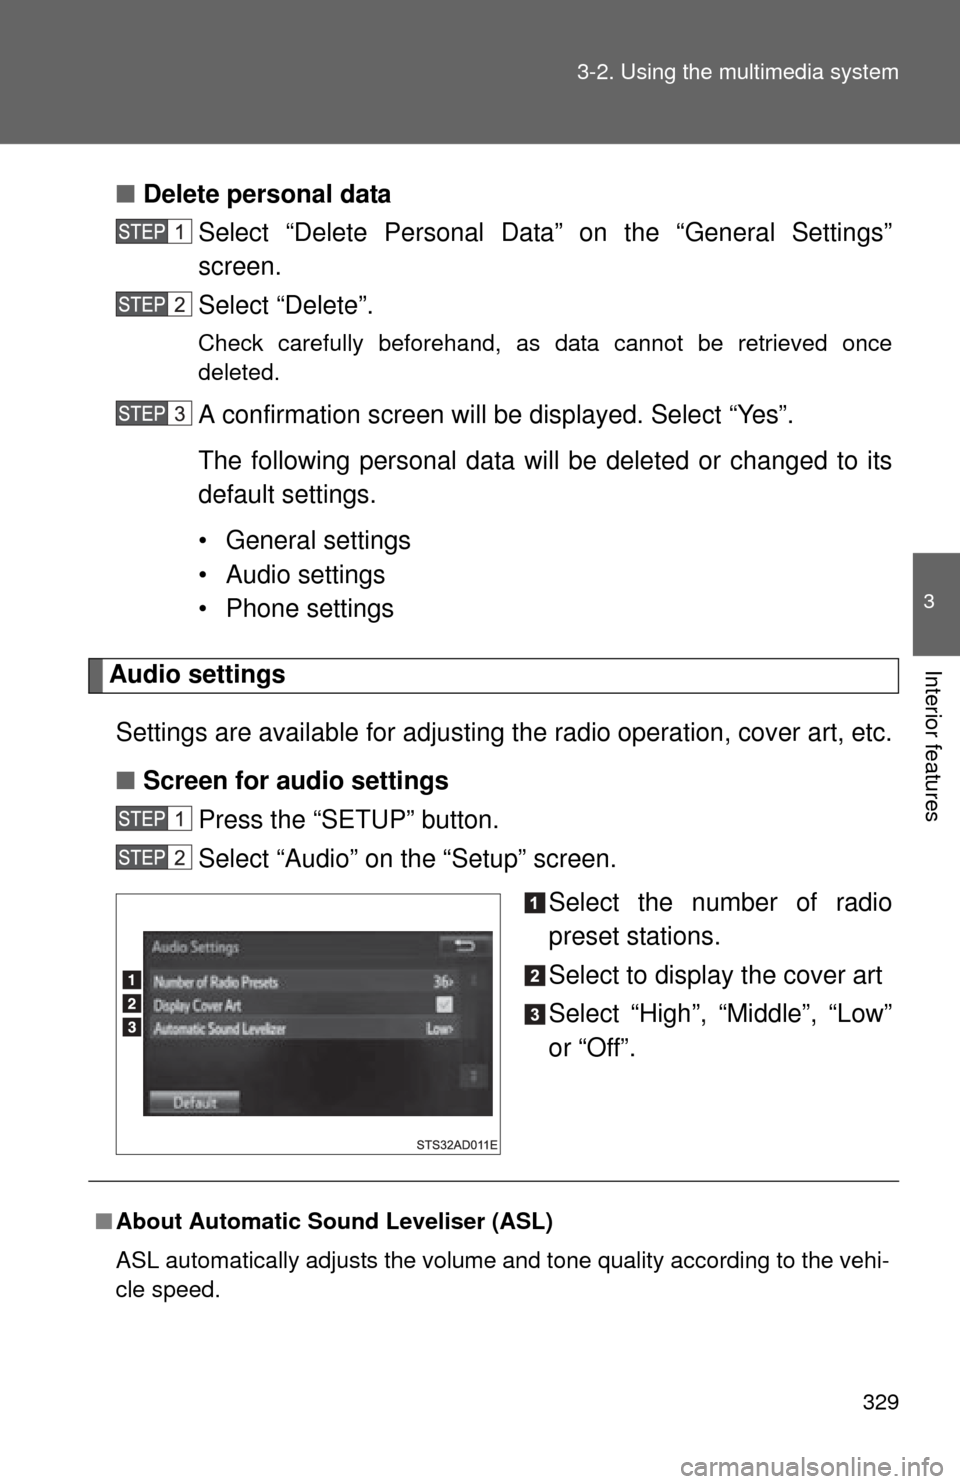
Settings are available for adjusting the radio operation, cover art, etc.
■ Screen for audio settings
Press the “SETUP” button.
Select “Audio” on the “Setup” screen.
Select the number of radio
preset stations.
Select to display the cover art
Select “High”, “Middle”, “Low”
or “Off”.
■About Automatic Sound Leveliser (ASL)
ASL automatically adjusts the volume and tone quality according to the vehi-
cle speed.
Page 330 of 668
330 3-2. Using the multimedia system
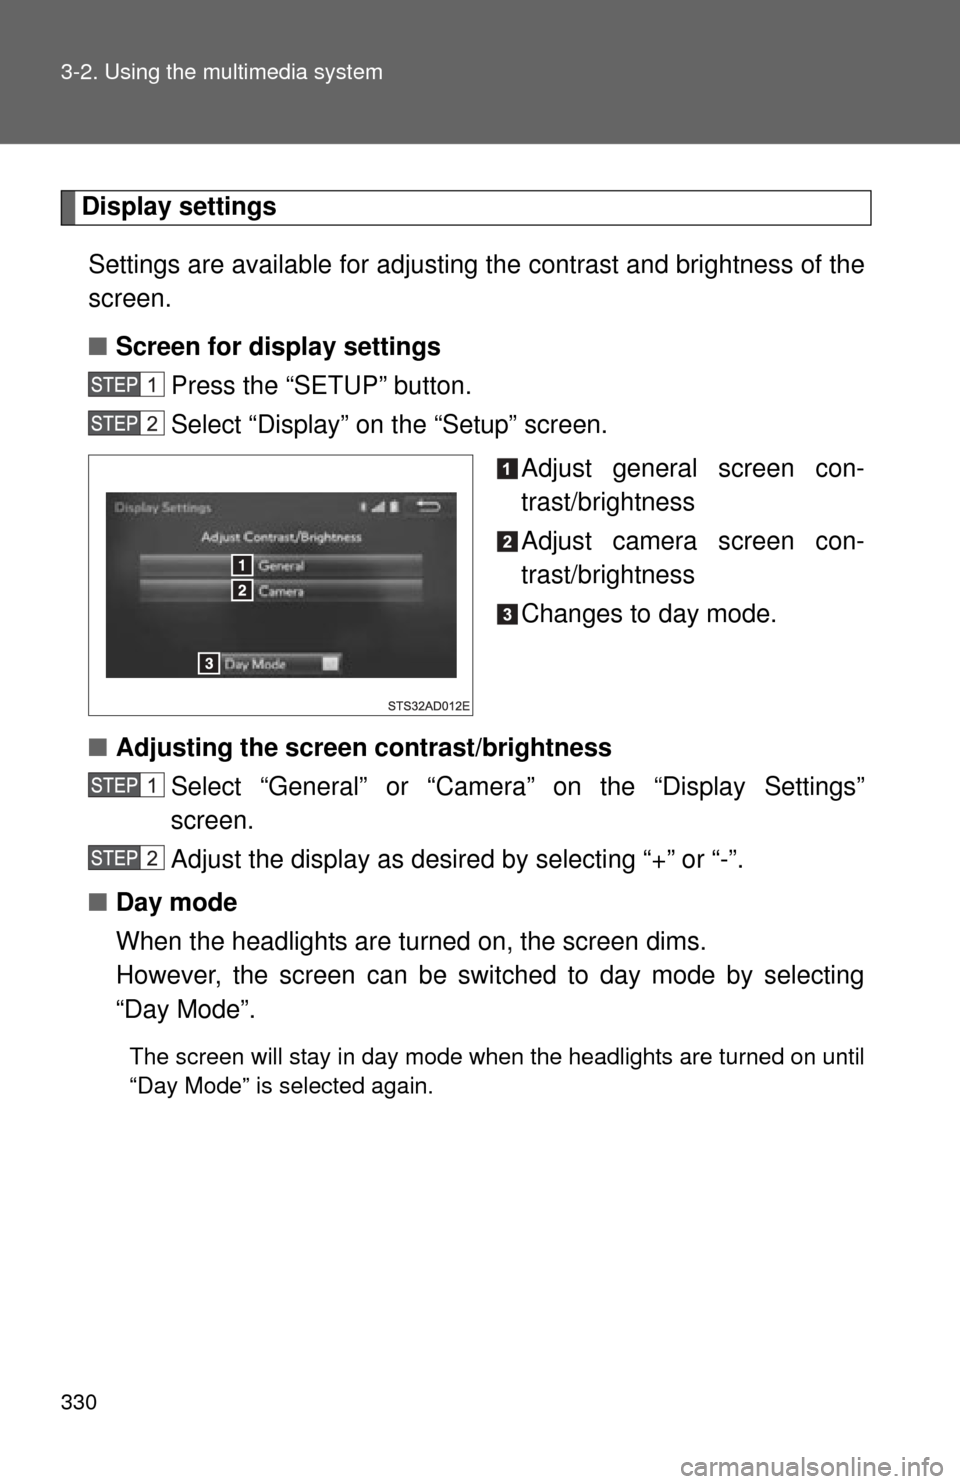
Display settingsSettings are available for adjusting the contrast and brightness of the
screen.
■ Screen for display settings
Press the “SETUP” button.
Select “Display” on the “Setup” screen.
Adjust general screen con-
trast/brightness
Adjust camera screen con-
trast/brightness
Changes to day mode.
■ Adjusting the screen contrast/brightness
Select “General” or “Camera” on the “Display Settings”
screen.
Adjust the display as desired by selecting “+” or “-”.
■ Day mode
When the headlights are turned on, the screen dims.
However, the screen can be switched to day mode by selecting
“Day Mode”.
The screen will stay in day mode when the headlights are turned on until
“Day Mode” is selected again.
Page 331 of 668
331
3-2. Using the multimedia system
3
Interior features
Basic audio operations
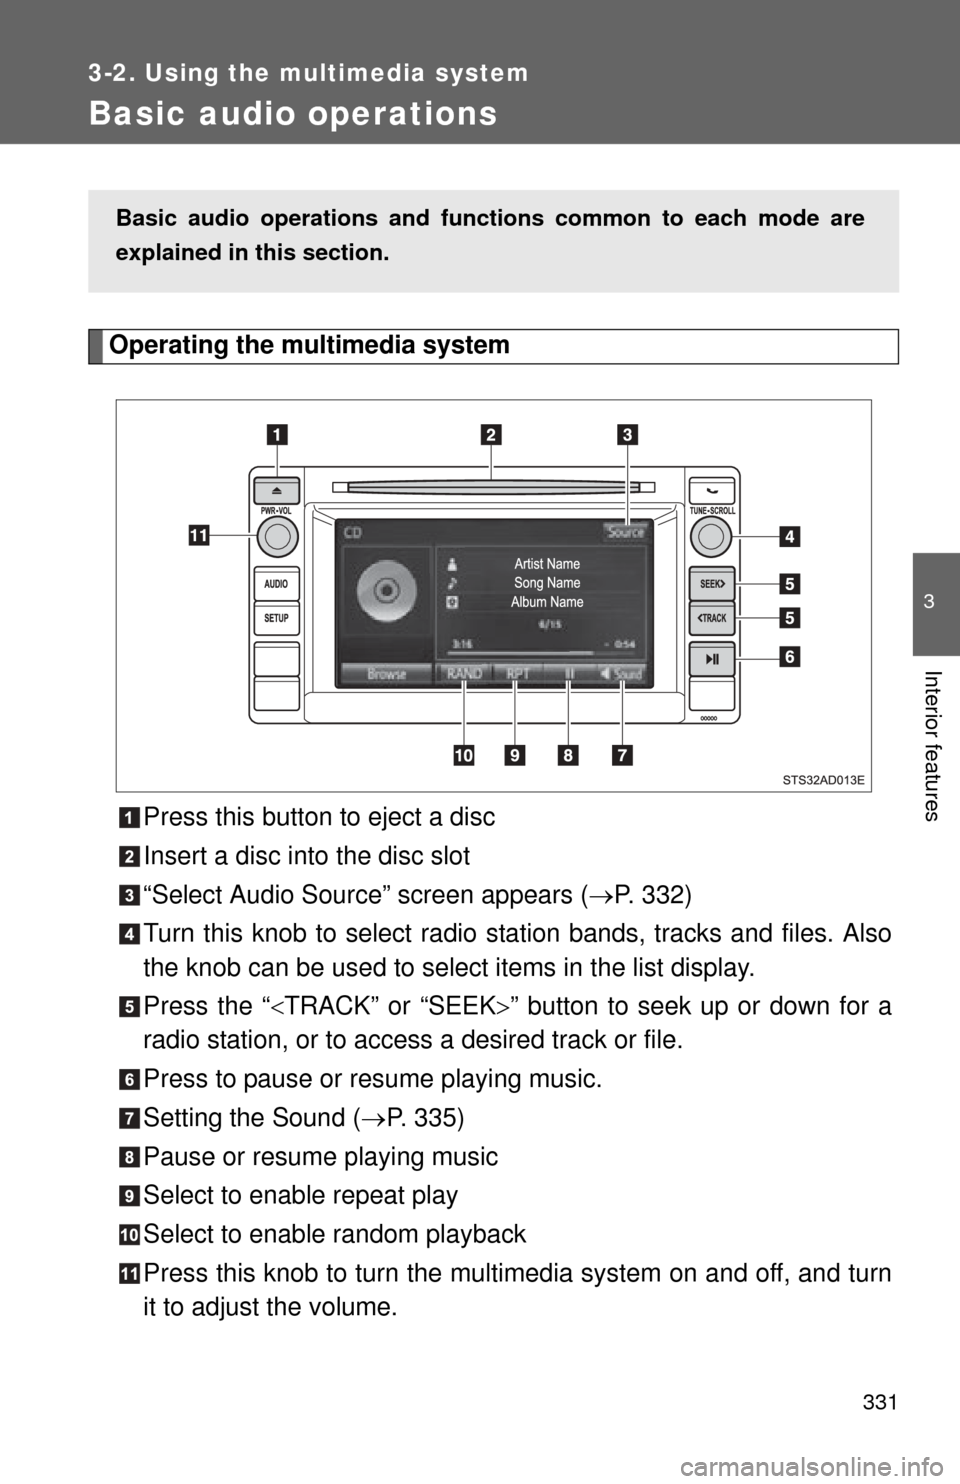
Operating the multimedia systemPress this button to eject a disc
Insert a disc into the disc slot
“Select Audio Source” screen appears ( P. 332)
Turn this knob to select radio station bands, tracks and files. Also
the knob can be used to select items in the list display.
Press the “ TRACK” or “SEEK ” button to seek up or down for a
radio station, or to access a desired track or file.
Press to pause or resume playing music.
Setting the Sound ( P. 335)
Pause or resume playing music
Select to enable repeat play
Select to enable random playback
Press this knob to turn the mult imedia system on and off, and turn
it to adjust the volume.
Basic audio operations and func tions common to each mode are
explained in this section.
Page 333 of 668
333
3-2. Using the multimedia system
3
Interior features
List screen operation
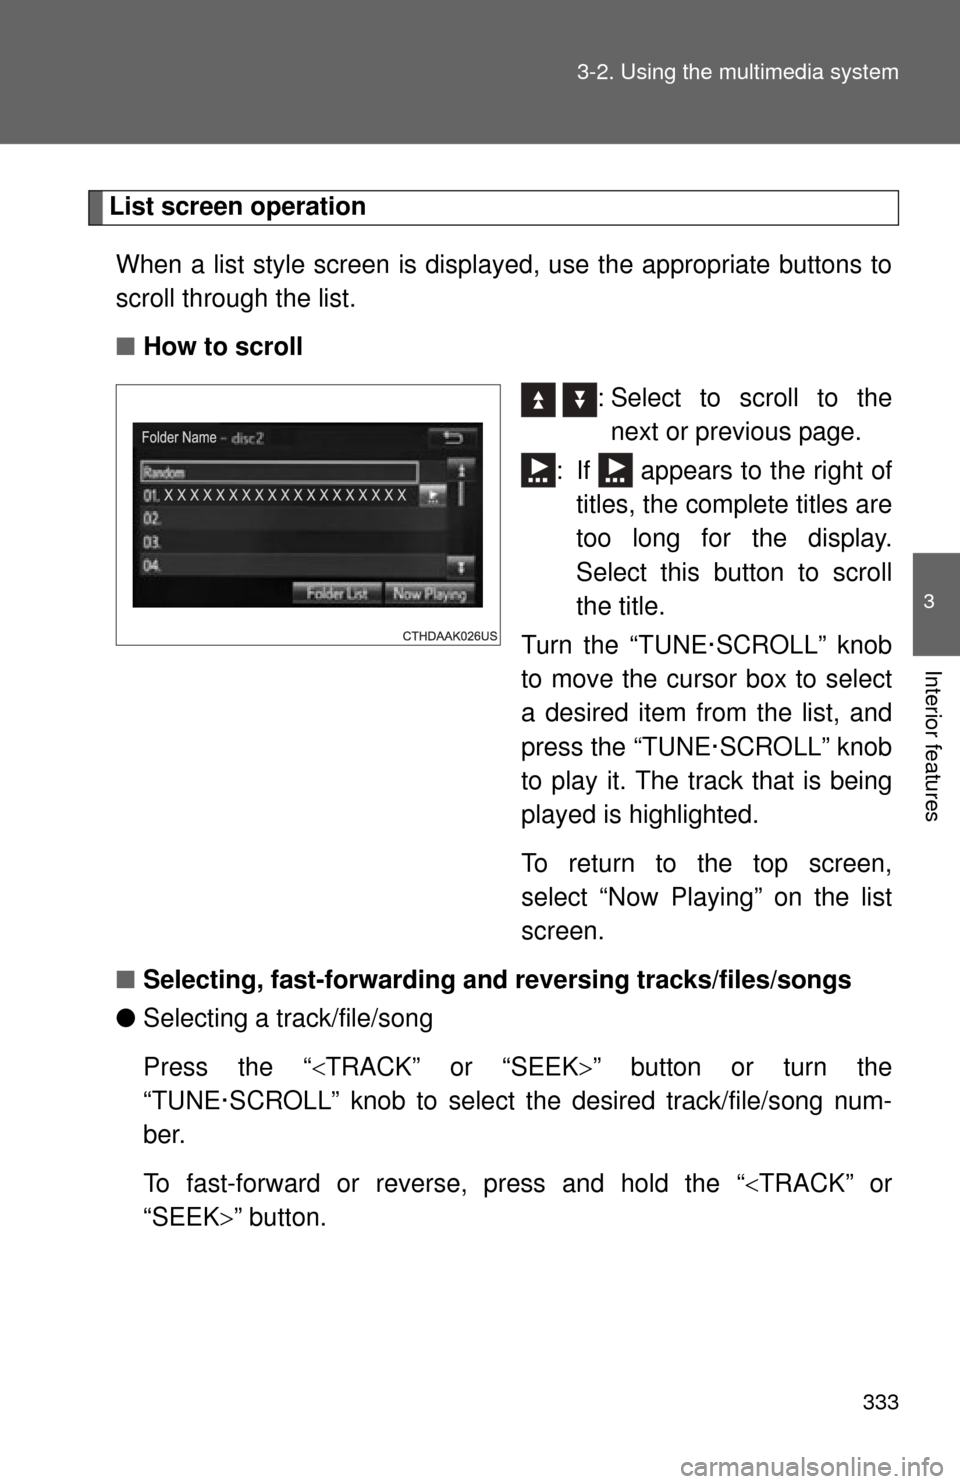
When a list style screen is display ed, use the appropriate buttons to
scroll through the list.
■ How to scroll
: Select to scroll to thenext or previous page.
: If appears to the right of titles, the complete titles are
too long for the display.
Select this button to scroll
the title.
Turn the “TUNE·SCROLL” knob
to move the cursor box to select
a desired item from the list, and
press the “TUNE·SCROLL” knob
to play it. The track that is being
played is highlighted.
To return to the top screen,
select “Now Playing” on the list
screen.
■ Selecting, fast-forwarding an d reversing tracks/files/songs
● Selecting a track/file/song
Press the “ TRACK” or “SEEK ” button or turn the
“TUNE·SCROLL” knob to select the desired track/file/song num-
ber.
To fast-forward or reverse, press and hold the “ TRACK” or
“SEEK” button.