display TOYOTA SEQUOIA 2014 2.G Owner's Guide
[x] Cancel search | Manufacturer: TOYOTA, Model Year: 2014, Model line: SEQUOIA, Model: TOYOTA SEQUOIA 2014 2.GPages: 668, PDF Size: 13.86 MB
Page 209 of 668
209
2-4. Using other
driving systems
2
When driving
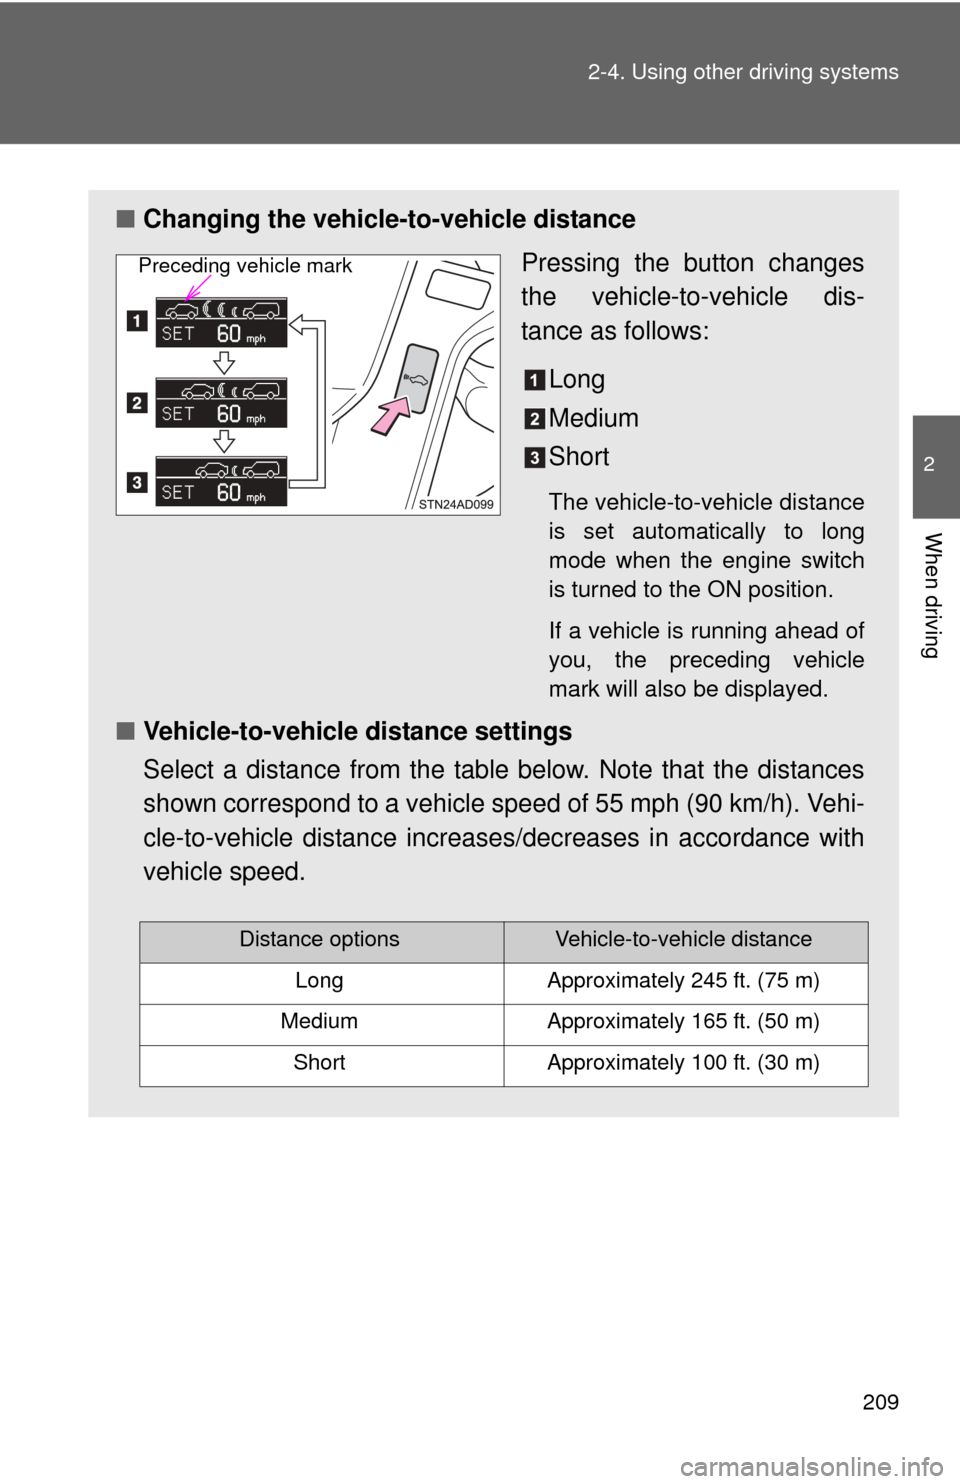
■Changing the vehicle -to-vehicle distance
Pressing the button changes
the vehicle-to-vehicle dis-
tance as follows:
Long
Medium
Short
The vehicle-to-vehicle distance
is set automatically to long
mode when the engine switch
is turned to the ON position.
If a vehicle is running ahead of
you, the preceding vehicle
mark will also be displayed.
■Vehicle-to-vehicle distance settings
Select a distance from the table below. Note that the distances
shown correspond to a vehicle speed of 55 mph (90 km/h). Vehi-
cle-to-vehicle distance increases/decreases in accordance with
vehicle speed.
Preceding vehicle mark
Distance optionsVehicle-to-vehicle distance
LongApproximately 245 ft. (75 m)
MediumApproximately 165 ft. (50 m)
ShortApproximately 100 ft. (30 m)
Page 227 of 668
227
2-4. Using other driving systems
2
When driving
Rear view monitor system
: If equipped
The rear view monitor system assists the driver by displaying guide
lines and an image of the view behind the vehicle while backing up,
for example while parking.
The screen illustrations used in th is text are intended as examples,
and may differ from the image that is actually displayed on the
screen.
Vehicles with Entune Audio Plus or Entune Premium Audio (Mul-
timedia system types: P. 320)
Refer to the “NAVIGATION SYSTEM OWNER’S MANUAL”.
Vehicles with Entune Audio (Multimedia system types: P. 320)
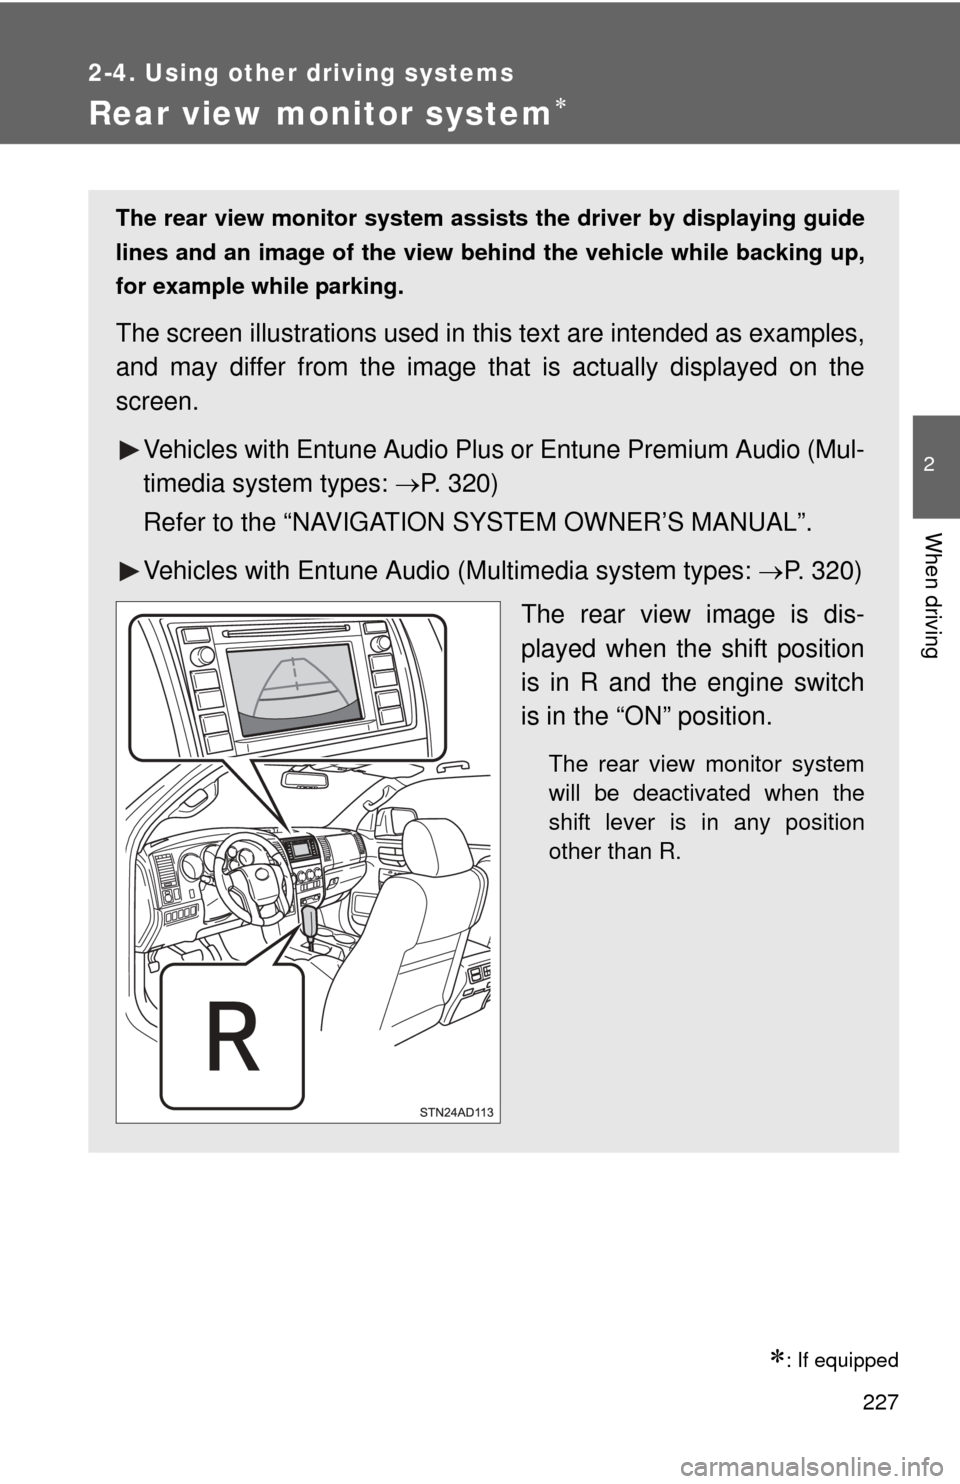
The rear view image is dis-
played when the shift position
is in R and the engine switch
is in the “ON” position.
The rear view monitor system
will be deactivated when the
shift lever is in any position
other than R.
Page 228 of 668
228 2-4. Using other driving systems
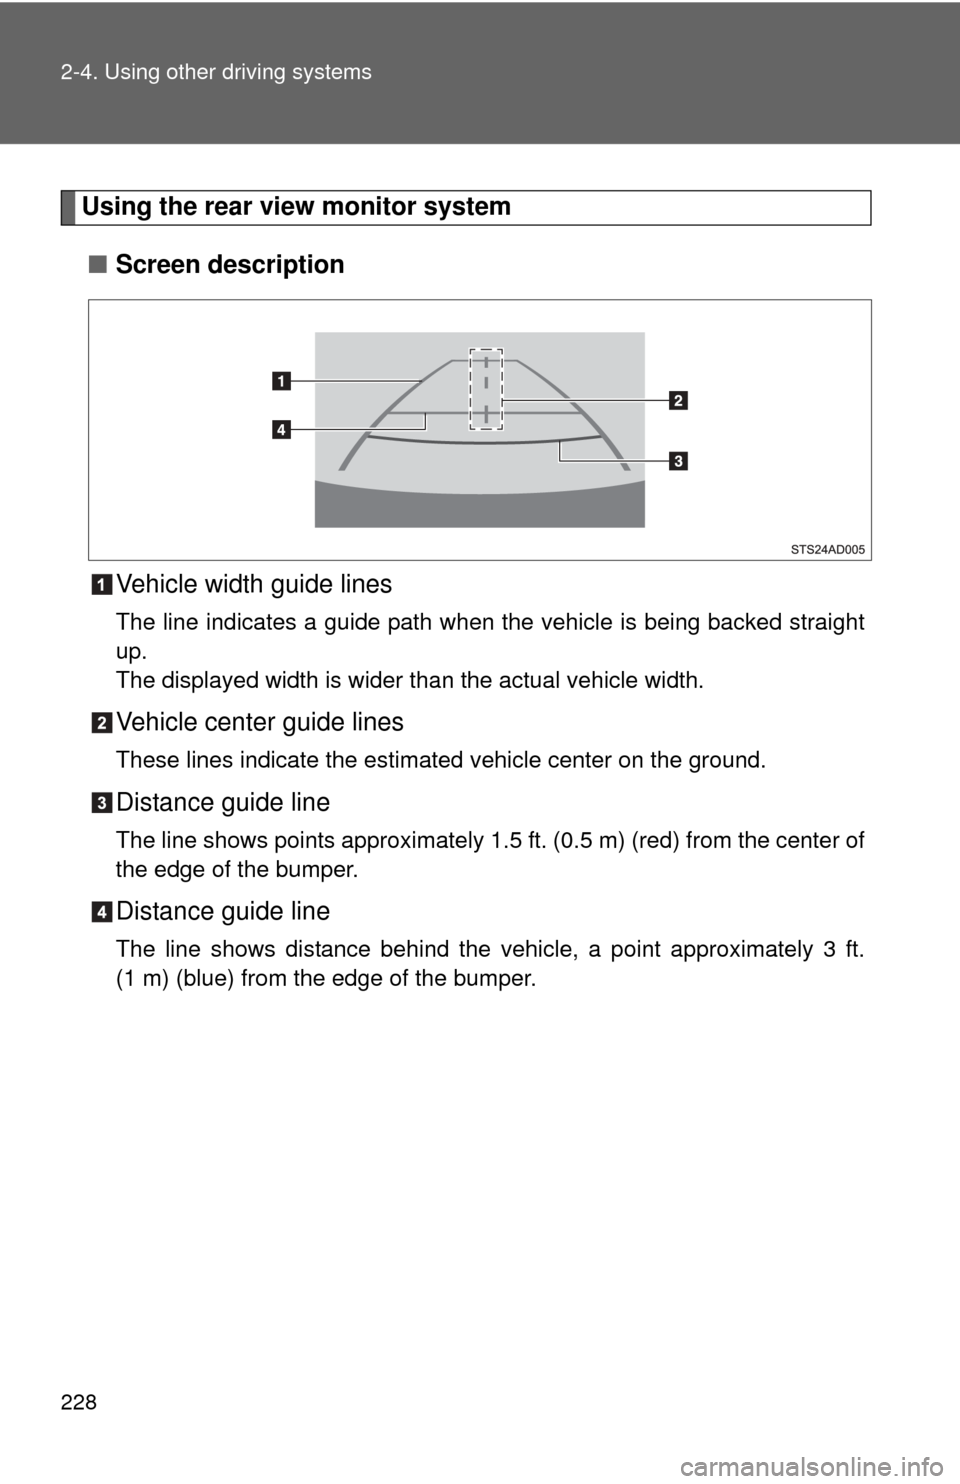
Using the rear view monitor system■ Screen description
Vehicle width guide lines
The line indicates a guide path when the vehicle is being backed straight
up.
The displayed width is wider than the actual vehicle width.
Vehicle center guide lines
These lines indicate the estimated vehicle center on the ground.
Distance guide line
The line shows points approximately 1.5 f t. (0.5 m) (red) from the center of
the edge of the bumper.
Distance guide line
The line shows distance behind the vehicle, a point approximately 3 ft.
(1 m) (blue) from the edge of the bumper.
Page 229 of 668
229
2-4. Using other
driving systems
2
When driving
Rear view monitor system precautions
■ Area displayed on screen
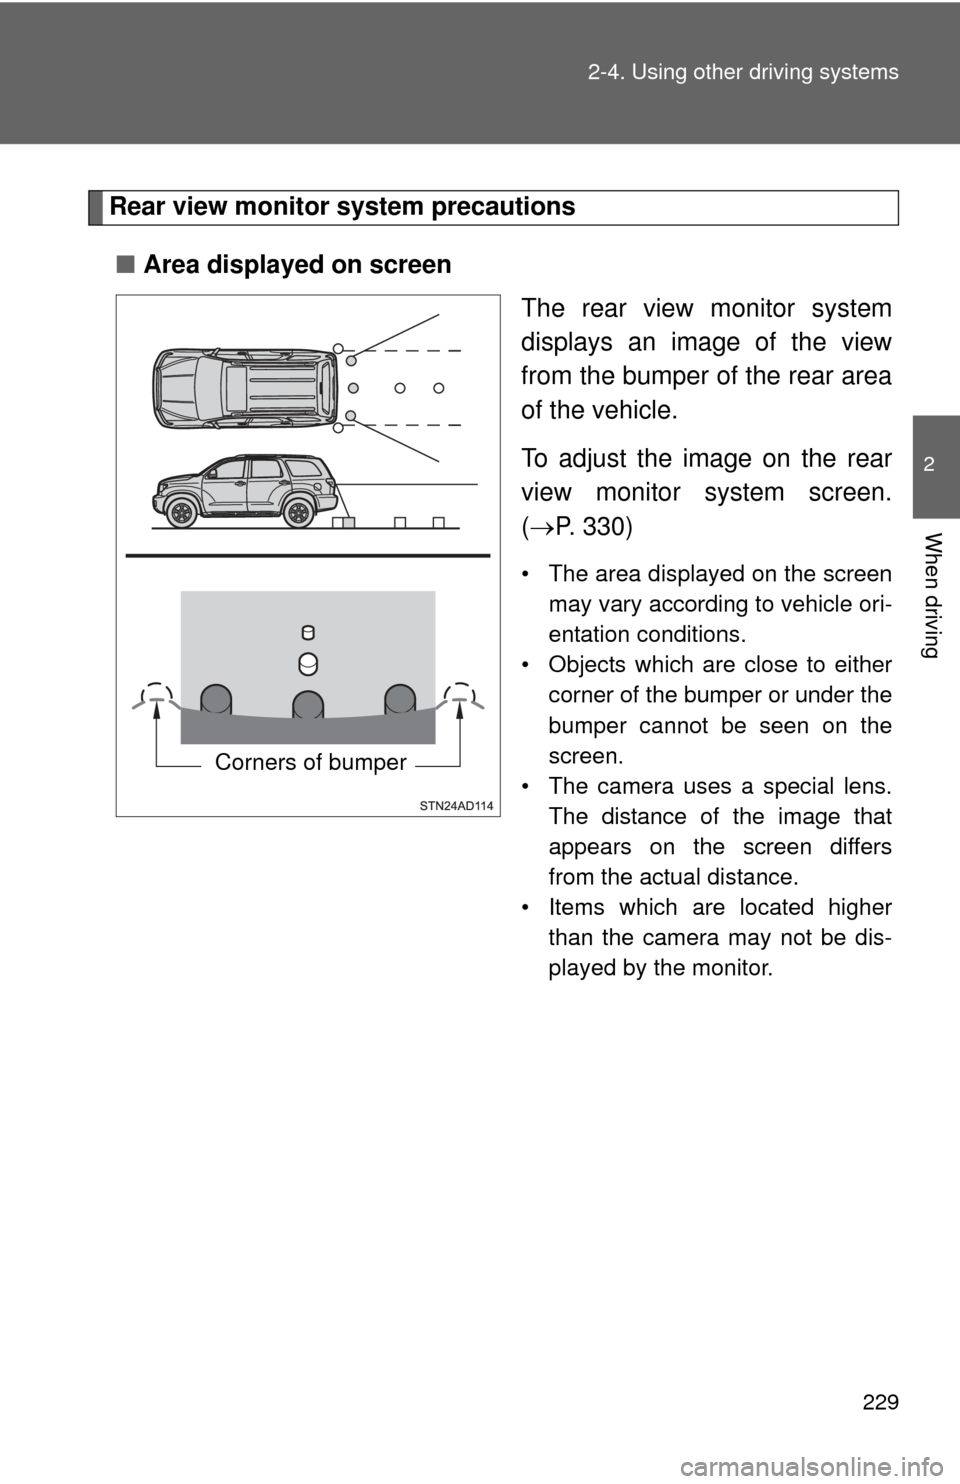
The rear view monitor system
displays an image of the view
from the bumper of the rear area
of the vehicle.
To adjust the image on the rear
view monitor system screen.
( P. 330)
• The area displayed on the screen
may vary according to vehicle ori-
entation conditions.
• Objects which are close to either corner of the bumper or under the
bumper cannot be seen on the
screen.
• The camera uses a special lens.
The distance of the image that
appears on the screen differs
from the actual distance.
• Items which are located higher than the camera may not be dis-
played by the monitor.
Corners of bumper
Page 232 of 668
232 2-4. Using other driving systems
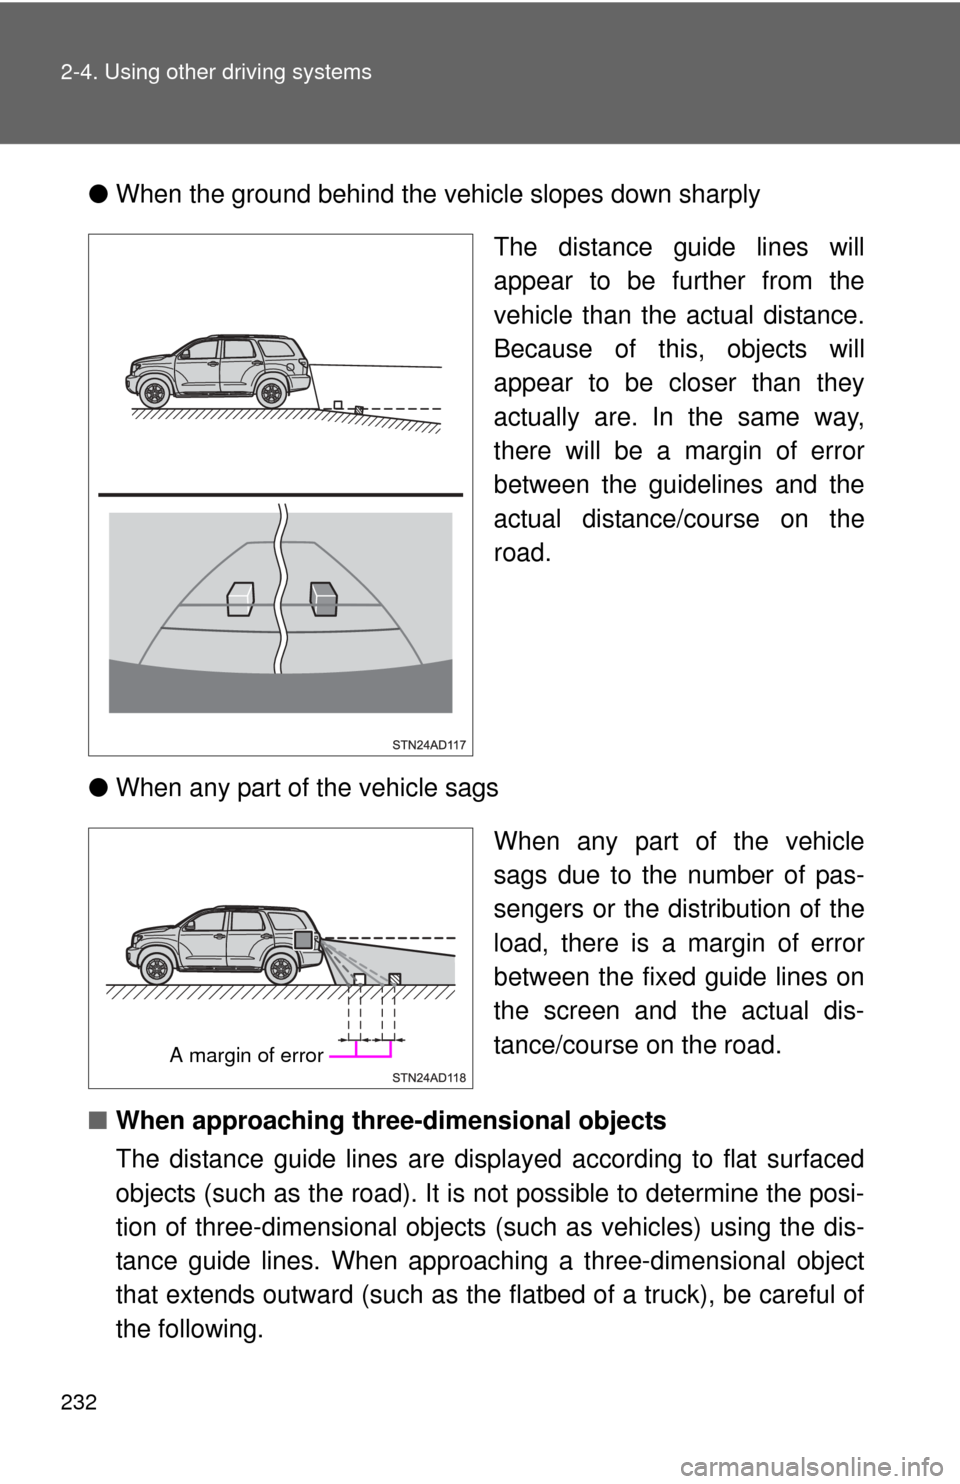
●When the ground behind the vehicle slopes down sharply
The distance guide lines will
appear to be further from the
vehicle than the actual distance.
Because of this, objects will
appear to be closer than they
actually are. In the same way,
there will be a margin of error
between the guidelines and the
actual distance/course on the
road.
● When any part of the vehicle sags
When any part of the vehicle
sags due to the number of pas-
sengers or the distribution of the
load, there is a margin of error
between the fixed guide lines on
the screen and the actual dis-
tance/course on the road.
■ When approaching three-dimensional objects
The distance guide lines are displayed according to flat surfaced
objects (such as the road). It is not possible to determine the posi-
tion of three-dimensional objects (such as vehicles) using the dis-
tance guide lines. When approaching a three-dimensional object
that extends outward (such as the flatbed of a truck), be careful of
the following.
A margin of error
Page 236 of 668
236 2-4. Using other driving systems
CAUTION
■When using the rear view monitor system
The rear view monitor system is a supplemental device intended to assist
the driver when backing up. When backing up, be sure to check visually
behind and all around the vehicle before proceeding.
Observe the following precautions to avoid an accident that could result in
death or serious injuries.
● Never depend on the rear view monitor system entirely when backing up.
The image and the position of the guide lines displayed on the screen may
differ from the actual state.
Use caution, just as you would when backing up any vehicle.
● Be sure to back up slowly, depressing the brake pedal to control vehicle
speed.
● The instructions given are only guidelines.
When and how much to turn the steering wheel will vary according to traf-
fic conditions, road surface conditions, vehicle condition, etc., when park-
ing. It is necessary to be fully aware of this before using the rear view
monitor system.
● When parking, be sure to check that the parking space will accommodate
your vehicle before maneuvering into it.
● Do not use the rear view monitor system in the following cases:
• On icy or slick road surfaces, or in snow
• When using tire chains or the compact spare tire
• When the back door is not closed completely
• On roads that are not flat or straight, such as curves or slopes.
● In low temperatures, the screen may darken or the image may become
faint. The image could distort when the vehicle is moving, or you may
become unable to see the image on the screen. Be sure to directly check
visually and with the mirrors all around the vehicle before proceeding.
● If the tire sizes are changed, the position of the fixed guide lines displayed
on the screen may change.
● The camera uses a special lens. The distances between objects and
pedestrians that appear in the image displayed on the screen will differ
from the actual distances. ( P. 231)
Page 241 of 668
241
2-4. Using other
driving systems
2
When driving
●Instances of the Blind Spot Monitor unnecessarily detecting a vehicle
and/or object may increase under the following conditions:
• When there is only a short distance between your vehicle and a guard-
rail, wall etc.
• When there is only a short distance between your vehicle and a follow- ing vehicle
• When vehicle lanes are narrow and a vehicle driving 2 lanes across from your vehicle enters the detection area
■ The outside rear view mirror indicators visibility
When under strong sunlight, the outside rear view mirror indicator may be
difficult to see.
■ When there is a malfunction in the system
If a system malfunction is detected due to any of the following reasons,
warning messages will be displayed: ( P. 572)
● There is a malfunction with the sensors
● The sensors have become dirty
● The outside temperature is extremely high or low
● The sensor voltage has become abnormal
■ Certification for the BSM
For vehicles sold in the U.S.A.
FCC ID: OAYBSDTX
This device complies with part 15 of the FCC Rules. Operation is subject to
the following three conditions:
(1) This device may not cause harmful interference.
(2) This device must accept any interference received, including interference that may cause undesired operation.
(3) This device may only work when the vehicle is in operation pursuant to § 15.252 (a) (4).
FCC WARNING
Changes or modifications not expressly approved by the party responsible
for compliance could void the user’s authority to operate the equipment.
Page 250 of 668
250
2-4. Using other driving systems
Four-wheel drive system
: If equipped
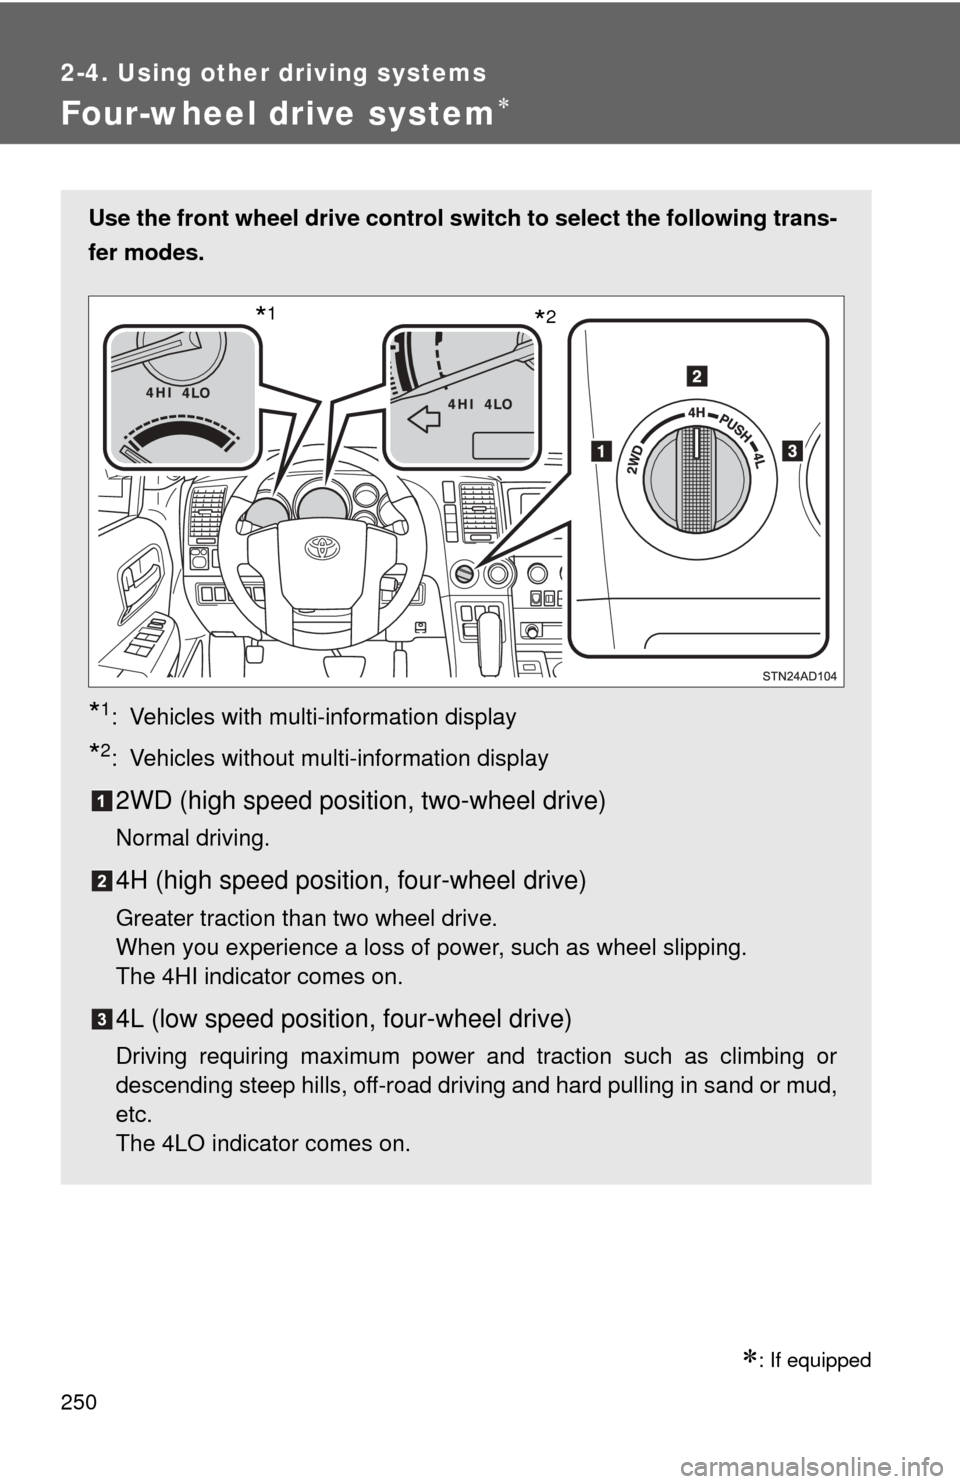
Use the front wheel drive control switch to select the following trans-
fer modes.
*1: Vehicles with multi-information display
*2: Vehicles without multi-information display
2WD (high speed position, two-wheel drive)
Normal driving.
4H (high speed position, four-wheel drive)
Greater traction than two wheel drive.
When you experience a loss of power, such as wheel slipping.
The 4HI indicator comes on.
4L (low speed position, four-wheel drive)
Driving requiring maximum power and traction such as climbing or
descending steep hills, off-road driving and hard pulling in sand or mud,
etc.
The 4LO indicator comes on.
*2*1
Page 303 of 668
Interior features3
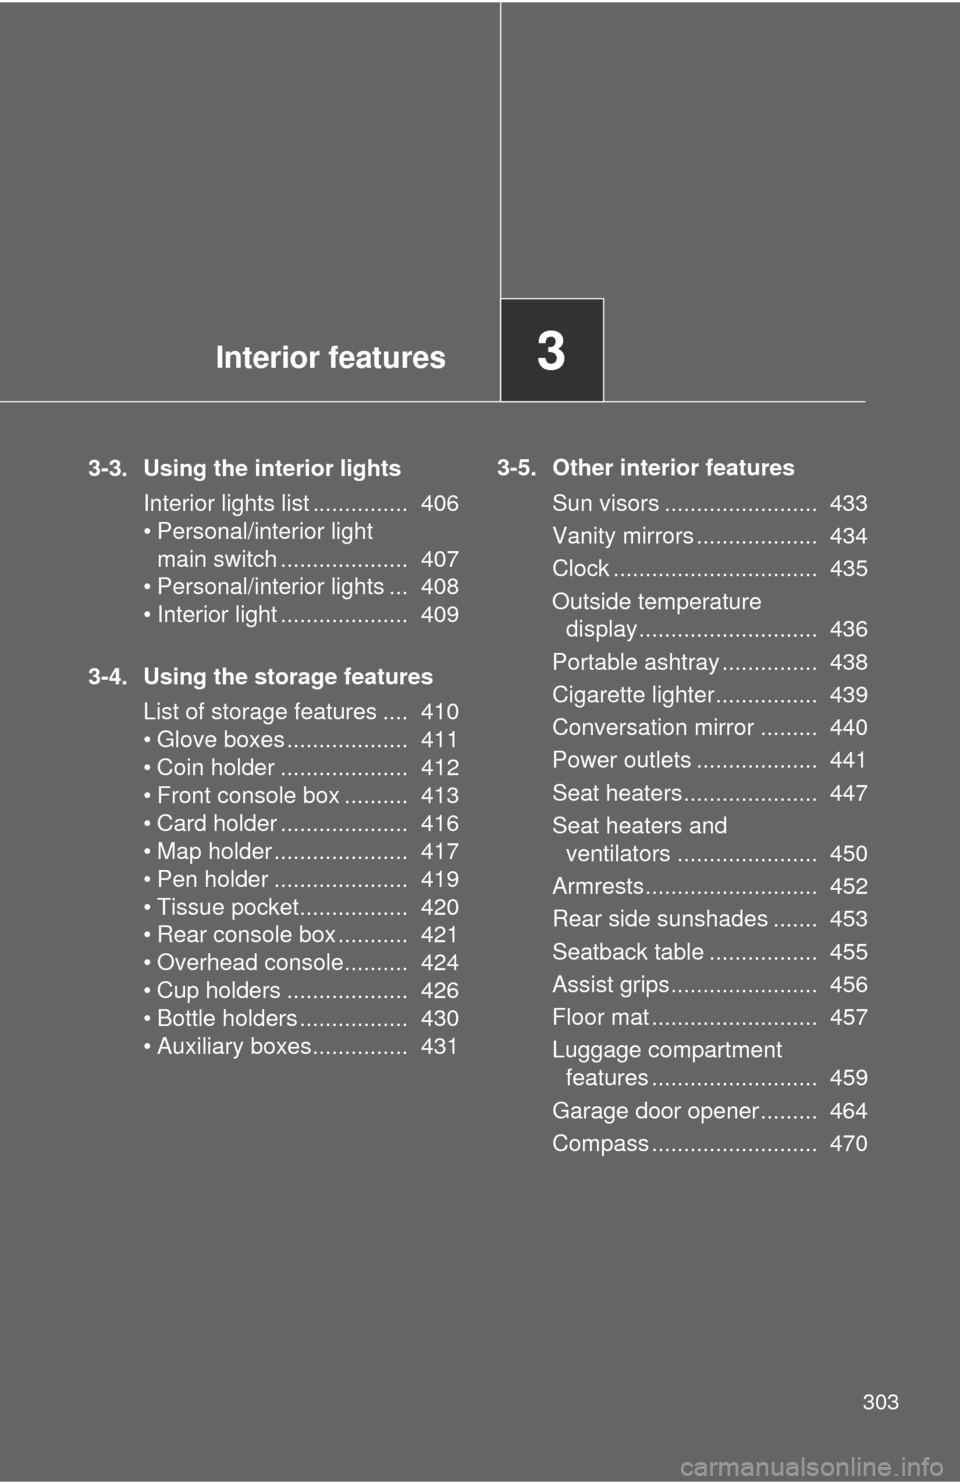
303
3-3. Using the interior lightsInterior lights list ............... 406
• Personal/interior light main switch .................... 407
• Personal/interior lights ... 408
• Interior light .................... 409
3-4. Using the storage features List of storage features .... 410
• Glove boxes ................... 411
• Coin holder .................... 412
• Front console box .......... 413
• Card holder .................... 416
• Map holder ..................... 417
• Pen holder ..................... 419
• Tissue pocket................. 420
• Rear console box ........... 421
• Overhead console.......... 424
• Cup holders ................... 426
• Bottle holders ................. 430
• Auxiliary boxes............... 431 3-5. Other interior features
Sun visors ........................ 433
Vanity mirrors ................... 434
Clock ................................ 435
Outside temperature display............................ 436
Portable ashtray ............... 438
Cigarette lighter................ 439
Conversation mirror ......... 440
Power outlets ................... 441
Seat heaters..................... 447
Seat heaters and ventilators ...................... 450
Armrests........................... 452
Rear side sunshades ....... 453
Seatback table ................. 455
Assist grips....................... 456
Floor mat .......................... 457
Luggage compartment features .......................... 459
Garage door opener......... 464
Compass .......................... 470
Page 305 of 668
305
3-1. Using the air conditioning system
and defogger
3
Interior features
Using the automatic mode
Press .
The air conditioning system will begin to operate. Air outlets and fan
speed are automatically adjusted according to the temperature set-
ting.
Turn the temperature control dial clockwise (warm) or coun-
terclockwise (cool).
The temperature for the driver and passenger seat can be set sepa-
rately.
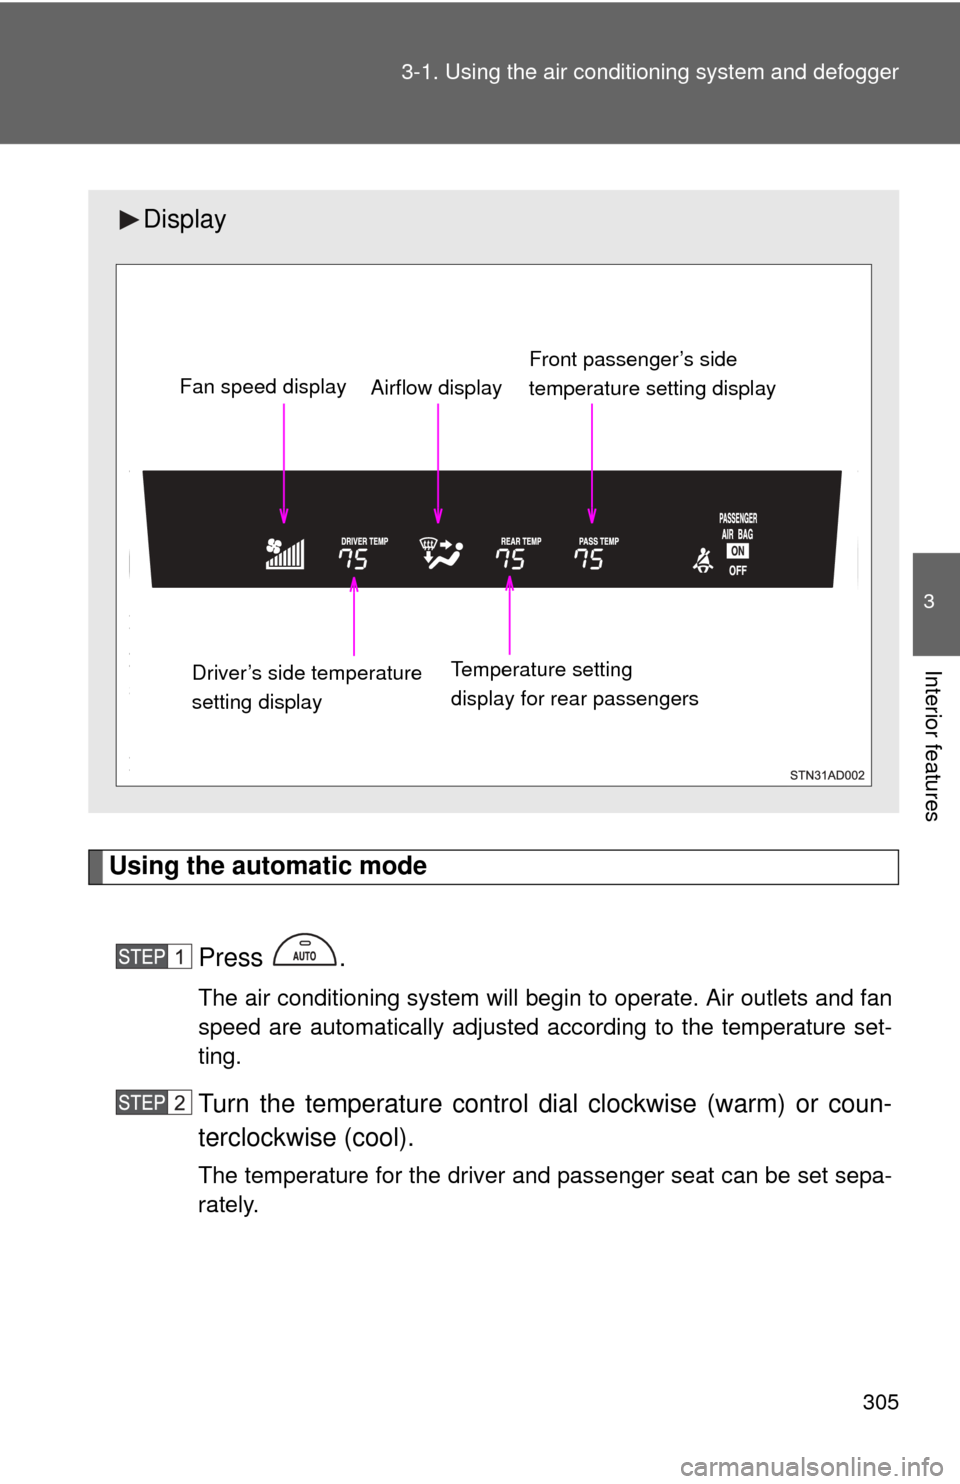
Display
Front passenger’s side
temperature setting display
Fan speed display
Airflow display
Driver’s side temperature
setting display Temperature setting
display for rear passengers