display TOYOTA SEQUOIA 2017 2.G Navigation Manual
[x] Cancel search | Manufacturer: TOYOTA, Model Year: 2017, Model line: SEQUOIA, Model: TOYOTA SEQUOIA 2017 2.GPages: 324, PDF Size: 7.13 MB
Page 26 of 324
26
2. NAVIGATION OPERATION
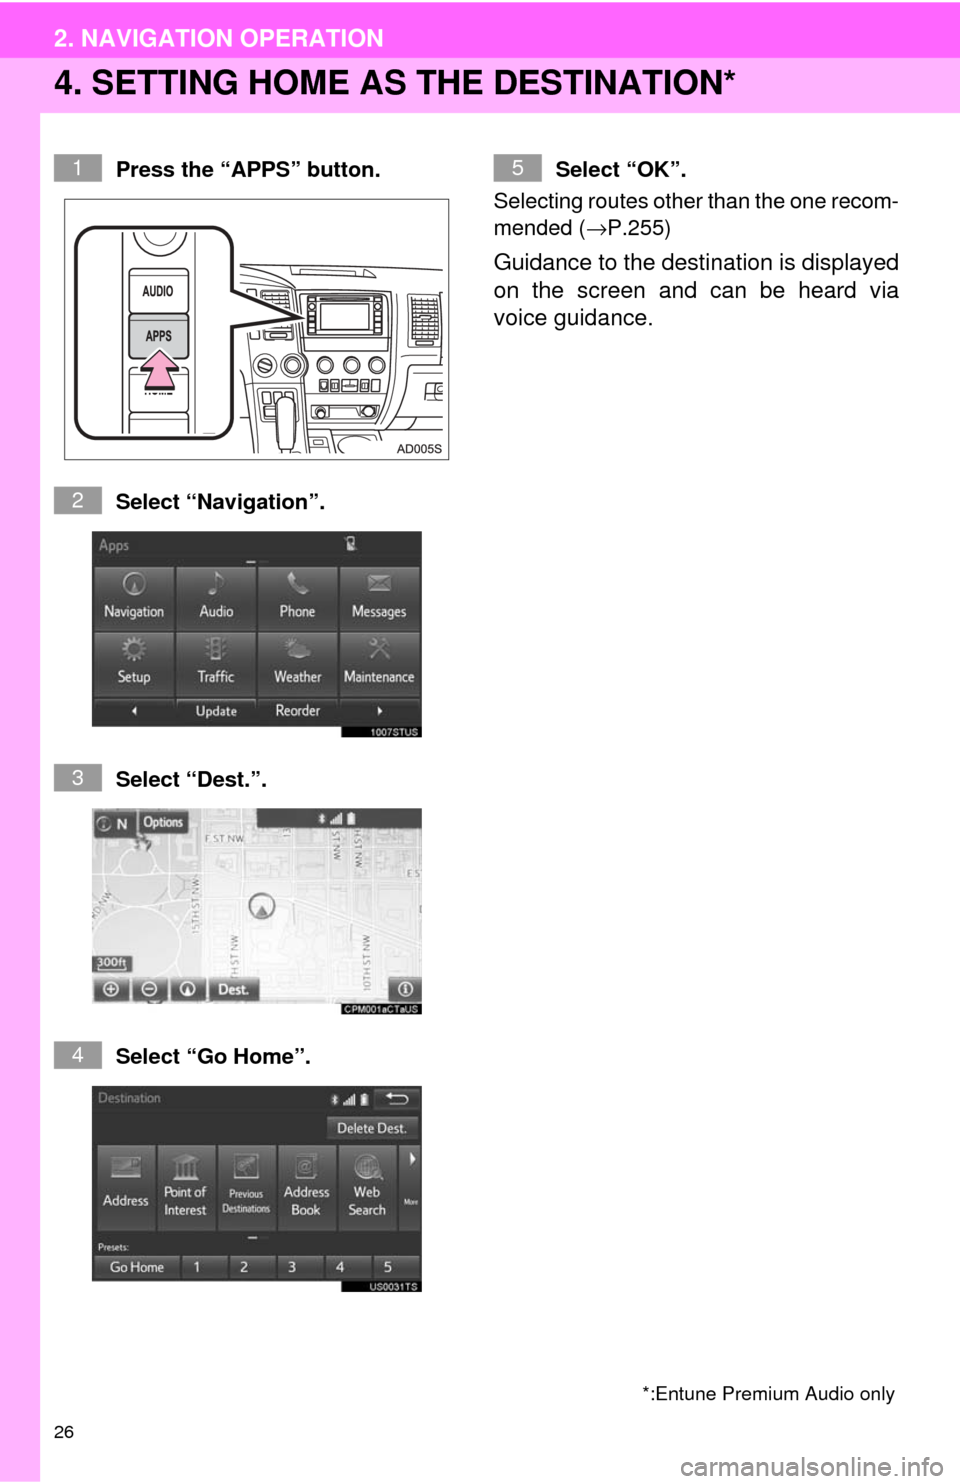
4. SETTING HOME AS THE DESTINATION*
Press the “APPS” button.
Select “Navigation”.
Select “Dest.”.
Select “Go Home”.Select “OK”.
Selecting routes other than the one recom-
mended ( →P.255)
Guidance to the destination is displayed
on the screen and can be heard via
voice guidance.
*:Entune Premium Audio only
1
2
3
4
5
Page 27 of 324
27
QUICK GUIDE
1
3. FUNCTION INDEX
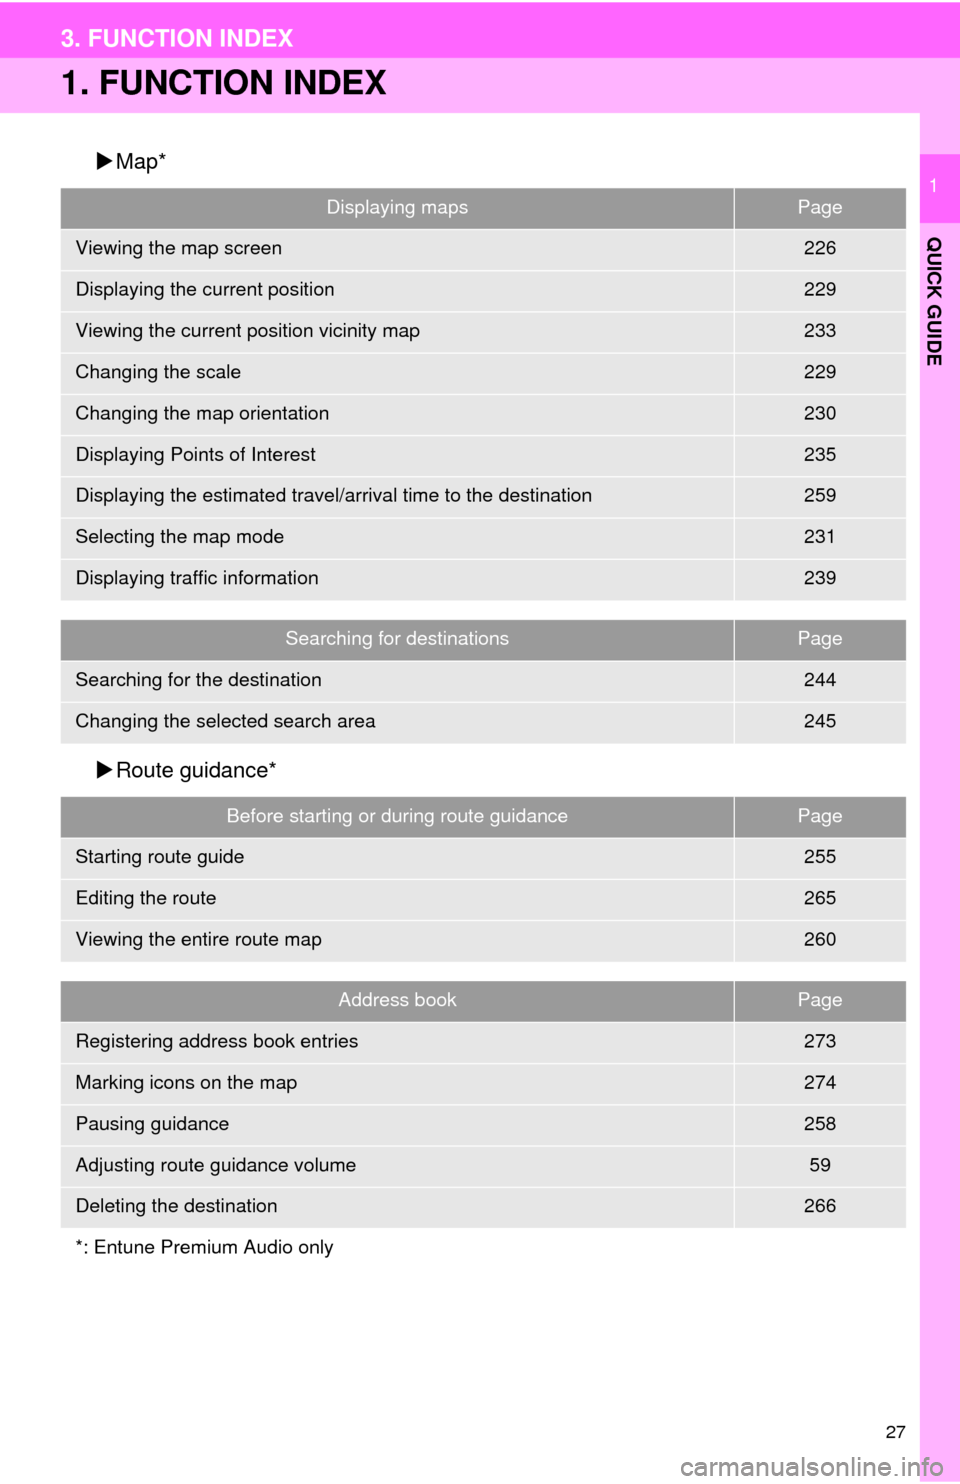
1. FUNCTION INDEX
Map*
Route guidance*
Displaying mapsPage
Viewing the map screen226
Displaying the current position229
Viewing the current position vicinity map233
Changing the scale229
Changing the map orientation230
Displaying Points of Interest235
Displaying the estimated travel/arrival time to the destination259
Selecting the map mode231
Displaying traffic information239
Searching for destinationsPage
Searching for the destination244
Changing the selected search area245
Before starting or during route guidancePage
Starting route guide255
Editing the route265
Viewing the entire route map260
Address bookPage
Registering address book entries273
Marking icons on the map274
Pausing guidance258
Adjusting route guidance volume59
Deleting the destination266
*: Entune Premium Audio only
Page 28 of 324
28
3. FUNCTION INDEX
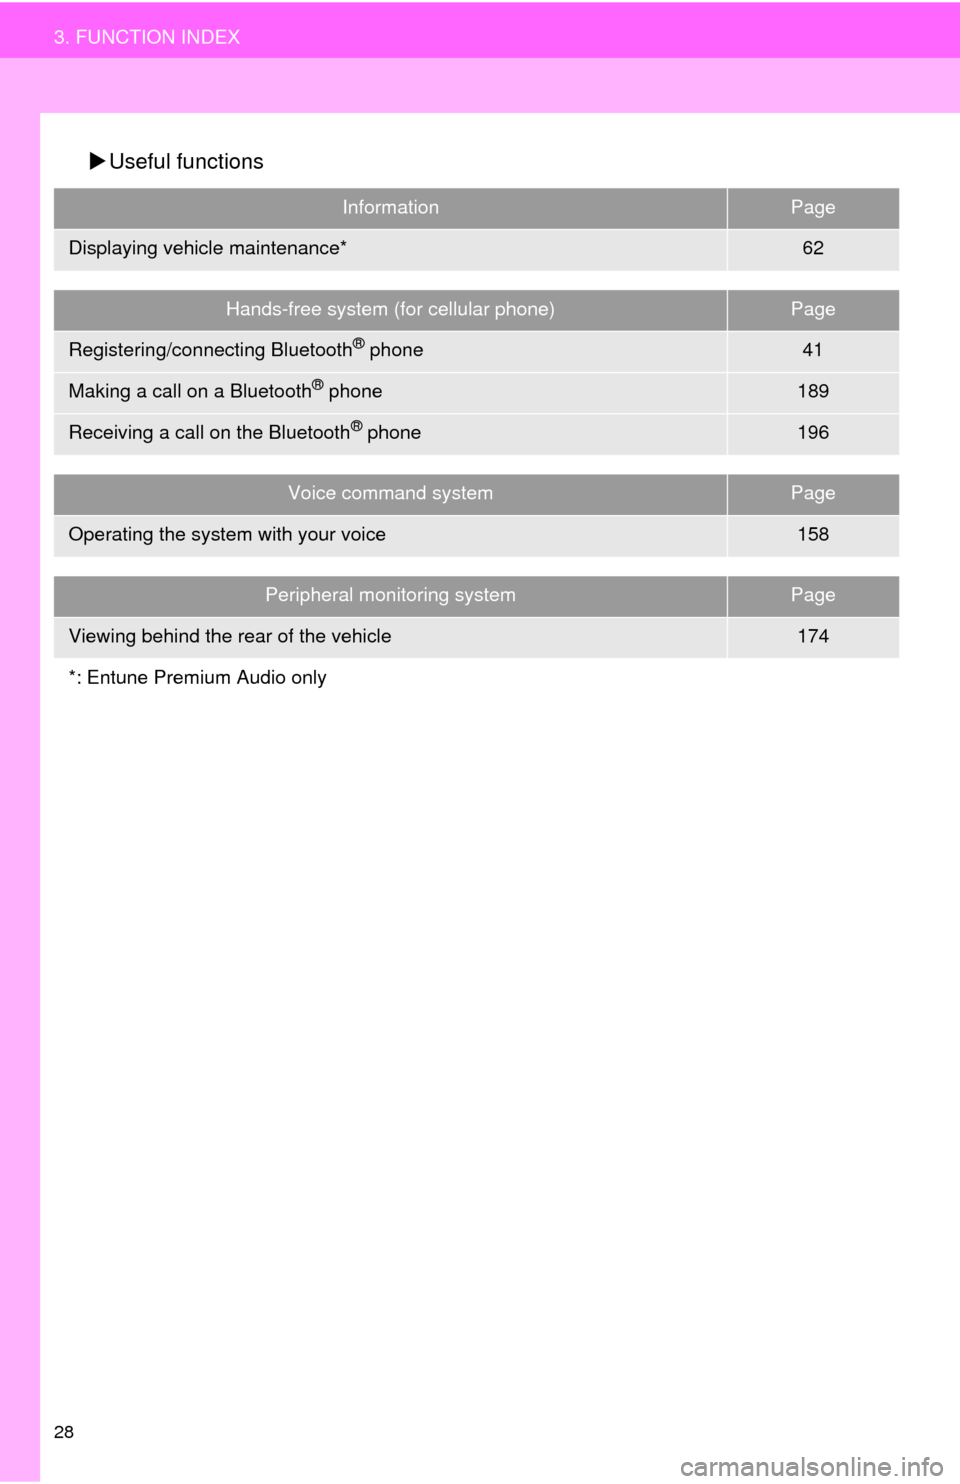
Useful functions
InformationPage
Displaying vehicle maintenance*62
Hands-free system (for cellular phone)Page
Registering/connecting Bluetooth® phone41
Making a call on a Bluetooth® phone189
Receiving a call on the Bluetooth® phone196
Voice command systemPage
Operating the system with your voice158
Peripheral monitoring systemPage
Viewing behind the rear of the vehicle174
*: Entune Premium Audio only
Page 30 of 324
30
1. BASIC INFORMATION BEFORE OPERATION
1. INITIAL SCREEN
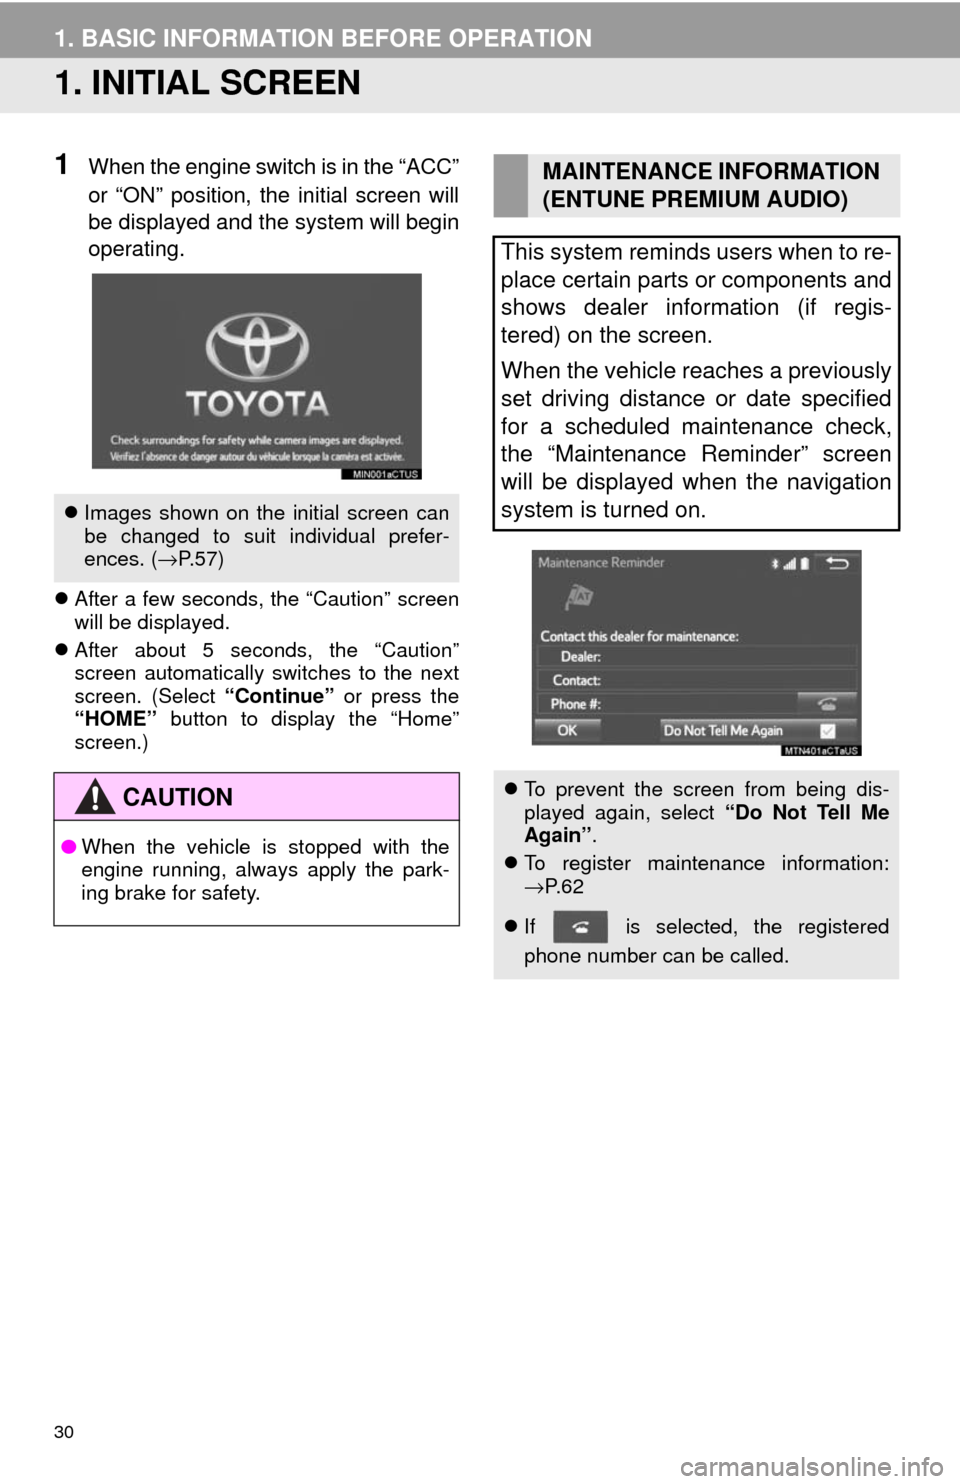
1When the engine switch is in the “ACC”
or “ON” position, the initial screen will
be displayed and the system will begin
operating.
After a few seconds, the “Caution” screen
will be displayed.
After about 5 seconds, the “Caution”
screen automatically switches to the next
screen. (Select “Continue” or press the
“HOME” button to display the “Home”
screen.)
Images shown on the initial screen can
be changed to suit individual prefer-
ences. ( →P.57)
CAUTION
● When the vehicle is stopped with the
engine running, always apply the park-
ing brake for safety.
MAINTENANCE INFORMATION
(ENTUNE PREMIUM AUDIO)
This system reminds users when to re-
place certain parts or components and
shows dealer information (if regis-
tered) on the screen.
When the vehicle reaches a previously
set driving distance or date specified
for a scheduled maintenance check,
the “Maintenance Reminder” screen
will be displayed when the navigation
system is turned on.
To prevent the screen from being dis-
played again, select “Do Not Tell Me
Again” .
To register maintenance information:
→P. 6 2
If is selected, the registered
phone number can be called.
Page 33 of 324
33
1. BASIC INFORMATION BEFORE OPERATION
BASIC FUNCTION
2
3. TOUCH SCREEN OPERATION
This system is operated mainly by the
buttons on the screen. (Referred to as
screen buttons in this manual.)
When a screen button is touched, a
beep sounds. (To set the beep sound,
see page 54.)
NOTICE
● To prevent damaging the screen, lightly
touch the screen buttons with your fin-
ger.
● Do not use objects other than your finger
to touch the screen.
● Wipe off fingerprints using a glass clean-
ing cloth. Do not use chemical cleaners
to clean the screen, as they may dam-
age the touch screen.
INFORMATION
●If the system does not respond to touch-
ing the screen button, move your finger
away from the screen and then touch it
again.
● Dimmed screen buttons cannot be oper-
ated.
● The displayed image may become
darker and moving images may be
slightly distorted when the screen is
cold.
● In extremely cold conditions, the screen
may not be displayed and the data input
by a user may be deleted. Also, the
screen buttons may not react properly.
● When you look at the screen through
polarized material such as polarized
sunglasses, the screen may be dark and
hard to see. If so, look at the screen
from different angles, adjust the screen
settings on the “Display Settings” screen
or take off your sunglasses.
Page 34 of 324
34
1. BASIC INFORMATION BEFORE OPERATION
4. “Home” SCREEN OPERATION
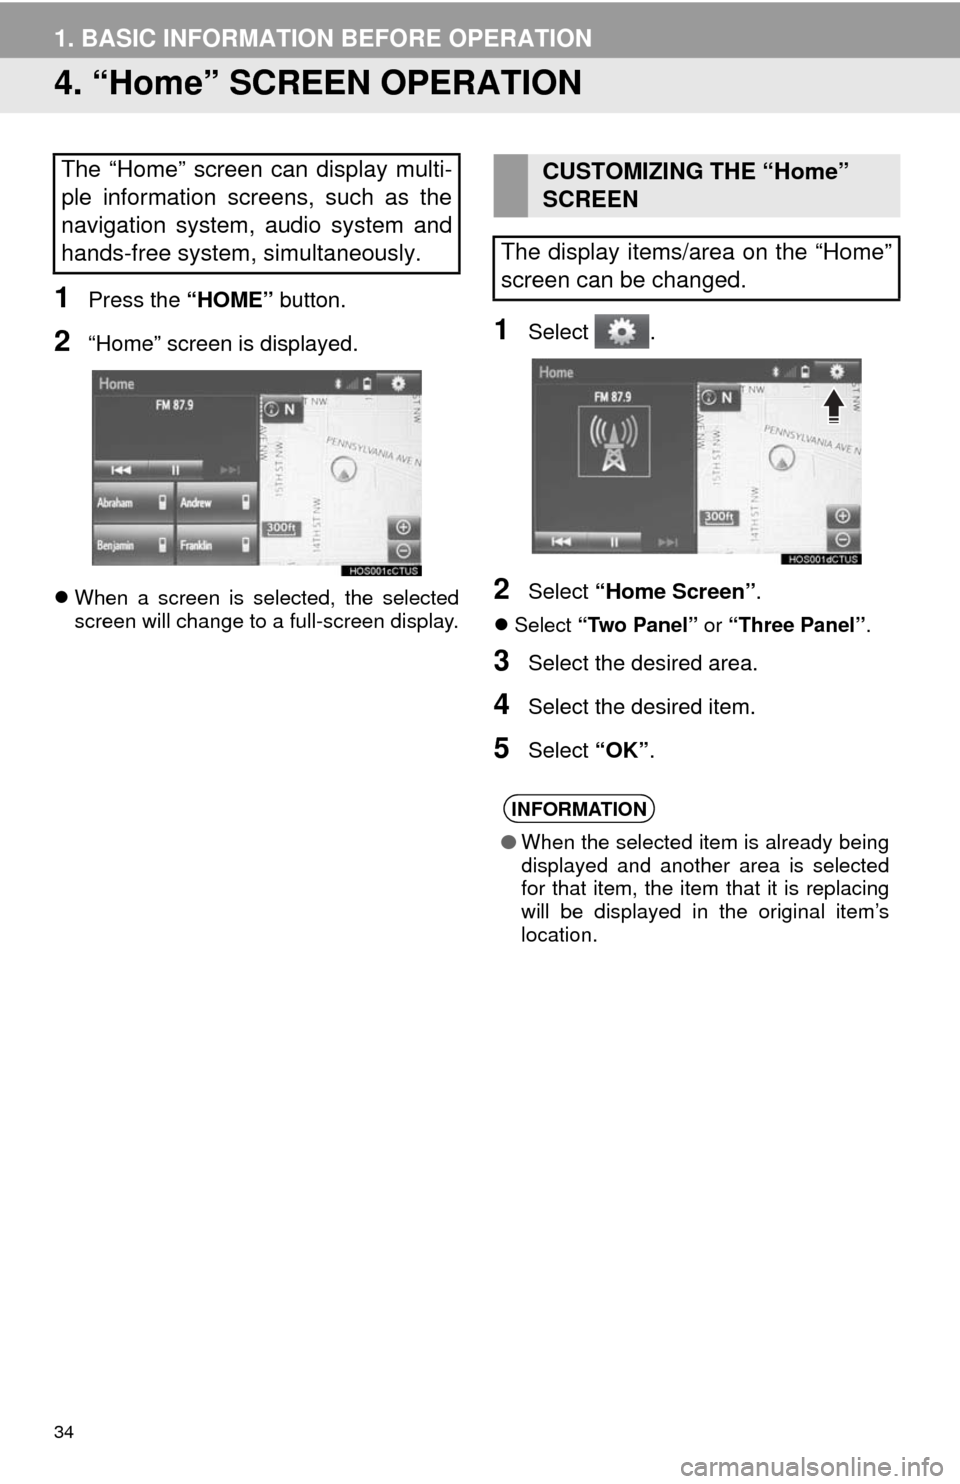
1Press the “HOME” button.
2“Home” screen is displayed.
When a screen is selected, the selected
screen will change to a full-screen display.
1Select .
2Select “Home Screen” .
Select “Two Panel” or “Three Panel” .
3Select the desired area.
4Select the desired item.
5Select “OK”.
The “Home” screen can display multi-
ple information screens, such as the
navigation system, audio system and
hands-free system, simultaneously. CUSTOMIZING THE “Home”
SCREEN
The display items/area on the “Home”
screen can be changed.
INFORMATION
● When the selected item is already being
displayed and another area is selected
for that item, the item that it is replacing
will be displayed in the original item’s
location.
Page 36 of 324
36
1. BASIC INFORMATION BEFORE OPERATION
6. ENTERING LETTERS AND NUMBERS/LIST SCREEN OPERATION*
On certain letter entry screens, letters can
be entered in upper or lower case.
: Select to enter in lower case.
: Select to enter in upper case.
1Enter characters and select “OK”.
Matching items from the database are
listed even if the entered address or name
is incomplete.
The list will be displayed automatically if
the maximum number of characters is
entered or matching items can be dis-
played on a single list screen.
When searching for an address, name,
etc., or entering data, letters and num-
bers can be entered via the screen.
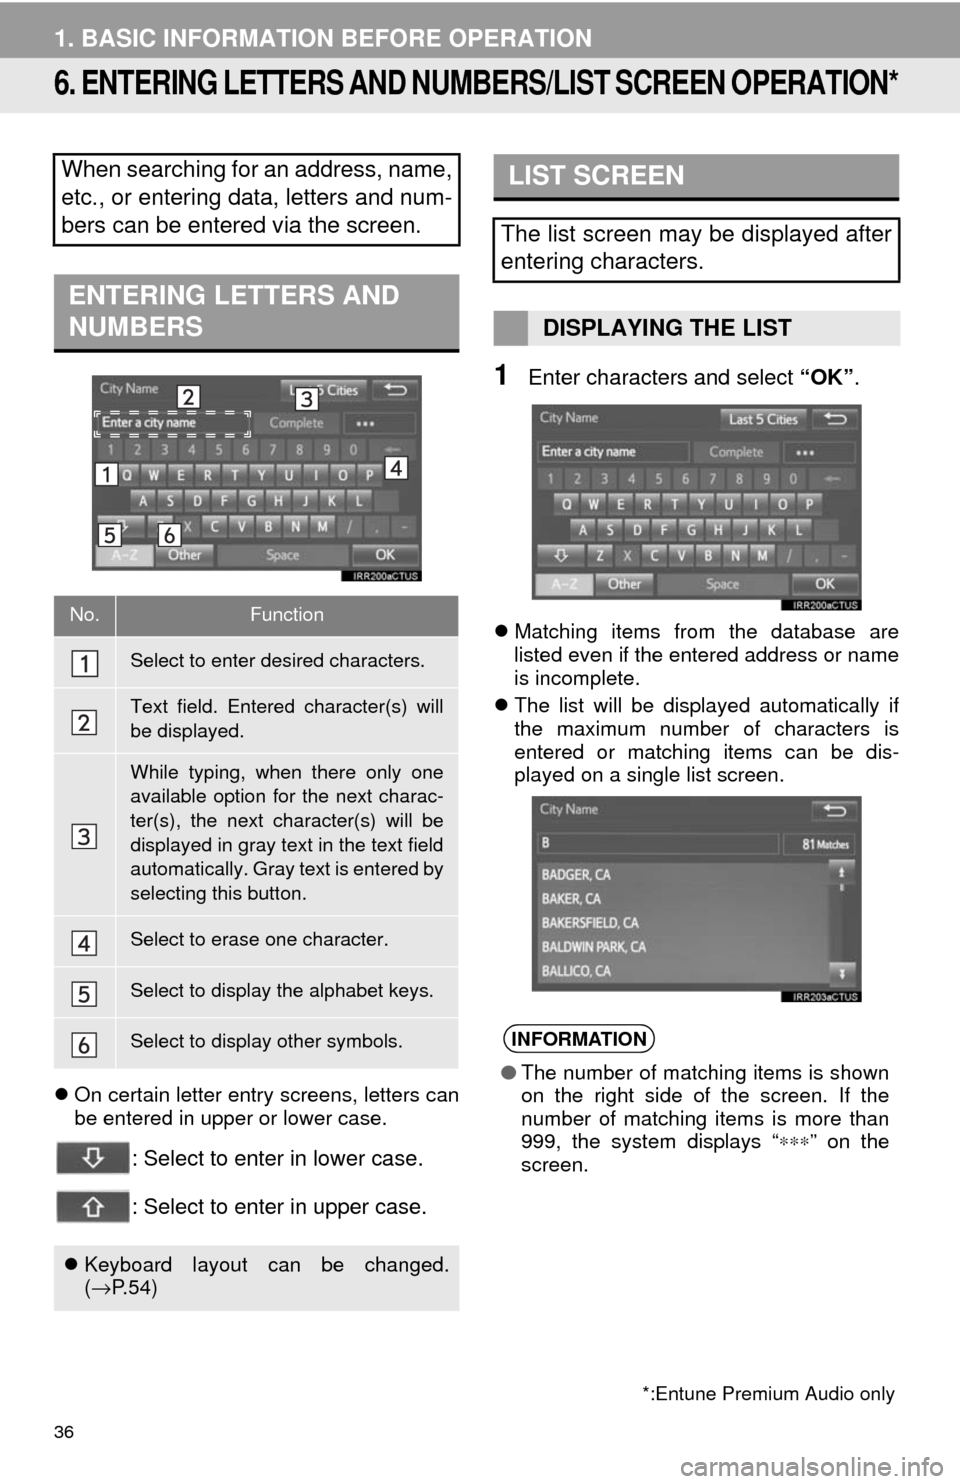
ENTERING LETTERS AND
NUMBERS
No.Function
Select to enter desired characters.
Text field. Entered character(s) will
be displayed.
While typing, when there only one
available option for the next charac-
ter(s), the next character(s) will be
displayed in gray text in the text field
automatically. Gray text is entered by
selecting this button.
Select to erase one character.
Select to display the alphabet keys.
Select to display other symbols.
Keyboard layout can be changed.
(→ P. 5 4 )
*:Entune Premium Audio only
LIST SCREEN
The list screen may be displayed after
entering characters.
DISPLAYING THE LIST
INFORMATION
●The number of matching items is shown
on the right side of the screen. If the
number of matching items is more than
999, the system displays “ ∗∗∗” on the
screen.
Page 37 of 324
37
1. BASIC INFORMATION BEFORE OPERATION
BASIC FUNCTION
2
■SELECTING ALL ITEMS
1Select “Select All” .
“Unselect All” : Unselect all items in the
list.
Some lists contain “Select All”. If “Se-
lect All” is selected, it is possible to
select all items.
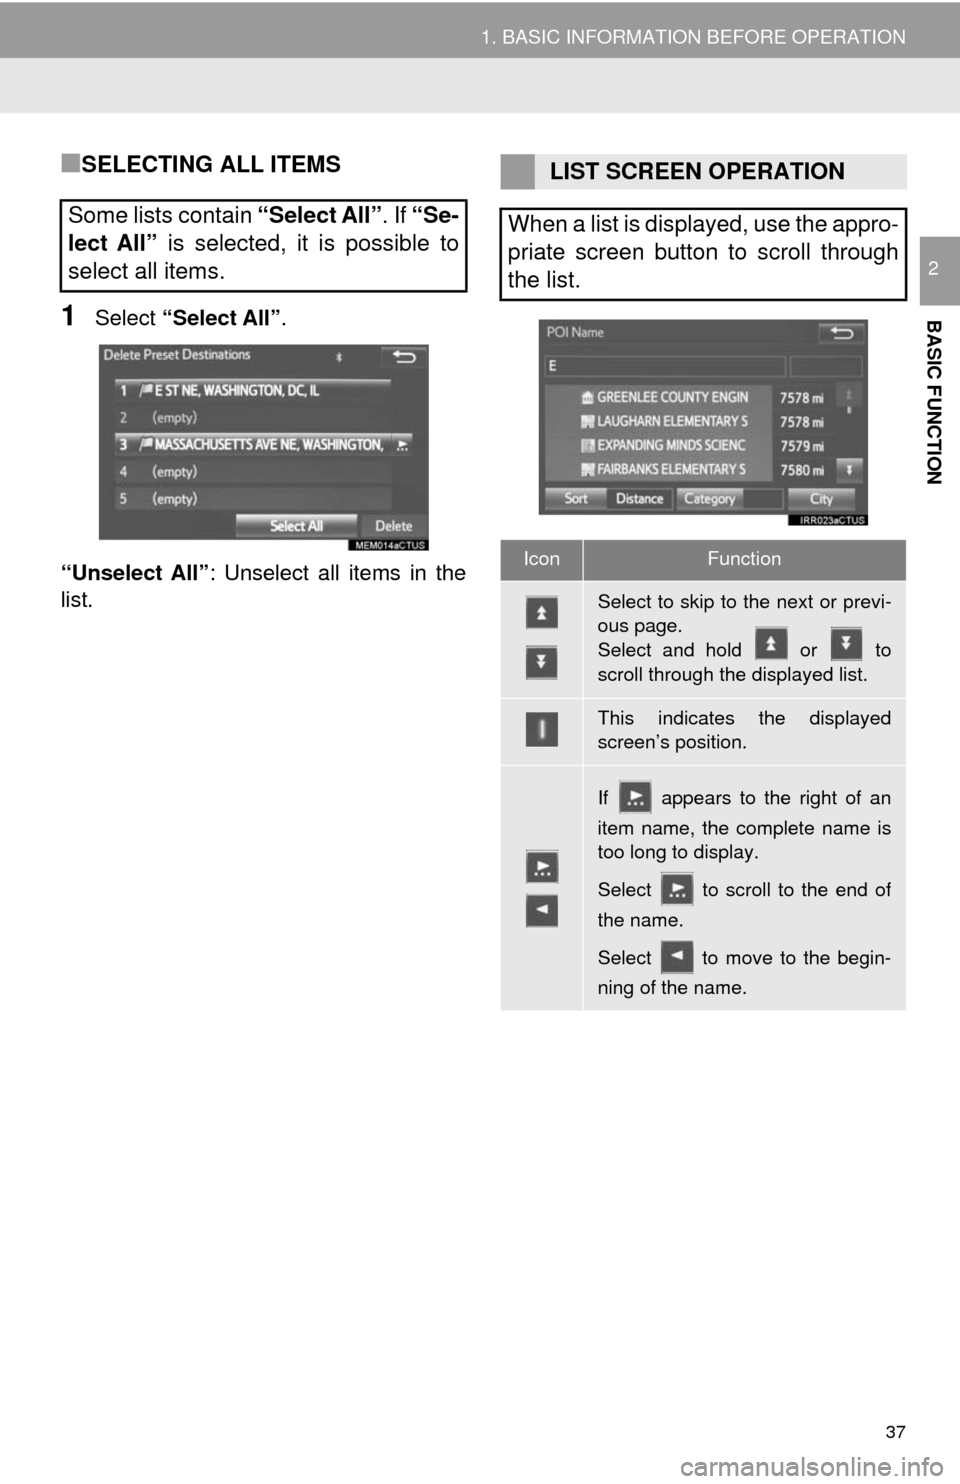
LIST SCREEN OPERATION
When a list is displayed, use the appro-
priate screen button to scroll through
the list.
IconFunction
Select to skip to the next or previ-
ous page.
Select and hold or to
scroll through the displayed list.
This indicates the displayed
screen’s position.
If appears to the right of an
item name, the complete name is
too long to display.
Select to scroll to the end of
the name.
Select to move to the begin-
ning of the name.
Page 38 of 324
38
1. BASIC INFORMATION BEFORE OPERATION
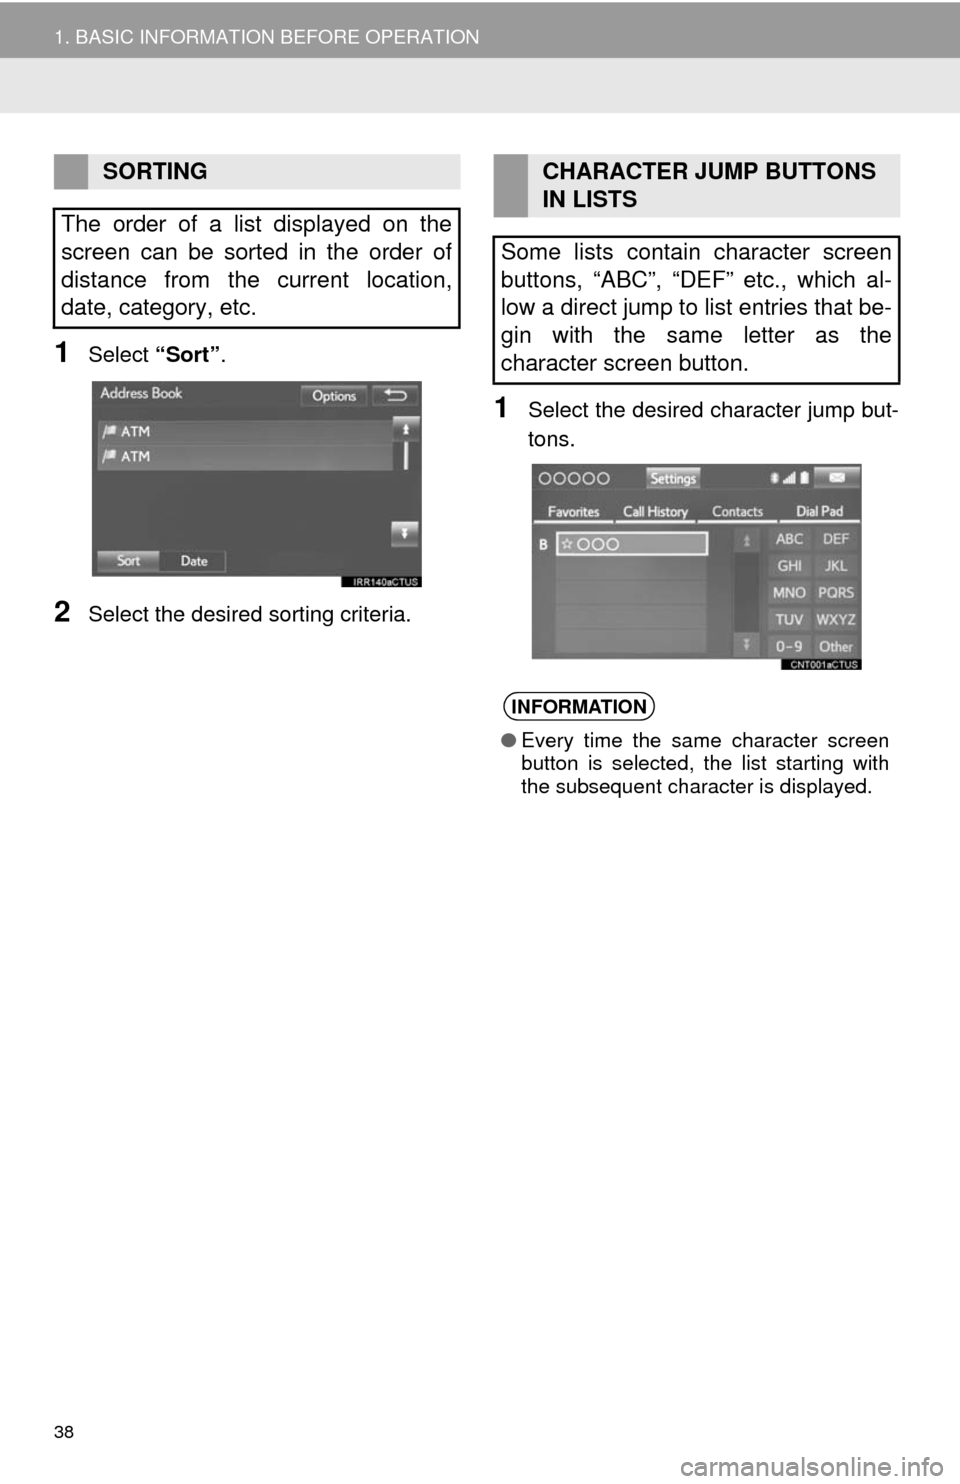
1Select “Sort”.
2Select the desired sorting criteria.
1Select the desired character jump but-
tons.
SORTING
The order of a list displayed on the
screen can be sorted in the order of
distance from the current location,
date, category, etc.CHARACTER JUMP BUTTONS
IN LISTS
Some lists contain character screen
buttons, “ABC”, “DEF” etc., which al-
low a direct jump to list entries that be-
gin with the same letter as the
character screen button.
INFORMATION
● Every time the same character screen
button is selected, the list starting with
the subsequent character is displayed.
Page 39 of 324
39
1. BASIC INFORMATION BEFORE OPERATION
BASIC FUNCTION
2
7. SCREEN ADJUSTMENT
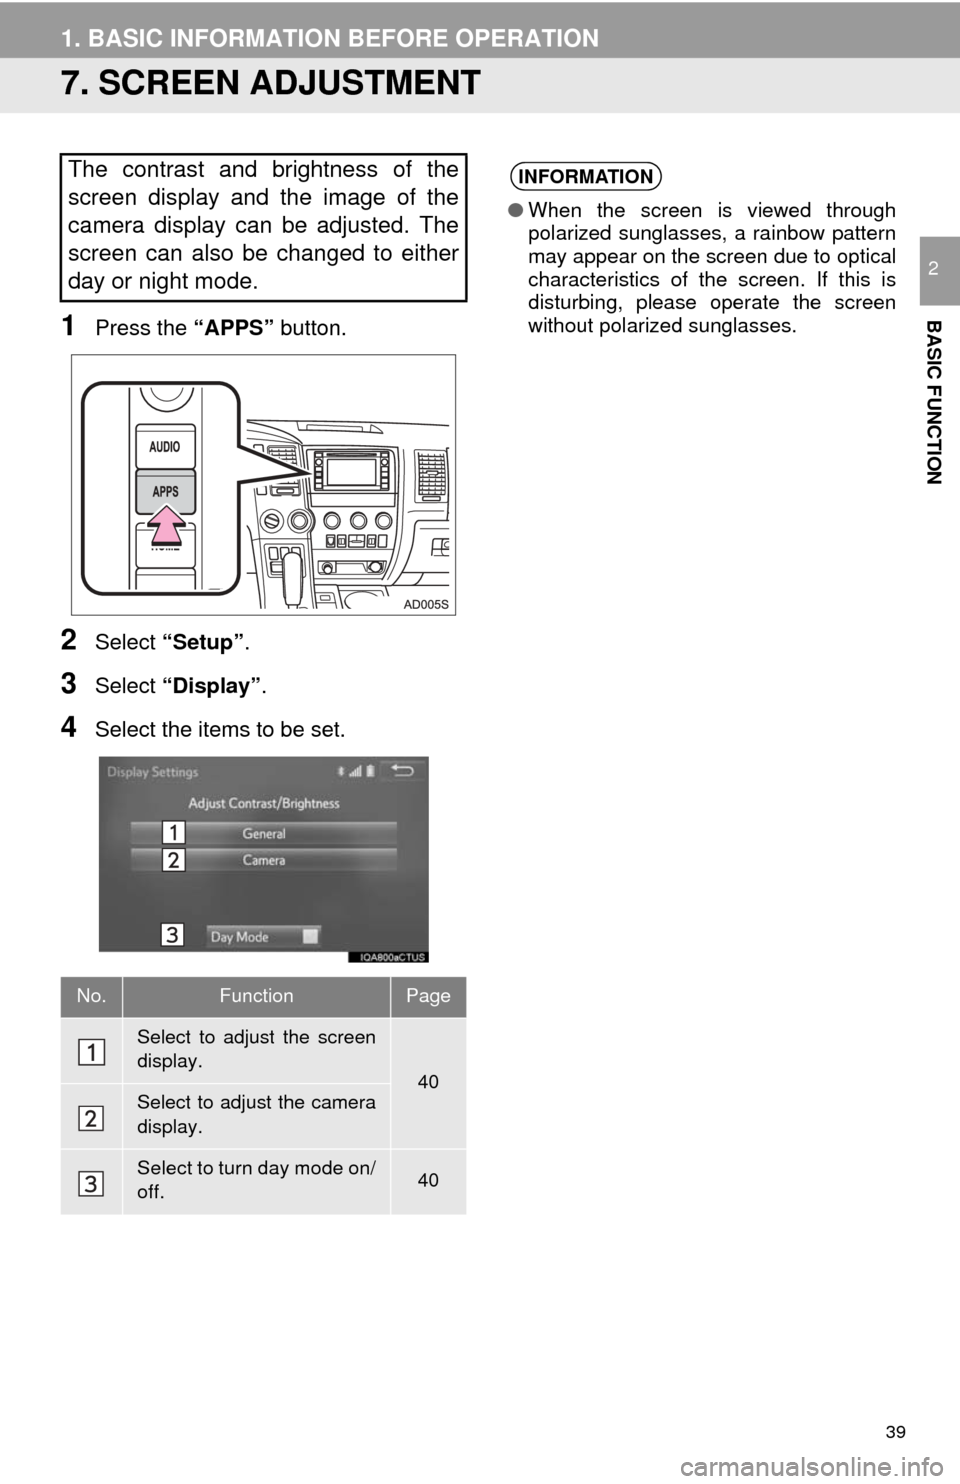
1Press the “APPS” button.
2Select “Setup” .
3Select “Display” .
4Select the items to be set.
The contrast and brightness of the
screen display and the image of the
camera display can be adjusted. The
screen can also be changed to either
day or night mode.
No.FunctionPage
Select to adjust the screen
display.
40Select to adjust the camera
display.
Select to turn day mode on/
off.40
INFORMATION
●When the screen is viewed through
polarized sunglasses, a rainbow pattern
may appear on the screen due to optical
characteristics of the screen. If this is
disturbing, please operate the screen
without polarized sunglasses.