display TOYOTA SEQUOIA 2017 2.G Navigation Manual
[x] Cancel search | Manufacturer: TOYOTA, Model Year: 2017, Model line: SEQUOIA, Model: TOYOTA SEQUOIA 2017 2.GPages: 324, PDF Size: 7.13 MB
Page 57 of 324
57
3. OTHER SETTINGS
BASIC FUNCTION
2
■TRANSFERRING IMAGES
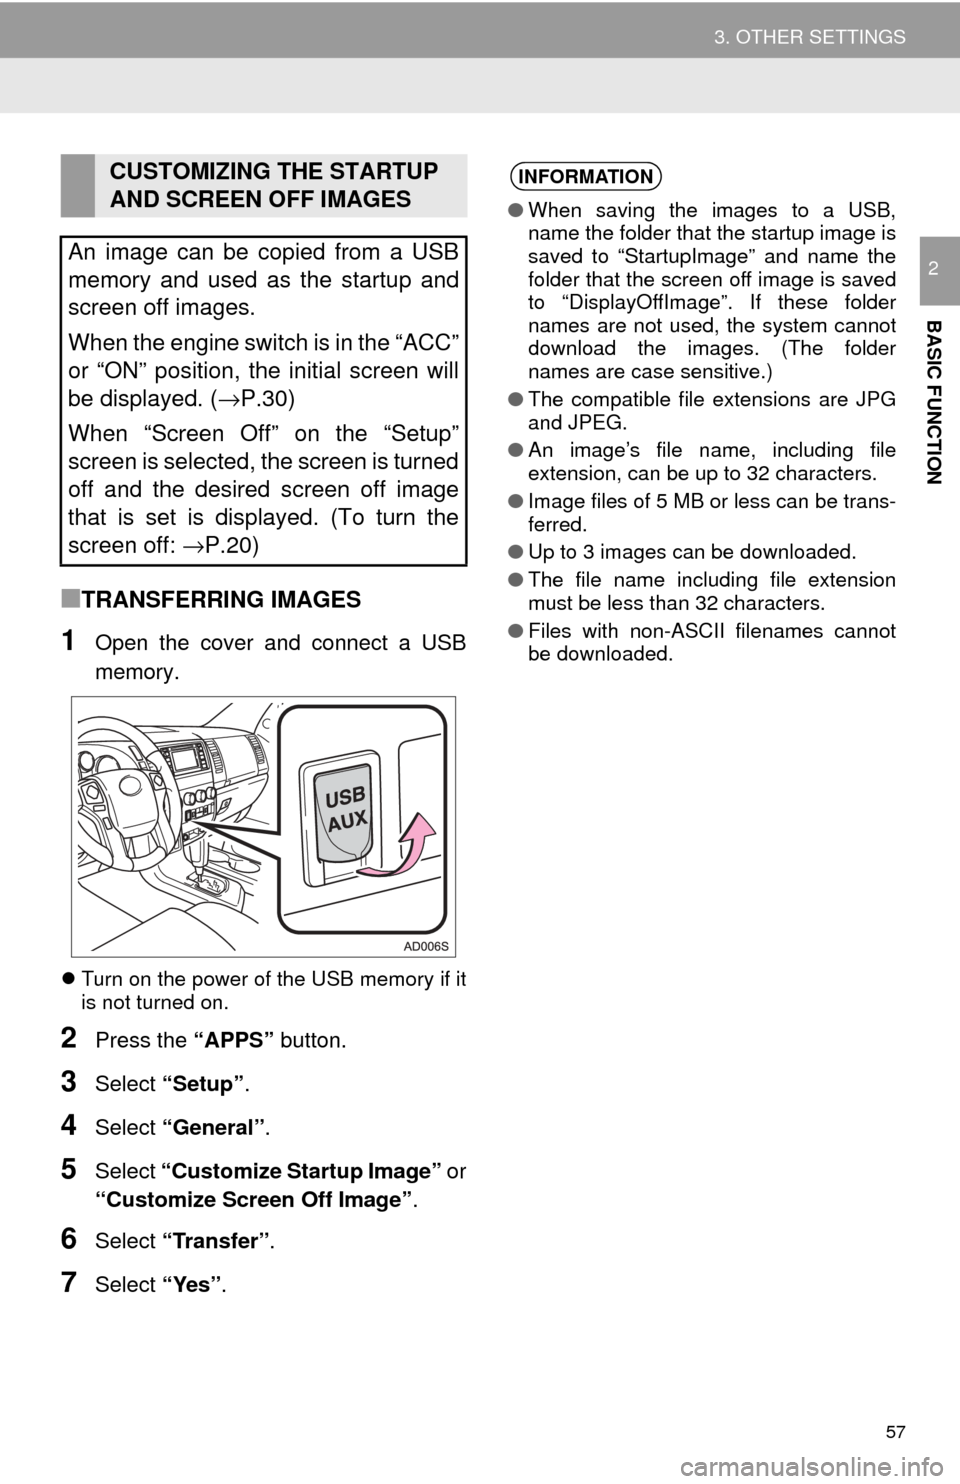
1Open the cover and connect a USB
memory.
Turn on the power of the USB memory if it
is not turned on.
2Press the “APPS” button.
3Select “Setup” .
4Select “General” .
5Select “Customize Startup Image” or
“Customize Screen Off Image” .
6Select “Transfer” .
7Select “Yes”.
CUSTOMIZING THE STARTUP
AND SCREEN OFF IMAGES
An image can be copied from a USB
memory and used as the startup and
screen off images.
When the engine switch is in the “ACC”
or “ON” position, the initial screen will
be displayed. ( →P.30)
When “Screen Off” on the “Setup”
screen is selected, the screen is turned
off and the desired screen off image
that is set is displayed. (To turn the
screen off: →P.20)INFORMATION
●When saving the images to a USB,
name the folder that the startup image is
saved to “StartupImage” and name the
folder that the screen off image is saved
to “DisplayOffImage”. If these folder
names are not used, the system cannot
download the images. (The folder
names are case sensitive.)
● The compatible file extensions are JPG
and JPEG.
● An image’s file name, including file
extension, can be up to 32 characters.
● Image files of 5 MB or less can be trans-
ferred.
● Up to 3 images can be downloaded.
● The file name including file extension
must be less than 32 characters.
● Files with non-ASCII filenames cannot
be downloaded.
Page 58 of 324
58
3. OTHER SETTINGS
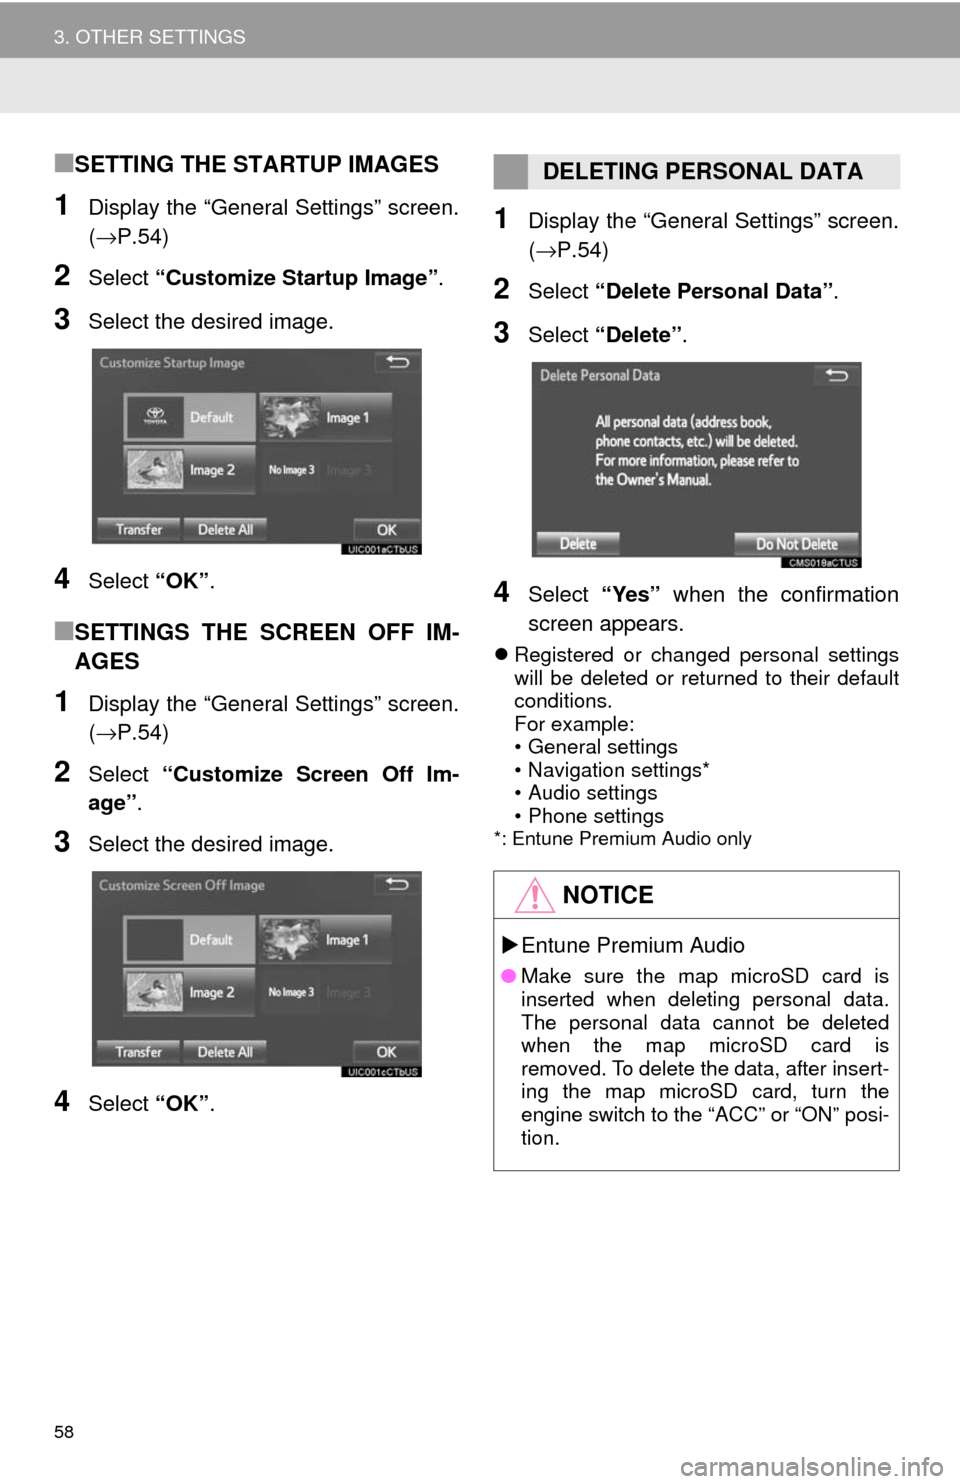
■SETTING THE STARTUP IMAGES
1Display the “General Settings” screen.
(→P.54)
2Select “Customize Startup Image” .
3Select the desired image.
4Select “OK”.
■SETTINGS THE SCREEN OFF IM-
AGES
1Display the “General Settings” screen.
(→P.54)
2Select “Customize Screen Off Im-
age” .
3Select the desired image.
4Select “OK”.
1Display the “General Settings” screen.
(→P.54)
2Select “Delete Personal Data” .
3Select “Delete” .
4Select “Yes” when the confirmation
screen appears.
Registered or changed personal settings
will be deleted or returned to their default
conditions.
For example:
• General settings
• Navigation settings*
• Audio settings
• Phone settings
*: Entune Premium Audio only
DELETING PERSONAL DATA
NOTICE
Entune Premium Audio
● Make sure the map microSD card is
inserted when deleting personal data.
The personal data cannot be deleted
when the map microSD card is
removed. To delete the data, after insert-
ing the map microSD card, turn the
engine switch to the “ACC” or “ON” posi-
tion.
Page 61 of 324
61
3. OTHER SETTINGS
BASIC FUNCTION
2
3. DRIVER SETTINGS
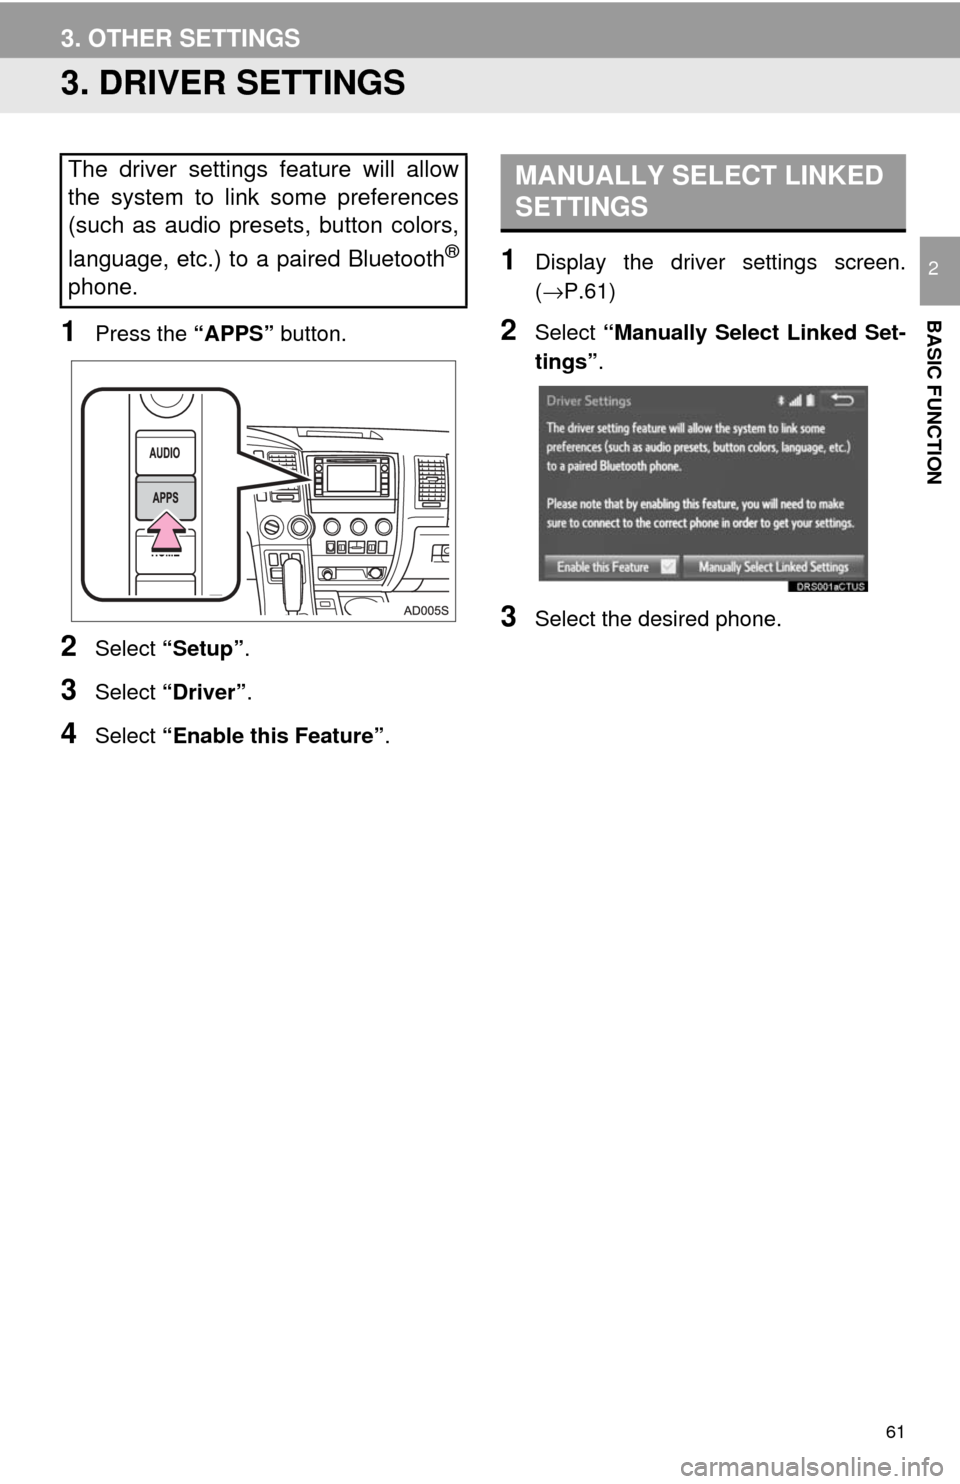
1Press the “APPS” button.
2Select “Setup” .
3Select “Driver” .
4Select “Enable this Feature” .
1Display the driver settings screen.
(→P.61)
2Select “Manually Select Linked Set-
tings” .
3Select the desired phone.
The driver settings feature will allow
the system to link some preferences
(such as audio presets, button colors,
language, etc.) to a paired Bluetooth
®
phone.
MANUALLY SELECT LINKED
SETTINGS
Page 64 of 324
64
3. OTHER SETTINGS
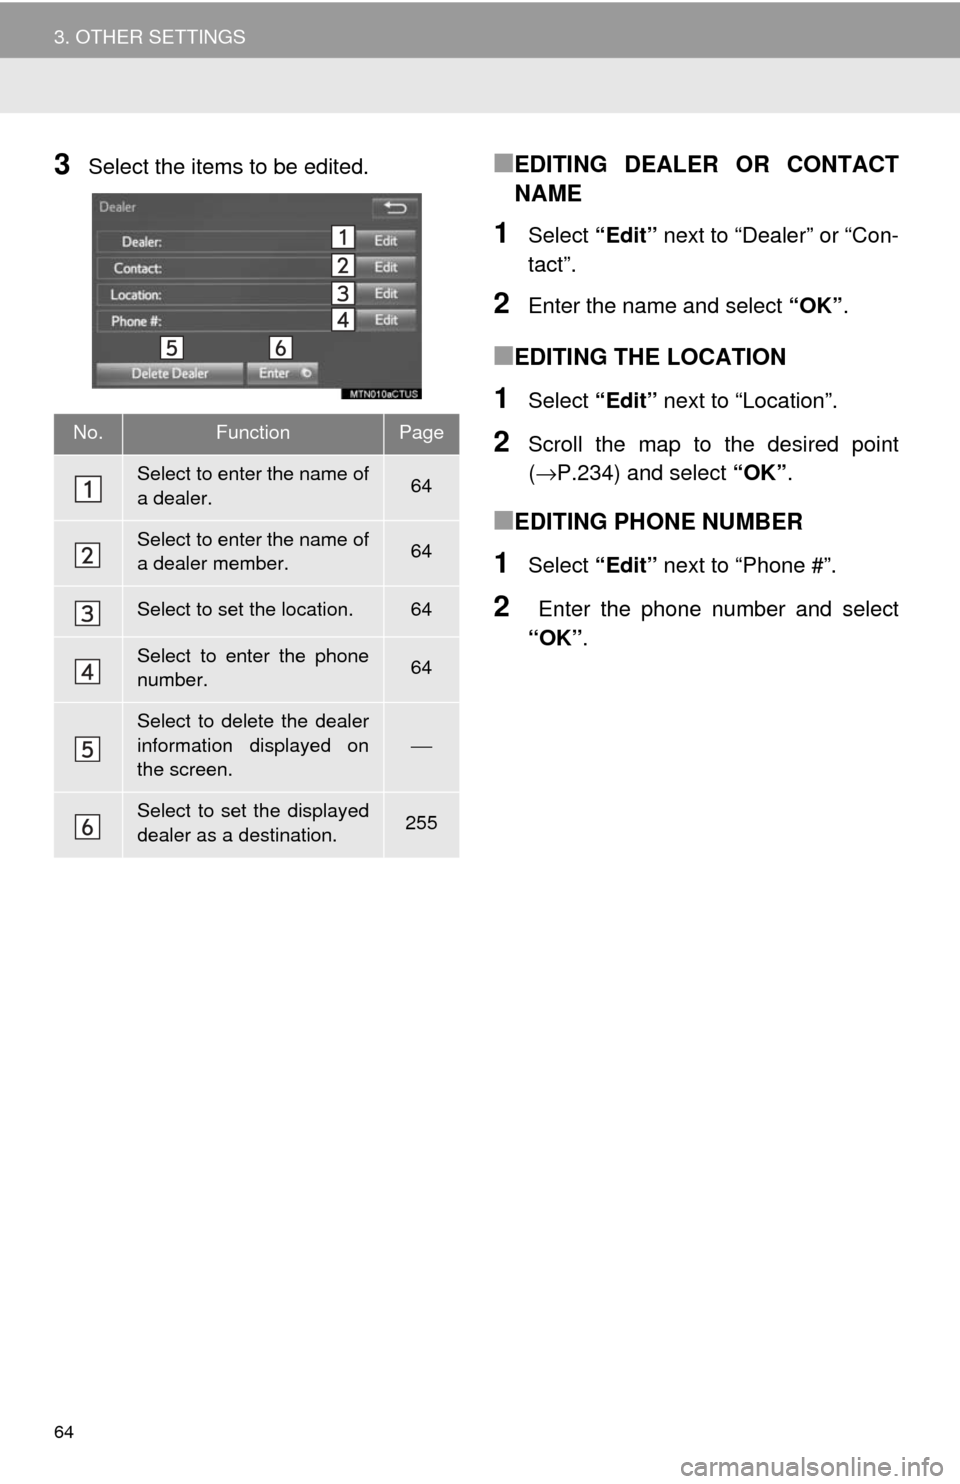
3Select the items to be edited.■EDITING DEALER OR CONTACT
NAME
1Select “Edit” next to “Dealer” or “Con-
tact”.
2Enter the name and select “OK”.
■EDITING THE LOCATION
1Select “Edit” next to “Location”.
2Scroll the map to the desired point
(→P.234) and select “OK”.
■EDITING PHONE NUMBER
1Select “Edit” next to “Phone #”.
2 Enter the phone number and select
“OK”.
No.FunctionPage
Select to enter the name of
a dealer.64
Select to enter the name of
a dealer member.64
Select to set the location.64
Select to enter the phone
number.64
Select to delete the dealer
information displayed on
the screen.
⎯
Select to set the displayed
dealer as a destination.255
Page 65 of 324
3
65
1
2
3
4
5
6
7
8
9
1. QUICK REFERENCE ..................... 68
2. SOME BASICS .............................. 70
TURNING THE SYSTEM ON AND OFF ............................................ 70
SELECTING AN AUDIO SOURCE ....... 71
DISC SLOT ............................................ 72
USB/AUX PORT .................................... 72
SOUND SETTINGS............................... 73
VOICE COMMAND SYSTEM ................ 74
1. AM/FM RADIO...................................... 75
OVERVIEW............................................ 75
PRESETTING A STATION .................... 78
SELECTING A STATION FROM THE LIST ............................................. 78
CACHING A RADIO PROGRAM (ENTUNE PREMIUM
AUDIO ONLY) ..................................... 79
RADIO BROADCAST DATA SYSTEM .............................................. 80
TRAFFIC ANNOUNCEMENT (FM RADIO) ........................................ 81
USING HD Radio™ TECHNOLOGY ................................... 81
AVAILABLE HD Radio™ TECHNOLOGY ................................... 82
TROUBLESHOOTING GUIDE .............. 84
2. XM Satellite Radio ........................ 85
OVERVIEW............................................ 85
HOW TO SUBSCRIBE TO XM Satellite Radio ............................... 87
DISPLAYING THE RADIO ID ................ 89
PRESETTING A CHANNEL .................. 89
SELECTING A CHANNEL FROM THE LIST ............................................. 89
IF THE SATELLITE RADIO TUNER MALFUNCTIONS ................................ 90
3. INTERNET RADIO ..... ................... 91
LISTENING TO INTERNET RADIO....... 91
1BASIC OPERATION2RADIO OPERATION
AUDIO SYSTEM
Page 67 of 324
3
67
1
2
3
4
5
6
7
8
9
1. REAR SEAT ENTERTAINMENT SYSTEM FEATURES ................ 121
DISPLAY ............................................. 122
DISC SLOT .......................................... 123
SD CARD SLOT .................................. 124
REMOTE CONTROLLER .................... 124
HEADPHONE JACKS ......................... 128
OPERATING FROM
THE FRONT SEATS ......................... 128
DISCS THAT CAN BE USED .............. 129
SD CARD THAT CAN BE USED ......... 131
COPYRIGHTS AND TRADEMARKS ................................. 131
2. PLAYING A Blu-ray Disc™ (BD) AND DVD DISCS ..... ...................134
REMOTE CONTROLLER .................... 134
TURNING ON THE BD/DVD MODE ... 135
PLAYING/PAUSING A DISC ............... 135
OPERATING THE DISC MENU .......... 135
OPTION SCREEN ............................... 135
BD/DVD VIDEO DISCS ....................... 144
3. PLAYING AN AUDIO CD AND
MP3/WMA DISCS ..................... 147
REMOTE CONTROLLER .................... 147
CONTROL SCREEN ........................... 147
TURNING ON THE AUDIO CD
AND MP3/WMA MODE ..................... 147
SELECTING A TRACK/FILE ............... 147
FAST FORWARDING OR REWINDING A TRACK/FILE ............ 147
SELECTING A FOLDER...................... 148
REPEAT PLAY .................................... 148
RANDOM PLAYBACK ......................... 148
MP3 AND WMA FILES ........................ 148
4. PLAYING AN SD CARD ............. 150
REMOTE CONTROLLER .................... 150
MAIN MENU ........................................ 150
PLAYING STILL PICTURES................ 151
PLAYING AVCHD VIDEO.................... 152
FORMATTING THE SD CARD ............ 153
DELETING THE BD HISTORY DATA ................................ 153
SD CARD INFORMATION ................... 153
5. USING THE VIDEO MODE ......... 155
REMOTE CONTROLLER .................... 155
USING THE A/V INPUT PORT ............ 155
7REAR SEAT ENTERTAINMENT
SYSTEM OPERATION
AUDIO SYSTEM
Page 68 of 324
68
1. BASIC OPERATION
1. QUICK REFERENCE
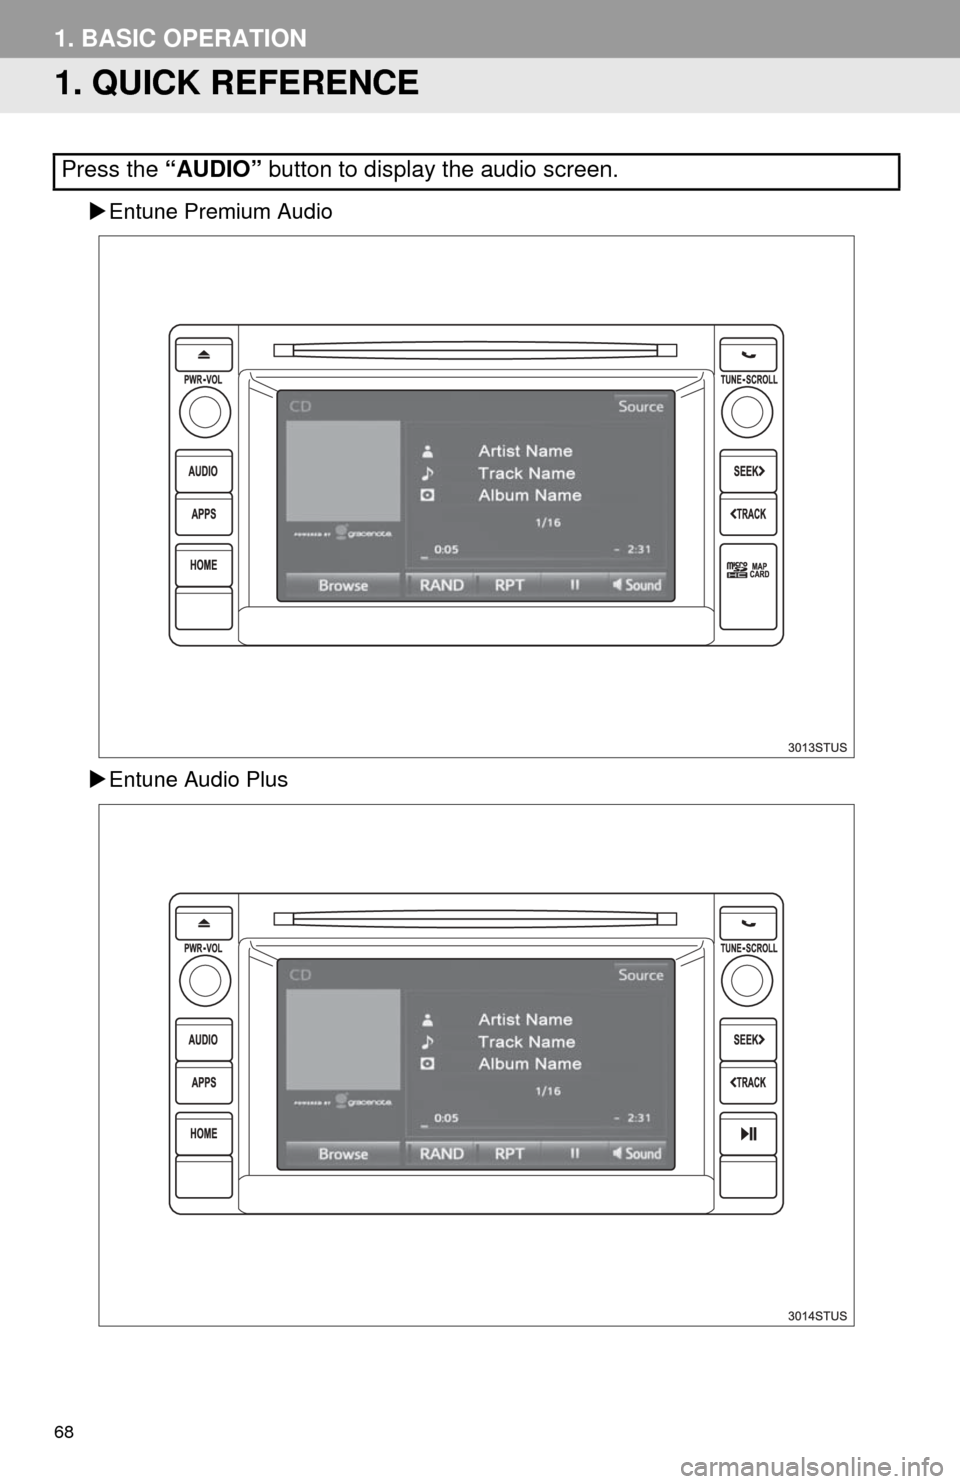
Entune Premium Audio
Entune Audio Plus
Press the “AUDIO” button to display the audio screen.
Page 70 of 324
70
1. BASIC OPERATION
2. SOME BASICS
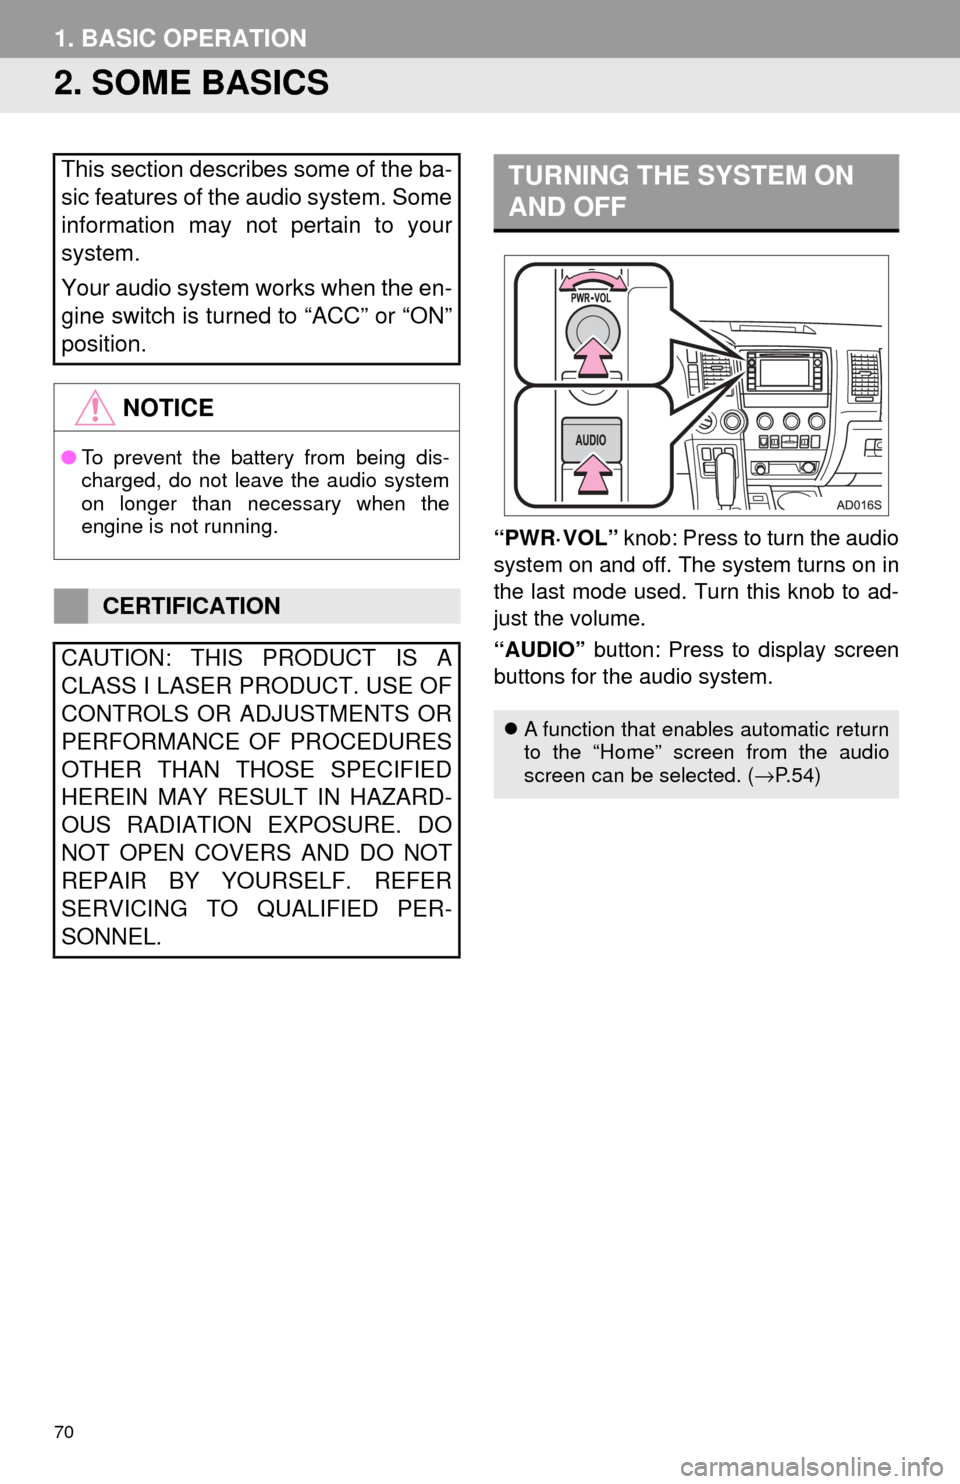
“PWR·VOL” knob: Press to turn the audio
system on and off. The system turns on in
the last mode used. Turn this knob to ad-
just the volume.
“AUDIO” button: Press to display screen
buttons for the audio system.
This section describes some of the ba-
sic features of the audio system. Some
information may not pertain to your
system.
Your audio system works when the en-
gine switch is turned to “ACC” or “ON”
position.
NOTICE
● To prevent the battery from being dis-
charged, do not leave the audio system
on longer than necessary when the
engine is not running.
CERTIFICATION
CAUTION: THIS PRODUCT IS A
CLASS I LASER PRODUCT. USE OF
CONTROLS OR ADJUSTMENTS OR
PERFORMANCE OF PROCEDURES
OTHER THAN THOSE SPECIFIED
HEREIN MAY RESULT IN HAZARD-
OUS RADIATION EXPOSURE. DO
NOT OPEN COVERS AND DO NOT
REPAIR BY YOURSELF. REFER
SERVICING TO QUALIFIED PER-
SONNEL.
TURNING THE SYSTEM ON
AND OFF
A function that enables automatic return
to the “Home” screen from the audio
screen can be selected. ( →P. 5 4 )
Page 77 of 324
77
2. RADIO OPERATION
AUDIO SYSTEM
3
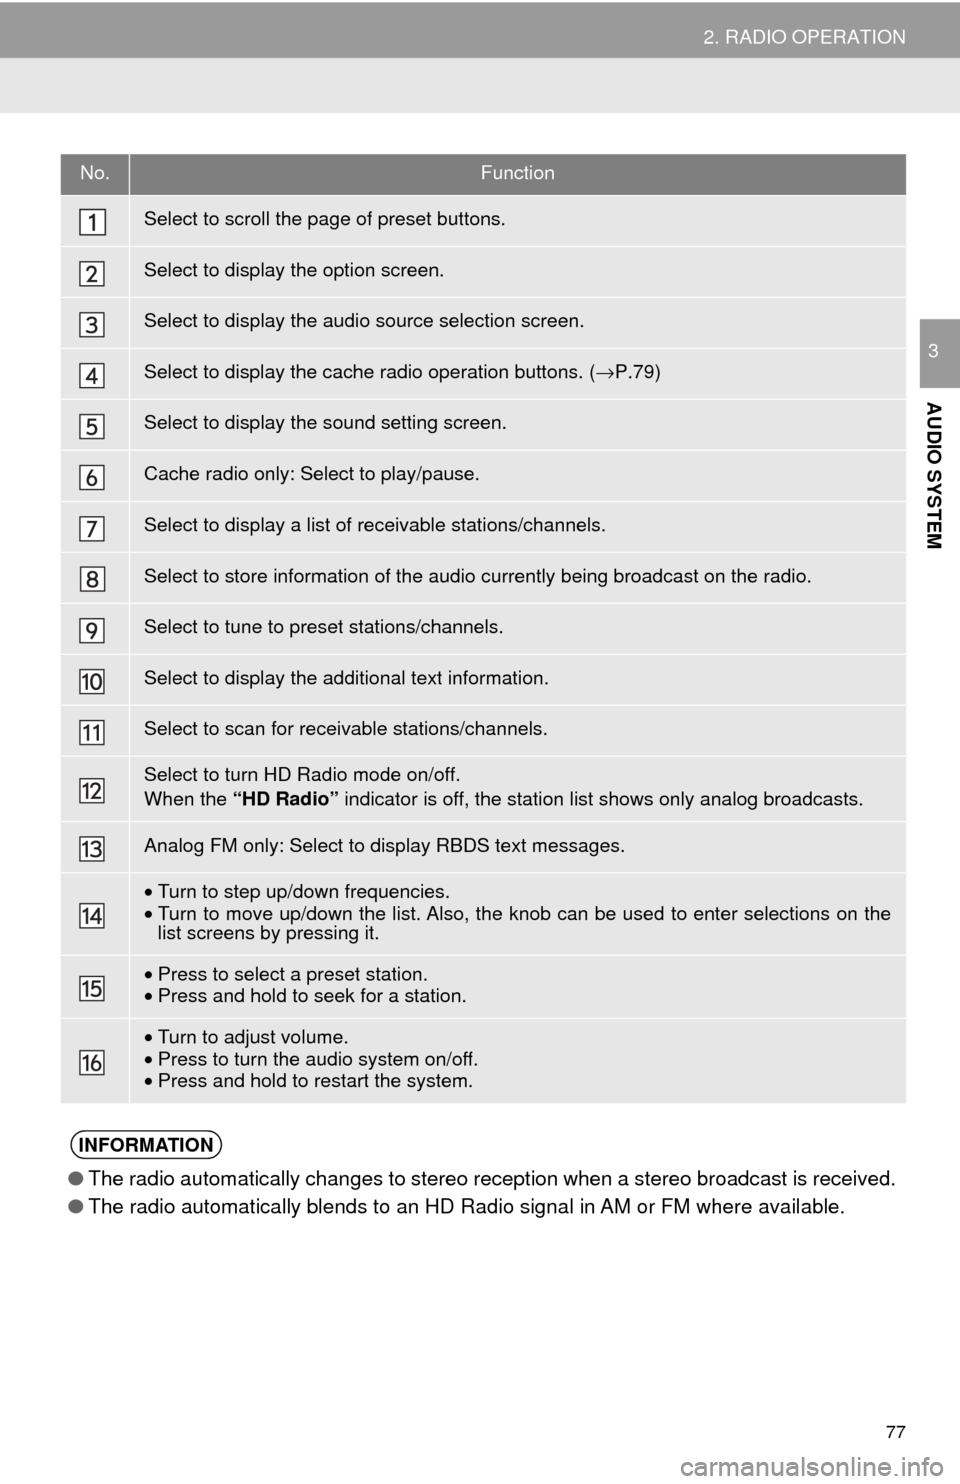
No.Function
Select to scroll the page of preset buttons.
Select to display the option screen.
Select to display the audio source selection screen.
Select to display the cache radio operation buttons. (→P.79)
Select to display the sound setting screen.
Cache radio only: Select to play/pause.
Select to display a list of receivable stations/channels.
Select to store information of the audio currently being broadcast on the radio.
Select to tune to preset stations/channels.
Select to display the additional text information.
Select to scan for receivable stations/channels.
Select to turn HD Radio mode on/off.
When the “HD Radio” indicator is off, the station list shows only analog broadcasts.
Analog FM only: Select to display RBDS text messages.
•Turn to step up/down frequencies.
• Turn to move up/down the list. Also, the knob can be used to enter selections on the
list screens by pressing it.
•Press to select a preset station.
• Press and hold to seek for a station.
•Turn to adjust volume.
• Press to turn the audio system on/off.
• Press and hold to restart the system.
INFORMATION
● The radio automatically changes to stereo reception when a stereo broadcast is received.
● The radio automatically blends to an HD Radio signal in AM or FM where available.
Page 78 of 324
78
2. RADIO OPERATION
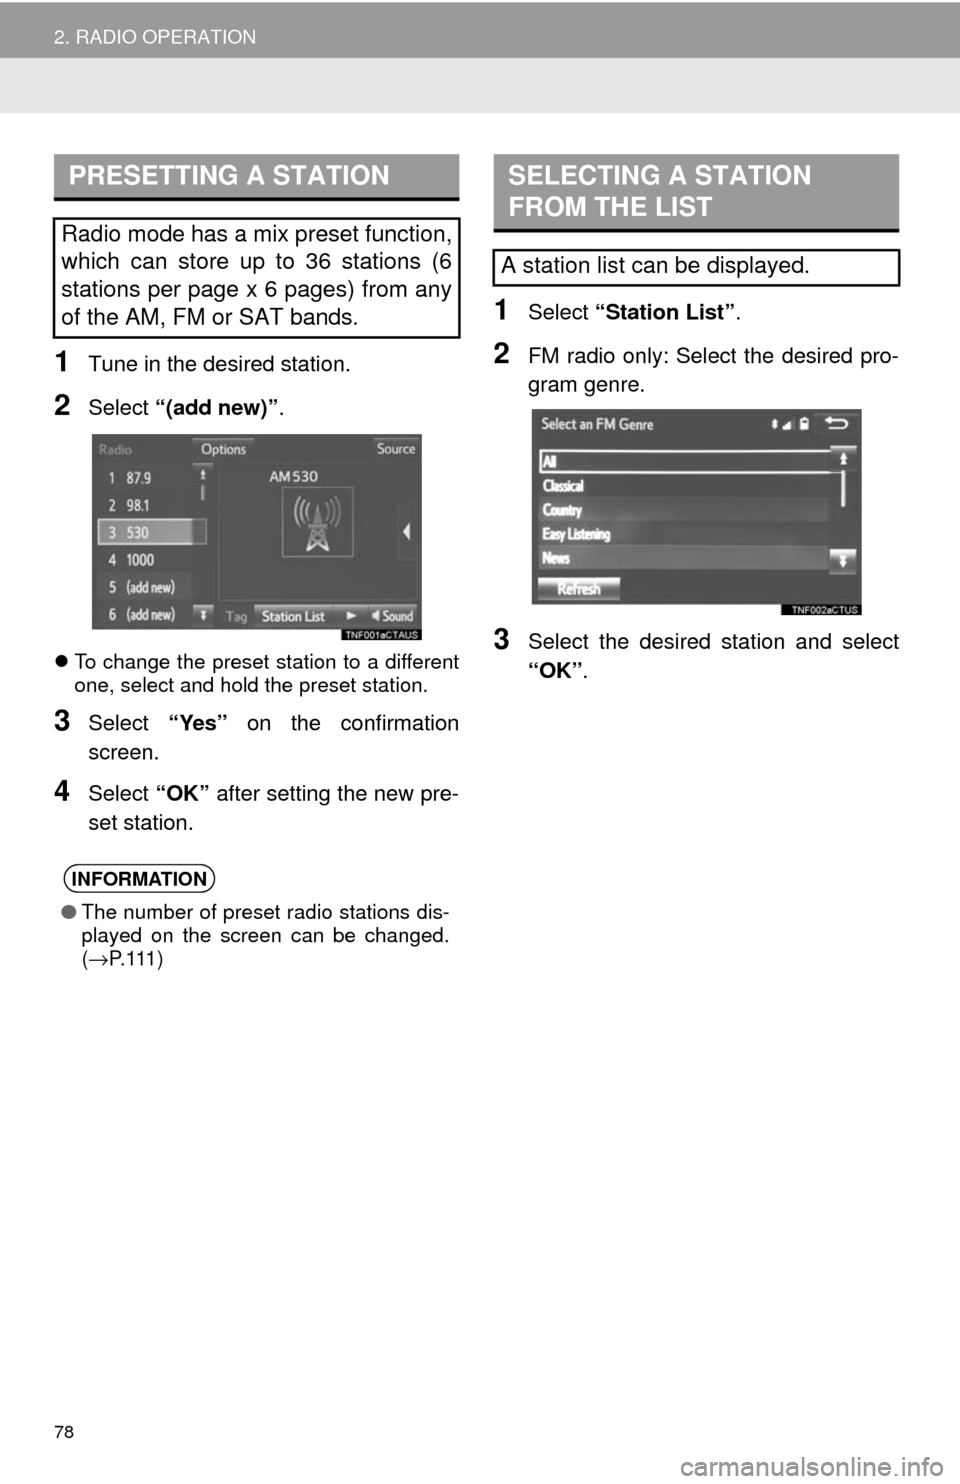
1Tune in the desired station.
2Select “(add new)” .
To change the preset station to a different
one, select and hold the preset station.
3Select “Yes” on the confirmation
screen.
4Select “OK” after setting the new pre-
set station.
1Select “Station List” .
2FM radio only: Select the desired pro-
gram genre.
3Select the desired station and select
“OK”.
PRESETTING A STATION
Radio mode has a mix preset function,
which can store up to 36 stations (6
stations per page x 6 pages) from any
of the AM, FM or SAT bands.
INFORMATION
●The number of preset radio stations dis-
played on the screen can be changed.
(→ P. 1 1 1 )
SELECTING A STATION
FROM THE LIST
A station list can be displayed.