display TOYOTA SEQUOIA HYBRID 2023 Owners Manual
[x] Cancel search | Manufacturer: TOYOTA, Model Year: 2023, Model line: SEQUOIA HYBRID, Model: TOYOTA SEQUOIA HYBRID 2023Pages: 628, PDF Size: 14.27 MB
Page 432 of 628
4325-4. Using the other interior features
Owners Manual_USA_M0C043_en
WARNING
■Caution regarding interfer-
ence with electronic devices
People with implantable cardiac
pacemakers, cardiac resynchroni-
zation therapy-pacemakers or
implantable cardioverter defibrilla-
tors, as well as any other electri-
cal medical device, should consult
their physician about the usage of
the wireless charger. The opera-
tions of the wireless charger may
have an affect on medical
devices.
■To prevent damage or burns
Observe the following precau-
tions.
Failure to do so m ay result in a
possibility of equ ipment failure
and damage, catch fire, burns due
to overheat.
●Do not insert any metallic
objects between the charging
area and the portable device
while charging
●Do not attach stickers, metallic
objects, etc., to the charger area
or portable device
●Do not cover with cloth, etc.,
and charge
●Do not charge portable devices
other than designated
●Do not attempt t o dismantle for
disassembly or modifications
●Do not hit or apply a strong
force
NOTICE
■Conditions in which the func-
tion may not operate cor-
rectly
In the following co nditions, it may
not operate correctly
●The portable device is fully
charged
●There is foreign matter between
the charge area and portable
device
●The temperature of the portable
device gets higher from
charging
●The charging surface of the por-
table device is facing up
●The placement of the portable
device is out of alignment with
the charge area
●Near a TV tower, electric power
plant, gas station, radio station,
large display, a irport or other
facility that gen erates strong
radio waves or electrical noise
●When the portable device is in
contact with, or is covered by
the following metallic objects
• Cards to which aluminum foil is attached
• Cigarette boxes that have alu- minum foil inside
• Metallic wallets or bags
• Coins
• Hand warmers made of metal
• Media such as CDs and DVDs
Page 433 of 628
4335-4. Using the other interior features
Owners Manual_USA_M0C043_en
5
Interior features
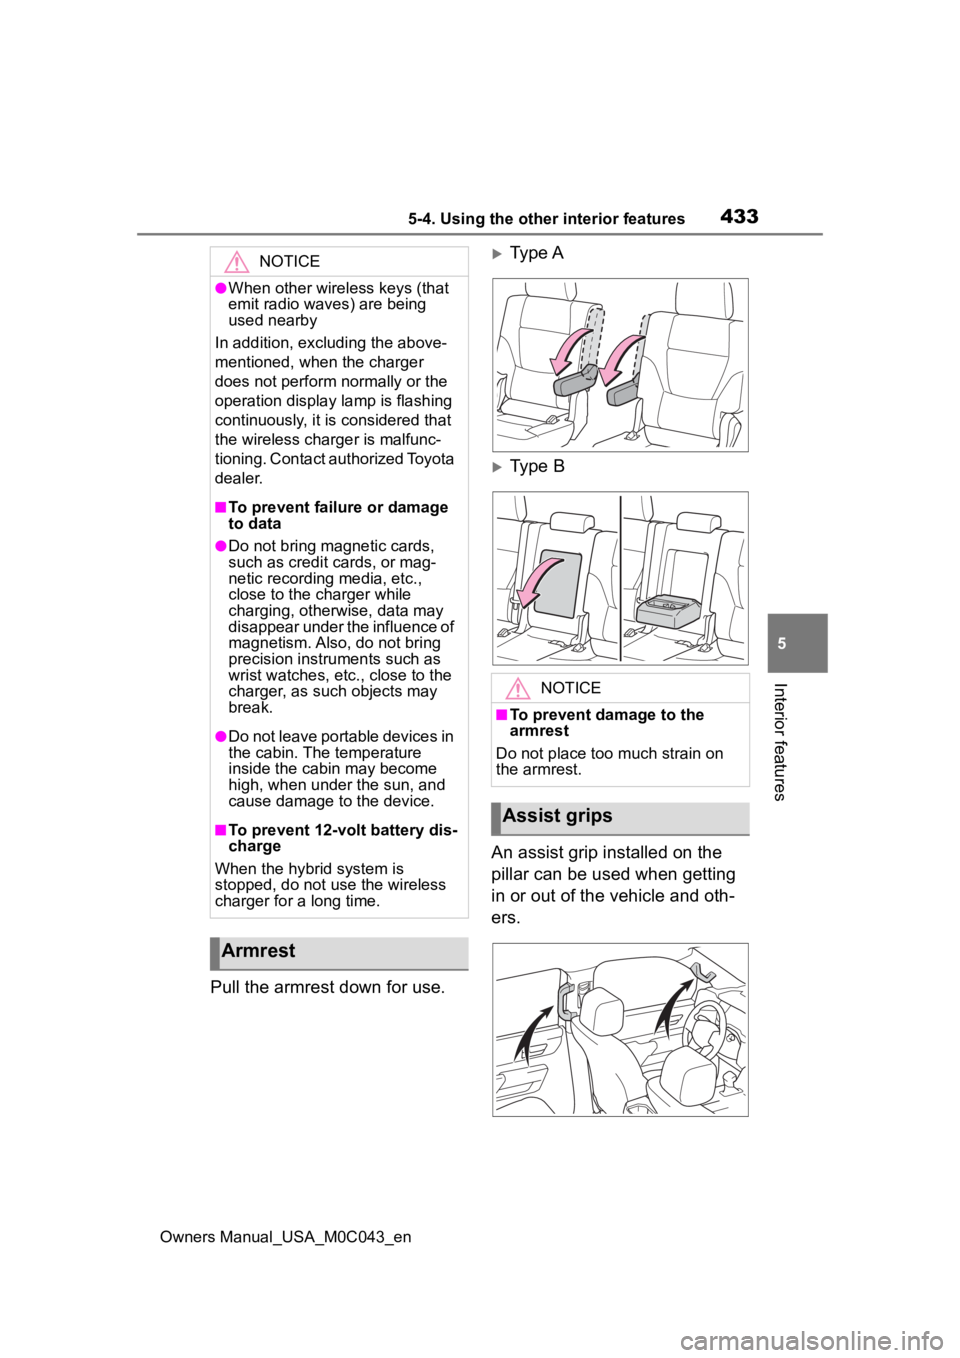
Pull the armrest down for use.
Type A
Type B
An assist grip installed on the
pillar can be used when getting
in or out of the vehicle and oth-
ers.
NOTICE
●When other wireless keys (that
emit radio waves) are being
used nearby
In addition, excl uding the above-
mentioned, when the charger
does not perform normally or the
operation display lamp is flashing
continuously, it is considered that
the wireless charger is malfunc-
tioning. Contact authorized Toyota
dealer.
■To prevent failu re or damage
to data
●Do not bring magnetic cards,
such as credit cards, or mag-
netic recording media, etc.,
close to the charger while
charging, otherwise, data may
disappear under the influence of
magnetism. Also, do not bring
precision instruments such as
wrist watches, etc ., close to the
charger, as such objects may
break.
●Do not leave portable devices in
the cabin. The temperature
inside the cabin may become
high, when under the sun, and
cause damage to the device.
■To prevent 12-volt battery dis-
charge
When the hybrid system is
stopped, do not use the wireless
charger for a long time.
Armrest
NOTICE
■To prevent damage to the
armrest
Do not place too much strain on
the armrest.
Assist grips
Page 443 of 628
4435-4. Using the other interior features
Owners Manual_USA_M0C043_en
5
Interior features
■Before programming Home-
Link
®
During programming, it is pos-
sible that garage doors,
gates, or other devices may
operate. For this reason,
make sure that people and
objects are clear of the
garage door or other devices
to prevent injury or other
potential harm.
It is recommended that a new
battery be placed in the
remote control transmitter for
more accurate programming.
Garage door opener motors
manufactured after 1995 may
be equipped with rolling code protection. If this is the case,
you may need a stepladder or
other sturdy, safe device to
reach the “Learn” or “Smart”
button on the garage door
opener motor.
■Programming HomeLink®
Steps
2 through 4 must be per-
formed within 60 seconds, oth-
erwise the indicator light will
stop flashing and programming
will not be successfully com-
pleted.
1 Vehicles with Digital Rear-
view Mirror: Press the Home-
Link
® button or menu button
When the HomeLink
® button
is pressed: Homelink
® Train-
ing Tutorial will be displayed
to assist you programming
the HomeLink
®.
When the menu button is pressed:
Press the menu button and
select the “SET UP”. Homelink
®
Training Tutorial will be displayed to
assist you programming the Home-
Link
®.
2 Press and release the Home-
Link
® button you want to pro-
gram and check that the
HomeLink
® indicator light
flashes (orange).
3 Point the remote control
transmitter for the device at
the rear view mirror, 1 to 3 in.
(25 to 75 mm) from the
HomeLink
® buttons.
WARNING
■Conforming to federal safety
standards
Do not use the HomeLink
® com-
patible transceiver with any
garage door opener or device that
lacks safety stop and reverse fea-
tures as required by federal safety
standards.
This includes any garage door
that cannot detect an interfering
object. A door or device without
these features increases the risk
of death or se rious injury.
■When operating or program-
ming HomeLink®
Never allow a child to operate or
play with the HomeLink® buttons.
Programming the Home-
Link
®
Page 457 of 628
4576-2. Maintenance
Owners Manual_USA_M0C043_en
6
Maintenance and care
■Resetting the message indicat-
ing maintenance is required
After the required maintenance is
performed according to the mainte-
nance schedule, please reset the
message.
To reset the messa ge, follow the
procedure described below:
1 Press or of meter control
switches and select on the
multi-information display.
2 Press or of meter control
switches and select “Vehicle Set-
tings”, and then press and hold
.
3 Press or of meter control
switches and select “Scheduled
Maintenance”, and then press
.
4 Select the “Yes” and press .
You can perform some mainte-
nance procedures by yourself.
Please be aware that do-it-your-
self maintenance may affect
warranty coverage.
The use of Toyota repair manuals is
recommended.
For details about warranty cover-
age, refer to the separate “Owner’s
Warranty Information Booklet” or
“Owner’s Manual Supplement”.
Do-it-yourself mainte-
nance
General maintenance
Listed below are the general
maintenance items that
should be performed at the
intervals specified in the
“Owner’s Warranty Informa-
tion Booklet” or “Owner’s
Manual Supplement/Sched-
uled Maintenance Guide”. It
is recommended that any
problem you notice should
be brought to the attention
of your Toyota dealer or
qualified service shop for
advice.
WARNING
■If the hybrid system is operat-
ing
Turn the hybrid system off and
ensure that there is adequate
ventilation before performing
maintenance checks.
Engine compartment
ItemsCheck points
Brake fluid
Is the brake fluid at
the correct level?
( P.469)
Engine/inter-
cooler/power
control unit
coolantIs the engine/inter-
cooler/power con-
trol unit coolant at
the correct level?
( P.468)
Engine oil
Is the engine oil at
the correct level?
( P.466)
Page 463 of 628
4636-3. Do-it-yourself maintenance
Owners Manual_USA_M0C043_en
6
Maintenance and care
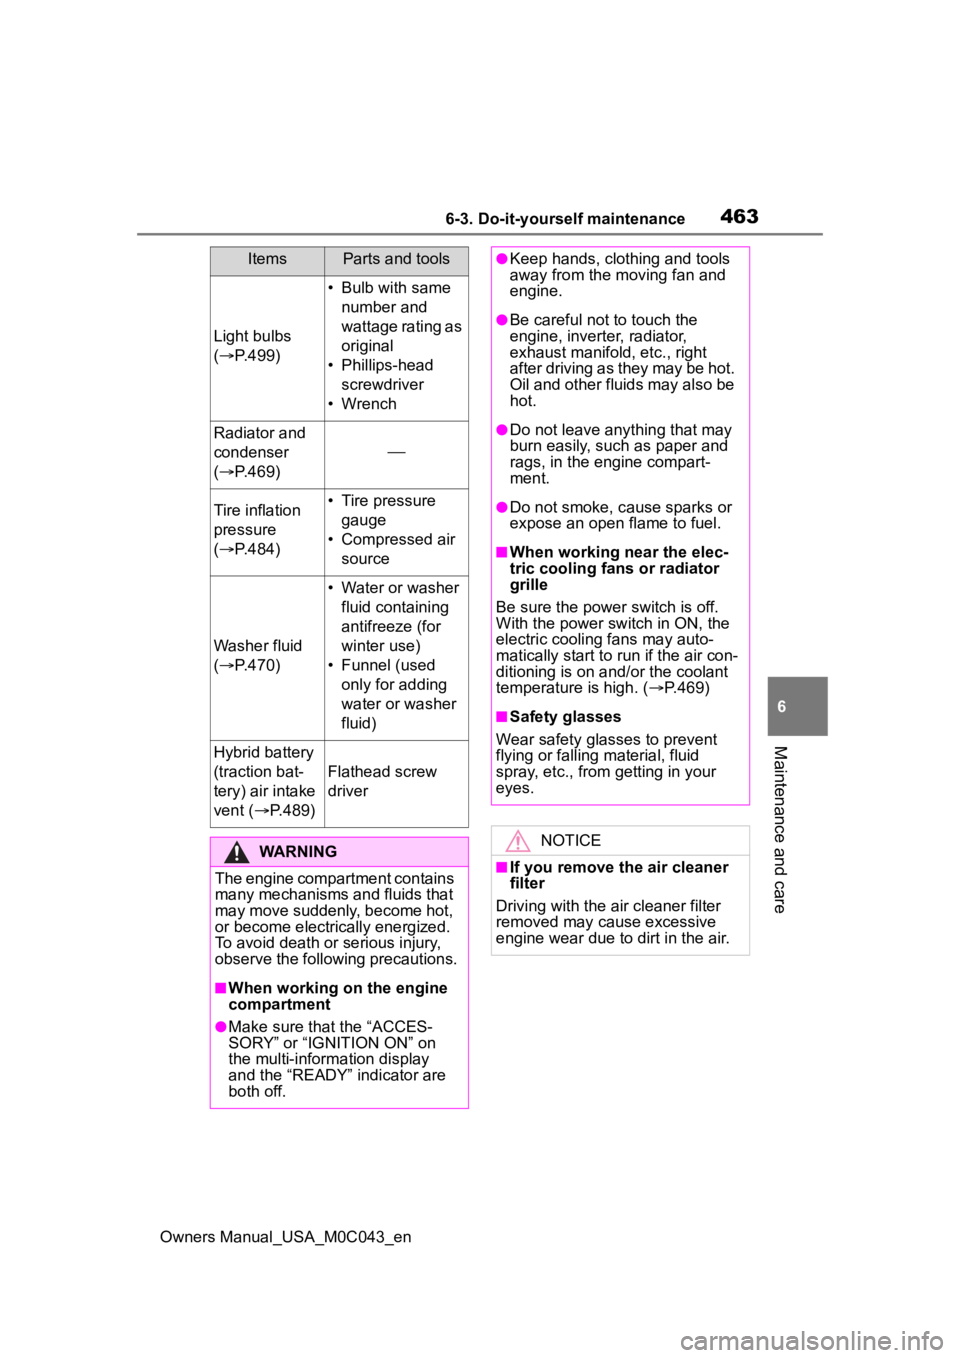
Light bulbs
( P.499)
• Bulb with same
number and
wattage rating as
original
• Phillips-head screwdriver
• Wrench
Radiator and
condenser
( P.469)
Tire inflation
pressure
( P.484)• Tire pressure
gauge
• Compressed air source
Washer fluid
( P.470)
• Water or washer
fluid containing
antifreeze (for
winter use)
• Funnel (used only for adding
water or washer
fluid)
Hybrid battery
(traction bat-
tery) air intake
vent ( P.489)
Flathead screw
driver
WARNING
The engine compartment contains
many mechanisms and fluids that
may move suddenly, become hot,
or become electrically energized.
To avoid death or serious injury,
observe the following precautions.
■When working on the engine
compartment
●Make sure that the “ACCES-
SORY” or “IGNITION ON” on
the multi-inform ation display
and the “READY” indicator are
both off.
ItemsParts and tools●Keep hands, clothing and tools
away from the moving fan and
engine.
●Be careful not to touch the
engine, inverter, radiator,
exhaust manifold, etc., right
after driving as they may be hot.
Oil and other fluids may also be
hot.
●Do not leave anything that may
burn easily, such as paper and
rags, in the engine compart-
ment.
●Do not smoke, cause sparks or
expose an open flame to fuel.
■When working near the elec-
tric cooling fans or radiator
grille
Be sure the power switch is off.
With the power switch in ON, the
electric cooling fans may auto-
matically start to r un if the air con-
ditioning is on an d/or the coolant
temperature is high. ( P.469)
■Safety glasses
Wear safety glasses to prevent
flying or falling material, fluid
spray, etc., from getting in your
eyes.
NOTICE
■If you remove the air cleaner
filter
Driving with the air cleaner filter
removed may cause excessive
engine wear due to dirt in the air.
Page 467 of 628
4676-3. Do-it-yourself maintenance
Owners Manual_USA_M0C043_en
6
Maintenance and care
Items
Clean funnel
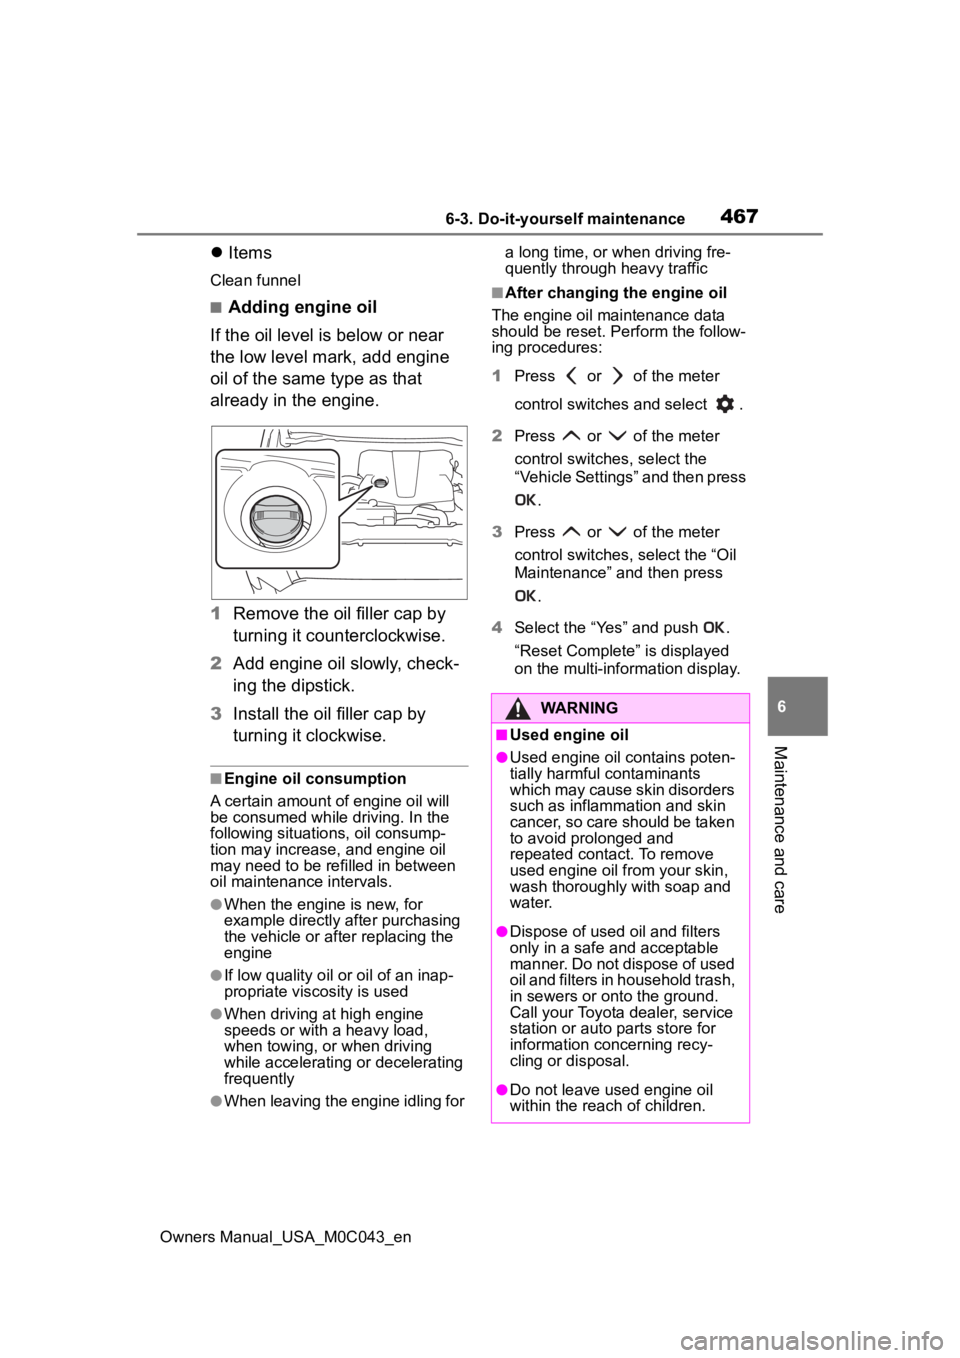
■Adding engine oil
If the oil level is below or near
the low level mark, add engine
oil of the same type as that
already in the engine.
1 Remove the oil filler cap by
turning it counterclockwise.
2 Add engine oil slowly, check-
ing the dipstick.
3 Install the oil filler cap by
turning it clockwise.
■Engine oil consumption
A certain amount of engine oil will
be consumed while driving. In the
following situatio ns, oil consump-
tion may increase, and engine oil
may need to be ref illed in between
oil maintenance intervals.
●When the engine is new, for
example directly after purchasing
the vehicle or after replacing the
engine
●If low quality oil or oil of an inap-
propriate viscosity is used
●When driving at high engine
speeds or with a heavy load,
when towing, or when driving
while accelerating o r decelerating
frequently
●When leaving the engine idling for a long time, or when driving fre-
quently through heavy traffic
■After changing the engine oil
The engine oil maintenance data
should be reset. Pe rform the follow-
ing procedures:
1 Press or of the meter
control switches and select .
2 Press or of the meter
control switches, select the
“Vehicle Settings” and then press
.
3 Press or of the meter
control switches, select the “Oil
Maintenance” and then press
.
4 Select the “Yes” and push .
“Reset Complete” is displayed
on the multi-info rmation display.
WARNING
■Used engine oil
●Used engine oil contains poten-
tially harmful contaminants
which may cause skin disorders
such as inflammation and skin
cancer, so care should be taken
to avoid prolonged and
repeated contact. To remove
used engine oil from your skin,
wash thoroughly with soap and
water.
●Dispose of used oil and filters
only in a safe and acceptable
manner. Do not dispose of used
oil and filters in h ousehold trash,
in sewers or onto the ground.
Call your Toyota dealer, service
station or auto parts store for
information concerning recy-
cling or disposal.
●Do not leave used engine oil
within the reach of children.
Page 476 of 628
4766-3. Do-it-yourself maintenance
Owners Manual_USA_M0C043_en
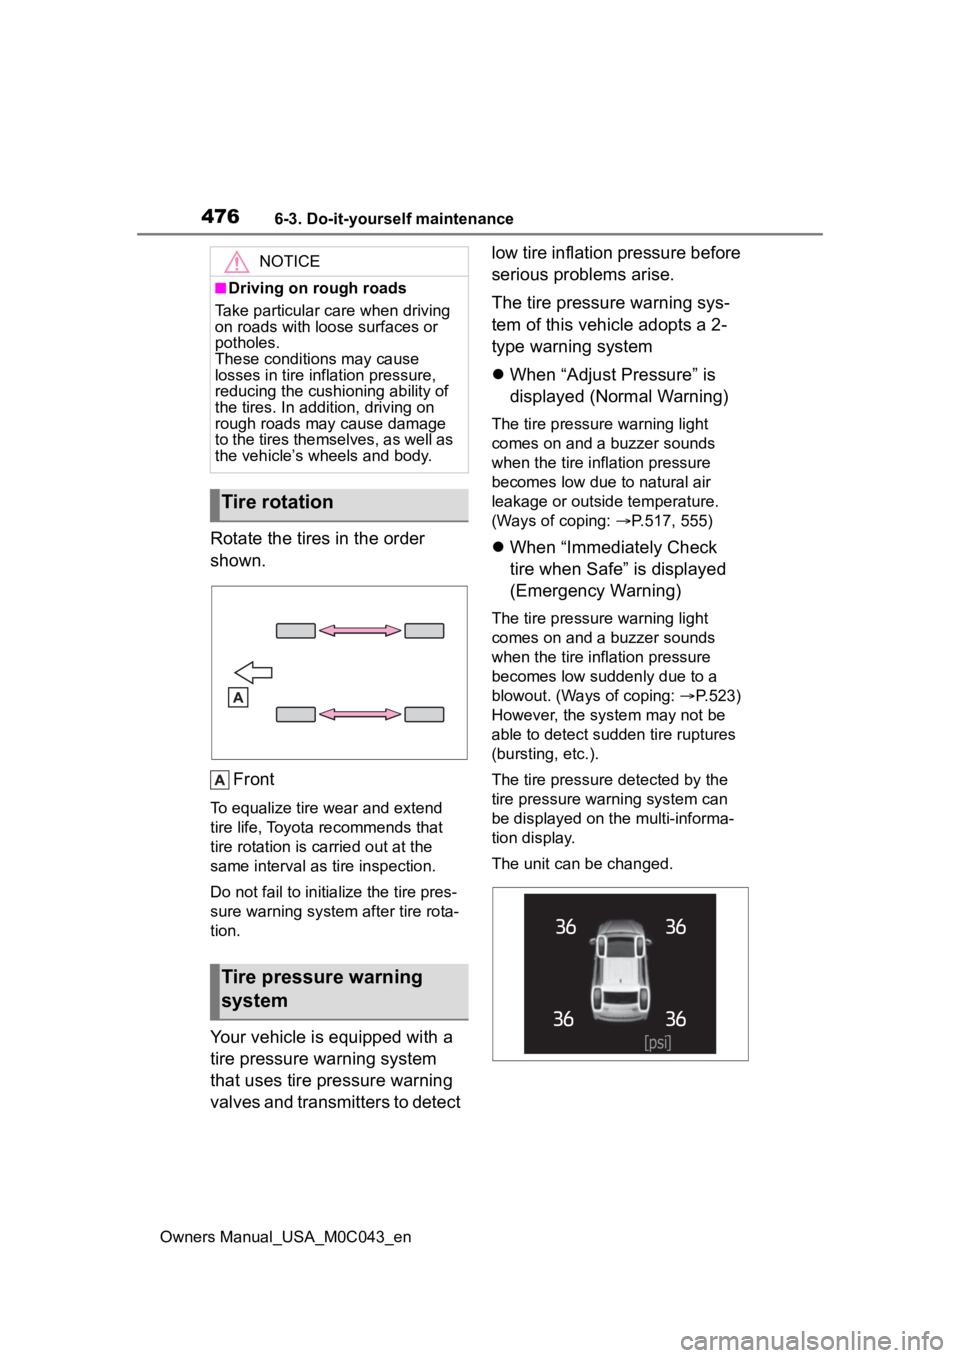
Rotate the tires in the order
shown.
Front
To equalize tire wear and extend
tire life, Toyota recommends that
tire rotation is c arried out at the
same interval as tire inspection.
Do not fail to initialize the tire pres-
sure warning system after tire rota-
tion.
Your vehicle is equipped with a
tire pressure warning system
that uses tire pressure warning
valves and transmitters to detect low tire inflation pressure before
serious problems arise.
The tire pressure warning sys-
tem of this vehicle adopts a 2-
type warning system
When “Adjust Pressure” is
displayed (Normal Warning)
The tire pressure warning light
comes on and a buzzer sounds
when the tire inflation pressure
becomes low due to natural air
leakage or outside temperature.
(Ways of coping: P.517, 555)
When “Immediately Check
tire when Safe” is displayed
(Emergency Warning)
The tire pressure warning light
comes on and a buzzer sounds
when the tire inflation pressure
becomes low suddenly due to a
blowout. (Ways of coping: P.523)
However, the system may not be
able to detect sudden tire ruptures
(bursting, etc.).
The tire pressure detected by the
tire pressure warning system can
be displayed on the multi-informa-
tion display.
The unit can be changed.
NOTICE
■Driving on rough roads
Take particular care when driving
on roads with loose surfaces or
potholes.
These conditions may cause
losses in tire inf lation pressure,
reducing the cushio ning ability of
the tires. In addit ion, driving on
rough roads may cause damage
to the tires themselves, as well as
the vehicle’s wheels and body.
Tire rotation
Tire pressure warning
system
Page 477 of 628

4776-3. Do-it-yourself maintenance
Owners Manual_USA_M0C043_en
6
Maintenance and care
■How to change the unit
1 Park the vehicle in a safe
place and turn the power
switch off.
Changing the unit cannot be per-
formed while the vehicle is moving.
2Turn the power switch to ON.
3 Press or of the meter
control switch to select .
4 Press or to select
“Vehicle Settings” and then
press and hold .
5 Press or to select
“TPWS” and then press .
6 Press or to select “Set
Unit” and then press .
7 Press or to select the
desired unit and then press
.
■Routine tire inflation pressure
checks
The tire pressure warning system
does not replace routine tire inflation
pressure checks. Make sure to
check tire inflation pressure as part
of your routine of daily vehicle
checks.
■Tire inflation pressure
●It may take a few minutes to dis-
play the tire inflation pressure
after the power switch is turned to
ON. It may also take a few min-
utes to display the tire inflation
pressure after inflation pressure
has been adjusted.
●Tire inflation pressure changes
with temperature. The displayed
values may also be different from
the values measured using a tire
pressure gauge.
■Situations in which the tire
pressure warning system may
not operate properly
●In the following cases, the tire
pressure warning system may not
operate properly.
• If non-genuine Toyota wheels are
used.
• A tire has been replaced with a
tire that is not an OE (Original
Equipment) tire.
• A tire has been replaced with a
tire that is not of the specified size.
• Tire chains, etc. , are equipped.
• An auxiliary-support ed run-flat tire
is equipped.
• If a window tint that affects the radio wave signals is installed.
• If there is a lot of snow or ice on
the vehicle, particularly around the
wheels or wheel housings.
• If the tire inflation pressure is
extremely higher than the speci-
fied level.
• If wheels without tire pressure
warning valves and transmitters
are used.
• If the ID code on the tire pressure
warning valves and transmitters is
not registered in the tire pressure
warning computer.
●Performance may be affected in
the following situations.
• Near a TV tower, electric power plant, gas station, radio station,
large display, airpo rt or other facil-
ity that generates strong radio
waves or electrical noise
• When carrying a portable radio,
cellular phone, cordless phone or
other wireless communication
device
If tire position info rmation is not cor-
rectly displayed due to the radio
wave conditions, the display may be
corrected by driving and changing
the radio wave c onditions may
Page 479 of 628

4796-3. Do-it-yourself maintenance
Owners Manual_USA_M0C043_en
6
Maintenance and care
system is initialized, the current
tire inflation pressure is set as
the benchmark pressure.
■How to initialize the tire
pressure warning system
1 Park the vehicle in a safe
place, turn the power switch
off and wait 20 minutes or
more.
Initialization cannot be performed
while the vehicle is moving.
2Adjust the tire inflation pres-
sure to the specified cold tire
inflation pressure level.
Make sure to adjust the tire pres-
sure to the specifie d cold tire infla-
tion pressure level. The tire
pressure warning system will oper-
ate based on this pressure level.
3 Start the hybrid system.
4 Press or of the meter
control switch to select .
5 Press or to select
“Vehicle Settings” and then
press and hold .
6 Press or to select
“TPWS” and then press .
7 Press or to select “Set
Pressure”. Then press and
hold .
“Set Pressure Accepted” will
be displayed on the multi-
information display and the
tire pressure warning light will blink 3 times.
When the message disap-
pears, initialization is com-
plete.
A message is displayed on the
multi-information di
splay. Also, “--”
is displayed for inflation pressure of
each tire on the m ulti-information
display while the tire pressure
warning system determines the
position.
8 Drive straight (with occa-
sional left and right turns) at
approximately 25 mph (40
km/h) or more for approxi-
mately 10 to 30 minutes.
When initialization is complete, the
inflation pressure of each tire will be
displayed on the multi-information
display.
Even if the vehicle is not driven at
approximately 25 mph (40 km/h) or
more, initialization can be com-
pleted by driving for a long time.
However, if initialization does not
complete after driving for 1 hour or
more, park the vehicle in a safe
place for approximately 20 minutes
and then drive the vehicle again.
■When initializing
●Initialization is p erformed while
driving at a veh icle speed of
approximately 25 mph (40 km/h)
or more.
●Make sure to carry out initializa-
tion after adjusting the tire inflation
pressure. Also, make sure the
tires are cold before carrying out
initialization or tire inflation pres-
sure adjustment.
●The tire pressure warning system
can be initialized by yourself, but
depending on the driving condi-
tions and driving environment, ini-
tialization may take some time to
complete.
Page 480 of 628
4806-3. Do-it-yourself maintenance
Owners Manual_USA_M0C043_en
■The initialization operation
●If you have accidentally turned the
power switch off during initializa-
tion, it is not necessary to restart
the initialization ag ain as initializa-
tion will restart wh en the power
switch has been turned to ON for
the next time.
●If you accidentally perform initial-
ization when initialization is not
necessary, adjust the tire inflation
pressure to the specified level
when the tires are cold, and con-
duct initialization again.
●While the position of each tire is
being determined and the inflation
pressures are not being displayed
on the multi-information display, if
the inflation pres sure of a tire
drops, the tire pressure warning
light will come on.
■If the tire pressure warning sys-
tem is not initialized properly
●In the following situations, initial-
ization may take longer than usual
to be completed or may not be
possible. Normally, initialization
completes within approximately
30 minutes.
• Vehicle is not driven at approxi-
mately 25 mph ( 40 km/h) or more
• Vehicle is driven on unpaved roads
• Vehicle is driven near other vehi- cles and system cannot recog-
nize tire pressure warning valve
and transmitters of your vehicle
over those of other vehicles
• If the vehicle is driven in heavy
traffic or another situation where
other vehicles are driven close by,
it may take time for the system to
recognize the tire pressure warn-
ing valve and tran smitters of your
vehicle over those of other vehi-
cles.
●If initialization does not complete
after driving for 1 hour or more,
park the vehicle in a safe place for
approximately 20 minutes and
then drive the vehicle again.
●If the vehicle is reversed during
initialization, the data up to that
point is reset, so perform the ini-
tialization procedure again from
the beginning.
●In the following situations, initial-
ization will not be started or was
not completed properly and the
system will not oper ate properly.
Perform the initialization proce-
dure again.
• If, when attempting to start initial- ization, the tire pressure warning
light does not blink 3 times.
• If, when the veh icle has been
driven for about 20 minutes after
performing initialization, the tire
pressure warning light blinks for
approximately 1 minute and then
illuminates.
If initialization cannot be completed
after performing the above proce-
dure, contact your Toyota dealer.
Every tire pressure warning
valve and transmitter has a
unique ID code. When replacing
a tire pressure warning valve
and transmitter, it is necessary
to register the ID code.
When registering the ID codes,
perform the following procedure.
WARNING
■When initializing the tire pres-
sure warning system
Do not initialize tire pressure with-
out first adjusting th e tire inflation
pressure to the specified level.
Otherwise, the tire pressure warn-
ing light may not come on even if
the tire inflation pressure is low, or
it may come on when the tire infla-
tion pressure is actually normal.
Registering ID codes