display TOYOTA SEQUOIA HYBRID 2023 Owners Manual
[x] Cancel search | Manufacturer: TOYOTA, Model Year: 2023, Model line: SEQUOIA HYBRID, Model: TOYOTA SEQUOIA HYBRID 2023Pages: 628, PDF Size: 14.27 MB
Page 379 of 628

3794-5. Using the driving support systems
Owners Manual_USA_M0C043_en
4
Driving
If the brake contro l has activated,
the slip indicator light will flash.
When the vehicle is in “SAND”,
“MUD” or “DEEP SNOW” mode,
VSC is automatically turned off.
(VSC OFF indicator light come on.)
■Multi-terrain Select
Multi-terrain Sel ect controls the
vehicle so that i t can maximize the
drive force and imp rove drivability
on rough roads. As a result, fuel effi-
ciency may diminish when com-
pared to driving in normal mode.
■Automatic system cancelation
In the following situations, Multi-ter-
rain Select will be canceled auto-
matically.
●When the power switch is turned
off
●When the front-wheel drive control
switch is in “2H”
●When “TOW HAUL” mode and
“TOW+” mode is selected while
the front-wheel drive control
switch is in “4H”
●When drive mode select is
selected while the front-wheel
drive control switch is in “4H”
■Turning off Mult i-terrain Select
Performing the following turns Multi-
terrain Select off, and then the dis-
play on the multi-information display
will disappear.
When the “MTS” switch indicator
is illuminated
Press the “MTS” switch while the
system is in operation.
When the “MTS” switch indicator
is not illuminated
Press the “MTS” sw itch to turn the
indicator on.
Press the “MTS” switch again with
the Multi-terrain Se lect indicator illu-
minated.
■When the vehicle is stuck
Switching the tran sfer and differen-
tial For the operation of the following
functions, refer to the following
pages. (If equipped)
●Four-wheel drive system
( P.369)
●Rear differential lock ( P.372)
■Driving in Multi-terrain Select
The following types of situations
may occur, but they are not malfunc-
tions.
●Vibrations may be felt throughout
the vehicle or steering wheel.
●Operating noise may be heard
from the hybrid system compart-
ment.
■When an inspection at your
Toyota dealer is necessary
In the following situ ations, the sys-
tem may be malf unctioning. Have
the vehicle inspected by your Toyota
dealer immediately.
●When the slip indica tor light illumi-
nates.
●When the indicator for each mode
does not illuminate on the multi-
information display even though
Multi-terrain Select is selected.
“MUD”
Suitable for
muddy roads
and other slip-
pery conditions
“DEEP
SNOW”Suitable for
deep snow
roads
ModeRoad Condi-
tions
Page 380 of 628
3804-5. Using the driving support systems
Owners Manual_USA_M0C043_en
*: If equipped
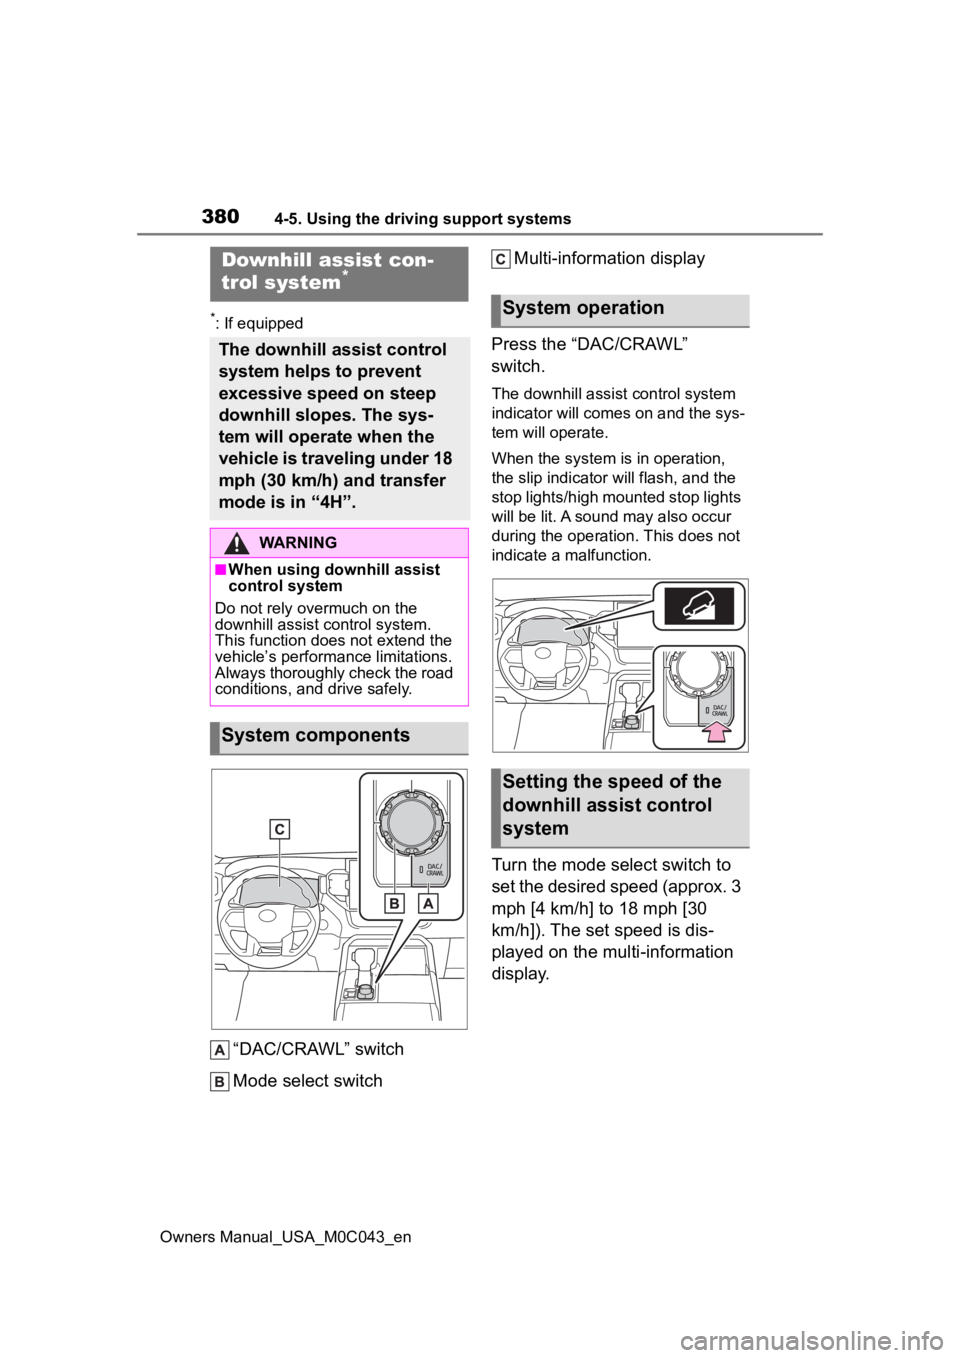
“DAC/CRAWL” switch
Mode select switchMulti-information display
Press the “DAC/CRAWL”
switch.
The downhill assist control system
indicator will comes on and the sys-
tem will operate.
When the system is in operation,
the slip indicator will flash, and the
stop lights/high mounted stop lights
will be lit. A sound may also occur
during the operation. This does not
indicate a malfunction.
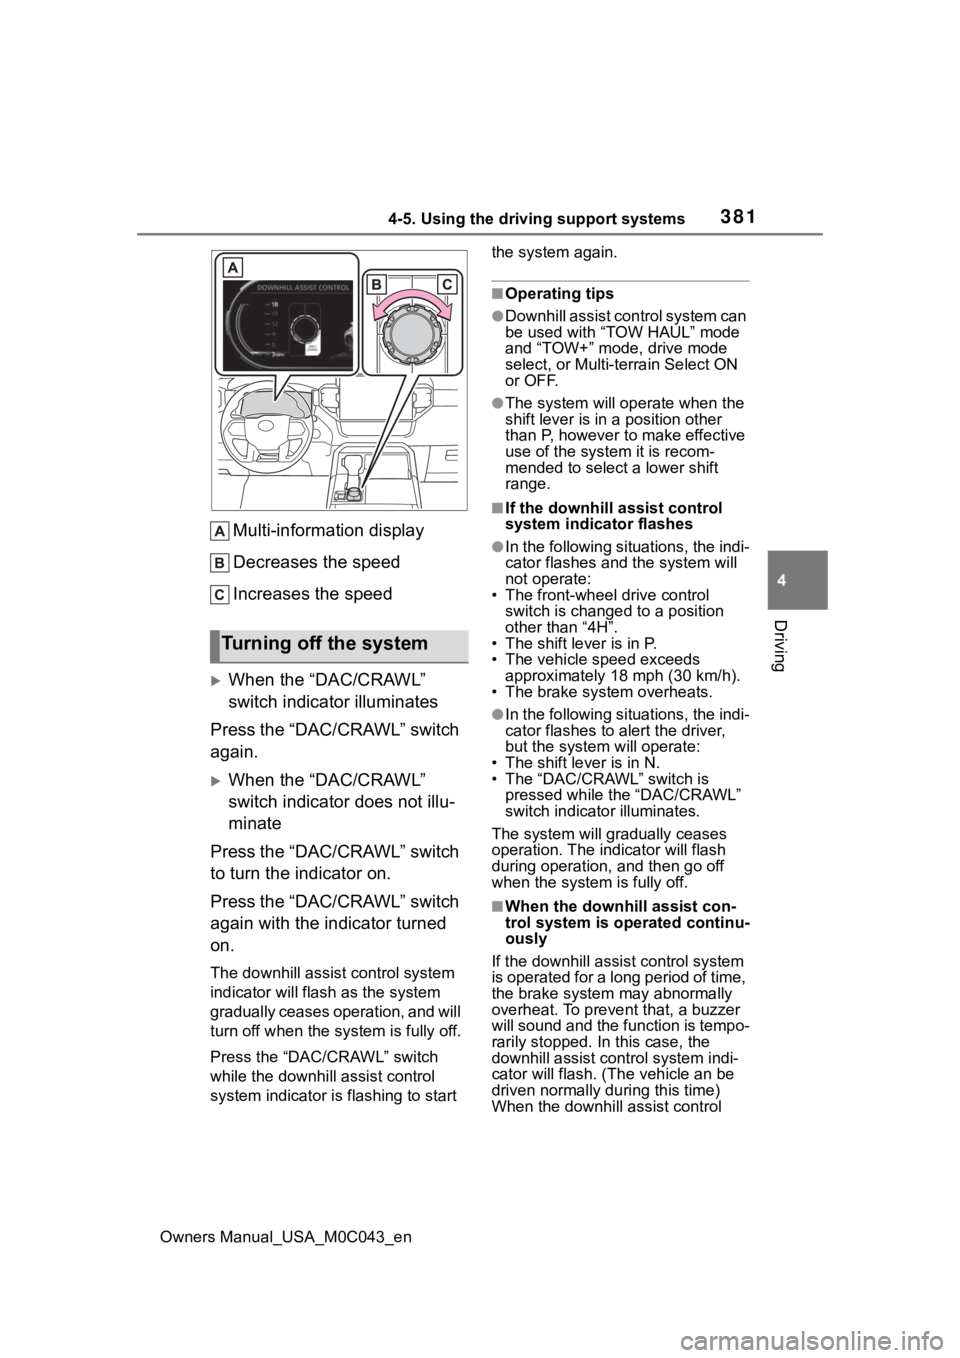
Turn the mode select switch to
set the desired speed (approx. 3
mph [4 km/h] to 18 mph [30
km/h]). The set speed is dis-
played on the multi-information
display.
Downhill assist con-
trol system*
The downhill assist control
system helps to prevent
excessive speed on steep
downhill slopes. The sys-
tem will operate when the
vehicle is traveling under 18
mph (30 km/h) and transfer
mode is in “4H”.
WARNING
■When using downhill assist
control system
Do not rely overmuch on the
downhill assist control system.
This function does not extend the
vehicle’s performance limitations.
Always thoroughly check the road
conditions, and drive safely.
System components
System operation
Setting the speed of the
downhill assist control
system
Page 381 of 628
3814-5. Using the driving support systems
Owners Manual_USA_M0C043_en
4
Driving
Multi-information display
Decreases the speed
Increases the speed
When the “DAC/CRAWL”
switch indicator illuminates
Press the “DAC/CRAWL” switch
again.
When the “DAC/CRAWL”
switch indicator does not illu-
minate
Press the “DAC/CRAWL” switch
to turn the indicator on.
Press the “DAC/CRAWL” switch
again with the indicator turned
on.
The downhill assist control system
indicator will flash as the system
gradually ceases operation, and will
turn off when the system is fully off.
Press the “DAC/CRAWL” switch
while the downhill assist control
system indicator is flashing to start the system again.
■Operating tips
●Downhill assist con
trol system can
be used with “TOW HAUL” mode
and “TOW+” mode, drive mode
select, or Multi-terrain Select ON
or OFF.
●The system will op erate when the
shift lever is in a position other
than P, however to make effective
use of the system it is recom-
mended to select a lower shift
range.
■If the downhill a ssist control
system indicator flashes
●In the following situ ations, the indi-
cator flashes and the system will
not operate:
• The front-wheel drive control switch is changed to a position
other than “4H”.
• The shift lever is in P.
• The vehicle speed exceeds approximately 18 mph (30 km/h).
• The brake system overheats.
●In the following situ ations, the indi-
cator flashes to alert the driver,
but the system will operate:
• The shift lever is in N.
• The “DAC/CRAWL” switch is pressed while the “DAC/CRAWL”
switch indicator illuminates.
The system will gradually ceases
operation. The indicator will flash
during operation, and then go off
when the system is fully off.
■When the downhill assist con-
trol system is operated continu-
ously
If the downhill assist control system
is operated for a long period of time,
the brake system may abnormally
overheat. To preve nt that, a buzzer
will sound and the function is tempo-
rarily stopped. In this case, the
downhill assist control system indi-
cator will flash. (Th e vehicle an be
driven normally during this time)
When the downhill assist control
Turning off the system
Page 384 of 628
3844-5. Using the driving support systems
Owners Manual_USA_M0C043_en
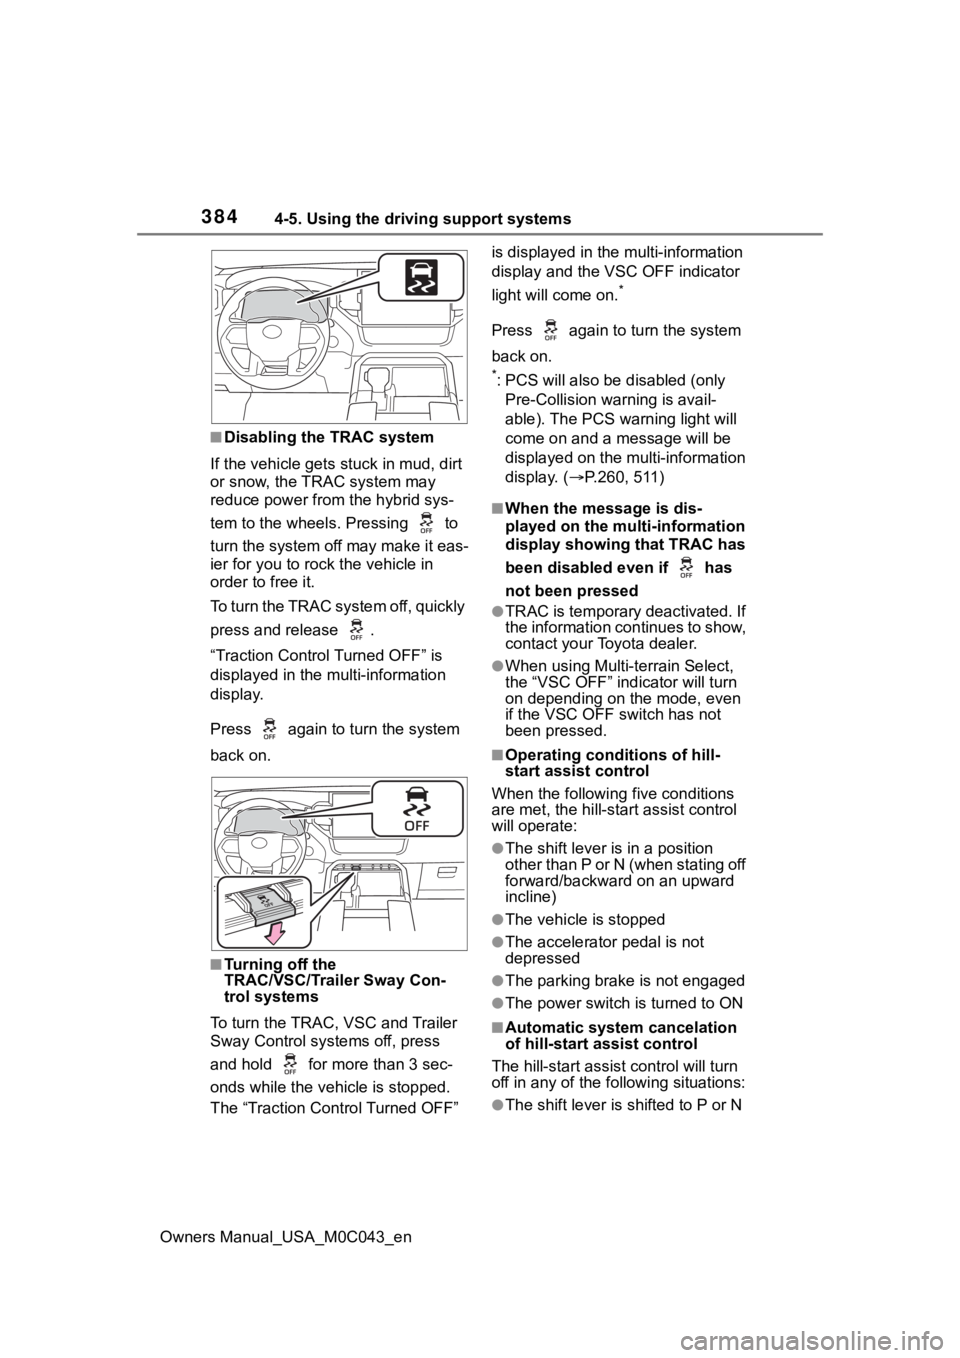
■Disabling the TRAC system
If the vehicle gets stuck in mud, dirt
or snow, the TRAC system may
reduce power from the hybrid sys-
tem to the wheels. Pressing to
turn the system off may make it eas-
ier for you to rock the vehicle in
order to free it.
To turn the TRAC system off, quickly
press and release .
“Traction Control Turned OFF” is
displayed in the multi-information
display.
Press again to t urn the system
back on.
■Turning off the
TRAC/VSC/Trailer Sway Con-
trol systems
To turn the TRAC, VSC and Trailer
Sway Control systems off, press
and hold for more than 3 sec-
onds while the vehicle is stopped.
The “Traction Control Turned OFF” is displayed in the
multi-information
display and the VSC OFF indicator
light will come on.
*
Press again to turn the system
back on.
*: PCS will also be disabled (only
Pre-Collision warning is avail-
able). The PCS warning light will
come on and a message will be
displayed on the multi-information
display. ( P.260, 511)
■When the message is dis-
played on the multi-information
display showing that TRAC has
been disabled even if has
not been pressed
●TRAC is temporary deactivated. If
the information continues to show,
contact your Toyota dealer.
●When using Multi-terrain Select,
the “VSC OFF” indicator will turn
on depending on the mode, even
if the VSC OFF switch has not
been pressed.
■Operating conditions of hill-
start assist control
When the following five conditions
are met, the hill-star t assist control
will operate:
●The shift lever is in a position
other than P or N (when stating off
forward/backward on an upward
incline)
●The vehicle is stopped
●The accelerator pedal is not
depressed
●The parking brake is not engaged
●The power switch is turned to ON
■Automatic system cancelation
of hill-start assist control
The hill-start assist control will turn
off in any of the fo llowing situations:
●The shift lever is shifted to P or N
Page 388 of 628

3884-5. Using the driving support systems
Owners Manual_USA_M0C043_en
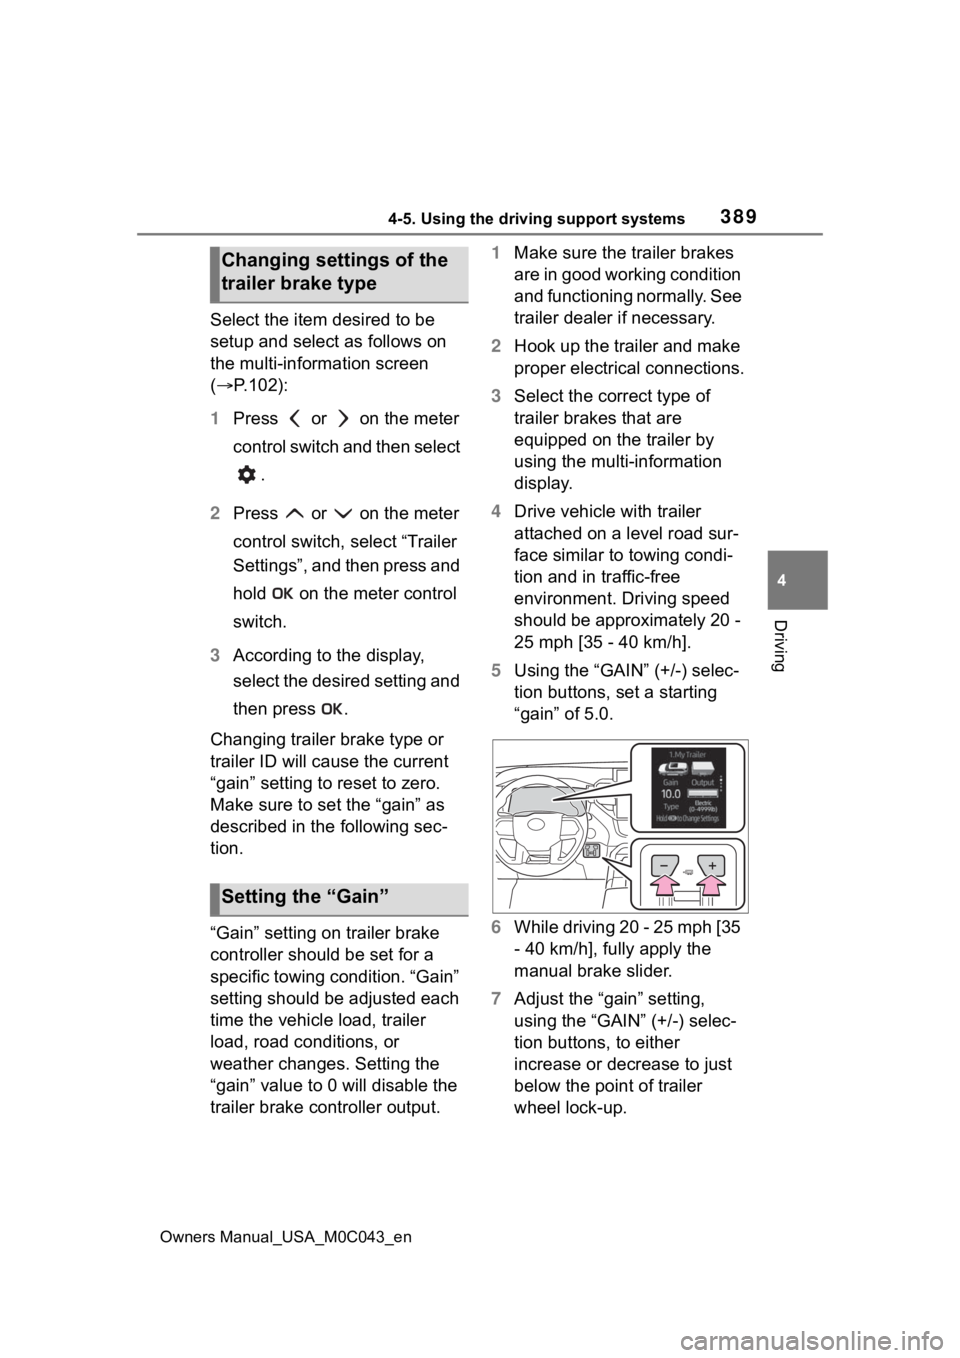
“GAIN” (+/-) selection button
Pressing the “GAIN” (+/-) buttons
will adjust the amount of power that
can be outputted to the trailer
brakes. The “gain” can be adjusted
from 0 (no trailer braking) to 10
(maximum output) in 0.5 incre-
ments. Each press of the button will
increase or decrease the “gain” set-
ting by one step. The “gain” value
will appear in the mu lti-information
display.
Trailer brake type
Trailer brake type can be selected
by using the multi-information. The
combination meter will show which
trailer brake type is selected in the
multi-information display.
Manual brake slider
Adjusting this slider position will
engage the trailer’s brakes only. If
the manual brake slider is used
while the vehicle brake is applied,
the greater of the two outputs will
be sent to the trailer brakes.
Trailer brake control-
ler
The trailer brakes can be
controlled by the Trailer
brake controller via the 7-
pin connector. By selecting
the type of brakes that are
being used on the trailer
(electric or electric-over-
hydraulic) and setting the
“gain” for the controller, the
manual brake slider is used
to slow just the trailer. The
vehicle brake pedal will also
slow down as well as stop
the trailer when applied,
also via the same connec-
tor. “Gain” values, manual
brake outputs, trailer brake
types, and the trailer con-
nection status are displayed
in the multi-information dis-
play.
WARNING
■When driving on slippery
road surfaces
When stopping with ABS acti-
vated, output to the trailer might
be reduced in order to reduce the
likelihood of trailer wheels to lock.
The trailer is not equipped with
ABS. Drive safely on slippery road
surfaces.
System operation
Page 389 of 628
3894-5. Using the driving support systems
Owners Manual_USA_M0C043_en
4
Driving
Select the item desired to be
setup and select as follows on
the multi-information screen
( P.102):
1 Press or on the meter
control switch and then select
.
2 Press or on the meter
control switch, select “Trailer
Settings”, and then press and
hold on the meter control
switch.
3 According to the display,
select the desired setting and
then press .
Changing trailer brake type or
trailer ID will cause the current
“gain” setting to reset to zero.
Make sure to set the “gain” as
described in the following sec-
tion.
“Gain” setting on trailer brake
controller should be set for a
specific towing condition. “Gain”
setting should be adjusted each
time the vehicle load, trailer
load, road conditions, or
weather changes. Setting the
“gain” value to 0 will disable the
trailer brake controller output. 1
Make sure the trailer brakes
are in good working condition
and functioning normally. See
trailer dealer if necessary.
2 Hook up the trailer and make
proper electrical connections.
3 Select the correct type of
trailer brakes that are
equipped on the trailer by
using the multi-information
display.
4 Drive vehicle with trailer
attached on a level road sur-
face similar to towing condi-
tion and in traffic-free
environment. Driving speed
should be approximately 20 -
25 mph [35 - 40 km/h].
5 Using the “GAIN” (+/-) selec-
tion buttons, set a starting
“gain” of 5.0.
6 While driving 20 - 25 mph [35
- 40 km/h], fully apply the
manual brake slider.
7 Adjust the “gain” setting,
using the “GAIN” (+/-) selec-
tion buttons, to either
increase or decrease to just
below the point of trailer
wheel lock-up.
Changing settings of the
trailer brake type
Setting the “Gain”
Page 390 of 628
3904-5. Using the driving support systems
Owners Manual_USA_M0C043_en
8For confirmation, repeat
steps 6 and 7 until desired
“gain” setting is reached (just
below point of trailer wheel
lock-up).
■When setting the “gain”
Wheel lock-up occurs when the
trailer wheel squeals or tire smoke
occurs. Trailer wheels may not lock-
up while driving heavily loaded
trailer. During this case, adjust the
Trailer “gain” to the highest allow-
able setting for the towing condition.
■When disconnecting and recon-
necting 12-volt battery termi-
nals
The “gain” setting data will be reset.
■Trailer Sway Control Function
Helps suppress trailer sway at an
early stage by using the trailer brake
control system to operate the trailer
brakes.
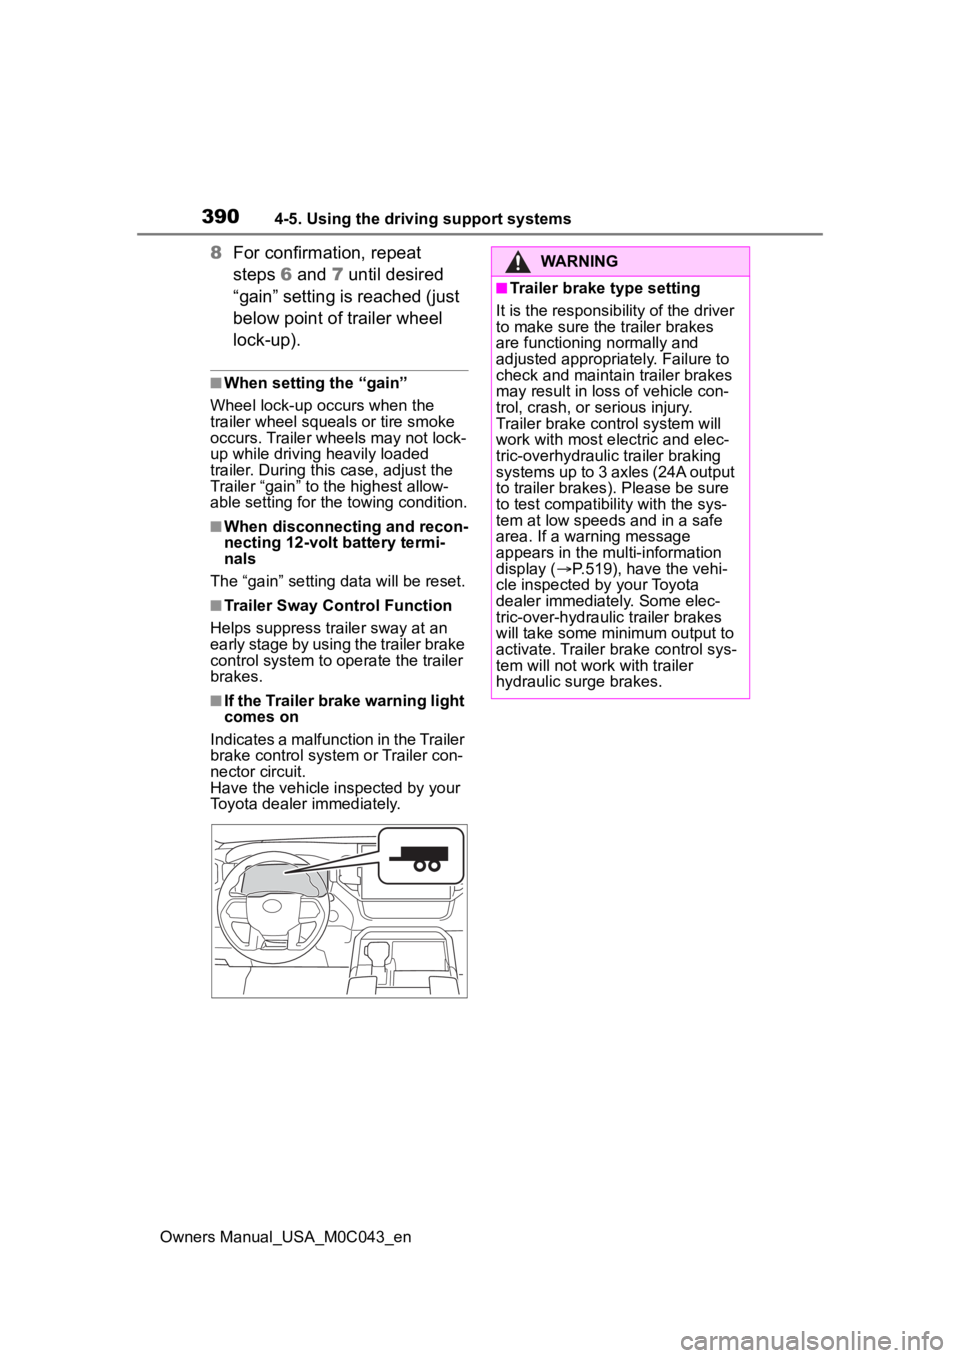
■If the Trailer brake warning light
comes on
Indicates a malfunction in the Trailer
brake control system or Trailer con-
nector circuit.
Have the vehicle inspected by your
Toyota dealer immediately.
WARNING
■Trailer brake type setting
It is the responsibility of the driver
to make sure the trailer brakes
are functioning normally and
adjusted appropriately. Failure to
check and maintain trailer brakes
may result in loss of vehicle con-
trol, crash, or serious injury.
Trailer brake control system will
work with most electric and elec-
tric-overhydraulic trailer braking
systems up to 3 axles (24A output
to trailer brakes). Please be sure
to test compatibility with the sys-
tem at low speeds and in a safe
area. If a warning message
appears in the multi-information
display ( P.519), have the vehi-
cle inspected by your Toyota
dealer immediately. Some elec-
tric-over-hydraulic trailer brakes
will take some minimum output to
activate. Trailer brake control sys-
tem will not work with trailer
hydraulic surge brakes.
Page 391 of 628
3914-5. Using the driving support systems
Owners Manual_USA_M0C043_en
4
Driving
*: If equipped
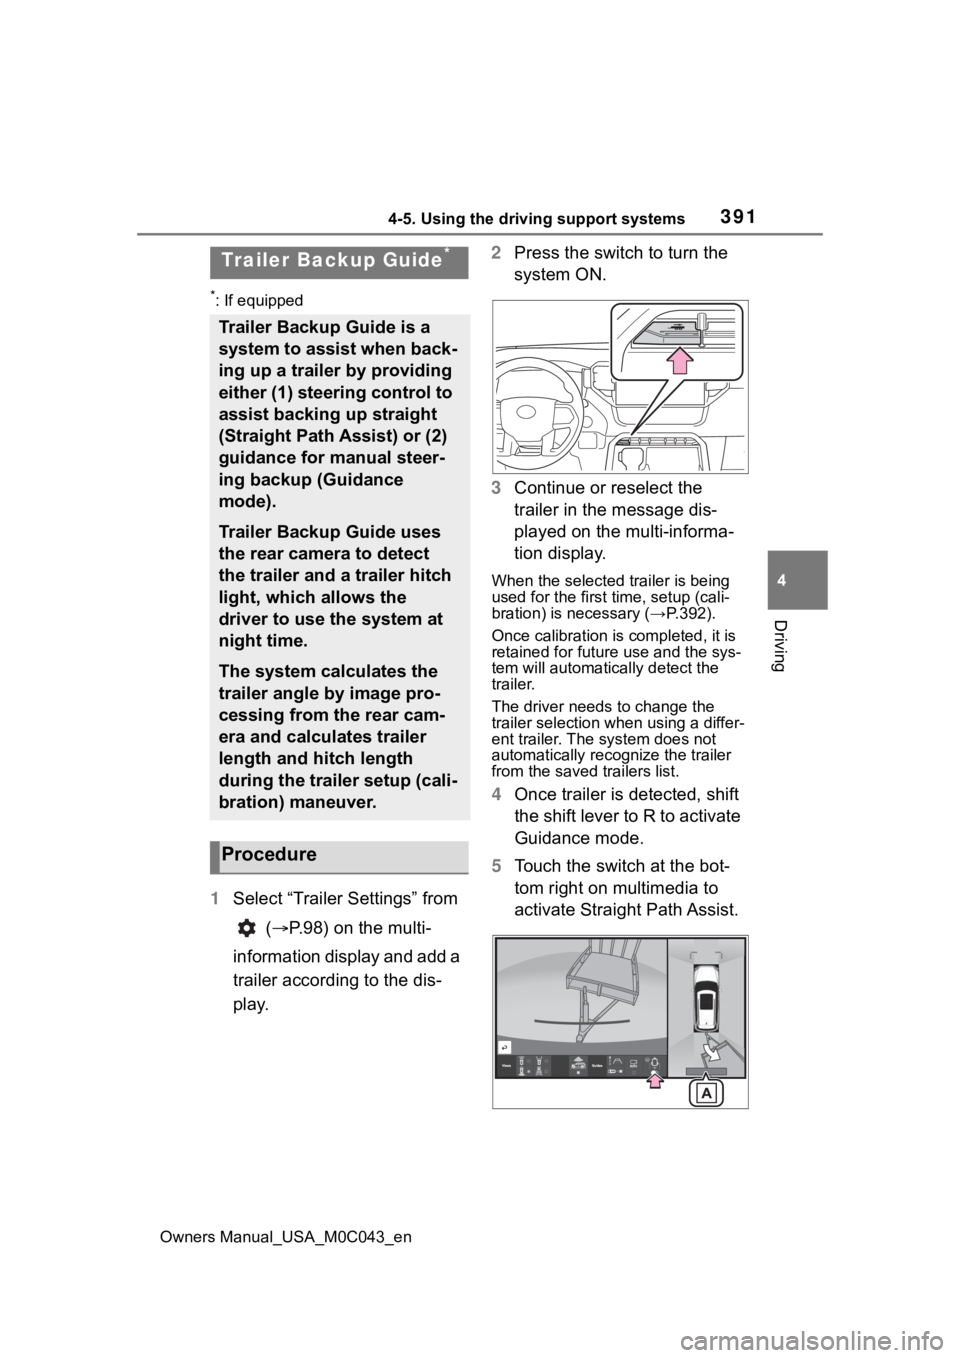
1 Select “Trailer Settings” from
( P.98) on the multi-
information display and add a
trailer according to the dis-
play. 2
Press the switch to turn the
system ON.
3 Continue or reselect the
trailer in the message dis-
played on the multi-informa-
tion display.
When the selected trailer is being
used for the first time, setup (cali-
bration) is nece ssary (→P.392).
Once calibration is completed, it is
retained for future use and the sys-
tem will automatically detect the
trailer.
The driver needs to change the
trailer selection when using a differ-
ent trailer. The system does not
automatically recognize the trailer
from the saved trailers list.
4 Once trailer is detected, shift
the shift lever to R to activate
Guidance mode.
5 Touch the switch at the bot-
tom right on multimedia to
activate Straight Path Assist.
Trailer Backup Guide*
Trailer Backup Guide is a
system to assist when back-
ing up a trailer by providing
either (1) steering control to
assist backing up straight
(Straight Path Assist) or (2)
guidance for manual steer-
ing backup (Guidance
mode).
Trailer Backup Guide uses
the rear camera to detect
the trailer and a trailer hitch
light, which allows the
driver to use the system at
night time.
The system calculates the
trailer angle by image pro-
cessing from the rear cam-
era and calculates trailer
length and hitch length
during the trailer setup (cali-
bration) maneuver.
Procedure
Page 392 of 628
3924-5. Using the driving support systems
Owners Manual_USA_M0C043_en
“Trailer Direction”
When using Straight Path Assist,
the driver can override the system
using the steering wheel to adjust
the trailer direction. Upon release of
the steering wheel, Straight Path
Assist re-activates with a revised
straight back target direction.
■When adding the trailer
Use the meter control switches to
select the trailer type. ( P. 9 8 )
1 Press or to select .
2 Press or to select “Trailer
Settings” and then press and
hold .
3 According to the display, select
the desired setting and then
press . ( P.102)
Trailer Settings are not available
while Trailer Backup Guide system
is active.
The system is designed to support
trailers with single or multi-axles
using a ball hitch.
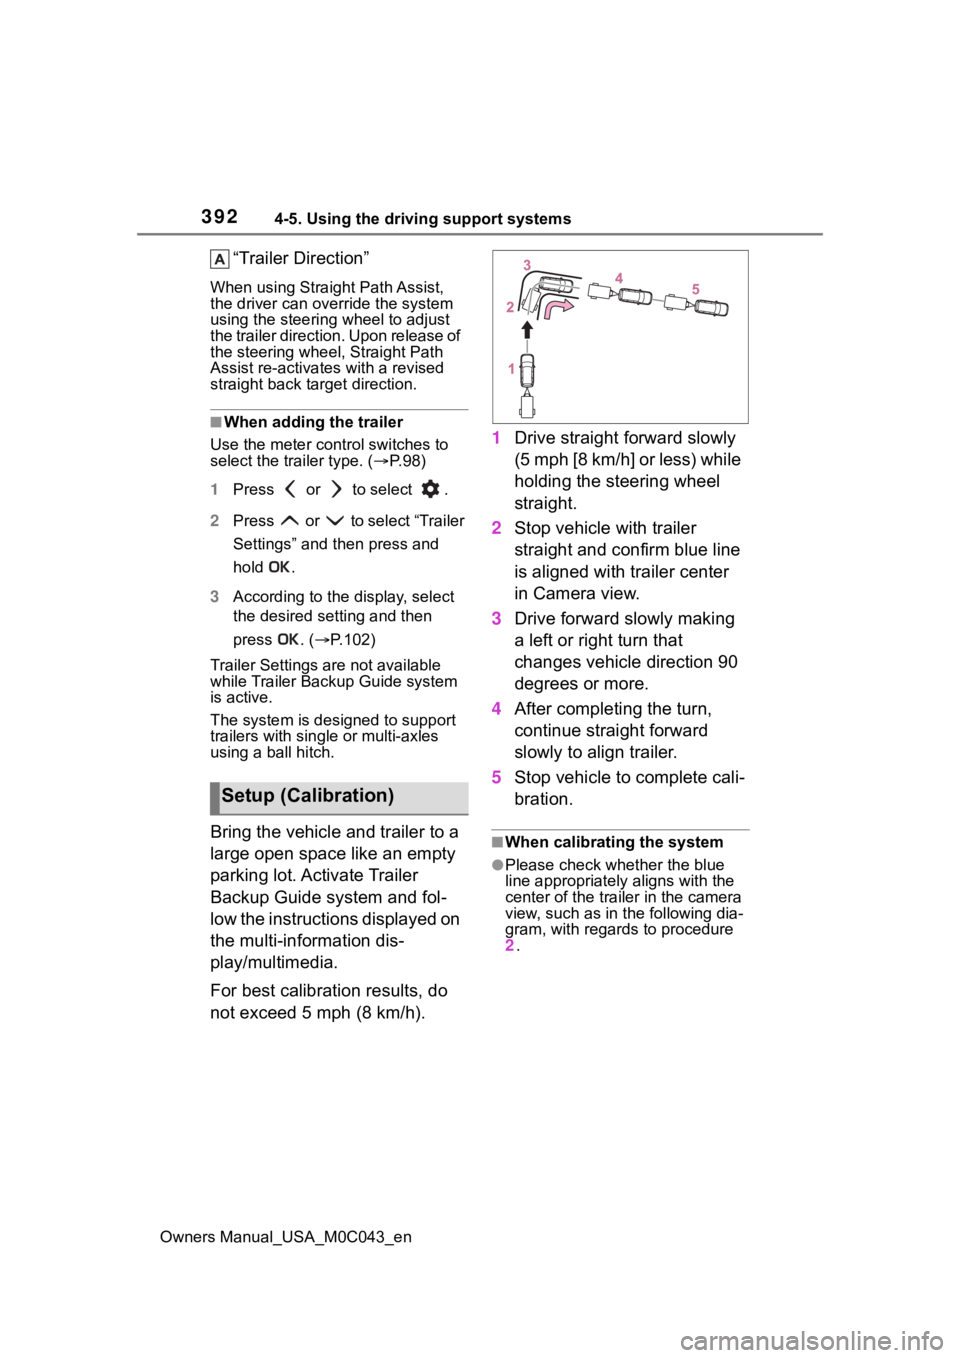
Bring the vehicle and trailer to a
large open space like an empty
parking lot. Activate Trailer
Backup Guide system and fol-
low the instructions displayed on
the multi-information dis-
play/multimedia.
For best calibration results, do
not exceed 5 mph (8 km/h). 1
Drive straight forward slowly
(5 mph [8 km/h] or less) while
holding the steering wheel
straight.
2 Stop vehicle with trailer
straight and confirm blue line
is aligned with trailer center
in Camera view.
3 Drive forward slowly making
a left or right turn that
changes vehicle direction 90
degrees or more.
4 After completing the turn,
continue straight forward
slowly to align trailer.
5 Stop vehicle to complete cali-
bration.■When calibrating the system
●Please check whether the blue
line appropriately aligns with the
center of the trailer in the camera
view, such as in the following dia-
gram, with regards to procedure
2 .
Setup (Calibration)
Page 393 of 628
3934-5. Using the driving support systems
Owners Manual_USA_M0C043_en
4
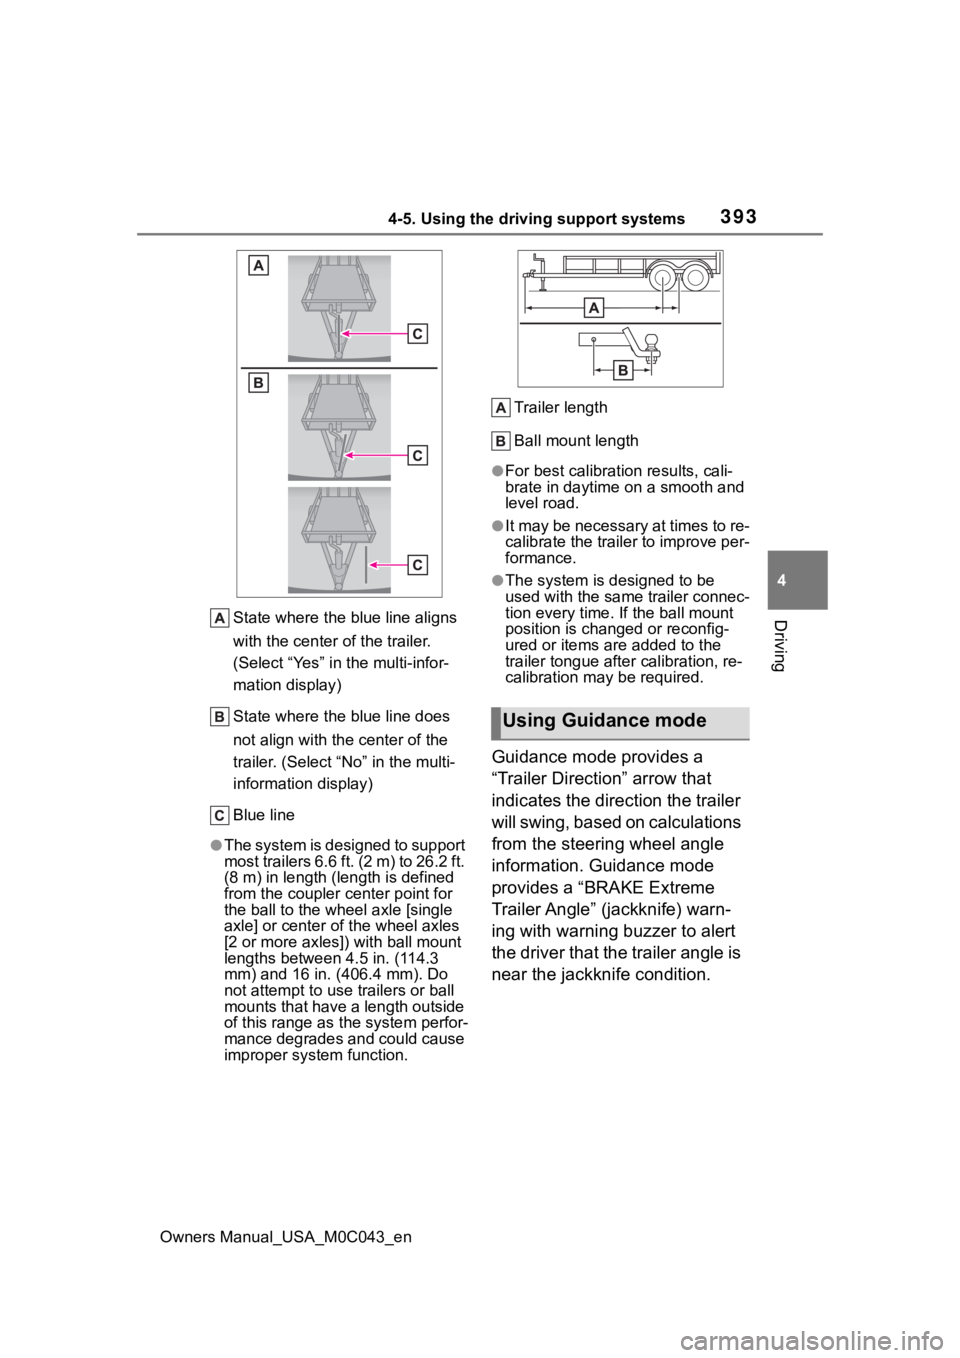
DrivingState where the blue line aligns
with the center of the trailer.
(Select “Yes” in the multi-infor-
mation display)
State where the blue line does
not align with the center of the
trailer. (Select “ No” in the multi-
information display)
Blue line
●The system is designed to support
most trailers 6.6 ft. (2 m) to 26.2 ft.
(8 m) in length (length is defined
from the coupler c enter point for
the ball to the wheel axle [single
axle] or center o f the wheel axles
[2 or more axles]) with ball mount
lengths between 4.5 in. (114.3
mm) and 16 in. (406.4 mm). Do
not attempt to use trailers or ball
mounts that have a length outside
of this range as t he system perfor-
mance degrades and could cause
improper system function. Trailer length
Ball mount length
●For best calibration results, cali-
brate in daytime on a smooth and
level road.
●It may be necessary at times to re-
calibrate the trailer to improve per-
formance.
●The system is designed to be
used with the same trailer connec-
tion every time. If the ball mount
position is changed or reconfig-
ured or items are added to the
trailer tongue
after calibration, re-
calibration may be required.
Guidance mode provides a
“Trailer Direction” arrow that
indicates the direction the trailer
will swing, based on calculations
from the steering wheel angle
information. Guidance mode
provides a “BRAKE Extreme
Trailer Angle” (jackknife) warn-
ing with warning buzzer to alert
the driver that the trailer angle is
near the jackknife condition.
Using Guidance mode