check engine TOYOTA SIENNA 2007 Service Repair Manual
[x] Cancel search | Manufacturer: TOYOTA, Model Year: 2007, Model line: SIENNA, Model: TOYOTA SIENNA 2007Pages: 3000, PDF Size: 52.26 MB
Page 1056 of 3000
2GR-FE ENGINE MECHANICAL – ENGINE UNITEM–109
EM
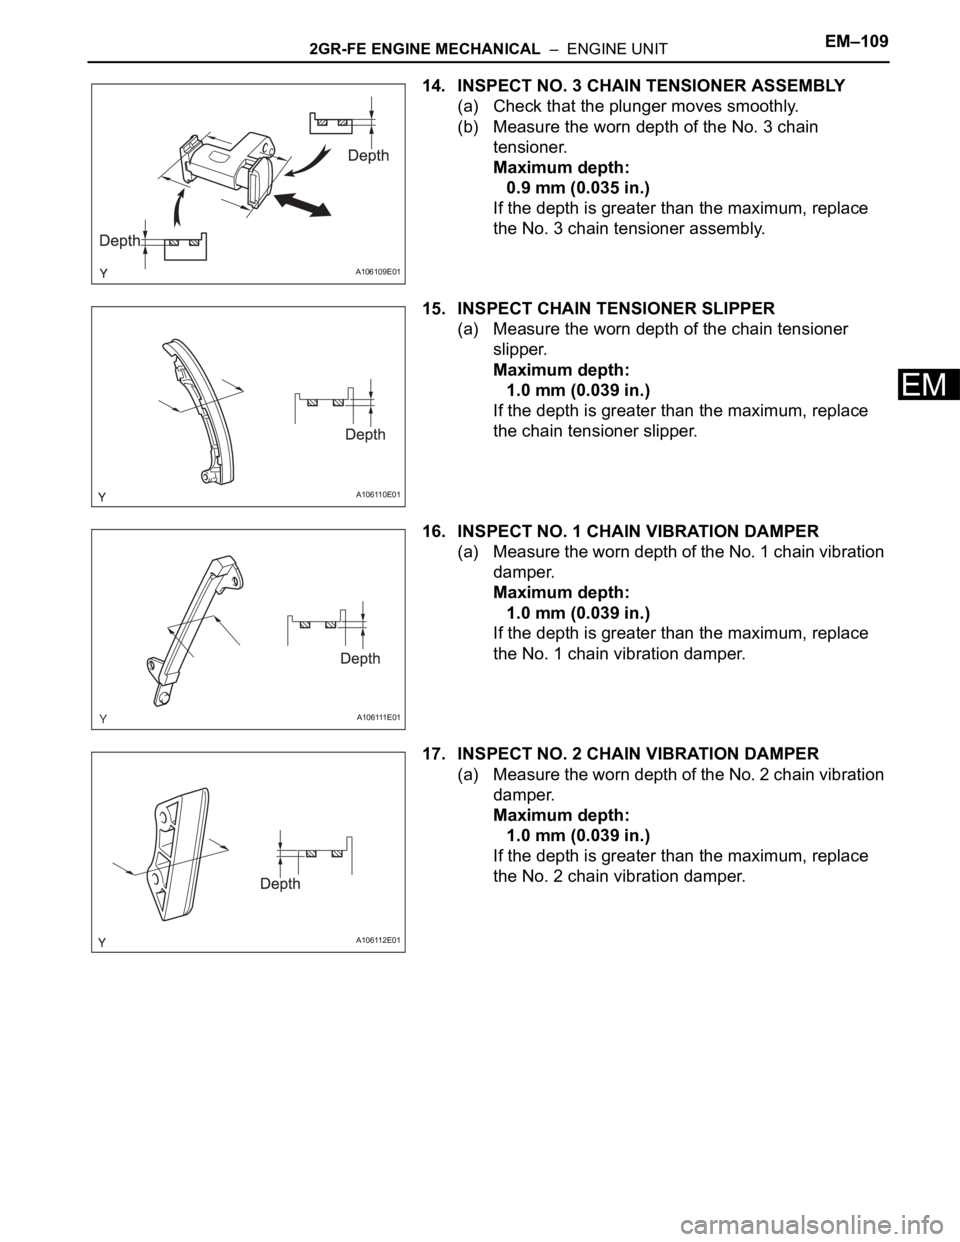
14. INSPECT NO. 3 CHAIN TENSIONER ASSEMBLY
(a) Check that the plunger moves smoothly.
(b) Measure the worn depth of the No. 3 chain
tensioner.
Maximum depth:
0.9 mm (0.035 in.)
If the depth is greater than the maximum, replace
the No. 3 chain tensioner assembly.
15. INSPECT CHAIN TENSIONER SLIPPER
(a) Measure the worn depth of the chain tensioner
slipper.
Maximum depth:
1.0 mm (0.039 in.)
If the depth is greater than the maximum, replace
the chain tensioner slipper.
16. INSPECT NO. 1 CHAIN VIBRATION DAMPER
(a) Measure the worn depth of the No. 1 chain vibration
damper.
Maximum depth:
1.0 mm (0.039 in.)
If the depth is greater than the maximum, replace
the No. 1 chain vibration damper.
17. INSPECT NO. 2 CHAIN VIBRATION DAMPER
(a) Measure the worn depth of the No. 2 chain vibration
damper.
Maximum depth:
1.0 mm (0.039 in.)
If the depth is greater than the maximum, replace
the No. 2 chain vibration damper.
A106109E01
A106110E01
A106111E01
A106112E01
Page 1057 of 3000
EM–1102GR-FE ENGINE MECHANICAL – ENGINE UNIT
EM
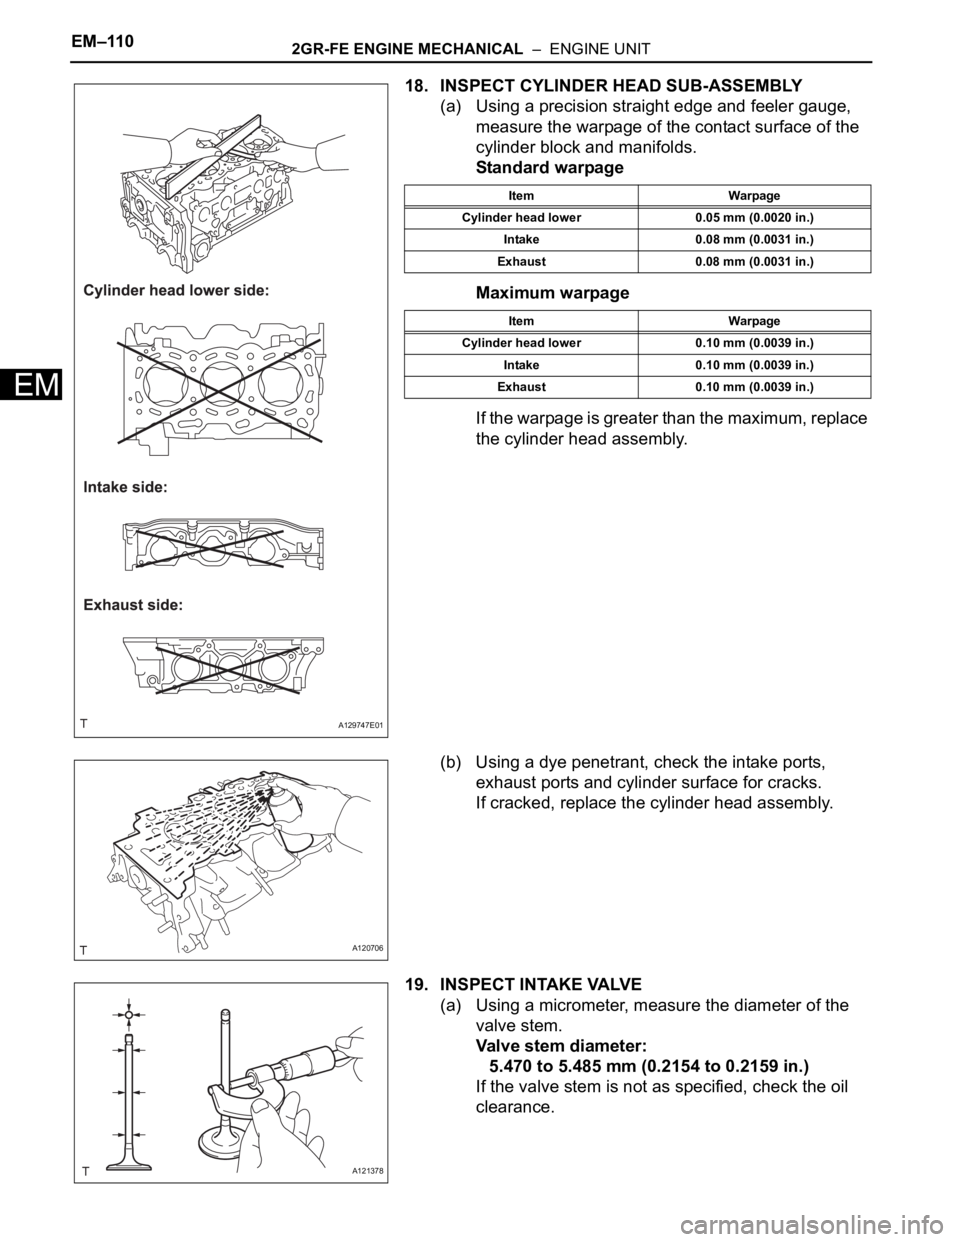
18. INSPECT CYLINDER HEAD SUB-ASSEMBLY
(a) Using a precision straight edge and feeler gauge,
measure the warpage of the contact surface of the
cylinder block and manifolds.
Standard warpage
Maximum warpage
If the warpage is greater than the maximum, replace
the cylinder head assembly.
(b) Using a dye penetrant, check the intake ports,
exhaust ports and cylinder surface for cracks.
If cracked, replace the cylinder head assembly.
19. INSPECT INTAKE VALVE
(a) Using a micrometer, measure the diameter of the
valve stem.
Valve stem diameter:
5.470 to 5.485 mm (0.2154 to 0.2159 in.)
If the valve stem is not as specified, check the oil
clearance.
A129747E01
Item Warpage
Cylinder head lower 0.05 mm (0.0020 in.)
Intake 0.08 mm (0.0031 in.)
Exhaust 0.08 mm (0.0031 in.)
Item Warpage
Cylinder head lower 0.10 mm (0.0039 in.)
Intake 0.10 mm (0.0039 in.)
Exhaust 0.10 mm (0.0039 in.)
A120706
A121378
Page 1058 of 3000
2GR-FE ENGINE MECHANICAL – ENGINE UNITEM–111
EM
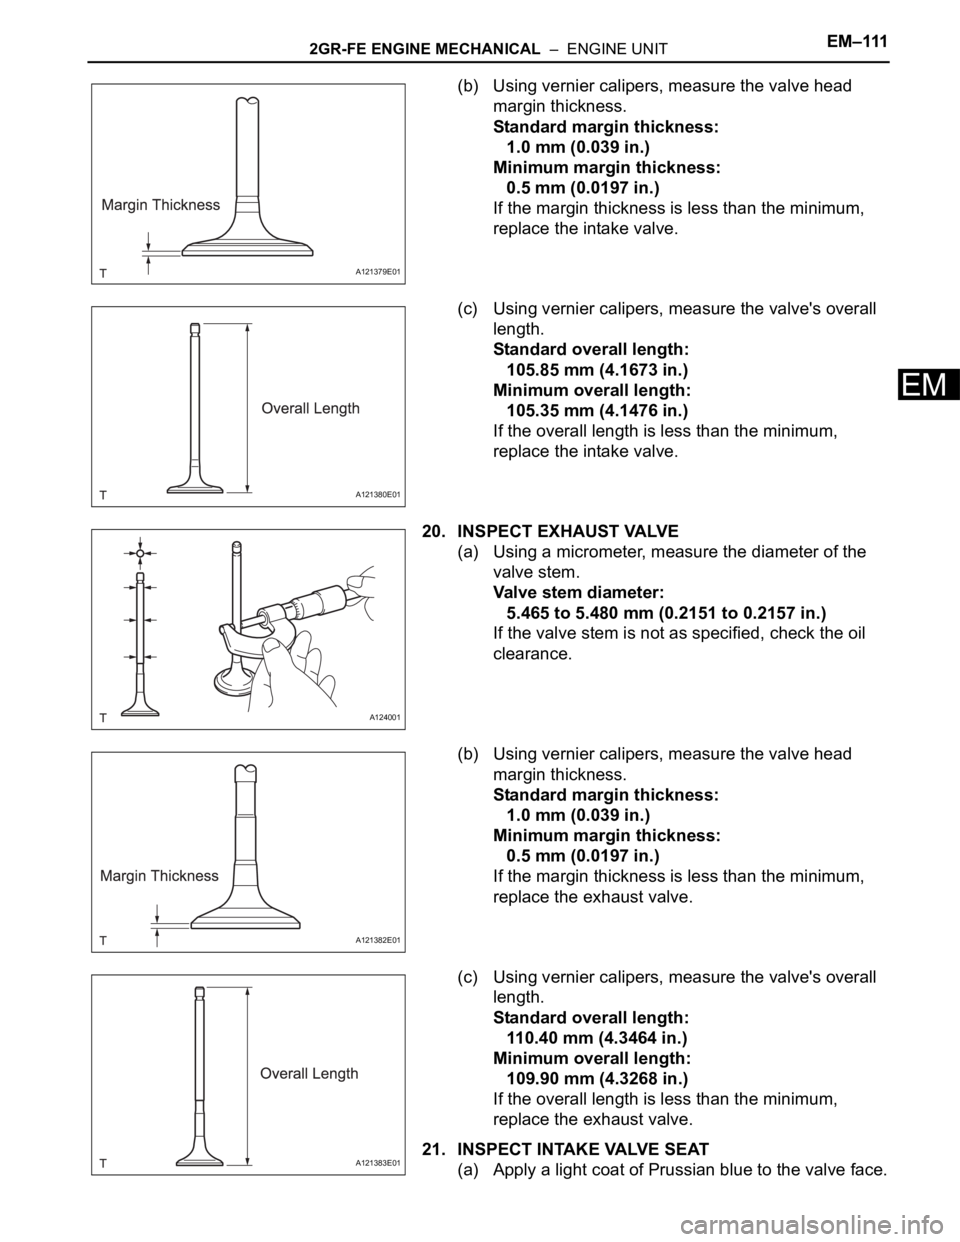
(b) Using vernier calipers, measure the valve head
margin thickness.
Standard margin thickness:
1.0 mm (0.039 in.)
Minimum margin thickness:
0.5 mm (0.0197 in.)
If the margin thickness is less than the minimum,
replace the intake valve.
(c) Using vernier calipers, measure the valve's overall
length.
Standard overall length:
105.85 mm (4.1673 in.)
Minimum overall length:
105.35 mm (4.1476 in.)
If the overall length is less than the minimum,
replace the intake valve.
20. INSPECT EXHAUST VALVE
(a) Using a micrometer, measure the diameter of the
valve stem.
Valve stem diameter:
5.465 to 5.480 mm (0.2151 to 0.2157 in.)
If the valve stem is not as specified, check the oil
clearance.
(b) Using vernier calipers, measure the valve head
margin thickness.
Standard margin thickness:
1.0 mm (0.039 in.)
Minimum margin thickness:
0.5 mm (0.0197 in.)
If the margin thickness is less than the minimum,
replace the exhaust valve.
(c) Using vernier calipers, measure the valve's overall
length.
Standard overall length:
110.40 mm (4.3464 in.)
Minimum overall length:
109.90 mm (4.3268 in.)
If the overall length is less than the minimum,
replace the exhaust valve.
21. INSPECT INTAKE VALVE SEAT
(a) Apply a light coat of Prussian blue to the valve face.
A121379E01
A121380E01
A124001
A121382E01
A121383E01
Page 1059 of 3000
EM–1122GR-FE ENGINE MECHANICAL – ENGINE UNIT
EM
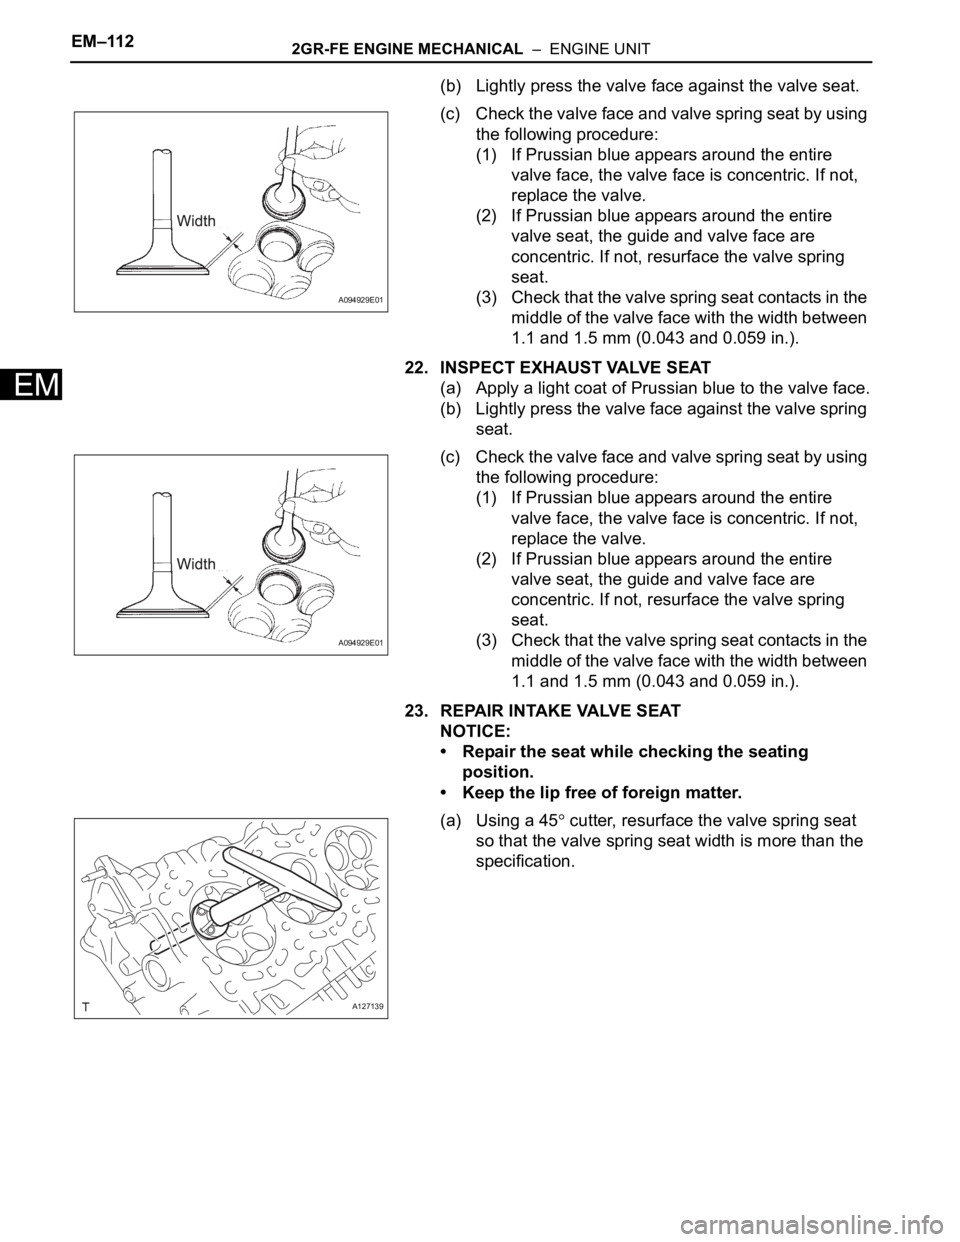
(b) Lightly press the valve face against the valve seat.
(c) Check the valve face and valve spring seat by using
the following procedure:
(1) If Prussian blue appears around the entire
valve face, the valve face is concentric. If not,
replace the valve.
(2) If Prussian blue appears around the entire
valve seat, the guide and valve face are
concentric. If not, resurface the valve spring
seat.
(3) Check that the valve spring seat contacts in the
middle of the valve face with the width between
1.1 and 1.5 mm (0.043 and 0.059 in.).
22. INSPECT EXHAUST VALVE SEAT
(a) Apply a light coat of Prussian blue to the valve face.
(b) Lightly press the valve face against the valve spring
seat.
(c) Check the valve face and valve spring seat by using
the following procedure:
(1) If Prussian blue appears around the entire
valve face, the valve face is concentric. If not,
replace the valve.
(2) If Prussian blue appears around the entire
valve seat, the guide and valve face are
concentric. If not, resurface the valve spring
seat.
(3) Check that the valve spring seat contacts in the
middle of the valve face with the width between
1.1 and 1.5 mm (0.043 and 0.059 in.).
23. REPAIR INTAKE VALVE SEAT
NOTICE:
• Repair the seat while checking the seating
position.
• Keep the lip free of foreign matter.
(a) Using a 45
cutter, resurface the valve spring seat
so that the valve spring seat width is more than the
specification.
A094929E01
A094929E01
A127139
Page 1060 of 3000
2GR-FE ENGINE MECHANICAL – ENGINE UNITEM–113
EM
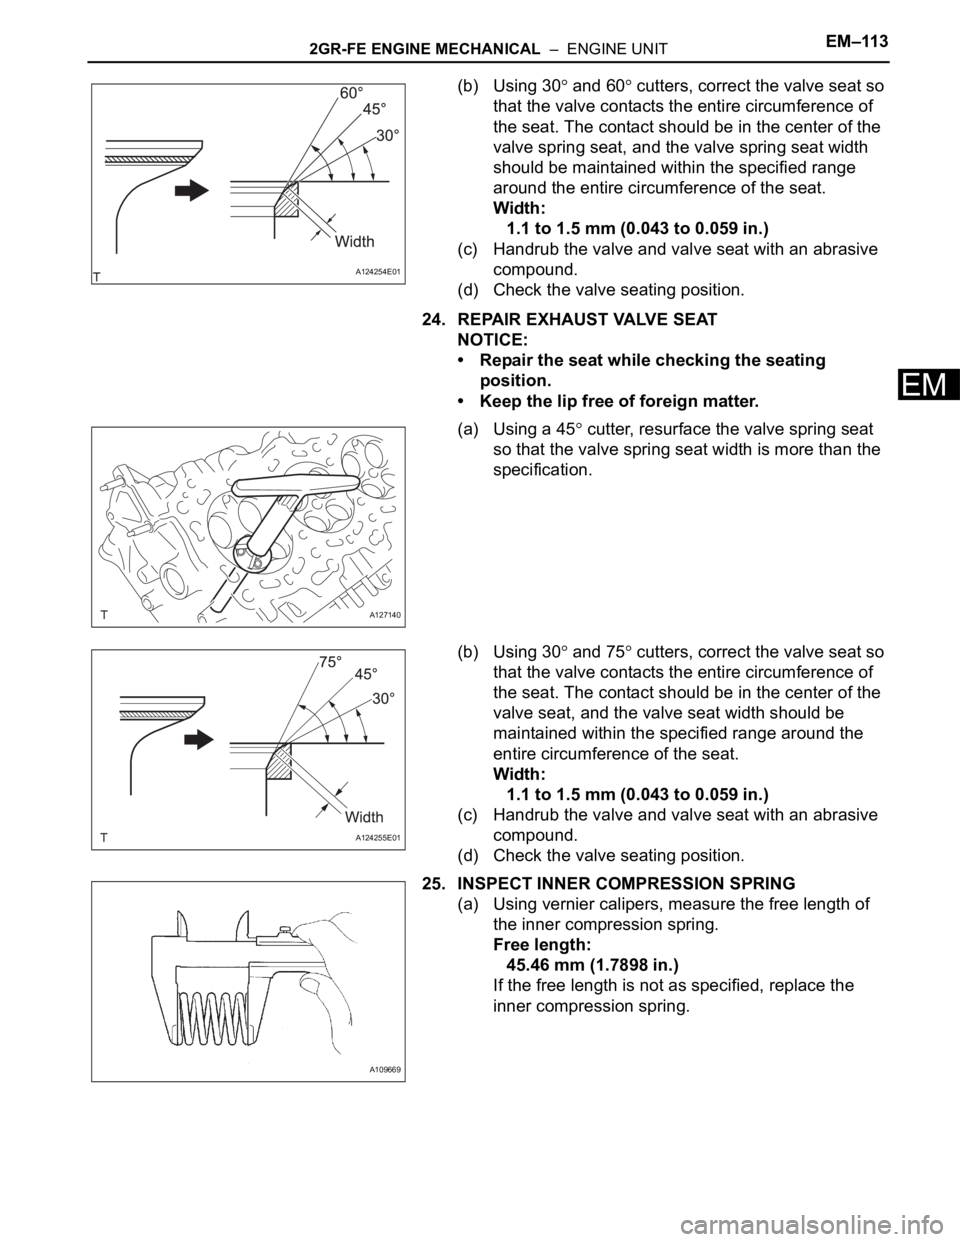
(b) Using 30 and 60 cutters, correct the valve seat so
that the valve contacts the entire circumference of
the seat. The contact should be in the center of the
valve spring seat, and the valve spring seat width
should be maintained within the specified range
around the entire circumference of the seat.
Width:
1.1 to 1.5 mm (0.043 to 0.059 in.)
(c) Handrub the valve and valve seat with an abrasive
compound.
(d) Check the valve seating position.
24. REPAIR EXHAUST VALVE SEAT
NOTICE:
• Repair the seat while checking the seating
position.
• Keep the lip free of foreign matter.
(a) Using a 45
cutter, resurface the valve spring seat
so that the valve spring seat width is more than the
specification.
(b) Using 30
and 75 cutters, correct the valve seat so
that the valve contacts the entire circumference of
the seat. The contact should be in the center of the
valve seat, and the valve seat width should be
maintained within the specified range around the
entire circumference of the seat.
Width:
1.1 to 1.5 mm (0.043 to 0.059 in.)
(c) Handrub the valve and valve seat with an abrasive
compound.
(d) Check the valve seating position.
25. INSPECT INNER COMPRESSION SPRING
(a) Using vernier calipers, measure the free length of
the inner compression spring.
Free length:
45.46 mm (1.7898 in.)
If the free length is not as specified, replace the
inner compression spring.
A124254E01
A127140
A124255E01
A109669
Page 1063 of 3000
EM–1162GR-FE ENGINE MECHANICAL – ENGINE UNIT
EM
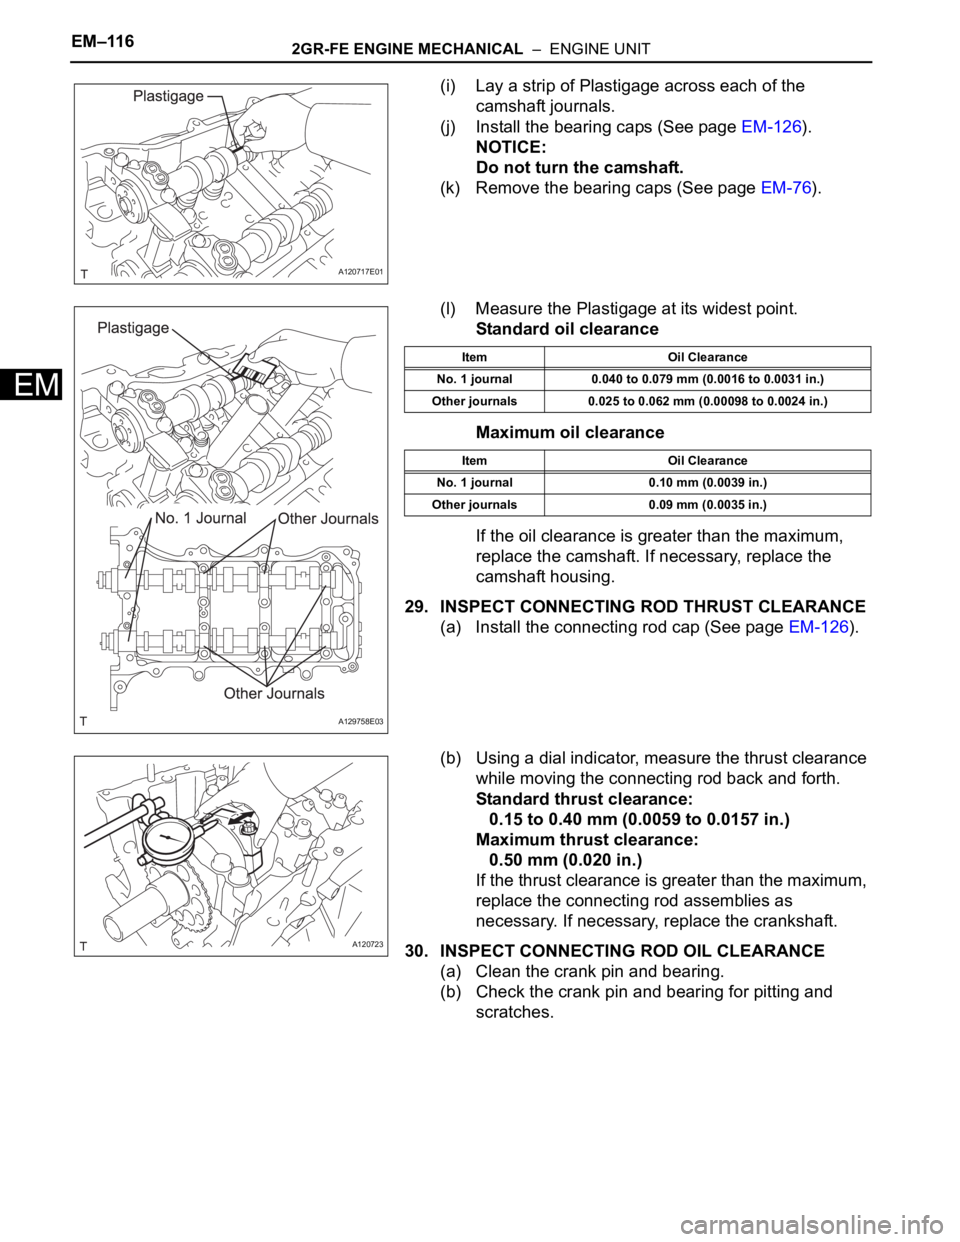
(i) Lay a strip of Plastigage across each of the
camshaft journals.
(j) Install the bearing caps (See page EM-126).
NOTICE:
Do not turn the camshaft.
(k) Remove the bearing caps (See page EM-76).
(l) Measure the Plastigage at its widest point.
Standard oil clearance
Maximum oil clearance
If the oil clearance is greater than the maximum,
replace the camshaft. If necessary, replace the
camshaft housing.
29. INSPECT CONNECTING ROD THRUST CLEARANCE
(a) Install the connecting rod cap (See page EM-126).
(b) Using a dial indicator, measure the thrust clearance
while moving the connecting rod back and forth.
Standard thrust clearance:
0.15 to 0.40 mm (0.0059 to 0.0157 in.)
Maximum thrust clearance:
0.50 mm (0.020 in.)
If the thrust clearance is greater than the maximum,
replace the connecting rod assemblies as
necessary. If necessary, replace the crankshaft.
30. INSPECT CONNECTING ROD OIL CLEARANCE
(a) Clean the crank pin and bearing.
(b) Check the crank pin and bearing for pitting and
scratches.
A120717E01
A129758E03
Item Oil Clearance
No. 1 journal 0.040 to 0.079 mm (0.0016 to 0.0031 in.)
Other journals 0.025 to 0.062 mm (0.00098 to 0.0024 in.)
Item Oil Clearance
No. 1 journal 0.10 mm (0.0039 in.)
Other journals 0.09 mm (0.0035 in.)
A120723
Page 1064 of 3000
2GR-FE ENGINE MECHANICAL – ENGINE UNITEM–117
EM
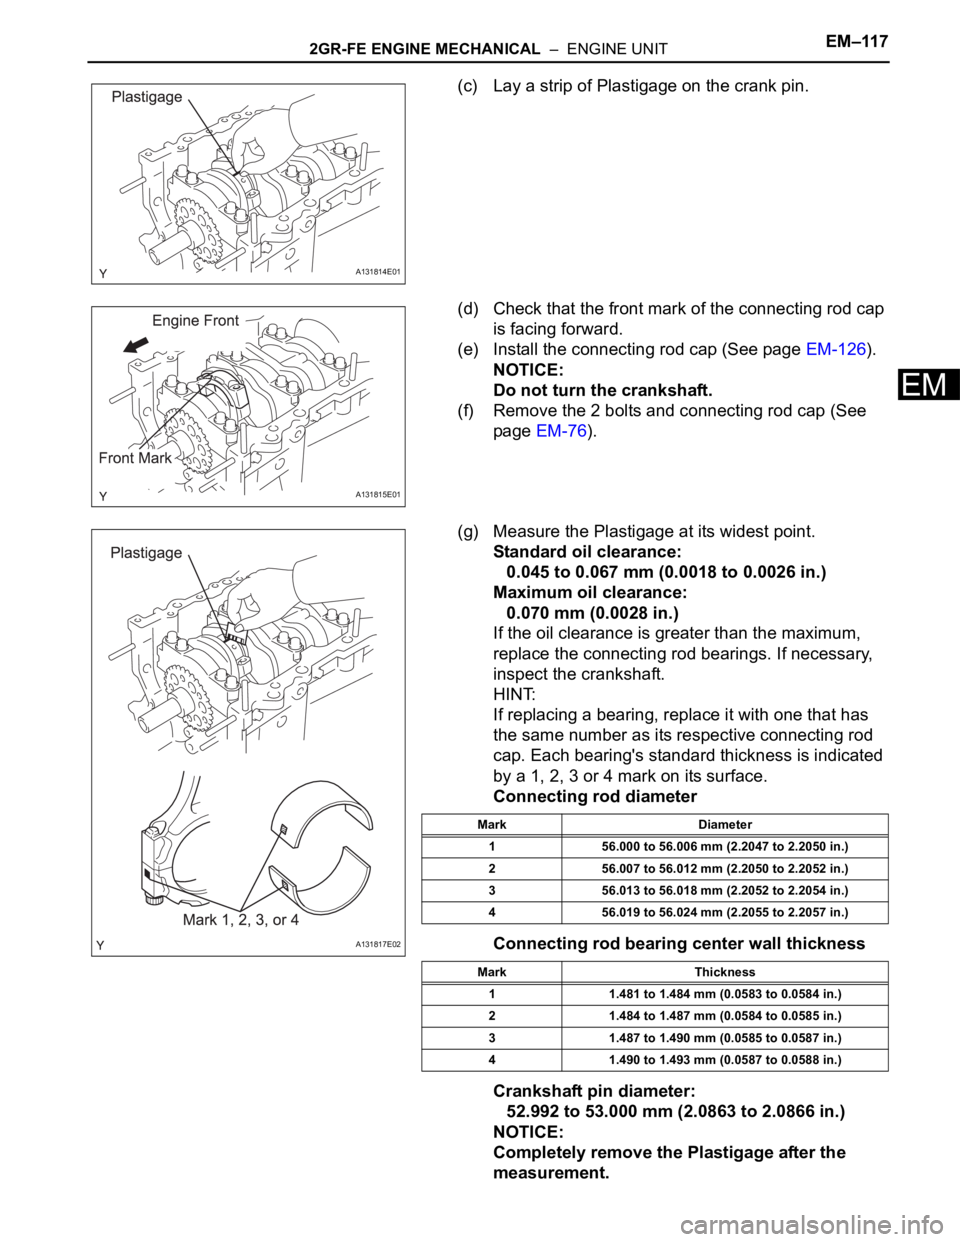
(c) Lay a strip of Plastigage on the crank pin.
(d) Check that the front mark of the connecting rod cap
is facing forward.
(e) Install the connecting rod cap (See page EM-126).
NOTICE:
Do not turn the crankshaft.
(f) Remove the 2 bolts and connecting rod cap (See
page EM-76).
(g) Measure the Plastigage at its widest point.
Standard oil clearance:
0.045 to 0.067 mm (0.0018 to 0.0026 in.)
Maximum oil clearance:
0.070 mm (0.0028 in.)
If the oil clearance is greater than the maximum,
replace the connecting rod bearings. If necessary,
inspect the crankshaft.
HINT:
If replacing a bearing, replace it with one that has
the same number as its respective connecting rod
cap. Each bearing's standard thickness is indicated
by a 1, 2, 3 or 4 mark on its surface.
Connecting rod diameter
Connecting rod bearing center wall thickness
Crankshaft pin diameter:
52.992 to 53.000 mm (2.0863 to 2.0866 in.)
NOTICE:
Completely remove the Plastigage after the
measurement.
A131814E01
A131815E01
A131817E02
Mark Diameter
1 56.000 to 56.006 mm (2.2047 to 2.2050 in.)
2 56.007 to 56.012 mm (2.2050 to 2.2052 in.)
3 56.013 to 56.018 mm (2.2052 to 2.2054 in.)
4 56.019 to 56.024 mm (2.2055 to 2.2057 in.)
Mark Thickness
1 1.481 to 1.484 mm (0.0583 to 0.0584 in.)
2 1.484 to 1.487 mm (0.0584 to 0.0585 in.)
3 1.487 to 1.490 mm (0.0585 to 0.0587 in.)
4 1.490 to 1.493 mm (0.0587 to 0.0588 in.)
Page 1065 of 3000
EM–1182GR-FE ENGINE MECHANICAL – ENGINE UNIT
EM
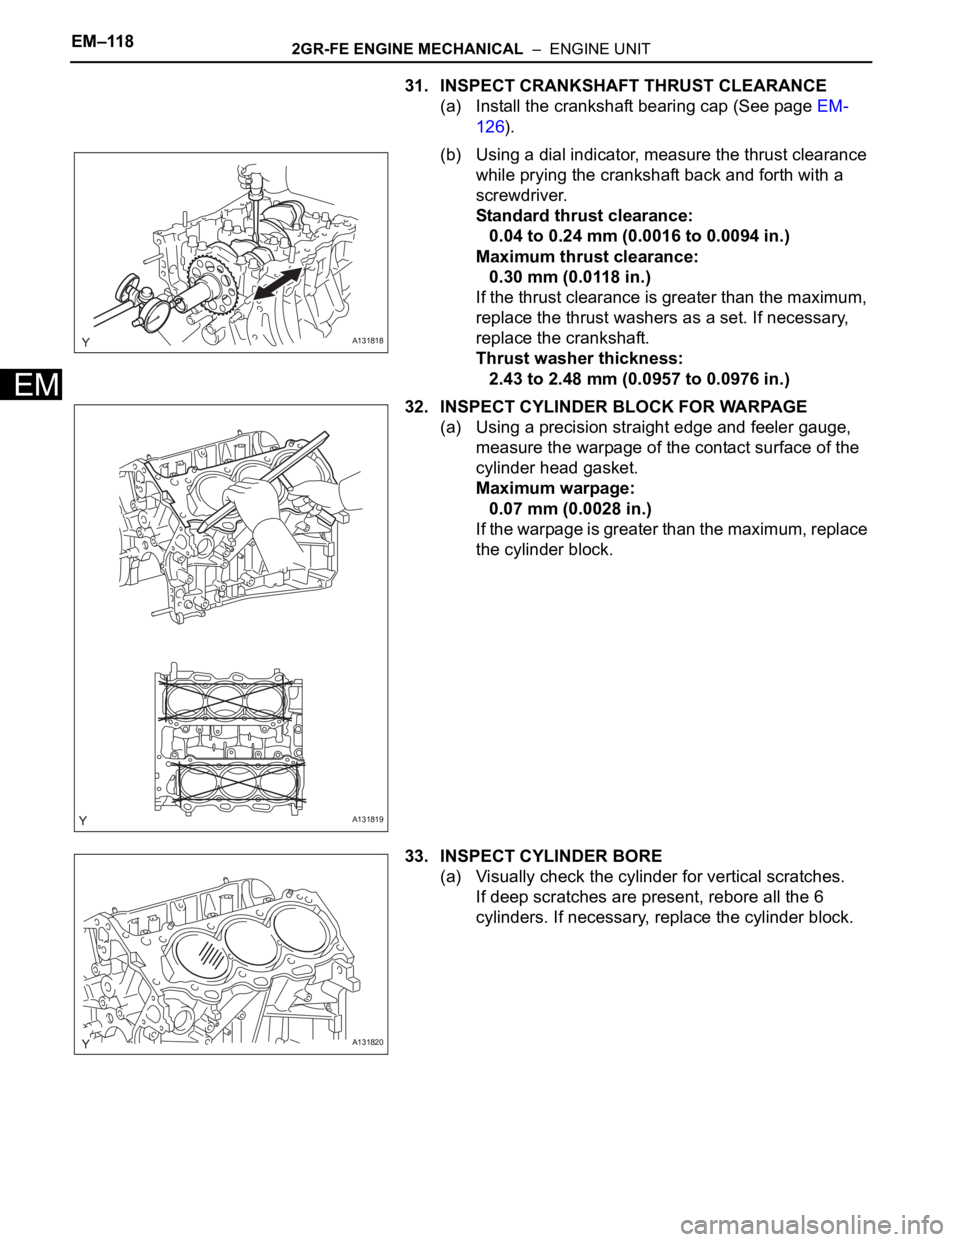
31. INSPECT CRANKSHAFT THRUST CLEARANCE
(a) Install the crankshaft bearing cap (See page EM-
126).
(b) Using a dial indicator, measure the thrust clearance
while prying the crankshaft back and forth with a
screwdriver.
Standard thrust clearance:
0.04 to 0.24 mm (0.0016 to 0.0094 in.)
Maximum thrust clearance:
0.30 mm (0.0118 in.)
If the thrust clearance is greater than the maximum,
replace the thrust washers as a set. If necessary,
replace the crankshaft.
Thrust washer thickness:
2.43 to 2.48 mm (0.0957 to 0.0976 in.)
32. INSPECT CYLINDER BLOCK FOR WARPAGE
(a) Using a precision straight edge and feeler gauge,
measure the warpage of the contact surface of the
cylinder head gasket.
Maximum warpage:
0.07 mm (0.0028 in.)
If the warpage is greater than the maximum, replace
the cylinder block.
33. INSPECT CYLINDER BORE
(a) Visually check the cylinder for vertical scratches.
If deep scratches are present, rebore all the 6
cylinders. If necessary, replace the cylinder block.
A131818
A131819
A131820
Page 1069 of 3000
EM–1222GR-FE ENGINE MECHANICAL – ENGINE UNIT
EM
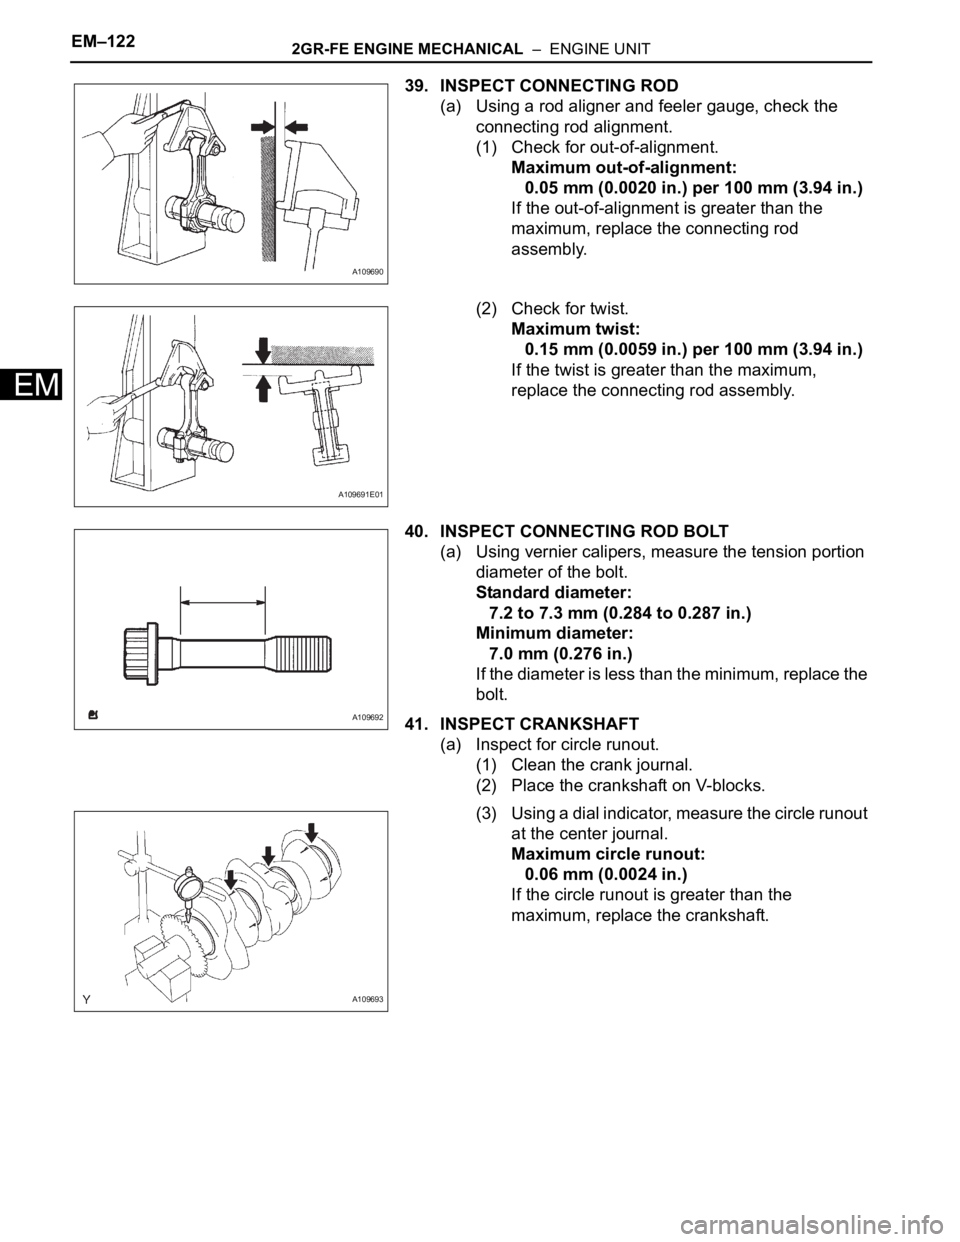
39. INSPECT CONNECTING ROD
(a) Using a rod aligner and feeler gauge, check the
connecting rod alignment.
(1) Check for out-of-alignment.
Maximum out-of-alignment:
0.05 mm (0.0020 in.) per 100 mm (3.94 in.)
If the out-of-alignment is greater than the
maximum, replace the connecting rod
assembly.
(2) Check for twist.
Maximum twist:
0.15 mm (0.0059 in.) per 100 mm (3.94 in.)
If the twist is greater than the maximum,
replace the connecting rod assembly.
40. INSPECT CONNECTING ROD BOLT
(a) Using vernier calipers, measure the tension portion
diameter of the bolt.
Standard diameter:
7.2 to 7.3 mm (0.284 to 0.287 in.)
Minimum diameter:
7.0 mm (0.276 in.)
If the diameter is less than the minimum, replace the
bolt.
41. INSPECT CRANKSHAFT
(a) Inspect for circle runout.
(1) Clean the crank journal.
(2) Place the crankshaft on V-blocks.
(3) Using a dial indicator, measure the circle runout
at the center journal.
Maximum circle runout:
0.06 mm (0.0024 in.)
If the circle runout is greater than the
maximum, replace the crankshaft.
A109690
A109691E01
A109692
A109693
Page 1070 of 3000
2GR-FE ENGINE MECHANICAL – ENGINE UNITEM–123
EM
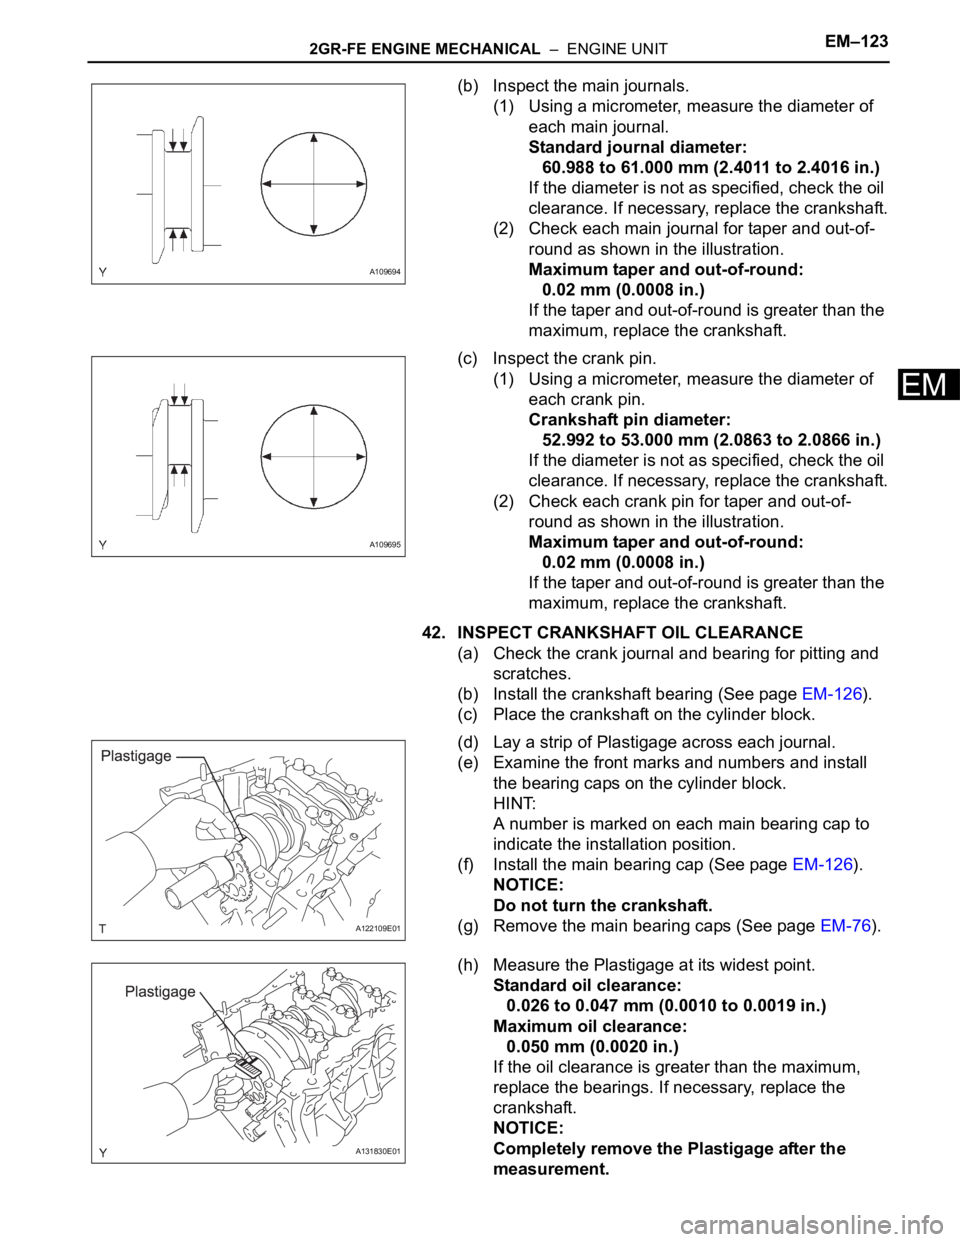
(b) Inspect the main journals.
(1) Using a micrometer, measure the diameter of
each main journal.
Standard journal diameter:
60.988 to 61.000 mm (2.4011 to 2.4016 in.)
If the diameter is not as specified, check the oil
clearance. If necessary, replace the crankshaft.
(2) Check each main journal for taper and out-of-
round as shown in the illustration.
Maximum taper and out-of-round:
0.02 mm (0.0008 in.)
If the taper and out-of-round is greater than the
maximum, replace the crankshaft.
(c) Inspect the crank pin.
(1) Using a micrometer, measure the diameter of
each crank pin.
Crankshaft pin diameter:
52.992 to 53.000 mm (2.0863 to 2.0866 in.)
If the diameter is not as specified, check the oil
clearance. If necessary, replace the crankshaft.
(2) Check each crank pin for taper and out-of-
round as shown in the illustration.
Maximum taper and out-of-round:
0.02 mm (0.0008 in.)
If the taper and out-of-round is greater than the
maximum, replace the crankshaft.
42. INSPECT CRANKSHAFT OIL CLEARANCE
(a) Check the crank journal and bearing for pitting and
scratches.
(b) Install the crankshaft bearing (See page EM-126).
(c) Place the crankshaft on the cylinder block.
(d) Lay a strip of Plastigage across each journal.
(e) Examine the front marks and numbers and install
the bearing caps on the cylinder block.
HINT:
A number is marked on each main bearing cap to
indicate the installation position.
(f) Install the main bearing cap (See page EM-126).
NOTICE:
Do not turn the crankshaft.
(g) Remove the main bearing caps (See page EM-76).
(h) Measure the Plastigage at its widest point.
Standard oil clearance:
0.026 to 0.047 mm (0.0010 to 0.0019 in.)
Maximum oil clearance:
0.050 mm (0.0020 in.)
If the oil clearance is greater than the maximum,
replace the bearings. If necessary, replace the
crankshaft.
NOTICE:
Completely remove the Plastigage after the
measurement.
A109694
A109695
A122109E01
A131830E01