bulb TOYOTA SIENNA 2009 XL20 / 2.G Owners Manual
[x] Cancel search | Manufacturer: TOYOTA, Model Year: 2009, Model line: SIENNA, Model: TOYOTA SIENNA 2009 XL20 / 2.GPages: 592, PDF Size: 12.86 MB
Page 5 of 592
1
2
3
4
5
6
7
5
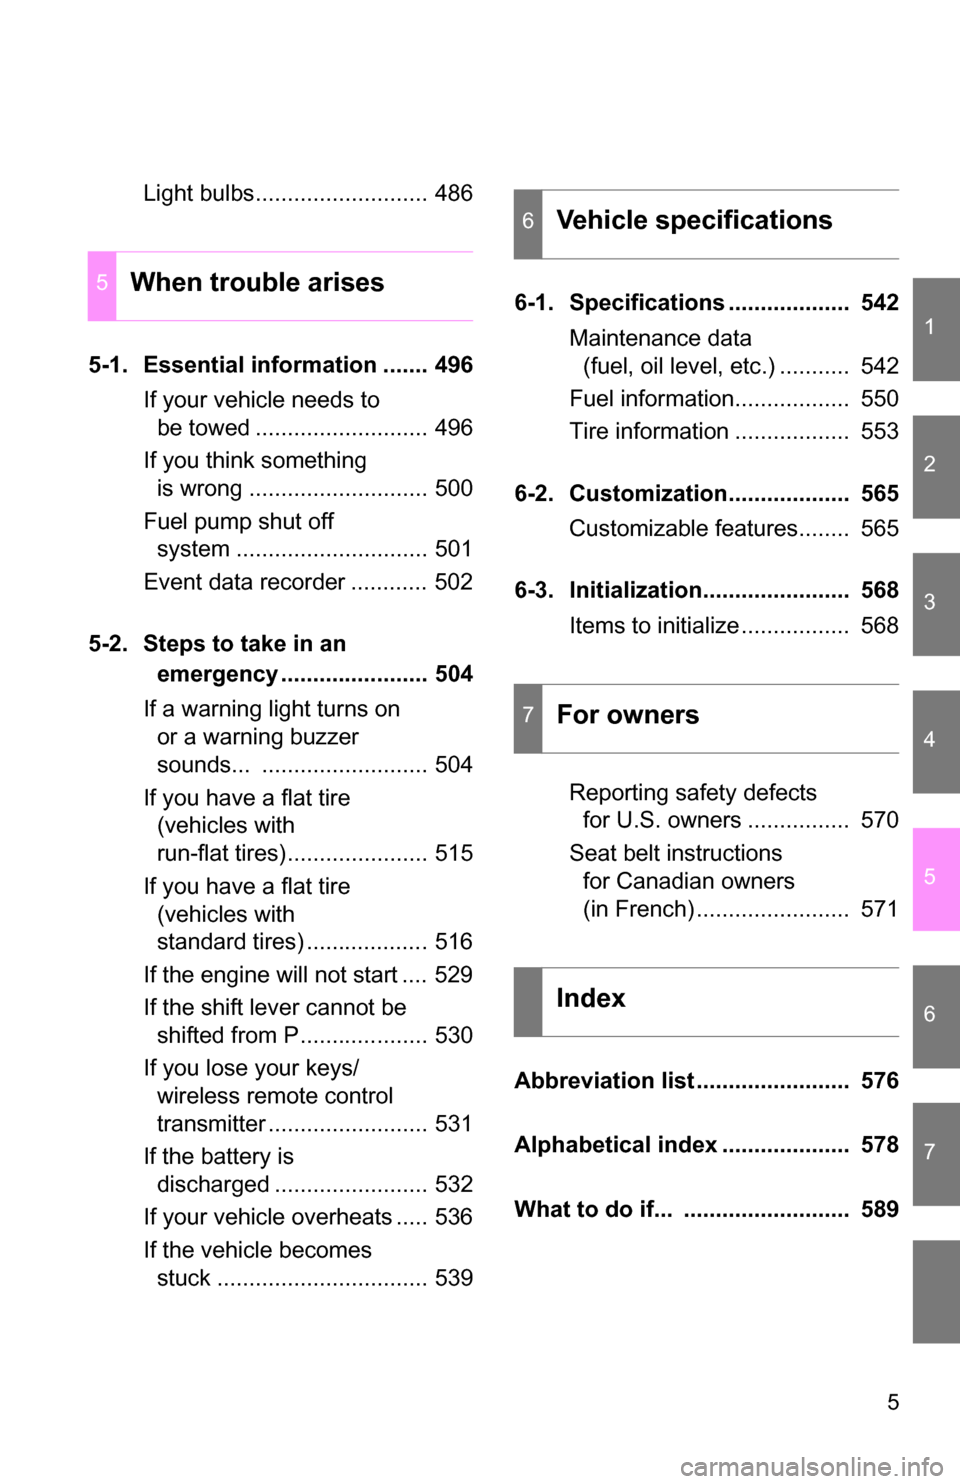
Light bulbs........................... 486
5-1. Essential information ....... 496 If your vehicle needs to be towed ........................... 496
If you think something is wrong ............................ 500
Fuel pump shut off system .............................. 501
Event data recorder ............ 502
5-2. Steps to take in an emergency ....................... 504
If a warning light turns on or a warning buzzer
sounds... .......................... 504
If you have a flat tire (vehicles with
run-flat tires)...................... 515
If you have a flat tire (vehicles with
standard tires) ................... 516
If the engine will not start .... 529
If the shift lever cannot be shifted from P.................... 530
If you lose your keys/ wireless remote control
transmitter ......................... 531
If the battery is discharged ........................ 532
If your vehicle overheats ..... 536
If the vehicle becomes stuck ................................. 539 6-1. Specifications ................... 542
Maintenance data (fuel, oil level, etc.) ........... 542
Fuel information.................. 550
Tire information .................. 553
6-2. Customization................... 565 Customizable features........ 565
6-3. Initialization....................... 568 Items to initialize ................. 568
Reporting safety defects for U.S. owners ................ 570
Seat belt instructions for Canadian owners
(in French) ........................ 571
Abbreviation list ........................ 576
Alphabetical index .................... 578
What to do if... .......................... 589
5When trouble arises
6Vehicle specifications
7For owners
Index
Page 172 of 592
172
2-1. Driving procedures
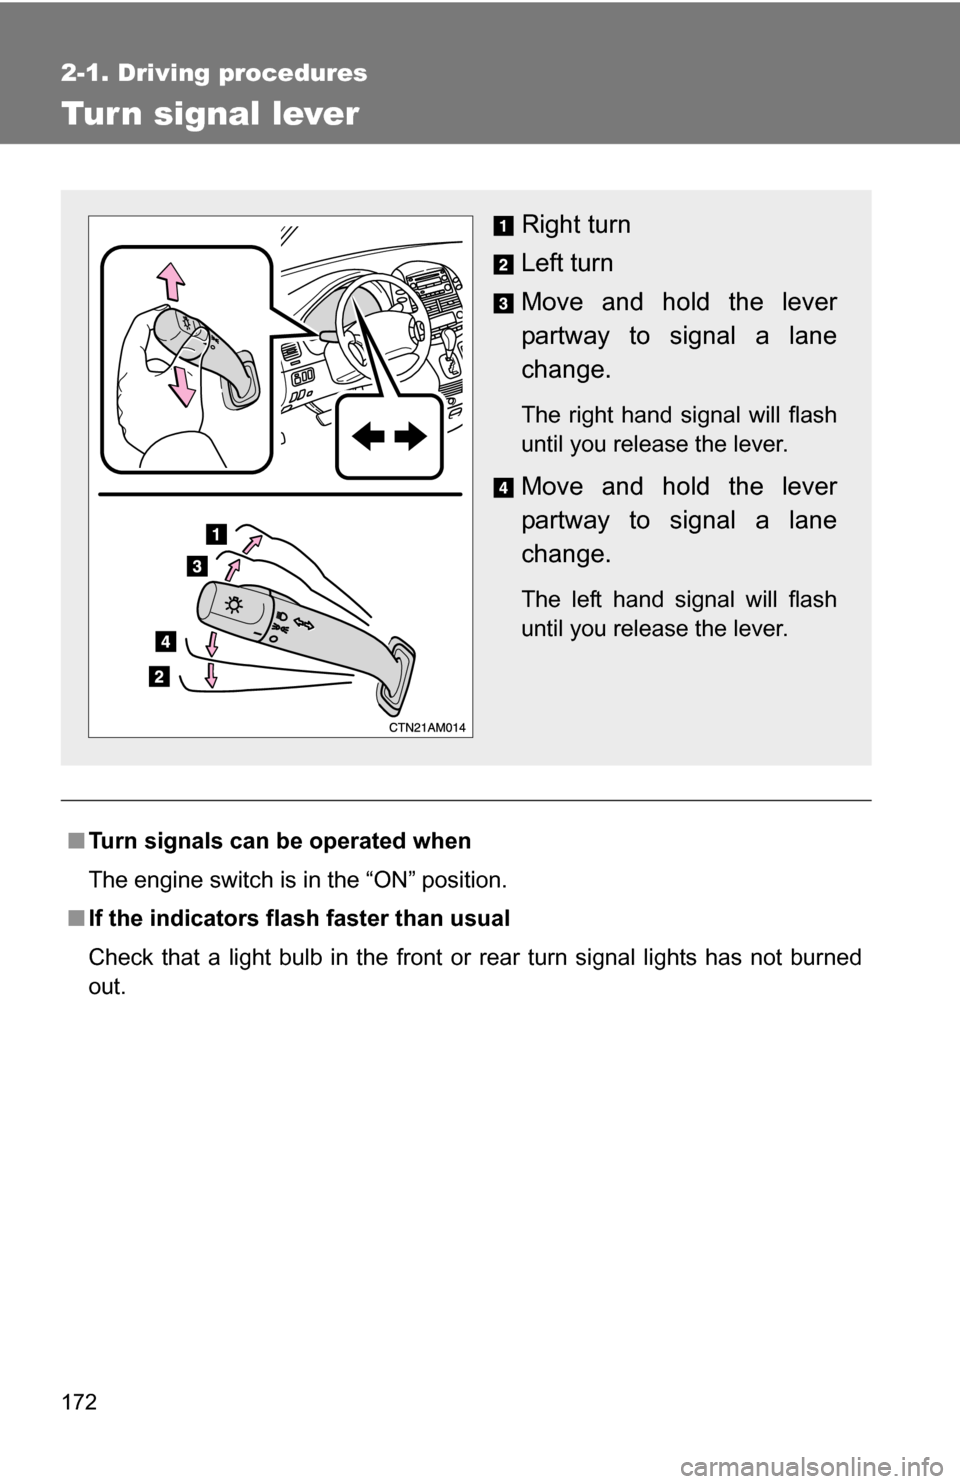
Tur n signal lever
■Turn signals can be operated when
The engine switch is in the “ON” position.
■ If the indicators flash faster than usual
Check that a light bulb in the front or rear turn signal lights has not burned
out.
Right turn
Left turn
Move and hold the lever
partway to signal a lane
change.
The right hand signal will flash
until you release the lever.
Move and hold the lever
partway to signal a lane
change.
The left hand signal will flash
until you release the lever.
Page 417 of 592
Maintenance and care4
417
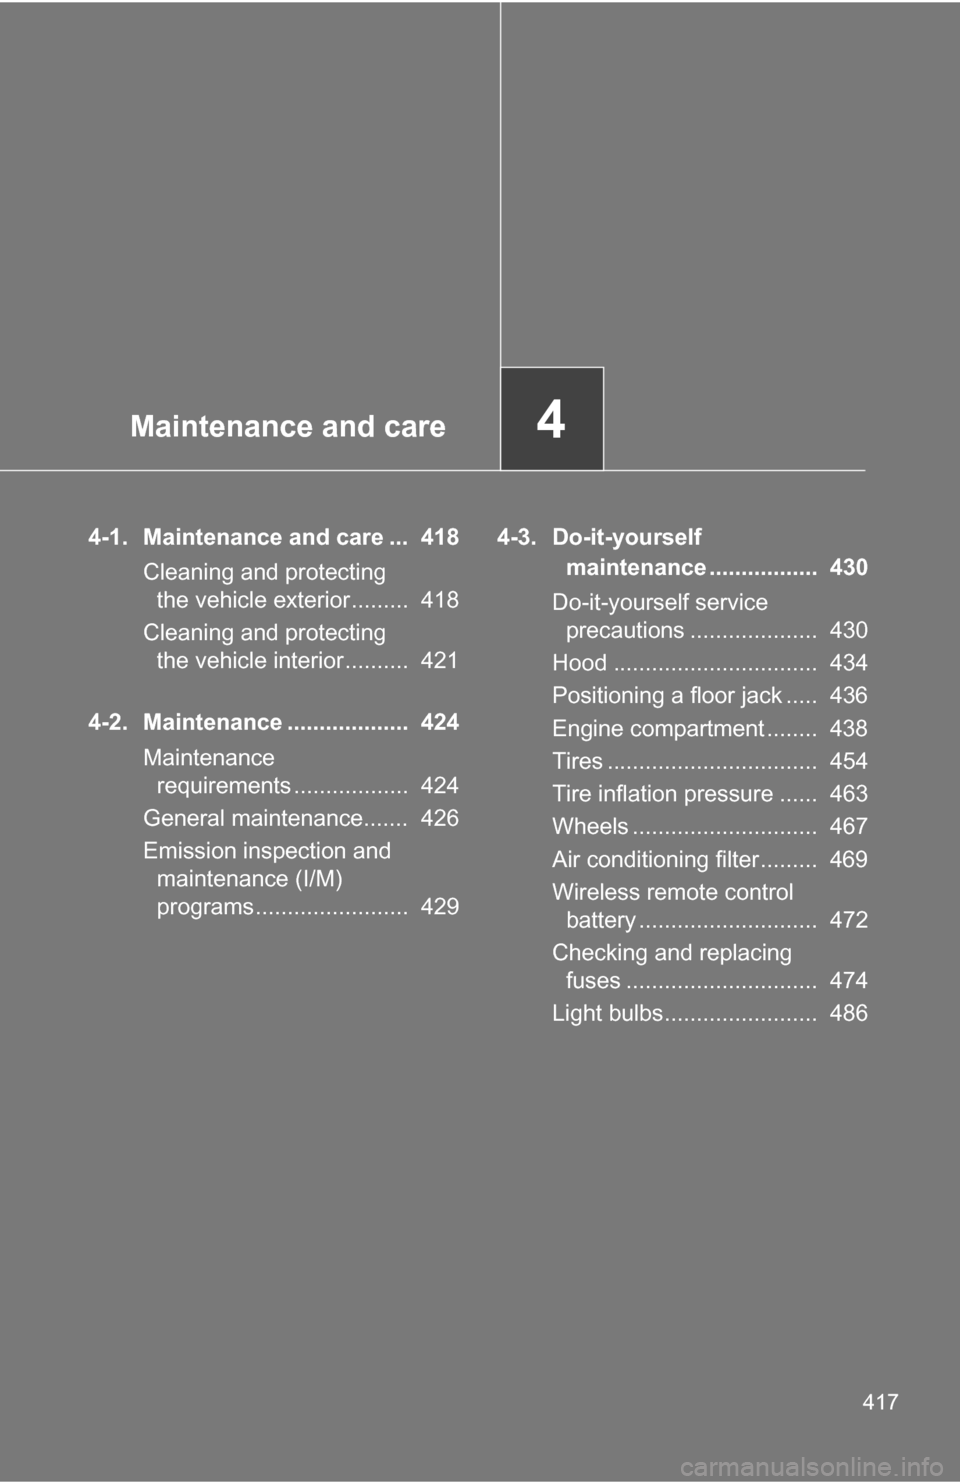
4-1. Maintenance and care ... 418Cleaning and protecting the vehicle exterior......... 418
Cleaning and protecting the vehicle interior.......... 421
4-2. Maintenance ................... 424 Maintenance requirements .................. 424
General maintenance....... 426
Emission inspection and maintenance (I/M)
programs........................ 429 4-3. Do-it-yourself
maintenance ................. 430
Do-it-yourself service precautions .................... 430
Hood ................................ 434
Positioning a floor jack ..... 436
Engine compartment ........ 438
Tires ................................. 454
Tire inflation pressure ...... 463
Wheels ............................. 467
Air conditioning filter......... 469
Wireless remote control battery ............................ 472
Checking and replacing fuses .............................. 474
Light bulbs........................ 486
Page 431 of 592
431
4-3. Do-it-yourself maintenance
4
Maintenance and care
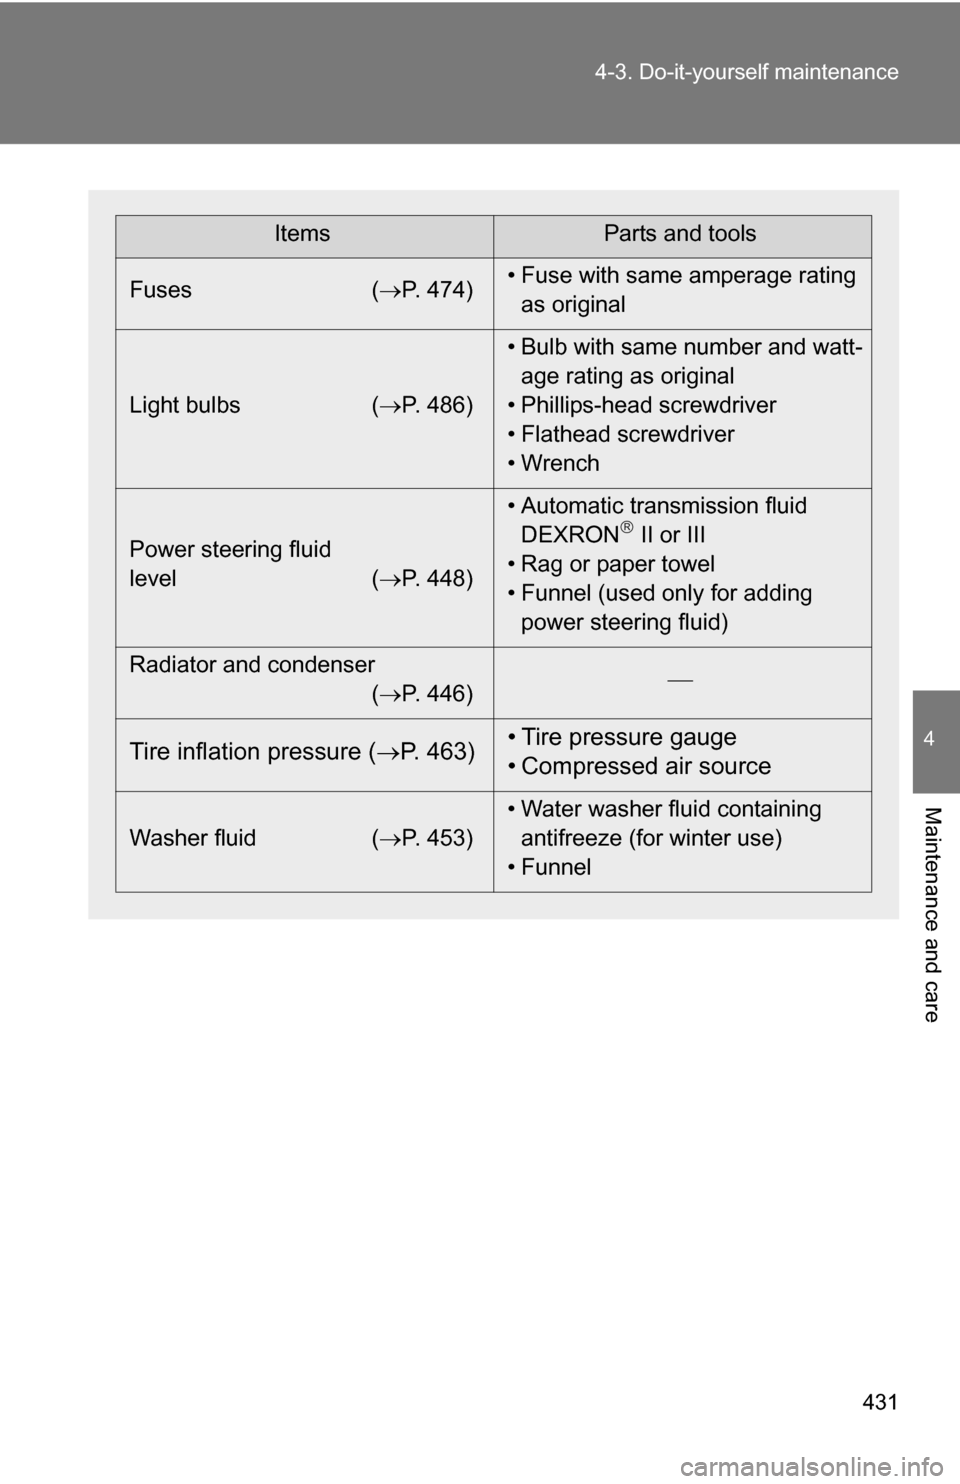
ItemsParts and tools
Fuses ( P. 474)• Fuse with same amperage rating
as original
Light bulbs ( P. 486)• Bulb with same number and watt-
age rating as original
• Phillips-head screwdriver
• Flathead screwdriver
• Wrench
Power steering fluid
level ( P. 448)• Automatic transmission fluid
DEXRON
II or III
• Rag or paper towel
• Funnel (used only for adding power steering fluid)
Radiator and condenser (P. 446)
Tire inflation pressure (
P. 463) • Tire pressure gauge
• Compressed air source
Washer fluid
(P. 453) • Water washer fluid containing
antifreeze (for winter use)
• Funnel
Page 484 of 592

484 4-3. Do-it-yourself maintenance
■Under the passenger’s side instrument panel
FuseAmpereCircuit
1ST 7.5 A Multiport fuel injection system/
sequential multiport fuel injection
system
2 A/C 7.5 A Manual air conditioning system
3 SFT 5 A Shift lock control system
■ After a fuse is replaced
●If the lights do not turn on even after the fuse has been replaced, a bulb
may need replacement. ( P. 486)
● If the replaced fuse blows again, have the vehicle inspected by your
Toyota dealer.
■ If there is an overload in the circuits
The fuses are designed to blow before the entire wiring harness is damaged.
Page 486 of 592
486
4-3. Do-it-yourself maintenance
Light bulbs
You may replace the following bulbs yourself. The difficulty level of
replacement varies depending on the bulb. If necessary bulb
replacement seems difficult to perfor m, contact your Toyota dealer.
For more information about replacing other light bulbs, contact your
Toyota dealer.
■ Preparing a replacement light bulb
Check the wattage of the light bulb being replaced. ( P. 549)
■ Turning the power back door main switch off
P. 4 8
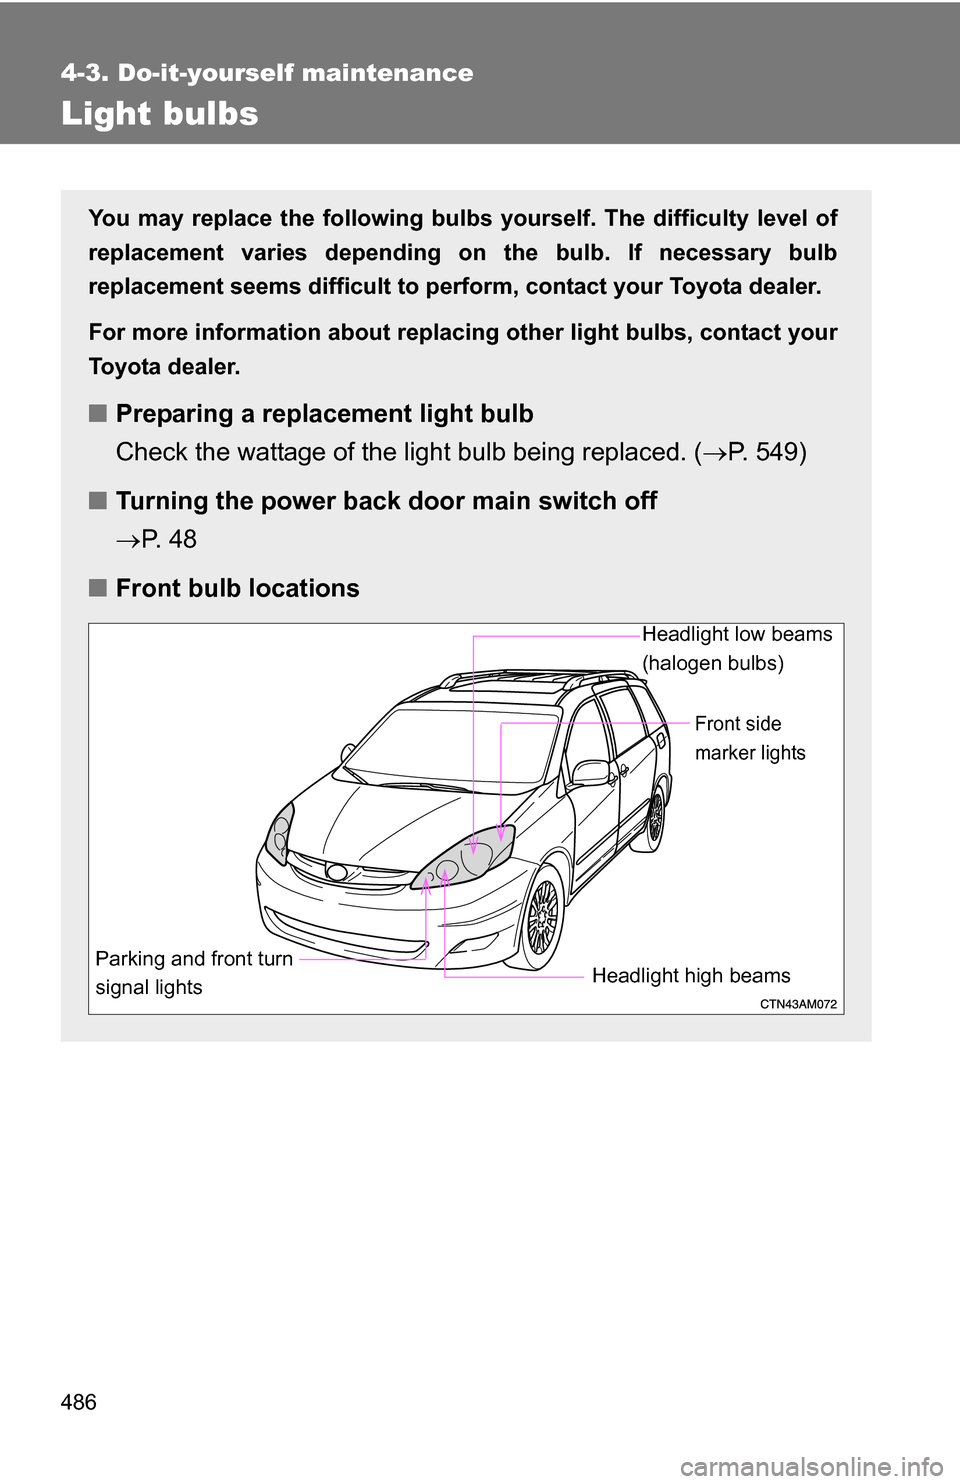
■ Front bulb locations
Headlight low beams
(halogen bulbs)
Front side
marker lights
Parking and front turn
signal lightsHeadlight high beams
Page 487 of 592
487
4-3. Do-it-yourself maintenance
4
Maintenance and care
Replacing light bulbs
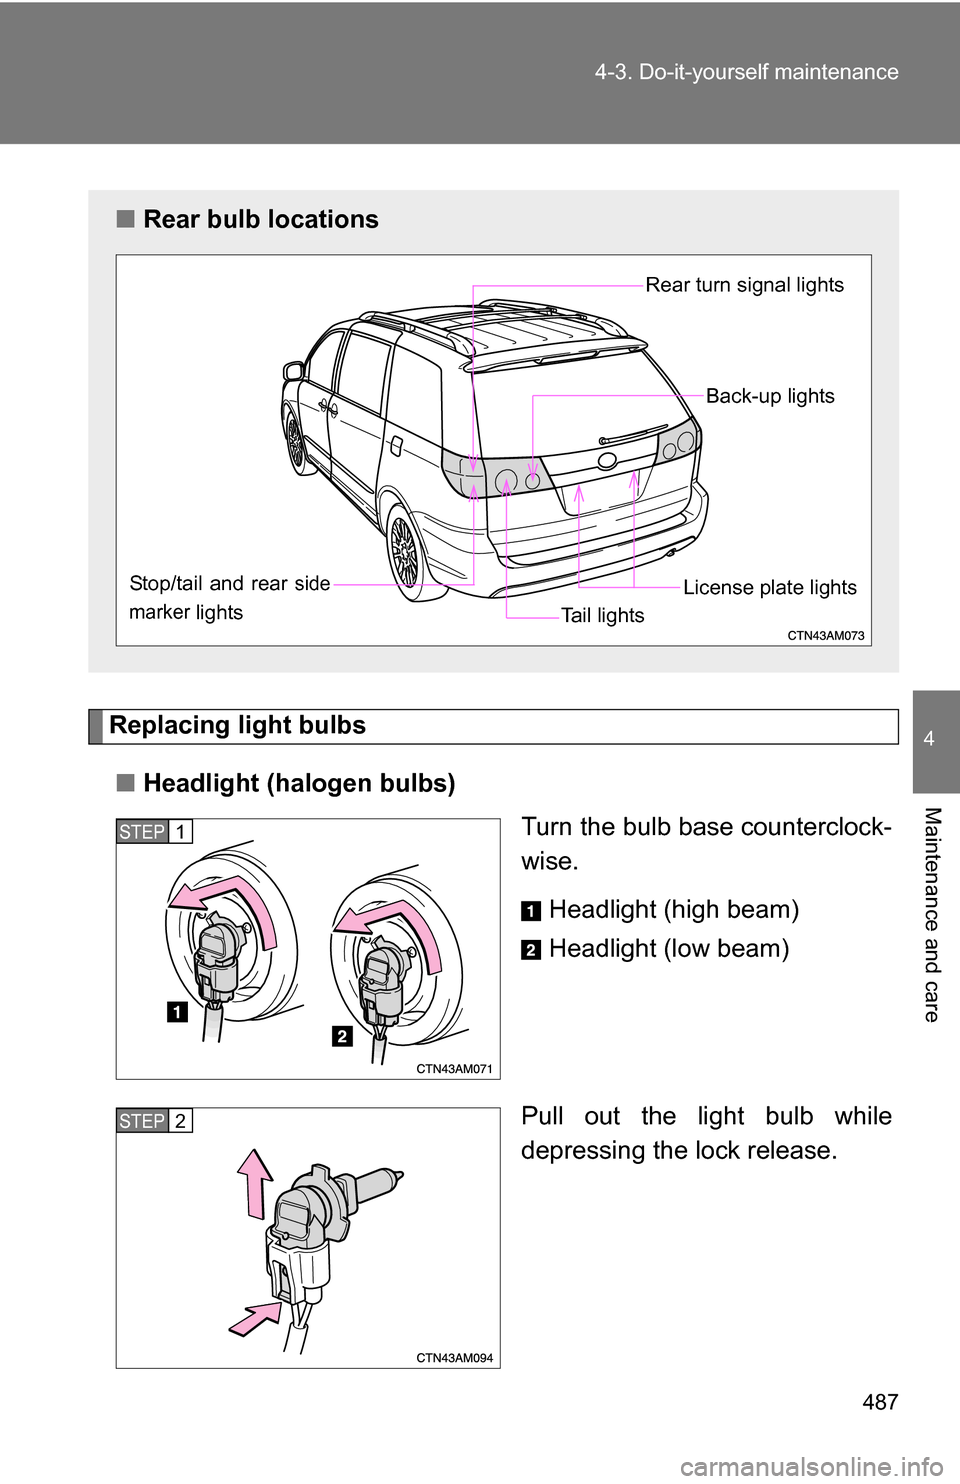
■ Headlight (halogen bulbs)
Turn the bulb base counterclock-
wise.
Headlight (high beam)
Headlight (low beam)
Pull out the light bulb while
depressing the lock release.
■ Rear bulb locations
Back-up lights
Rear turn signal lights
Stop/tail and rear
side
marker
lights
License plate lights
Ta i l lights
STEP1
STEP2
Page 488 of 592
488 4-3. Do-it-yourself maintenance
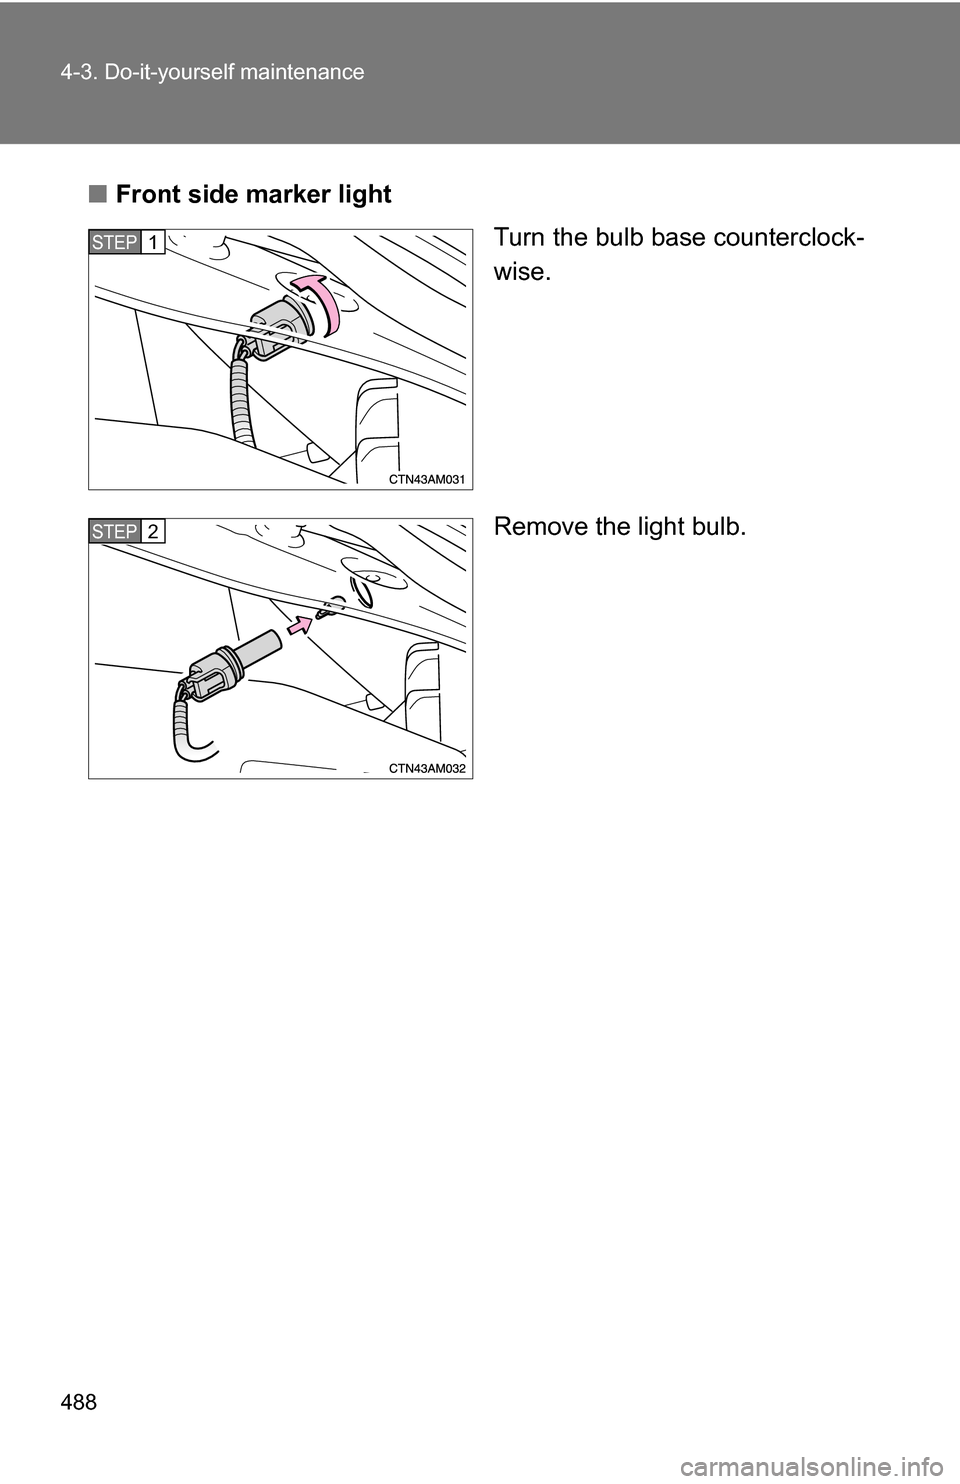
■Front side marker light
Turn the bulb base counterclock-
wise.
Remove the light bulb.
STEP1
STEP2
Page 489 of 592
489
4-3. Do-it-yourself maintenance
4
Maintenance and care
■
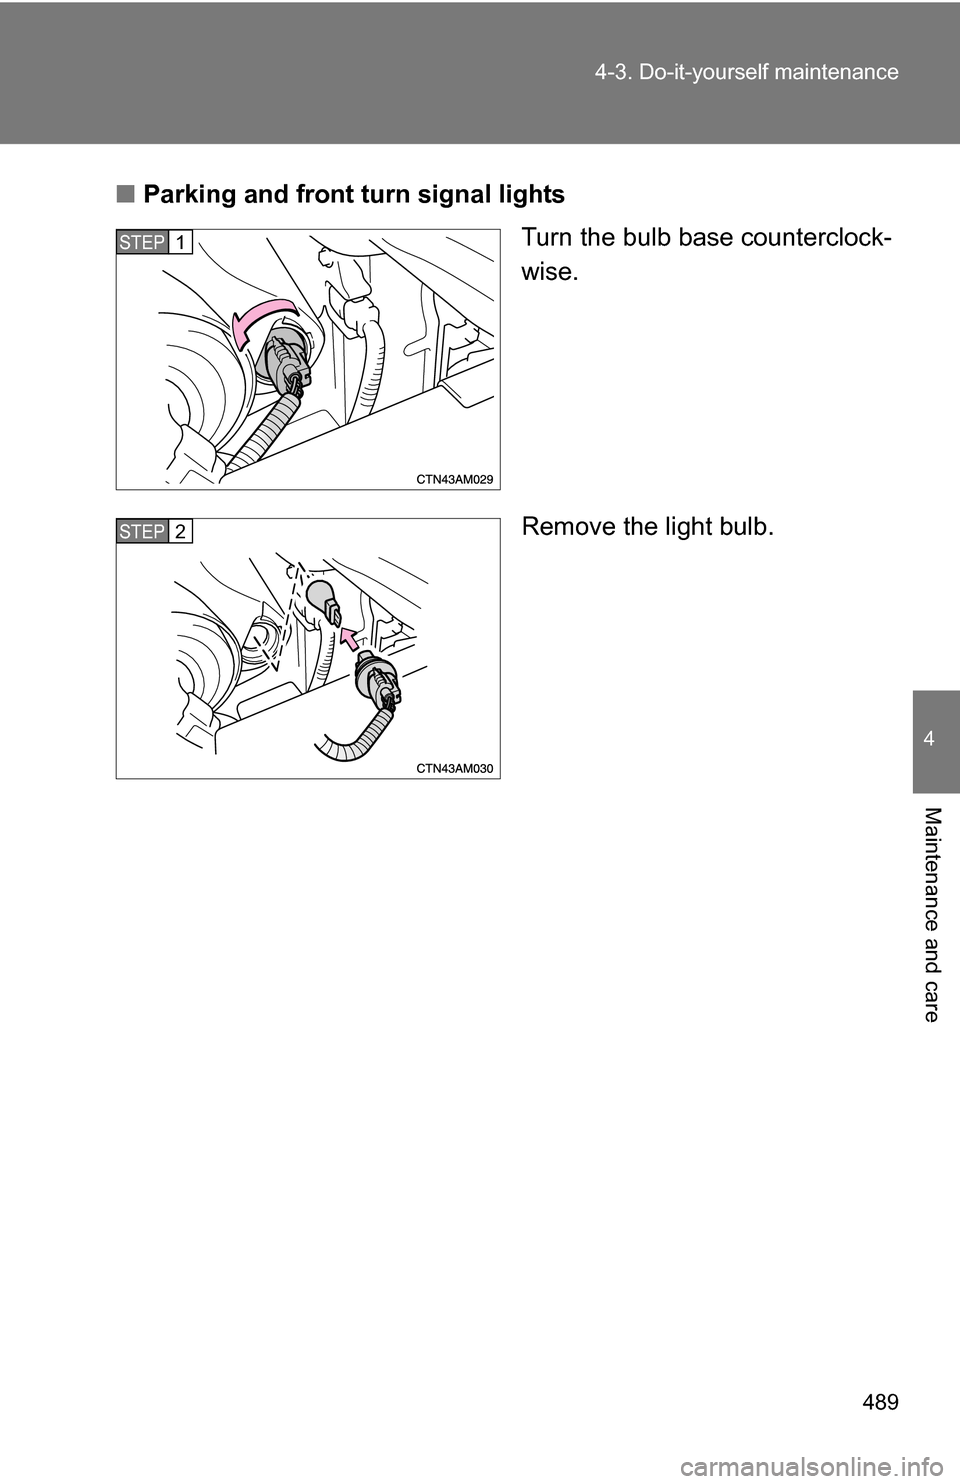
Parking and front turn signal lights
Turn the bulb base counterclock-
wise.
Remove the light bulb.
STEP1
STEP2
Page 490 of 592
490 4-3. Do-it-yourself maintenance
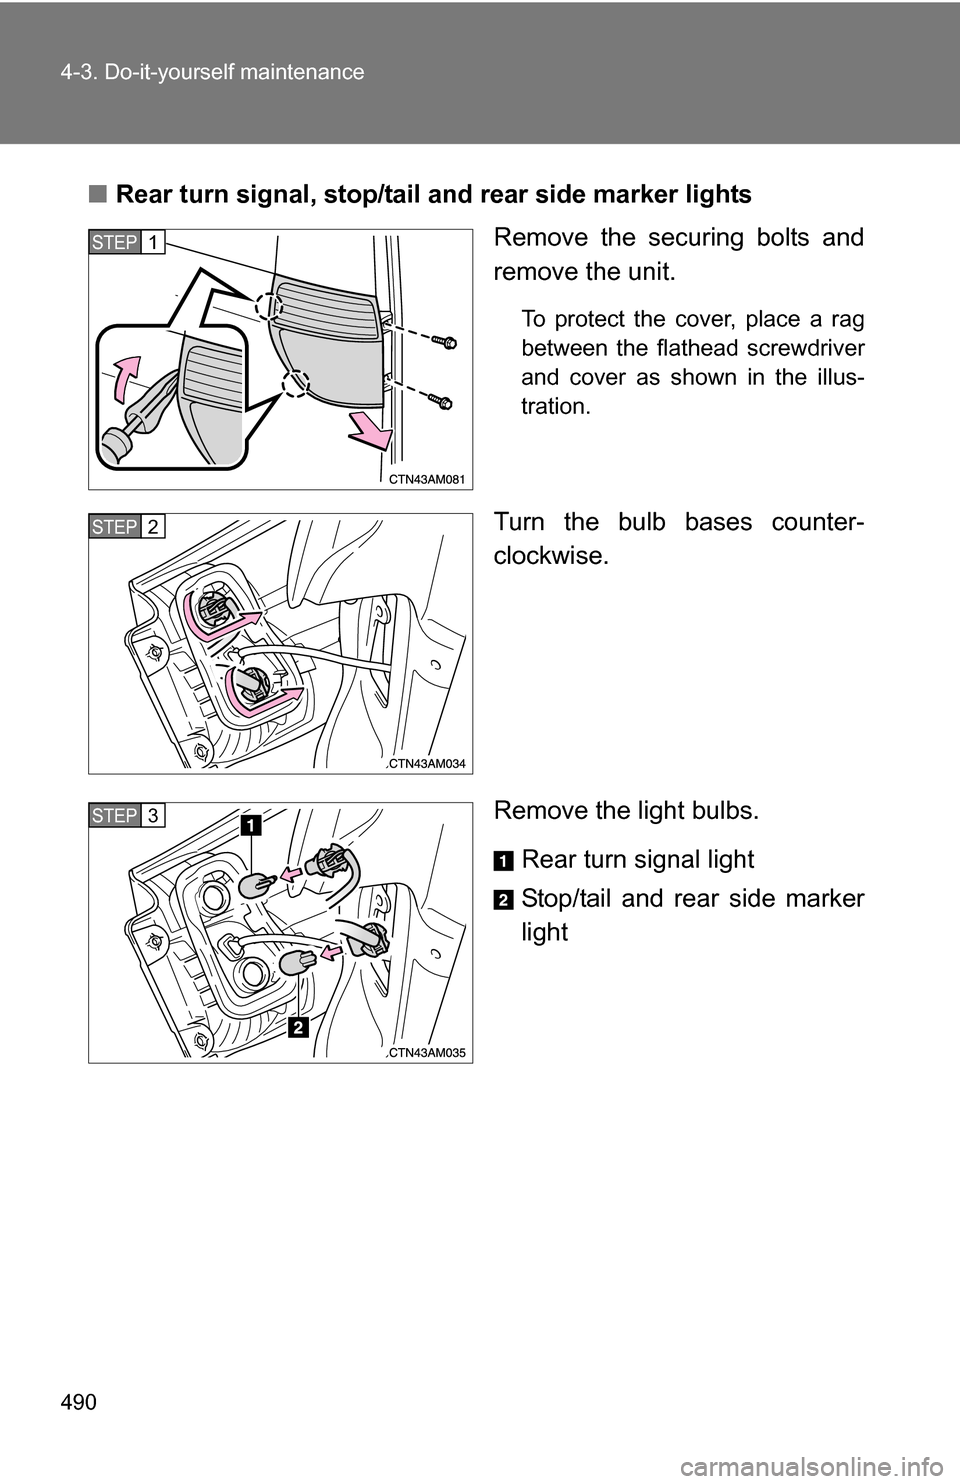
■Rear turn signal, stop/tail a nd rear side marker lights
Remove the securing bolts and
remove the unit.
To protect the cover, place a rag
between the flathead screwdriver
and cover as shown in the illus-
tration.
Turn the bulb bases counter-
clockwise.
Remove the light bulbs.
Rear turn signal light
Stop/tail and rear side marker
light
STEP1
STEP2
STEP3