width TOYOTA SIENNA 2018 Accessories, Audio & Navigation (in English)
[x] Cancel search | Manufacturer: TOYOTA, Model Year: 2018, Model line: SIENNA, Model: TOYOTA SIENNA 2018Pages: 435, PDF Size: 11.83 MB
Page 260 of 435

260
3. PANORAMIC VIEW MONITOR
SIENNA_Navi+MM_OM08021U_(U)
17.08.16 10:05
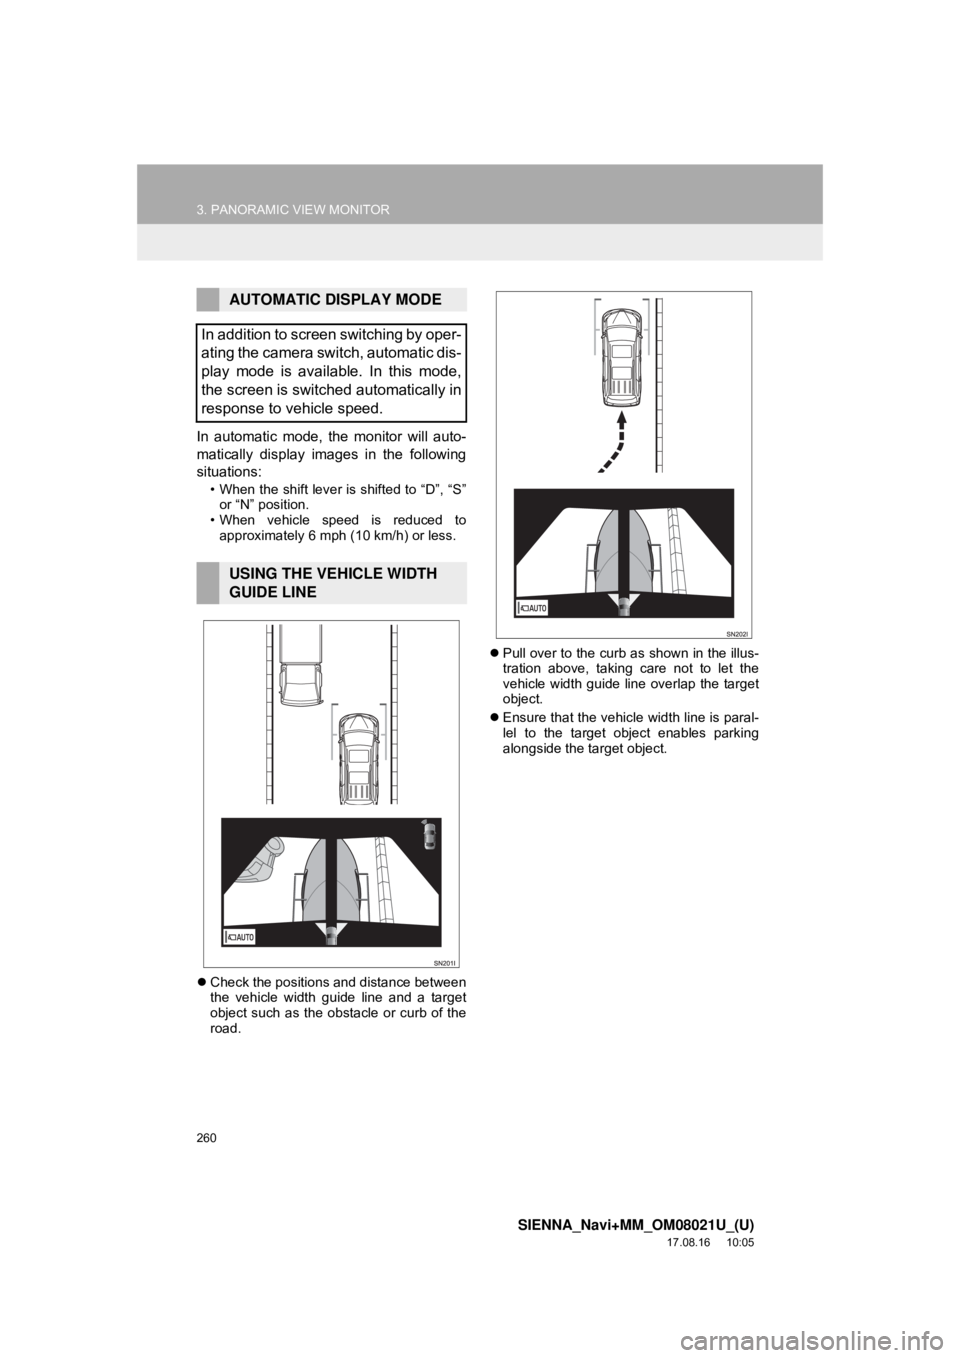
In automatic mode, the monitor will auto-
matically display images in the following
situations:
• When the shift lever is shifted to “D”, “S” or “N” position.
• When vehicle speed is reduced to approximately 6 mph (10 km/h) or less.
Check the positions and distance between
the vehicle width guide line and a target
object such as the obstacle or curb of the
road.
Pull over to the curb as shown in the illus-
tration above, taking care not to let the
vehicle width guide line overlap the target
object.
Ensure that the vehicle width line is paral-
lel to the target object enables parking
alongside the target object.
AUTOMATIC DISPLAY MODE
In addition to screen switching by oper-
ating the camera switch, automatic dis-
play mode is available. In this mode,
the screen is switched automatically in
response to vehicle speed.
USING THE VEHICLE WIDTH
GUIDE LINE
Page 264 of 435

264
3. PANORAMIC VIEW MONITOR
SIENNA_Navi+MM_OM08021U_(U)
17.08.16 10:05
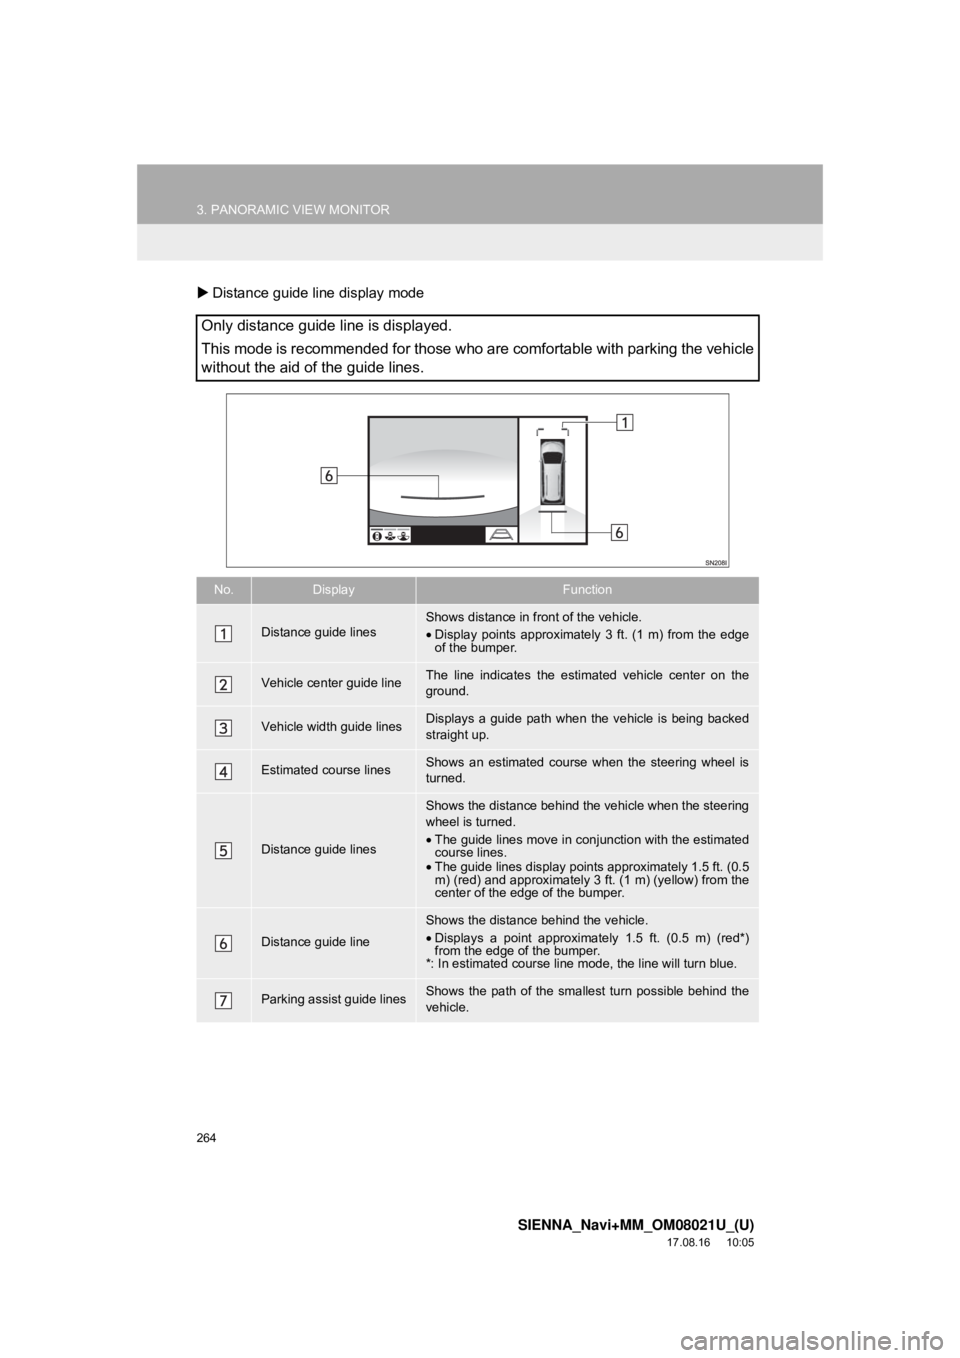
Distance guide line display mode
Only distance guide line is displayed.
This mode is recommended for those who are comfortable with parking the vehicle
without the aid of the guide lines.
No.DisplayFunction
Distance guide linesShows distance in front of the vehicle.
•Display points approximately 3 ft. (1 m) from the edge
of the bumper.
Vehicle center guide line The line indicates the estima ted vehicle center on the
ground.
Vehicle width guide linesDisplays a guide path when the vehicle is being backed
straight up.
Estimated course linesShows an estimated course when the steering wheel is
turned.
Distance guide lines
Shows the distance behind the vehicle when the steering
wheel is turned.
• The guide lines move in conj unction with the estimated
course lines.
• The guide lines display points approximately 1.5 ft. (0.5
m) (red) and approximately 3 ft. (1 m) (yellow) from the
center of the edge of the bumper.
Distance guide line
Shows the distance behind the vehicle.
• Displays a point approximately 1.5 ft. (0.5 m) (red*)
from the edge of the bumper.
*: In estimated course line mode, the line will turn blue.
Parking assist guide linesShows the path of the smallest turn possible behind the
vehicle.
Page 265 of 435

265
3. PANORAMIC VIEW MONITOR
SIENNA_Navi+MM_OM08021U_(U)
17.08.16 10:05
PERIPHERAL MONITORING SYSTEM
6
WA R N I N G
●Depending on the circumstances of the vehicle (number of passengers, amount of lug-
gage, etc.), the position of the guide lines displayed on the screen may change. Be sure
to check visually around the vehicle before proceeding.
● If the steering wheel is straight and the vehicle width guide lines and the estimated
course lines are not in alignment, have the vehicle inspected by your Toyota dealer.
● Do not use the system if the display is incorrect due to an uneven (hilly) road or a non-
straight (curvy) road.
Page 266 of 435

266
3. PANORAMIC VIEW MONITOR
SIENNA_Navi+MM_OM08021U_(U)
17.08.16 10:05
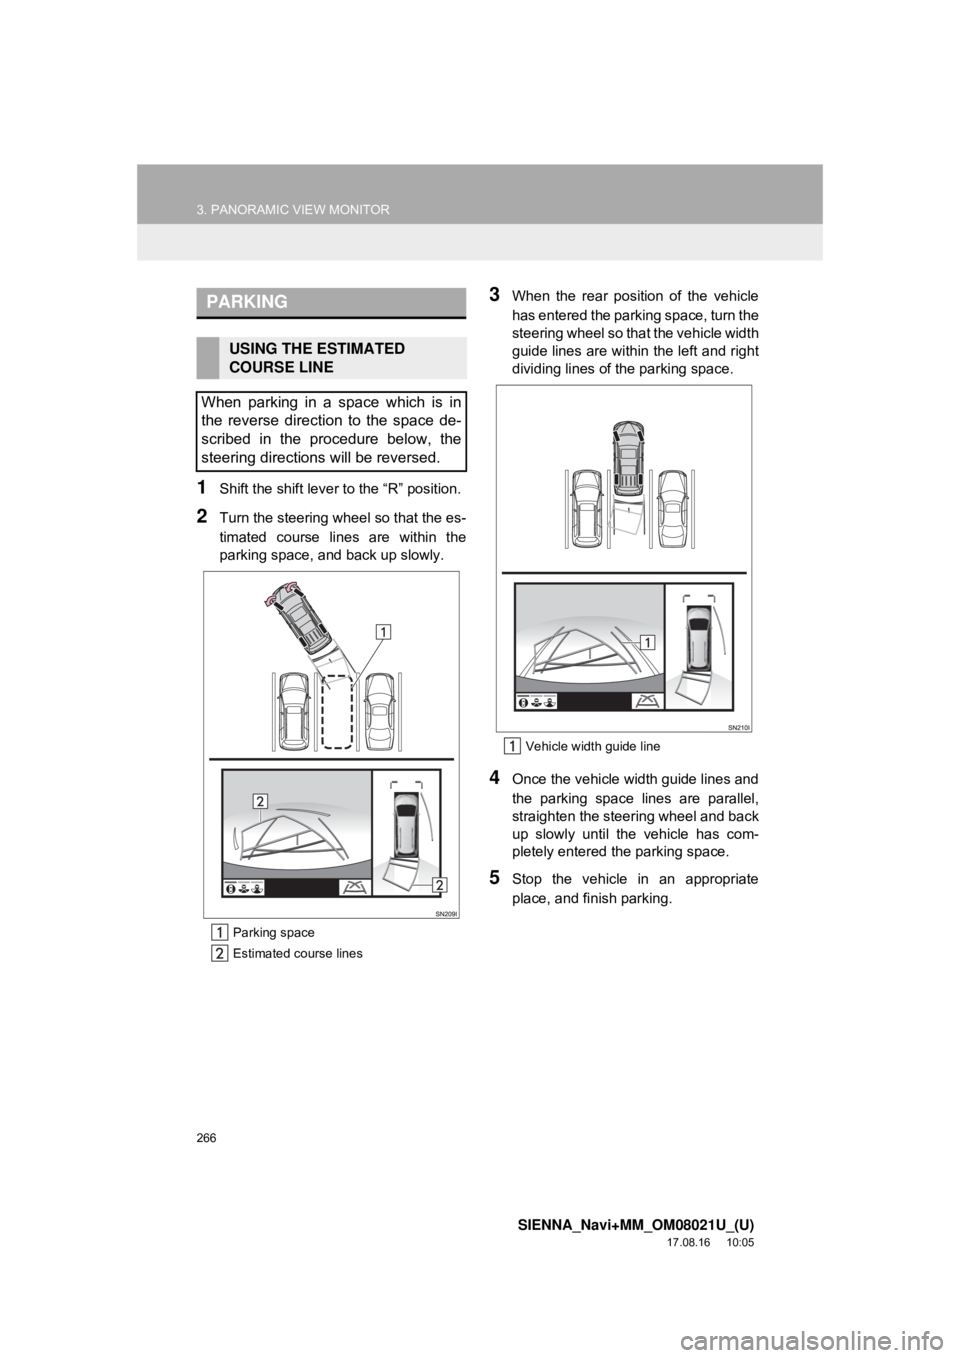
1Shift the shift lever to the “R” position.
2Turn the steering whee l so that the es-
timated course lines are within the
parking space, and back up slowly.
Parking space
Estimated course lines
3When the rear position of the vehicle
has entered the parking space, turn the
steering wheel so that the vehicle width
guide lines are within the left and right
dividing lines of the parking space.
Vehicle width guide line
4Once the vehicle width guide lines and
the parking space lines are parallel,
straighten the steering wheel and back
up slowly until the vehicle has com-
pletely entered the parking space.
5Stop the vehicle in an appropriate
place, and finish parking.
PARKING
USING THE ESTIMATED
COURSE LINE
When parking in a space which is in
the reverse direction to the space de-
scribed in the procedure below, the
steering directions will be reversed.
Page 268 of 435

268
3. PANORAMIC VIEW MONITOR
SIENNA_Navi+MM_OM08021U_(U)
17.08.16 10:05
6. DISPLAY WHEN THE OUTSIDE REAR VIEW MIRRORS ARE RETRACTED
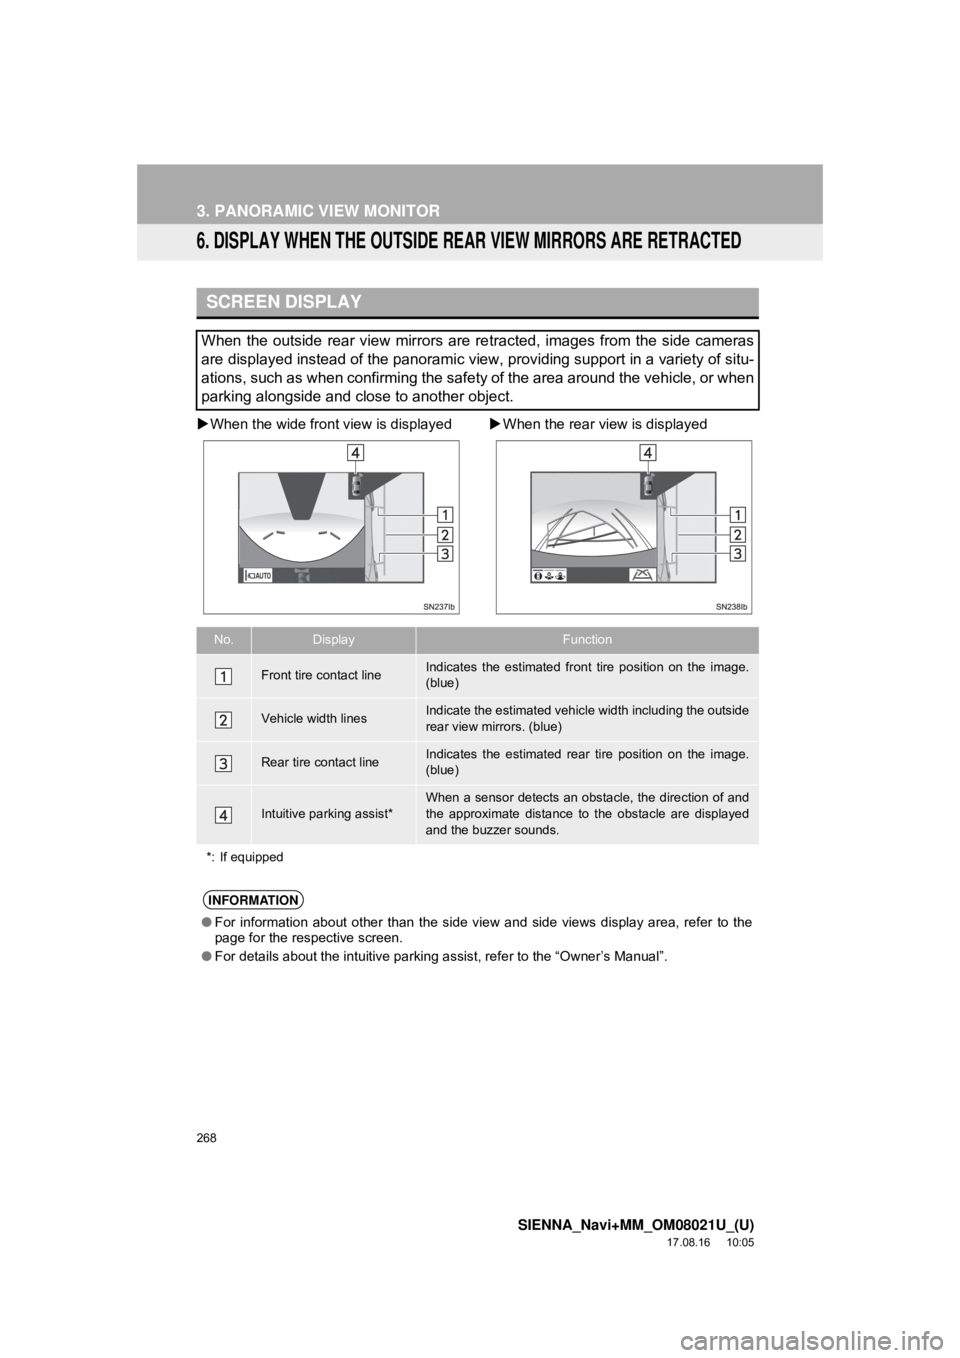
When the wide front view is displayed When the rear view is displayed
SCREEN DISPLAY
When the outside rear view mirrors are re tracted, images from the side cameras
are displayed instead of the panoramic view, providing support in a variety of situ-
ations, such as when confirming the safety of the area around the vehicle, or when
parking alongside and close to another object.
No.DisplayFunction
Front tire contact lineIndicates the estimated front tire position on the image.
(blue)
Vehicle width linesIndicate the estimated vehicl e width including the outside
rear view mirrors. (blue)
Rear tire contact lineIndicates the estimated rear tire position on the image.
(blue)
Intuitive parking assist*
When a sensor detects an obstacle, the direction of and
the approximate distance to the obstacle are displayed
and the buzzer sounds.
*: If equipped
INFORMATION
● For information about other than the side view and side views display area, refer to the
page for the respective screen.
● For details about the intuitive parking assist, refer to the “Owner’s Manual”.
Page 275 of 435

275
3. PANORAMIC VIEW MONITOR
SIENNA_Navi+MM_OM08021U_(U)
17.08.16 10:05
PERIPHERAL MONITORING SYSTEM
6
The distance guide lines and the vehicle
width guide lines may not actually be par-
allel with the dividing lines of the parking
space, even when they appear to be so.
Be sure to check visually.
The distances between the vehicle width
guide lines and the left and right dividing
lines of the parking space may not be
equal, even when they appear to be so.
Be sure to check visually.
The distance guide lines give a distance
guide for flat road surfaces. In any of the
following situations, there is a margin of
error between the guide lines on the
screen and the actual distance/course on
the road.
NOTICE
● The panoramic view monitor may not
operate properly in the following cases.
• If the camera is hit, the position and
mounting angle of the camera may
change.
• As the camera has a water proof con-
struction, do not detach, disassemble
or modify it. This may cause incorrect
operation.
• When cleaning the camera lens, flush the camera with a large quantity of
water and wipe it with a soft and wet
cloth. Strongly rubbing the camera lens
may cause the camera lens to be
scratched and unable to transmit a
clear image.
• Do not allow an organic solvent, car wax, window cleaner or a glass coating
to adhere to the camera. If this hap-
pens, wipe it off as soon as possible.
• If the temperature changes rapidly,
such as when hot water is poured on
the vehicle in cold weather, the system
may not operate normally.
• When washing the vehicle, do not apply intensive bursts of water to the
camera or camera area. Doing so may
result in the camera malfunctioning.
● Do not expose the camera to strong
impacts as this could cause a malfunc-
tion. If this happens, have the vehicle
inspected by your Toyota dealer as soon
as possible.
DIFFERENCES BETWEEN
THE SCREEN AND THE
ACTUAL ROAD