ECO mode TOYOTA SIENNA 2018 Owners Manual (in English)
[x] Cancel search | Manufacturer: TOYOTA, Model Year: 2018, Model line: SIENNA, Model: TOYOTA SIENNA 2018Pages: 584, PDF Size: 14.47 MB
Page 27 of 584
271-1. For safe use
SIENNA_OM_OM08019U_(U)
1
For safety and security
WARNING
Observe the following precautions.
Failure to do so may cause the driver’s floor mat to slip, possibly interfering
with the pedals while driving. An unexpectedly high speed may result or it may
become difficult to stop the vehicle. This could lead to an acc ident, resulting in
death or serious injury.
■ When installing the driver’s floor mat
● Do not use floor mats designed for other models or different mo del year
vehicles, even if they are Toyota Genuine floor mats.
● Only use floor mats designed for the driver’s seat.
● Always install the floor mat securely using the retaining hooks (clips) pro-
vided.
● Do not use two or more floor mats on top of each other.
● Do not place the floor mat bottom-side up or upside-down.
■ Before driving
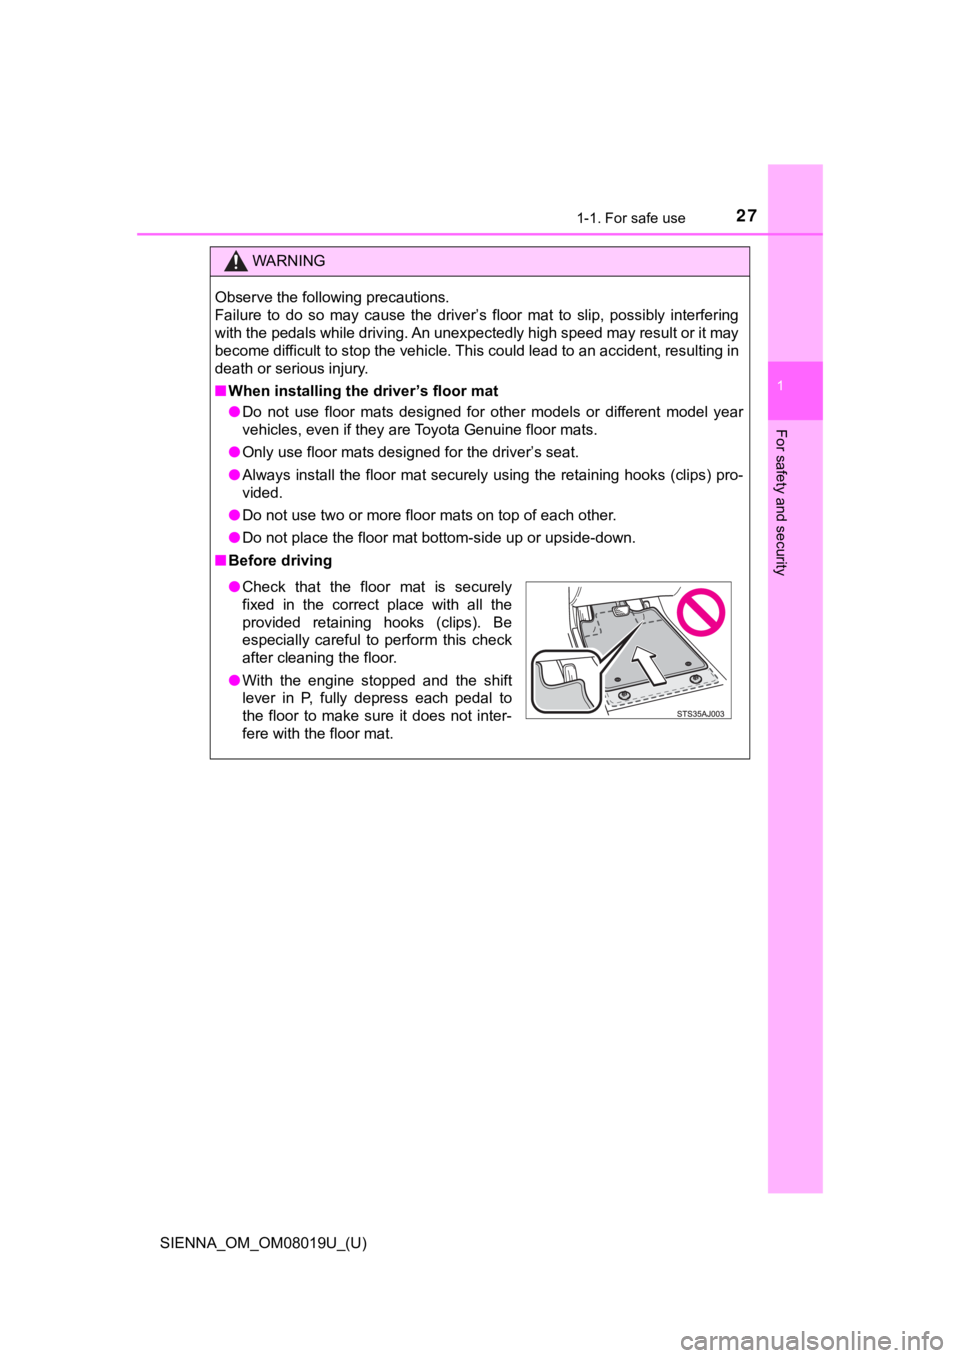
● Check that the floor mat is securely
fixed in the correct place with all the
provided retaining hooks (clips). Be
especially careful to perform this check
after cleaning the floor.
● With the engine stopped and the shift
lever in P, fully depress each pedal to
the floor to make sure it does not inter-
fere with the floor mat.
Page 62 of 584
621-1. For safe use
SIENNA_OM_OM08019U_(U)
Installing child restraints
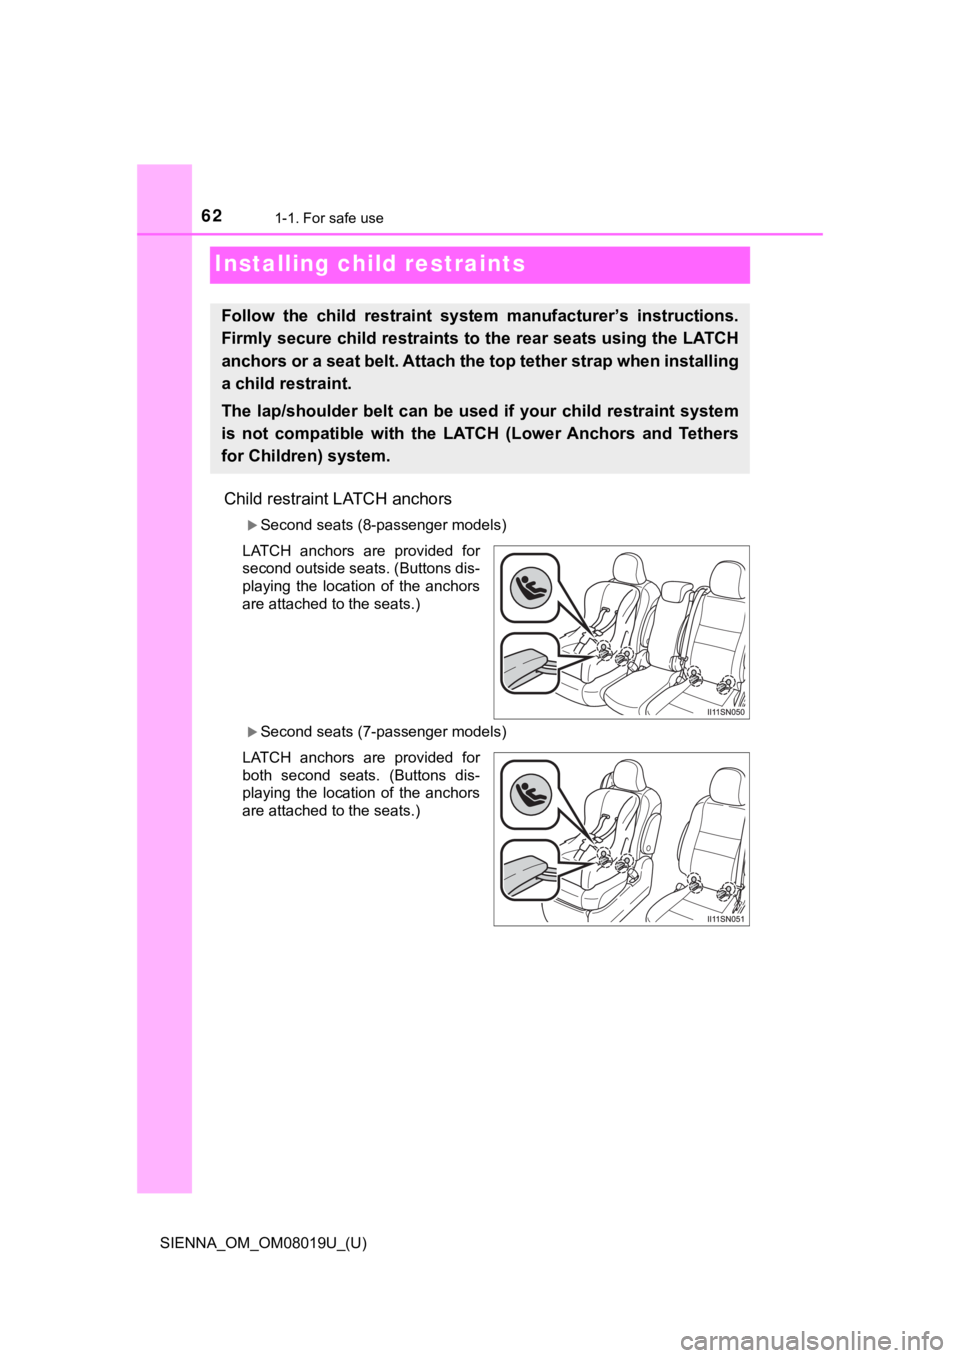
Child restraint LATCH anchors
Second seats (8-passenger models)
LATCH anchors are provided for
second outside seats. (Buttons dis-
playing the location of the anchors
are attached to the seats.)
Second seats (7-passenger models)
LATCH anchors are provided for
both second seats. (Buttons dis-
playing the location of the anchors
are attached to the seats.)
Follow the child restraint system manufacturer’s instructions.
Firmly secure child restraints to the rear seats using the LATC H
anchors or a seat belt. Attach t he top tether strap when installing
a child restraint.
The lap/shoulder belt can be used if your child restraint syste m
is not compatible with the LATCH (Lower Anchors and Tethers
for Children) system.
Page 63 of 584
631-1. For safe use
SIENNA_OM_OM08019U_(U)
1
For safety and security
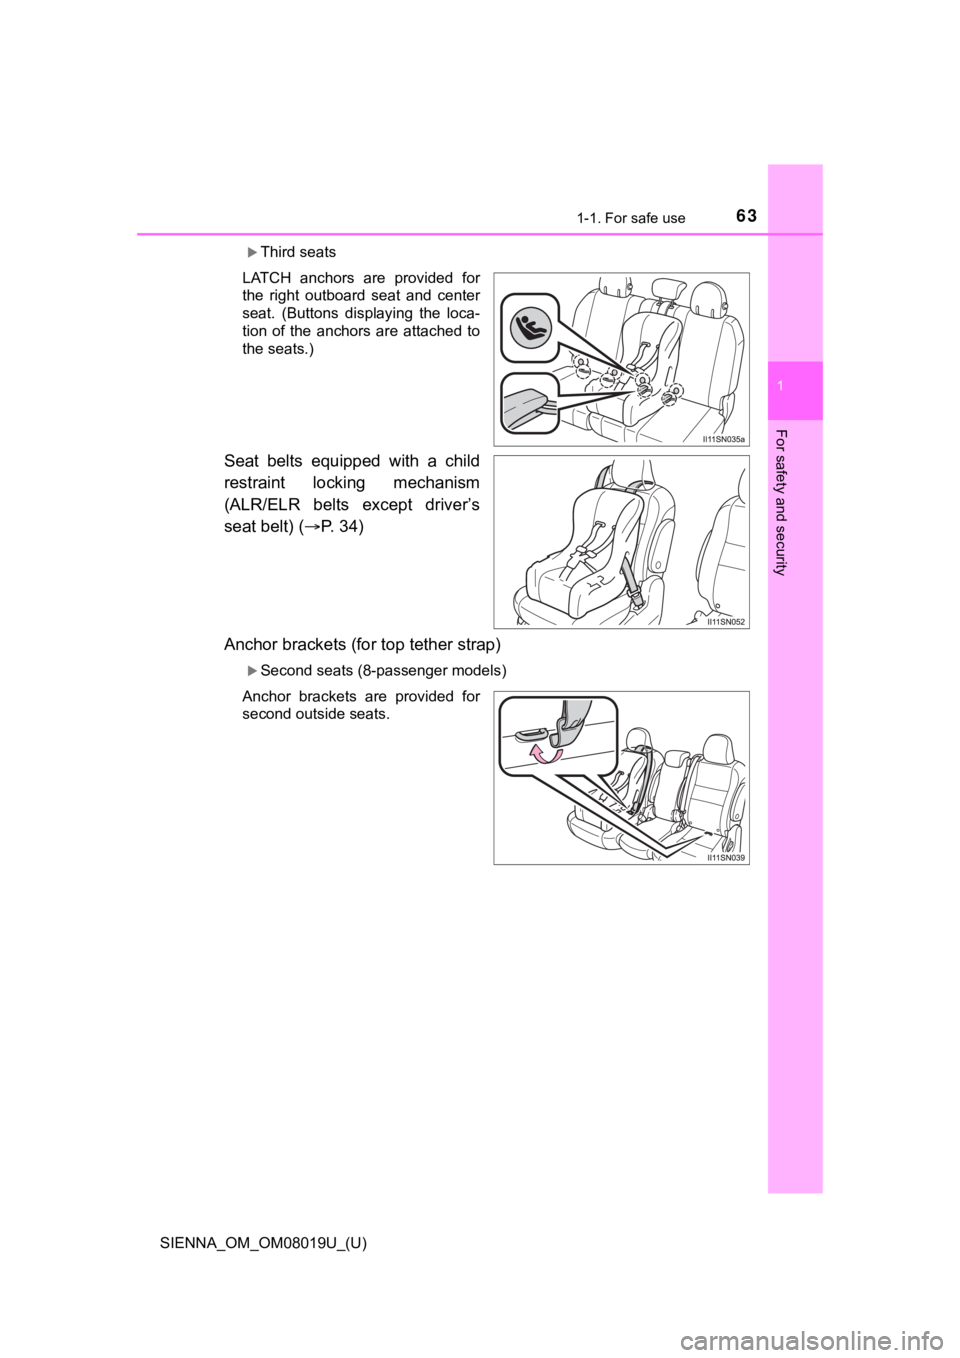
Third seats
LATCH anchors are provided for
the right outboard seat and center
seat. (Buttons displaying the loca-
tion of the anchors are attached to
the seats.)
Seat belts equipped with a child
restraint locking mechanism
(ALR/ELR belts except driver’s
seat belt) ( P. 34)
Anchor brackets (for top tether strap)
Second seats (8-passenger models)
Anchor brackets are provided for
second outside seats.
Page 64 of 584
641-1. For safe use
SIENNA_OM_OM08019U_(U)
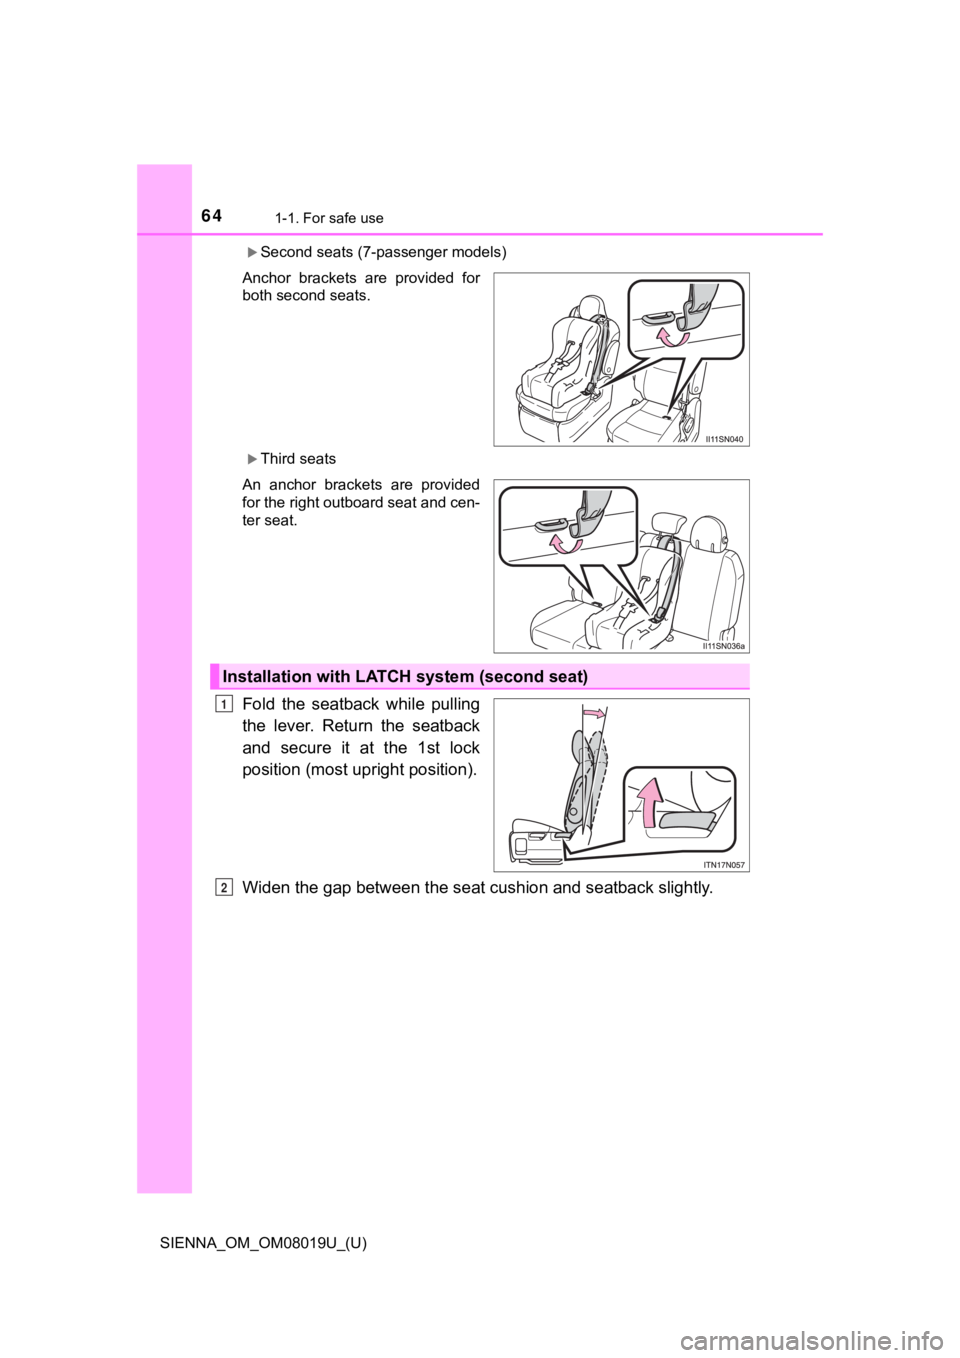
Second seats (7-passenger models)
Anchor brackets are provided for
both second seats.
Third seats
An anchor brackets are provided
for the right outboard seat and cen-
ter seat.
Fold the seatback while pulling
the lever. Return the seatback
and secure it at the 1st lock
position (most upr ight position).
Widen the gap between the seat cushion and seatback slightly.
Installation with LATCH system (second seat)
1
2
Page 74 of 584
741-1. For safe use
SIENNA_OM_OM08019U_(U)
WARNING
■When installing a child restraint system
● When installing a child restraint system on the third center se at, adjust
both seatbacks at the same angle. Otherwise, the child restrain t system
cannot be securely restrained and this may cause death or serious injuries
in the event of sudden braking, sudden swerving or an accident.
● When using the LATCH anchors for a child restraint system, move the seat
as far back as possible (second seat only), with the seatback c lose to the
child restraint system.
● When a booster seat is installed, always ensure that the should er belt is
positioned across the center of the child’s shoulder. The belt should be
kept away from the child’s neck, but not so that it could fall off the child’s
shoulder. Failing to do so may result in death or serious injur y in the event
of sudden braking, sudden swerving or an accident.
● Ensure that the belt and plate are securely locked and the seat belt is not
twisted.
● Shake the child restraint system left and right, and forward and backward
to ensure that it has been securely installed.
● After securing a child restraint system, never adjust the seat.
● Follow all installation instructions provided by the child restraint system
manufacturer.
● When securing some types of child restraint systems in second ( 8-passen-
ger models) or third row seats, it may not be possible to properly use the
seat belts in positions next to the child restraint without interfering with it or
affecting seat belt effectiveness. Be sure your seat belt fits snugly across
your shoulder and low on your hips. if it dose not, or if it in terferes with the
child restraint, move to a different position. Failure to do so may result in
death or serious injury.
Page 86 of 584
86
SIENNA_OM_OM08019U_(U)
2. Instrument cluster
*1: These lights turn on when the engine switch is turned to the “ON” position
(vehicles without a smart key system) or IGNITION ON mode (vehicles
with a smart key system) to indicate that a system check is being per-
formed. They will turn off after the engine is started, or after a few seconds.
There may be a malfunction in a system if a light does not come on, or if
the lights do not turn off. Have the vehicle inspected by your Toyota dealer.
*2: The light comes on or flashes to indicate a malfunction.
*3: This light illuminates on the multi-information display.
*4: If equipped
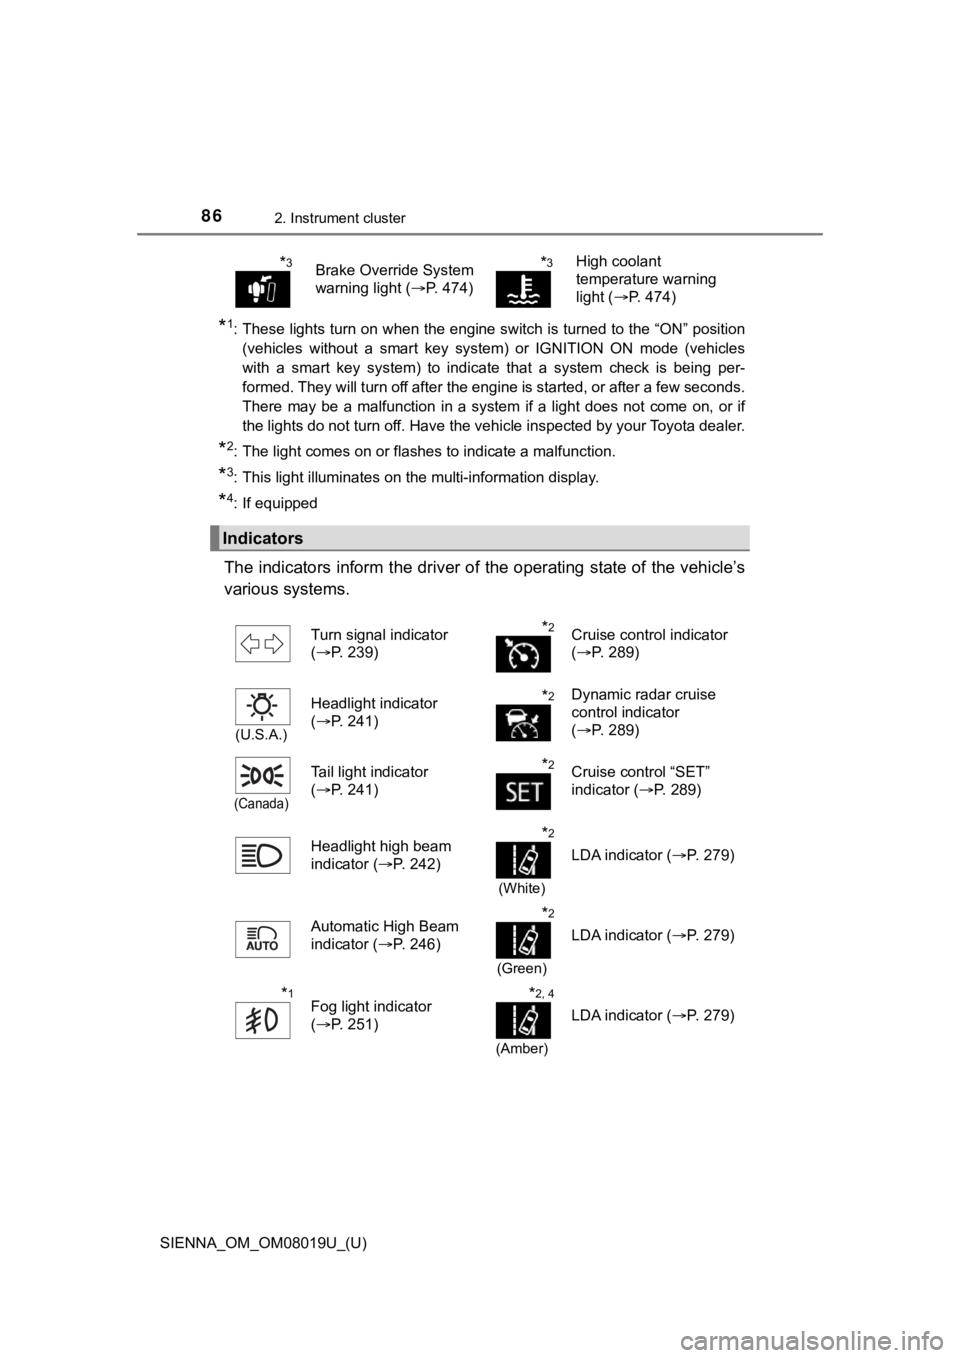
The indicators inform the driver of the operating state of the vehicle’s
various systems.
*3Brake Override System
warning light ( P. 474)*3High coolant
temperature warning
light (P. 474)
Indicators
Turn signal indicator
(P. 239)*2Cruise control indicator
(P. 289)
(U.S.A.)
Headlight indicator
(P. 241)*2Dynamic radar cruise
control indicator
(P. 289)
(Canada)
Tail light indicator
(P. 241)*2Cruise control “SET”
indicator ( P. 289)
Headlight high beam
indicator ( P. 242)
*2
(White)
LDA indicator ( P. 279)
Automatic High Beam
indicator ( P. 246)
*2
(Green)
LDA indicator ( P. 279)
*1Fog light indicator
(P. 251)*2, 4
(Amber)
LDA indicator ( P. 279)
Page 87 of 584
SIENNA_OM_OM08019U_(U)
872. Instrument cluster
2
Instrument cluster
*1: If equipped
*2: This light illuminates on the multi-information display.
*3: These lights turn on when the engine switch is turned to the “ON” position
(vehicles without a smart key system) or IGNITION ON mode (vehicles
with a smart key system) to indicate that a system check is being per-
formed. They will turn off after the engine is started, or after a few seconds.
There may be a malfunction in a system if a light does not come on, or if
the lights do not turn off. Have the vehicle inspected by your Toyota dealer.
*4: The light flashes to indicate that the system is operating.
*5: The light comes on when the system is turned off.
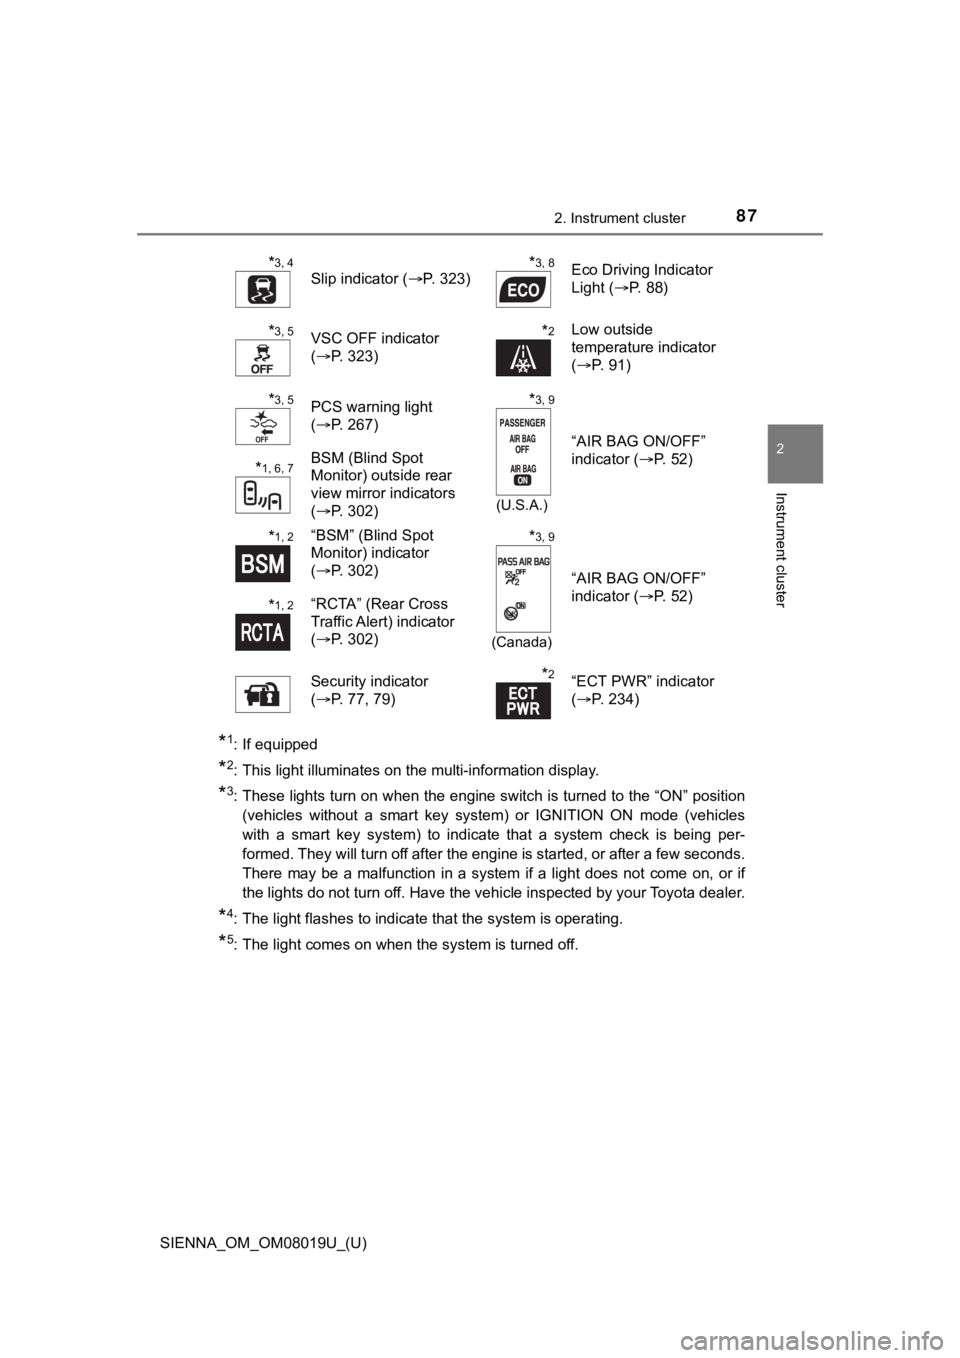
*3, 4
Slip indicator (P. 323)*3, 8Eco Driving Indicator
Light (P. 88)
*3, 5VSC OFF indicator
(P. 323)*2Low outside
temperature indicator
(P. 91)
*3, 5PCS warning light
(P. 267)*3, 9
(U.S.A.)
“AIR BAG ON/OFF”
indicator ( P. 52)
*1, 6, 7BSM (Blind Spot
Monitor) outside rear
view mirror indicators
(P. 302)
*1, 2“BSM” (Blind Spot
Monitor) indicator
(P. 302)*3, 9
(Canada)
“AIR BAG ON/OFF”
indicator ( P. 52)
*1, 2“RCTA” (Rear Cross
Traffic Alert) indicator
(P. 302)
Security indicator
( P. 77, 79)
*2“ECT PWR” indicator
(P. 234)
Page 88 of 584
88
SIENNA_OM_OM08019U_(U)
2. Instrument cluster
*6: In order to confirm operation, the BSM outside rear view mirror indicators
illuminate in the following situations:
• When the engine switch is turned to the “ON” position (vehicles without a smart key system) or IGNITION ON mode (vehicles with a smart ke y sys-
tem) while the BSM function is turned on.
• When the BSM function is turned on while the engine switch is in the
“ON” position (vehicles without a smart key system) or IGNITION ON
mode (vehicles with a smart key system).
If the system is functioning correctly, the BSM outside rear vi ew mirror indi-
cators will turn off after a few seconds.
If the BSM outside rear view mirror indicators do not illuminat e or do not
turn off, there may be a malfunction in the system.
If this occurs, have the vehicle inspected by your Toyota deale r.
*7: This light illuminates on the outside rear view mirrors.
*8: The light does not turn on when the system is disabled.
*9: This light illuminates on the center panel.
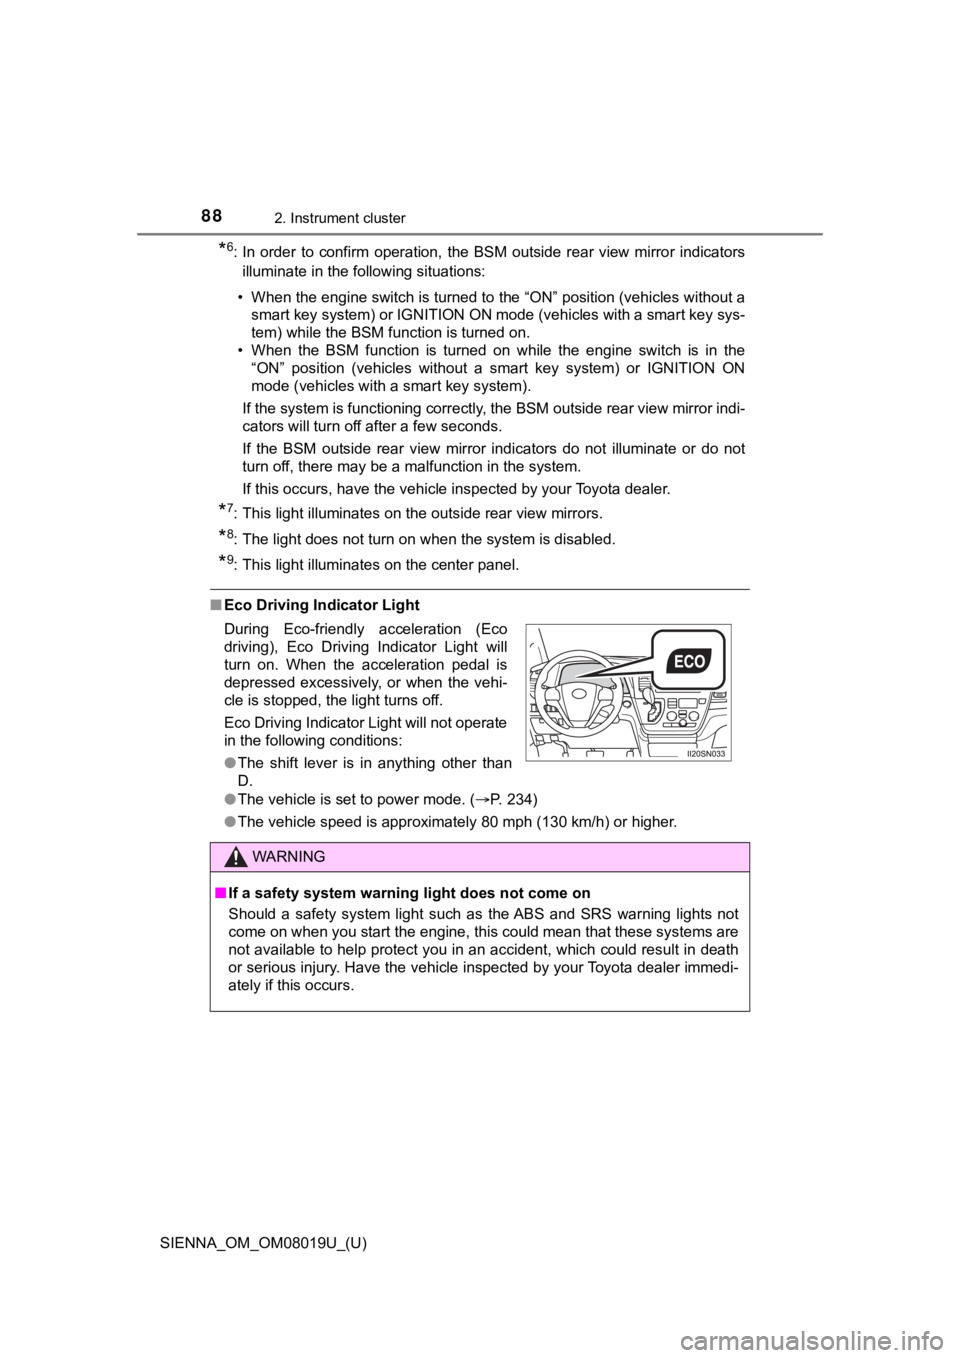
■Eco Driving Indicator Light
●The vehicle is set to power mode. ( P. 234)
● The vehicle speed is approximately 80 mph (130 km/h) or higher.
During Eco-friendly acceleration (Eco
driving), Eco Driving Indicator Light will
turn on. When the acceleration pedal is
depressed excessively, or when the vehi-
cle is stopped, the light turns off.
Eco Driving Indicator Light will not operate
in the following conditions:
●
The shift lever is in anything other than
D.
WARNING
■If a safety system warning light does not come on
Should a safety system light such as the ABS and SRS warning lights not
come on when you start the engine, this could mean that these s ystems are
not available to help protect you in an accident, which could r esult in death
or serious injury. Have the vehicle inspected by your Toyota de aler immedi-
ately if this occurs.
Page 100 of 584
100
SIENNA_OM_OM08019U_(U)
2. Instrument cluster
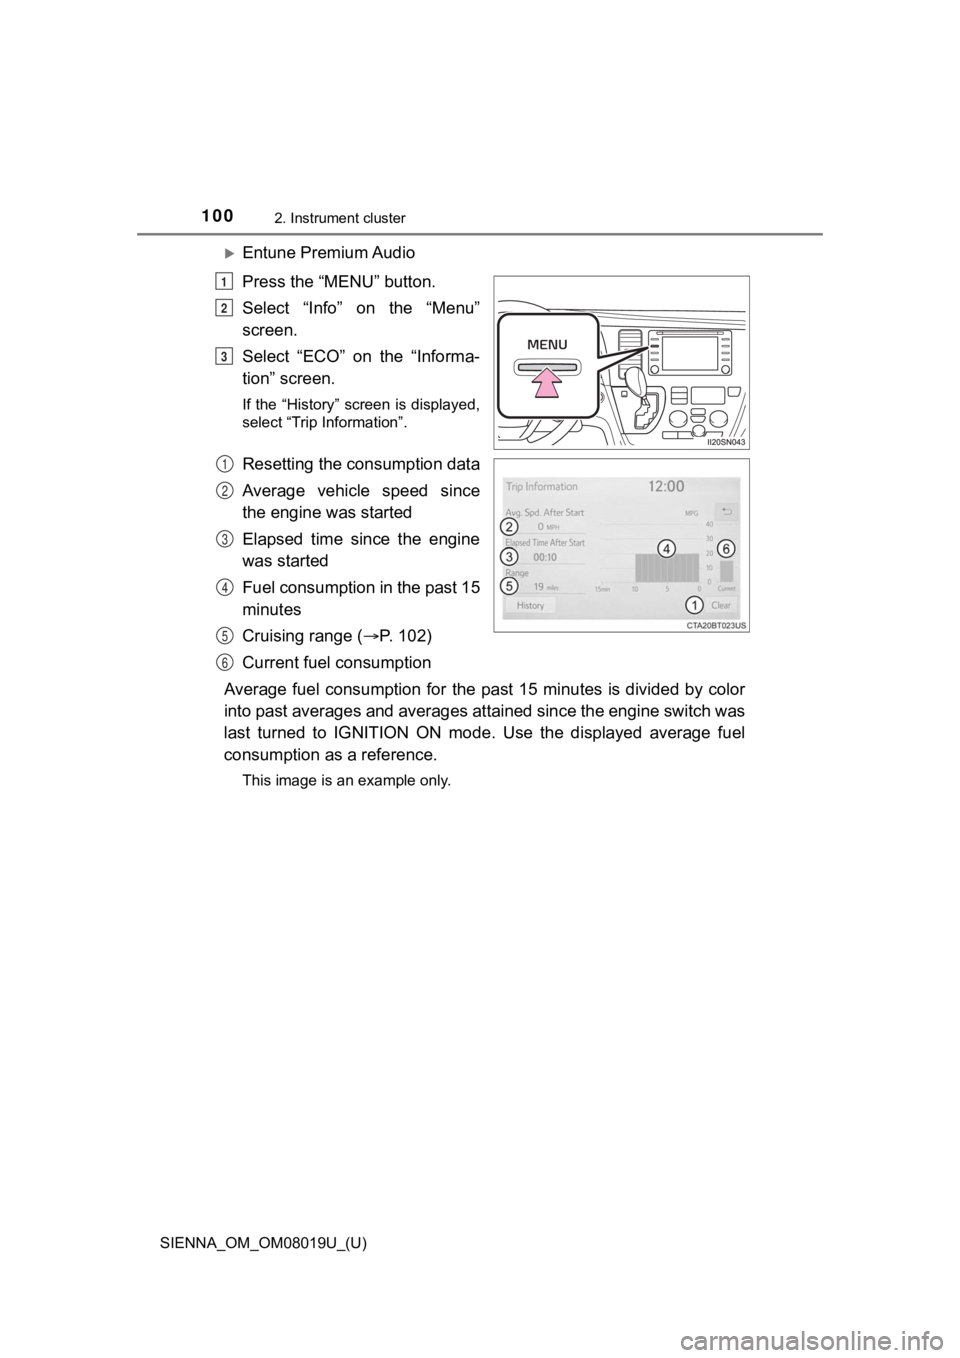
Entune Premium Audio
Press the “MENU” button.
Select “Info” on the “Menu”
screen.
Select “ECO” on the “Informa-
tion” screen.
If the “History” screen is displayed,
select “Trip Information”.
Resetting the consumption data
Average vehicle speed since
the engine was started
Elapsed time since the engine
was started
Fuel consumption in the past 15
minutes
Cruising range (P. 102)
Current fuel consumption
Average fuel consumption for the past 15 minutes is divided by color
into past averages and averages attained since the engine switch was
last turned to IGNITION ON mode. Use the displayed average fuel
consumption as a reference.
This image is an example only.
1
2
3
1
2
3
4
5
6
Page 106 of 584
106
SIENNA_OM_OM08019U_(U)
3-1. Key information
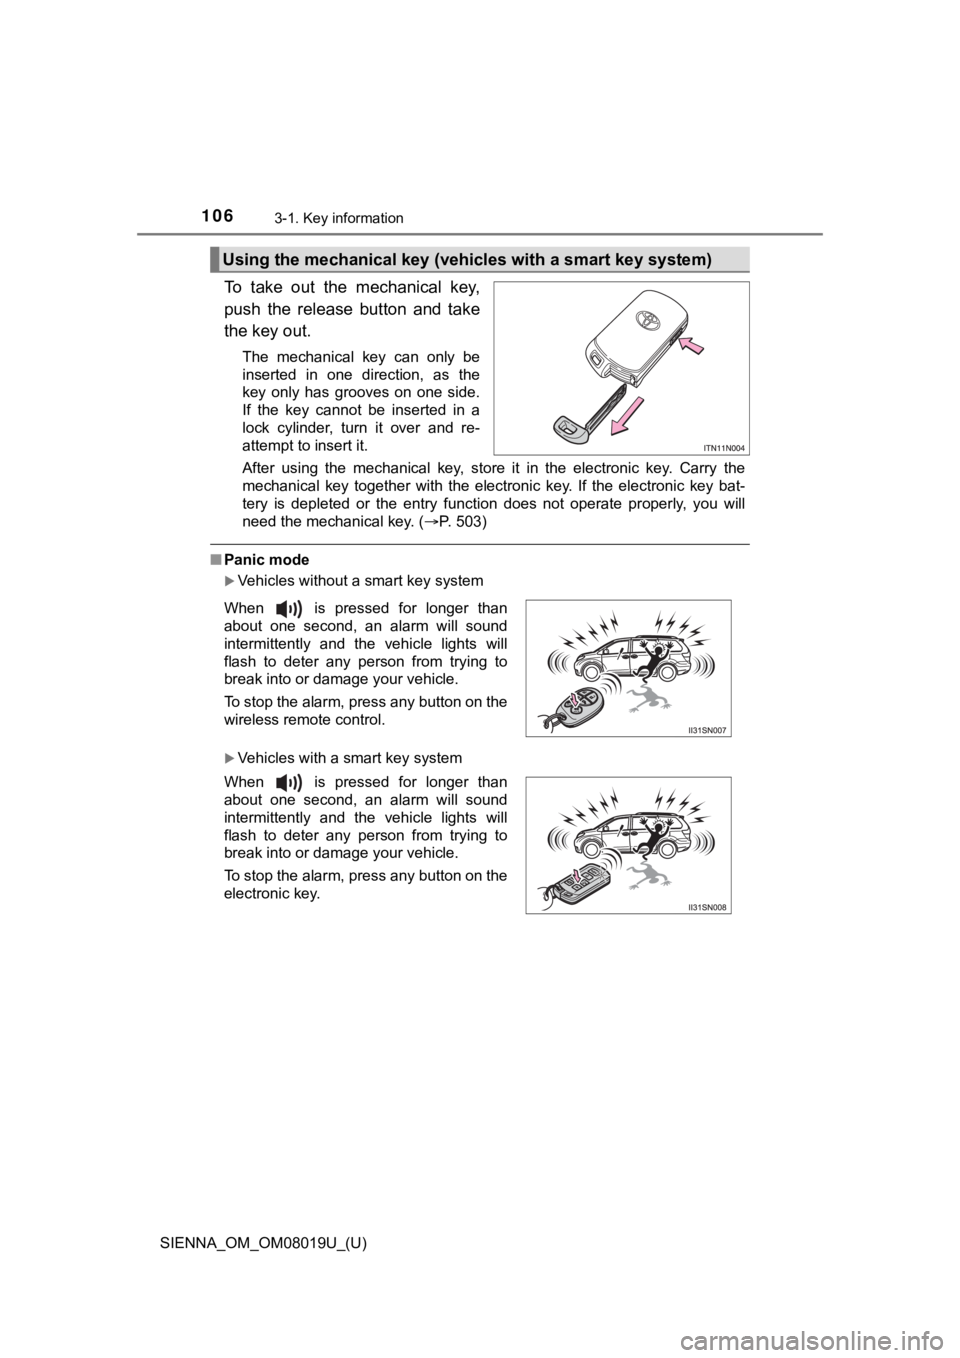
To take out the mechanical key,
push the release button and take
the key out.
The mechanical key can only be
inserted in one direction, as the
key only has grooves on one side.
If the key cannot be inserted in a
lock cylinder, turn it over and re-
attempt to insert it.
After using the mechanical key, store it in the electronic key. Carry the
mechanical key together with the electronic key. If the electro nic key bat-
tery is depleted or the entry function does not operate properl y, you will
need the mechanical key. ( P. 503)
■Panic mode
Vehicles without a smart key system
Vehicles with a smart key system
Using the mechanical key (vehic les with a smart key system)
When is pressed for longer than
about one second, an alarm will sound
intermittently and the vehicle lights will
flash to deter any person from trying to
break into or damage your vehicle.
To stop the alarm, press any button on the
wireless remote control.
When is pressed for longer than
about one second, an alarm will sound
intermittently and the vehicle lights will
flash to deter any person from trying to
break into or damage your vehicle.
To stop the alarm, press any button on the
electronic key.