jump cable TOYOTA SIENNA 2018 Owners Manual (in English)
[x] Cancel search | Manufacturer: TOYOTA, Model Year: 2018, Model line: SIENNA, Model: TOYOTA SIENNA 2018Pages: 584, PDF Size: 14.47 MB
Page 505 of 584
505
SIENNA_OM_OM08019U_(U)
7-2. Steps to take in an emergency
7
When trouble arises
If the batter y is discharged
If you have a set of jumper (or booster) cables and a second vehicle
with a 12-volt battery, you can jump start your vehicle by foll owing the
steps below.
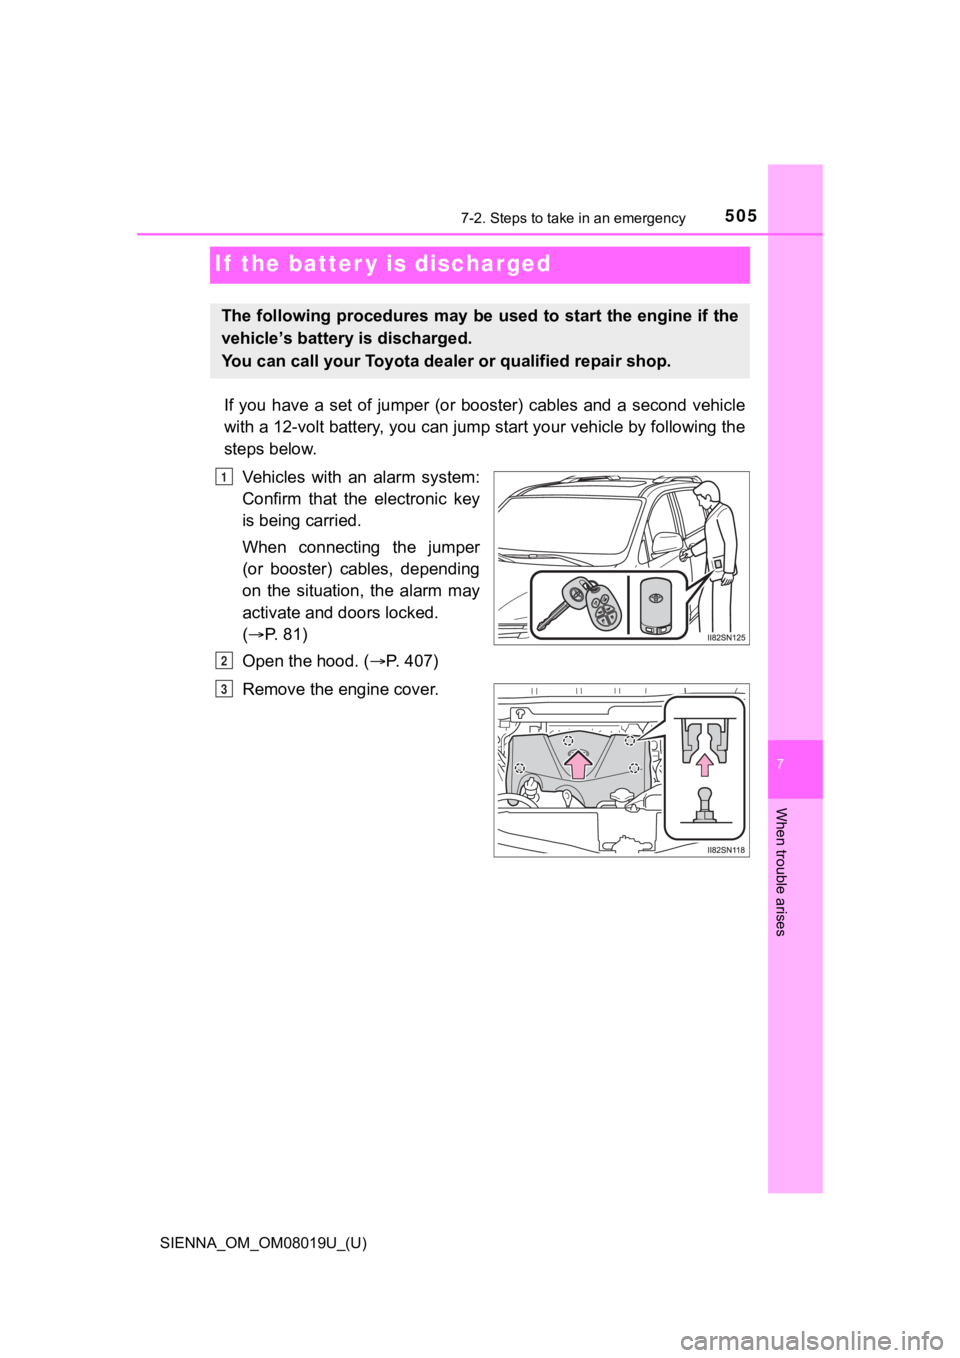
Vehicles with an alarm system:
Confirm that the electronic key
is being carried.
When connecting the jumper
(or booster) cables, depending
on the situation, the alarm may
activate and doors locked.
( P. 81)
Open the hood. ( P. 407)
Remove the engine cover.
The following procedures may be used to start the engine if the
vehicle’s battery is discharged.
You can call your Toyota deal er or qualified repair shop.
1
2
3
Page 506 of 584
5067-2. Steps to take in an emergency
SIENNA_OM_OM08019U_(U)
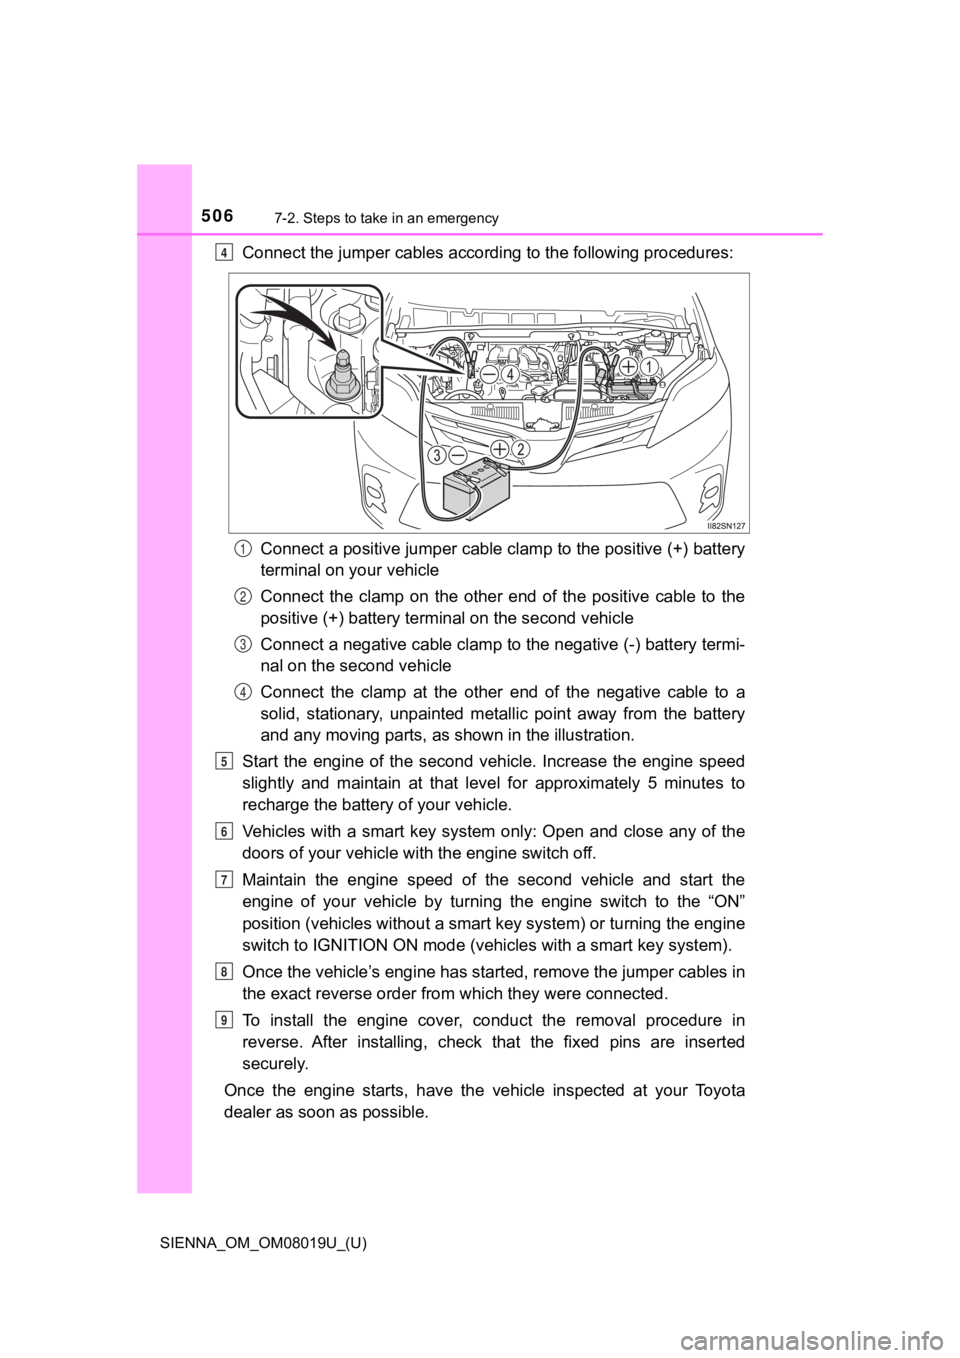
Connect the jumper cables according to the following procedures:
Connect a positive jumper cable clamp to the positive (+) batte ry
terminal on your vehicle
Connect the clamp on the other end of the positive cable to the
positive (+) battery termi nal on the second vehicle
Connect a negative cable clamp to the negative (-) battery term i-
nal on the s econd vehicle
Connect the clamp at the other e nd of the negative cable to a
solid, stationary, unpainted meta llic point away from the battery
and any moving parts, as shown in the illustration.
Start the engine of the second v ehicle. Increase the engine speed
slightly and maintain at that lev el for approximately 5 minutes to
recharge the batter y of your vehicle.
Vehicles with a smart key system only: Open and close any of th e
doors of your vehicle wi th the engine switch off.
Maintain the engine speed of the second vehicle and start the
engine of your vehicle by turning the engine switch to the “ON”
position (vehicles without a smart key system) or turning the e ngine
switch to IGNITION ON mode (vehi cles with a smart key system).
Once the vehicle’s engine has st arted, remove the jumper cables in
the exact reverse order from which they were connected.
To install the engine cover, conduct the removal procedure in
reverse. After installing, check that the fixed pins are inserted
securely.
Once the engine starts, have the vehicle inspected at your Toyota
dealer as soon as possible.4
1
2
3
4
5
6
7
8
9
Page 508 of 584
5087-2. Steps to take in an emergency
SIENNA_OM_OM08019U_(U)
WARNING
■Avoiding battery fires or explosions
Observe the following precautions to prevent accidentally ignit ing the flam-
mable gas that may be emitted from the battery:
● Make sure the jumper cable is connected to the correct terminal and that it
is not unintentionally in contact with any other than the inten ded terminal.
● Do not allow the other end of the jumper cable connected to the “+” termi-
nal to come into contact with any other parts or metal surfaces in the area,
such as brackets or unpainted metal.
● Do not allow the + and - clamps of the jumper cables to come in to contact
with each other.
● Do not smoke, use matches, cigarette lighters or allow open fla me near
the battery.
■ Battery precautions
The battery contains poisonous and corrosive acidic electrolyte , while
related parts contain lead and lead compounds. Observe the foll owing pre-
cautions when handling the battery:
● When working with the battery, always wear safety glasses and t ake care
not to allow any battery fluids (acid) to come into contact wit h skin, clothing
or the vehicle body.
● Do not lean over the battery.
● In the event that battery fluid comes into contact with the skin or eyes,
immediately wash the affected area with water and seek medical attention.
Place a wet sponge or cloth over the affected area until medica l attention
can be received.
● Always wash your hands after handling the battery support, term inals, and
other battery-related parts.
● Do not allow children near the battery.
NOTICE
■When handling jumper cables
When connecting the jumper cables, ensure that they do not beco me entan-
gled in the cooling fans or belt.
■ To prevent damage to the engine cover
● When removing the cover, make sure that you pull the cover towards you
after lifting the front edge to remove the fixed pins.
● When installing the cover, do not force the cover or subject it to strong
shocks.