light TOYOTA SIENNA HYBRID 2021 Accessories, Audio & Navigation (in English)
[x] Cancel search | Manufacturer: TOYOTA, Model Year: 2021, Model line: SIENNA HYBRID, Model: TOYOTA SIENNA HYBRID 2021Pages: 332, PDF Size: 11.73 MB
Page 28 of 332
282-1. Basic information before operation
●Flick operations may not be performed smoothly at high altitude s.
●If the system does not respond to
touching a screen button, move
your finger away from the screen
and then touch it again.
●Dimmed screen buttons cannot be
operated.
●The displayed image may become
darker and moving images may
be slightly distorted when the
screen is cold.
●In extremely cold conditions, the
screen may not be displayed and
the data input by a user may be
deleted. Also, the screen buttons
may be harder than usual to
depress.
●When you look at the screen
through polarized material such as
polarized sunglasses, the screen
may be dark and hard to see. If
so, look at the scr een from differ-
ent angles, adjust the screen set-
tings on the display settings
screen or take off your sun-
glasses.
●When is displayed on the
screen, select to return to the
previous screen.
The operable areas of the
capacitive touch screen buttons
use capacitive touch sensors
and may not operate properly in
the following situations:
If the screen is dirty or wet
If a source of strong electro-
magnetic waves is brought
near the screen
If a glove is worn during oper-
ation
If the screen is touched by a
fingernail
If a stylus is used to operate
the buttons
If your palm touches the oper-
able area of another button
during operation
If a button is touched quickly
If the operable part of a
capacitive touch screen but-
ton is touched by or covered
Touch screen operation
This system is operated
mainly by the buttons on
the screen. (Referred to as
screen buttons in this man-
ual.)
When a screen button is
touched, a beep sounds. (To
set the beep sound: P.60)
NOTICE
●To prevent damaging the
screen, lightly touch the screen
buttons with your finger.
●Do not use objec ts other than
your finger to touch the screen.
●Wipe off fingerprints using a
glass cleaning cloth. Do not use
chemical cleaners to clean the
screen, as they may damage
the touch screen.
Capacitive touch screen
buttons
Page 34 of 332
342-1. Basic information before operation
ton.
Select to turn day mode
on/off. (P.34)
Select to adjust the screen
display. ( P.34)
Select to adjust the camera
display.
●When the screen is viewed
through polarized sunglasses, a
rainbow pattern may appear on
the screen due to optical charac-
teristics of the scr een. If this is dis-
turbing, please operate the screen
without polarized sunglasses.
Depending on the position of the
headlight switch, the screen
changes to day or night mode.
This feature is available when
the headlight is switched on.
1 Select “Day Mode”.
●If the screen is set to day mode
with the headlight switch turned
on, this condition is memorized
even with the hybrid system
turned off.
The contrast and brightness of
the screen can be adjusted
according to the brightness of
your surroundings.
1 Select “General” or “Cam-
era”.
2 Select the desired item.
“Display (General)” screen
only: Select “<” or “>” to select
the desired display.
• “Contrast”
“+”: Select to strengthen the con-
trast of the screen.
“-”: Select to weaken the contrast of
the screen.
• “Brightness”
“+”: Select to brighten the screen.
“-”: Select to darken the screen.
Changing between day
and night mode
Adjusting the con-
trast/brightness
B
C
D
Page 55 of 332
552-3. Apple CarPlay/Android Auto
2
Basic function
changed by turning the “PWR
VOL” knob on the Audio control
panel.
●Apple CarPlay/Android Auto is an
application developed by Apple
Inc/Google LLC. Its functions and
services may be terminated or
changed without notice depending
on the connected device’s opera-
tion system, hardware and soft-
ware, or due to changes in Apple
CarPlay/Android Auto specifica-
tions.
●For a list of the apps supported by
Apple CarPlay or Android Auto,
refer to their respective website.
●While using these functions, vehi-
cle and user information, such as
location and vehicle speed, will be
shared with the respective appli-
cation publisher and the cellular
service provider.
●By downloading and using each
application, you agree to their
terms of use.
●Data for these functions is trans-
mitted using the internet and may
incur charges. For information
about data transmission fees,
contact your cellular service pro-
vider.
●Depending on the application, cer-
tain functions, such as music play-
back, may be restricted.
●As the applications for each func-
tion are provided by a third-party,
they may be subject to change or
discontinuation without notice. For
details, refer to the website of the
function.
●If the vehicle’s navigation system
is being used for route guidance
and a route is set using the Apple
CarPlay/Android Auto Maps app,
route guidance w ill be performed
through Apple CarPlay/Android
Auto. If the Apple CarPlay/Android
Auto Maps app is being used for
route guidance and a route is set
using the vehicle’s navigation sys-
tem, route guidance will be per- formed by the vehicle’s navigation
system.
●If the USB cable is disconnected,
operation of Apple Car-
Play/Android Auto will end. At this
time, sound outp
ut will stop and
change to the system screen.
■Certification
●Use of the Apple CarPlay logo
means that a vehicle user inter-
face meets Apple performance
standards. Apple is not responsi-
ble for the operation of this vehicle
or its compliance with safety and
regulatory standards. Please note
that the use of this product with
iPhone, iPod, or iPad may affect
wireless performance.
●CarPlay, iPhone, iPod, iPod nano,
iPod touch, and Lightning are
trademarks of Apple Inc., regis-
tered in the U.S. and other coun-
tries.Apple CarPlay is a trademark
of Apple Inc.
Android and Android Auto are trade-
marks of Google LLC.
WARNING
●Do not connect iPhone or oper-
ate the controls while driving.
Page 56 of 332
562-3. Apple CarPlay/Android Auto
If you are experiencing difficulties with Apple CarPlay/Android Auto,
check the following table.
NOTICE
●Do not leave your smartphone
in the vehicle. In particular, high
temperatures inside the vehicle
may damage the smartphone.
●Do not push down on or apply
unnecessary pressure to the
smartphone while it is con-
nected as this may damage the
smartphone or its terminal.
●Do not insert foreign objects into
the port as this may damage the
smartphone or its terminal.
Troubleshooting
SymptomSolution
An Apple Car-
Play/Android Auto con-
nection cannot be
established.
Check if the device supports Apple Car-
Play/Android Auto.
Check Apple CarPlay/Android Auto is enabled
on the connected device.
Check that the Android Auto application is
installed to the device to be connected.
For details, refer to
https://www.apple.com/ios/carplay/
,
https://www.and roid.com/auto/
.
Check if “Apple CarPlay”/“Android Auto” of
“Projection Settings” on the general settings
screen is set to on. ( P.60)
Check if the USB cable be ing used is securely
connected to the device and USB port.
Try connecting the smartphone directly to the
USB port in the vehicle, without using the hub.
For Apple CarPlay: Check if the Lightning cable
being used is certified by Apple and check if Siri
is enabled.
After checking all of the above, try to establish
an Apple CarPlay/Android Auto connection.
( P.53)
Page 60 of 332
602-4. Other settings
2-4.Other settings
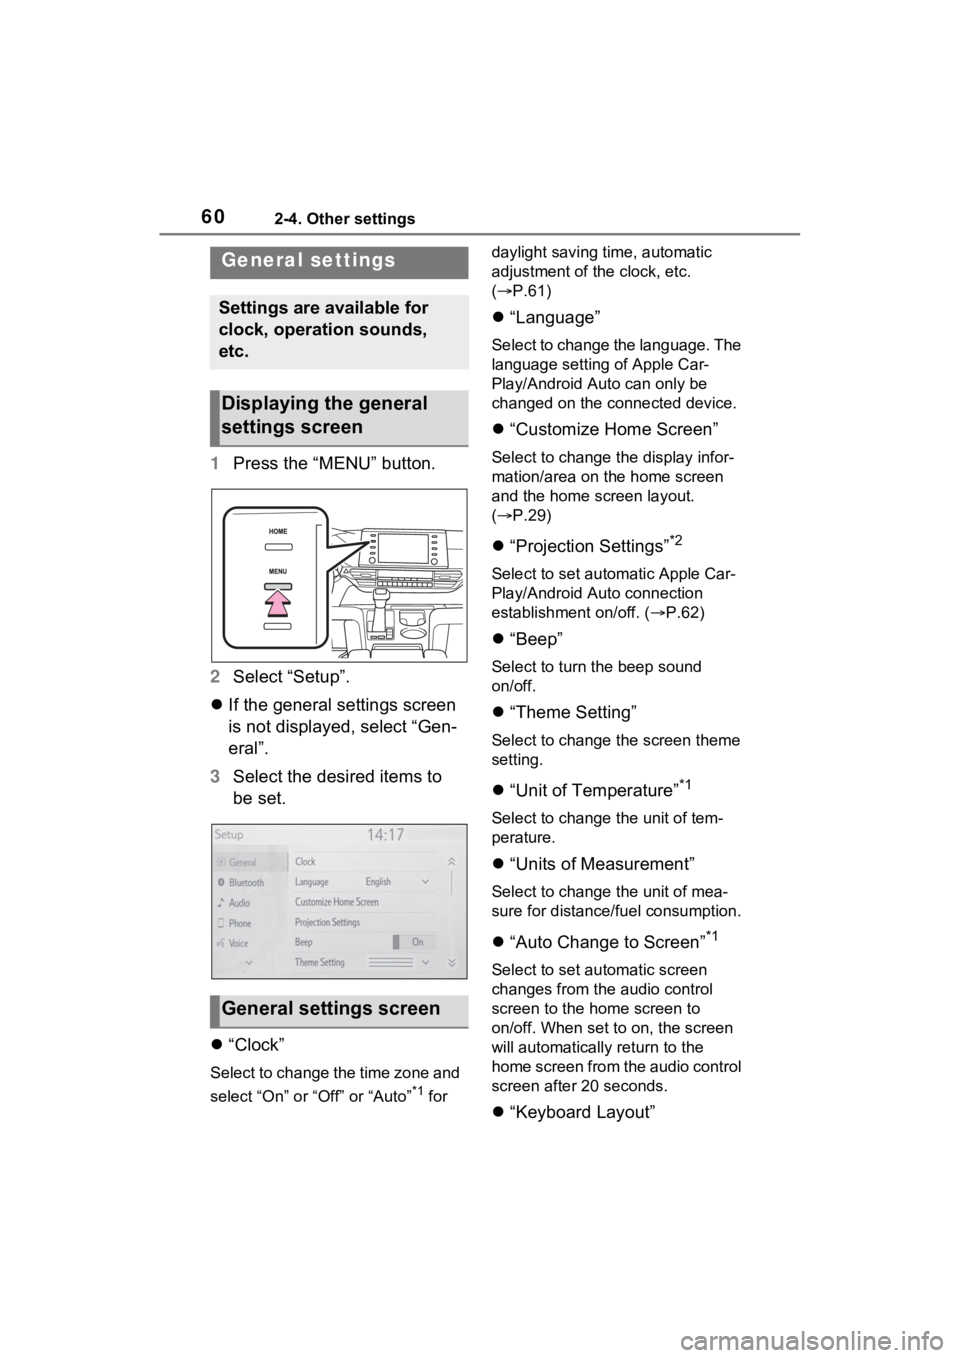
1Press the “MENU” button.
2 Select “Setup”.
If the general settings screen
is not displayed, select “Gen-
eral”.
3 Select the desired items to
be set.
“Clock”
Select to change the time zone and
select “On” or “Off” or “Auto”
*1 for daylight saving time, automatic
adjustment of the clock, etc.
(
P.61)
“Language”
Select to change the language. The
language setting of Apple Car-
Play/Android Auto can only be
changed on the connected device.
“Customize Home Screen”
Select to change the display infor-
mation/area on the home screen
and the home screen layout.
( P.29)
“Projection Settings”*2
Select to set automatic Apple Car-
Play/Android Auto connection
establishment on/off. ( P.62)
“Beep”
Select to turn the beep sound
on/off.
“Theme Setting”
Select to change the screen theme
setting.
“Unit of Temperature”*1
Select to change the unit of tem-
perature.
“Units of Measurement”
Select to change the unit of mea-
sure for distance/fuel consumption.
“Auto Change to Screen”*1
Select to set automatic screen
changes from the audio control
screen to the home screen to
on/off. When set to on, the screen
will automatically r eturn to the
home screen from the audio control
screen after 20 seconds.
“Keyboard Layout”
General settings
Settings are available for
clock, operation sounds,
etc.
Displaying the general
settings screen
General settings screen
Page 61 of 332
612-4. Other settings
2
Basic function
Select to change the keyboard lay-
out.
“Delete Keyboard History”
Select to delete the keyboard his-
tory.
“Memorize Keyboard History”
Select to set the memorize key-
board history on/off.
“Animation”
Select to turn the a nimations on/off.
“Driver Setting”
Select to change the driver set-
tings. ( P.62)
“Delete Personal Data”
Select to delete personal data.
( P.63)
“Software Update”
Select to update software versions.
For details, contact your Toyota
dealer.
“Software Update Setting”*2, 3
Select to set software update set-
ting. ( P.63)
“Gracenote Database
Update”
Select to update Gracenote® data-
base versions. For details, contact
your Toyota dealer.
“Software Information”
Select to display the software infor-
mation. Notices related to third
party software used in this product
are enlisted. (This includes instruc-
tions for obtaining such software,
where applicable.)
“SW Sensitivity Level”
Select to change the capacitive touch screen button
sensitivity to 1
(low), 2 (medium), or 3 (high).
*1: Premium Audio only
*2: This function is not made avail- able in some countries or areas.
*3: Vehicles equipped with DCM
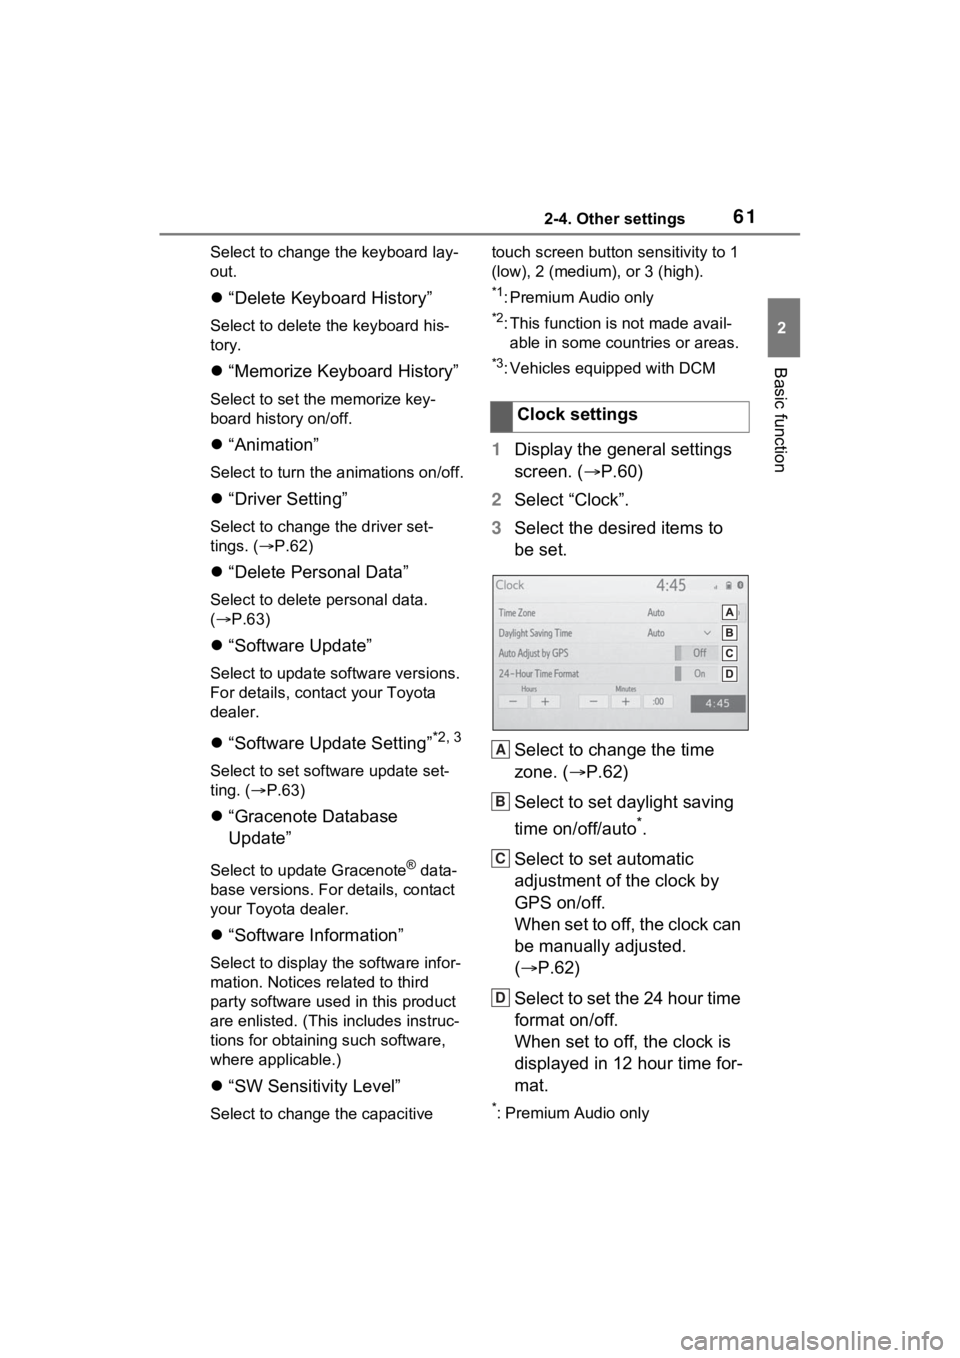
1 Display the general settings
screen. ( P.60)
2 Select “Clock”.
3 Select the desired items to
be set.
Select to change the time
zone. ( P.62)
Select to set daylight saving
time on/off/auto
*.
Select to set automatic
adjustment of the clock by
GPS on/off.
When set to off, the clock can
be manually adjusted.
( P.62)
Select to set the 24 hour time
format on/off.
When set to off, the clock is
displayed in 12 hour time for-
mat.
*: Premium Audio only
Clock settings
A
B
C
D
Page 149 of 332
1494-6. Tips for operating the audio/visual system
4
Audio/visual system
Station interference: When a
reflected signal and a signal
received directly from a radio
station are very nearly the same
frequency, they can interfere
with each other, making it diffi-
cult to hear the broadcast.
Static: AM is easily affected by
external sources of electrical
noise, such as high tension
power lines, lightening or electri-
cal motors. This results in static.
■SiriusXM
Cargo loaded on the roof lug-
gage carrier, especially metal
objects, may adversely affect
the reception of SiriusXM Sat-
ellite Radio.
Alternation or modifications
carried out without appropri-
ate authorization may invali-
date the user’s right to
operate the equipment.
■Certification
Premium Audio
Use of the Made for Apple
badge means that an acces-
sory has been designed to
connect specifically to the
Apple product(s) identified in
the badge, and has been cer-
tified by the developer to meet
Apple performance stan-
dards.
Apple is not responsible for
the operation of this device or
its compliance with safety and
regulatory standards.
Please note that the use of
this accessory with an Apple
product may affect wireless
performance.
CarPlay, iPhone, iPod, iPod
nano, iPod touch, and Light-
ning are trademarks of Apple
Inc., registered in the U.S.
and other countries. Apple
CarPlay is a trademark of
Apple Inc.
Made for
• iPhone X
• iPhone 8 Plus
• iPhone 8
• iPhone 7 Plus
• iPhone 7
• iPhone SE
iPod/iPhone
Page 150 of 332

1504-6. Tips for operating the audio/visual system
• iPhone 6s Plus
• iPhone 6s
• iPhone 6 Plus
• iPhone 6
• iPhone 5s
• iPhone 5c
• iPhone 5
• iPhone 4s
• iPod touch (6th generation)
• iPod touch (5th generation)
• iPod nano (7th generation)
Use of the Apple CarPlay logo
means that a vehicle user
interface meets Apple perfor-
mance standards. Apple is
not responsible for the opera-
tion of this vehicle or its com-
pliance with safety and
regulatory standards. Please
note that the use of this prod-
uct with iPhone, iPod, or iPad
may affect wireless perfor-
mance.
Audio/Audio Plus
Use of the Made for Apple
badge means that an acces-
sory has been designed to
connect specifically to the
Apple product(s) identified in
the badge, and has been cer-
tified by the developer to meet
Apple performance stan-
dards. Apple is not responsi-
ble for the operation of this
device or its compliance with
safety and regulatory stan-
dards. Please note that the
use of this accessory with an
Apple product may affect wireless performance.
iPhone, iPod, iPod classic,
iPod nano, iPod touch, and
Lightning are trademarks of
Apple Inc., registered in the
U.S. and other countries.
■Compatible models
The following iPod nano
®, iPod
touch
® and iPhone® devices
can be used with this system.
Made for
• iPhone XS Max
• iPhone XS
• iPhone XR
• iPhone X
• iPhone 8
• iPhone 8 Plus
• iPhone 7
• iPhone 7 Plus
• iPhone SE
• iPhone 6s
• iPhone 6s Plus
• iPhone 6
• iPhone 6 Plus
• iPhone 5s
• iPhone 5c
• iPhone 5
• iPod touch (6th generation)
• iPod touch (5th generation)
• iPod nano (7th generation)
●This system only supports audio
playback.
●Depending on difference between
models or software versions etc.,
some models might be incompati-
ble with this system.
Page 160 of 332
1604-7. Rear seat entertainment system operation
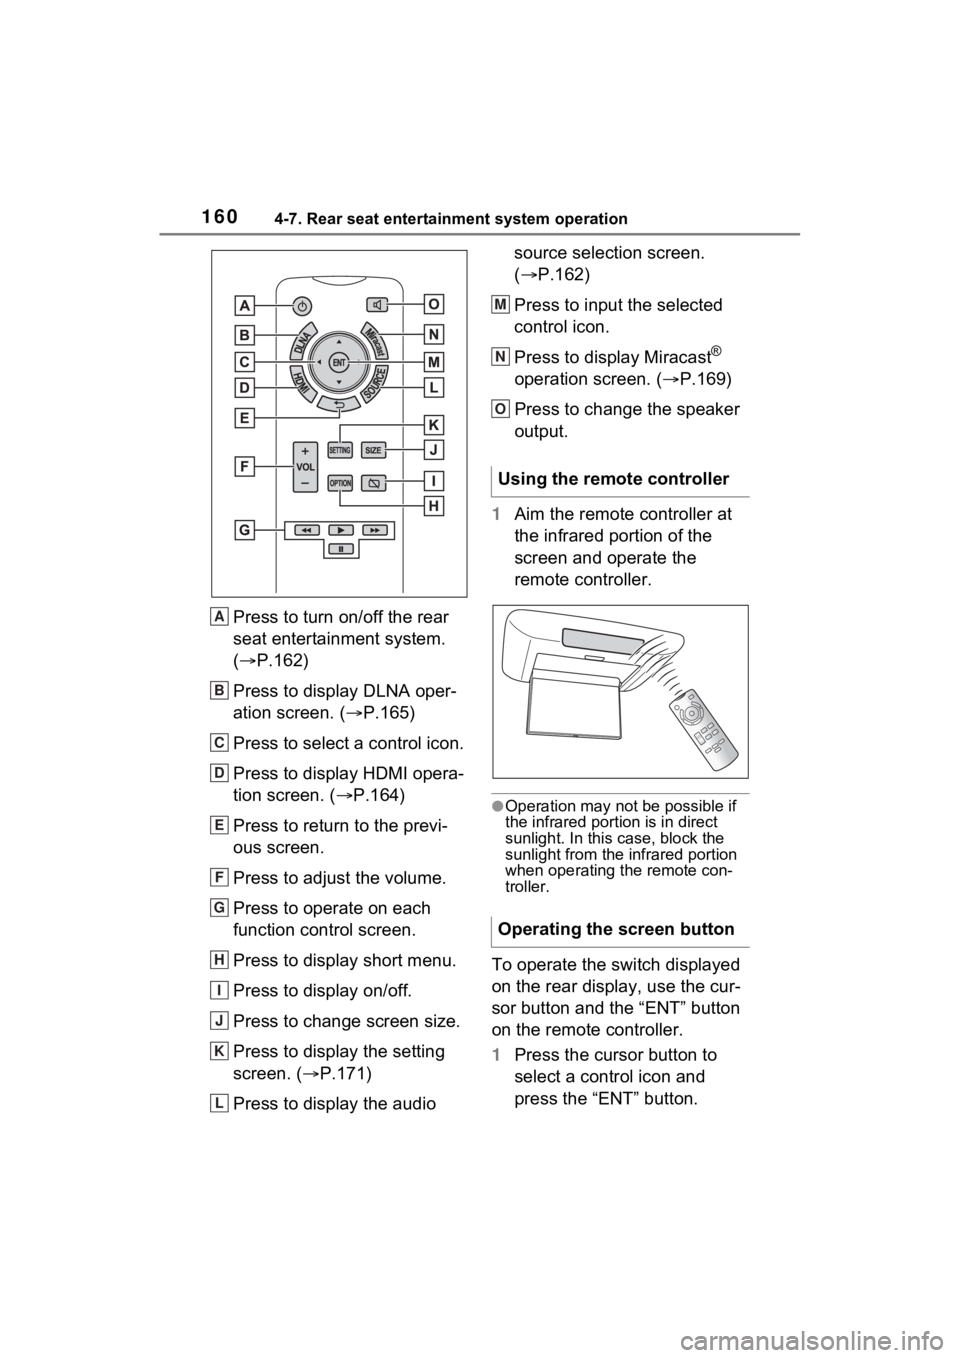
Press to turn on/off the rear
seat entertainment system.
(P.162)
Press to display DLNA oper-
ation screen. ( P.165)
Press to select a control icon.
Press to display HDMI opera-
tion screen. ( P.164)
Press to return to the previ-
ous screen.
Press to adjust the volume.
Press to operate on each
function control screen.
Press to display short menu.
Press to display on/off.
Press to change screen size.
Press to display the setting
screen. ( P.171)
Press to display the audio source selection screen.
(
P.162)
Press to input the selected
control icon.
Press to display Miracast
®
operation screen. ( P.169)
Press to change the speaker
output.
1 Aim the remote controller at
the infrared portion of the
screen and operate the
remote controller.
●Operation may not be possible if
the infrared portion is in direct
sunlight. In this case, block the
sunlight from the infrared portion
when operating the remote con-
troller.
To operate the switch displayed
on the rear display, use the cur-
sor button and the “ENT” button
on the remote controller.
1Press the cursor button to
select a control icon and
press the “ENT” button.
A
B
C
D
E
F
G
H
I
J
K
L
Using the remote controller
Operating the screen button
M
N
O
Page 174 of 332
1744-9. Tips for operating rear seat entertainment system
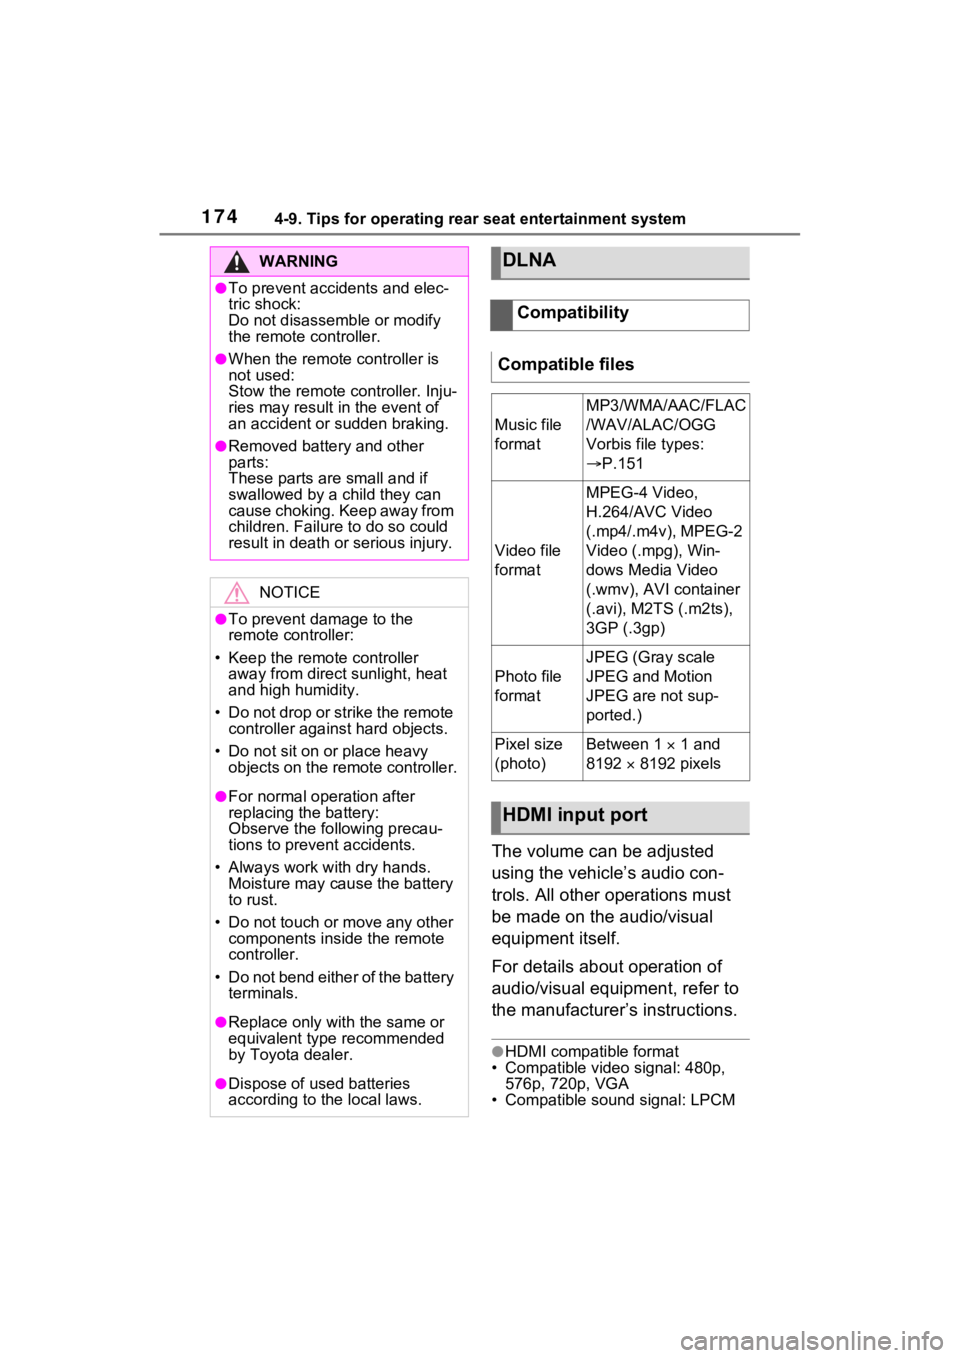
The volume can be adjusted
using the vehicle’s audio con-
trols. All other operations must
be made on the audio/visual
equipment itself.
For details about operation of
audio/visual equipment, refer to
the manufacturer’s instructions.
●HDMI compatible format
• Compatible video signal: 480p,
576p, 720p, VGA
• Compatible sound signal: LPCM
WARNING
●To prevent accidents and elec-
tric shock:
Do not disassemble or modify
the remote controller.
●When the remote c ontroller is
not used:
Stow the remote controller. Inju-
ries may result in the event of
an accident or sudden braking.
●Removed battery and other
parts:
These parts are small and if
swallowed by a child they can
cause choking. Keep away from
children. Failure to do so could
result in death or serious injury.
NOTICE
●To prevent damage to the
remote controller:
• Keep the remote controller away from direct sunlight, heat
and high humidity.
• Do not drop or strike the remote controller against hard objects.
• Do not sit on or place heavy objects on the remote controller.
●For normal operation after
replacing the battery:
Observe the following precau-
tions to prevent accidents.
• Always work with dry hands. Moisture may cau se the battery
to rust.
• Do not touch or move any other components inside the remote
controller.
• Do not bend either of the battery terminals.
●Replace only with the same or
equivalent type recommended
by Toyota dealer.
●Dispose of used batteries
according to the local laws.
DLNA
Compatibility
Compatible files
Music file
format
MP3/WMA/AAC/FLAC
/WAV/ALAC/OGG
Vorbis file types:
P.151
Video file
format
MPEG-4 Video,
H.264/AVC Video
(.mp4/.m4v), MPEG-2
Video (.mpg), Win-
dows Media Video
(.wmv), AVI container
(.avi), M2TS (.m2ts),
3GP (.3gp)
Photo file
format
JPEG (Gray scale
JPEG and Motion
JPEG are not sup-
ported.)
Pixel size
(photo)Between 1 1 and
8192 8192 pixels
HDMI input port