maintenance TOYOTA SIENNA HYBRID 2021 (in English) User Guide
[x] Cancel search | Manufacturer: TOYOTA, Model Year: 2021, Model line: SIENNA HYBRID, Model: TOYOTA SIENNA HYBRID 2021Pages: 601, PDF Size: 32.07 MB
Page 100 of 601
1002-1. Instrument cluster
■Pop-up display
Distance until the next engine oil
change will displayed when a warn-
ing message indicating that oil
maintenance should be performed
soon or is required is displayed.
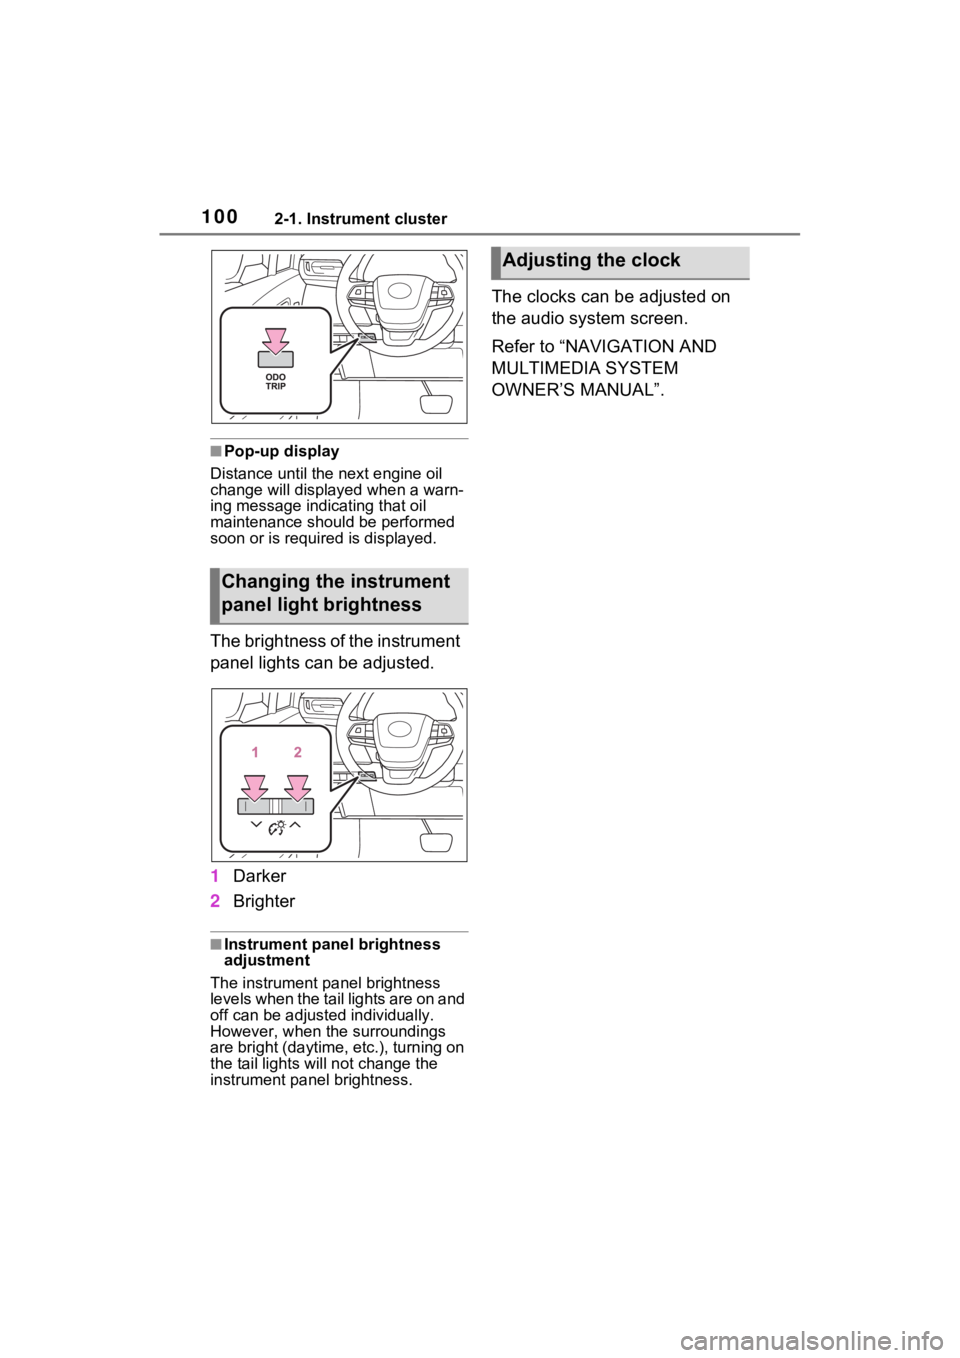
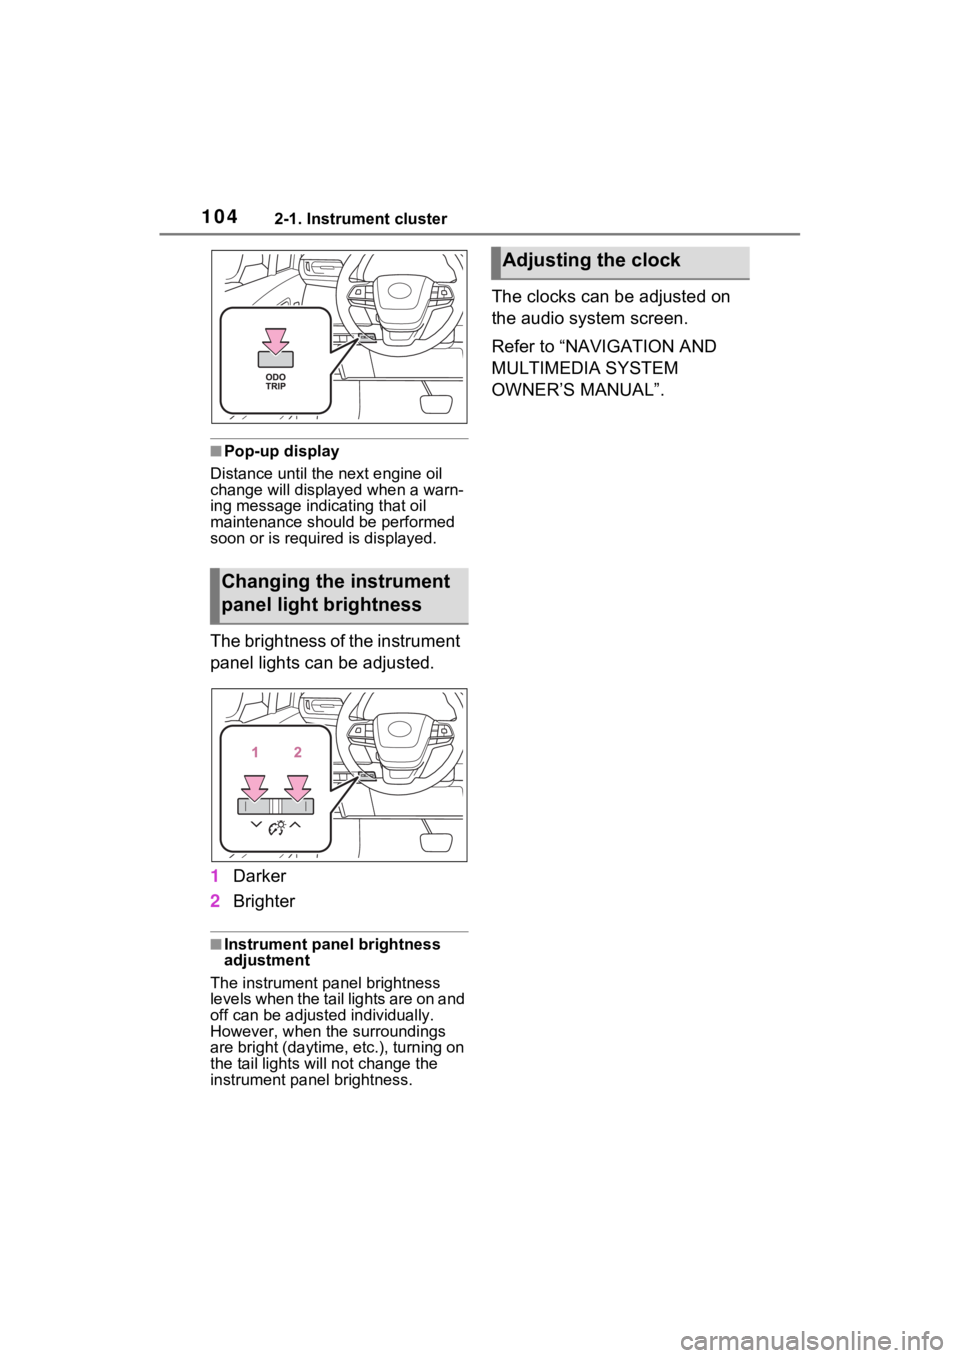
The brightness of the instrument
panel lights can be adjusted.
1 Darker
2 Brighter
■Instrument panel brightness
adjustment
The instrument panel brightness
levels when the tail lights are on and
off can be adjusted individually.
However, when the surroundings
are bright (daytime, etc.), turning on
the tail lights will not chan ge the
instrument panel brightness.
The clocks can be adjusted on
the audio system screen.
Refer to “NAVIGATION AND
MULTIMEDIA SYSTEM
OWNER’S MANUAL”.
Changing the instrument
panel light brightness
Adjusting the clock
Page 101 of 601
1012-1. Instrument cluster
2
Vehicle status information and indicators
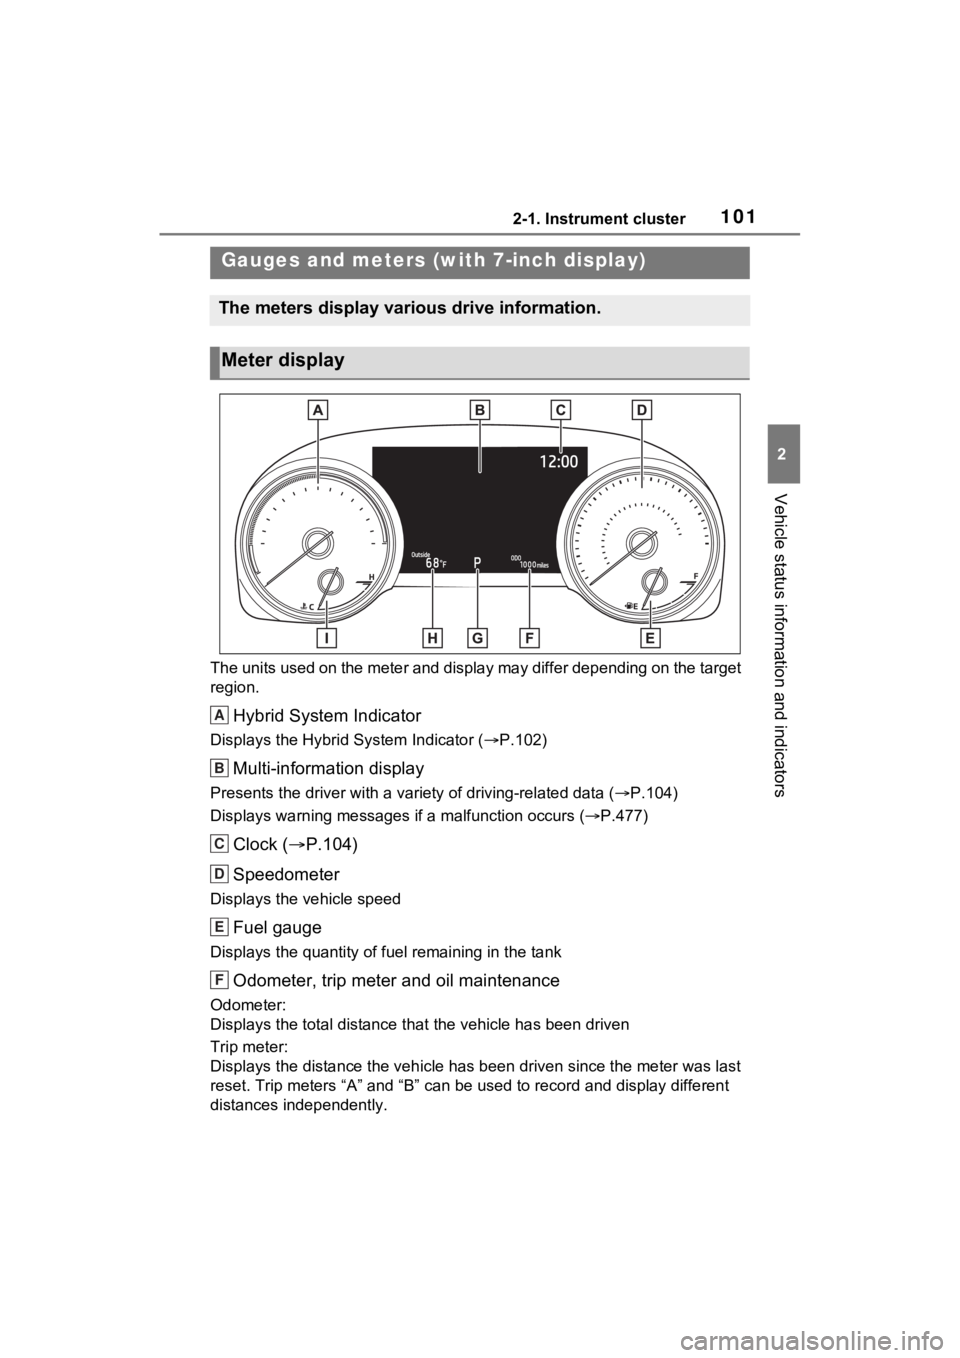
The units used on the meter and display may differ depending on the target
region.
Hybrid System Indicator
Displays the Hybrid System Indicator ( P.102)
Multi-information display
Presents the driver with a variety of driving-related data ( P.104)
Displays warning messages if a malfunction occurs (P.477)
Clock ( P.104)
Speedometer
Displays the vehicle speed
Fuel gauge
Displays the quantity of fu el remaining in the tank
Odometer, trip meter and oil maintenance
Odometer:
Displays the total distance th at the vehicle has been driven
Trip meter:
Displays the distance the vehicle has been driven since the meter was last
reset. Trip meters “A” and “B” c an be used to record and display different
distances independently.
Gauges and meters (with 7-inch display)
The meters display various drive information.
Meter display
A
B
C
D
E
F
Page 102 of 601
1022-1. Instrument cluster
Oil maintenance:
Displays the distance until the next engine oil change.
Shift position and shift range indicator
Displays the selected shift posit ion or selected shift range (P.238)
Outside temperature ( P.102)
Engine coolant temperature gauge
Displays the engine c oolant temperature
■The meters and display illumi-
nate when
The power swit ch is in ON.■When changing driving mode
Speedometer color is changed fol-
lowing the selected driving mode.
( P.333)
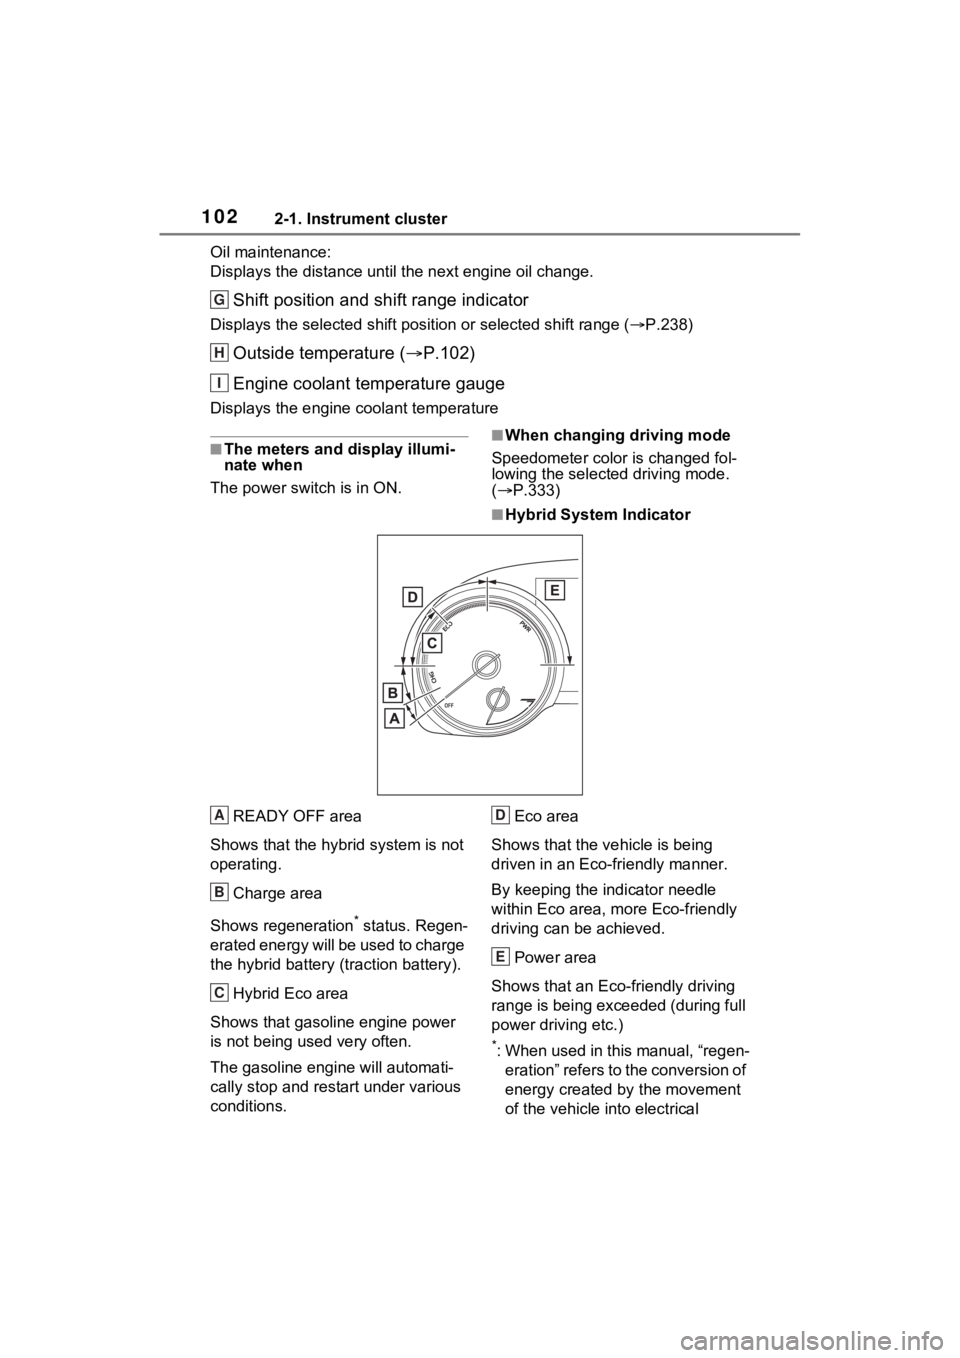
■Hybrid System Indicator
READY OFF area
Shows that the hybrid system is not
operating.
Charge area
Shows regeneration
* status. Regen-
erated energy will be used to charge
the hybrid battery (traction battery).
Hybrid Eco area
Shows that gasoline engine power
is not being used very often.
The gasoline engine will automati-
cally stop and rest art under various
conditions. Eco area
Shows that the vehicle is being
driven in an Eco-friendly manner.
By keeping the indicator needle
within Eco area, more Eco-friendly
driving can be achieved.
Power area
Shows that an Eco-friendly driving
range is being exceeded (during full
power driving etc.)
*: When used in this manual, “regen- eration” refers to the conversion of
energy created by the movement
of the vehicle into electrical
G
H
I
A
B
C
D
E
Page 103 of 601
1032-1. Instrument cluster
2
Vehicle status information and indicators
energy.
In the following situ ation, the Hybrid
System Indicator does not operate.
●“READY” indicator is not illumi-
nated.
●The shift lever is in a range other
than D or S.
■Outside temperature display
●In the following si tuations, the cor-
rect outside tempe rature may not
be displayed, or the display may
take longer than normal to
change.
• When stopped, or driving at low speeds (less than 12 mph [20
km/h])
• When the outside temperature has changed suddenly (at the
entrance/exit of a garage, tunnel,
etc.)
●When “--” or “E” is displayed, the
system may be malfunctioning.
Take your vehicle to your Toyota
dealer.
●Displays the outside temperature
within the range of -40°F (-40°C)
to 122°F (50°C).
●When the outside temperature is
approximately 37°F (3°C) or
lower, the low outside temperature
indicator will flash for approxi-
mately 10 seconds , then stay on.
■Liquid crystal display
P.105
■Customization
Settings (e. g. meter display) can be
changed on the screen of the
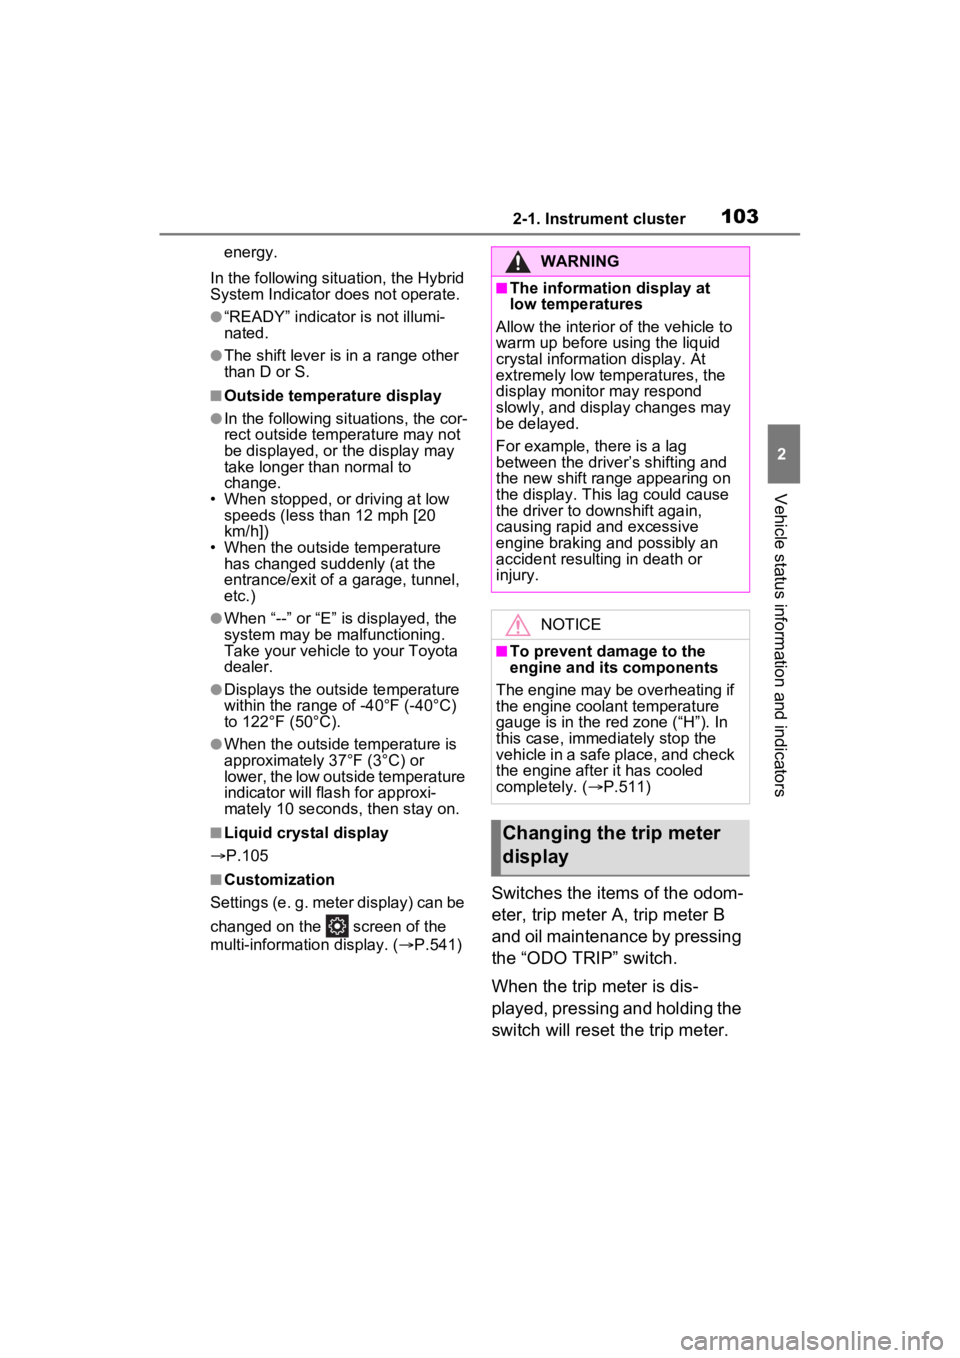
multi-informat ion display. (P.541)Switches the items of the odom-
eter, trip meter A, trip meter B
and oil maintenance by pressing
the “ODO TRIP” switch.
When the trip meter is dis-
played, pressing and holding the
switch will reset the trip meter.
WARNING
■The information display at
low temperatures
Allow the interior of the vehicle to
warm up before using the liquid
crystal information display. At
extremely low temperatures, the
display monitor may respond
slowly, and display changes may
be delayed.
For example, there is a lag
between the driver’s shifting and
the new shift range appearing on
the display. This lag could cause
the driver to downshift again,
causing rapid and excessive
engine braking and possibly an
accident resulting in death or
injury.
NOTICE
■To prevent damage to the
engine and its components
The engine may be overheating if
the engine coolant temperature
gauge is in the red zone (“H”). In
this case, immediately stop the
vehicle in a safe place, and check
the engine after it has cooled
completely. ( P.511)
Changing the trip meter
display
Page 104 of 601
1042-1. Instrument cluster
■Pop-up display
Distance until the next engine oil
change will displayed when a warn-
ing message indicating that oil
maintenance should be performed
soon or is required is displayed.
The brightness of the instrument
panel lights can be adjusted.
1 Darker
2 Brighter
■Instrument panel brightness
adjustment
The instrument panel brightness
levels when the tail lights are on and
off can be adjusted individually.
However, when the surroundings
are bright (daytime, etc.), turning on
the tail lights will not chan ge the
instrument panel brightness.
The clocks can be adjusted on
the audio system screen.
Refer to “NAVIGATION AND
MULTIMEDIA SYSTEM
OWNER’S MANUAL”.
Changing the instrument
panel light brightness
Adjusting the clock
Page 116 of 601

1162-1. Instrument cluster
ID code set, contact your Toyota
dealer.
• “Setting UNIT”
Select to change the units of the
tire pressure displayed.
“Oil Maintenance” ( P.418)
Select to reset the Oil maintenance.
■ Meter Settings
“Language”
Select to change the language on
the multi-inform ation display.
“Units”
Select to change t he units of mea-
sure displayed.
Digital Speed (7-inch display)
Select to enable/disable the speed-
ometer display.
EV indicator ( P.80)
Select to enable/disable the EV
indicator.
Driving information display
settings
Select to set up the following items.
• “Hybrid System”
Select to enable/disable the ECO
Accelerator Guidance ( P.108).
• “Fuel Economy”
Select to change the average fuel
economy display ( P.106).
Audio settings
Select to enable/d isable the audio
system-linked display.
Vehicle information dis-
play settings
• “Display Contents” Select to displa
y the following
items.
“Energy monitor”
Select to enable/disable the Energy
monitor ( P.122)
“AWD” (AWD models)
Select to enable /disable the AWD
system display ( P.112).
• “Drive Info Type” (4.2-inch dis- play)
Select to change the drive informa-
tion type between trip and total
( P.111).
• “Drive Info Items” (4.2-inch dis- play)
Select to set the items on the upper
and lower side of the drive informa-
tion screen. from th ree items, aver-
age speed, distance and total time.
“Trip Summary” (4.2-inch dis-
play)
Select to set the items displayed
when the power switch is turned off.
“Pop-Up Display”
Select to enable/d isable the follow-
ing pop-up displays, which may
appear in some situations.
• TbT Navigation (if equipped)
• Telephone (if equipped)
• Audio operation
• Volume operation
• Voice control (if equipped)
• Brightness
“Multi-Information Display
OFF”
A blank screen is displayed.
“Default Settings”
Page 230 of 601

2294-1. Before driving
4
Driving
5Shift into P and turn off the
hybrid system.
When restarting after parking
on a slope:
1 With the transmission in P,
start the hybrid system. Be
sure to keep the brake pedal
depressed.
2 Shift into a forward gear. If
reversing, shift into R.
3 If the parking brake is in man-
ual mode, release the park-
ing brake. ( P.243)
4 Release the brake pedal, and
slowly pull or back away from
the wheel blocks. Stop and
apply the brakes.
5 Have someone retrieve the
blocks.
■Break-in schedule
If your vehicle is new or equipped
with any new power train compo-
nents (such as an engine, transmis-
sion, differential or wheel bearing),
Toyota recommends that you do not
tow a trailer unt il the vehicle has
been driven for over 500 miles (800
km).
After the vehicle has been driven for
over 500 miles (800 km), you can
start towing. However, for the next
500 miles (800 km), drive the vehi-
cle at a speed of less than 45 mph
(72 km/h) when towing a trailer, and
avoid full throttle acceleration.
■Maintenance
●If you tow a traile r, your vehicle
will require more f requent mainte-
nance due to the additional load.
(See “Scheduled Maintenance
Guide” or “Owner’s Manual Sup-
plement”.)
●Retighten the fixing bolts of the
towing ball and bracket after
approximately 600 miles (1000
km) of tra iler towing.
■If trailer sway occurs
One or more factors (crosswinds,
passing vehicles, rough roads, etc.)
can adversely affect handling of
your vehicle and t railer, causing
instability.
●If trailer swaying occurs:
• Firmly grip the steering wheel. Steer straight ahead.
Do not try to contr ol trailer sway-
ing by turning the steering wheel.
• Begin releasing the accelerator pedal immediately but very gradu-
ally to reduce speed.
Do not increase speed. Do not
apply vehicle brakes.
If you make no extreme correction
with the steering or brakes, your
vehicle and trailer should stabilize (if
enabled, Trailer Sway Control can
also help to stabilize the vehicle and
trailer.).
●After the trailer swaying has
stopped:
• Stop in a safe place. Get all occu- pants out of the vehicle.
• Check the tires of the vehicle and the trailer.
• Check the load in the trailer.
Make sure the load has not
shifted.
Make sure the tongue weight is
appropriate, if possible.
• Check the load in the vehicle. Make sure the vehicle is not over-
loaded after occupants get in.
If you cannot find any problems, the
speed at which trailer swaying
occurred is beyond the limit of your
particular vehicle-trailer combina-
tion. Drive at a lower speed to pre-
vent instability. Remember that
swaying of the towing vehicle-trailer
increases as speed increases.
Page 400 of 601
399
6
6
Maintenance and care
Maintenance and care
6-1. Maintenance and careCleaning and protecting the vehicle exterior .......... 400
Cleaning and protecting the vehicle interior ........... 403
6-2. Maintenance Maintenance requirements.................................. 406
General maintenance.. 407
Emission inspection and maintenance (I/M) pro-
grams ........................ 410
6-3. Do-it-yourself mainte- nance
Do-it-yourself service pre- cautions ..................... 411
Hood ........................... 413
Positioning a floor jack 415
Engine compartment ... 416
12-volt battery ............. 422
Tires ............................ 424
Tire inflation pressure . 438
Wheels ......... ...............440
Air conditioning filter .... 441
Cleaning the hybrid battery (traction battery) air intake
vents and filters ......... 443
Electronic key battery.. 447
Checking and replacing fuses.......................... 449
Light bulbs................... 451
Page 401 of 601
4006-1. Maintenance and care
6-1.Maintenance and care
Working from top to bottom,
liberally apply water to the
vehicle body, wheel wells and
underside of the vehicle to
remove any dirt and dust.
Wash the vehicle body using
a sponge or soft cloth, such
as a chamois.
For hard-to-remove marks,
use car wash soap and rinse
thoroughly with water.
Wipe away any water.
Wax the vehicle when the
waterproof coating deterio-
rates.
If water does not bead on a clean
surface, apply wax when the vehi-
cle body is cool.
■Automatic car washes
●Before washing the vehicle:
• Fold the mirrors
• Disable the powe r sliding door
system
• Disable the power back door sys- tem (if equipped)
Start washing from the front of the
vehicle. Make sure to extend the
mirrors before driving.
●Brushes used in automatic car
washes may scratch the vehicle
surface, parts (wheel, etc.) and
harm your vehicle’s paint.
●Rear spoiler may not be washable
in some automatic car washes.
There may also be an increased
risk of damage to vehicle.
■High pressure car washes
As water may enter the cabin, do
not bring the nozzle tip near the
gaps around the doors or perimeter
of the windows, or spray these
areas continuously.
■Note for a smart key system
If the door handle becomes wet
while the electronic key is within the
effective range, t he door may lock
and unlock repeatedly. In that case,
follow the following correction pro-
cedures to wash the vehicle:
●Place the key in a position 6 ft. (2
m) or more separate from the
vehicle while the vehicle is being
washed. (Take care to ensure that
the key is not stolen.)
●Set the electronic key to battery-
saving mode to disable the smart
key system. ( P.165)
●If the electronic key is inside the
vehicle and a door handle
becomes wet during a car wash, a
buzzer may sound outside the
vehicle and “Key Detected in
Vehicle” may be shown on the
multi-information d isplay. To turn
off the alarm, lock all the doors.
■Wheels and wheel ornaments
●Remove any dirt immediately by
using a neutral detergent.
●Wash detergent off with water
immediately after use.
●To protect the paint from damage,
make sure to obs erve the follow-
ing precautions.
• Do not use acidic, alkaline or
abrasive detergent
• Do not use hard brushes
• Do not use detergent on the
Cleaning a nd protect-
ing the vehicle exte-
rior
Perform the following to
protect the vehicle and
maintain it in prime condi-
tion:
Cleaning instructions
Page 402 of 601
4016-1. Maintenance and care
6
Maintenance and care
wheels when they are hot, such
as after driving or parking in hot
weather
■Bumpers
Do not scrub with abrasive cleaners.
■Plated portions
If dirt cannot be removed, clean the
parts as follows:
●Use a soft cloth dampened with
an approximately 5% solution of
neutral detergent and water to
clean the dirt off.
●Wipe the surface with a dry, soft
cloth to remove any remaining
moisture.
●To remove oily deposits, use alco-
hol wet wipes or a similar product.
WARNING
■When washing the vehicle
Do not apply water to the inside of
the engine compartment. Doing
so may cause the electrical com-
ponents, etc. to catch fire.
■When cleaning the windshield
(vehicles with rain-sensing
windshield wipers)
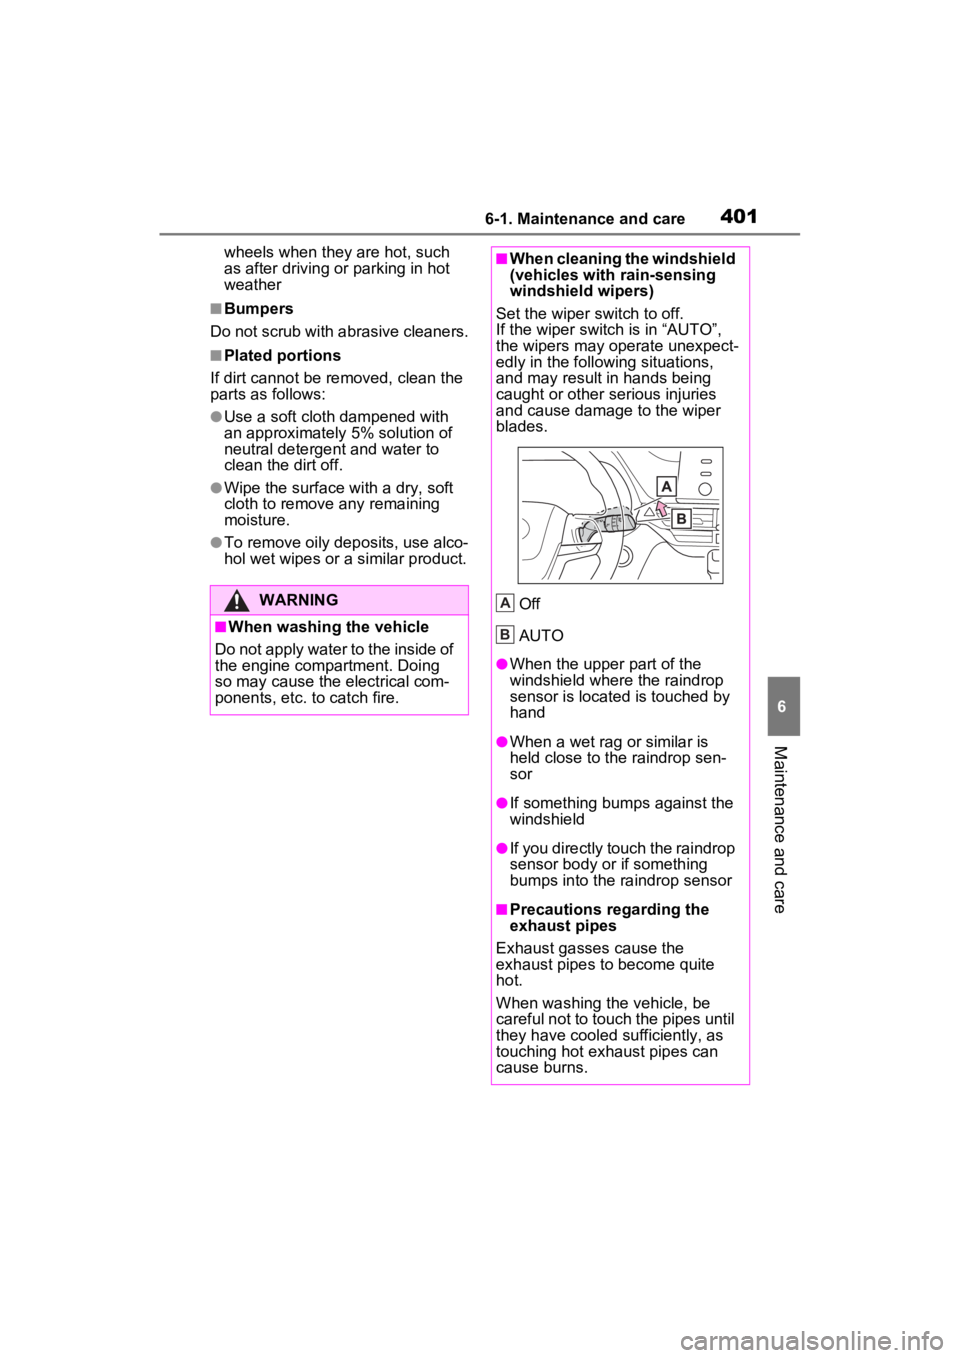
Set the wiper switch to off.
If the wiper switch is in “AUTO”,
the wipers may operate unexpect-
edly in the following situations,
and may result in hands being
caught or other serious injuries
and cause damage to the wiper
blades.
Off
AUTO
●When the upper part of the
windshield where the raindrop
sensor is located is touched by
hand
●When a wet rag or similar is
held close to the raindrop sen-
sor
●If something bumps against the
windshield
●If you directly touch the raindrop
sensor body or if something
bumps into the ra indrop sensor
■Precautions regarding the
exhaust pipes
Exhaust gasses cause the
exhaust pipes to become quite
hot.
When washing the vehicle, be
careful not to touch the pipes until
they have cooled sufficiently, as
touching hot exhaust pipes can
cause burns.
A
B