ECO mode TOYOTA SIENNA HYBRID 2021 Owners Manual (in English)
[x] Cancel search | Manufacturer: TOYOTA, Model Year: 2021, Model line: SIENNA HYBRID, Model: TOYOTA SIENNA HYBRID 2021Pages: 601, PDF Size: 32.07 MB
Page 26 of 601
26Pictorial index
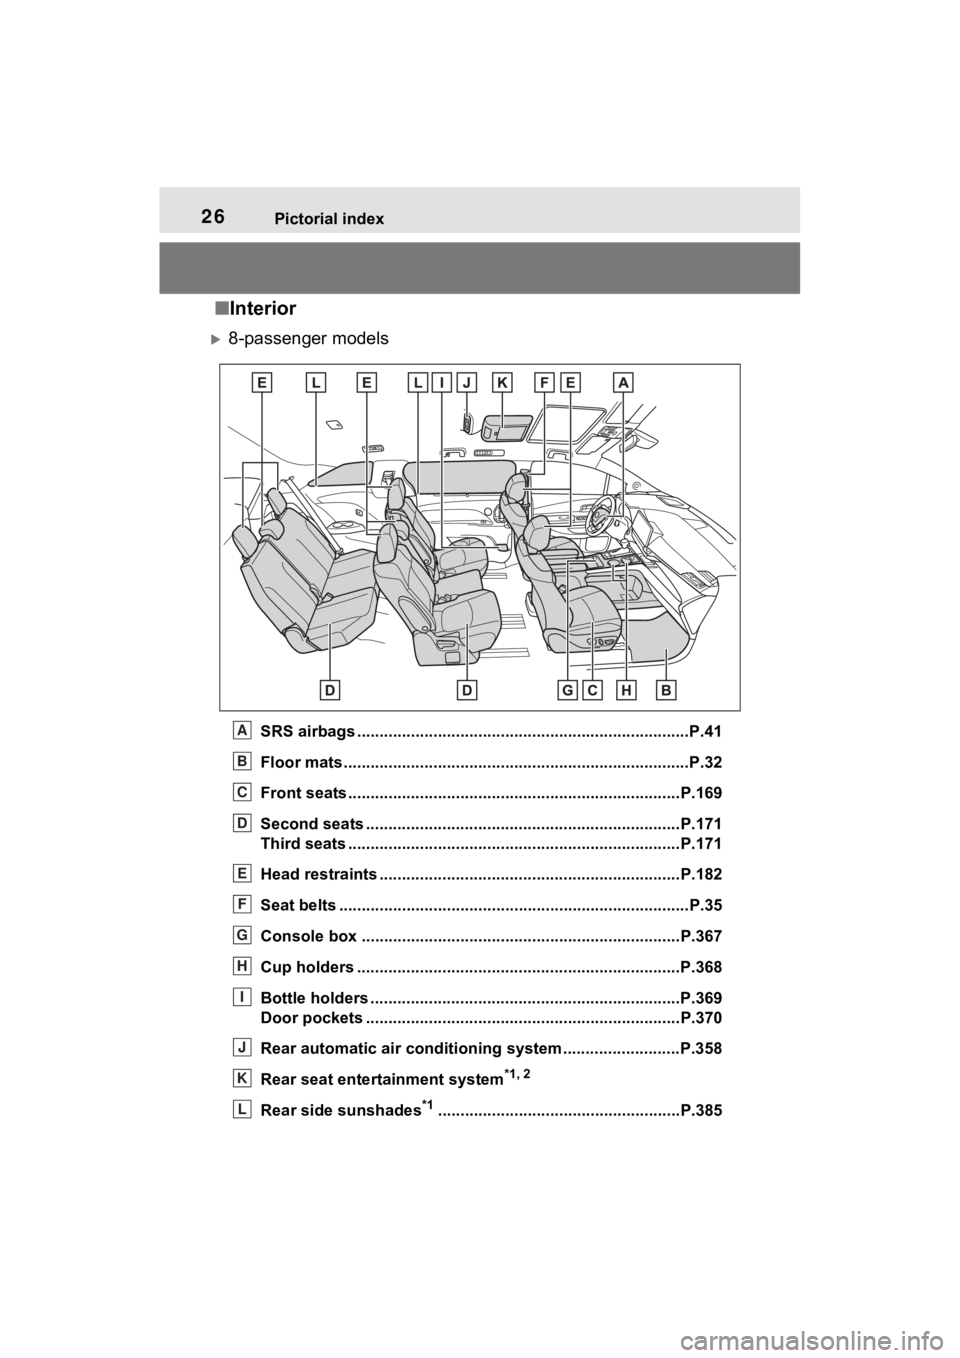
■Interior
8-passenger models
SRS airbags .................................................... ......................P.41
Floor mats..................................................... ........................P.32
Front seats .................................................... ......................P.169
Second seats ......................................................................P.171
Third seats .................................................... ......................P.171
Head restraints ...................................................................P.182
Seat belts ..................................................... .........................P.35
Console box .................................................... ...................P.367
Cup holders ........................................................................P.368
Bottle holders .....................................................................P.369
Door pockets ................................................... ...................P.370
Rear automatic air conditioning system ......................... .P.358
Rear seat entertainment system
*1, 2
Rear side sunshades*1......................................................P.385
A
B
C
D
E
F
G
H
I
J
K
L
Page 27 of 601
27Pictorial index
*1: If equipped
*2: Refer to “NAVIGATION AND MULTIMEDIA SYSTEM OWNER’S MAN-
UAL”.
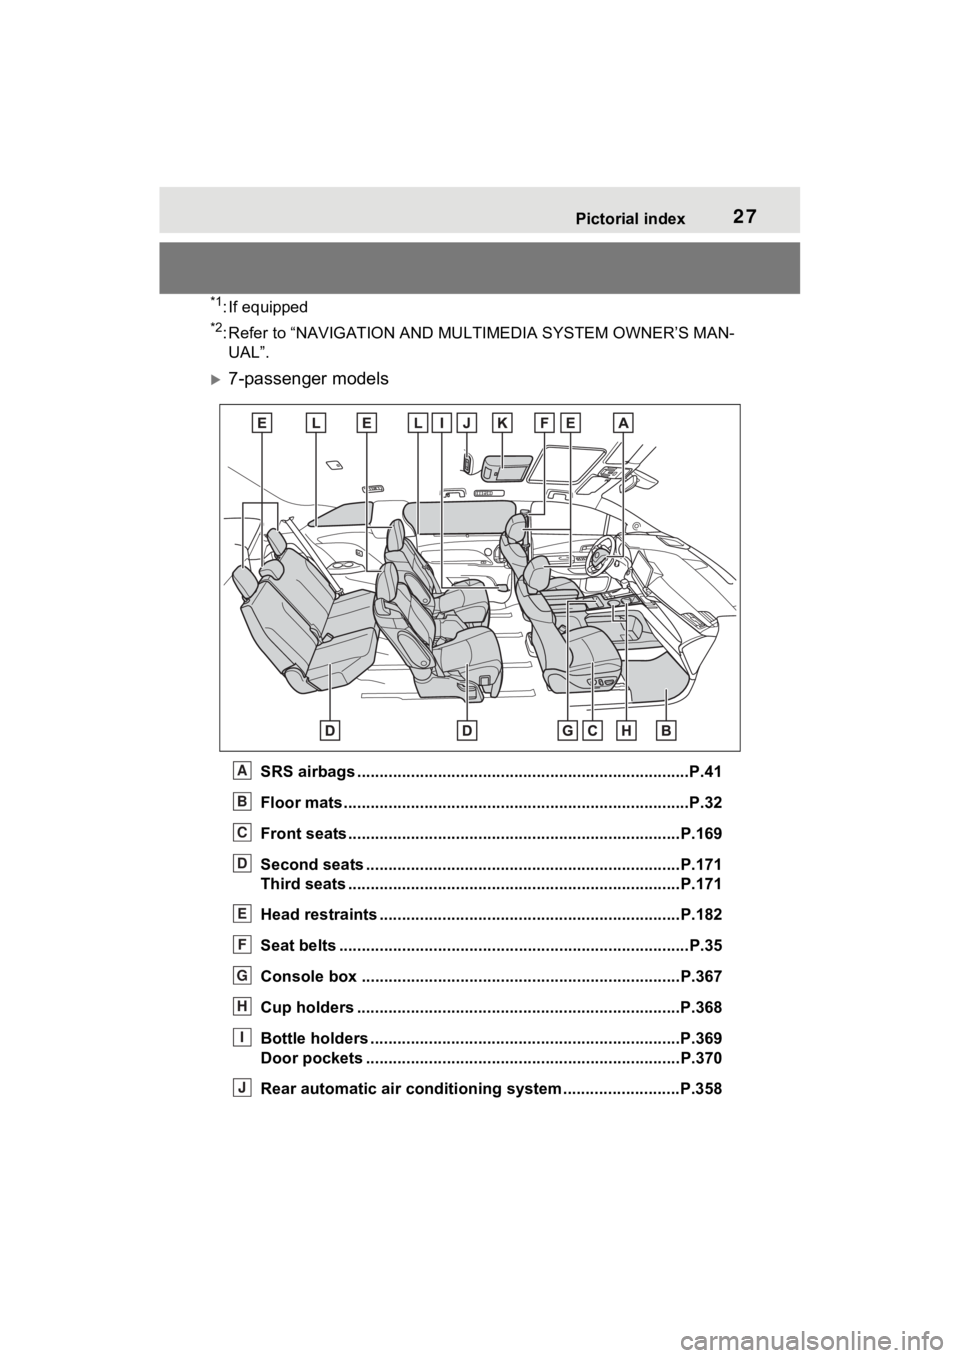
7-passenger models
SRS airbags .................................................... ......................P.41
Floor mats..................................................... ........................P.32
Front seats .................................................... ......................P.169
Second seats ......................................................................P.171
Third seats .................................................... ......................P.171
Head restraints ...................................................................P.182
Seat belts ..................................................... .........................P.35
Console box .................................................... ...................P.367
Cup holders ........................................................................P.368
Bottle holders .....................................................................P.369
Door pockets ................................................... ...................P.370
Rear automatic air conditioning system ......................... .P.358A
B
C
D
E
F
G
H
I
J
Page 32 of 601
321-1. For safe use
1-1.For safe use
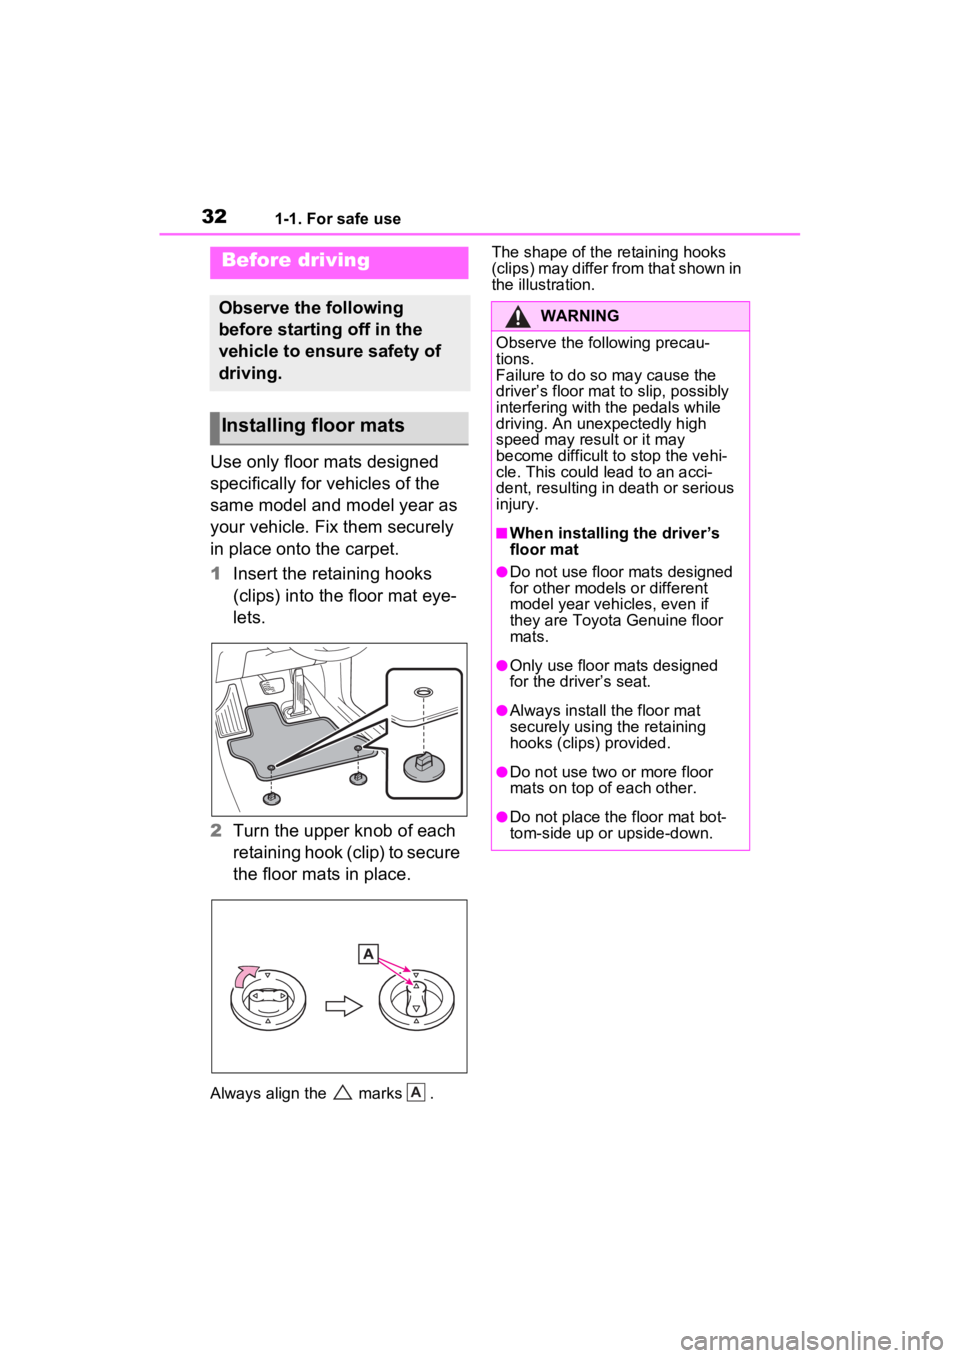
Use only floor mats designed
specifically for vehicles of the
same model and model year as
your vehicle. Fix them securely
in place onto the carpet.
1Insert the retaining hooks
(clips) into the floor mat eye-
lets.
2 Turn the upper knob of each
retaining hook (clip) to secure
the floor mats in place.
Always align the marks . The shape of the retaining hooks
(clips) may differ from that shown in
the illustration.
Before driving
Observe the following
before starting off in the
vehicle to ensure safety of
driving.
Installing floor mats
A
�:�$�5�1�,�1�*
Observe the following precau-
tions.
Failure to do so may cause the
driver’s floor mat to slip, possibly
interfering with t
he pedals while
driving. An unexpectedly high
speed may result or it may
become difficult to stop the vehi-
cle. This could lead to an acci-
dent, resulting in death or serious
injury.
■When installing the driver’s
floor mat
●Do not use floor mats designed
for other models or different
model year vehicles, even if
they are Toyota Genuine floor
mats.
●Only use floor mats designed
for the driver’s seat.
●Always install the floor mat
securely using the retaining
hooks (clips) provided.
●Do not use two or more floor
mats on top of each other.
●Do not place the floor mat bot-
tom-side up or upside-down.
Page 61 of 601
611-2. Child safety
1
For safety and security
■When installing a child
restraint system to a front
passenger seat
For the safety of a child, install a
child restraint system to a rear seat. When installing the child
restraint system to a front pas-
senger seat is unavoidable,
adjust the seat as follows and
install the child restraint system.
Raise the seatback as much
as possible.
Move the front seat fully rear-
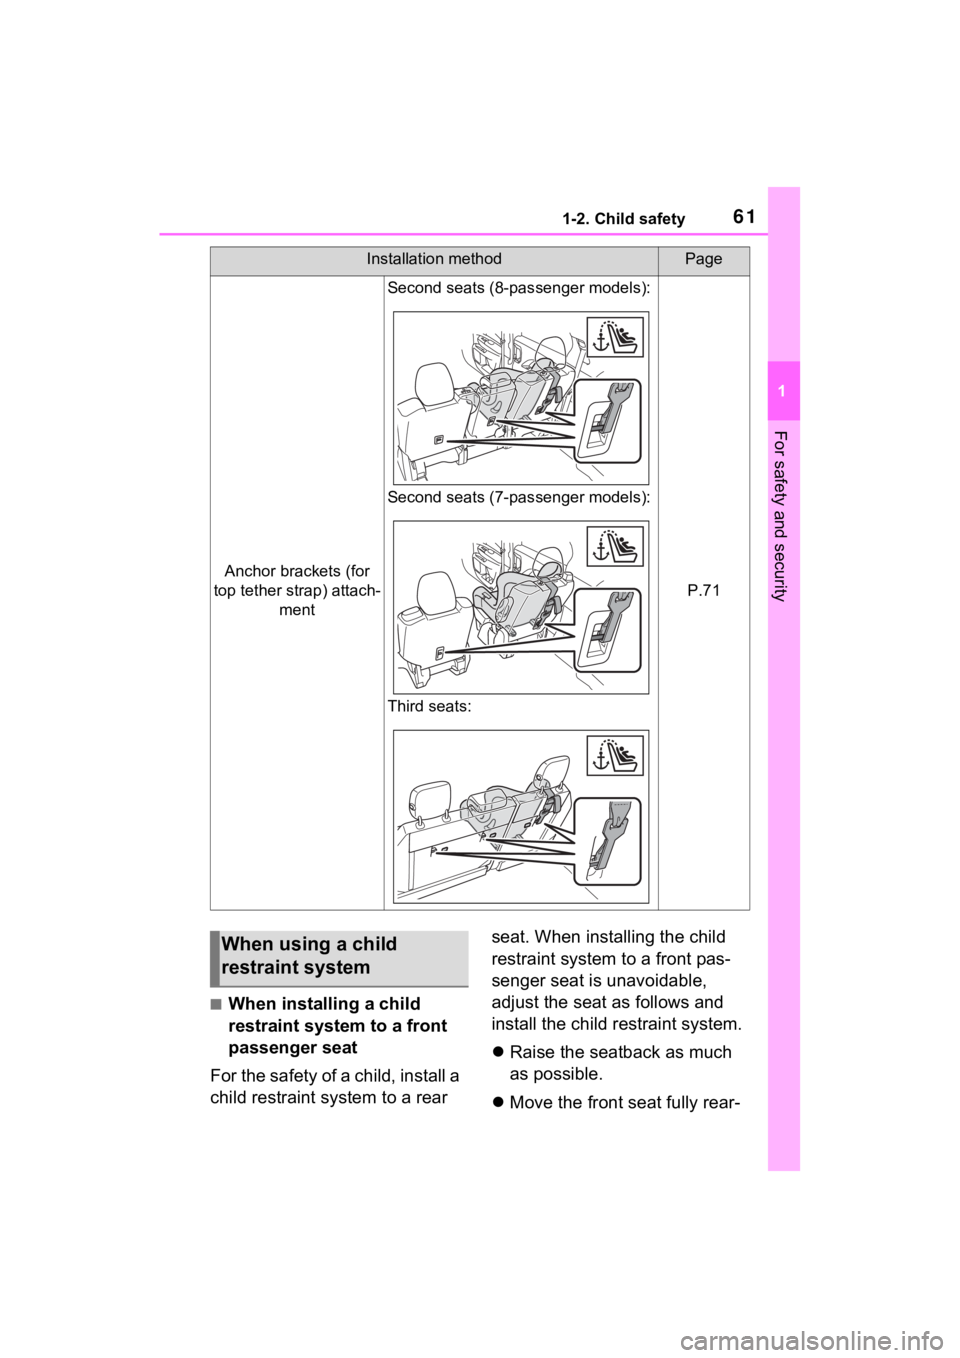
Anchor brackets (for
top tether strap) attach- ment
Second seats (8-pas senger models):
Second seats (7-pas senger models):
Third seats:
P.71
Installation methodPage
When using a child
restraint system
Page 67 of 601
671-2. Child safety
1
For safety and security
WARNING
■When installing a child
restraint system
Observe the following precau-
tions.
Failure to do so m ay result in
death or serious injury.
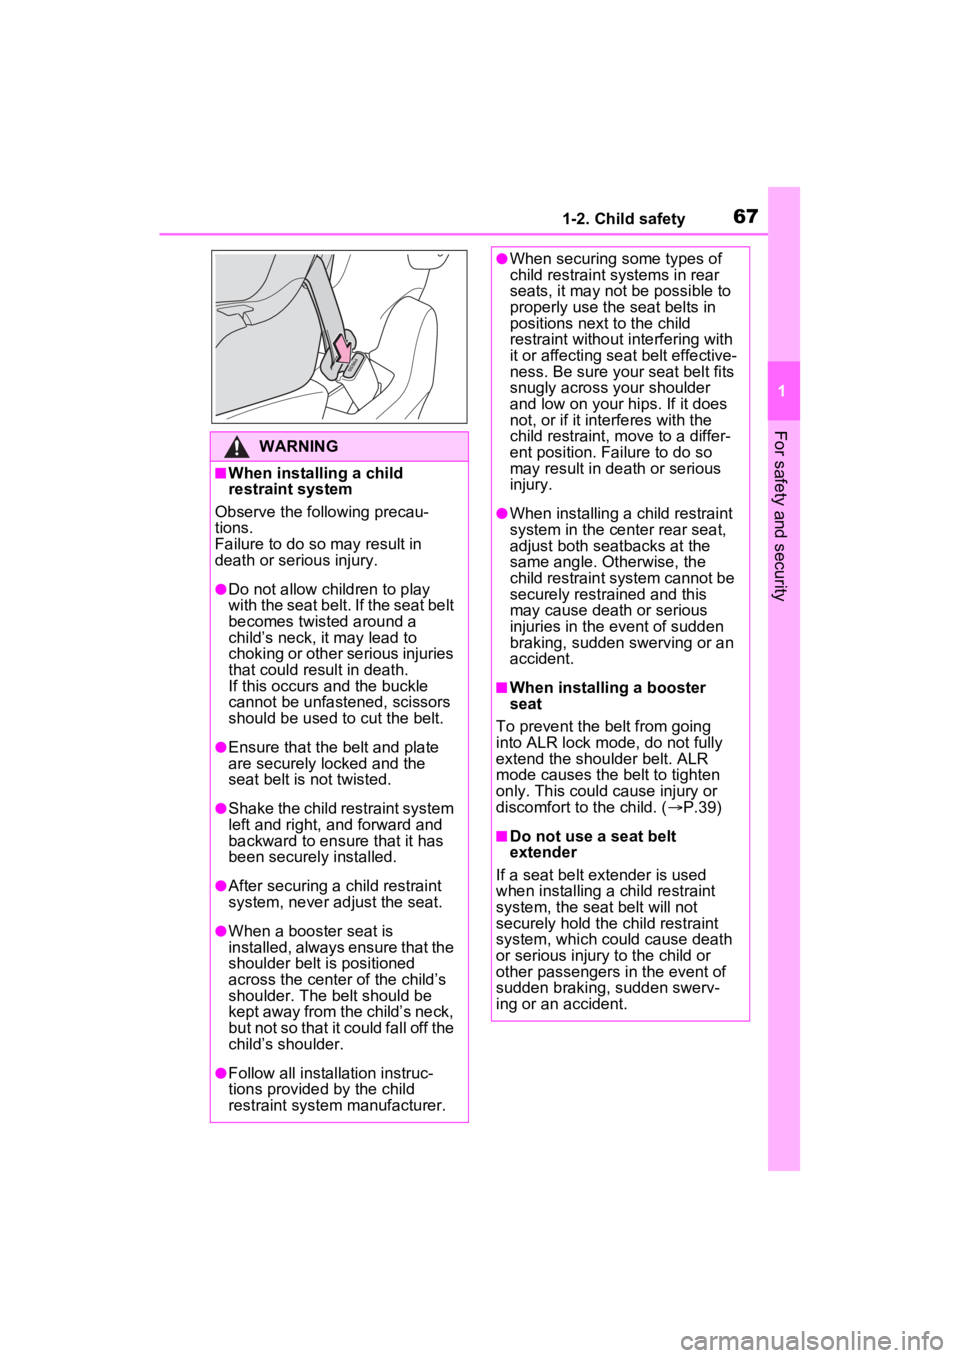
●Do not allow children to play
with the seat belt. If the seat belt
becomes twisted around a
child’s neck, it may lead to
choking or other serious injuries
that could result in death.
If this occurs and the buckle
cannot be unfastened, scissors
should be used to cut the belt.
●Ensure that the belt and plate
are securely locked and the
seat belt is not twisted.
●Shake the child restraint system
left and right, and forward and
backward to ensure that it has
been securely installed.
●After securing a child restraint
system, never adjust the seat.
●When a booster seat is
installed, always ensure that the
shoulder belt is positioned
across the center of the child’s
shoulder. The belt should be
kept away from the child’s neck,
but not so that it could fall off the
child’s shoulder.
●Follow all installation instruc-
tions provided by the child
restraint system manufacturer.
●When securing some types of
child restraint systems in rear
seats, it may not be possible to
properly use the seat belts in
positions next to the child
restraint without interfering with
it or affecting s eat belt effective-
ness. Be sure your seat belt fits
snugly across your shoulder
and low on your hips. If it does
not, or if it interferes with the
child restraint, move to a differ-
ent position. Fa ilure to do so
may result in death or serious
injury.
●When installing a child restraint
system in the ce nter rear seat,
adjust both seatbacks at the
same angle. Otherwise, the
child restraint system cannot be
securely restrained and this
may cause death or serious
injuries in the event of sudden
braking, sudden swerving or an
accident.
■When installing a booster
seat
To prevent the belt from going
into ALR lock mode, do not fully
extend the shoulder belt. ALR
mode causes the belt to tighten
only. This could cause injury or
discomfort to the child. ( P.39)
■Do not use a seat belt
extender
If a seat belt extender is used
when installing a child restraint
system, the seat belt will not
securely hold the child restraint
system, which could cause death
or serious injury to the child or
other passengers in the event of
sudden braking, sudden swerv-
ing or an accident.
Page 68 of 601
681-2. Child safety
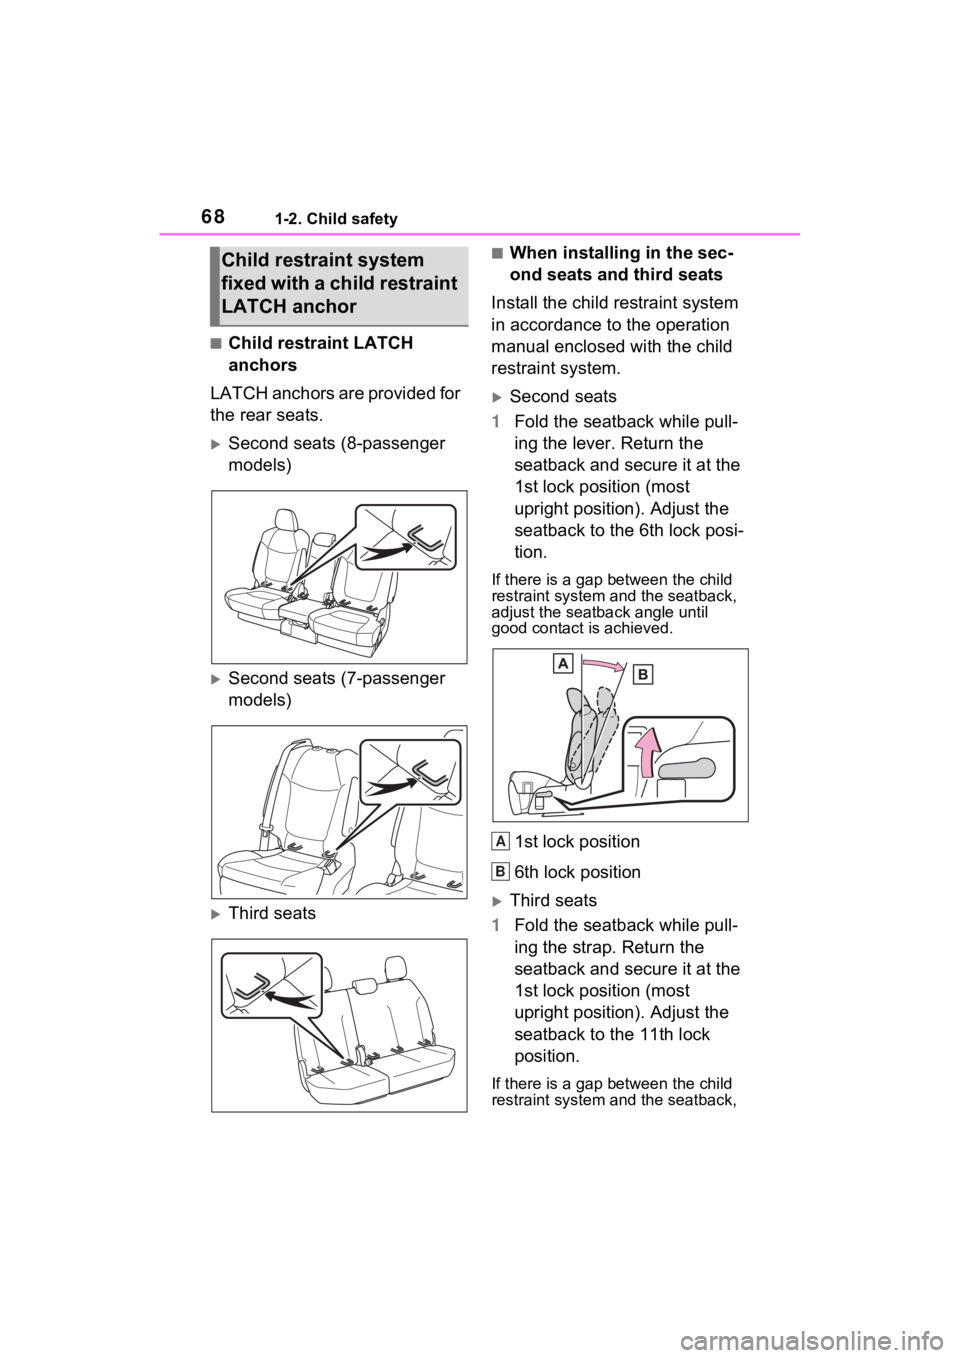
■Child restraint LATCH
anchors
LATCH anchors are provided for
the rear seats.
Second seats (8-passenger
models)
Second seats (7-passenger
models)
Third seats
■When installing in the sec-
ond seats and third seats
Install the child restraint system
in accordance to the operation
manual enclosed with the child
restraint system.
Second seats
1 Fold the seatback while pull-
ing the lever. Return the
seatback and secure it at the
1st lock position (most
upright position). Adjust the
seatback to the 6th lock posi-
tion.
If there is a gap between the child
restraint system and the seatback,
adjust the seatback angle until
good contact is achieved.
1st lock position
6th lock position
Third seats
1 Fold the seatback while pull-
ing the strap. Return the
seatback and secure it at the
1st lock position (most
upright position). Adjust the
seatback to the 11th lock
position.
If there is a gap between the child
restraint system and the seatback,
Child restraint system
fixed with a child restraint
LATCH anchor
A
B
Page 71 of 601
711-2. Child safety
1
For safety and security
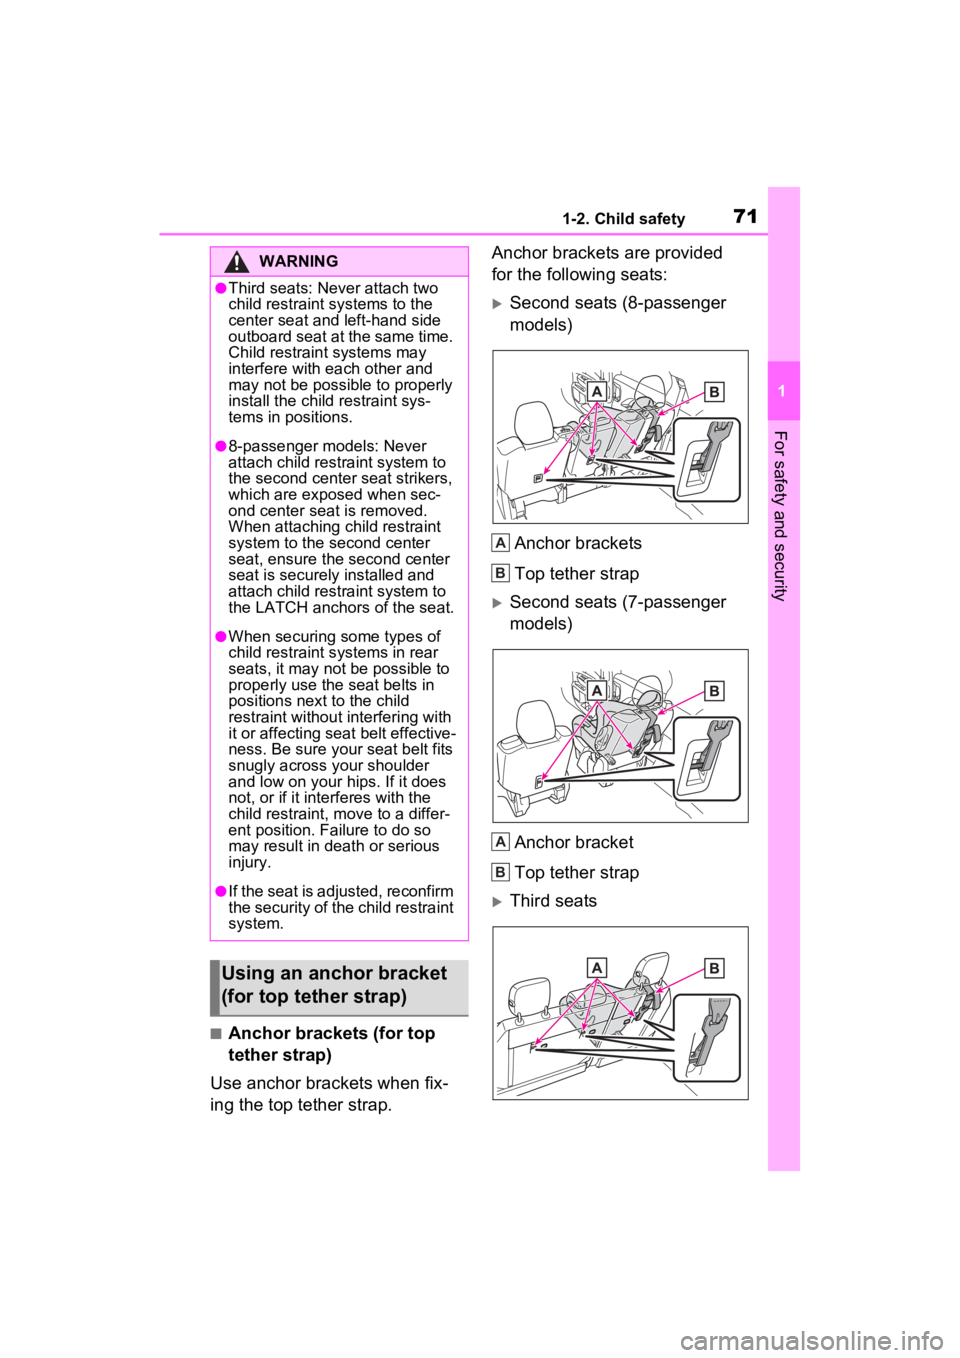
■Anchor brackets (for top
tether strap)
Use anchor brackets when fix-
ing the top tether strap. Anchor brackets are provided
for the following seats:
Second seats (8-passenger
models)
Anchor brackets
Top tether strap
Second seats (7-passenger
models)Anchor bracket
Top tether strap
Third seats
WARNING
●Third seats: Never attach two
child restraint systems to the
center seat and left-hand side
outboard seat at the same time.
Child restraint systems may
interfere with each other and
may not be possible to properly
install the child restraint sys-
tems in positions.
●8-passenger models: Never
attach child restraint system to
the second center seat strikers,
which are exposed when sec-
ond center seat is removed.
When attaching child restraint
system to the second center
seat, ensure the second center
seat is securely installed and
attach child restraint system to
the LATCH anchors of the seat.
●When securing some types of
child restraint s ystems in rear
seats, it may not be possible to
properly use the seat belts in
positions next to the child
restraint without interfering with
it or affecting seat belt effective-
ness. Be sure your seat belt fits
snugly across your shoulder
and low on your hips. If it does
not, or if it interferes with the
child restraint, move to a differ-
ent position. Failure to do so
may result in death or serious
injury.
●If the seat is adjusted, reconfirm
the security of the child restraint
system.
Using an anchor bracket
(for top tether strap)
A
B
A
B
Page 76 of 601
761-3. Emergency assistance
After you have signed the
Telematics Subscription Ser-
vice Agreement and are
enrolled, you can begin receiv-
ing services.
A variety of subscription terms
are available for purchase. Con-
tact your Toyota dealer, call the
following appropriate Customer
Experience Center or push the
“SOS” button in your vehicle for
further subscription details.
The United States
1-800-331-4331
Canada
1-888-869-6828
Puerto Rico
1-877-855-8377
■Safety Connect Services Infor-
mation
●Phone calls using the vehicle’s
Bluetooth® technology will not be
possible when Safety Connect is
active and in use.
●Safety Connect is available begin-
ning Fall 2009 on select Toyota
models (in the contiguous United
States only). Contact with the
Safety Connect response center
is dependent upon the telematics
device being in operative condi-
tion, cellular connection availabil-
ity, and GPS satellite signal
reception, which can limit the abil-
ity to reach the response center or
receive emergency service sup-
port. Enrollment and Telematics
Subscription Service Agreement
are required. A variety of subscrip-
tion terms are available; charges vary by subscription term selected
and location.
●Automatic Collision Notification,
Emergency Assistance and Stolen
Vehicle Location are available in
the United States, including
Hawaii and Alaska
, Puerto Rico
and Canada, and Enhanced
Roadside Assistance are avail-
able in the United States, Puerto
Rico and Canada.
●Automatic Collision Notification,
Emergency Assistance, Stolen
Vehicle and Enhanced Road
Assistance are not available in the
U.S. Virgin Islands.
For vehicles first sold in the U.S.
Virgin Islands, no Safety Connect
services will function in or outside
the U.S. Virgin Islands.
●Safety Connect services are not
subject to section 255 of the Tele-
communications Act and the
device is not TTY compatible.
■Languages
The Safety Connect response cen-
ter will offer suppor t in multiple lan-
guages. The Safety Connect system
will offer voice prompts in English,
Spanish, and French. Please indi-
cate your language of choice when
enrolling.
■When contacting the response
center
You may be unable to contact the
response center if the network is
busy.
When the power switch is turned
to ON, the red indicator light
comes on for 2 seconds then
turns off. Afterward, the green
indicator light comes on, indicat-
ing that the service is active.
Subscription
Safety Connect LED light
Indicators
Page 83 of 601
831-4. Hybrid system
1
For safety and security
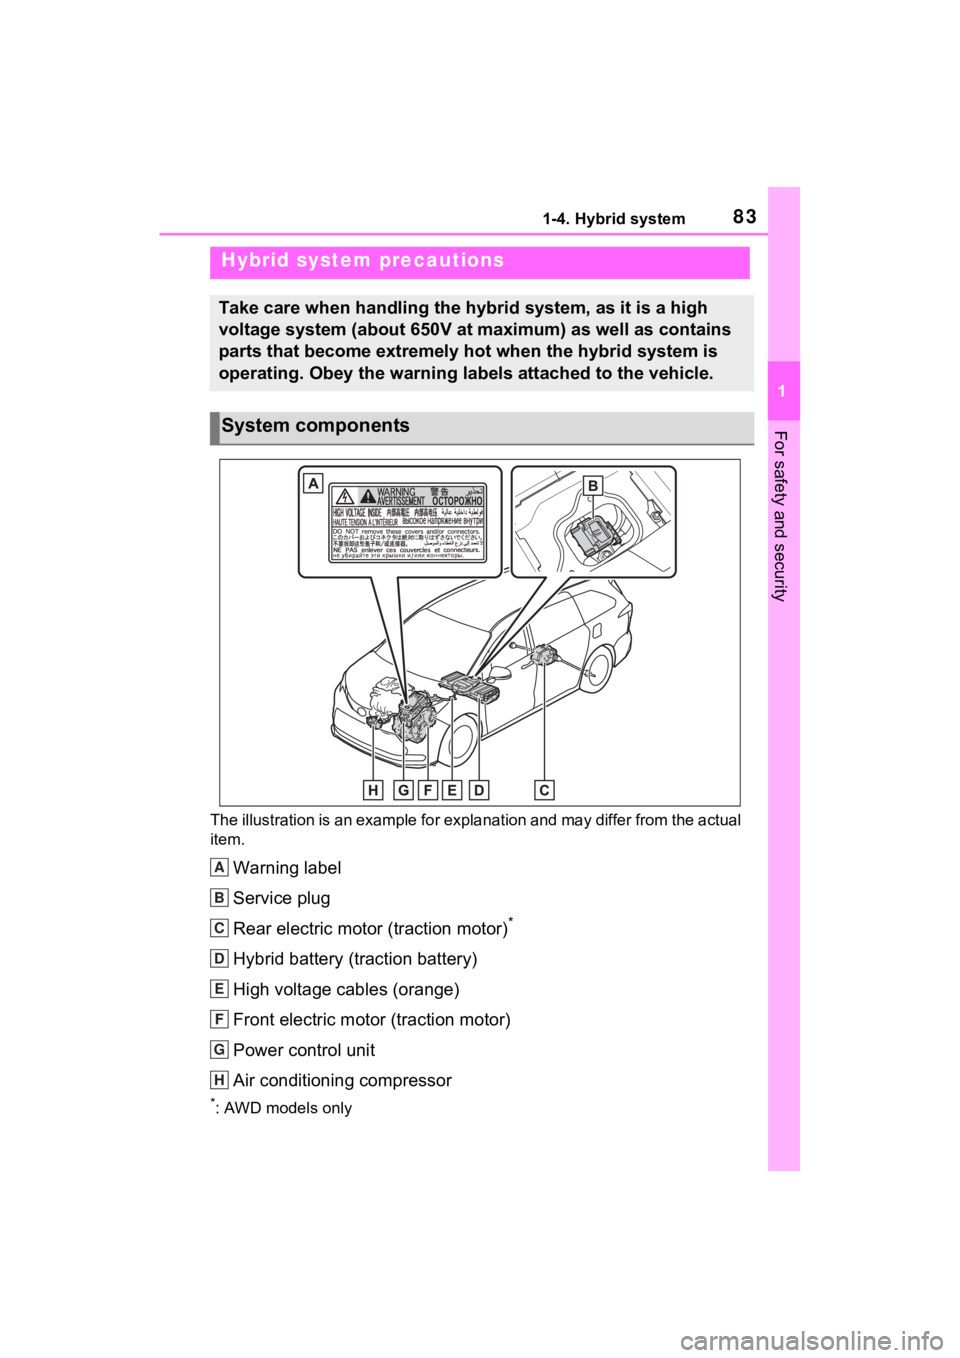
The illustration is an example for explanation and may differ from the actual
item.
Warning label
Service plug
Rear electric motor (traction motor)
*
Hybrid battery (traction battery)
High voltage cables (orange)
Front electric motor (traction motor)
Power control unit
Air conditioning compressor
*: AWD models only
Hybrid system precautions
Take care when handling the hybrid system, as it is a high
voltage system (about 650V at maximum) as well as contains
parts that become extremely hot when the hybrid system is
operating. Obey the warning labels attached to the vehicle.
System components
A
B
C
D
E
F
G
H
Page 96 of 601
962-1. Instrument cluster
*1: This light illuminates on the multi-informatio n display with a
message.
*2: Depending on the operating con- ditions, the color and illuminat-
ing/flashing state of the light
change.
*3: The light comes on when the system is turned off.
*4: Intuitive parking assist OFF indi-cator turns on when the power
switch is turned to ON while the
Intuitive parking assist function is
on. It will turn off after a few sec-
onds.
*5: These lights turn on when the
power switch is turned to ON to
indicate that a system check is
being performed. They will turn
off after the hybr id system is on,
or after a few seconds. There
may be a malfunction in a sys-
tem if the lights do not turn on, or
turn off. Have the vehicle
inspected by your Toyota dealer.
*6: This light illumi nates on the out-
side rear view mirrors.
*7: This light illumi nates on the cen- ter panel.
*8: When the outside temperature is
approximately 37°F (3°C) or
lower, the indicator will flash for
approximately 10 seconds, then
stay on.
*9: With 4.2-inch display
*10: With 7-inch display
■BSM (Blind Spot Monitor) out-
side rear view mirror indicators
(if equipped)
In order to confirm operation, the
BSM outside rear view mirror indica-
tors illuminate in t he following situa-
tions:
●When the power switch is turned
to ON while the BSM function is
enabled on the screen of the
multi-information display.
●When the BSM function is
enabled on the screen of the
multi-information display while the
power switch is in ON.
If the system is functioning correctly,
the BSM outside rear view mirror
indicators will turn off after a few
seconds.
If the BSM outside rear view mirror
indicators do not illuminate or do not
turn off, there may be a malfunction
in the system. If this occurs, have
the vehicle inspected by your
Toyota dealer.
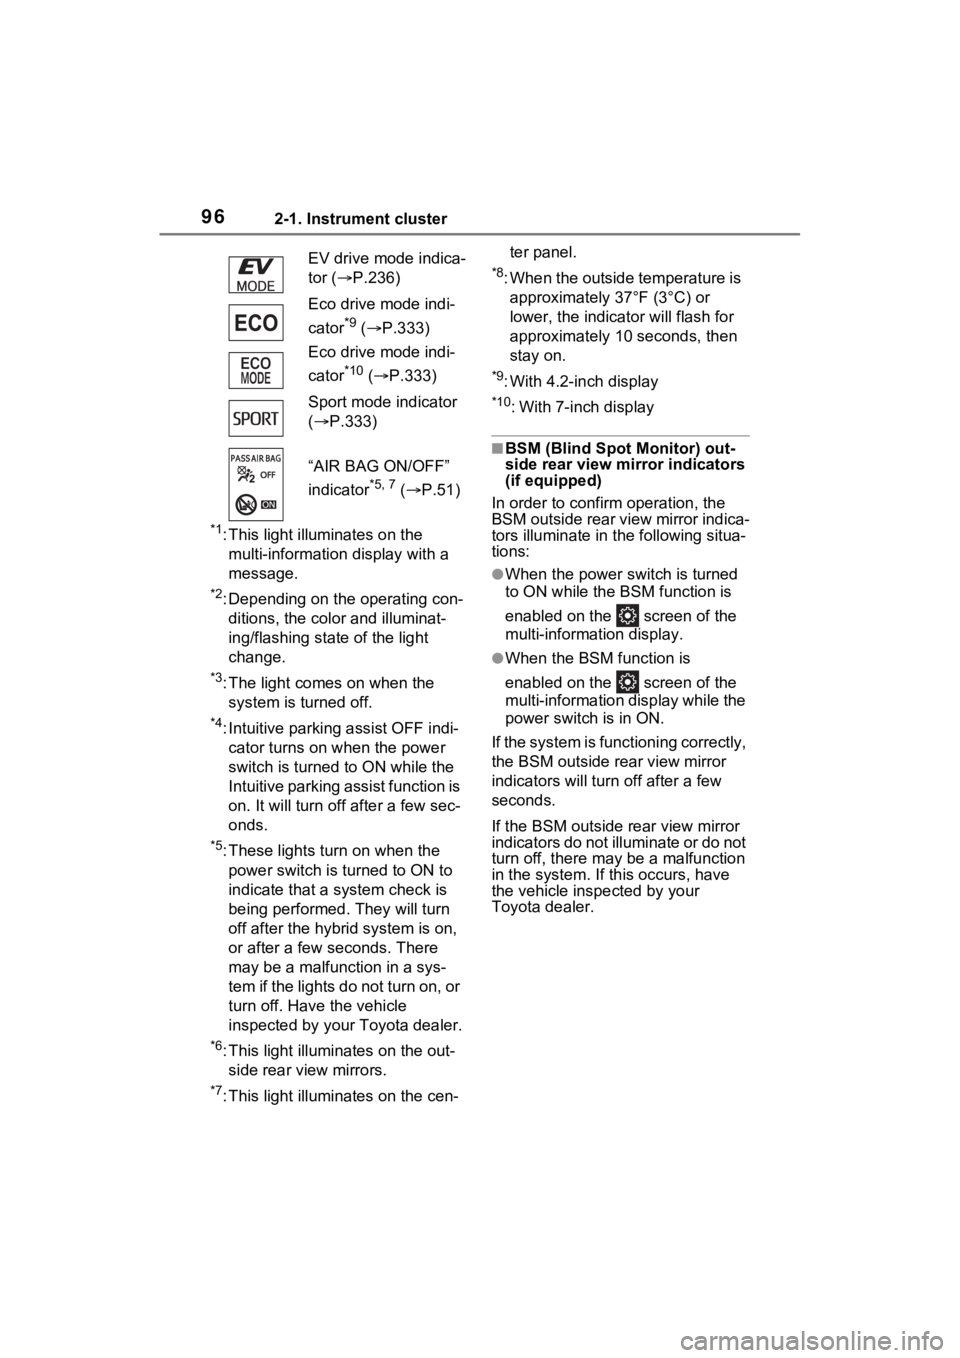
EV drive mode indica-
tor (
P.236)
Eco drive mode indi-
cator
*9 ( P.333)
Eco drive mode indi-
cator
*10 ( P.333)
Sport mode indicator
( P.333)
“AIR BAG ON/OFF”
indicator
*5, 7 ( P.51)