TOYOTA SUPRA 1986 Service Repair Manual
SUPRA 1986
TOYOTA
TOYOTA
https://www.carmanualsonline.info/img/14/57467/w960_57467-0.png
TOYOTA SUPRA 1986 Service Repair Manual
Trending: width, charging, brake fluid, air conditioning, air condition, coolant, stop start
Page 351 of 878
IDLE AIR CONTROL (IAC) VALVE
ON±VEHICLE INSPECTION
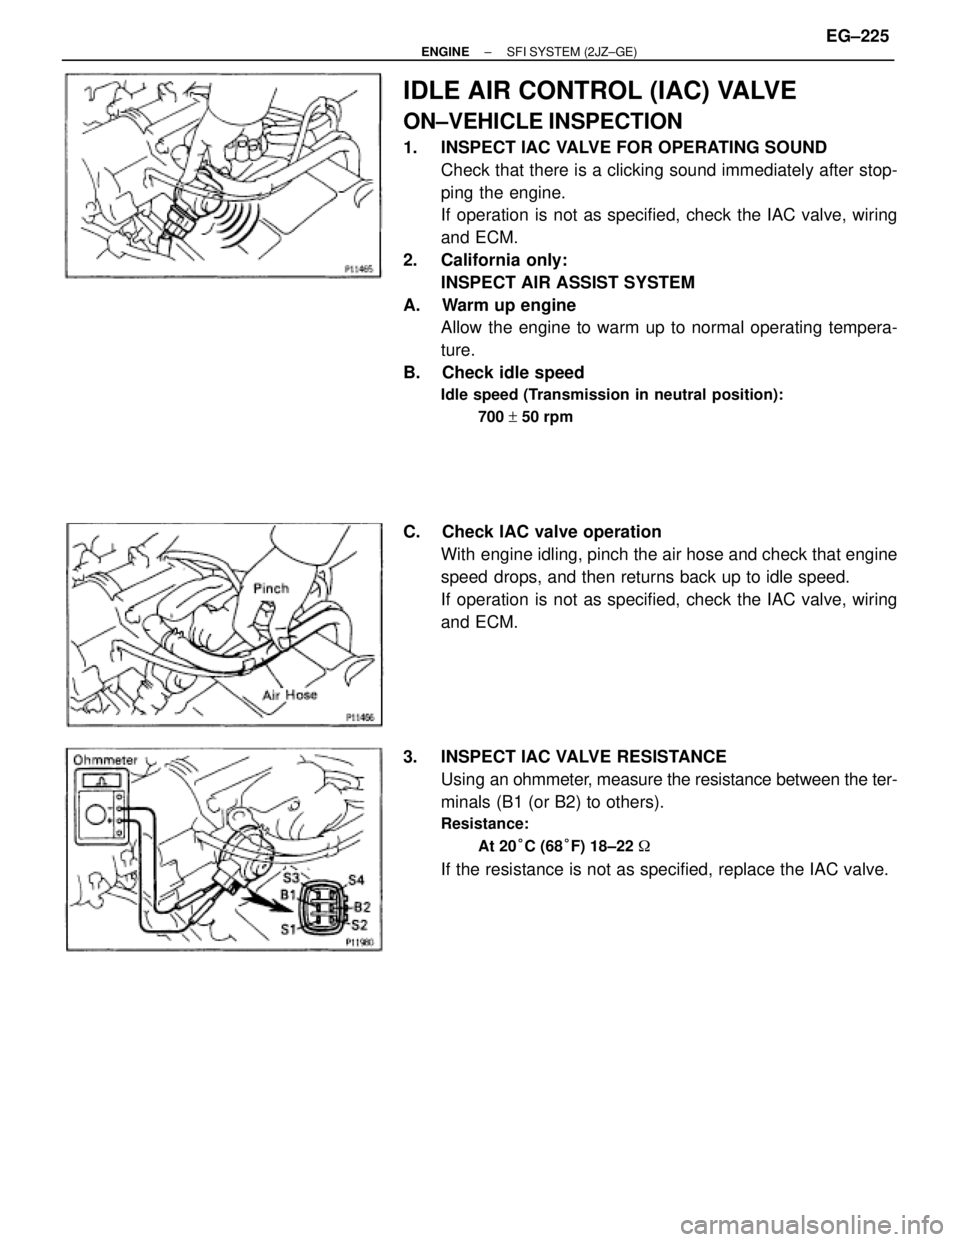
1. INSPECT IAC VALVE FOR OPERATING SOUND
Check that there is a clicking sound immediately after stop-
ping the engine.
If operation is not as specified, check the IAC valve, wiring
and ECM.
2. California only:
INSPECT AIR ASSIST SYSTEM
A. Warm up engine
Allow the engine to warm up to normal operating tempera-
ture.
B. Check idle speed
Idle speed (Transmission in neutral position):
700 + 50 rpm
C. Check IAC valve operation
With engine idling, pinch the air hose and check that engine
speed drops, and then returns back up to idle speed.
If operation is not as specified, check the IAC valve, wiring
and ECM.
3. INSPECT IAC VALVE RESISTANCE
Using an ohmmeter, measure the resistance between the ter-
minals (B1 (or B2) to others).
Resistance:
At 20°C (68°F) 18±22 �
If the resistance is not as specified, replace the IAC valve.
± ENGINESFI SYSTEM (2JZ±GE)EG±225
Page 352 of 878
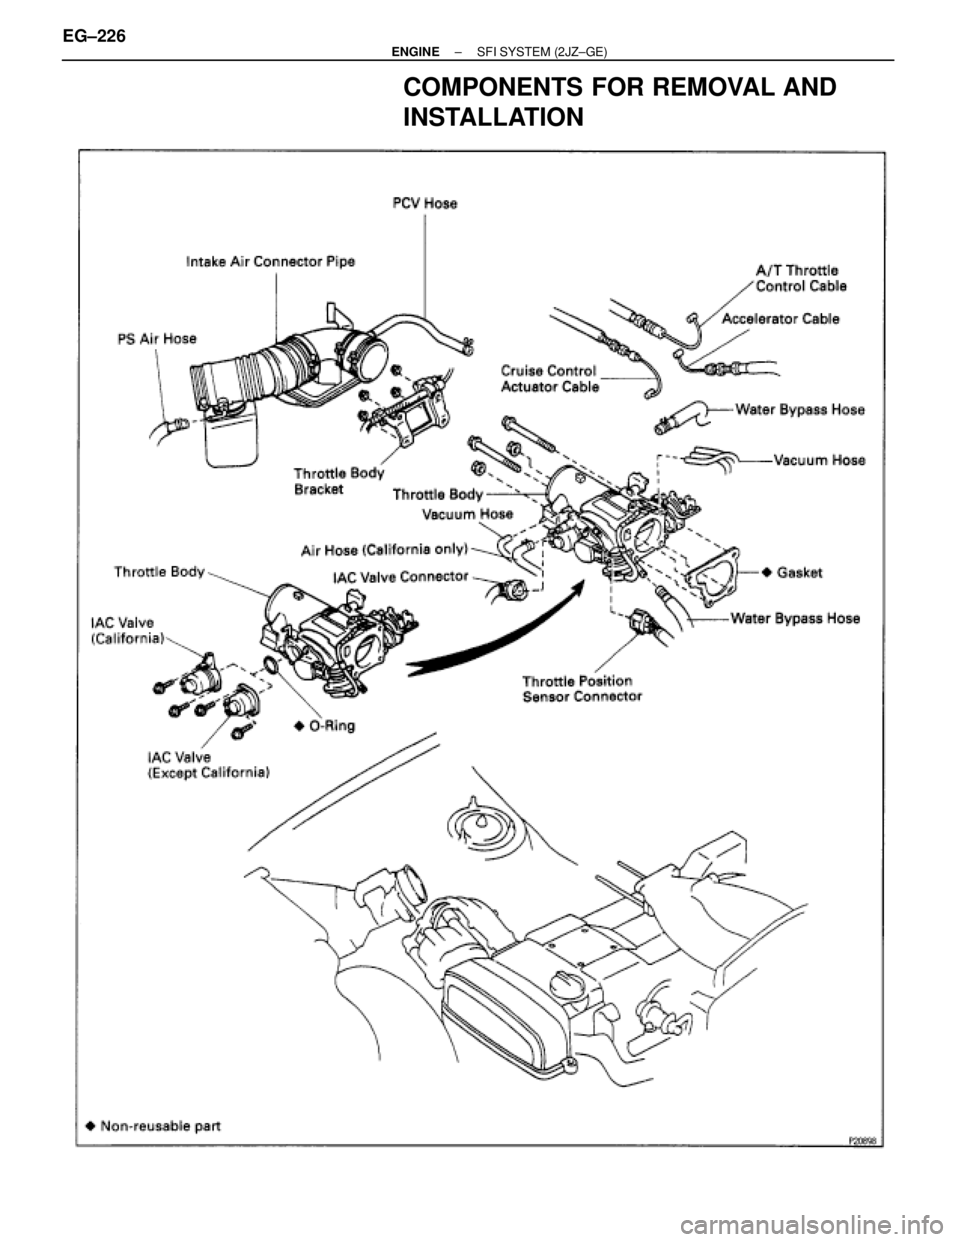
COMPONENTS FOR REMOVAL AND
INSTALLATION
EG±226± ENGINESFI SYSTEM (2JZ±GE)
Page 353 of 878
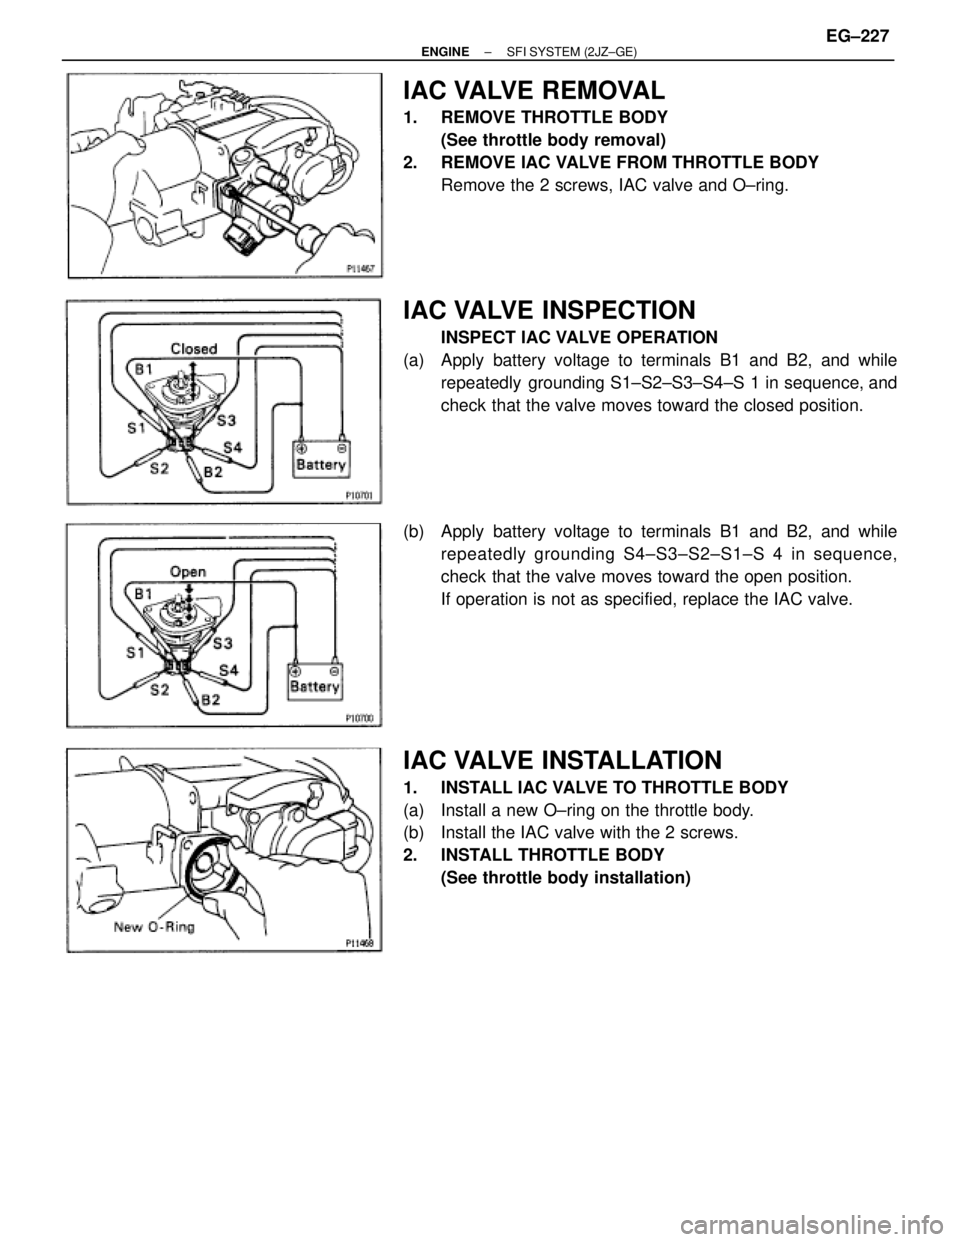
IAC VALVE REMOVAL
1. REMOVE THROTTLE BODY
(See throttle body removal)
2. REMOVE IAC VALVE FROM THROTTLE BODY
Remove the 2 screws, IAC valve and O±ring.
IAC VALVE INSPECTION
INSPECT IAC VALVE OPERATION
(a) Apply battery voltage to terminals B1 and B2, and while
repeatedly grounding S1±S2±S3±S4±S 1 in sequence, and
check that the valve moves toward the closed position.
(b) Apply battery voltage to terminals B1 and B2, and while
repeatedly grounding S4±S3±S2±S1±S 4 in sequence,
check that the valve moves toward the open position.
If operation is not as specified, replace the IAC valve.
IAC VALVE INSTALLATION
1. INSTALL IAC VALVE TO THROTTLE BODY
(a) Install a new O±ring on the throttle body.
(b) Install the IAC valve with the 2 screws.
2. INSTALL THROTTLE BODY
(See throttle body installation)
± ENGINESFI SYSTEM (2JZ±GE)EG±227
Page 354 of 878
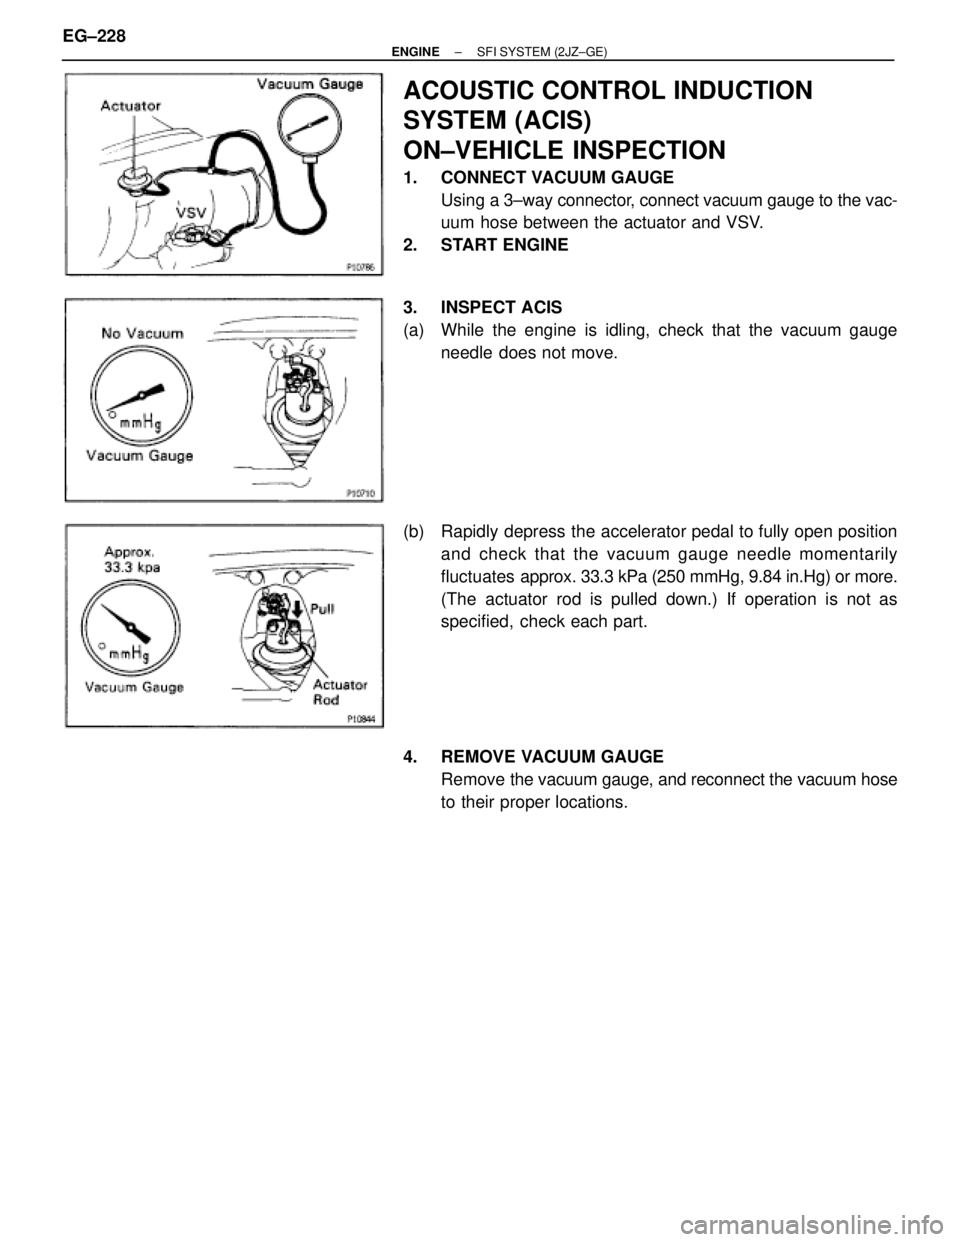
ACOUSTIC CONTROL INDUCTION
SYSTEM (ACIS)
ON±VEHICLE INSPECTION
1. CONNECT VACUUM GAUGE
Using a 3±way connector, connect vacuum gauge to the vac-
uum hose between the actuator and VSV.
2. START ENGINE
3. INSPECT ACIS
(a) While the engine is idling, check that the vacuum gauge
needle does not move.
(b) Rapidly depress the accelerator pedal to fully open position
and check that the vacuum gauge needle momentarily
fluctuates approx. 33.3 kPa (250 mmHg, 9.84 in.Hg) or more.
(The actuator rod is pulled down.) If operation is not as
specified, check each part.
4. REMOVE VACUUM GAUGE
Remove the vacuum gauge, and reconnect the vacuum hose
to their proper locations. EG±228
± ENGINESFI SYSTEM (2JZ±GE)
Page 355 of 878
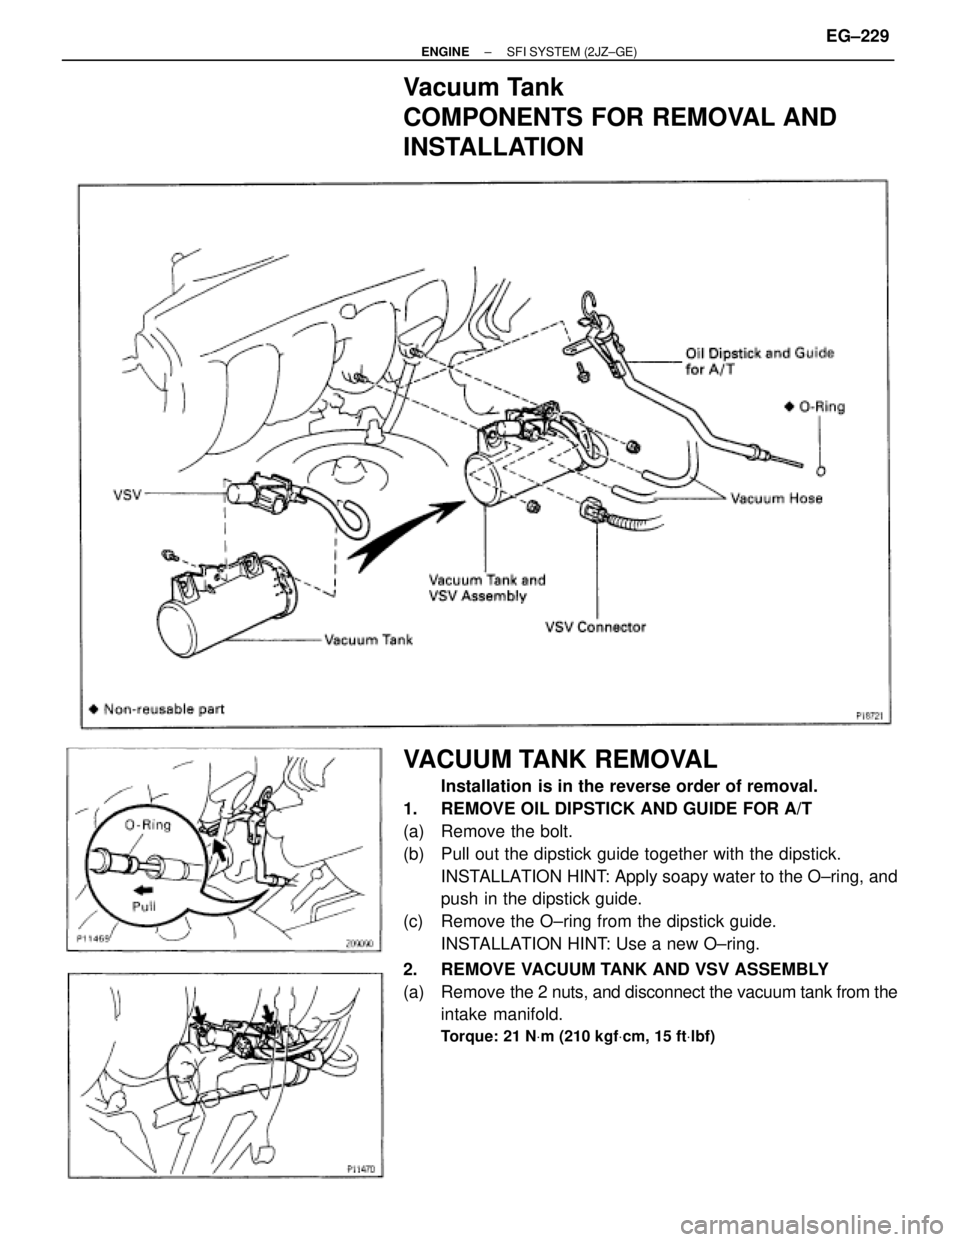
Vacuum Tank
COMPONENTS FOR REMOVAL AND
INSTALLATION
VACUUM TANK REMOVAL
Installation is in the reverse order of removal.
1. REMOVE OIL DIPSTICK AND GUIDE FOR A/T
(a) Remove the bolt.
(b) Pull out the dipstick guide together with the dipstick.
INSTALLATION HINT: Apply soapy water to the O±ring, and
push in the dipstick guide.
(c) Remove the O±ring from the dipstick guide.
INSTALLATION HINT: Use a new O±ring.
2. REMOVE VACUUM TANK AND VSV ASSEMBLY
(a) Remove the 2 nuts, and disconnect the vacuum tank from the
intake manifold.
Torque: 21 NVm (210 kgfVcm, 15 ftVlbf)
± ENGINESFI SYSTEM (2JZ±GE)EG±229
Page 356 of 878
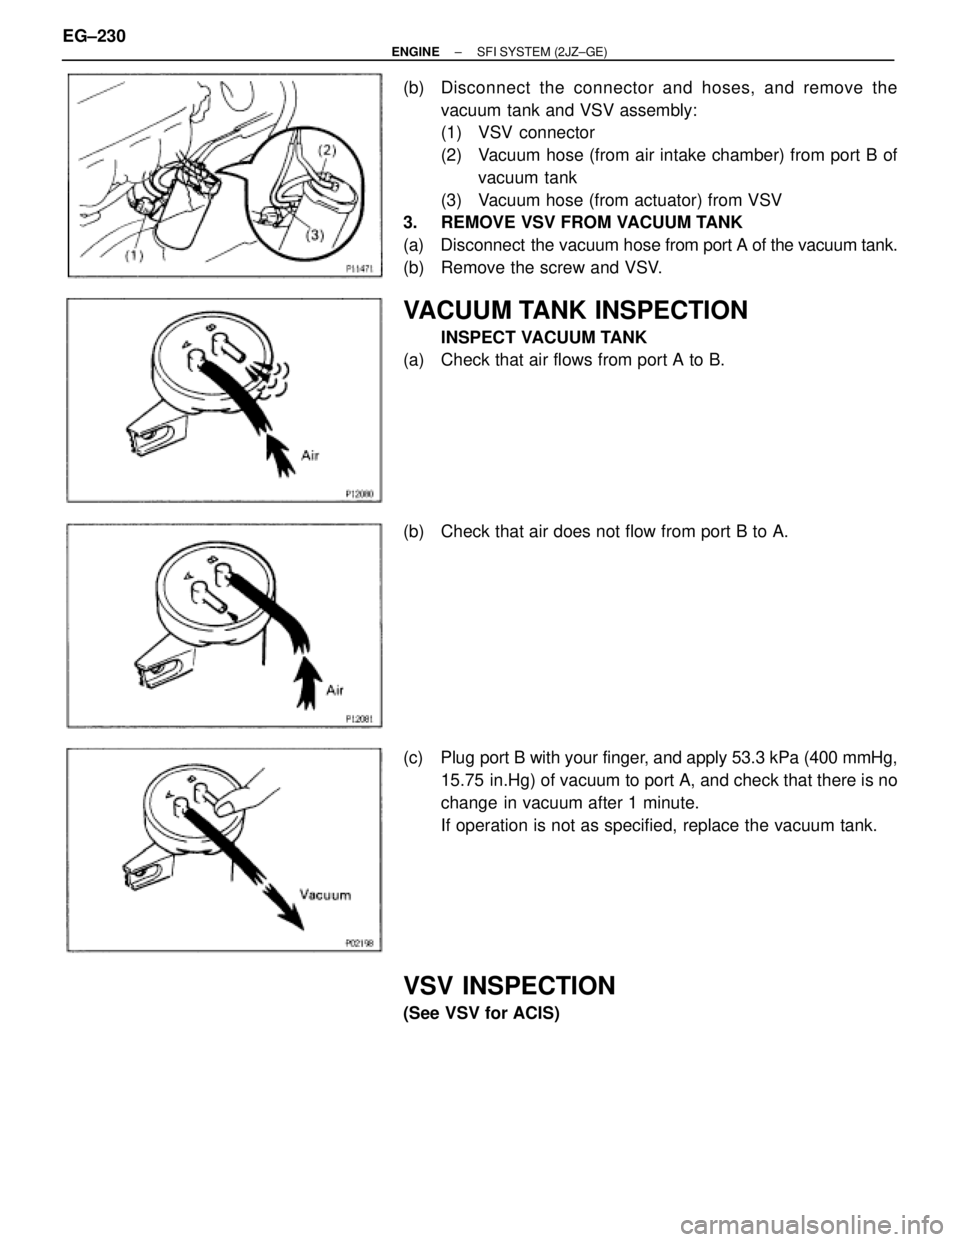
(b) Disconnect the connector and hoses, and remove the
vacuum tank and VSV assembly:
(1) VSV connector
(2) Vacuum hose (from air intake chamber) from port B of
vacuum tank
(3) Vacuum hose (from actuator) from VSV
3. REMOVE VSV FROM VACUUM TANK
(a) Disconnect the vacuum hose from port A of the vacuum tank.
(b) Remove the screw and VSV.
VACUUM TANK INSPECTION
INSPECT VACUUM TANK
(a) Check that air flows from port A to B.
(b) Check that air does not flow from port B to A.
(c) Plug port B with your finger, and apply 53.3 kPa (400 mmHg,
15.75 in.Hg) of vacuum to port A, and check that there is no
change in vacuum after 1 minute.
If operation is not as specified, replace the vacuum tank.
VSV INSPECTION
(See VSV for ACIS) EG±230
± ENGINESFI SYSTEM (2JZ±GE)
Page 357 of 878
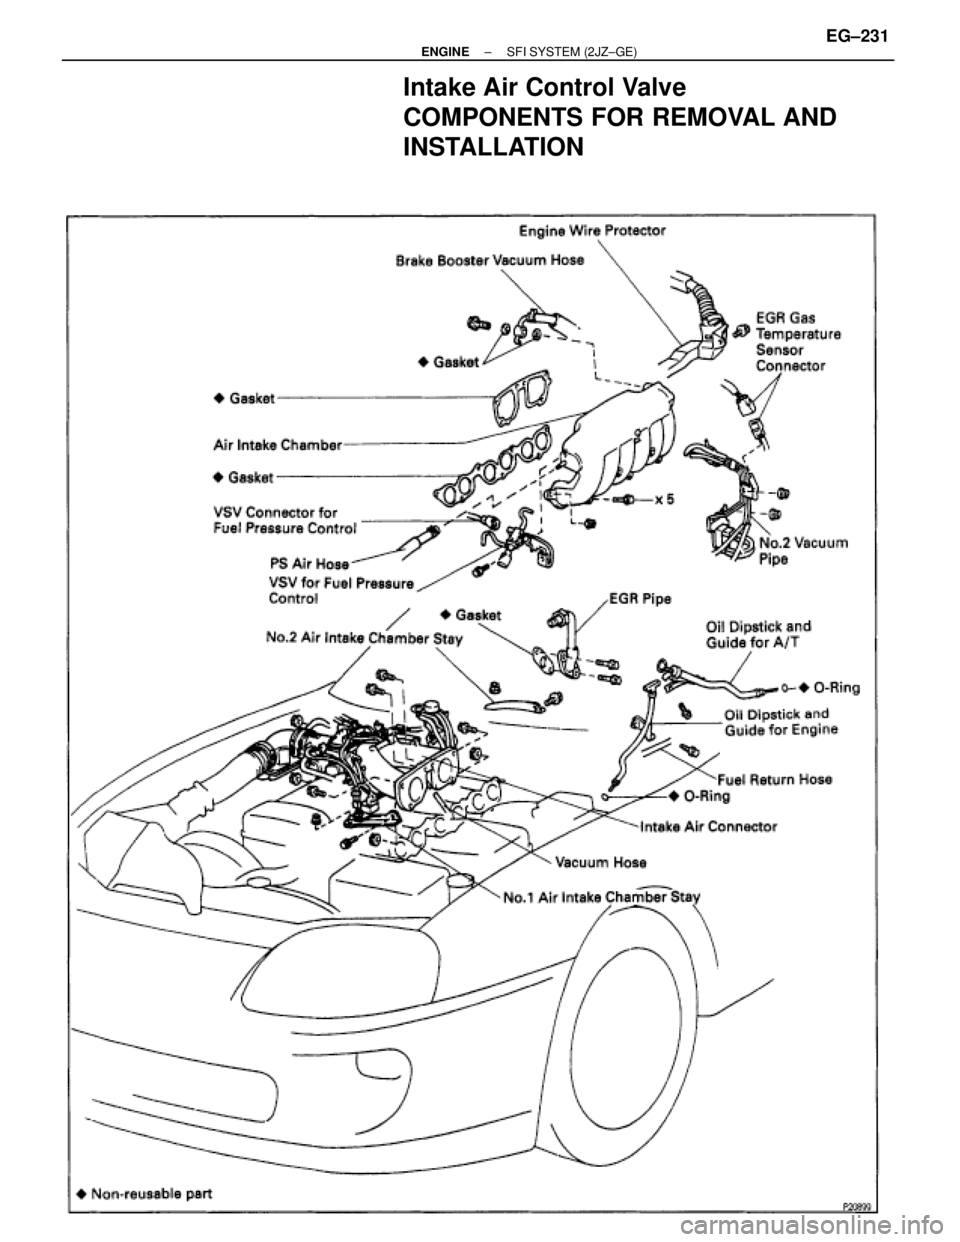
Intake Air Control Valve
COMPONENTS FOR REMOVAL AND
INSTALLATION
± ENGINESFI SYSTEM (2JZ±GE)EG±231
Page 358 of 878
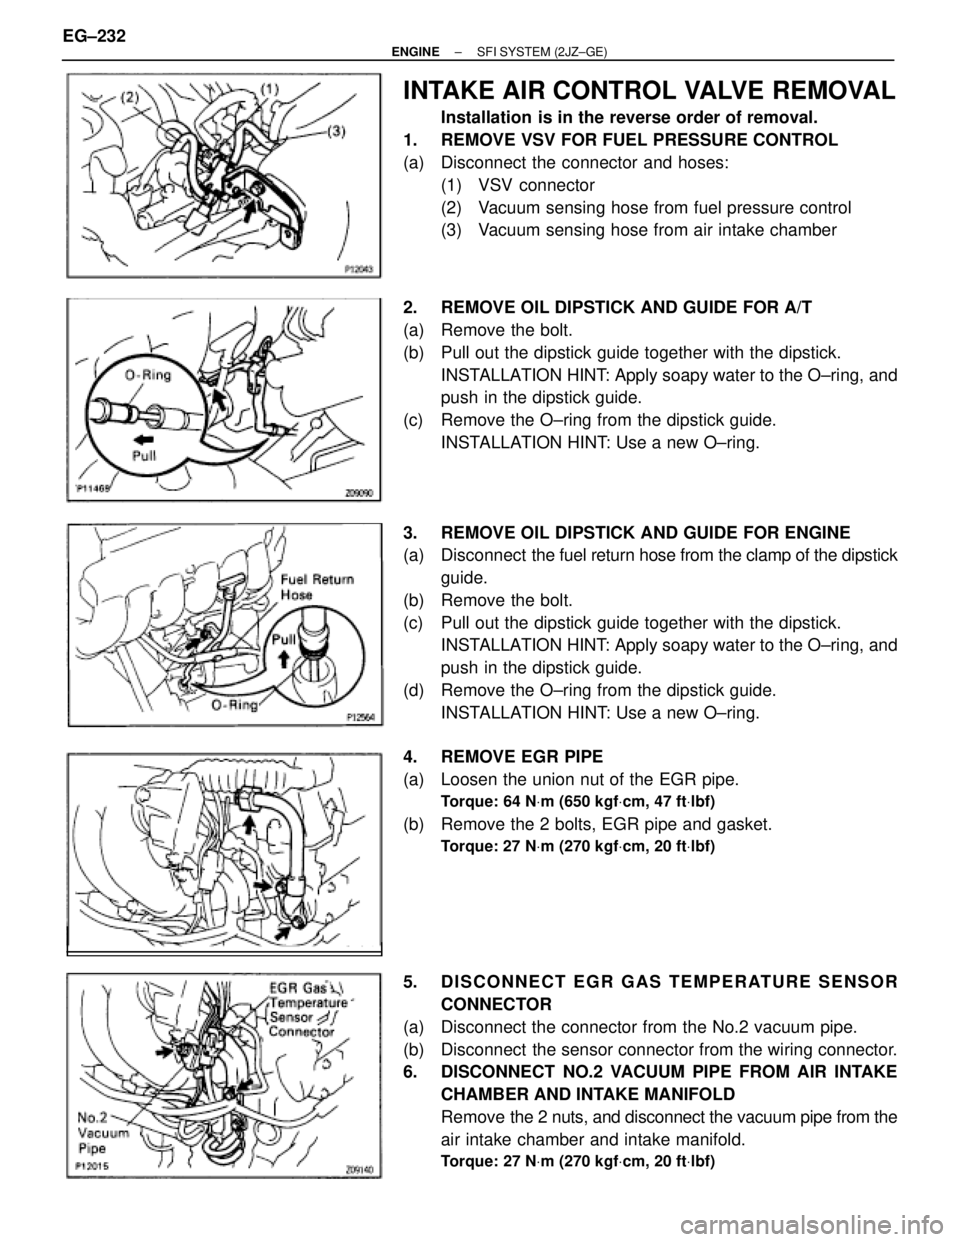
INTAKE AIR CONTROL VALVE REMOVAL
Installation is in the reverse order of removal.
1. REMOVE VSV FOR FUEL PRESSURE CONTROL
(a) Disconnect the connector and hoses:
(1) VSV connector
(2) Vacuum sensing hose from fuel pressure control
(3) Vacuum sensing hose from air intake chamber
2. REMOVE OIL DIPSTICK AND GUIDE FOR A/T
(a) Remove the bolt.
(b) Pull out the dipstick guide together with the dipstick.
INSTALLATION HINT: Apply soapy water to the O±ring, and
push in the dipstick guide.
(c) Remove the O±ring from the dipstick guide.
INSTALLATION HINT: Use a new O±ring.
3. REMOVE OIL DIPSTICK AND GUIDE FOR ENGINE
(a) Disconnect the fuel return hose from the clamp of the dipstick
guide.
(b) Remove the bolt.
(c) Pull out the dipstick guide together with the dipstick.
INSTALLATION HINT: Apply soapy water to the O±ring, and
push in the dipstick guide.
(d) Remove the O±ring from the dipstick guide.
INSTALLATION HINT: Use a new O±ring.
4. REMOVE EGR PIPE
(a) Loosen the union nut of the EGR pipe.
Torque: 64 NVm (650 kgfVcm, 47 ftVlbf)
(b) Remove the 2 bolts, EGR pipe and gasket.
Torque: 27 NVm (270 kgfVcm, 20 ftVlbf)
5. DISCONNECT EGR GAS TEMPERATURE SENSOR
CONNECTOR
(a) Disconnect the connector from the No.2 vacuum pipe.
(b) Disconnect the sensor connector from the wiring connector.
6. DISCONNECT NO.2 VACUUM PIPE FROM AIR INTAKE
CHAMBER AND INTAKE MANIFOLD
Remove the 2 nuts, and disconnect the vacuum pipe from the
air intake chamber and intake manifold.
Torque: 27 NVm (270 kgfVcm, 20 ftVlbf)
EG±232± ENGINESFI SYSTEM (2JZ±GE)
Page 359 of 878
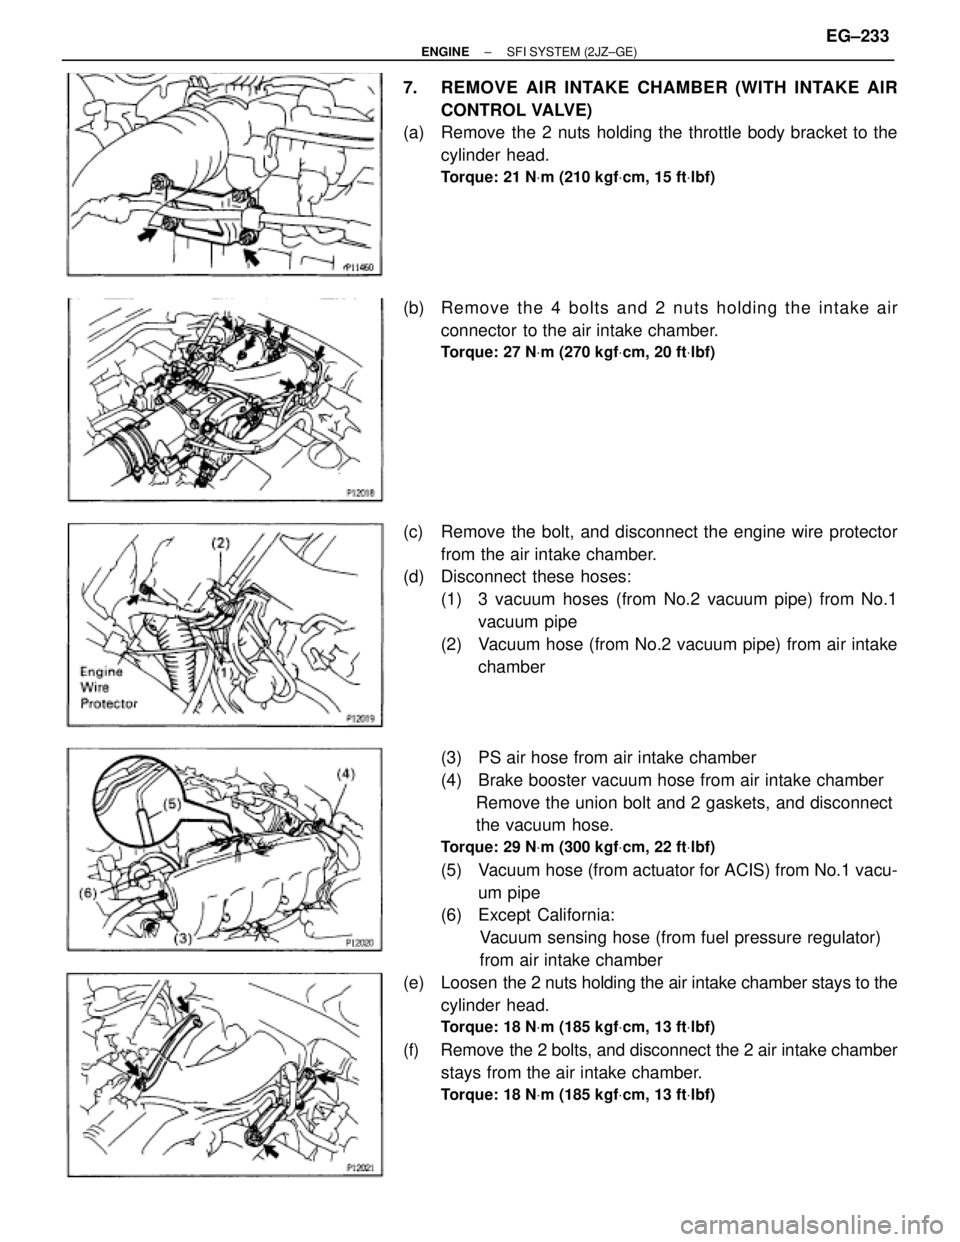
7. REMOVE AIR INTAKE CHAMBER (WITH INTAKE AIR
CONTROL VALVE)
(a) Remove the 2 nuts holding the throttle body bracket to the
cylinder head.
Torque: 21 NVm (210 kgfVcm, 15 ftVlbf)
(b) Re mo ve th e 4 bo lts an d 2 nu ts ho ld in g th e in ta ke air
connector to the air intake chamber.
Torque: 27 NVm (270 kgfVcm, 20 ftVlbf)
(c) Remove the bolt, and disconnect the engine wire protector
from the air intake chamber.
(d) Disconnect these hoses:
(1) 3 vacuum hoses (from No.2 vacuum pipe) from No.1
vacuum pipe
(2) Vacuum hose (from No.2 vacuum pipe) from air intake
chamber
(3) PS air hose from air intake chamber
(4) Brake booster vacuum hose from air intake chamber
Remove the union bolt and 2 gaskets, and disconnect
the vacuum hose.
Torque: 29 NVm (300 kgfVcm, 22 ftVlbf)
(5) Vacuum hose (from actuator for ACIS) from No.1 vacu-
um pipe
(6) Except California:
Vacuum sensing hose (from fuel pressure regulator)
from air intake chamber
(e) Loosen the 2 nuts holding the air intake chamber stays to the
cylinder head.
Torque: 18 NVm (185 kgfVcm, 13 ftVlbf)
(f) Remove the 2 bolts, and disconnect the 2 air intake chamber
stays from the air intake chamber.
Torque: 18 NVm (185 kgfVcm, 13 ftVlbf)
± ENGINESFI SYSTEM (2JZ±GE)EG±233
Page 360 of 878
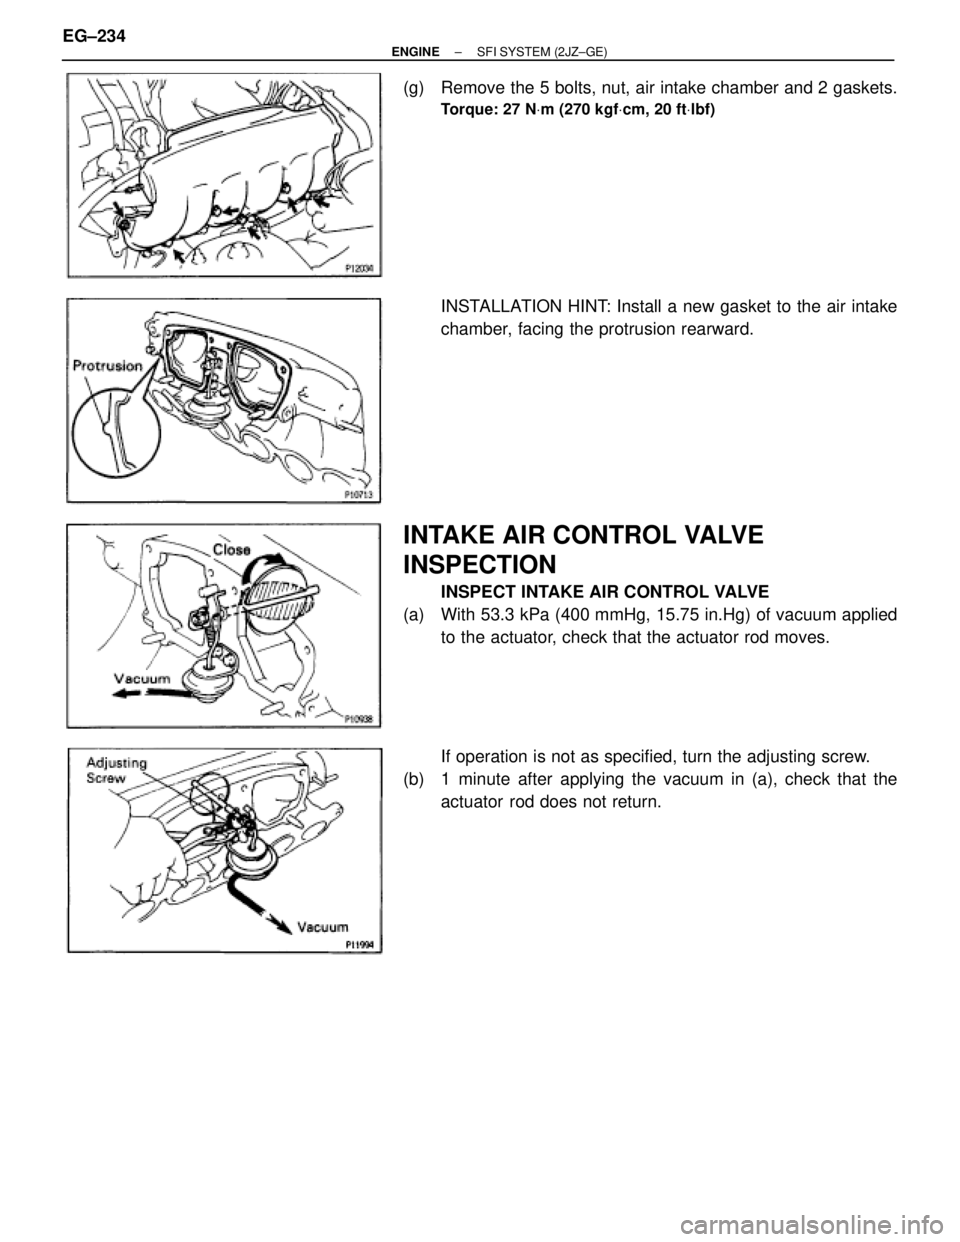
(g) Remove the 5 bolts, nut, air intake chamber and 2 gaskets.
Torque: 27 NVm (270 kgfVcm, 20 ftVlbf)
INSTALLATION HINT: Install a new gasket to the air intake
chamber, facing the protrusion rearward.
INTAKE AIR CONTROL VALVE
INSPECTION
INSPECT INTAKE AIR CONTROL VALVE
(a) With 53.3 kPa (400 mmHg, 15.75 in.Hg) of vacuum applied
to the actuator, check that the actuator rod moves.
If operation is not as specified, turn the adjusting screw.
(b) 1 minute after applying the vacuum in (a), check that the
actuator rod does not return. EG±234
± ENGINESFI SYSTEM (2JZ±GE)
Trending: display, engine oil capacity, check engine light, MPG, compression ratio, air suspension, low oil pressure
