TOYOTA SUPRA 1986 Service Repair Manual
SUPRA 1986
TOYOTA
TOYOTA
https://www.carmanualsonline.info/img/14/57467/w960_57467-0.png
TOYOTA SUPRA 1986 Service Repair Manual
Trending: heating, coolant, mirror, ESP, brake fluid, oil dipstick, fuel type
Page 371 of 878
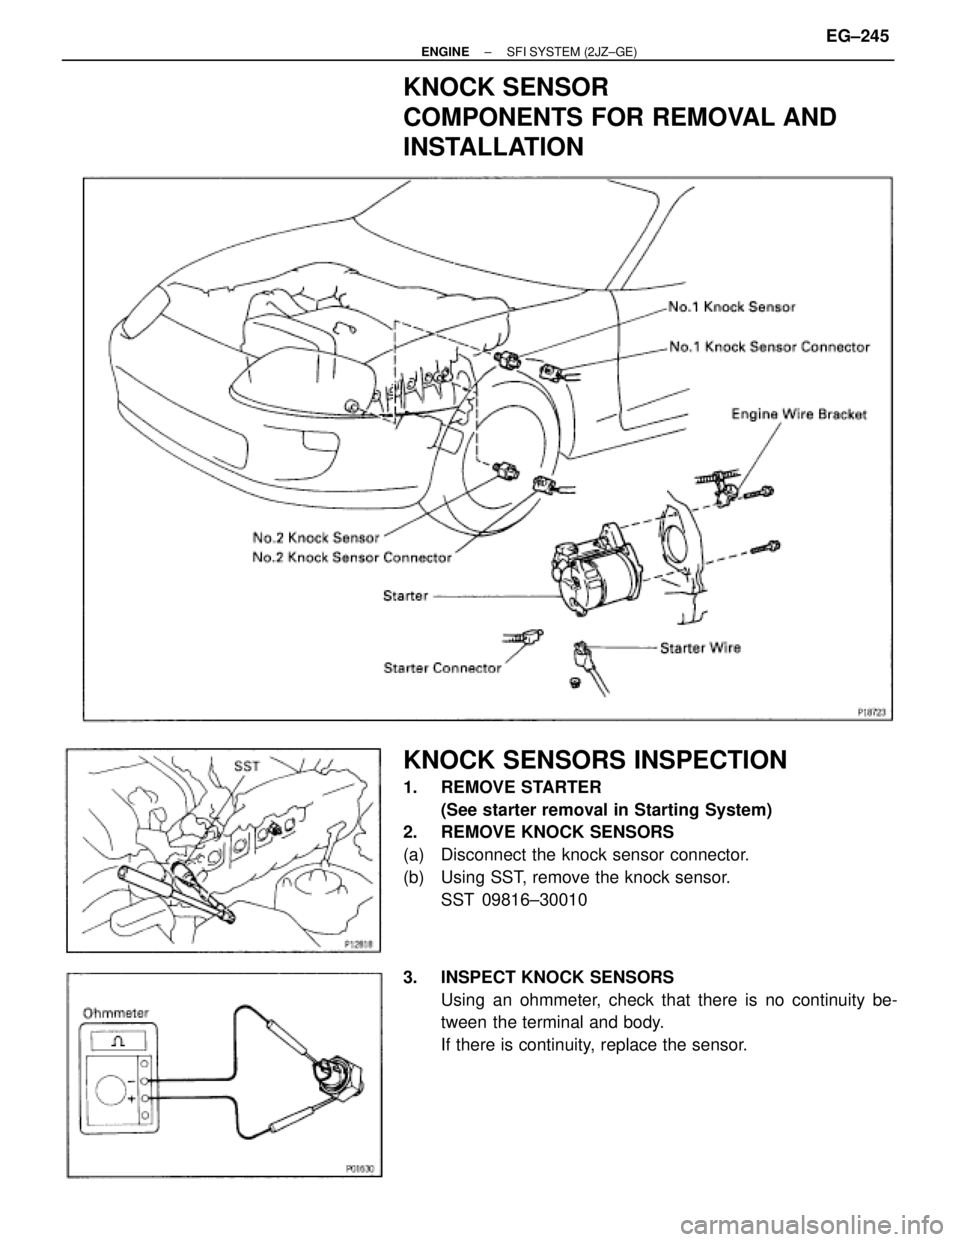
KNOCK SENSOR
COMPONENTS FOR REMOVAL AND
INSTALLATION
KNOCK SENSORS INSPECTION
1. REMOVE STARTER
(See starter removal in Starting System)
2. REMOVE KNOCK SENSORS
(a) Disconnect the knock sensor connector.
(b) Using SST, remove the knock sensor.
SST 09816±30010
3. INSPECT KNOCK SENSORS
Using an ohmmeter, check that there is no continuity be-
tween the terminal and body.
If there is continuity, replace the sensor.
± ENGINESFI SYSTEM (2JZ±GE)EG±245
Page 372 of 878
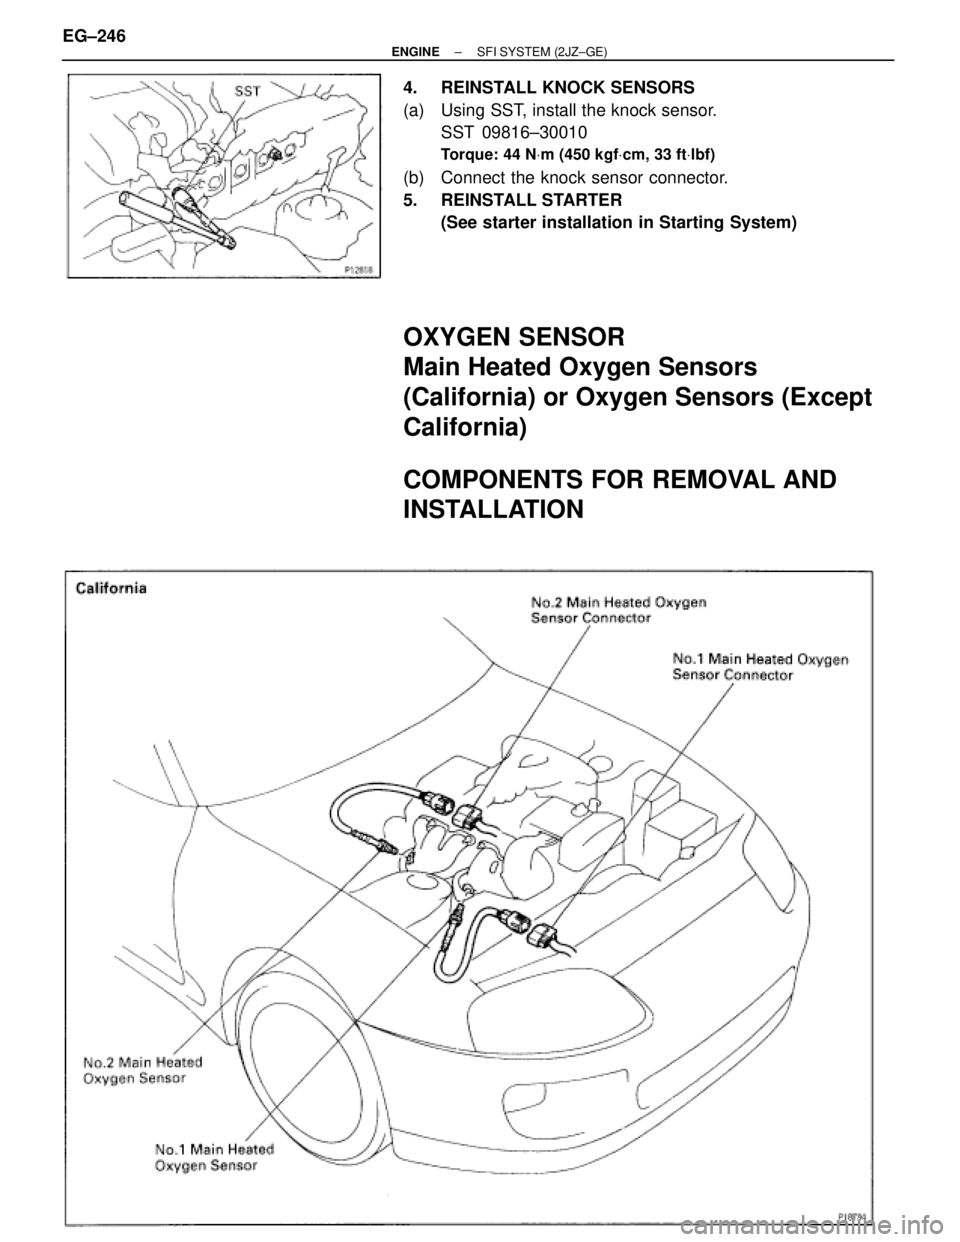
4. REINSTALL KNOCK SENSORS
(a) Using SST, install the knock sensor.
SST 09816±30010
Torque: 44 NVm (450 kgfVcm, 33 ftVlbf)
(b) Connect the knock sensor connector.
5. REINSTALL STARTER
(See starter installation in Starting System)
OXYGEN SENSOR
Main Heated Oxygen Sensors
(California) or Oxygen Sensors (Except
California)
COMPONENTS FOR REMOVAL AND
INSTALLATION
EG±246± ENGINESFI SYSTEM (2JZ±GE)
Page 373 of 878
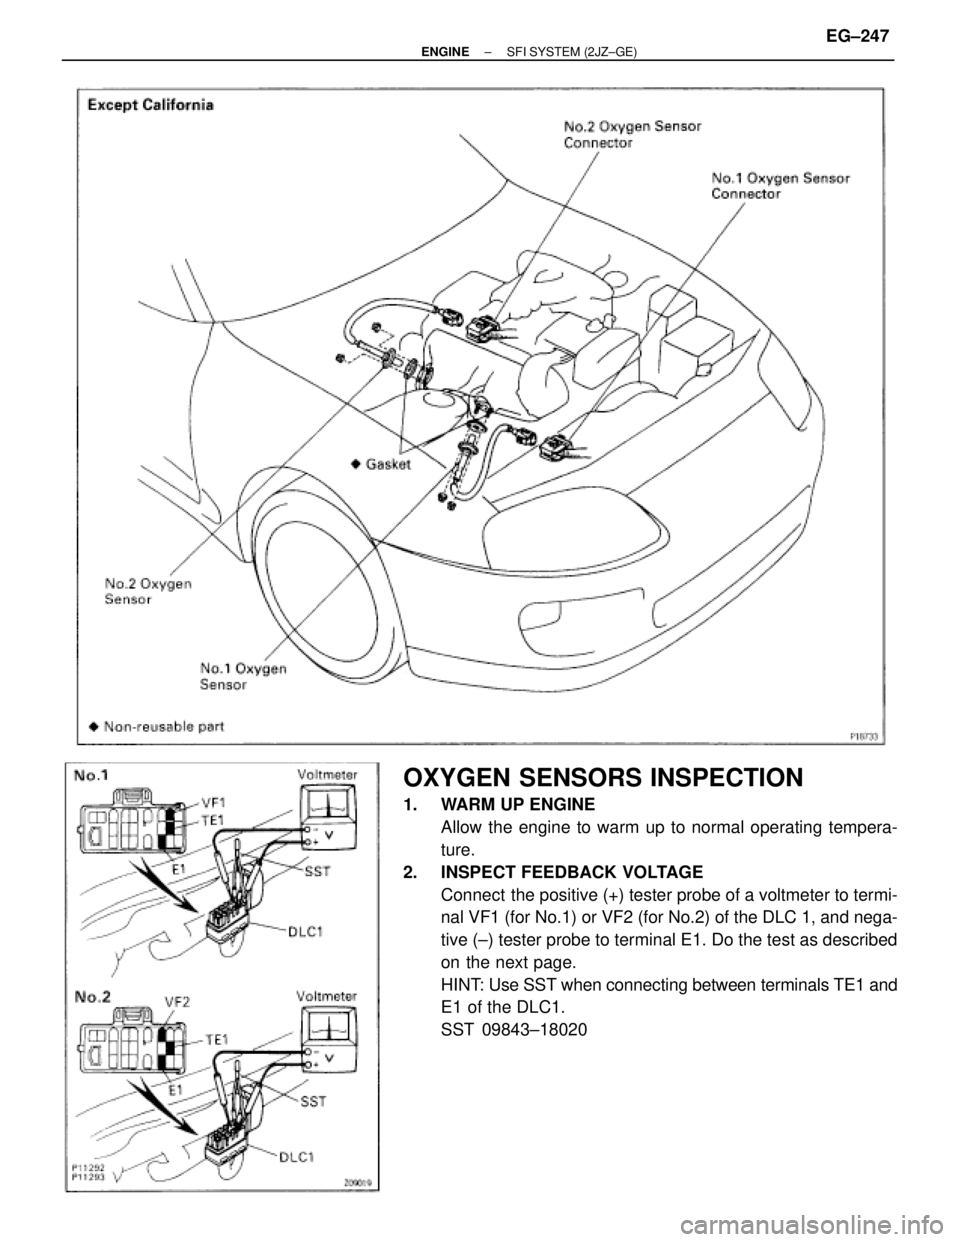
OXYGEN SENSORS INSPECTION
1. WARM UP ENGINE
Allow the engine to warm up to normal operating tempera-
ture.
2. INSPECT FEEDBACK VOLTAGE
Connect the positive (+) tester probe of a voltmeter to termi-
nal VF1 (for No.1) or VF2 (for No.2) of the DLC 1, and nega-
tive (±) tester probe to terminal E1. Do the test as described
on the next page.
HINT: Use SST when connecting between terminals TE1 and
E1 of the DLC1.
SST 09843±18020
± ENGINESFI SYSTEM (2JZ±GE)EG±247
Page 374 of 878
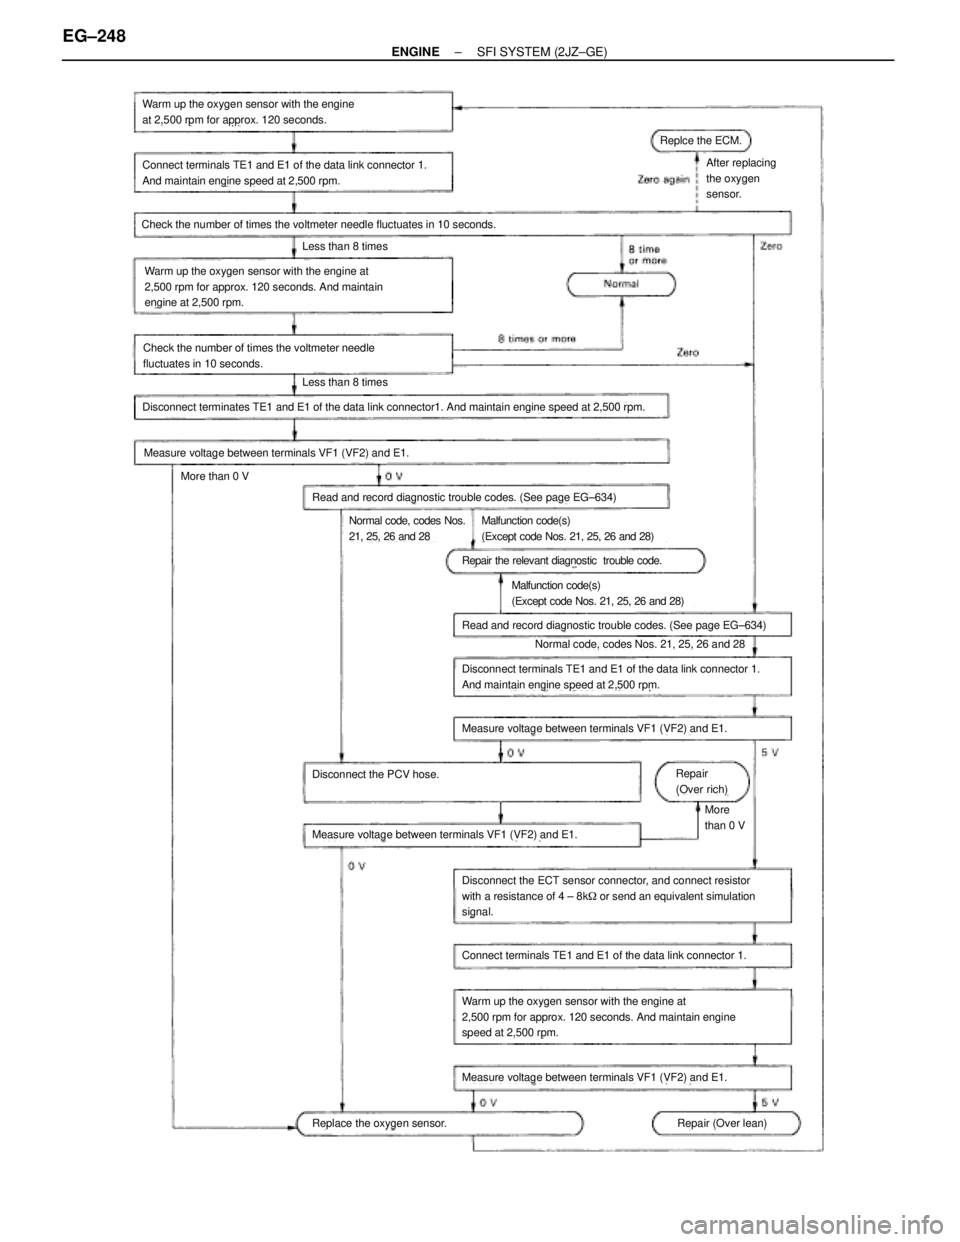
Warm up the oxygen sensor with the engine
at 2,500 rpm for approx. 120 seconds.
Connect terminals TE1 and E1 of the data link connector 1.
And maintain engine speed at 2,500 rpm.
Check the number of times the voltmeter needle fluctuates in 10 seconds.
Less than 8 times
Warm up the oxygen sensor with the engine at
2,500 rpm for approx. 120 seconds. And maintain
engine at 2,500 rpm.
Check the number of times the voltmeter needle
fluctuates in 10 seconds.
Less than 8 times
Disconnect terminates TE1 and E1 of the data link connector1. And maintain engine speed at 2,500 rpm.
Measure voltage between terminals VF1 (VF2) and E1.
More than 0 V
Read and record diagnostic trouble codes. (See page EG±634)
Normal code, codes Nos.
21, 25, 26 and 28Malfunction code(s)
(Except code Nos. 21, 25, 26 and 28)
Repair the relevant diagnostic trouble code.
Malfunction code(s)
(Except code Nos. 21, 25, 26 and 28)
Read and record diagnostic trouble codes. (See page EG±634)
Normal code, codes Nos. 21, 25, 26 and 28
Disconnect terminals TE1 and E1 of the data link connector 1.
And maintain engine speed at 2,500 rpm.
Measure voltage between terminals VF1 (VF2) and E1.
Repair
(Over rich)
More
than 0 V
Disconnect the PCV hose.
Measure voltage between terminals VF1 (VF2) and E1.
Disconnect the ECT sensor connector, and connect resistor
with a resistance of 4 ± 8k� or send an equivalent simulation
signal.
Connect terminals TE1 and E1 of the data link connector 1.
Warm up the oxygen sensor with the engine at
2,500 rpm for approx. 120 seconds. And maintain engine
speed at 2,500 rpm.
Measure voltage between terminals VF1 (VF2) and E1.
Repair (Over lean)Replace the oxygen sensor.
Replce the ECM.
After replacing
the oxygen
sensor.
EG±248± ENGINESFI SYSTEM (2JZ±GE)
Page 375 of 878
3. California only:
INSPECT HEATER RESISTANCE OF MAIN HEATED OXY-
GEN SENSORS
(a) Disconnect the oxygen sensor connectors.
(b) Using an ohmmeter, measure the resistance between the
terminals +B and HT.
Resistance:
At 20°C (68°F) 11±16 �
If the resistance is not as specified, replace the sensor.
Torque: 44 NVm (450 kgfVcm, 33 ftVlbf)
(c) Reconnect the oxygen sensor connectors.
± ENGINESFI SYSTEM (2JZ±GE)EG±249
Page 376 of 878
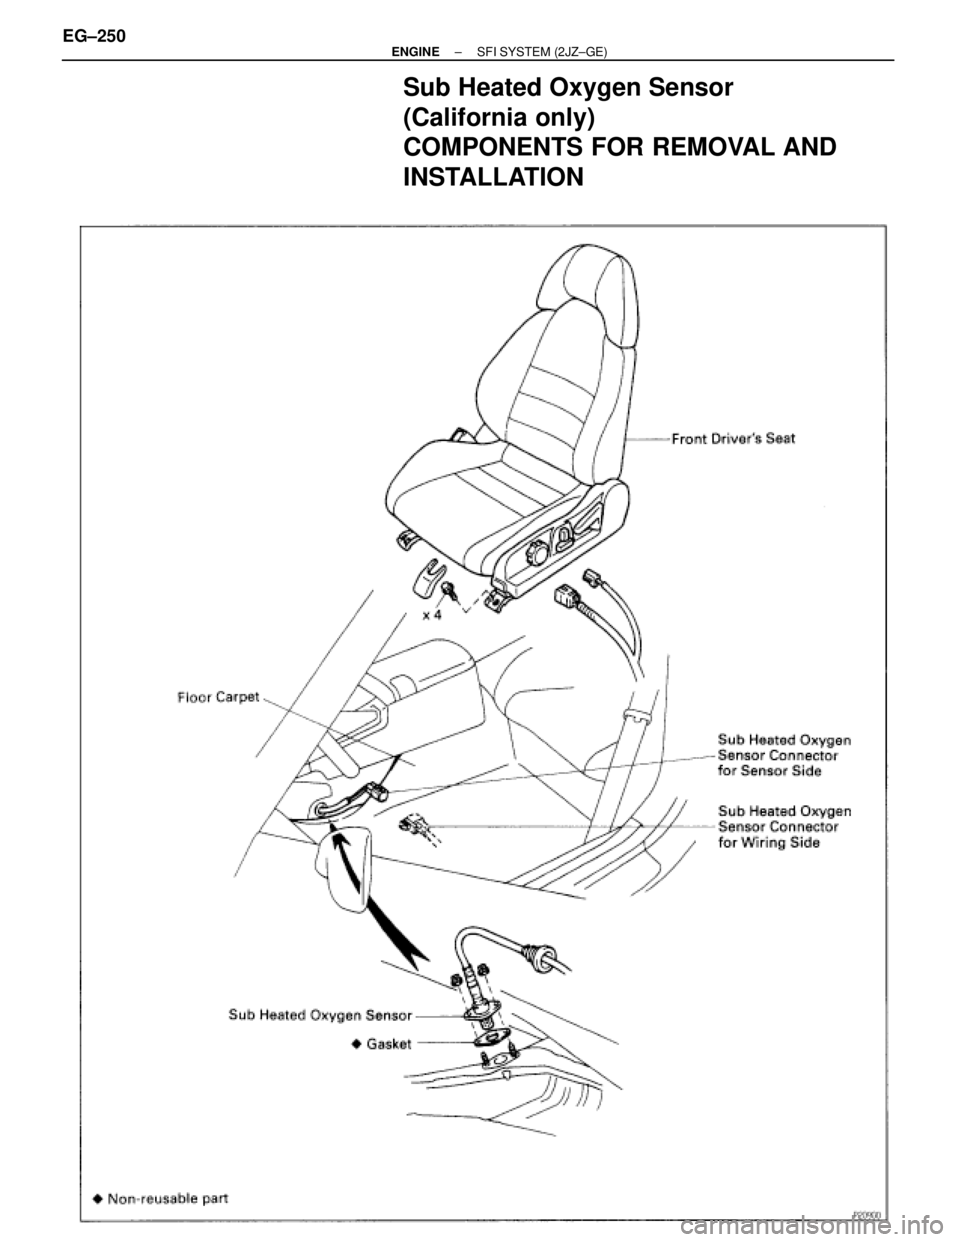
Sub Heated Oxygen Sensor
(California only)
COMPONENTS FOR REMOVAL AND
INSTALLATION
EG±250± ENGINESFI SYSTEM (2JZ±GE)
Page 377 of 878
OXYGEN SENSOR INSPECTION
1. INSPECT OPERATION OF SUB HEATED OXYGEN
SENSOR
(See circuit inspection in Engine Troubleshooting)
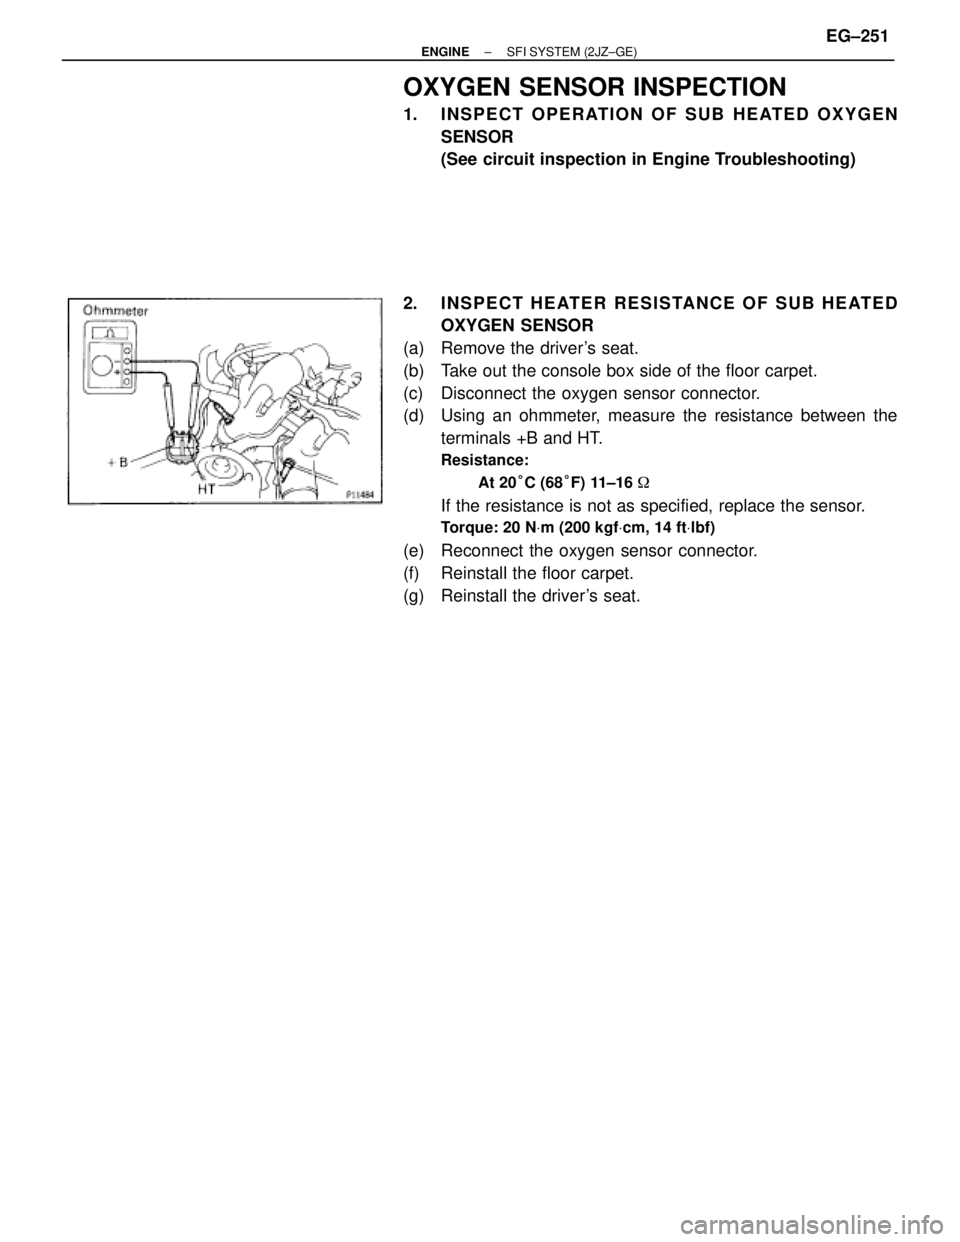
2. INSPECT HEATER RESISTANCE OF SUB HEATED
OXYGEN SENSOR
(a) Remove the driver's seat.
(b) Take out the console box side of the floor carpet.
(c) Disconnect the oxygen sensor connector.
(d) Using an ohmmeter, measure the resistance between the
terminals +B and HT.
Resistance:
At 20°C (68°F) 11±16 �
If the resistance is not as specified, replace the sensor.
Torque: 20 NVm (200 kgfVcm, 14 ftVlbf)
(e) Reconnect the oxygen sensor connector.
(f) Reinstall the floor carpet.
(g) Reinstall the driver's seat.
± ENGINESFI SYSTEM (2JZ±GE)EG±251
Page 378 of 878
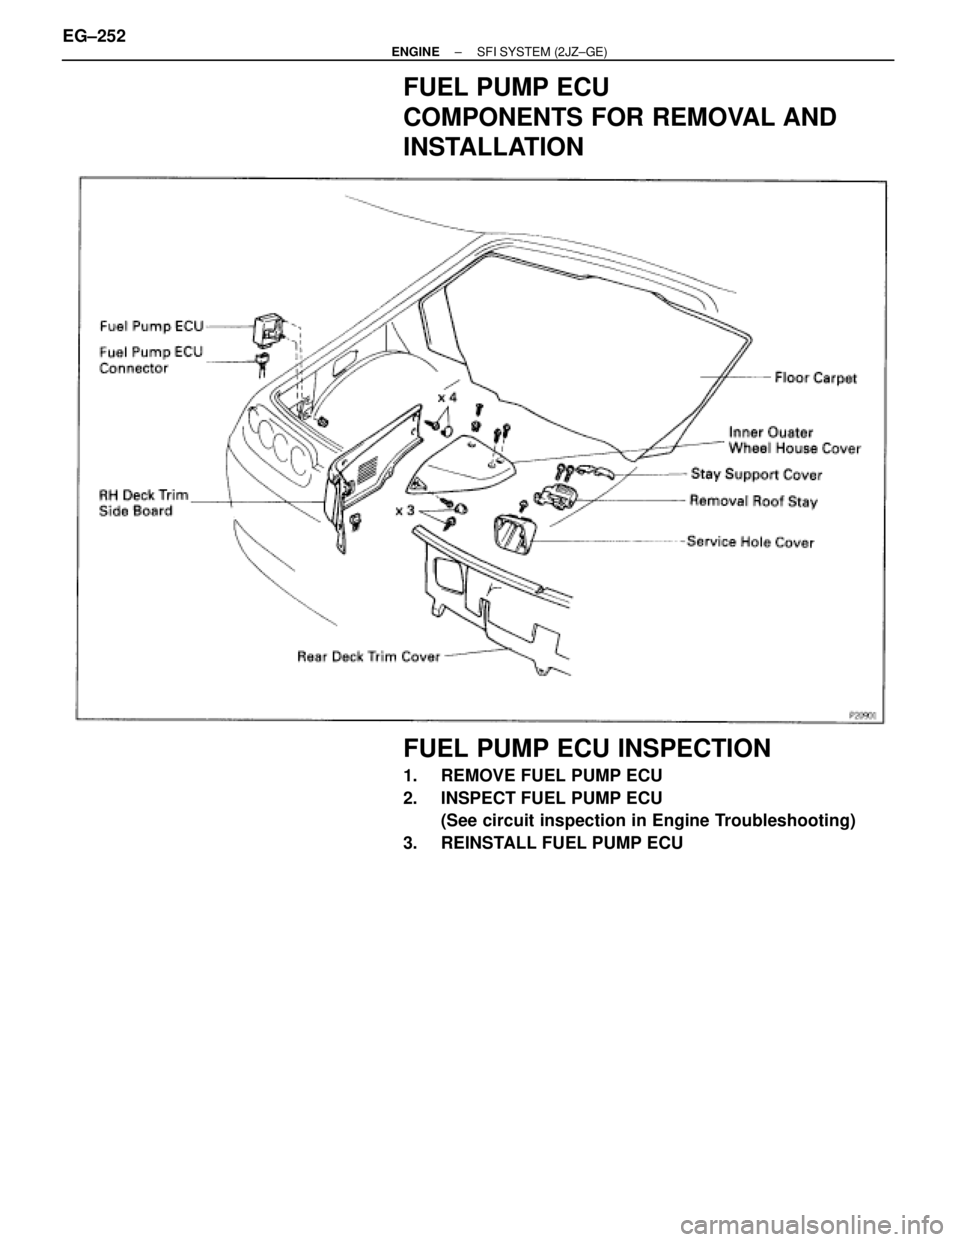
FUEL PUMP ECU
COMPONENTS FOR REMOVAL AND
INSTALLATION
FUEL PUMP ECU INSPECTION
1. REMOVE FUEL PUMP ECU
2. INSPECT FUEL PUMP ECU
(See circuit inspection in Engine Troubleshooting)
3. REINSTALL FUEL PUMP ECU EG±252
± ENGINESFI SYSTEM (2JZ±GE)
Page 379 of 878
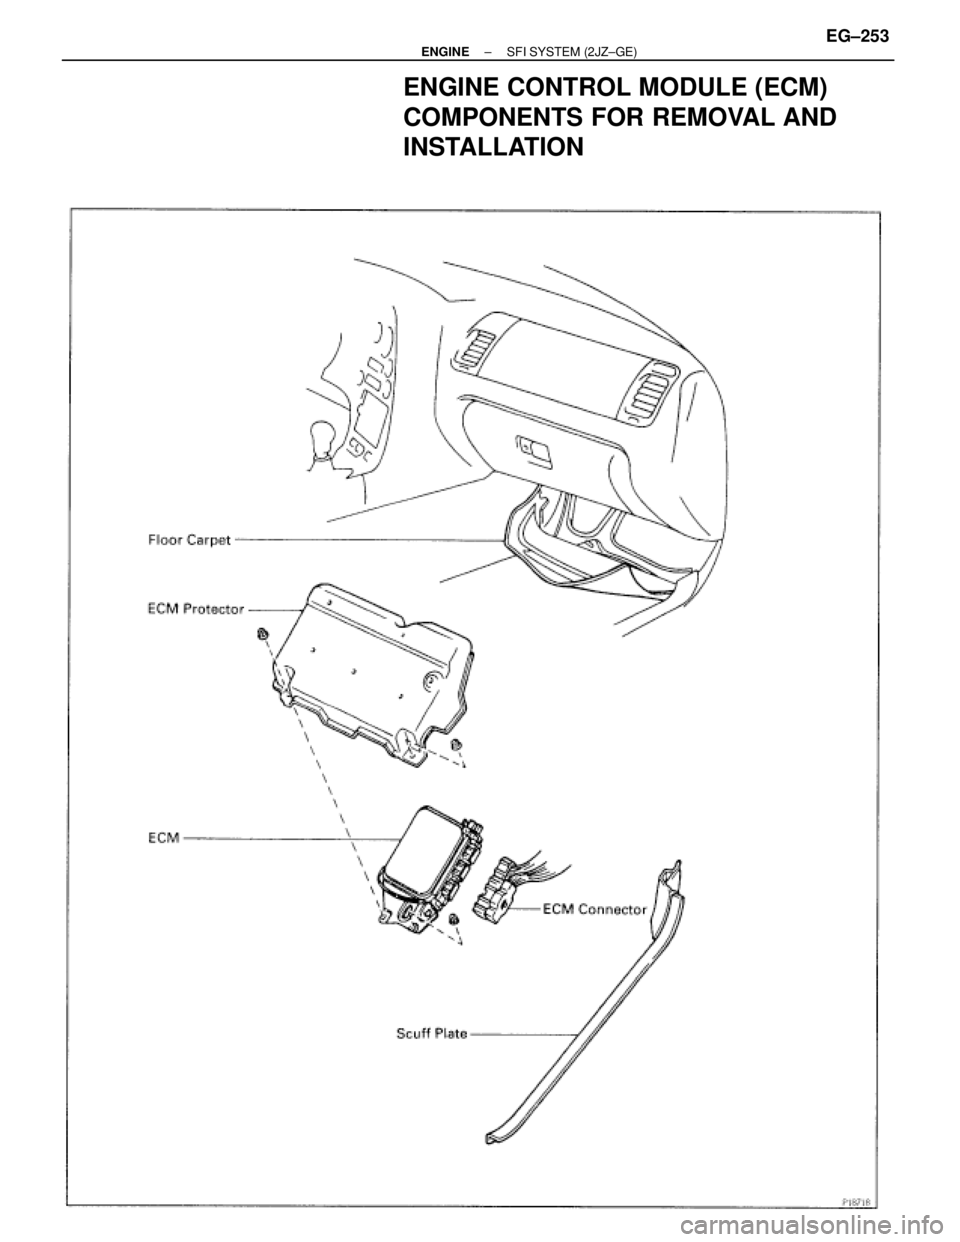
ENGINE CONTROL MODULE (ECM)
COMPONENTS FOR REMOVAL AND
INSTALLATION
± ENGINESFI SYSTEM (2JZ±GE)EG±253
Page 380 of 878
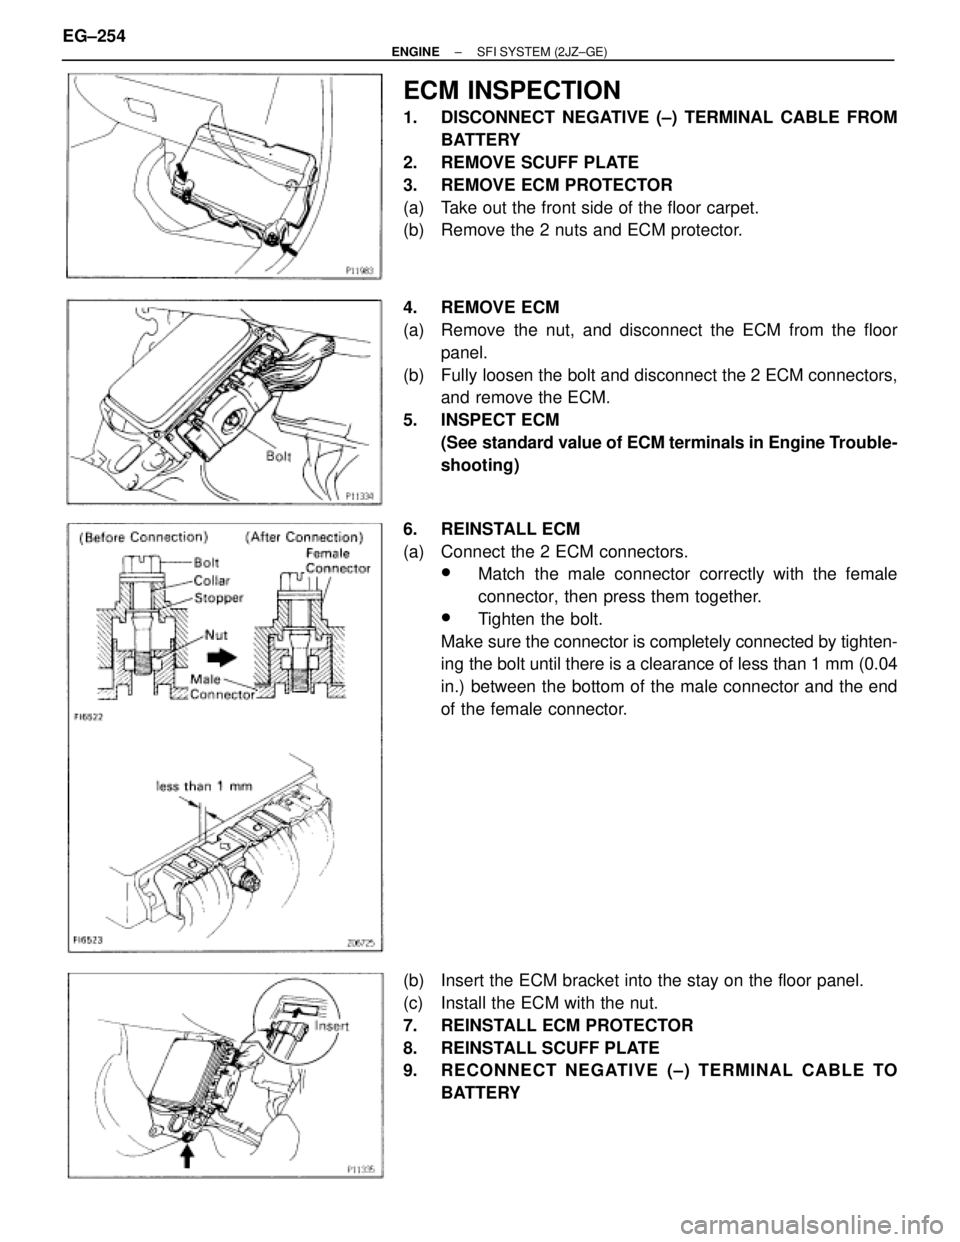
ECM INSPECTION
1. DISCONNECT NEGATIVE (±) TERMINAL CABLE FROM
BATTERY
2. REMOVE SCUFF PLATE
3. REMOVE ECM PROTECTOR
(a) Take out the front side of the floor carpet.
(b) Remove the 2 nuts and ECM protector.
4. REMOVE ECM
(a) Remove the nut, and disconnect the ECM from the floor
panel.
(b) Fully loosen the bolt and disconnect the 2 ECM connectors,
and remove the ECM.
5. INSPECT ECM
(See standard value of ECM terminals in Engine Trouble-
shooting)
6. REINSTALL ECM
(a) Connect the 2 ECM connectors.
wMatch the male connector correctly with the female
connector, then press them together.
wTighten the bolt.
Make sure the connector is completely connected by tighten-
ing the bolt until there is a clearance of less than 1 mm (0.04
in.) between the bottom of the male connector and the end
of the female connector.
(b) Insert the ECM bracket into the stay on the floor panel.
(c) Install the ECM with the nut.
7. REINSTALL ECM PROTECTOR
8. REINSTALL SCUFF PLATE
9. RECONNECT NEGATIVE (±) TERMINAL CABLE TO
BATTERY EG±254
± ENGINESFI SYSTEM (2JZ±GE)
Trending: fuel consumption, stop start, battery location, transmission fluid, open hood, turn signal bulb, fuse
