TOYOTA SUPRA 1986 Service Repair Manual
SUPRA 1986
TOYOTA
TOYOTA
https://www.carmanualsonline.info/img/14/57467/w960_57467-0.png
TOYOTA SUPRA 1986 Service Repair Manual
Trending: oil viscosity, air conditioning, engine, gte, wheel bolts, change time, wheel bolt torque
Page 411 of 878
TIMING BELT COMPONENTS
INSPECTION
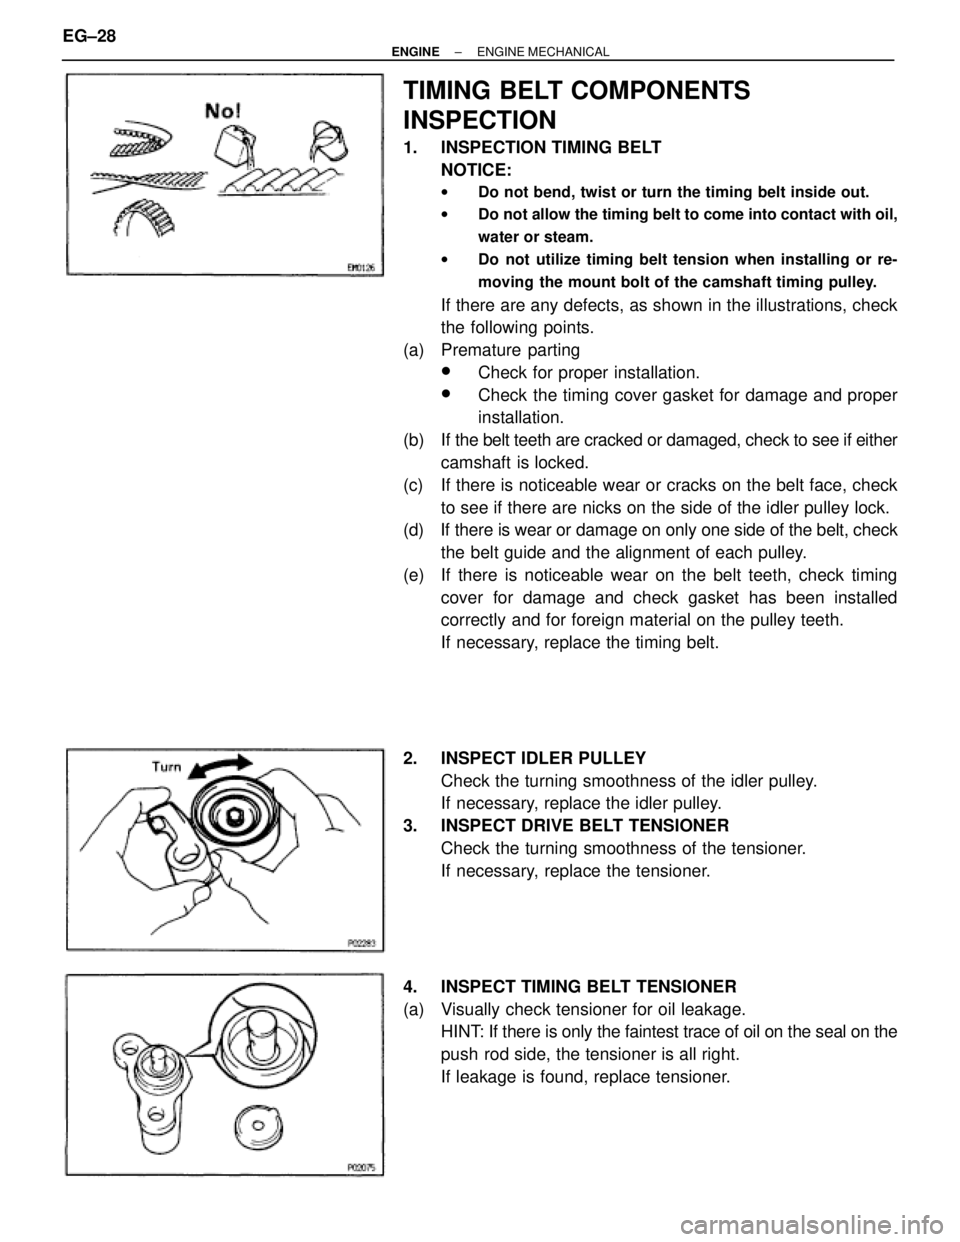
1. INSPECTION TIMING BELT
NOTICE:
wDo not bend, twist or turn the timing belt inside out.
wDo not allow the timing belt to come into contact with oil,
water or steam.
wDo not utilize timing belt tension when installing or re-
moving the mount bolt of the camshaft timing pulley.
If there are any defects, as shown in the illustrations, check
the following points.
(a) Premature parting
wCheck for proper installation.
wCheck the timing cover gasket for damage and proper
installation.
(b) If the belt teeth are cracked or damaged, check to see if either
camshaft is locked.
(c) If there is noticeable wear or cracks on the belt face, check
to see if there are nicks on the side of the idler pulley lock.
(d) If there is wear or damage on only one side of the belt, check
the belt guide and the alignment of each pulley.
(e) If there is noticeable wear on the belt teeth, check timing
cover for damage and check gasket has been installed
correctly and for foreign material on the pulley teeth.
If necessary, replace the timing belt.
2. INSPECT IDLER PULLEY
Check the turning smoothness of the idler pulley.
If necessary, replace the idler pulley.
3. INSPECT DRIVE BELT TENSIONER
Check the turning smoothness of the tensioner.
If necessary, replace the tensioner.
4. INSPECT TIMING BELT TENSIONER
(a) Visually check tensioner for oil leakage.
HINT: If there is only the faintest trace of oil on the seal on the
push rod side, the tensioner is all right.
If leakage is found, replace tensioner. EG±28
± ENGINEENGINE MECHANICAL
Page 412 of 878
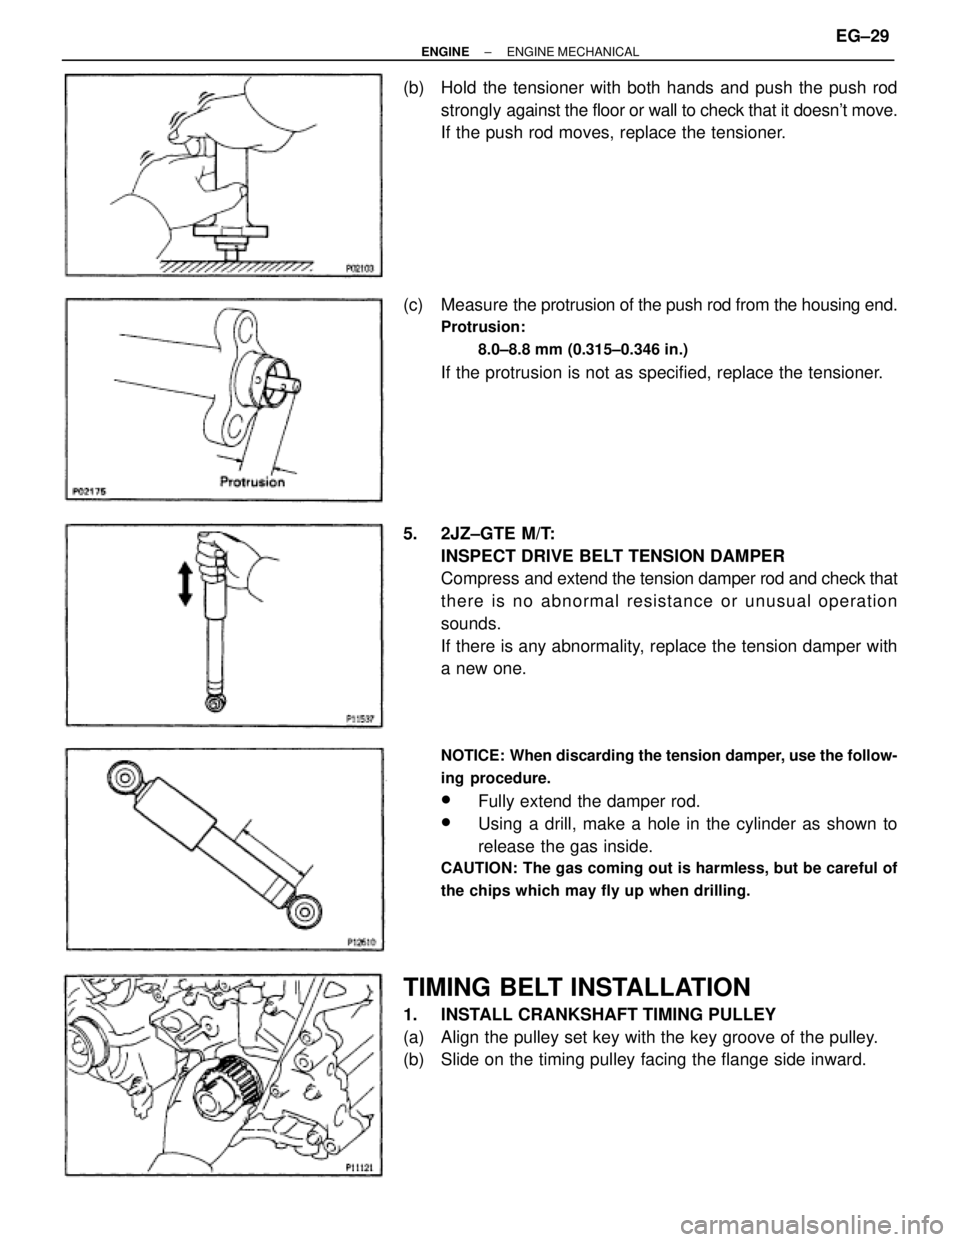
(b) Hold the tensioner with both hands and push the push rod
strongly against the floor or wall to check that it doesn't move.
If the push rod moves, replace the tensioner.
(c) Measure the protrusion of the push rod from the housing end.
Protrusion:
8.0±8.8 mm (0.315±0.346 in.)
If the protrusion is not as specified, replace the tensioner.
5. 2JZ±GTE M/T:
INSPECT DRIVE BELT TENSION DAMPER
Compress and extend the tension damper rod and check that
there is no abnormal resistance or unusual operation
sounds.
If there is any abnormality, replace the tension damper with
a new one.
NOTICE: When discarding the tension damper, use the follow-
ing procedure.
wFully extend the damper rod.
wUsing a drill, make a hole in the cylinder as shown to
release the gas inside.
CAUTION: The gas coming out is harmless, but be careful of
the chips which may fly up when drilling.
TIMING BELT INSTALLATION
1. INSTALL CRANKSHAFT TIMING PULLEY
(a) Align the pulley set key with the key groove of the pulley.
(b) Slide on the timing pulley facing the flange side inward.
± ENGINEENGINE MECHANICALEG±29
Page 413 of 878
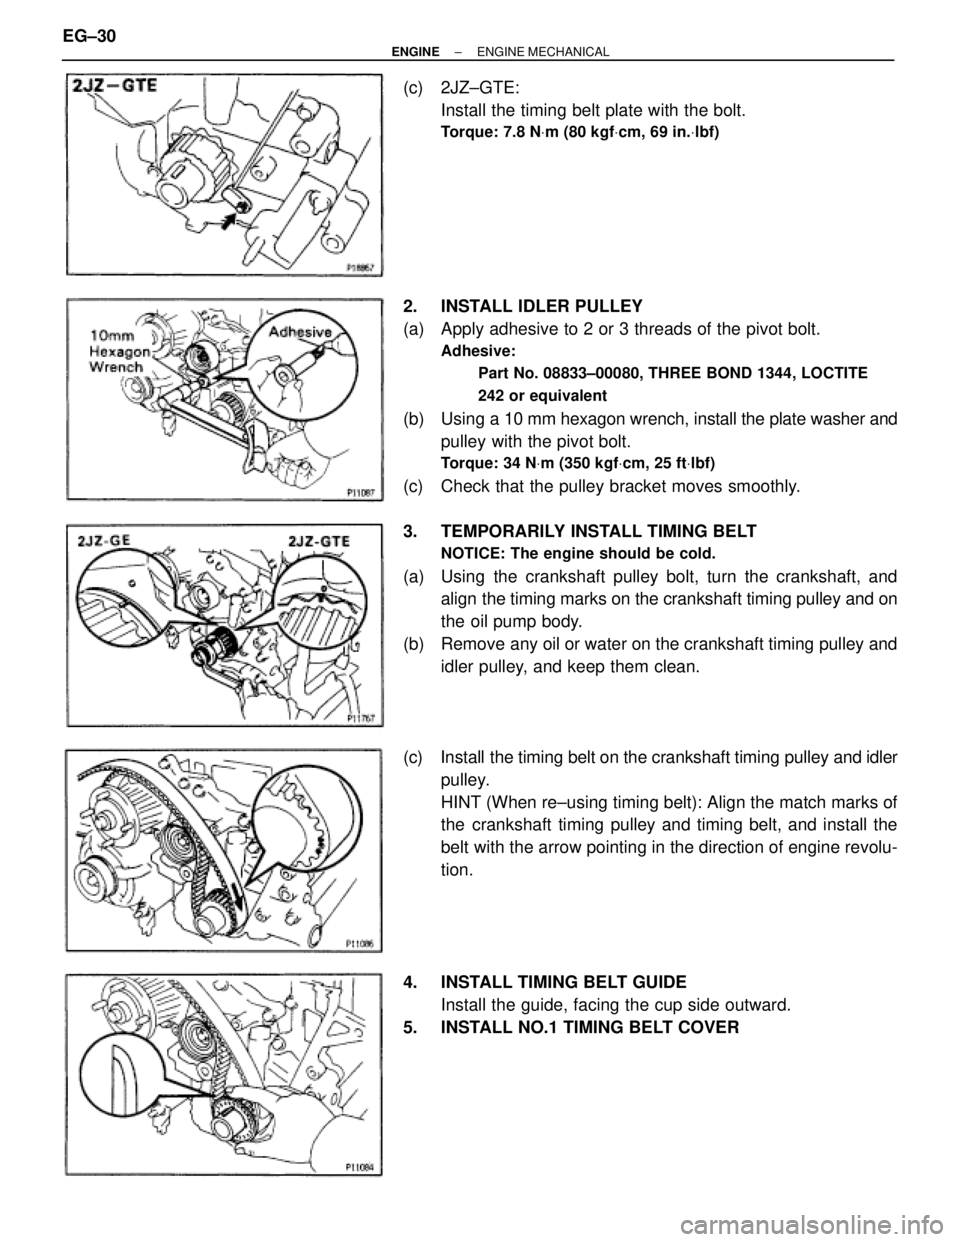
(c) 2JZ±GTE:
Install the timing belt plate with the bolt.
Torque: 7.8 NVm (80 kgfVcm, 69 in.Vlbf)
2. INSTALL IDLER PULLEY
(a) Apply adhesive to 2 or 3 threads of the pivot bolt.
Adhesive:
Part No. 08833±00080, THREE BOND 1344, LOCTITE
242 or equivalent
(b) Using a 10 mm hexagon wrench, install the plate washer and
pulley with the pivot bolt.
Torque: 34 NVm (350 kgfVcm, 25 ftVlbf)
(c) Check that the pulley bracket moves smoothly.
3. TEMPORARILY INSTALL TIMING BELT
NOTICE: The engine should be cold.
(a) Using the crankshaft pulley bolt, turn the crankshaft, and
align the timing marks on the crankshaft timing pulley and on
the oil pump body.
(b) Remove any oil or water on the crankshaft timing pulley and
idler pulley, and keep them clean.
(c) Install the timing belt on the crankshaft timing pulley and idler
pulley.
HINT (When re±using timing belt): Align the match marks of
the crankshaft timing pulley and timing belt, and install the
belt with the arrow pointing in the direction of engine revolu-
tion.
4. INSTALL TIMING BELT GUIDE
Install the guide, facing the cup side outward.
5. INSTALL NO.1 TIMING BELT COVER EG±30
± ENGINEENGINE MECHANICAL
Page 414 of 878
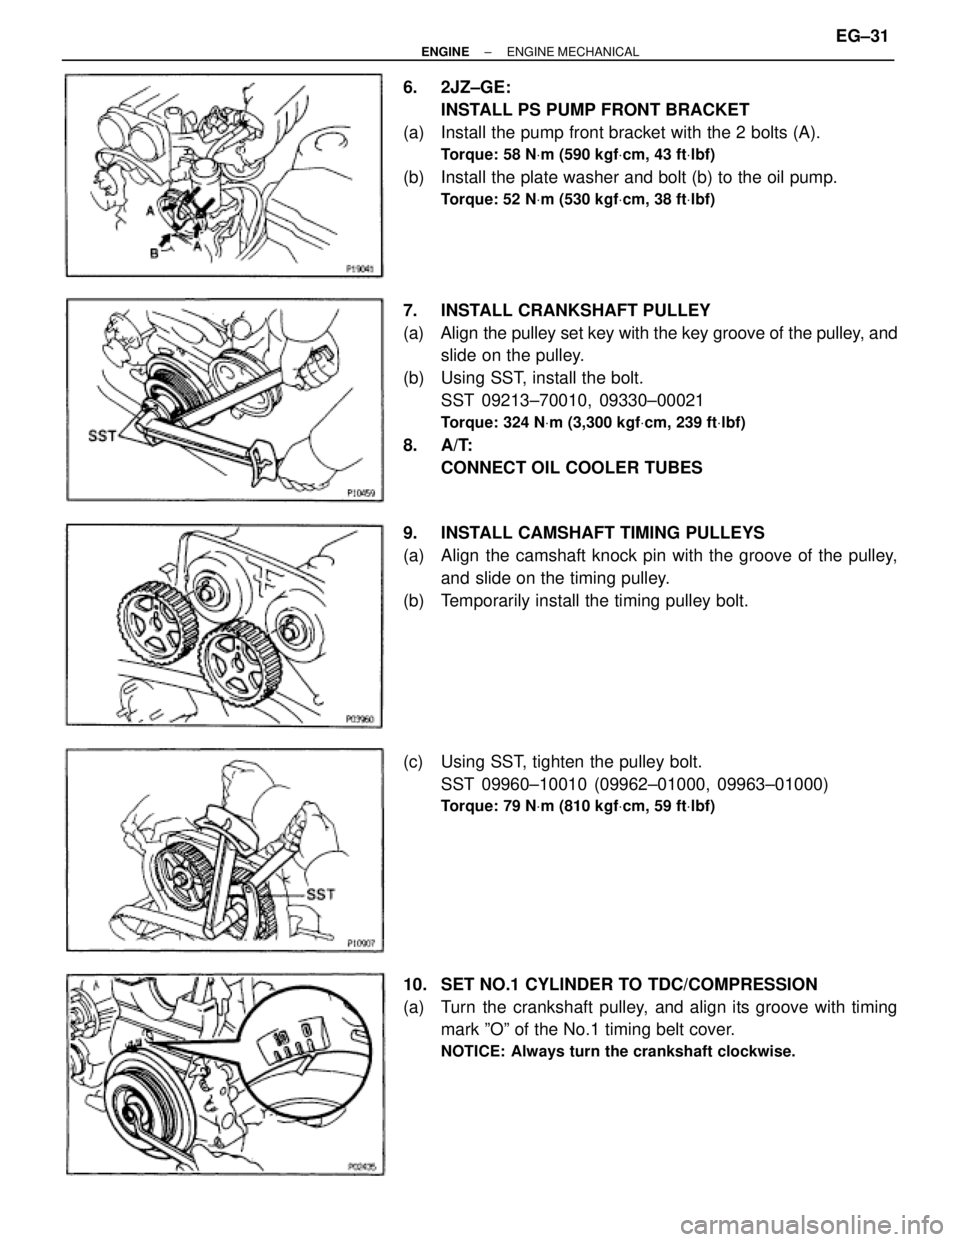
6. 2JZ±GE:
INSTALL PS PUMP FRONT BRACKET
(a) Install the pump front bracket with the 2 bolts (A).
Torque: 58 NVm (590 kgfVcm, 43 ftVlbf)
(b) Install the plate washer and bolt (b) to the oil pump.
Torque: 52 NVm (530 kgfVcm, 38 ftVlbf)
7. INSTALL CRANKSHAFT PULLEY
(a) Align the pulley set key with the key groove of the pulley, and
slide on the pulley.
(b) Using SST, install the bolt.
SST 09213±70010, 09330±00021
Torque: 324 NVm (3,300 kgfVcm, 239 ftVlbf)
8. A/T:
CONNECT OIL COOLER TUBES
9. INSTALL CAMSHAFT TIMING PULLEYS
(a) Align the camshaft knock pin with the groove of the pulley,
and slide on the timing pulley.
(b) Temporarily install the timing pulley bolt.
(c) Using SST, tighten the pulley bolt.
SST 09960±10010 (09962±01000, 09963±01000)
Torque: 79 NVm (810 kgfVcm, 59 ftVlbf)
10. SET NO.1 CYLINDER TO TDC/COMPRESSION
(a) Turn the crankshaft pulley, and align its groove with timing
mark ºOº of the No.1 timing belt cover.
NOTICE: Always turn the crankshaft clockwise.
± ENGINEENGINE MECHANICALEG±31
Page 415 of 878
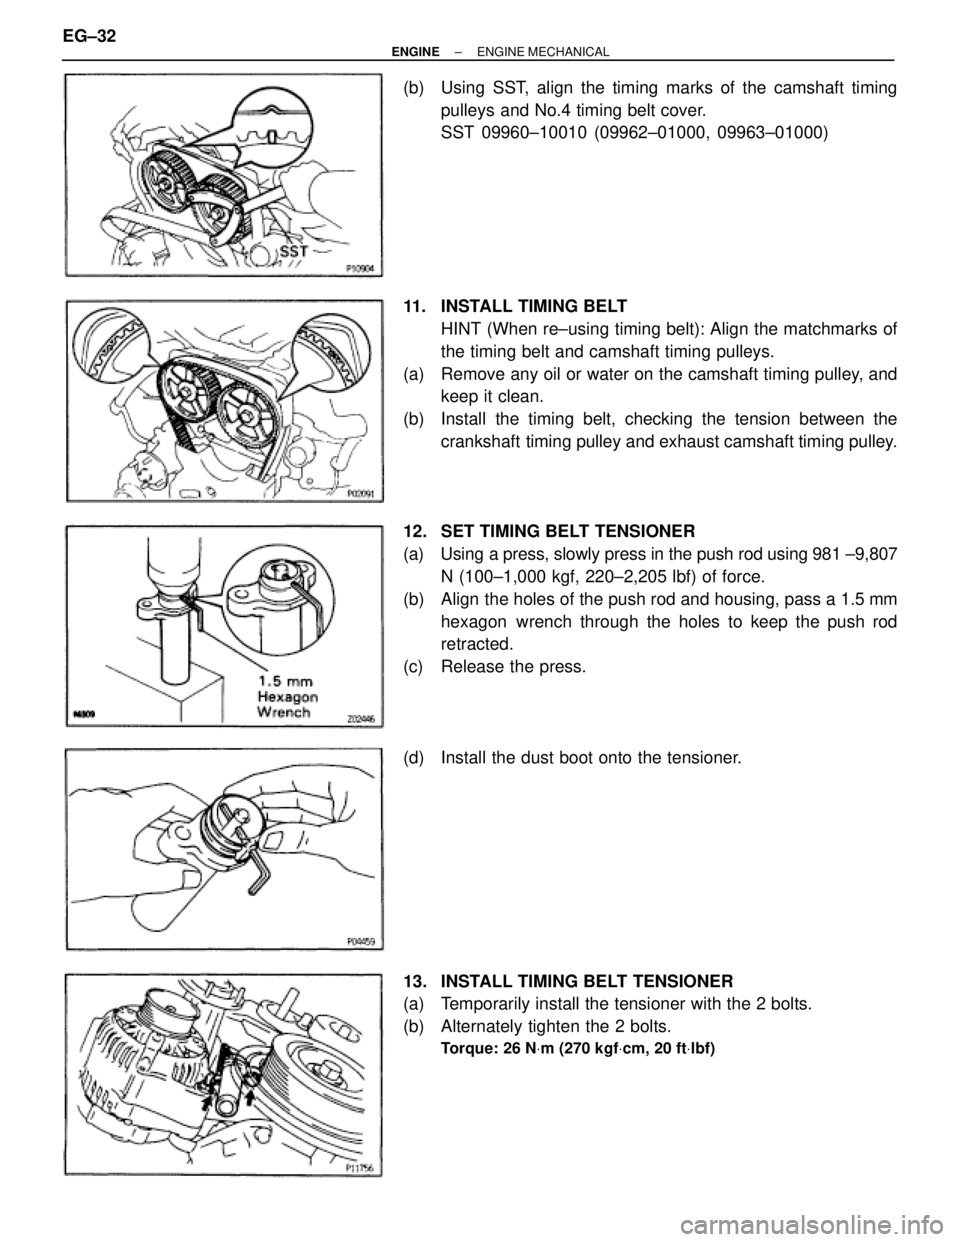
(b) Using SST, align the timing marks of the camshaft timing
pulleys and No.4 timing belt cover.
SST 09960±10010 (09962±01000, 09963±01000)
11. INSTALL TIMING BELT
HINT (When re±using timing belt): Align the matchmarks of
the timing belt and camshaft timing pulleys.
(a) Remove any oil or water on the camshaft timing pulley, and
keep it clean.
(b) Install the timing belt, checking the tension between the
crankshaft timing pulley and exhaust camshaft timing pulley.
12. SET TIMING BELT TENSIONER
(a) Using a press, slowly press in the push rod using 981 ±9,807
N (100±1,000 kgf, 220±2,205 lbf) of force.
(b) Align the holes of the push rod and housing, pass a 1.5 mm
hexagon wrench through the holes to keep the push rod
retracted.
(c) Release the press.
(d) Install the dust boot onto the tensioner.
13. INSTALL TIMING BELT TENSIONER
(a) Temporarily install the tensioner with the 2 bolts.
(b) Alternately tighten the 2 bolts.
Torque: 26 NVm (270 kgfVcm, 20 ftVlbf)
EG±32± ENGINEENGINE MECHANICAL
Page 416 of 878
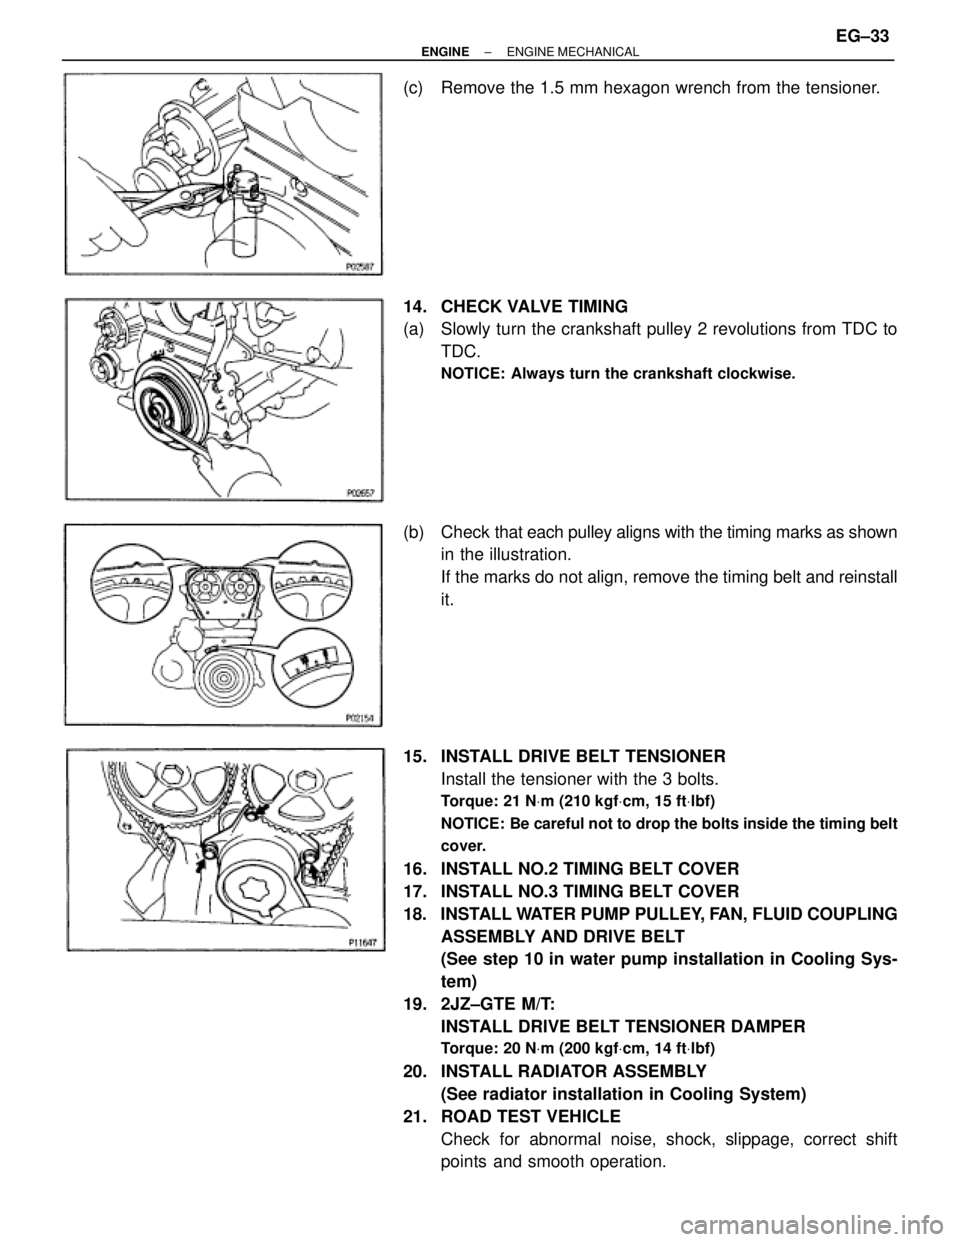
(c) Remove the 1.5 mm hexagon wrench from the tensioner.
14. CHECK VALVE TIMING
(a) Slowly turn the crankshaft pulley 2 revolutions from TDC to
TDC.
NOTICE: Always turn the crankshaft clockwise.
(b) Check that each pulley aligns with the timing marks as shown
in the illustration.
If the marks do not align, remove the timing belt and reinstall
it.
15. INSTALL DRIVE BELT TENSIONER
Install the tensioner with the 3 bolts.
Torque: 21 NVm (210 kgfVcm, 15 ftVlbf)
NOTICE: Be careful not to drop the bolts inside the timing belt
cover.
16. INSTALL NO.2 TIMING BELT COVER
17. INSTALL NO.3 TIMING BELT COVER
18. INSTALL WATER PUMP PULLEY, FAN, FLUID COUPLING
ASSEMBLY AND DRIVE BELT
(See step 10 in water pump installation in Cooling Sys-
tem)
19. 2JZ±GTE M/T:
INSTALL DRIVE BELT TENSIONER DAMPER
Torque: 20 NVm (200 kgfVcm, 14 ftVlbf)
20. INSTALL RADIATOR ASSEMBLY
(See radiator installation in Cooling System)
21. ROAD TEST VEHICLE
Check for abnormal noise, shock, slippage, correct shift
points and smooth operation.
± ENGINEENGINE MECHANICALEG±33
Page 417 of 878
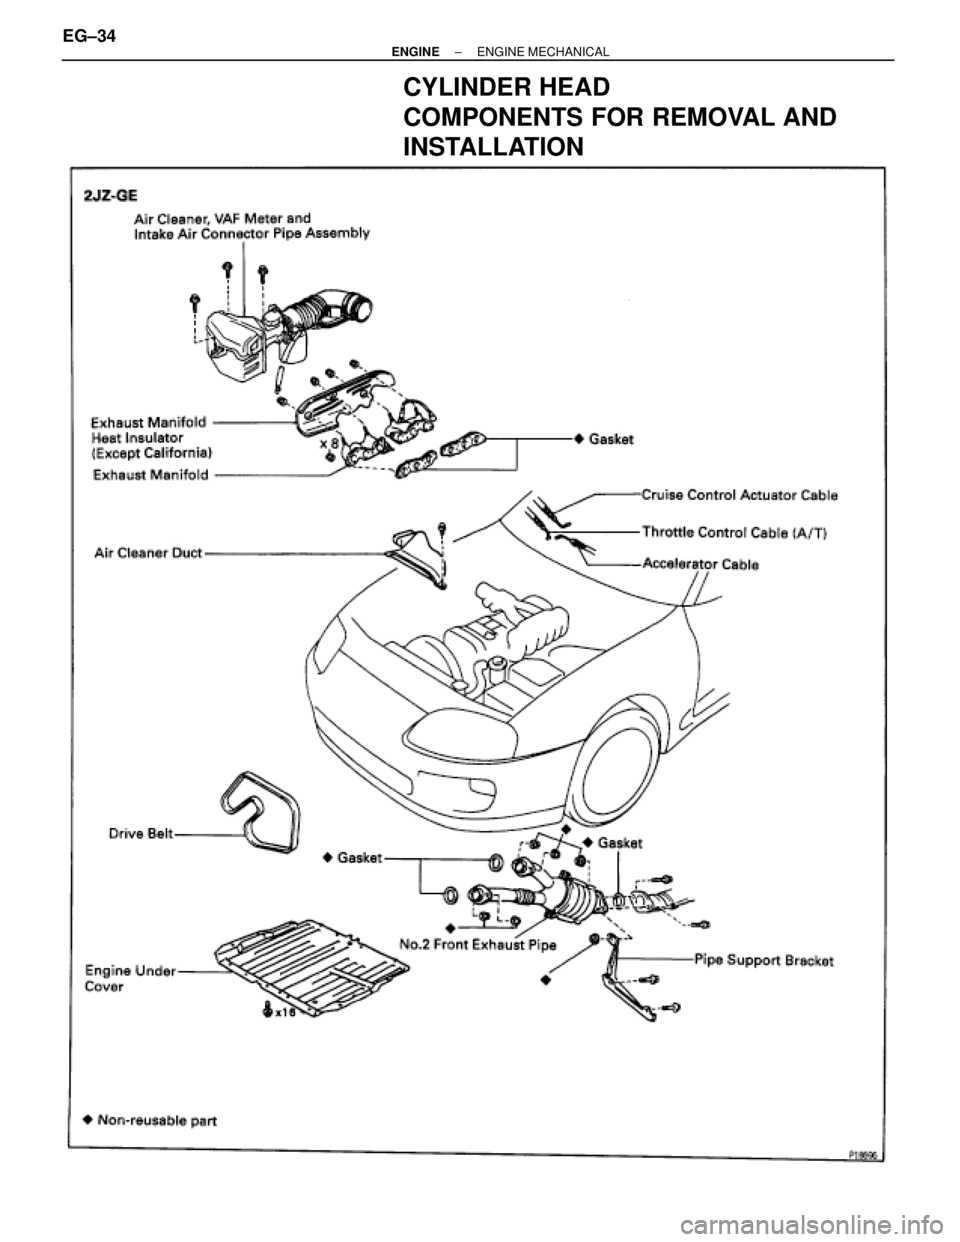
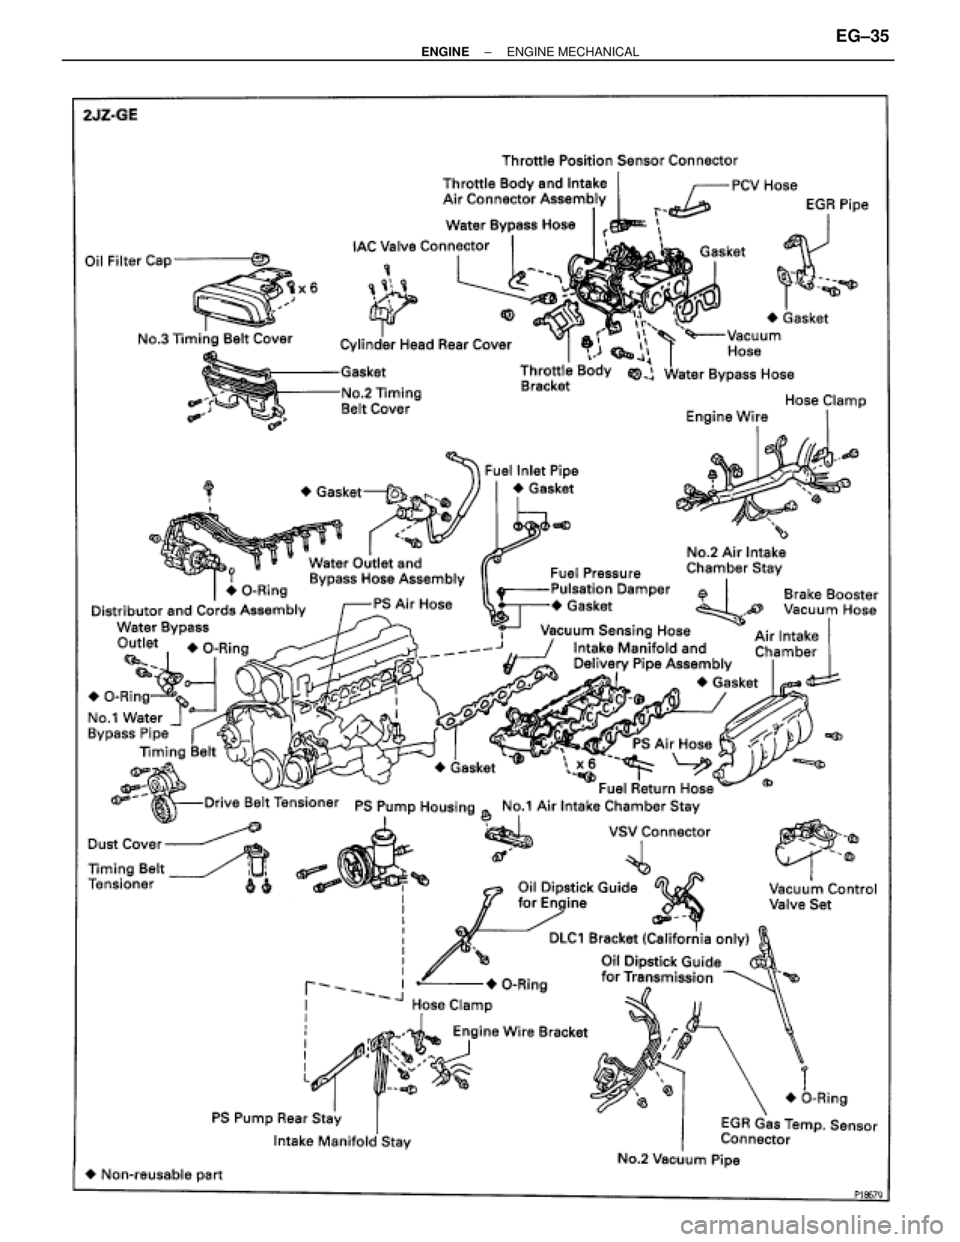
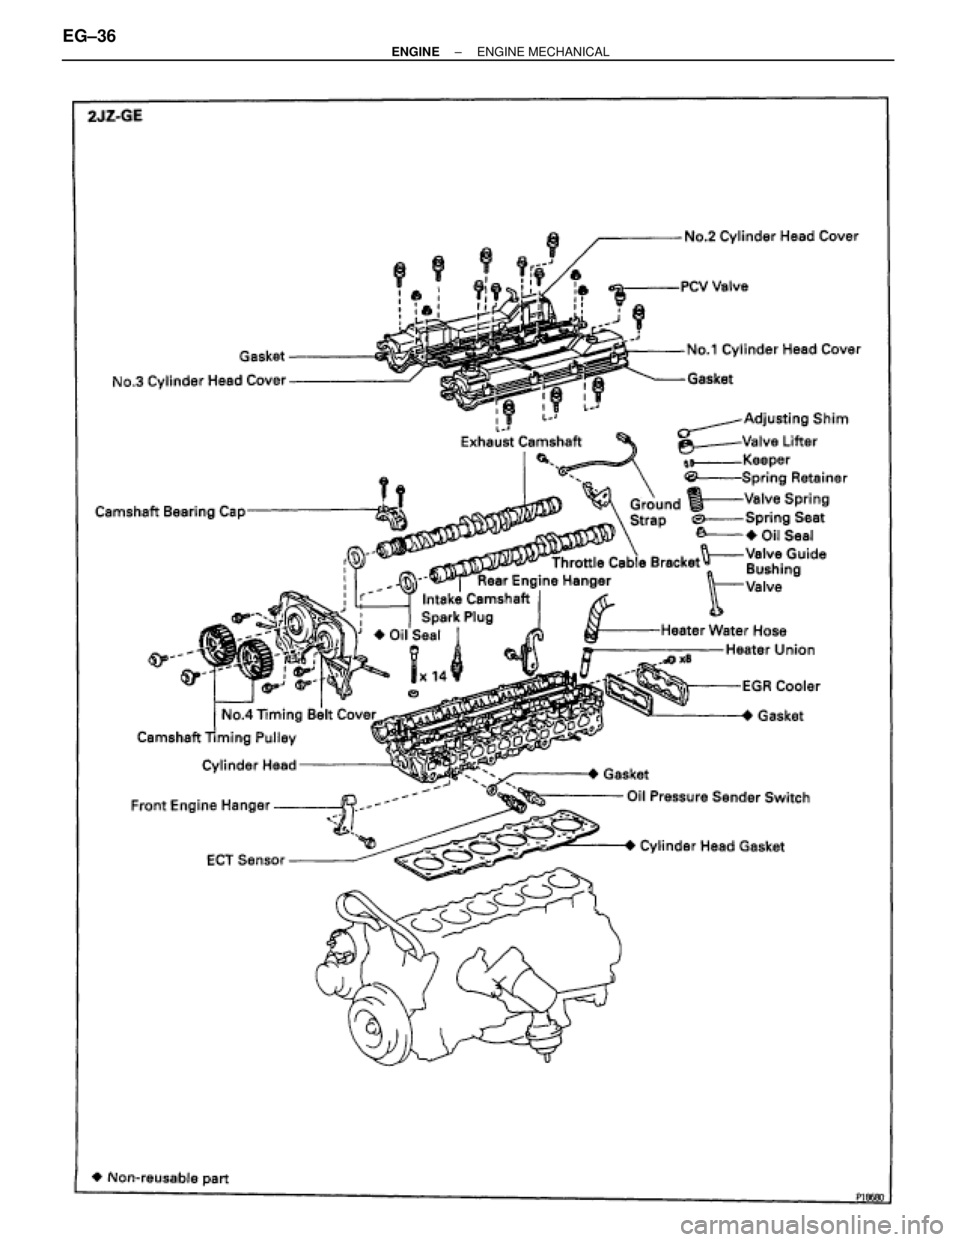
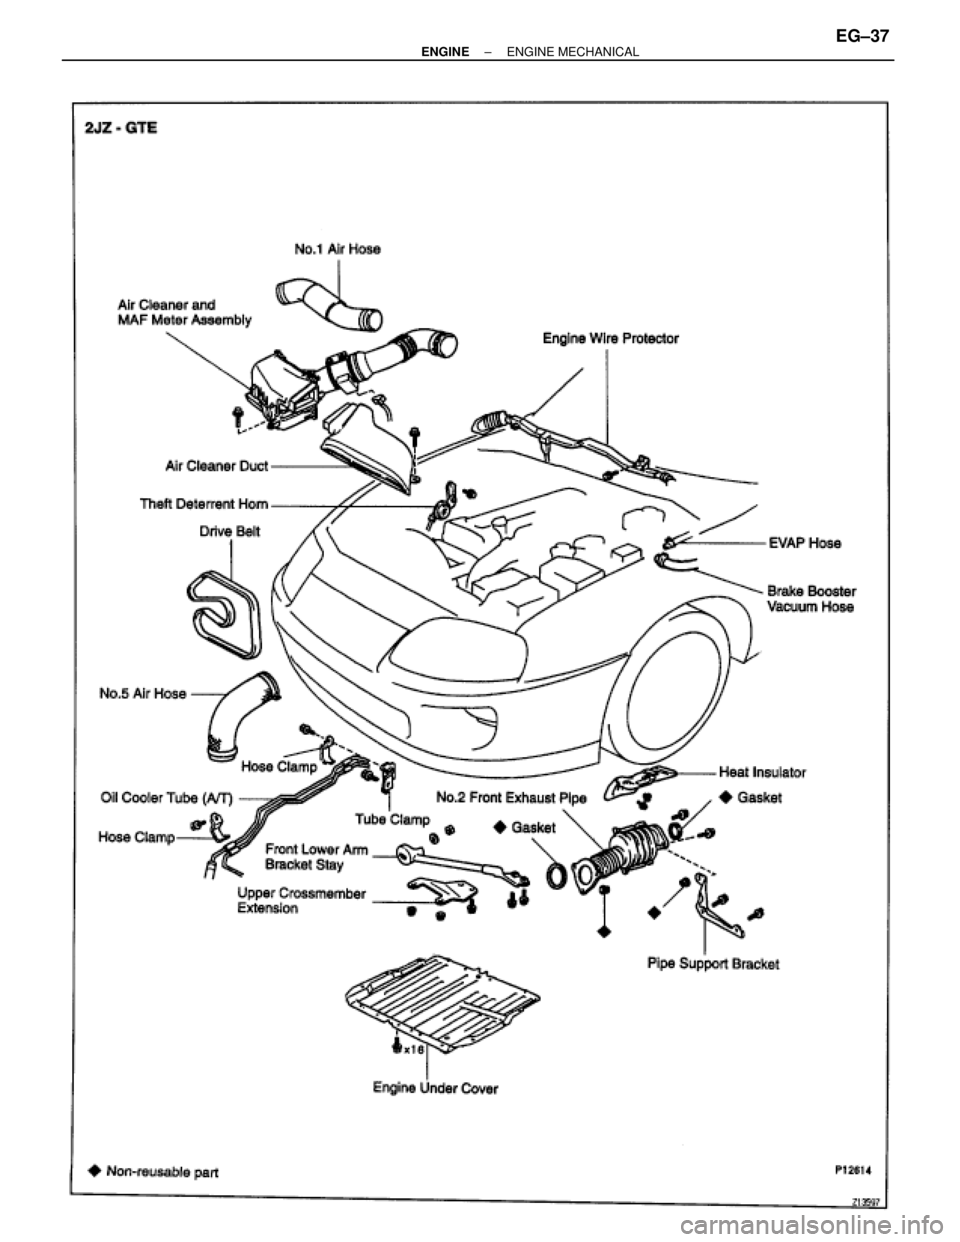
CYLINDER HEAD
COMPONENTS FOR REMOVAL AND
INSTALLATION
EG±34± ENGINEENGINE MECHANICAL
Page 418 of 878
± ENGINEENGINE MECHANICALEG±35
Page 419 of 878
EG±36± ENGINEENGINE MECHANICAL
Page 420 of 878
± ENGINEENGINE MECHANICALEG±37
Trending: air condition, battery replacement, sensor, transmission, headlights, oil level, open hood


