TOYOTA SUPRA 1997 Service Repair Manual
SUPRA 1997
TOYOTA
TOYOTA
https://www.carmanualsonline.info/img/14/57469/w960_57469-0.png
TOYOTA SUPRA 1997 Service Repair Manual
Trending: spare tire, flat tire, spark plug, fuse box location, battery replacement, coolant level, remove seats
Page 391 of 1807
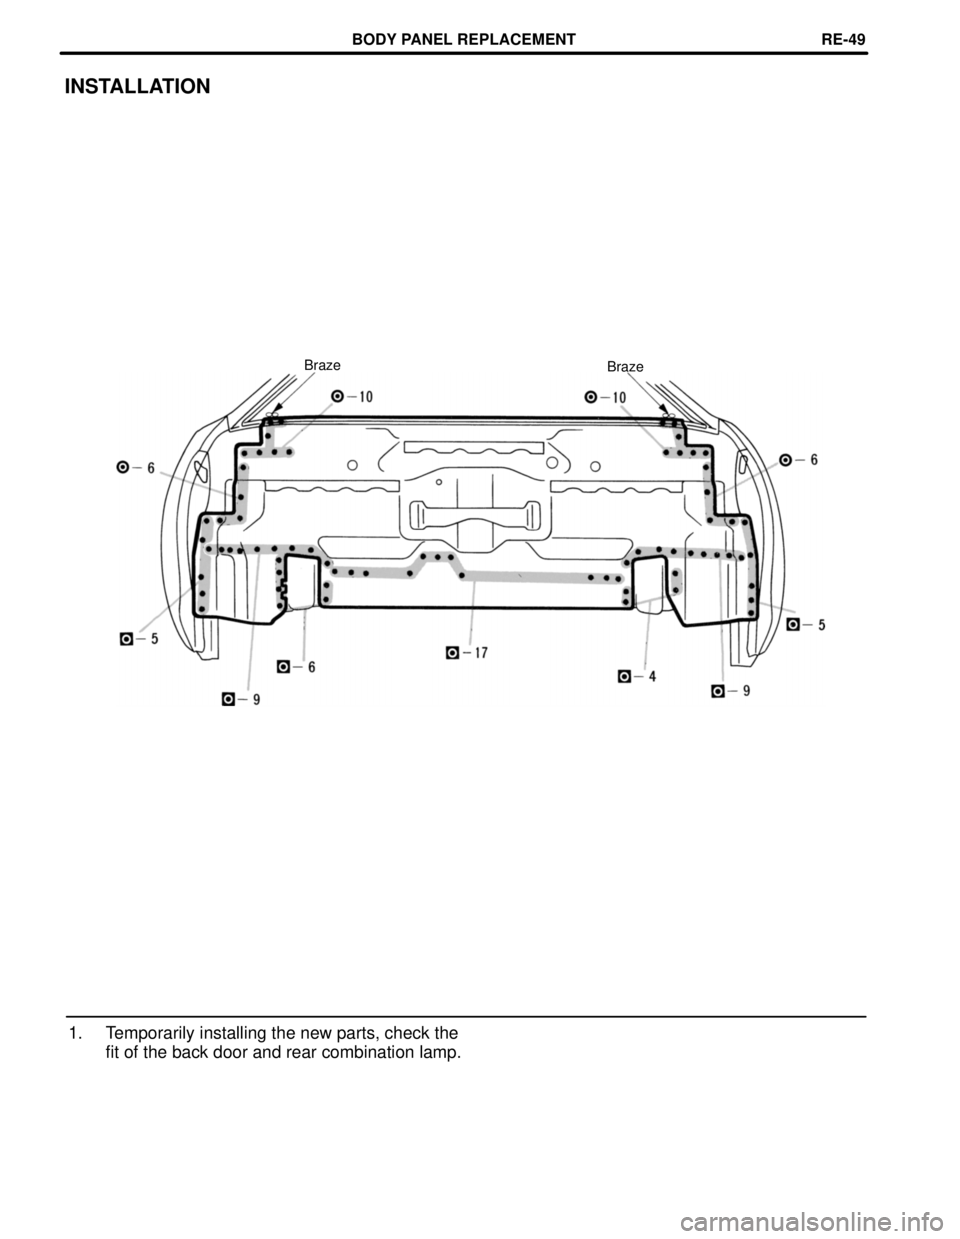
INSTALLATION
Braze Braze
1. Temporarily installing the new parts, check the
fit of the back door and rear combination lamp.
BODY PANEL REPLACEMENTRE-49
Page 392 of 1807
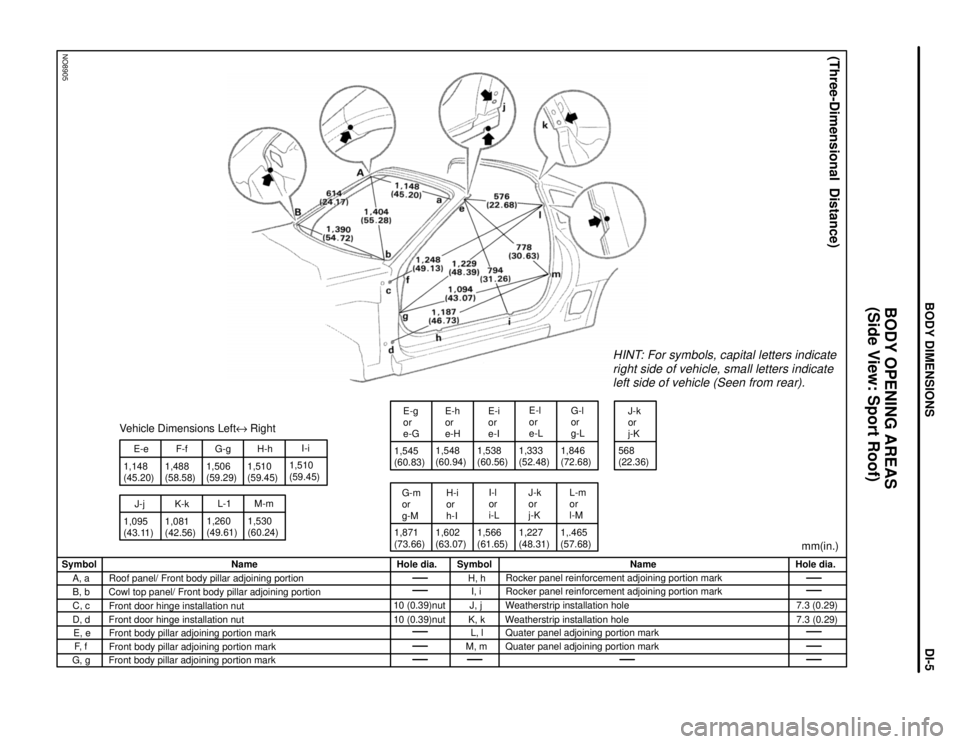
NO8905
1,148
(45.20)
J-j E-e
1,095
(43.11)1,488
(58.58)F-f
K-k
1,081
(42.56)G-g
1,260
(49.61)L-1Vehicle Dimensions LefteRight
1,506
(59.29)1,510
(59.45)
M-mH-h
1,530
(60.24)1,510
(59.45)I-i
1,545
(60.83)
G-m
or
g-ME-g
or
e-G
1,871
(73.66)1,602
(63.07) 1,548
(60.94)E-h
or
e-H
H-i
or
h-I1,538
(60.56)
I-l
or
i-L E-i
or
e-I
1,566
(61.65)E-l
or
e-L
J-k
or
j-K
1,227
(48.31) 1,333
(52.48)
L-m
or
l-MG-l
or
g-L
1,.465
(57.68)1,846
(72.68)
HINT: For symbols, capital letters indicate
right side of vehicle, small letters indicate
left side of vehicle (Seen from rear).
J-k
or
j-K
568
(22.36)
mm(in.)
(Three-Dimensional Distance)
Hole dia.
7.3 (0.29)
7.3 (0.29) Name
Rocker panel reinforcement adjoining portion mark
Rocker panel reinforcement adjoining portion mark
Weatherstrip installation hole
Weatherstrip installation hole
Quater panel adjoining portion mark
Quater panel adjoining portion mark Symbol
H, h
I, i
J, j
K, k
L, l
M, m Hole dia.
10 (0.39)nut
10 (0.39)nut Name
Roof panel/ Front body pillar adjoining portion
Cowl top panel/ Front body pillar adjoining portion
Front door hinge installation nut
Front door hinge installation nut
Front body pillar adjoining portion mark
Front body pillar adjoining portion mark
Front body pillar adjoining portion mark Symbol
A, a
B, b
C, c
D, d
E, e
F, f
G, g
BODY OPENING AREAS
(Side View: Sport Roof)
BODY DIMENSIONSDI-5
Page 393 of 1807
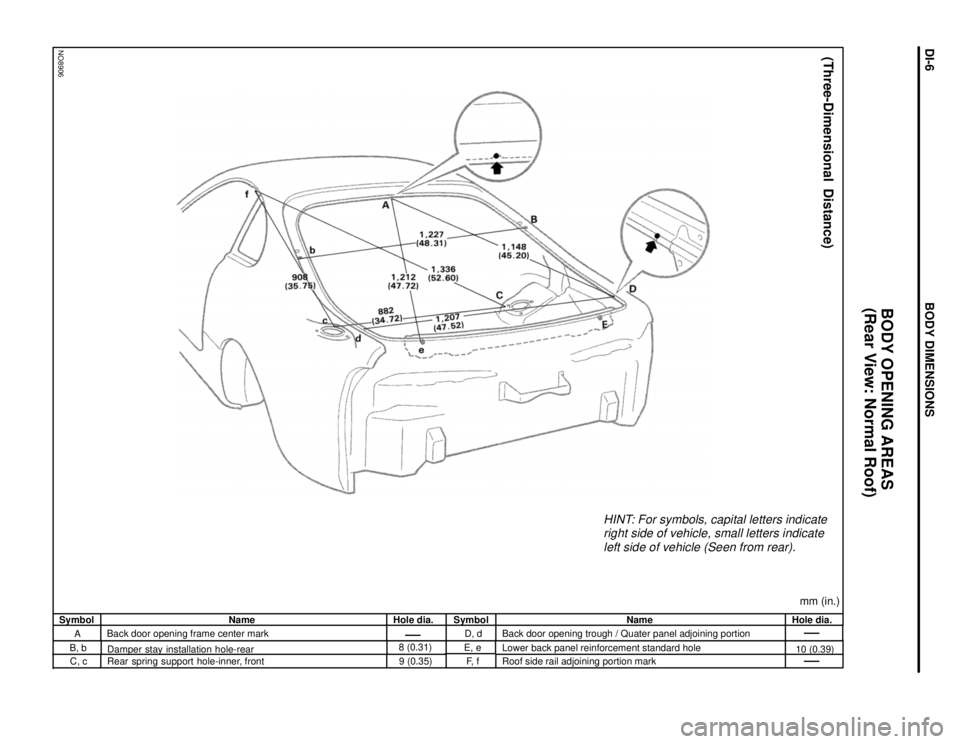
NO8906
HINT: For symbols, capital letters indicate
right side of vehicle, small letters indicate
left side of vehicle (Seen from rear).
(Three-Dimensional Distance)
mm (in.)Hole dia.
10 (0.39) Name
Back door opening trough / Quater panel adjoining portion
Lower back panel reinforcement standard hole
Roof side rail adjoining portion mark Symbol
D, d
E, e
F, f Hole dia.
8 (0.31)
9 (0.35) Name
Back door opening frame center mark
Damper stay installation hole-rear
Rear spring support hole-inner, front Symbol
A
B, b
C, c
BODY OPENING AREAS
(Rear View: Normal Roof)
BODY DIMENSIONSDI-6
Page 394 of 1807
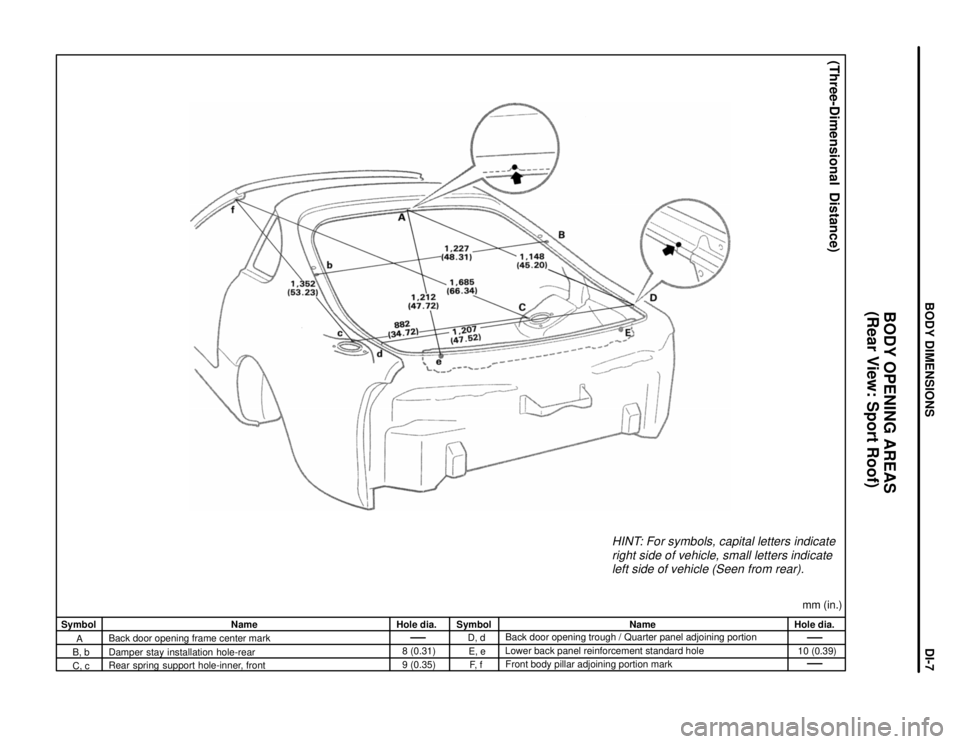
HINT: For symbols, capital letters indicate
right side of vehicle, small letters indicate
left side of vehicle (Seen from rear).
(Three-Dimensional Distance)
mm (in.)Hole dia.
10 (0.39) Name
Back door opening trough / Quarter panel adjoining portion
Lower back panel reinforcement standard hole
Front body pillar adjoining portion mark Symbol
D, d
E, e
F, f Hole dia.
8 (0.31)
9 (0.35) Name
Back door opening frame center mark
Damper stay installation hole-rear
Rear spring support hole-inner, front Symbol
A
B, b
C, c
BODY OPENING AREAS
(Rear View: Sport Roof)
BODY DIMENSIONSDI-7
Page 395 of 1807
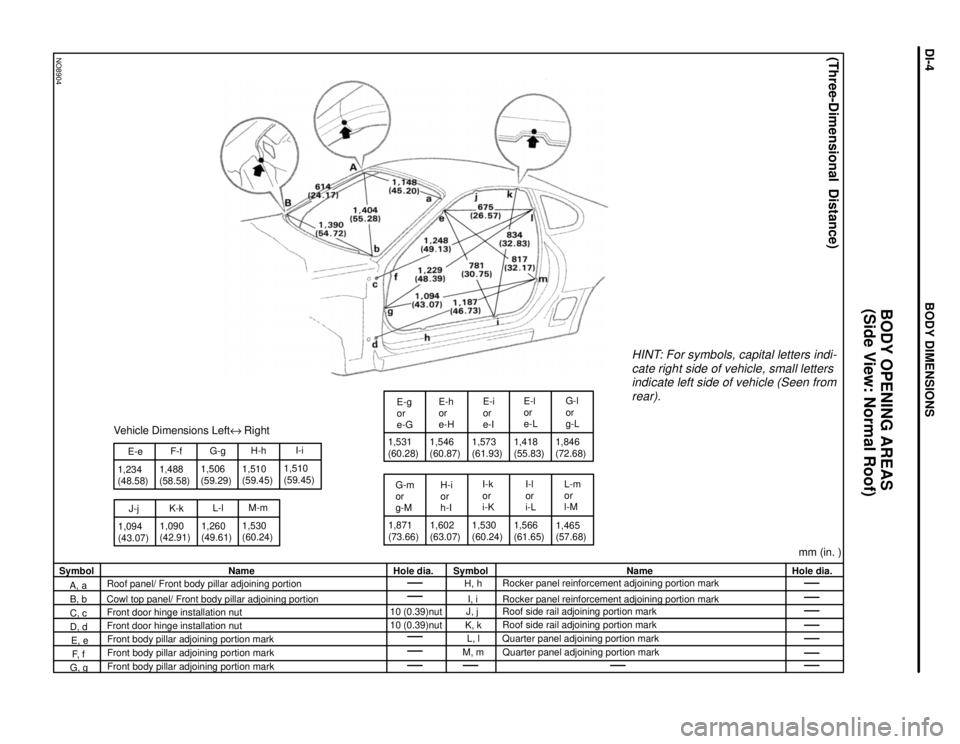
NO8904
J-j 1,234
(48.58)E-e
1,094
(43.07)1,488
(58.58)
K-kF-f
1,090
(42.91)
Vehicle Dimensions LefteRight
G-g
1,260
(49.61)L-l 1,506
(59.29)
1,530
(60.24)H-h
M-m 1,510
(59.45)1,510
(59.45)I-i1,531
(60.28)
G-m
or
g-ME-g
or
e-G
1,871
(73.66)1,602
(63.07)E-h
or
e-H
H-i
or
h-I 1,546
(60.87)
1,530
(60.24)I-k
or
i-KE-i
or
e-I
1,573
(61.93)1,418
(55.83)
1,566
(61.65)E-l
or
e-L
I-l
or
i-L1,846
(72.68)G-l
or
g-L
L-m
or
l-M
1,465
(57.68)
HINT: For symbols, capital letters indi-
cate right side of vehicle, small letters
indicate left side of vehicle (Seen from
rear).
(Three-Dimensional Distance)
mm (in. )Hole dia. Name
Rocker panel reinforcement adjoining portion mark
Rocker panel reinforcement adjoining portion mark
Roof side rail adjoining portion mark
Roof side rail adjoining portion mark
Quarter panel adjoining portion mark
Quarter panel adjoining portion mark Symbol
H, h
I, i
J, j
K, k
L, l
M, m Hole dia.
10 (0.39)nut
10 (0.39)nut Name
Roof panel/ Front body pillar adjoining portion
Cowl top panel/ Front body pillar adjoining portion
Front door hinge installation nut
Front door hinge installation nut
Front body pillar adjoining portion mark
Front body pillar adjoining portion mark
Front body pillar adjoining portion mark Symbol
A, a
B, b
C, c
D, d
E, e
F, f
G, g
BODY OPENING AREAS
(Side View: Normal Roof)
BODY DIMENSIONSDI-4
Page 396 of 1807
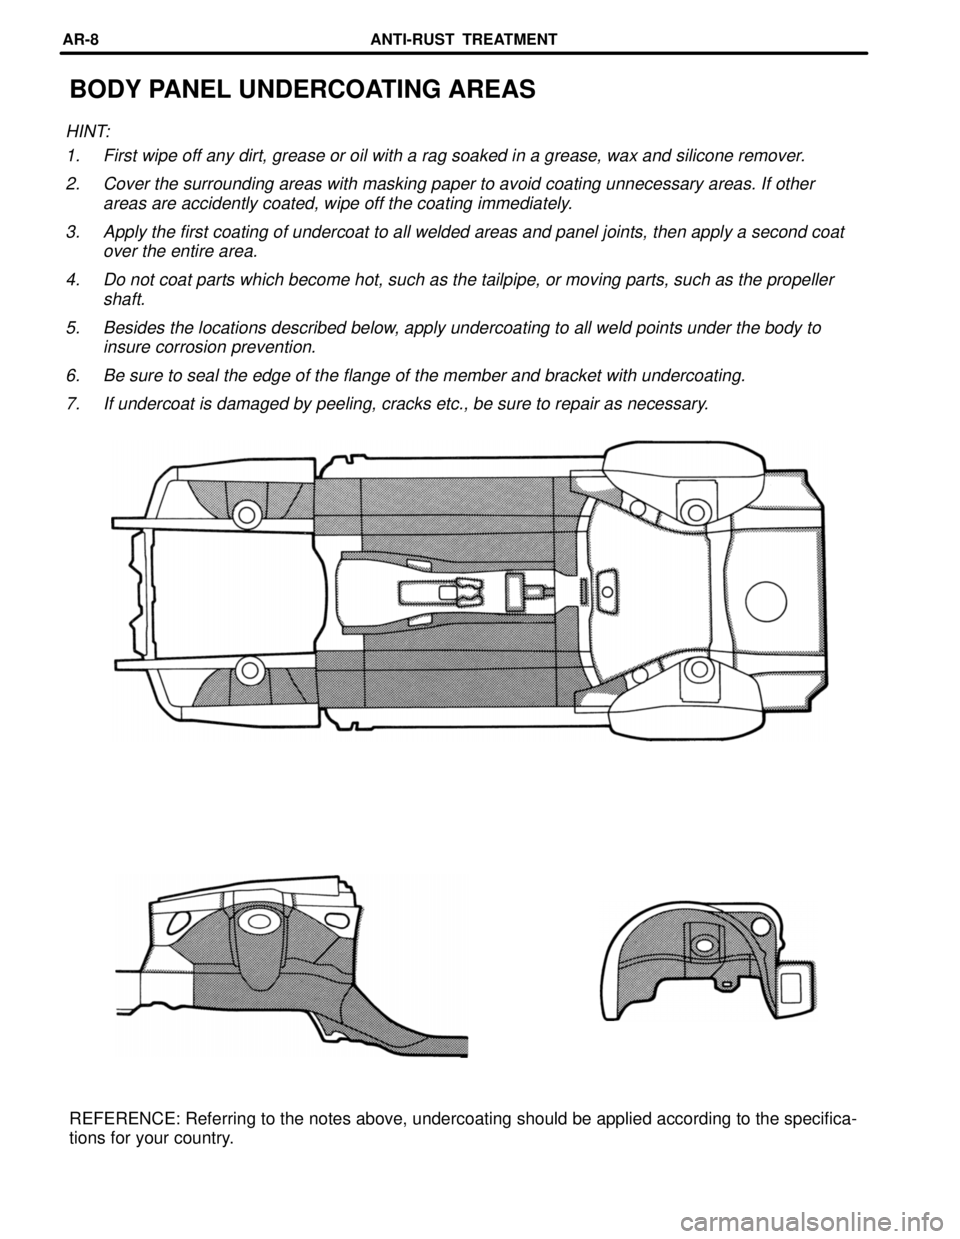
BODY PANEL UNDERCOATING AREAS
HINT:
1. First wipe off any dirt, grease or oil with a rag soaked in a grease, wax and silicone remover.
2. Cover the surrounding areas with masking paper to avoid coating unnecessary areas. If other
areas are accidently coated, wipe off the coating immediately.
3. Apply the first coating of undercoat to all welded areas and panel joints, then apply a second coat
over the entire area.
4. Do not coat parts which become hot, such as the tailpipe, or moving parts, such as the propeller
shaft.
5. Besides the locations described below, apply undercoating to all weld points under the body to
insure corrosion prevention.
6. Be sure to seal the edge of the flange of the member and bracket with undercoating.
7. If undercoat is damaged by peeling, cracks etc., be sure to repair as necessary.
REFERENCE: Referring to the notes above, undercoating should be applied according to the specifica-
tions for your country.
ANTI-RUST TREATMENTAR-8
Page 397 of 1807
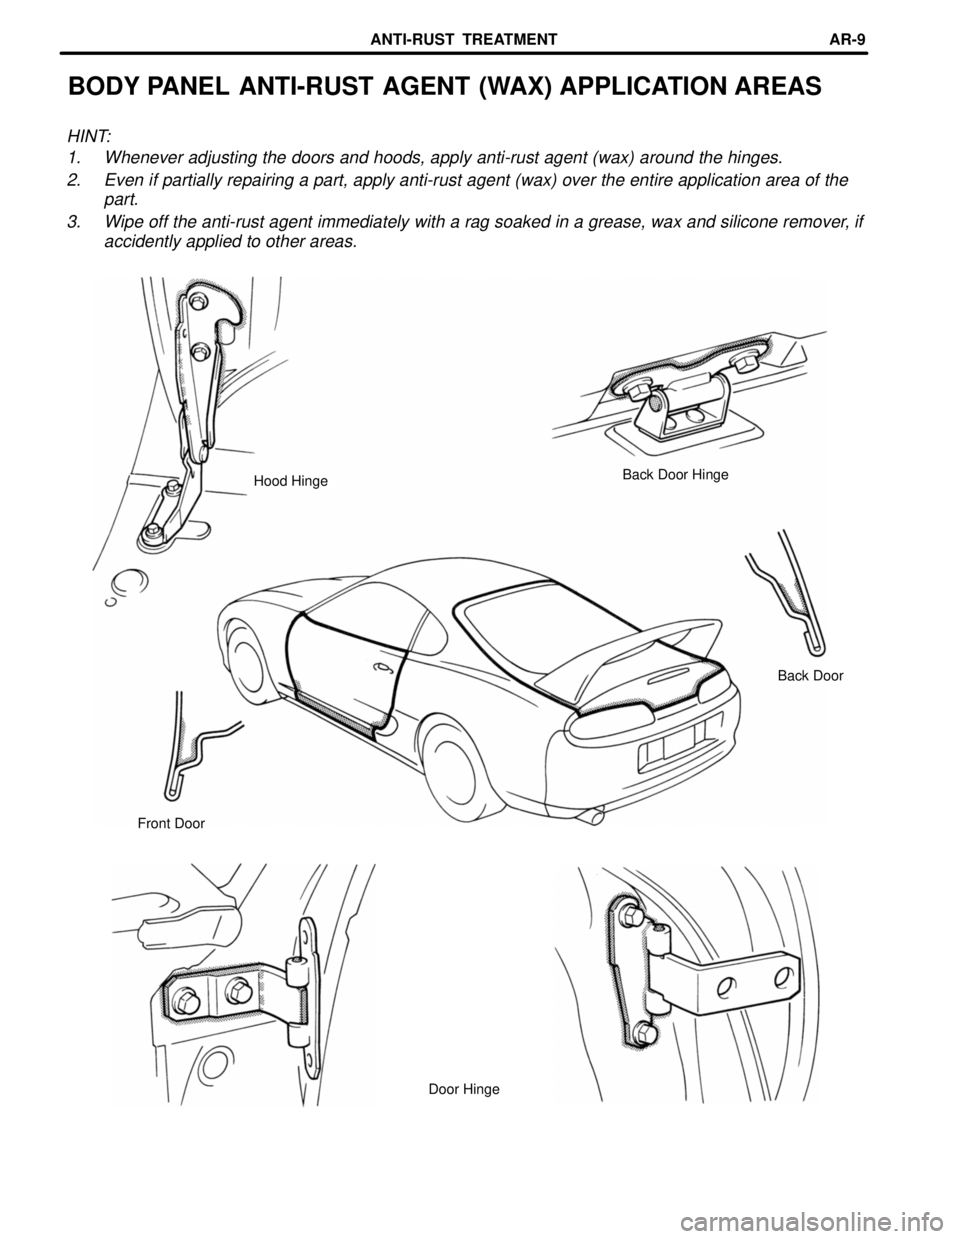
BODY PANEL ANTI-RUST AGENT (WAX) APPLICATION AREAS
HINT:
1. Whenever adjusting the doors and hoods, apply anti-rust agent (wax) around the hinges.
2. Even if partially repairing a part, apply anti-rust agent (wax) over the entire application area of the
part.
3. Wipe off the anti-rust agent immediately with a rag soaked in a grease, wax and silicone remover, if
accidently applied to other areas.
Back Door Hinge
Hood Hinge
Back Door
Front Door
Door Hinge
ANTI-RUST TREATMENTAR-9
Page 398 of 1807
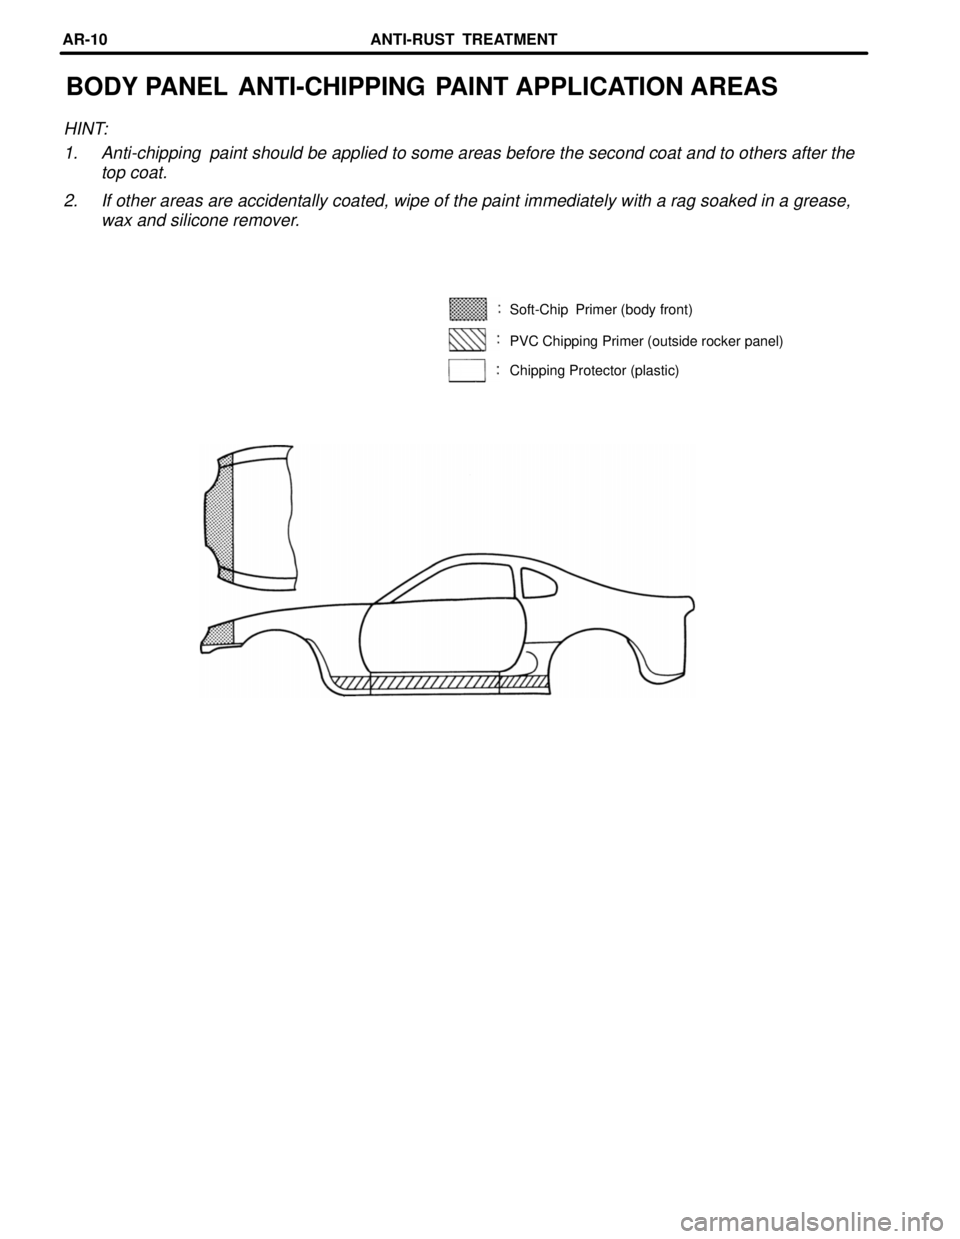
BODY PANEL ANTI-CHIPPING PAINT APPLICATION AREAS
HINT:
1. Anti-chipping paint should be applied to some areas before the second coat and to others after the
top coat.
2. If other areas are accidentally coated, wipe of the paint immediately with a rag soaked in a grease,
wax and silicone remover.
Soft-Chip Primer (body front)
PVC Chipping Primer (outside rocker panel)
Chipping Protector (plastic)
ANTI-RUST TREATMENTAR-10
Page 399 of 1807
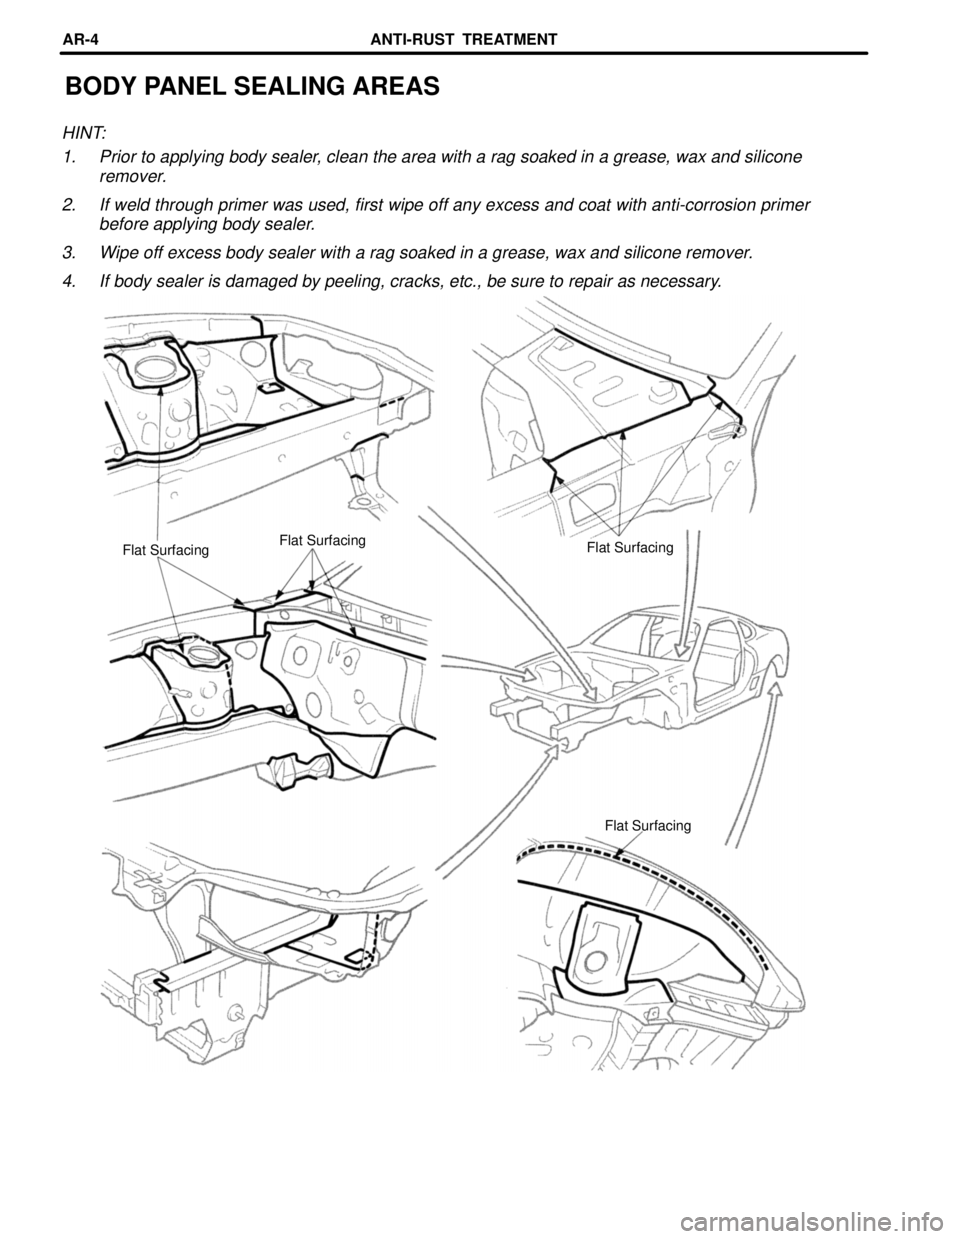
BODY PANEL SEALING AREAS
HINT:
1. Prior to applying body sealer, clean the area with a rag soaked in a grease, wax and silicone
remover.
2. If weld through primer was used, first wipe off any excess and coat with anti-corrosion primer
before applying body sealer.
3. Wipe off excess body sealer with a rag soaked in a grease, wax and silicone remover.
4. If body sealer is damaged by peeling, cracks, etc., be sure to repair as necessary.
Flat Surfacing
Flat Surfacing
Flat Surfacing
Flat Surfacing
ANTI-RUST TREATMENTAR-4
Page 400 of 1807
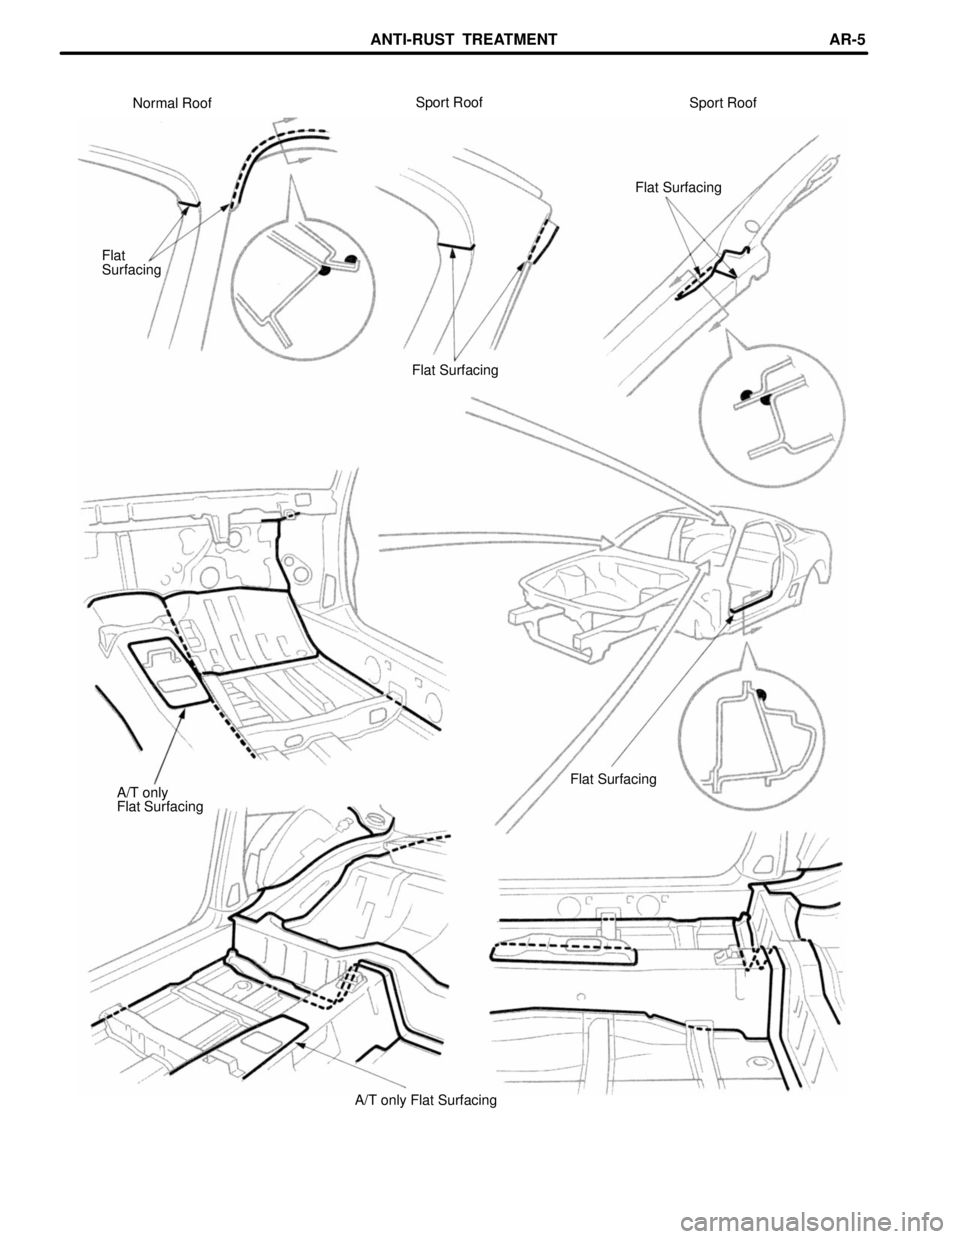
Flat SurfacingSport Roof Sport Roof
Normal Roof
Flat Surfacing
Flat
Surfacing
Flat Surfacing
A/T only
Flat Surfacing
A/T only Flat Surfacing
ANTI-RUST TREATMENTAR-5
Trending: coolant reservoir, check engine light, fuel cap, battery, inflation pressure, coolant temperature, fuse
