TOYOTA SUPRA 1997 Service Repair Manual
SUPRA 1997
TOYOTA
TOYOTA
https://www.carmanualsonline.info/img/14/57469/w960_57469-0.png
TOYOTA SUPRA 1997 Service Repair Manual
Trending: turn signal, bolt pattern, oil reset, automatic transmission fluid, OBD port, clock reset, fuel cap
Page 461 of 1807
mmin.
5 0.20
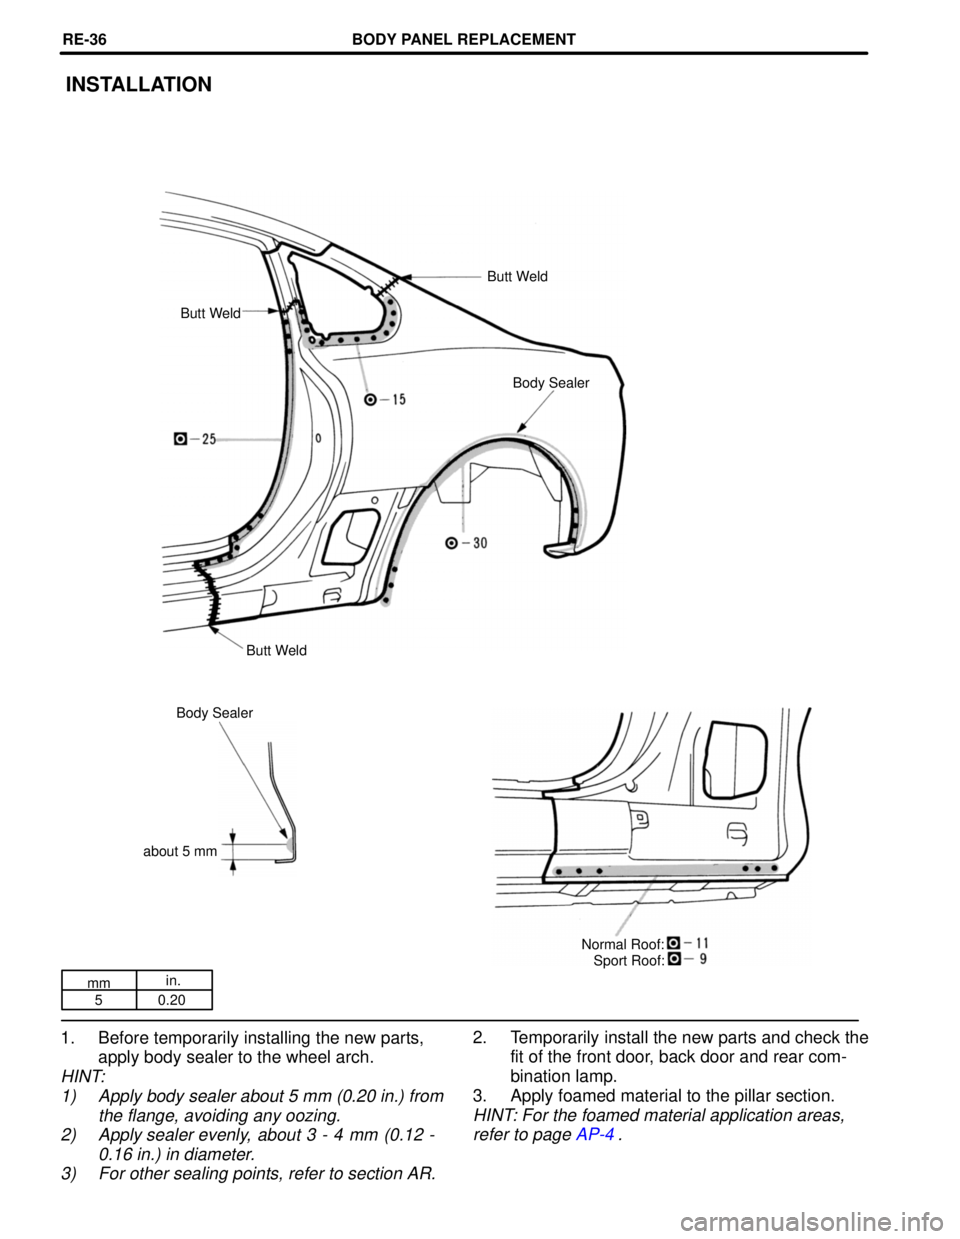
1. Before temporarily installing the new parts,
apply body sealer to the wheel arch.
HINT:
1) Apply body sealer about 5 mm (0.20 in.) from
the flange, avoiding any oozing.
2) Apply sealer evenly, about 3 - 4 mm (0.12 -
0.16 in.) in diameter.
3) For other sealing points, refer to section AR.
INSTALLATION
Butt Weld
Butt Weld
Body Sealer
Butt Weld
Body Sealer
about 5 mm
Normal Roof:
2. Temporarily install the new parts and check the
fit of the front door, back door and rear com-
bination lamp.
3. Apply foamed material to the pillar section.
HINT: For the foamed material application areas,
refer to page AP-4.
Sport Roof:
BODY PANEL REPLACEMENTRE-36
Page 462 of 1807
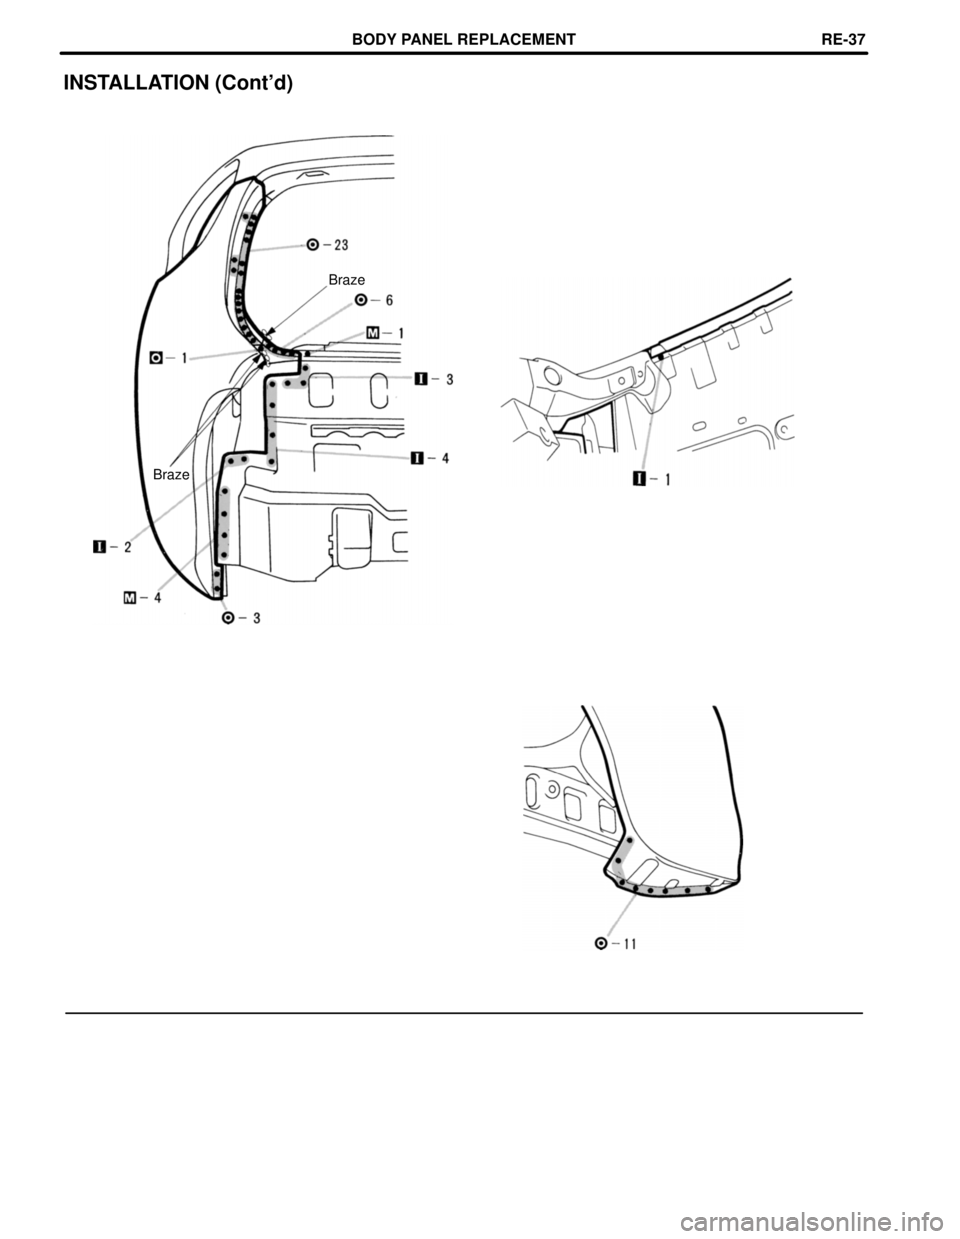
INSTALLATION (Cont'd)
Braze
Braze
BODY PANEL REPLACEMENTRE-37
Page 463 of 1807
mm in.
1204.72
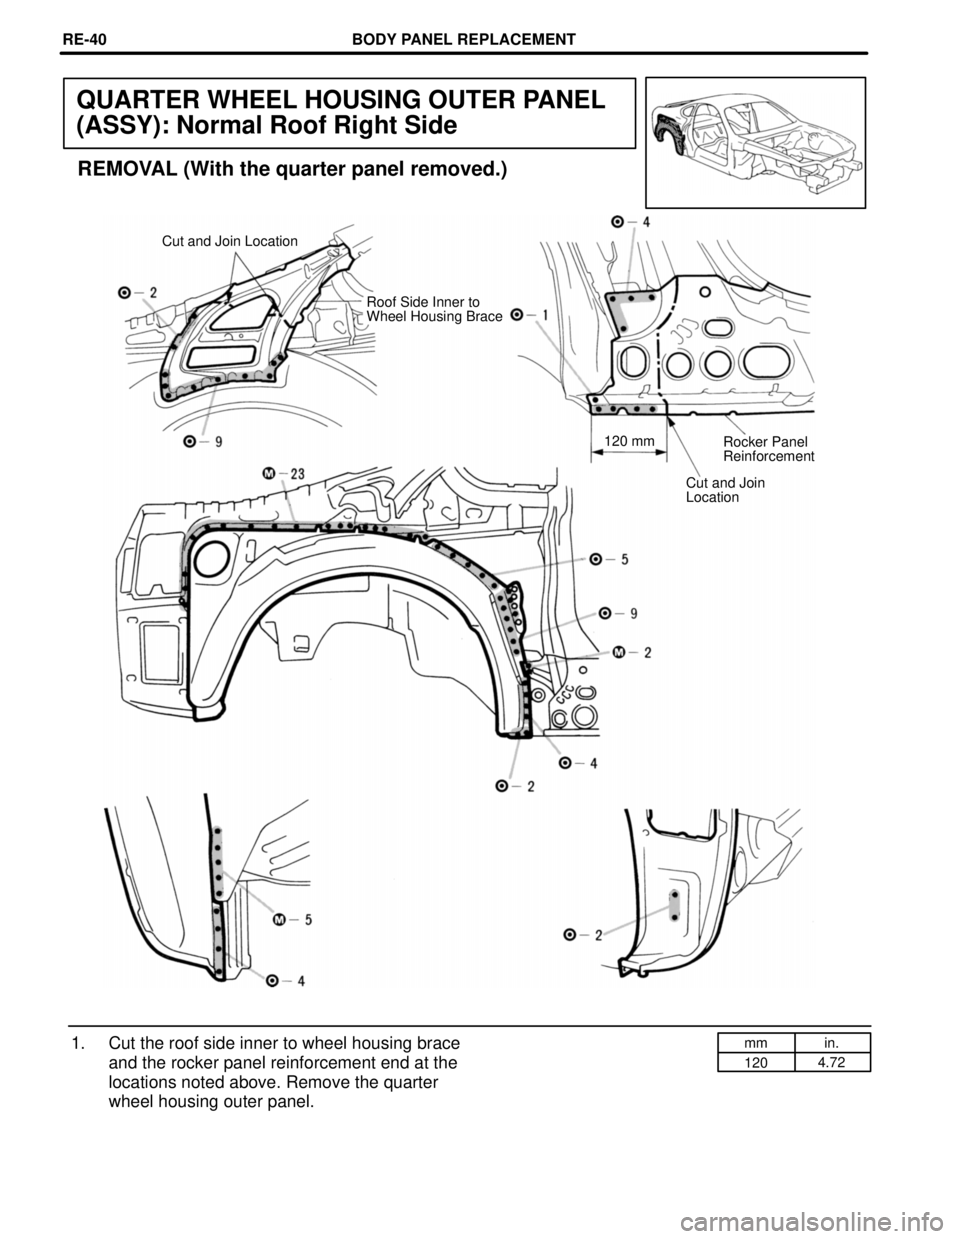
QUARTER WHEEL HOUSING OUTER PANEL
(ASSY): Normal Roof Right Side
REMOVAL (With the quarter panel removed.)
Cut and Join Location
Roof Side Inner to
Wheel Housing Brace
120 mm
Rocker Panel
Reinforcement
Cut and Join
Location
1. Cut the roof side inner to wheel housing brace
and the rocker panel reinforcement end at the
locations noted above. Remove the quarter
wheel housing outer panel.
BODY PANEL REPLACEMENTRE-40
Page 464 of 1807
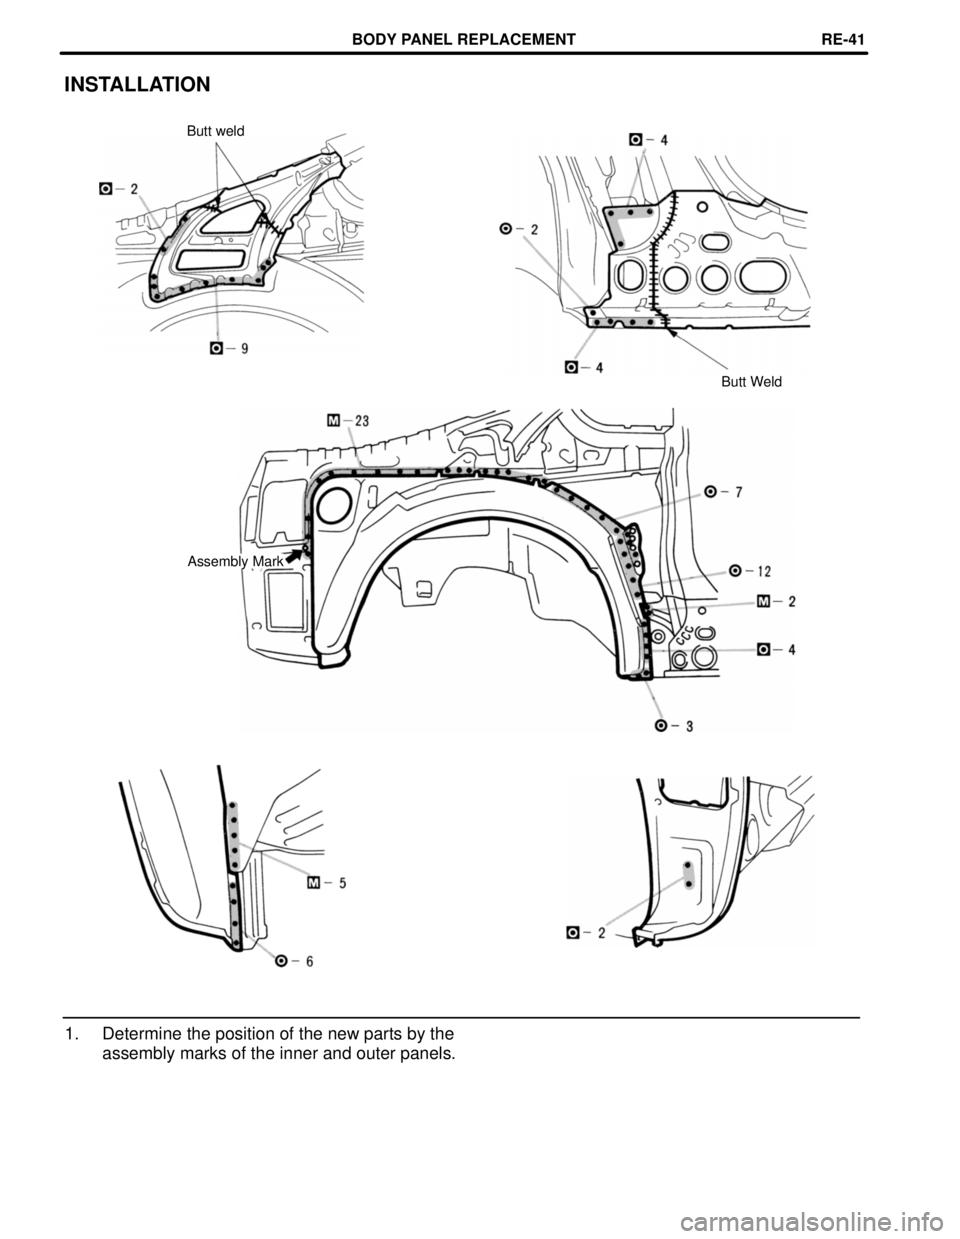
INSTALLATION
Butt weld
Butt Weld
Assembly Mark
1. Determine the position of the new parts by the
assembly marks of the inner and outer panels.
BODY PANEL REPLACEMENTRE-41
Page 465 of 1807
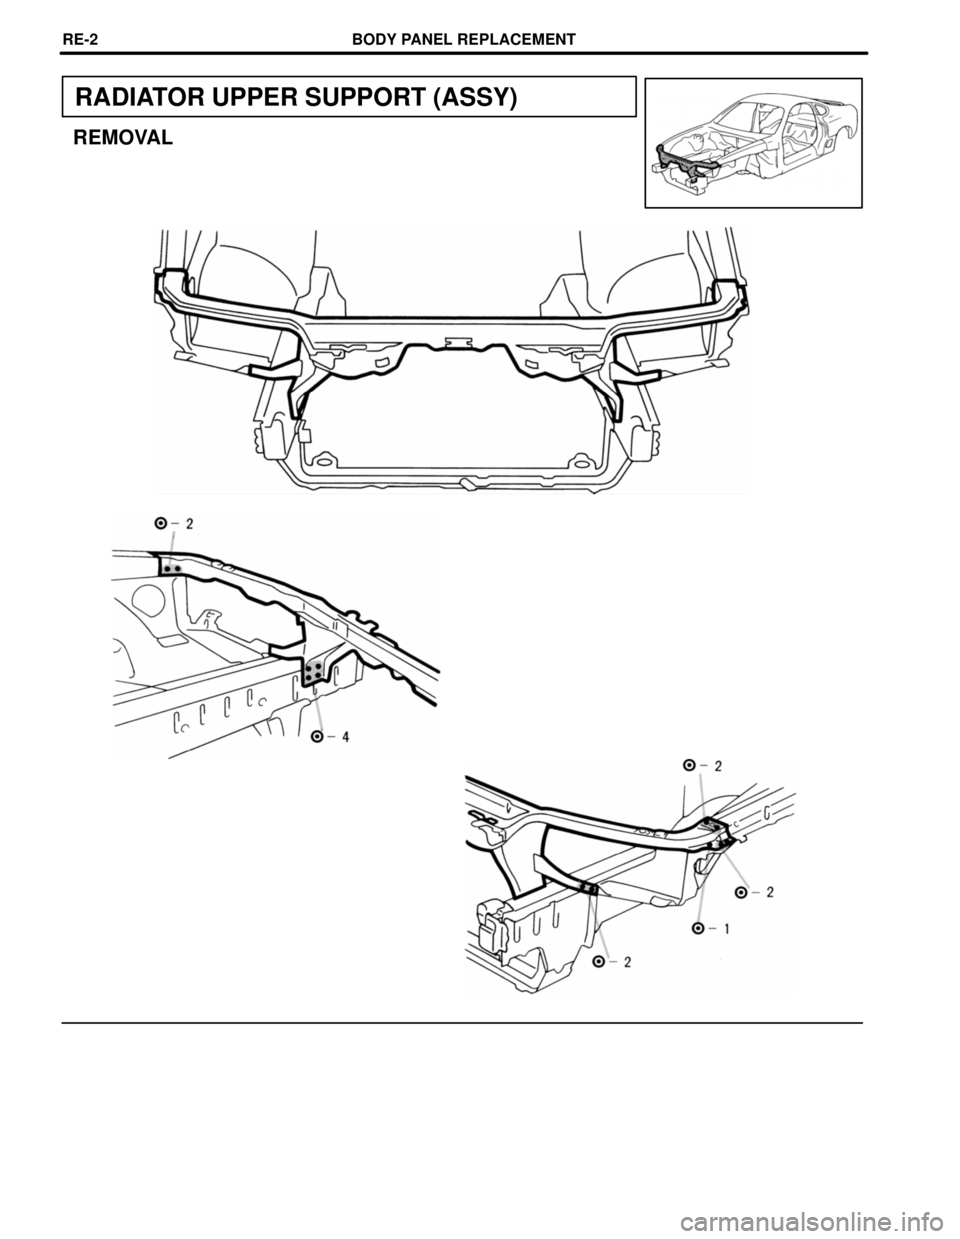
RADIATOR UPPER SUPPORT (ASSY)
REMOVAL
BODY PANEL REPLACEMENTRE-2
Page 466 of 1807
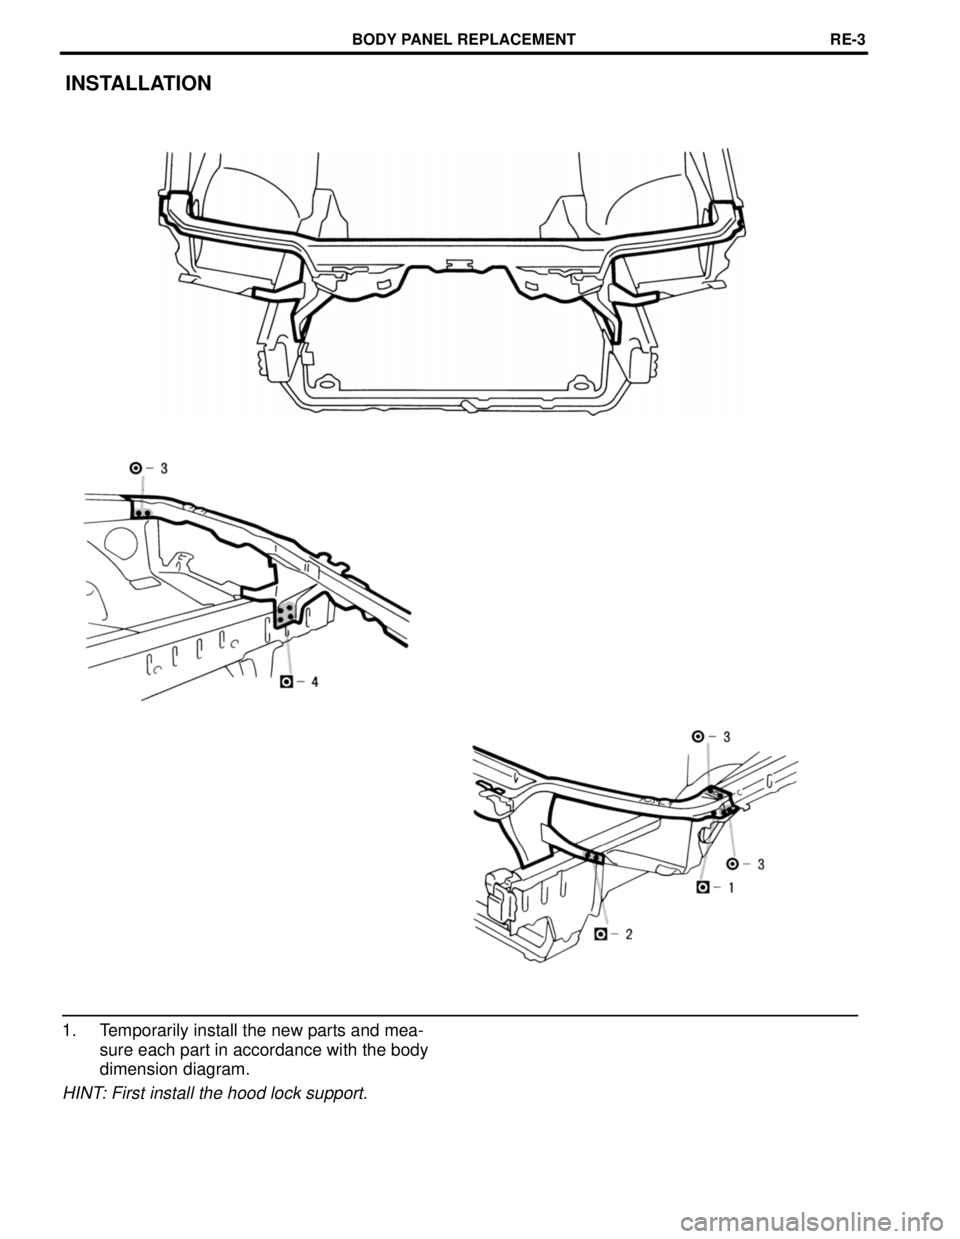
INSTALLATION
1. Temporarily install the new parts and mea-
sure each part in accordance with the body
dimension diagram.
HINT: First install the hood lock support.
BODY PANEL REPLACEMENTRE-3
Page 467 of 1807
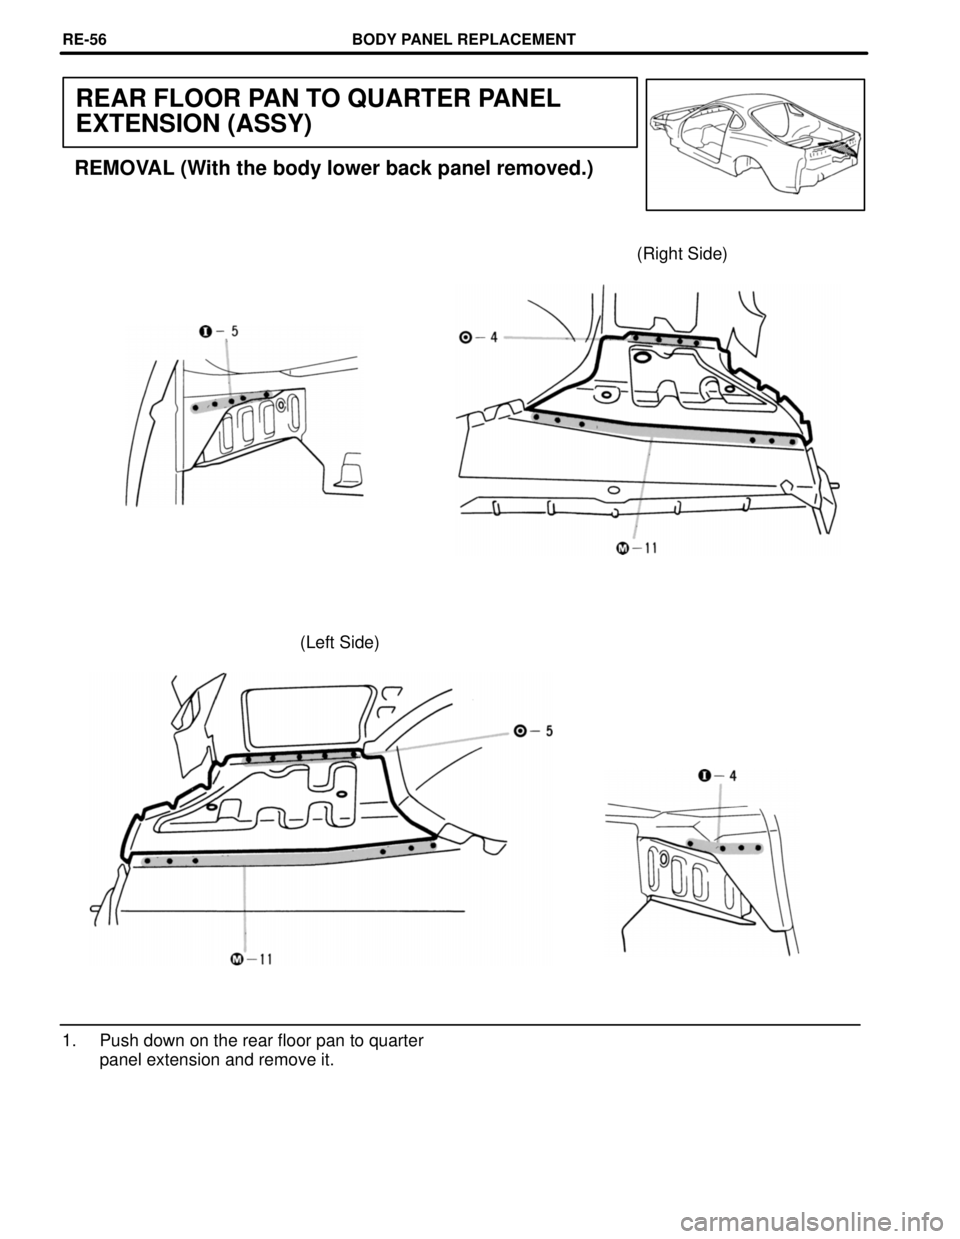
REAR FLOOR PAN TO QUARTER PANEL
EXTENSION (ASSY)
REMOVAL (With the body lower back panel removed.)
(Right Side)
(Left Side)
1. Push down on the rear floor pan to quarter
panel extension and remove it.
BODY PANEL REPLACEMENTRE-56
Page 468 of 1807
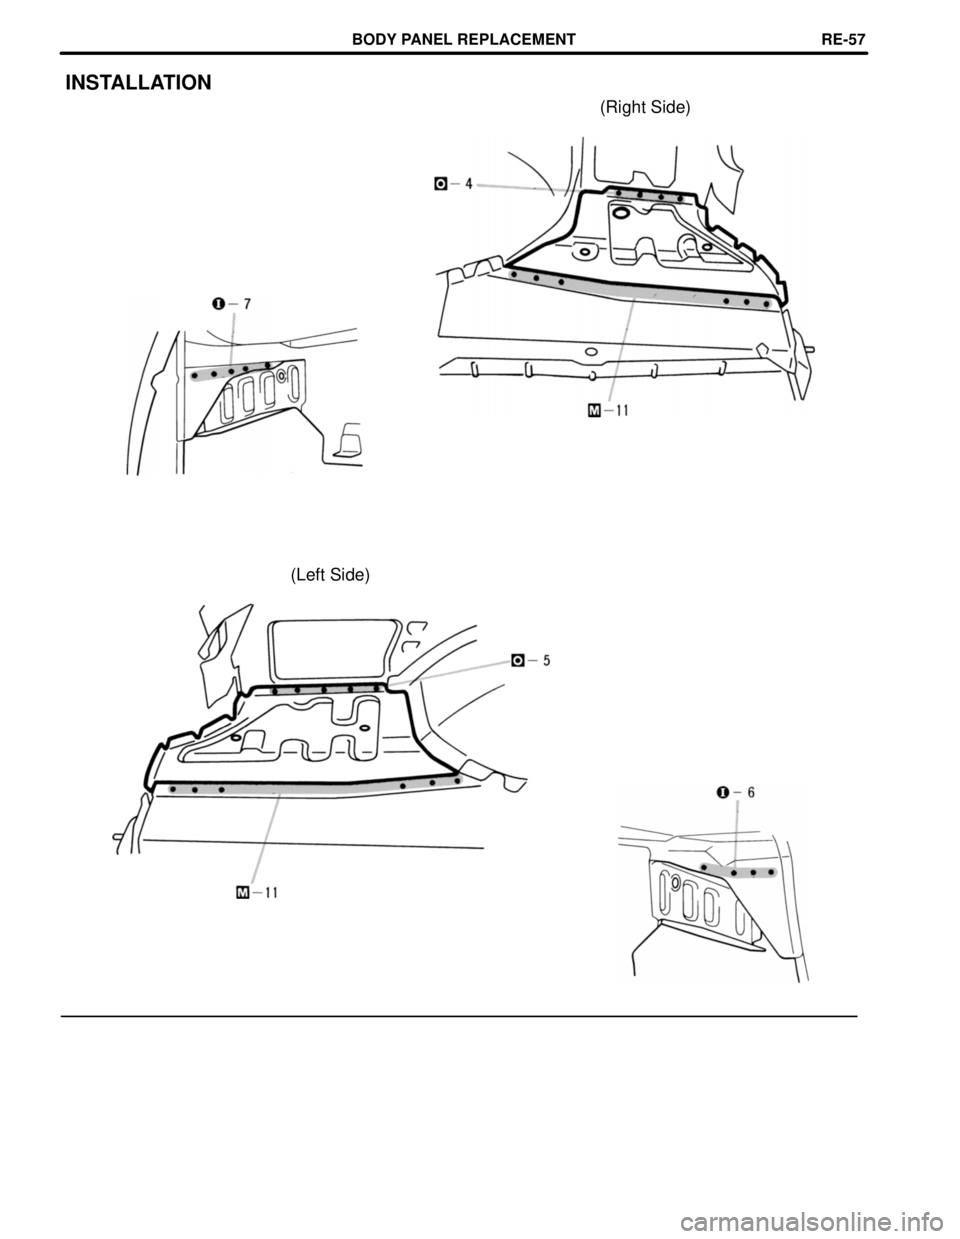
(Left Side)
INSTALLATION
(Right Side)
BODY PANEL REPLACEMENTRE-57
Page 469 of 1807
mm in.
20
0.79
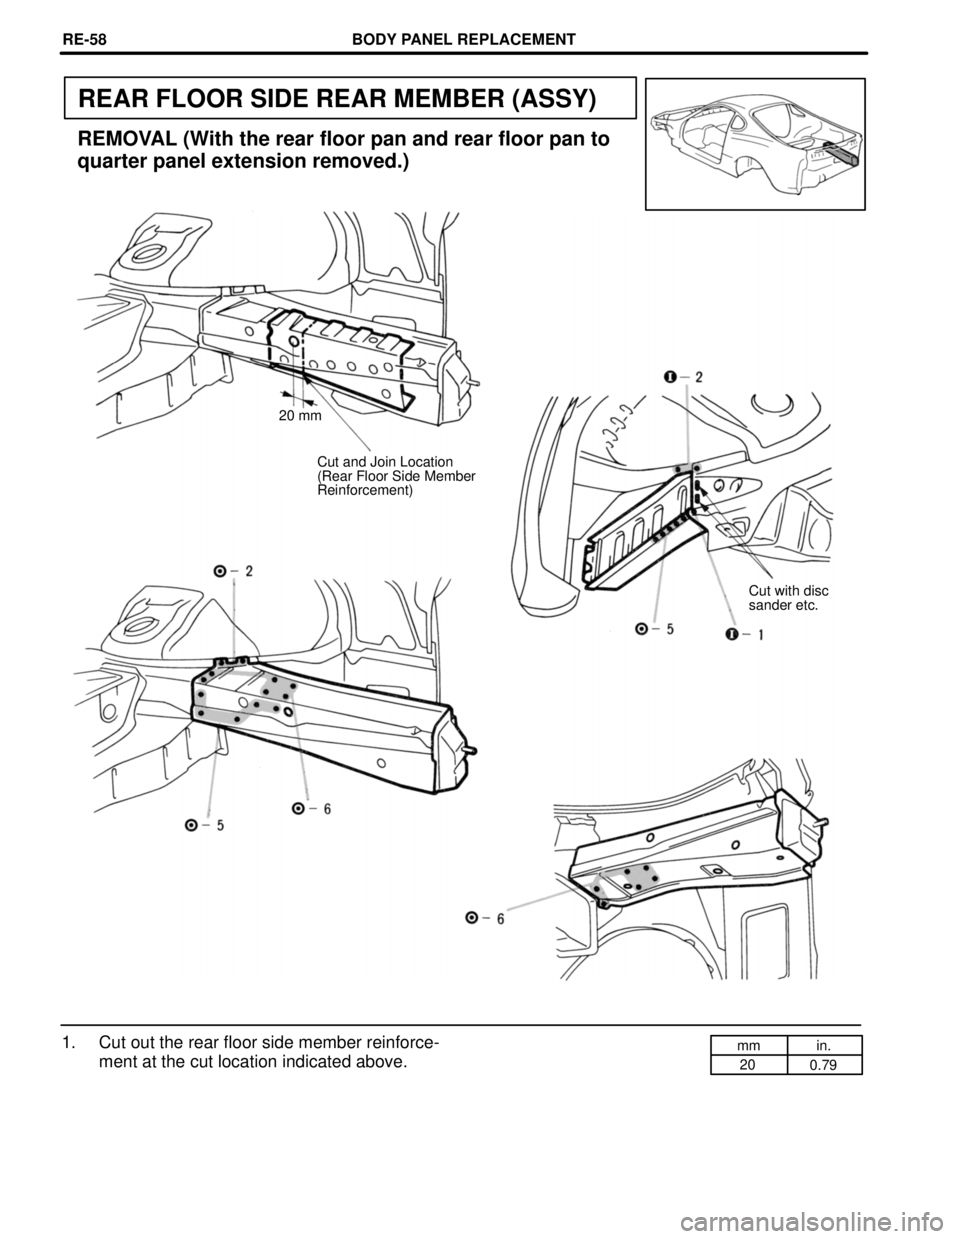
REAR FLOOR SIDE REAR MEMBER (ASSY)
20 mm
REMOVAL (With the rear floor pan and rear floor pan to
quarter panel extension removed.)
Cut and Join Location
(Rear Floor Side Member
Reinforcement)
Cut with disc
sander etc.
1. Cut out the rear floor side member reinforce-
ment at the cut location indicated above.
BODY PANEL REPLACEMENTRE-58
Page 470 of 1807
mm in.
25 0.98
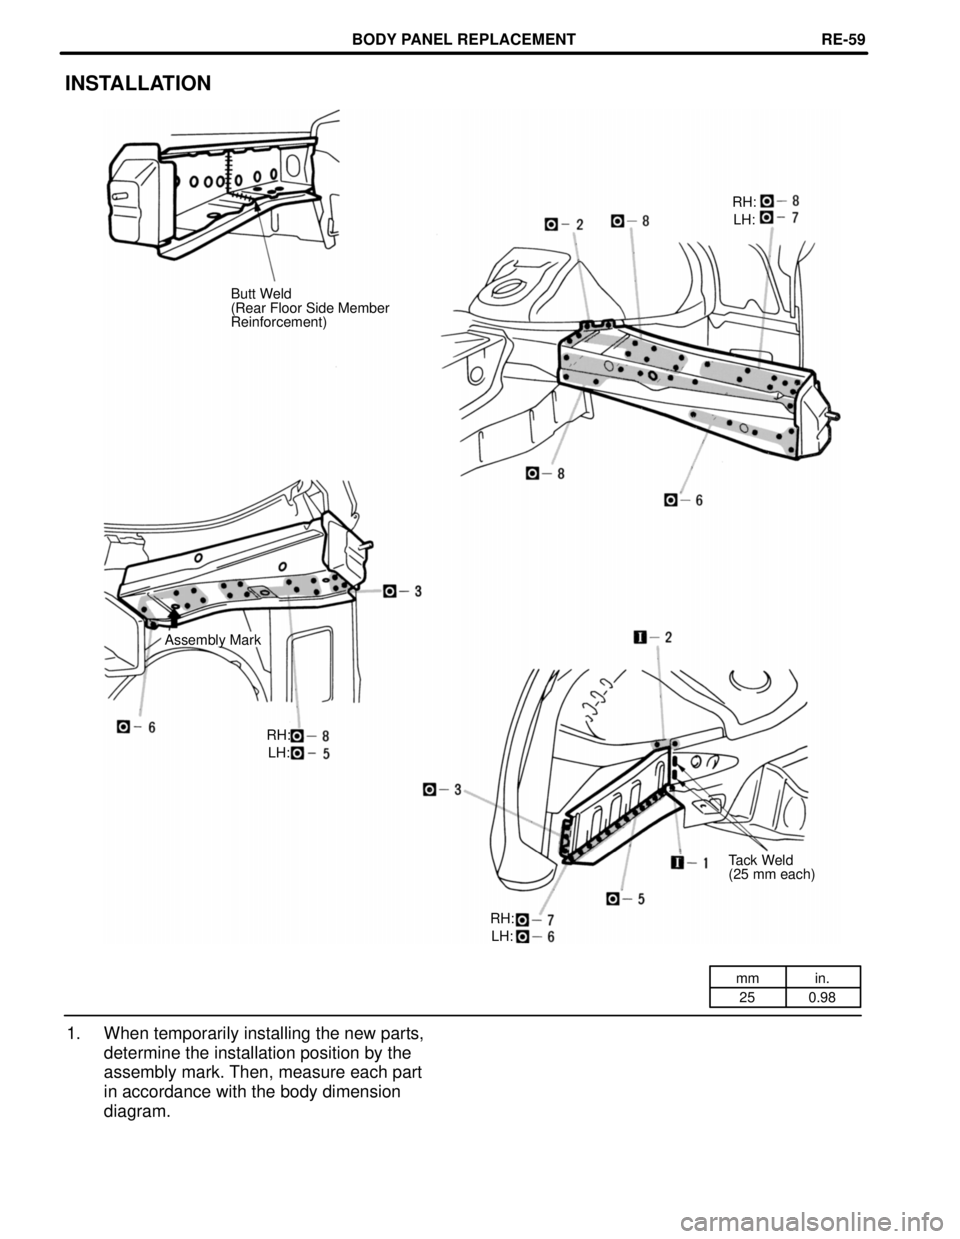
INSTALLATION
LH:
Butt Weld
(Rear Floor Side Member
Reinforcement)
Assembly Mark
Tack Weld
(25 mm each)
1. When temporarily installing the new parts,
determine the installation position by the
assembly mark. Then, measure each part
in accordance with the body dimension
diagram.
RH:
LH: RH:
LH: RH:
BODY PANEL REPLACEMENTRE-59
Trending: tow bar, technical data, interior lights, power steering, trip computer, jump start terminals, ac-25
