relay TOYOTA T100 1996 Factory Workshop Manual
[x] Cancel search | Manufacturer: TOYOTA, Model Year: 1996, Model line: T100, Model: TOYOTA T100 1996Pages: 2062, PDF Size: 43.47 MB
Page 513 of 2062
Downloaded from www.Manualslib.com manuals search engine − DIAGNOSTICSENGINE (5VZ−FE)
DI−249
1996 TOYOTA T100 (RM449U)
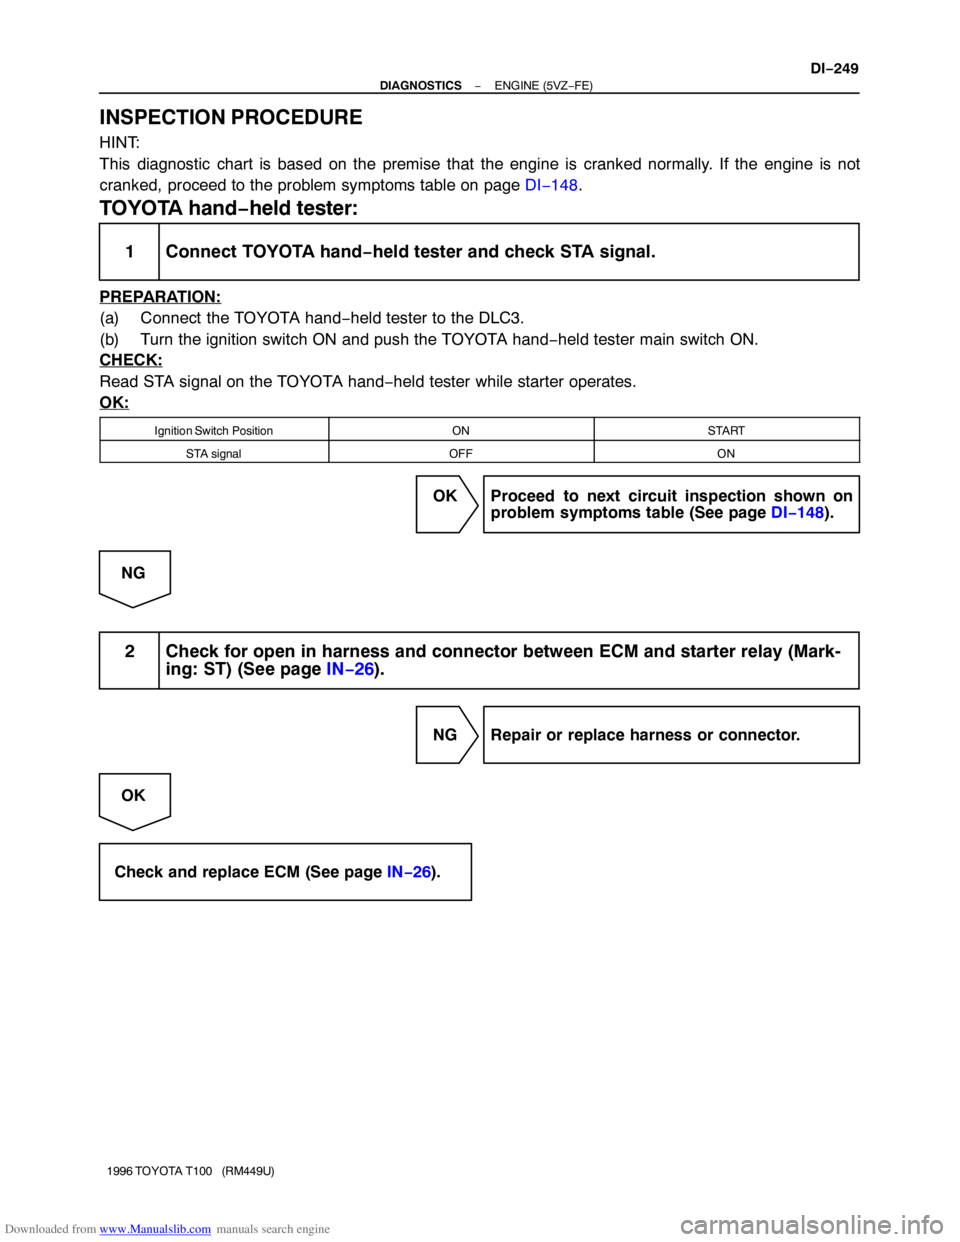
INSPECTION PROCEDURE
HINT:
This diagnostic chart is based on the premise that the engine is cranked normally. If the engine is not
cranked, proceed to the problem symptoms table on page DI−148.
TOYOTA hand−held tester:
1 Connect TOYOTA hand−held tester and check STA signal.
PREPARATION:
(a) Connect the TOYOTA hand−held tester to the DLC3.
(b) Turn the ignition switch ON and push the TOYOTA hand−held tester main switch ON.
CHECK:
Read STA signal on the TOYOTA hand−held tester while starter operates.
OK:
Ignition Switch PositionONSTART
STA signalOFFON
OK Proceed to next circuit inspection shown on
problem symptoms table (See page DI−148).
NG
2 Check for open in harness and connector between ECM and starter relay (Mark-
ing: ST) (See page IN−26).
NG Repair or replace harness or connector.
OK
Check and replace ECM (See page IN−26).
Page 514 of 2062
Downloaded from www.Manualslib.com manuals search engine BE6653S04092S05027A00776
START
For M/T
For A/TSTA (+)
STA (+)
DI−250
− DIAGNOSTICSENGINE (5VZ−FE)
1996 TOYOTA T100 (RM449U)
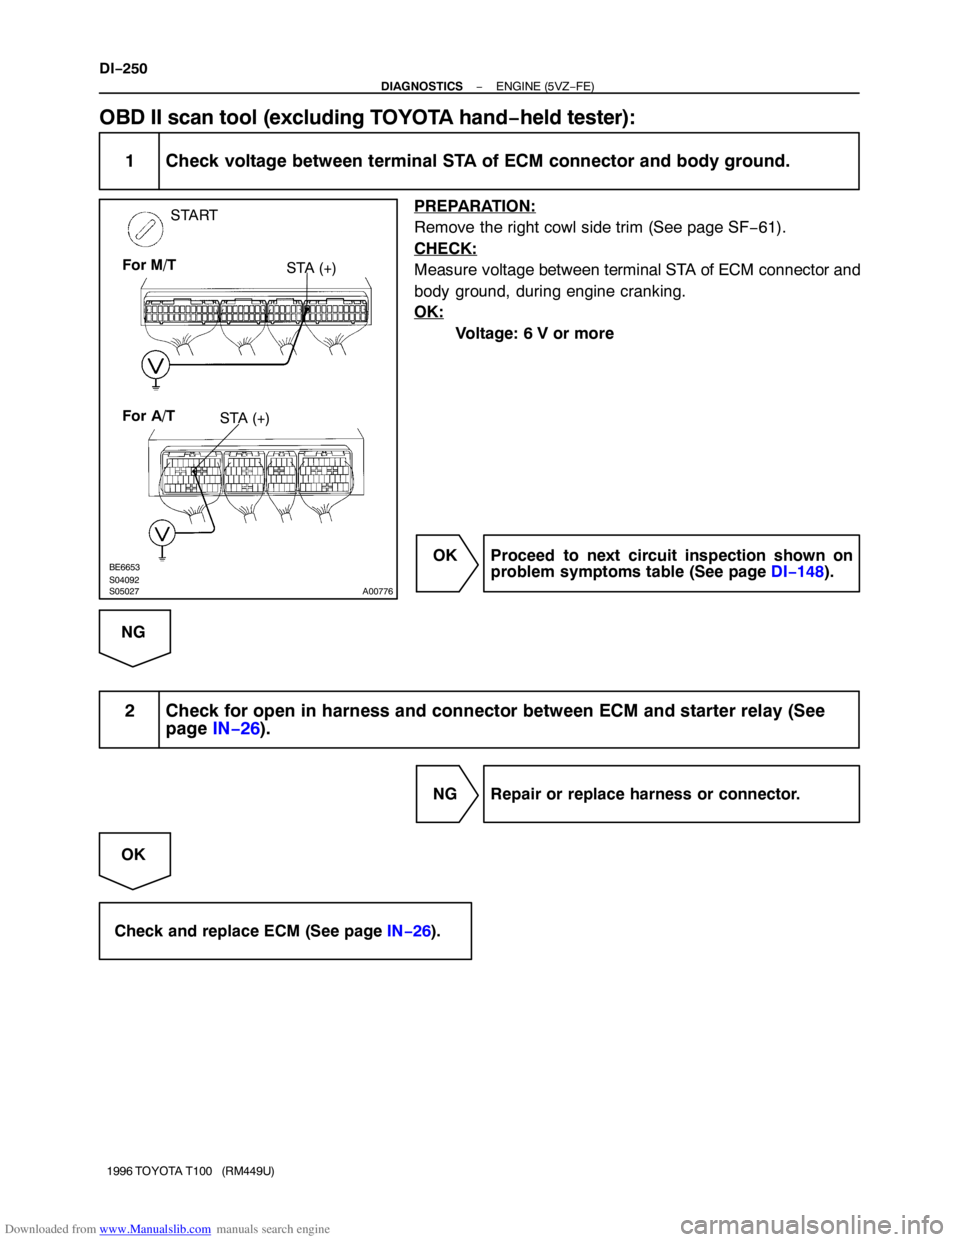
OBD II scan tool (excluding TOYOTA hand−held tester):
1 Check voltage between terminal STA of ECM connector and body ground.
PREPARATION:
Remove the right cowl side trim (See page SF−61).
CHECK:
Measure voltage between terminal STA of ECM connector and
body ground, during engine cranking.
OK:
Voltage: 6 V or more
OK Proceed to next circuit inspection shown on
problem symptoms table (See page DI−148).
NG
2 Check for open in harness and connector between ECM and starter relay (See
page IN−26).
NG Repair or replace harness or connector.
OK
Check and replace ECM (See page IN−26).
Page 515 of 2062

Downloaded from www.Manualslib.com manuals search engine A00779
BatterySwitch IG
W
2 2
2 W−R
12 22
E4 E4
(M/T)(A/T)
ECM
W−R
W−R R−L
B−W B−RB−Y
W−RW−R
BRW−BB−Y
IGN
J/B No.1 1A 1C
317
8
8 7
IA3
EA14
9
4
3
12
R/B No.2EFI AM2
2 22 2
52 3
1 2
EFI
Relay
E7 E5
24 16
E1 +B
EAEB
EA1
− DIAGNOSTICSENGINE (5VZ−FE)
DI−251
1996 TOYOTA T100 (RM449U)
ECM Power Source Circuit
CIRCUIT DESCRIPTION
When the ignition switch is turned ON, battery positive voltage is applied to the coil, closing the contacts of
the EFI main relay (Marking: EFI) and supplying power to terminal +B of the ECM.
WIRING DIAGRAM
DI0VB−01
Page 516 of 2062
Downloaded from www.Manualslib.com manuals search engine BE6653
P24221
P24332A00126
ON
For M/T
For A/TE1 (−) +B (+)
E1 (−) +B (+)
DI−252
− DIAGNOSTICSENGINE (5VZ−FE)
1996 TOYOTA T100 (RM449U)
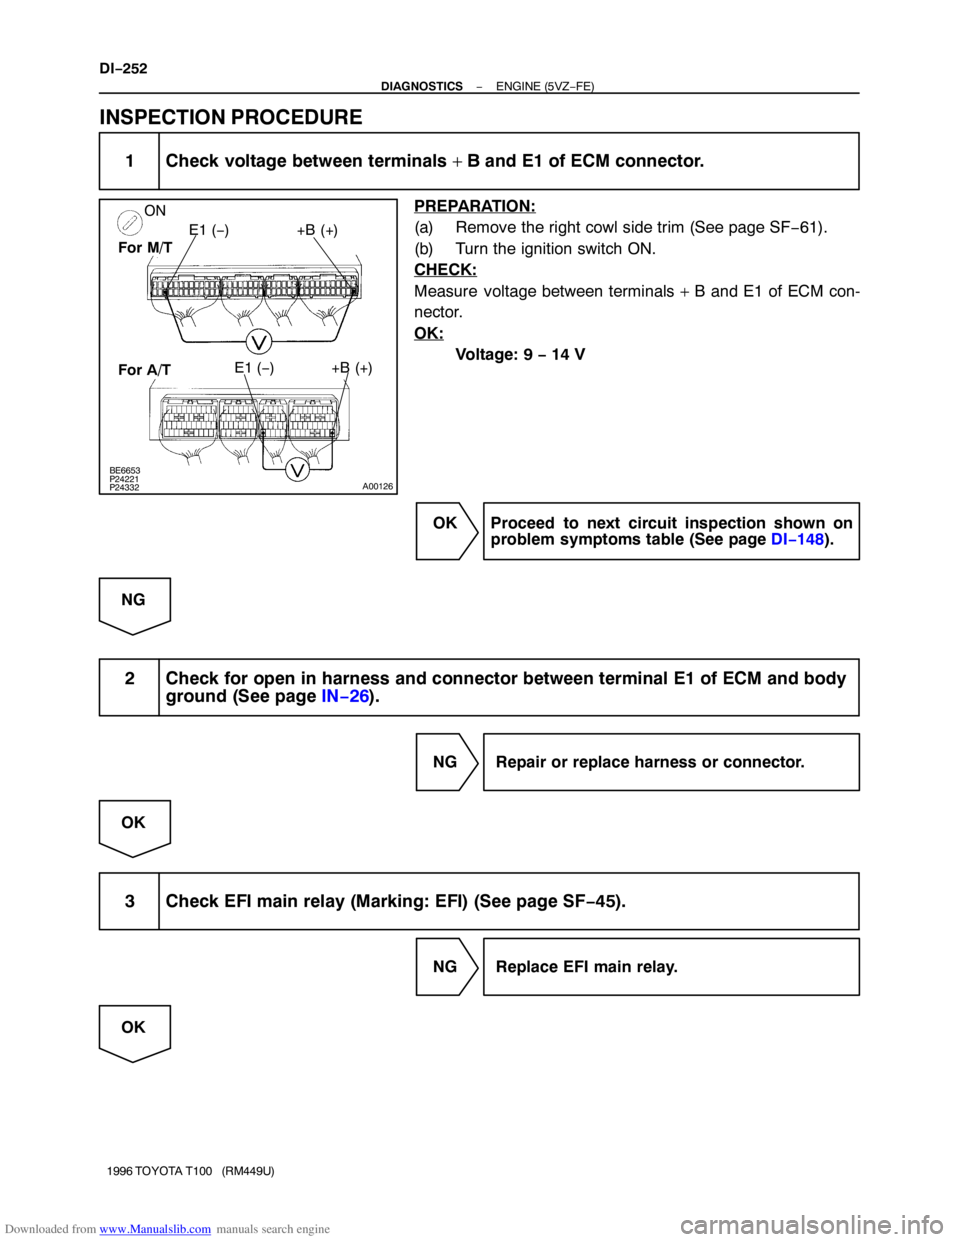
INSPECTION PROCEDURE
1 Check voltage between terminals + B and E1 of ECM connector.
PREPARATION:
(a) Remove the right cowl side trim (See page SF−61).
(b) Turn the ignition switch ON.
CHECK:
Measure voltage between terminals + B and E1 of ECM con-
nector.
OK:
Voltage: 9 − 14 V
OK Proceed to next circuit inspection shown on
problem symptoms table (See page DI−148).
NG
2 Check for open in harness and connector between terminal E1 of ECM and body
ground (See page IN−26).
NG Repair or replace harness or connector.
OK
3 Check EFI main relay (Marking: EFI) (See page SF−45).
NG Replace EFI main relay.
OK
Page 517 of 2062
Downloaded from www.Manualslib.com manuals search engine FI7106
IGN Fuse
J/B No.1
− DIAGNOSTICSENGINE (5VZ−FE)
DI−253
1996 TOYOTA T100 (RM449U)
4 Check EFI fuse (See page DI−244, step 2).
NG Check for short in all harness and
components connected to EFI fuse.
OK
5 Check for open harness and connector between EFI main relay (Marking: EFI)
and battery, EFI main relay (Marking: EFI) and ECM (See page IN−26).
NG Repair or replace harness or connector.
OK
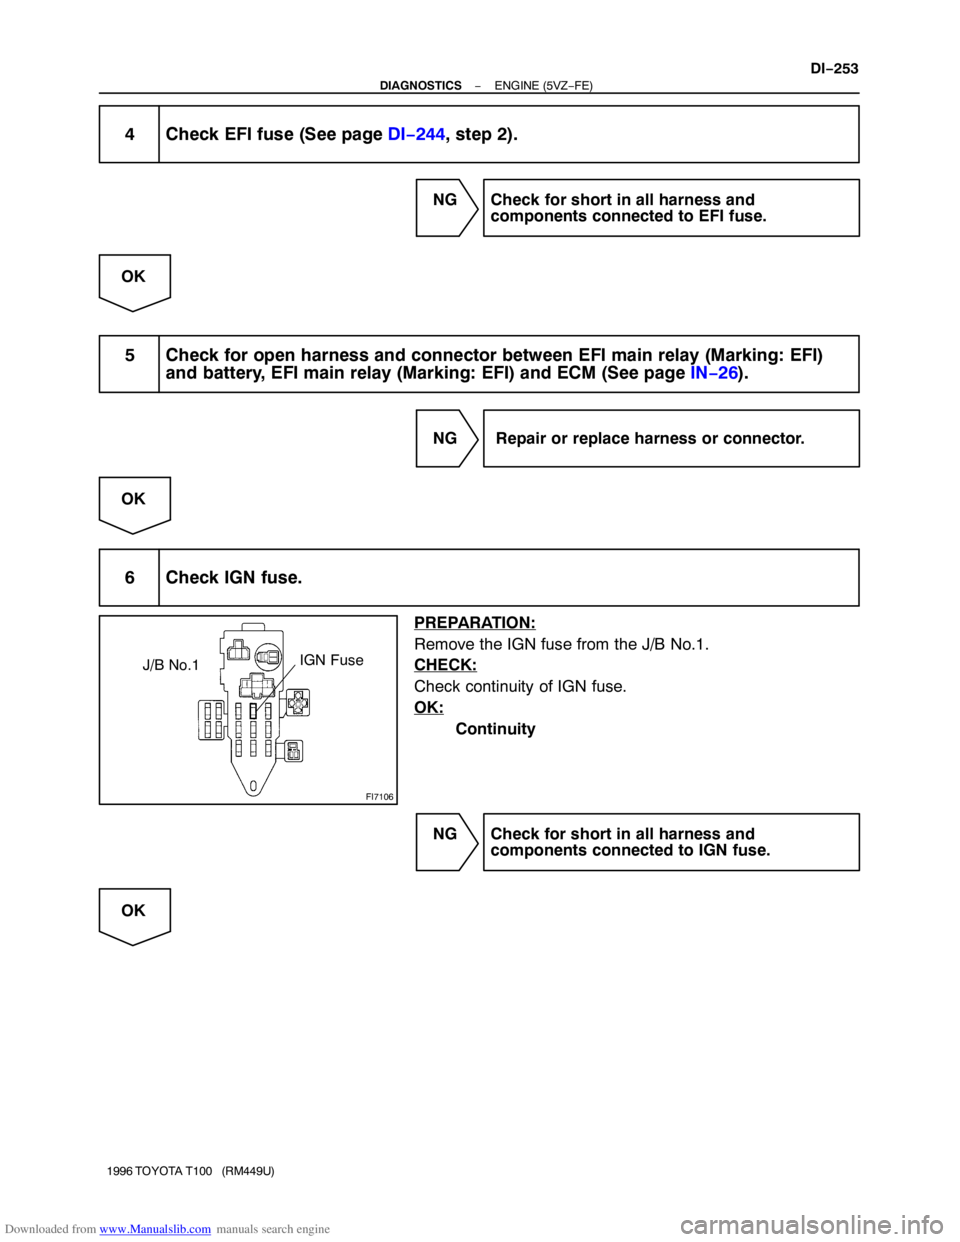
6 Check IGN fuse.
PREPARATION:
Remove the IGN fuse from the J/B No.1.
CHECK:
Check continuity of IGN fuse.
OK:
Continuity
NG Check for short in all harness and
components connected to IGN fuse.
OK
Page 518 of 2062
Downloaded from www.Manualslib.com manuals search engine DI−254
− DIAGNOSTICSENGINE (5VZ−FE)
1996 TOYOTA T100 (RM449U)
7 Check ignition switch (See page BE−12).
NG Replace ignition switch.
OK
Check for open in harness and connector be-
tween IG switch and EFI main relay, EFI main
relay and body ground (See page IN−26).
Page 519 of 2062

Downloaded from www.Manualslib.com manuals search engine A01010
EFI
AM2
AM1
ALT
BatteryIG Switch
IG2
IG1
STIGNEFI Relay
Circuit Opening Relay
Clutch Start
Cancel Switch
(M/T)
L1 L2
ECM Fuel Pump
FC
Tr
STA
NE
Starter
Park/Neutral
Position Switch
(A/T)
Relay Starter
Start Clutch
Switch
(M/T)Crankshaft From
Position
Sensor(STA Signal)
(NE Signal)
− DIAGNOSTICSENGINE (5VZ−FE)
DI−255
1996 TOYOTA T100 (RM449U)
Fuel Pump Control Circuit
CIRCUIT DESCRIPTION
The fuel pump is switched on (low voltage at terminal FC) when STA is on or while the NE signal is input to
the ECM.
In the diagram below, when the engine is cranked, current flows from terminal ST of the ignition switch to
the starter relay coil, the starter relay switches on and current flows to coil L1 of the circuit opening relay.
Thus the circuit opening relay switches on, power is supplied to the fuel pump and the fuel pump operates.
When the STA signal and NE signal are input to the ECM, Tr is turned ON, current flows to coil L2 of the circuit
opening relay, the relay switches on and the fuel pump operates.
While the NE signal is generated (engine running), the ECM keeps Tr ON (circuit opening relay ON) and the
fuel pump also keeps operating.
DI0VC−01
Page 520 of 2062

Downloaded from www.Manualslib.com manuals search engine A00651
ECM
EFI AM2 ALT
Battery
IG Switch
Park/
Switch
StarterOpening Relay
Clutch
Start
Switch
E01 FC 4 14
E7 E5
(M/T)(A/T)
G−Y13
IE1 G−YL
1 4
6
Circuit
8
W−B
BJ1
W−B
IC
IC2 W−RW−R
EA19
EA
6
B−WB−R
Relay
(M/T)
3
B−O
WB−W
3
2
22
2 RelayEFI
2 22
51
2
22
2
22 5 R/B
1 2 2
2 3
1 W
W
B−YIA3
IGN
B (M/T)
B
Neutral
Position
(A/T)
Fuel
PumpW−BBJ1 BJ2
BJ2W−B(w/ ABS)
(w/o ABS)
11
(w/ ABS)
(w/o ABS)
10 16
Clutch
Start
Switch
(M/T)Cancel
No.2Starter
J/B No.1
B−R
B−WB−W
B−W B−W
B−W
B−O
B
B−R
W−B
W−RW
B−Y
W 2
2W−B
AM1
23
151 5
1 36 873 17 1113
IC
EB1
S1
EA1IA3
IA31C1A
1
IE1
IE1
B−Y
W−R
W−B
2
2 5 6 4
1
13A/T
DI−256
− DIAGNOSTICSENGINE (5VZ−FE)
1996 TOYOTA T100 (RM449U)
WIRING DIAGRAM
Page 522 of 2062

Downloaded from www.Manualslib.com manuals search engine A00685
2 (+)
1 (+)
4 (−)
1 2
34
6
BE6653
P24225
P24335A00128
ON
For M/T
For A/TFC (+)
FC (+)
DI−258
− DIAGNOSTICSENGINE (5VZ−FE)
1996 TOYOTA T100 (RM449U)
3 Check circuit opening relay.
PREPARATION:
Remove the circuit opening relay (See page SF−46).
CHECK:
(a) Apply battery voltage between terminals 2 and 4.
(b) Measure voltage between terminals 1 and 4.
OK:
Voltage: Same as battery
NG Replace circuit opening relay.
OK
4 Check voltage between terminal FC of ECM connector and body ground.
PREPARATION:
(a) Remove the right cowl side trim (See page SF−61).
(b) Turn the ignition switch ON.
CHECK:
Measure voltage between terminal FC of ECM connector and
body ground.
OK:
Voltage: 9 − 14 V
NG Check for open in harness and connector be-
tween EFI main relay and circuit opening relay,
and ECM (See page IN−26).
OK
Page 523 of 2062
Downloaded from www.Manualslib.com manuals search engine A00686
1 2
34
6
3 (+)
6 (−)1
2
− DIAGNOSTICSENGINE (5VZ−FE)
DI−259
1996 TOYOTA T100 (RM449U)
5 Check fuel pump (See page SF−5).
NG Repair or replace fuel pump.
OK
6 Check for open in harness and connector between circuit opening relay and fuel
pump, fuel pump and body ground (See page IN−26).
NG Repair or replace harness or connector.
OK
Check and replace ECM (See page IN−26).
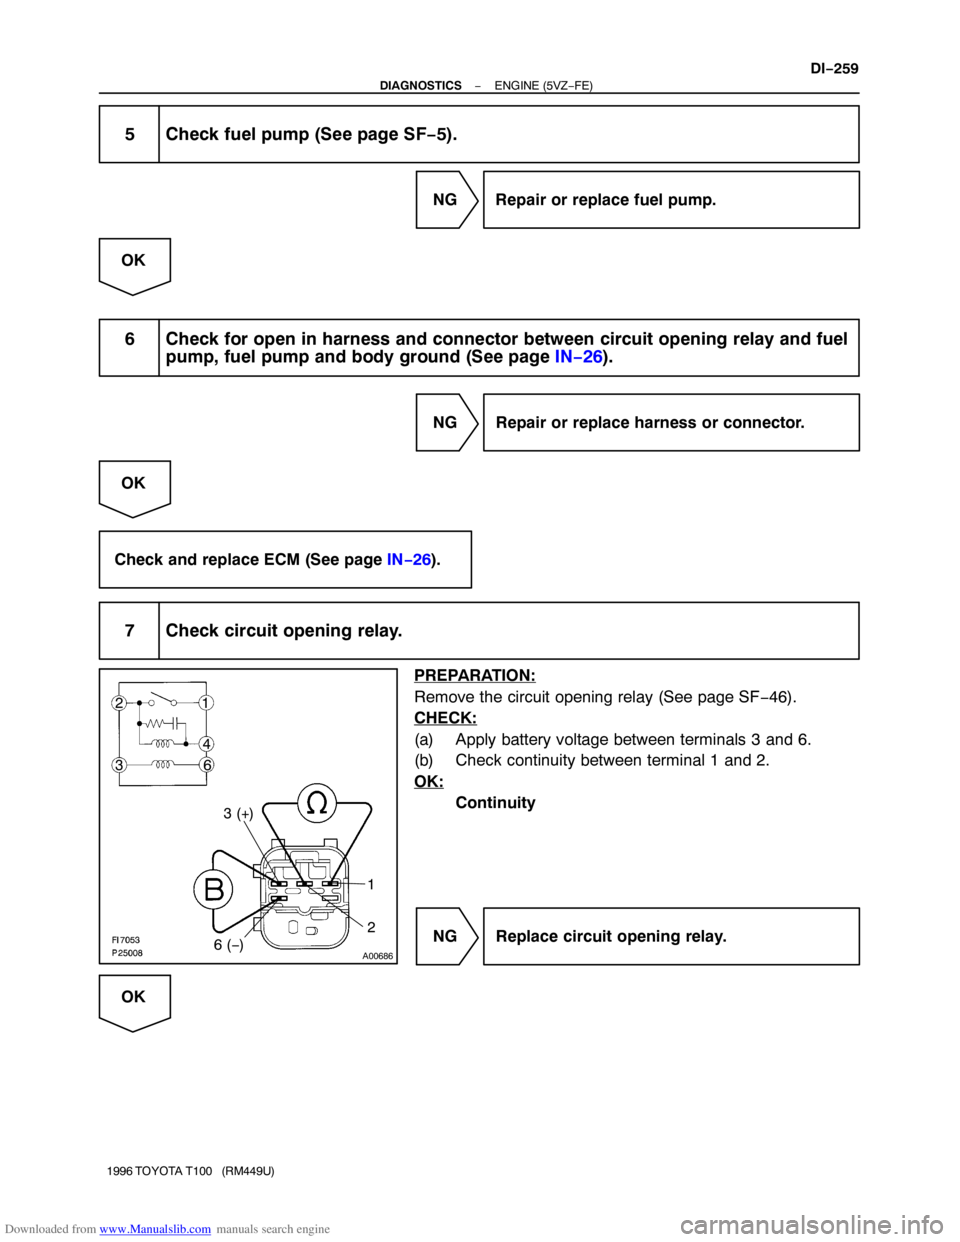
7 Check circuit opening relay.
PREPARATION:
Remove the circuit opening relay (See page SF−46).
CHECK:
(a) Apply battery voltage between terminals 3 and 6.
(b) Check continuity between terminal 1 and 2.
OK:
Continuity
NG Replace circuit opening relay.
OK