light TOYOTA T100 1997 Owners Manual
[x] Cancel search | Manufacturer: TOYOTA, Model Year: 1997, Model line: T100, Model: TOYOTA T100 1997Pages: 212, PDF Size: 3.17 MB
Page 7 of 212

Indicator symbols on the instrument panel
6
4WD
Anti-lock brake system warning light*
Brake system warning light* Seat belt reminder light*
Discharge warning light*
Low oil pressure warning light*
Malfunction indicator light*
Low fuel level warning light*
SRS airbag warning light* Automatic transmission fluid
temperature warning light*
Turn signal indicator lights
Headlight high beam indicator light
Over-drive indicator light
Unengaged Parkº warning light* Low windshield washer fluid level warning light*
4WDº indicator light
Automatic transmission indicator lights
Cruise control indicator light
The indicators marked with * are service reminder indicators.
For details, see Service reminder indicators and warning
buzzersº in Chapter 1-5.
Page 10 of 212
9
CAUTION!
Before driving, be sure that the
doors are closed and locked, espe-
cially when small children are in the
vehicle. A long with the proper use of
seat belts, locking the doors helps
prevent the driver and passengers
from being thrown out from the ve-
hicle during an accident. It also
helps prevent the doors from being
opened unintentionally.
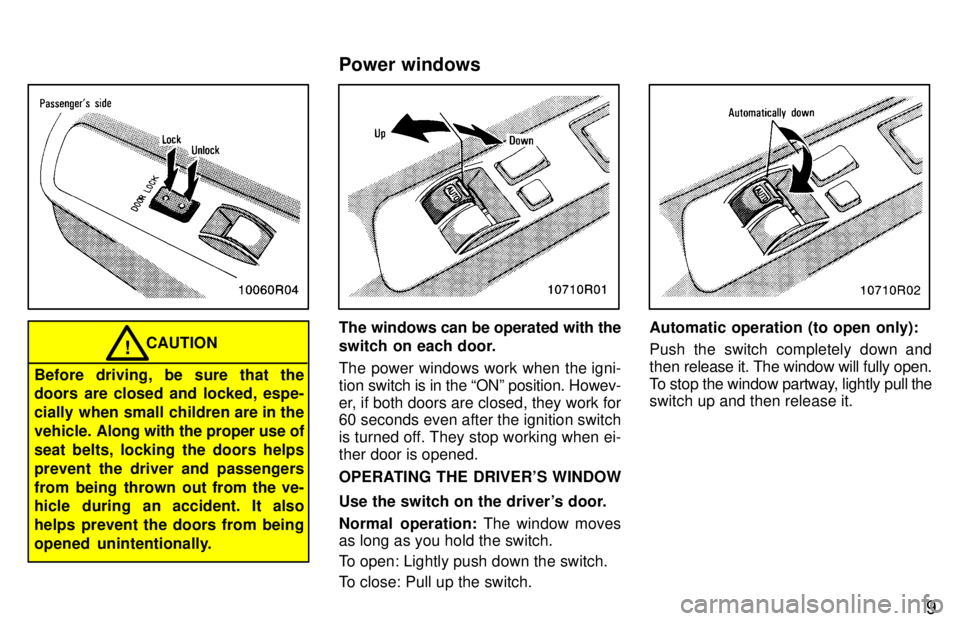
The windows can be operated with the
switch on each door.
The power windows work when the igni- tion switch is in the ONº position. Howev-
er, if both doors are closed, they work for 60 seconds even after the ignition switch
is turned off. They stop working when ei-ther door is opened.
OPERATING THE DRIVER'S WINDOW
Use the switch on the driver's door.
Normal operation: The window moves
as long as you hold the switch.
To open: Lightly push down the switch.
To close: Pull up the switch.Automatic operation (to open only):
Push the switch completely down and
then rel ease it. The window will fully open.
To stop the window partway, lightly pull the
switch up and then release it.
Power windows
Page 13 of 212
12
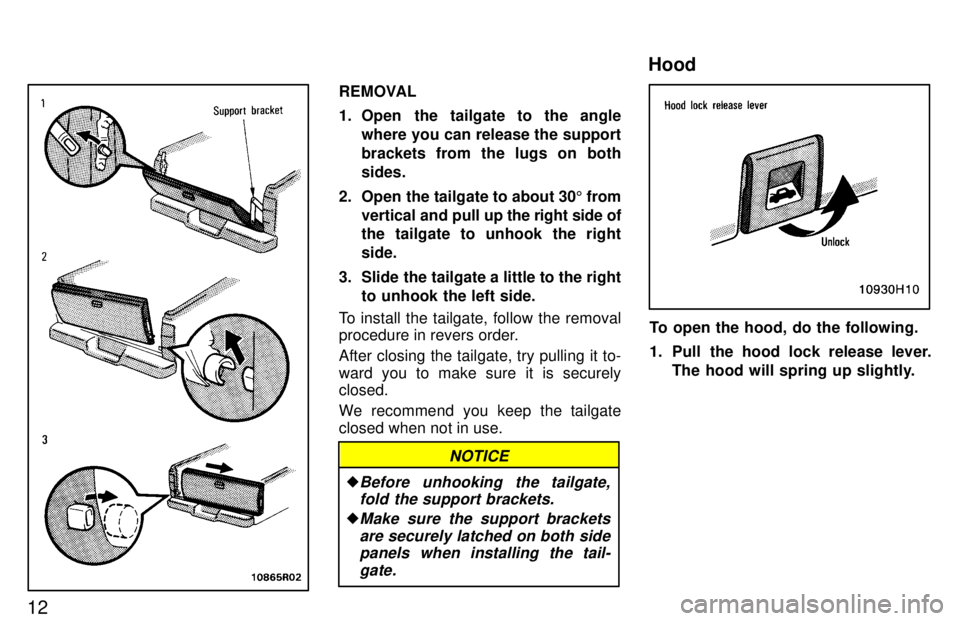
REMOVAL
1. Open the tailgate to the anglewhere you can release the support
brackets from the lugs on bothsides.
2. Open the tailgate to about 30 5 from
vertical and pull up the right side of
the tailgate to unhook the rightside.
3. Slide the tailgate a little to the right to unhook the left side.
To install the tailgate, follow the removal
procedure in revers order.
After closing the tailgate, try pulling it to-
ward you to make sure it is securely closed.
We recommend you keep the tailgate
closed when not in use.
�
Before unhooking the tailgate,fold the support brackets.
�Make sure the support brackets
are securely latched on both sidepanels when installing the tail-
gate.
NOTICE
To open the hood, do the following.
1. Pull the hood lock release lever.
The hood will spring up slightly.
Hood
Page 15 of 212
14
CAUTION!
� Do not fill a fuel container on a plas-
tic truck bed liner, a rubber truck
bed mat, or any other insulating
material. A static electricity charge
could cause a spark and fire haz-
ard. The proper procedure is to
place an approved fuel container
on the ground away from the truck for filling.
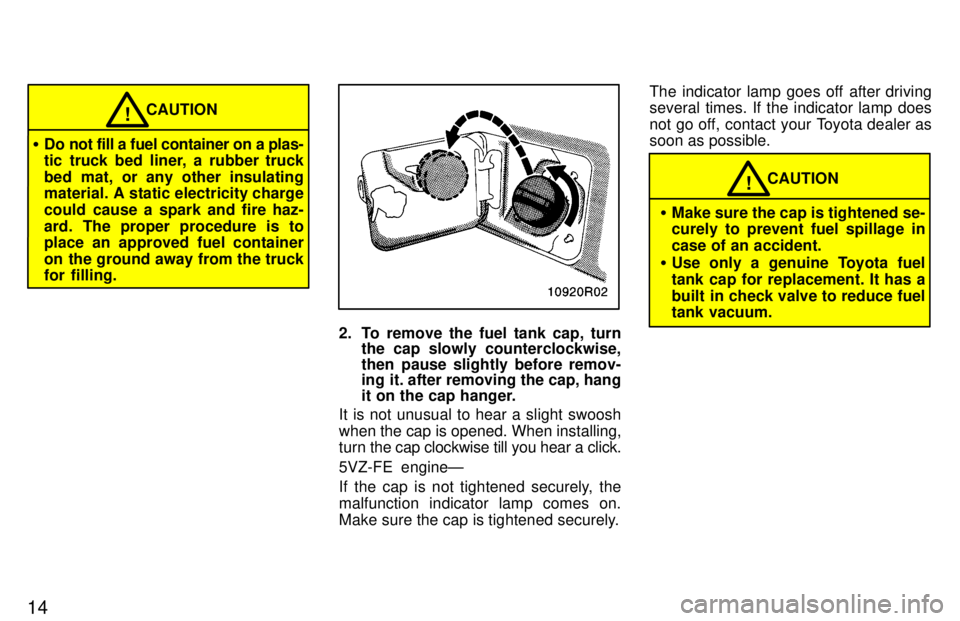
2. To remove the fuel tank cap, turn
the cap slowly counterclockwise,
then pause slightly before remov-
ing it. after removing the cap, hang
it on the cap hanger.
It is not unusual to hear a slight swoosh
when the cap is opened. When installing,
turn the cap clockwise till you hear a click.
5VZ-FE engineÐ
If the cap is not tightened securely, the malfunction indicator lamp comes on.
Make sure the cap is tightened securely. The indicator lamp goes off after driving several times. If the indicator lamp does
not go off, contact your Toyota dealer as soon as possible.
CAUTION!
� Make sure the cap is tightened se-
curely to prevent fuel spillage in
case of an accident.
� Use only a genuine Toyota fuel
tank cap for replacement. It has a
built in check valve to reduce fuel tank vacuum.
Page 18 of 212
17
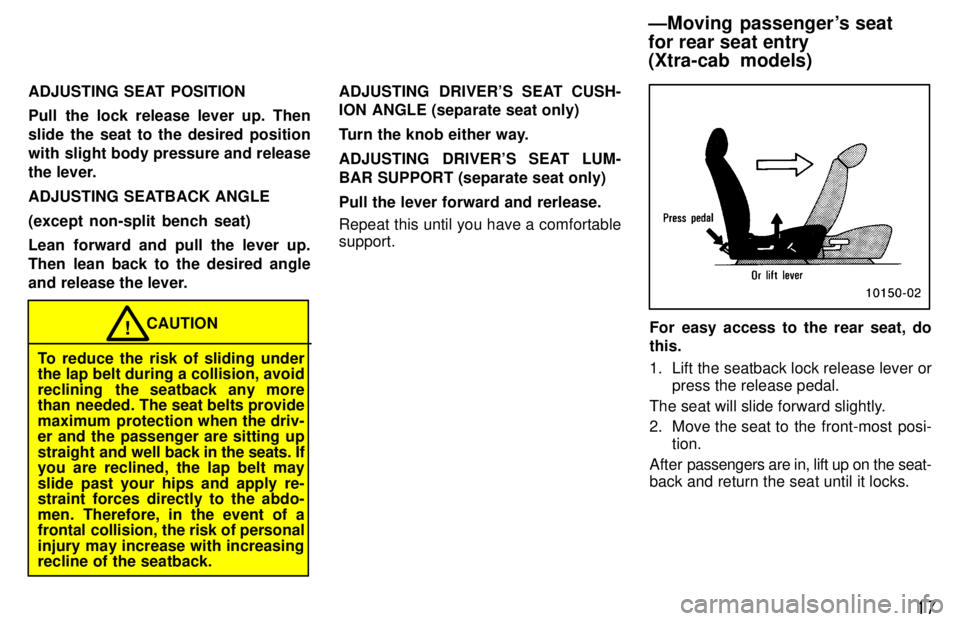
ADJUSTING SEAT POSITION
Pull the lock release lever up. Then
slide the seat to the desired position
with slight body pressure and release
the lever.
ADJUSTING SEATBACK ANGLE(except non-split bench seat)
Lean forward and pull the lever up.
Then lean back to the desired angle
and release the lever.
CAUTION!
To reduce the risk of sliding under
the lap belt during a collision, avoid
reclining the seatback any more
than needed. The seat belts provide
maximum protection when the driv-
er and the passenger are sitting up
straight and well back in the seats. If
you are reclined, the lap belt may
slide past your hips and apply re- straint forces directly to the abdo-
men. Therefore, in the event of a
frontal collision, the risk of personal
injury may increase with increasing recline of the seatback. ADJUSTING DRIVER'S SEAT CUSH-
ION ANGLE (separate seat only)
Turn the knob either way.
ADJUSTING DRIVER'S SEAT LUM-
BAR SUPPORT (separate seat only) Pull the lever forward and rerlease. Repeat this until you have a comfortable support.For easy access to the rear seat, do this.
1. Lift the seatback lock release lever or
press the release pedal.
The seat will slide forward slightly.
2. Move the seat to the front-most posi- tion.
After passengers are in, lift up on the seat-
back and return the seat until it locks.
ÐMoving passenger's seat for rear seat entry (Xtra-cab models)
Page 19 of 212
18
CAUTION!
� After putting back the seat, try
pushing the seat forward and rear-
ward to make sure it is secured inplace.
� Never allow anyone to rest their
foot on the release pedal while the
vehicle is moving.
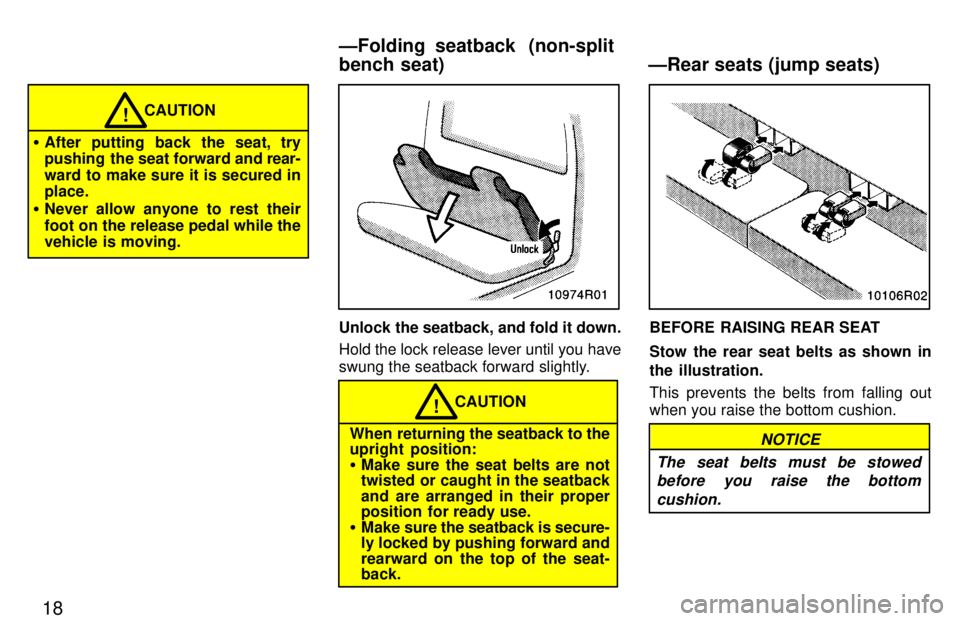
Unlock the seatback, and fold it down.
Hold the lock release lever until you have
swung the seatback forward slightly.
CAUTION!
When returning the seatback to the
upright position: � Make sure the seat belts are not
twisted or caught in the seatback
and are arranged in their proper
position for ready use.
� Make sure the seatback is secure-
ly locked by pushing forward and rearward on the top of the seat- back.
BEFORE RAISING REAR SEAT
Stow the rear seat belts as shown in
the illustration.
This prevents the belts from falling out
when you raise the bottom cushion.
NOTICE
The seat belts must be stowed before you raise the bottom
cushion.
ÐFolding seatback (non-split
bench seat) ÐRear seats (jump seats)
Page 21 of 212

20
To use the armrest, pull it out as shown above. When you fold the seatback, the armrest retracts to avoid hitting the manual trans-
mission gear shift lever.
NOTICE
To prevent damage to the armrest, avoid putting heavy loads on it.
Toyota strongly urges that the driver and passengers in the vehicle be properly re- strained at all times with the seat belts
provided. Failure to do so could increase
the chance of injury and/or the severity of
injury in accidents. Child. Use a child restraint system ap-
propriate for the child until the child be-
comes large enough to properly wear the
vehicle's seat belts. See Child restraintº
for details. NORMAL-CAB MODELSÐ
If a child is too large for a child restriant
systemn, the child should sit in the seat
and must be restrained using the vehicle's
seat belt. XTRA-CAB MODELSÐ
If a child is too large for a child restraint
system, the child should sit in the rear seat
and must be restrained using the vehicle's
seat belt. According to accident statistics,the child is safer when properly restrained
in the rear seat than in the front seat. If a
child must sit in the front seat, the seat
belts should be worn properly. Do not allow the child to stand up or kneel
on either rear or front seats. An unre-
strained child could suffer serious injury
during emergency braking or a collision.
Also, do not let the child sit on your lap. It
does not provide sufficient restraint.
If the shoulder belt falls across the child's neck or face, move the child to the center
position and use the center lap belt.
Small-framed person or youth in a
3-point type seat belt.
On models with
a bench seat, have a small-framed per-
son or youth sit slightly closer to the center
of the vehicle (so the shoulder belt does
not cross over the neck). On models with separate seats, move the seat fully back- ward.
Pregnant woman. Toyota recommends
the use of a seat belt. Ask your doctor for
specific recommendations. The lap belt
should be worn securely and as low as
possible over the hips and not on thewaist.
Injured person. Toyota recommends the
use of a seat belt. Depending on the injury,
first check with your doctor for specific recommendations.
Seat beltsÐ ÐSeat belt precautions
Armrest
Page 22 of 212

20
To use the armrest, pull it out as shown above. When you fold the seatback, the armrest retracts to avoid hitting the manual trans-
mission gear shift lever.
NOTICE
To prevent damage to the armrest, avoid putting heavy loads on it.
Toyota strongly urges that the driver and passengers in the vehicle be properly re- strained at all times with the seat belts
provided. Failure to do so could increase
the chance of injury and/or the severity of
injury in accidents. Child. Use a child restraint system ap-
propriate for the child until the child be-
comes large enough to properly wear the
vehicle's seat belts. See Child restraintº
for details. NORMAL-CAB MODELSÐ
If a child is too large for a child restriant
systemn, the child should sit in the seat
and must be restrained using the vehicle's
seat belt. XTRA-CAB MODELSÐ
If a child is too large for a child restraint
system, the child should sit in the rear seat
and must be restrained using the vehicle's
seat belt. According to accident statistics,the child is safer when properly restrained
in the rear seat than in the front seat. If a
child must sit in the front seat, the seat
belts should be worn properly. Do not allow the child to stand up or kneel
on either rear or front seats. An unre-
strained child could suffer serious injury
during emergency braking or a collision.
Also, do not let the child sit on your lap. It
does not provide sufficient restraint.
If the shoulder belt falls across the child's neck or face, move the child to the center
position and use the center lap belt.
Small-framed person or youth in a
3-point type seat belt.
On models with
a bench seat, have a small-framed per-
son or youth sit slightly closer to the center
of the vehicle (so the shoulder belt does
not cross over the neck). On models with separate seats, move the seat fully back- ward.
Pregnant woman. Toyota recommends
the use of a seat belt. Ask your doctor for
specific recommendations. The lap belt
should be worn securely and as low as
possible over the hips and not on thewaist.
Injured person. Toyota recommends the
use of a seat belt. Depending on the injury,
first check with your doctor for specific recommendations.
Seat beltsÐ ÐSeat belt precautions
Armrest
Page 24 of 212
22
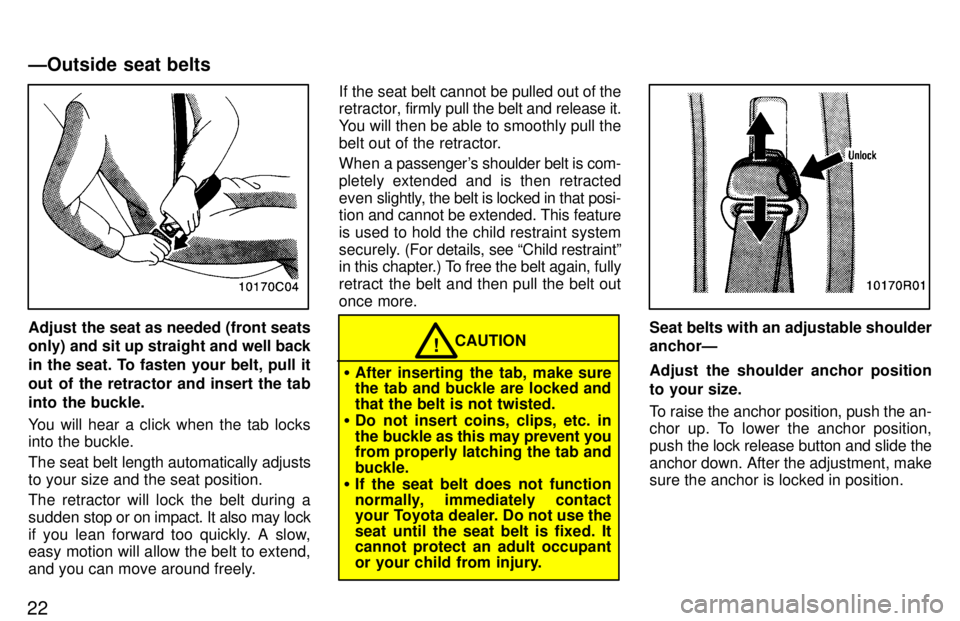
Adjust the seat as needed (front seats only) and sit up straight and well back
in the seat. To fasten your belt, pull it
out of the retractor and insert the tab
into the buckle.
You will hear a click when the tab locks into the buckle.
The seat belt length automatically adjusts
to your size and the seat position.
The retractor will lock the belt during a
sudden stop or on impact. It also may lock
if you lean forward too quickly. A slow, easy motion will allow the belt to extend,
and you can move around freely. If the seat belt cannot be pulled out of the
retractor,
firmly pull the belt and release it.
You will then be able to smoothly pull the
belt out of the retractor.
When a passenger's shoulder belt is com-
pletely extended and is then retracted
even slightly, the belt is locked in that posi-
tion and cannot be extended. This feature
is used to hold the child restraint system
securely. (For details, see Child restraintº
in this chapter.) To free the belt again, fully
retract the belt and then pull the belt out
once more.CAUTION!
� After inserting the tab, make sure
the tab and buckle are locked and that the belt is not twisted.
� Do not insert coins, clips, etc. in
the buckle as this may prevent you
from properly latching the tab and buckle.
� If the seat belt does not function
normally, immediately contact
your Toyota dealer. Do not use the
seat until the seat belt is fixed. It cannot protect an adult occupant
or your child from injury.
Seat belts with an adjustable shoulder anchorÐ
Adjust the shoulder anchor position
to your size.
To raise the anchor position, push the an-
chor up. To lower the anchor position,
push the lock release button and slide the
anchor down. After the adjustment, make sure the anchor is locked in position.
ÐOutside seat belts
Page 30 of 212

28
This indicator comes on when the
ignition key is turned to the ACCº or
ONº position. It goes off after about 6
seconds. This means the SRS airbag
is operating properly.
The SRS airbag warning light system
monitors the front airbag sensors, inflat- ors, warning light, interconnecting wiring
and power sources.The SRS airbag system is designed to
activate in response to a severe frontal
impact within the shaded area be-
tween the arrows in the illustration.
The SRS airbags will deploy if the severity
of the impact is above the designed
threshold level, comparable to an approxi-
mate 20 km/h (14 mph) collision when im-
pacting straight into a fixed barrier that
does not move or deform.
If the severity of the impact is below the
above threshold level, the SRS airbag
may not deploy. However, this threshold velocity will be
considerably higher if the vehicle strikes
an object, such as a parked vehicle or sign
pole, which can move or deform on im-
pact, or if it is
involved in an underride col-
lision (e.g. a collision in which the noise of
the vehicle underridesº, or goes under, the bed of a truck).
For the safety of all occupants, be sure to
always wear your seat belts.