TOYOTA TACOMA 2010 Owners Manual (in English)
TACOMA 2010
TOYOTA
TOYOTA
https://www.carmanualsonline.info/img/14/42947/w960_42947-0.png
TOYOTA TACOMA 2010 Owners Manual (in English)
Trending: radio antenna, engine overheat, steering wheel, trip computer, engine oil capacity, transmission fluid, immobilizer
Page 331 of 532
331 3-6. Other interior features
3
Interior and exterior features
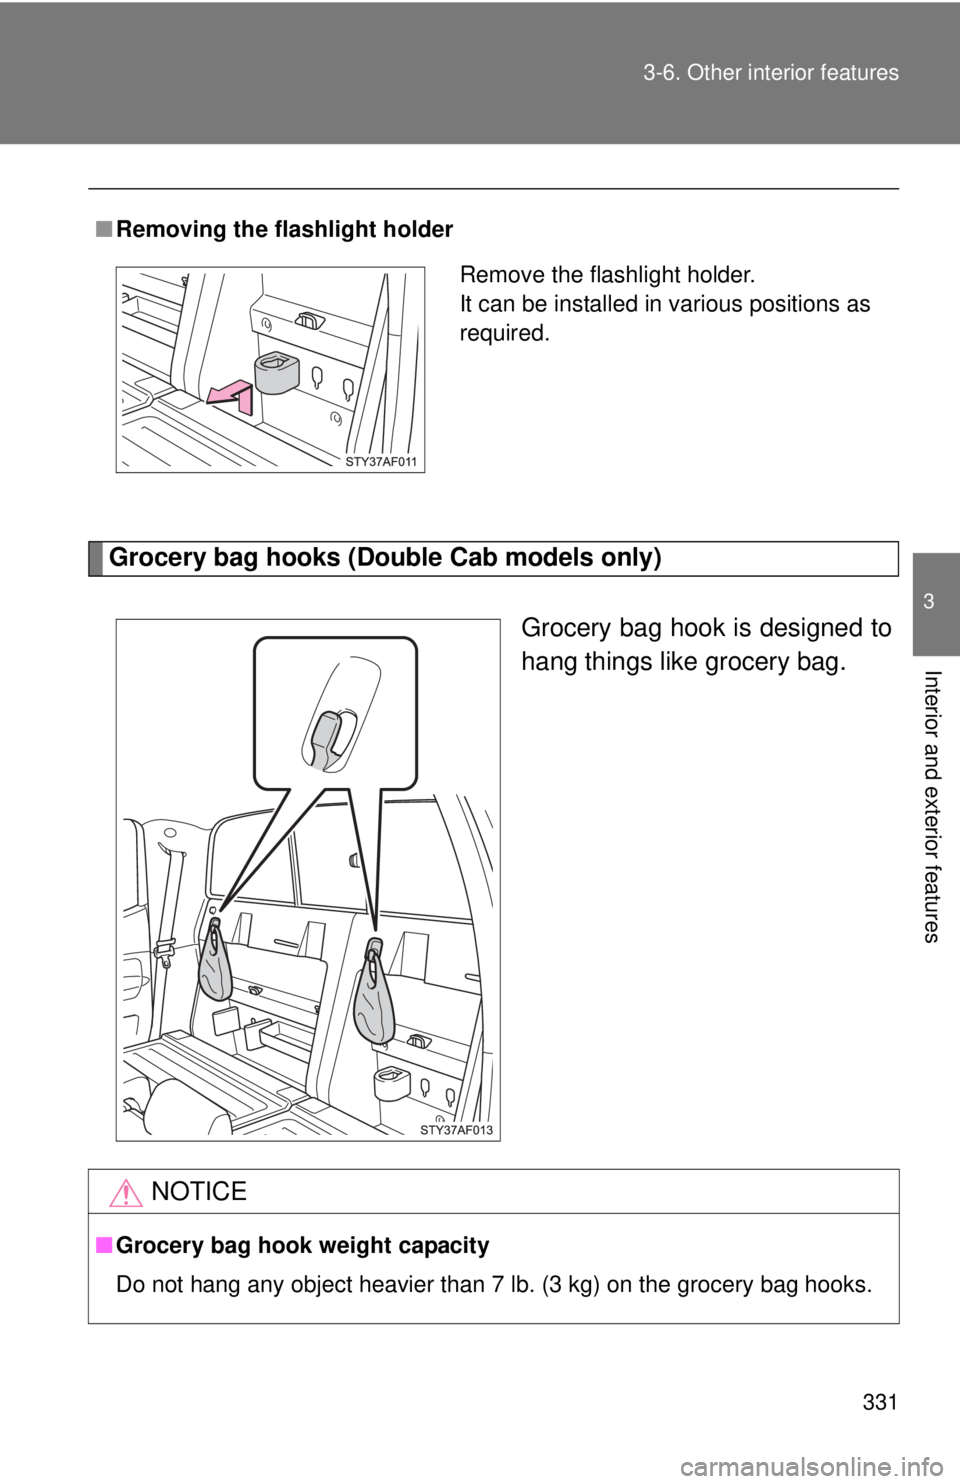
Grocery bag hooks (Double Cab models only)
Grocery bag hook is designed to
hang things like grocery bag.
■Removing the flashlight holder
Remove the flashlight holder.
It can be installed in various positions as
required.
NOTICE
■Grocery bag hook weight capacity
Do not hang any object heavier than 7 lb. (3 kg) on the grocery bag hooks.
Page 332 of 532
332 3-6. Other interior features
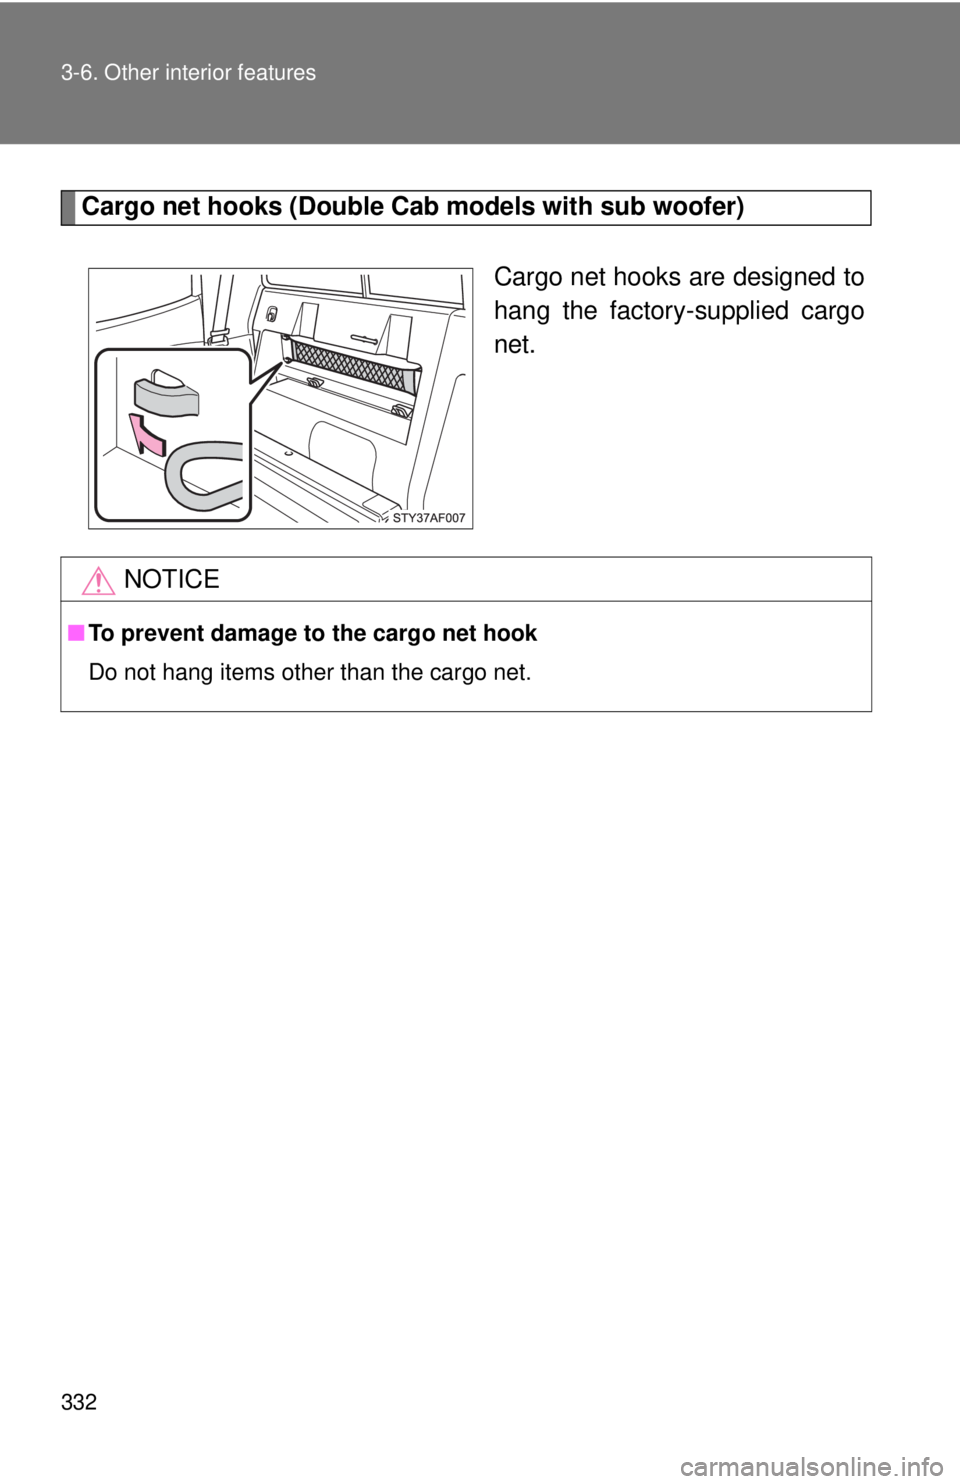
Cargo net hooks (Double Cab models with sub woofer)
Cargo net hooks are designed to
hang the factory-supplied cargo
net.
NOTICE
■To prevent damage to the cargo net hook
Do not hang items other than the cargo net.
Page 333 of 532
333
3-6. Other interior features
3
Interior and exterior features
Garage door opener box
: If equipped
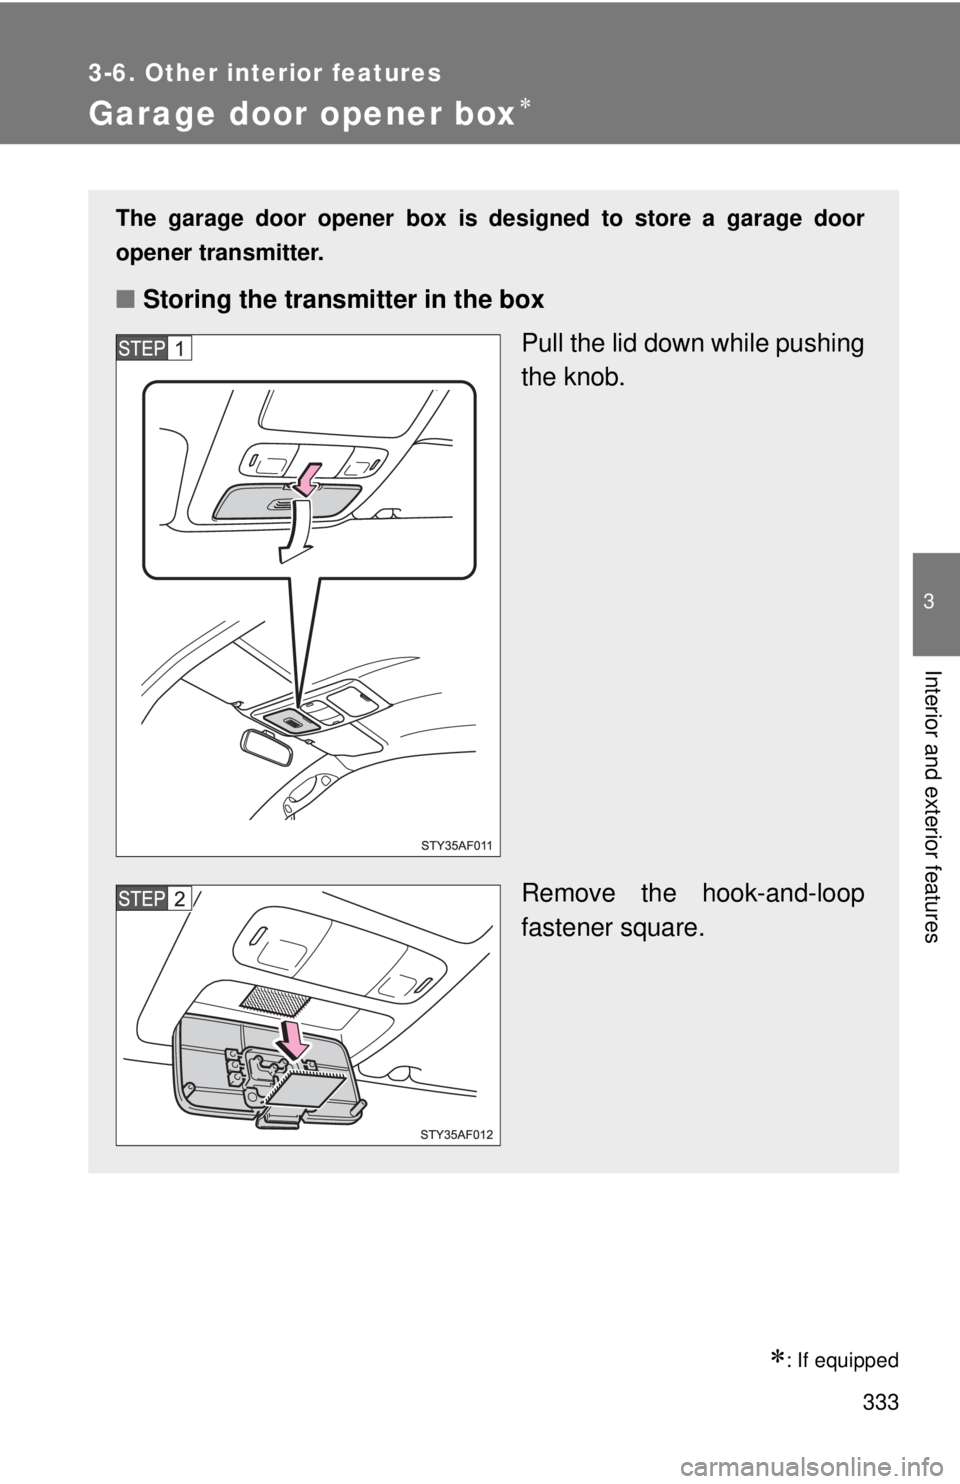
The garage door opener box is designed to store a garage door
opener transmitter.
■Storing the transmitter in the box
Pull the lid down while pushing
the knob.
Remove the hook-and-loop
fastener square.
Page 334 of 532
334 3-6. Other interior features
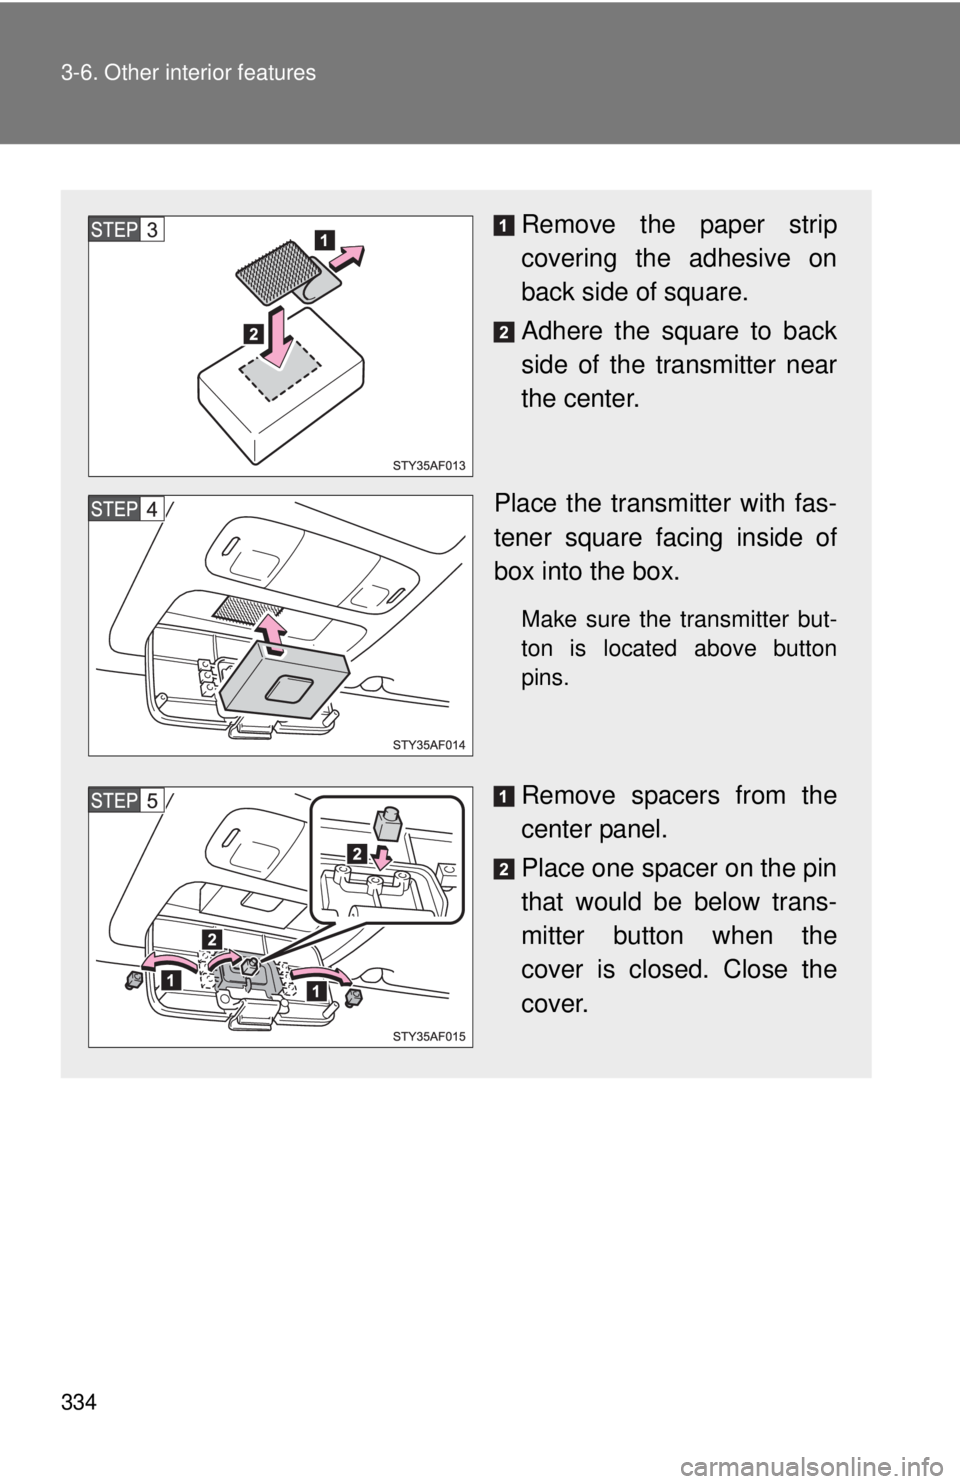
Remove the paper strip
covering the adhesive on
back side of square.
Adhere the square to back
side of the transmitter near
the center.
Place the transmitter with fas-
tener square facing inside of
box into the box.
Make sure the transmitter but-
ton is located above button
pins.
Remove spacers from the
center panel.
Place one spacer on the pin
that would be below trans-
mitter button when the
cover is closed. Close the
cover.
Page 335 of 532
335 3-6. Other interior features
3
Interior and exterior features
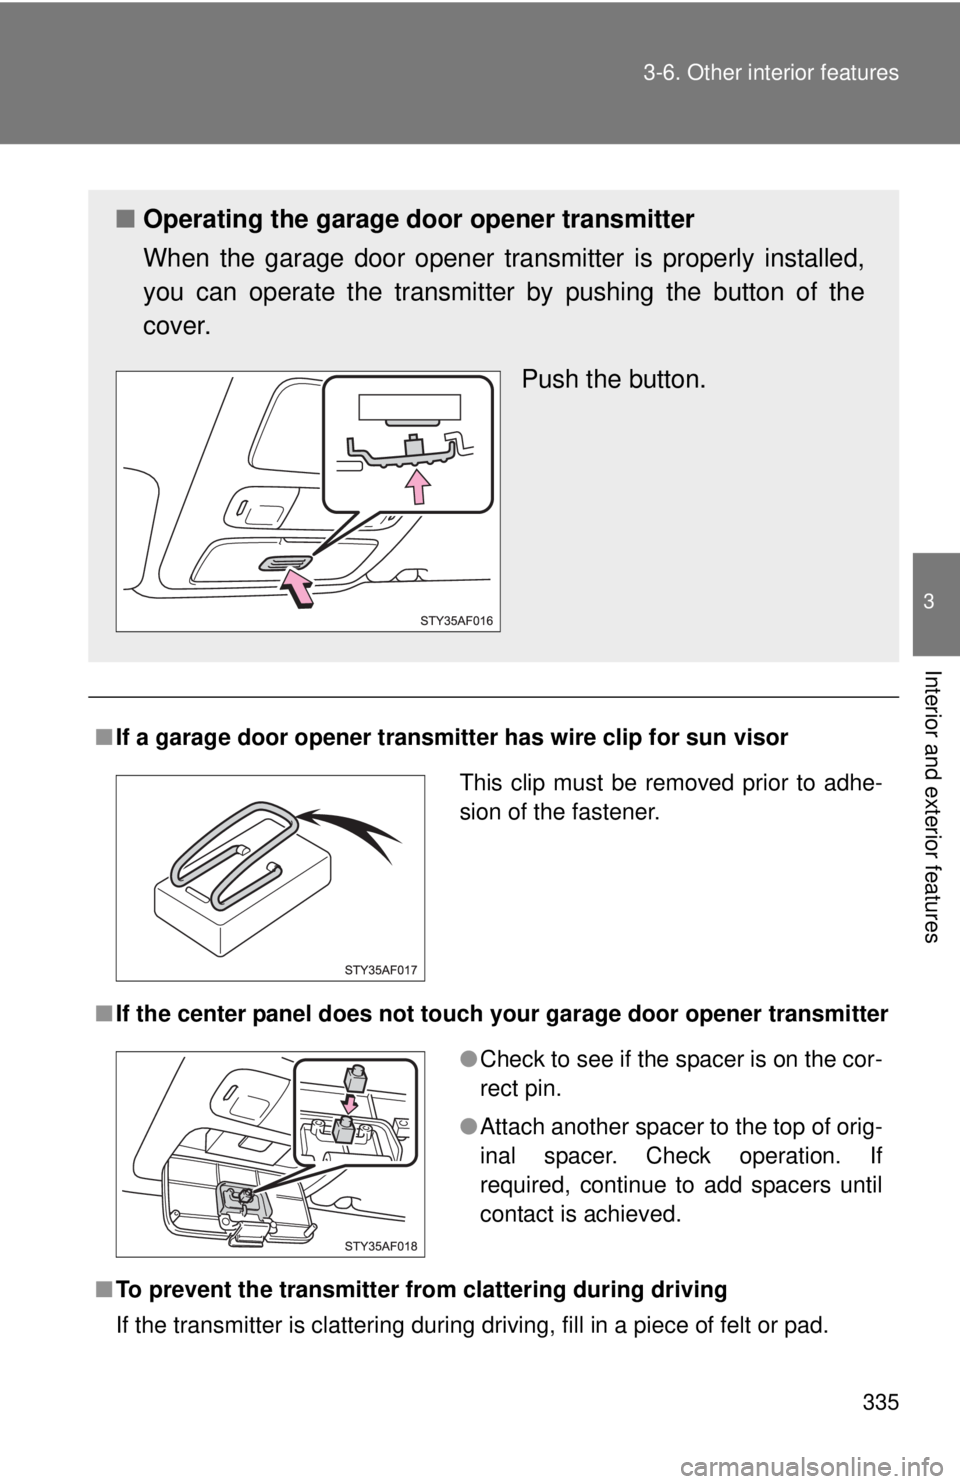
■If a garage door opener transmitter has wire clip for sun visor
■If the center panel does not touch your garage door opener transmitter
■To prevent the transmitter from clattering during driving
If the transmitter is clattering during driving, fill in a piece of felt or pad.
■Operating the garage door opener transmitter
When the garage door opener transmitter is properly installed,
you can operate the transmitter by pushing the button of the
cover.
Push the button.
This clip must be removed prior to adhe-
sion of the fastener.
●Check to see if the spacer is on the cor-
rect pin.
●Attach another spacer to the top of orig-
inal spacer. Check operation. If
required, continue to add spacers until
contact is achieved.
Page 336 of 532
336 3-6. Other interior features
CAUTION
■Caution while driving
Keep the garage door opener box closed.
Injuries may result in the event of an accident or sudden braking.
■To prevent an accident
Keep the remaining spacers away from the children.
Page 337 of 532
337
3-6. Other interior features
3
Interior and exterior features
Compass (vehicles with accessor y meter)
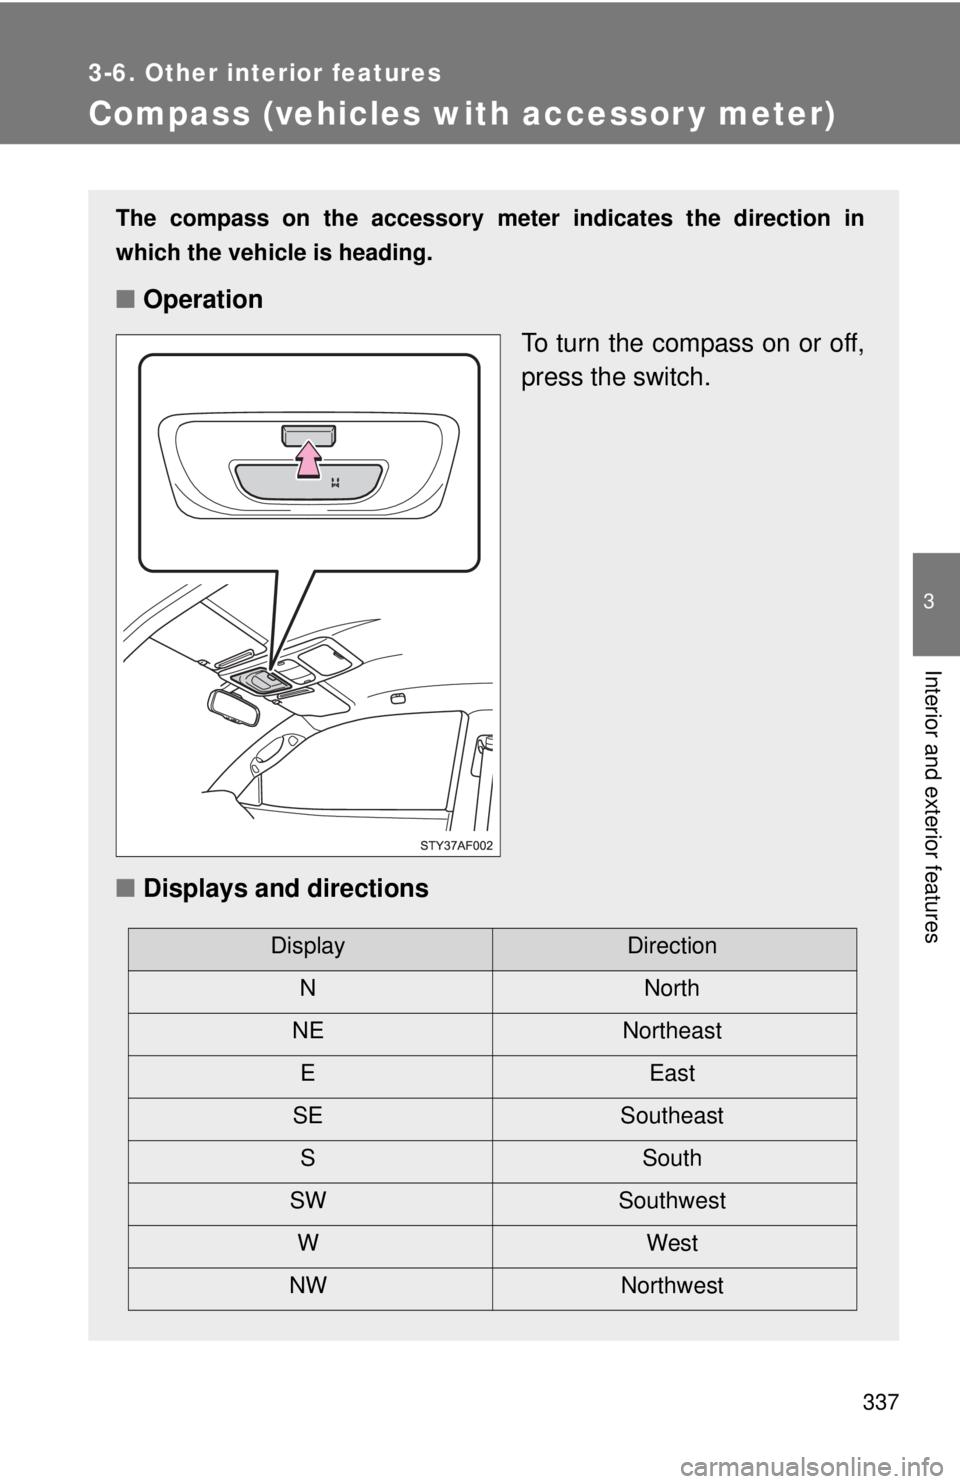
The compass on the accessory meter indicates the direction in
which the vehicle is heading.
■Operation
To turn the compass on or off,
press the switch.
■Displays and directions
DisplayDirection
NNorth
NE Northeast
EEast
SE Southeast
S South
SW Southwest
WWest
NW Northwest
Page 338 of 532
338 3-6. Other interior features
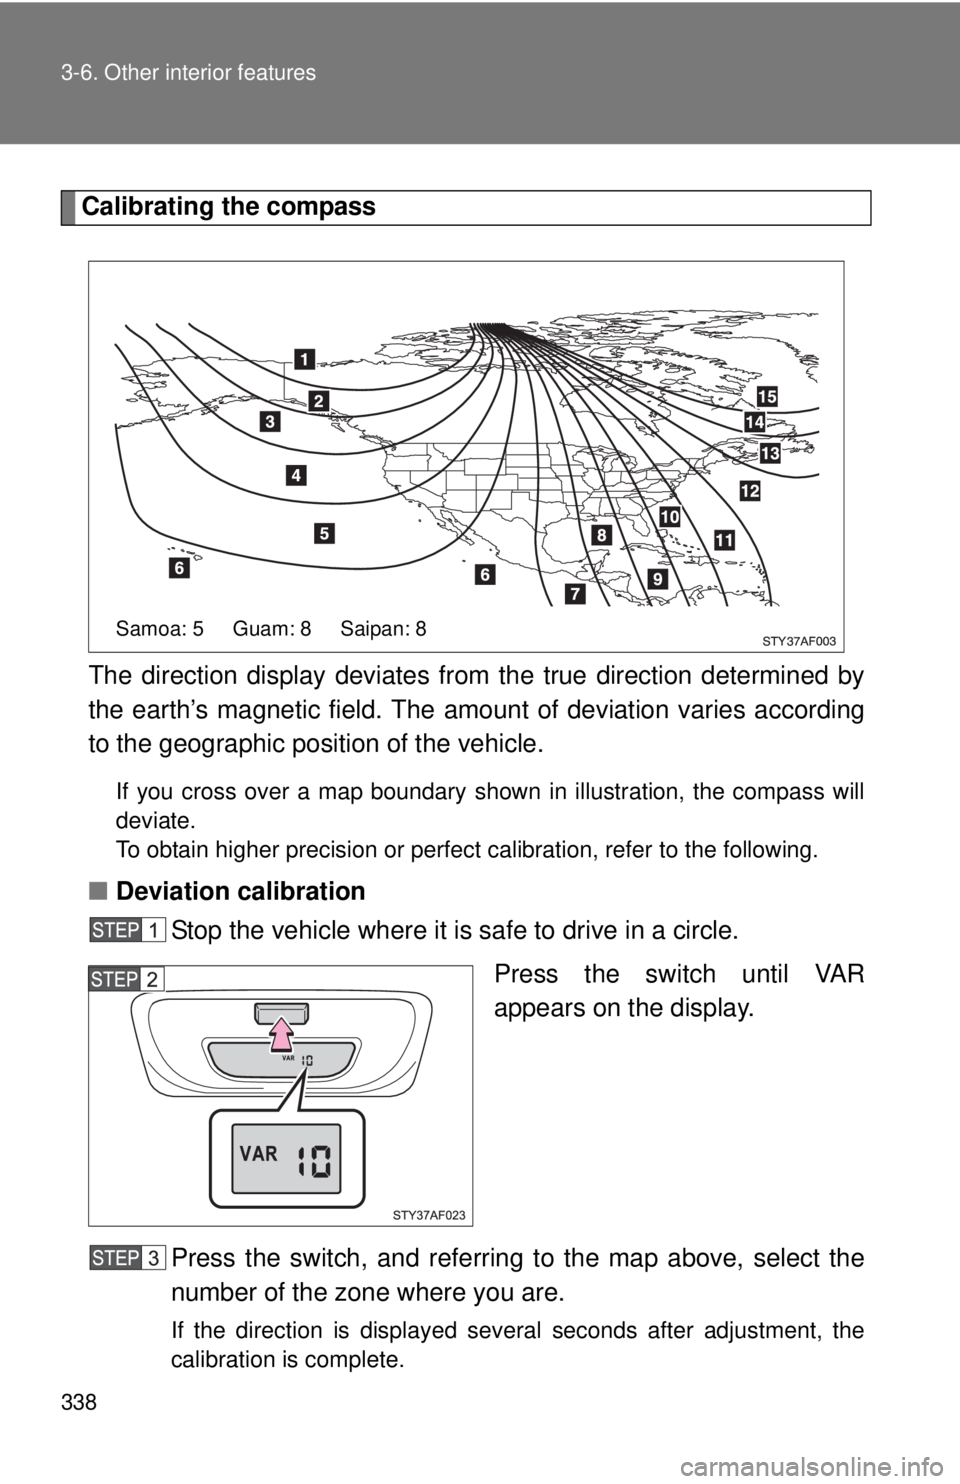
Calibrating the compass
The direction display deviates from the true direction determined by
the earth’s magnetic field. The amount of deviation varies according
to the geographic position of the vehicle.
If you cross over a map boundary shown in illustration, the compass will
deviate.
To obtain higher precision or perfect calibration, refer to the following.
■Deviation calibration
Stop the vehicle where it is safe to drive in a circle.
Press the switch until VAR
appears on the display.
Press the switch, and referring to the map above, select the
number of the zone where you are.
If the direction is displayed several seconds after adjustment, the
calibration is complete.
Samoa: 5 Guam: 8 Saipan: 8
Page 339 of 532
339 3-6. Other interior features
3
Interior and exterior features
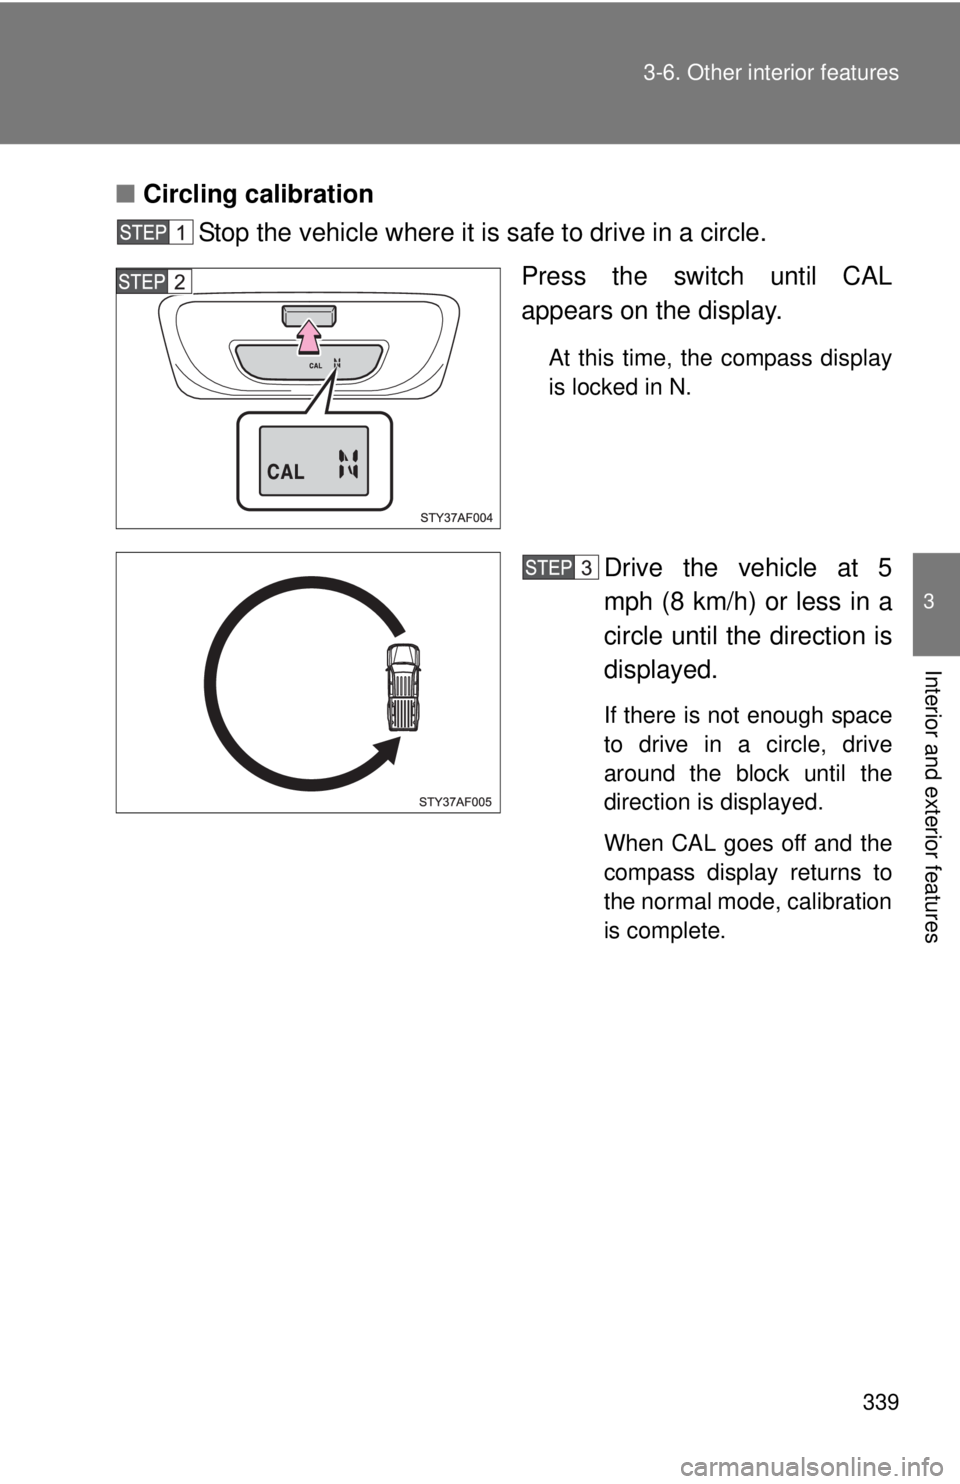
■Circling calibration
Stop the vehicle where it is safe to drive in a circle.
Press the switch until CAL
appears on the display.
At this time, the compass display
is locked in N.
Drive the vehicle at 5
mph (8 km/h) or less in a
circle until the direction is
displayed.
If there is not enough space
to drive in a circle, drive
around the block until the
direction is displayed.
When CAL goes off and the
compass display returns to
the normal mode, calibration
is complete.
Page 340 of 532

340 3-6. Other interior features
■Conditions unfavorable to correct operation
The compass may not show the correct direction in the following conditions:
●The vehicle is stopped immediately after turning.
The compass does not adjust while the vehicle is stopped.
●The engine switch is turned off immediately after turning.
●The vehicle is on an inclined surface.
●The vehicle is in a place where the earth’s magnetic field is subject to
interference by artificial magnetic fields (underground car park/parking
lot, under a steel tower, between buildings, roof car park/parking lot, near
an intersection, near a large vehicle, etc.).
●The vehicle has become magnetized.
(There is a magnet or metal object on or near the roof.)
●The battery has been disconnected.
CAUTION
■While driving the vehicle
Do not adjust the display. Be sure to adjust the display only when the vehicle
is stopped.
■When doing the circling calibration
Be sure to secure a wide space, and watch out for people and vehicles in the
neighborhood. Do not violate any local traffic rules while performing circling
calibration.
Trending: torque, four wheel drive, snow chains, lane assist, fuel filter, bluetooth, airbag
