reverse TOYOTA TACOMA 2012 Accessories, Audio & Navigation (in English)
[x] Cancel search | Manufacturer: TOYOTA, Model Year: 2012, Model line: TACOMA, Model: TOYOTA TACOMA 2012Pages: 228, PDF Size: 3.73 MB
Page 69 of 228

69
6. NAVIGATION SYSTEM INFORMATION
2
APPLICATION-“Map”
LICENSE GRANT
NAVTEQ grants you a non-exclusive
license to use the Database for your
personal use or, if applicable, for use in
your business’ internal operations. This
license does not include the right to
grant sub-licenses.
LIMITATIONS ON USE
The Database is restricted for use in
the specific system for which it was
created. Except to the extent explicitly
permitted by mandatory laws (e.g.
national laws based on the European
Software Directive (91/250) and the
Database Directive (96/9)), you may
not extract or reutilize substantial parts
of the contents of the Database nor
reproduce, copy, modify, adapt,
translate, disassemble, decompile,
reverse engineer any portion of the
Database. If you wish to obtain
interoperability information as meant in
(the national laws based on) the
European Software Directive, you shall
grant NAVTEQ reasonable opportunity
to provide said information on
reasonable terms, including costs, to
be determined by NAVTEQ.
TRANSFER OF LICENSE
You may not transfer the Database to
third parties, except when installed in
the system for which it was created or
when you do not retain any copy of the
Database, and provided that the
transferee agrees to all terms and
conditions of this Agreement and
confirms this in writing to NAVTEQ.
Multi-disc sets may only be transferred
or sold as a complete set as provided
by NAVTEQ and not as subset thereof.LIMITED WARRANTY
NAVTEQ warrants that, subject to the
warnings set out below, for a period of
12 months after acquisition of your
copy of the Database, it will perform
substantially in accordance with
NAVTEQ’s Criteria for Accuracy and
Completeness existing on the date you
acquired the Database; these criteria
are available from NAVTEQ at your
request. If the Database does not
perform in accordance with this limited
warranty, NAVTEQ will use reasonable
efforts to repair or replace your non-
conforming copy of the Database. If
these efforts do not lead to
performance of the Database in
accordance with the warranties set out
herein, you will have the option to either
receive a reasonable refund of the
price you paid for the Database or to
rescind this Agreement. This shall be
NAVTEQ’s entire liability and your sole
remedy against NAVTEQ. Except as
expressly provided in this section,
NAVTEQ does not warrant nor make
any representations regarding the use
of results of the use of the Database in
terms of its correctness, accuracy,
reliability, or otherwise. NAVTEQ does
not warrant that the Database is or will
be error free. No oral or written
information or advice provided by
NAVTEQ, your supplier or any other
person shall create a warranty or in any
way increase the scope of the limited
warranty described above. The limited
warranty set forth in this Agreement
does not affect or prejudice any
statutory legal rights that you may have
under the legal warranty against
hidden defects.
Page 118 of 228
118
1. AUDIO SYSTEM OPERATION
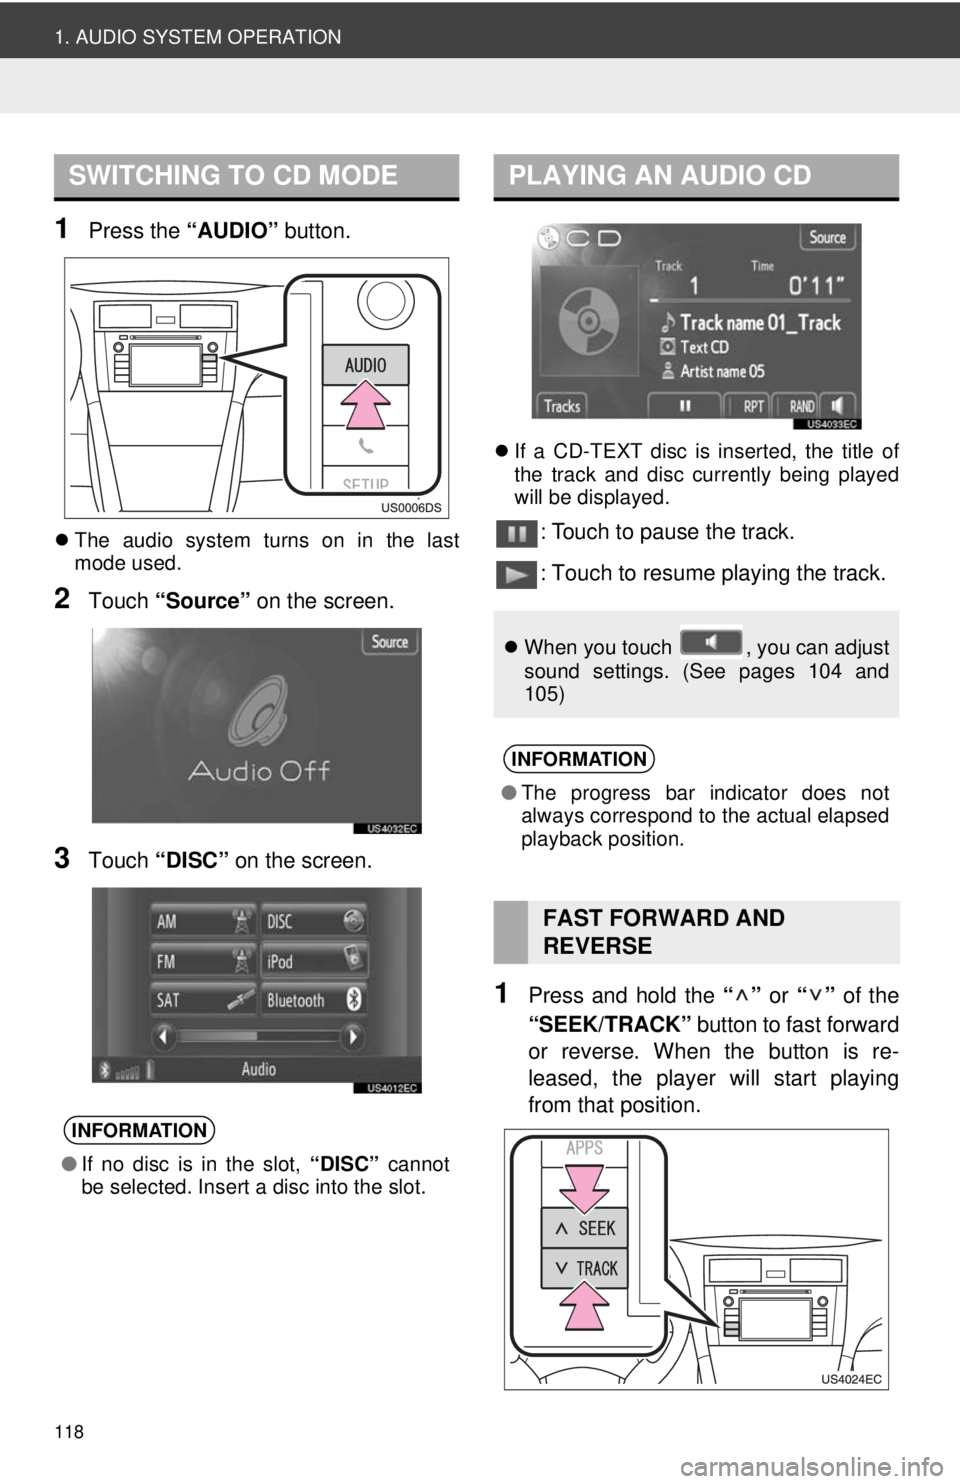
1Press the “AUDIO” button.
The audio system turns on in the last
mode used.
2Touch “Source” on the screen.
3Touch “DISC” on the screen.
If a CD-TEXT disc is inserted, the title of
the track and disc currently being played
will be displayed.
: Touch to pause the track.
: Touch to resume playing the track.
1Press and hold the “” or “” of the
“SEEK/TRACK” button to fast forward
or reverse. When the button is re-
leased, the player will start playing
from that position.
SWITCHING TO CD MODE
INFORMATION
● If no disc is in the slot, “DISC” cannot
be selected. Insert a disc into the slot.
PLAYING AN AUDIO CD
When you touch , you can adjust
sound settings. (See pages 104 and
105)
INFORMATION
●The progress bar indicator does not
always correspond to the actual elapsed
playback position.
FAST FORWARD AND
REVERSE
Page 120 of 228
120
1. AUDIO SYSTEM OPERATION
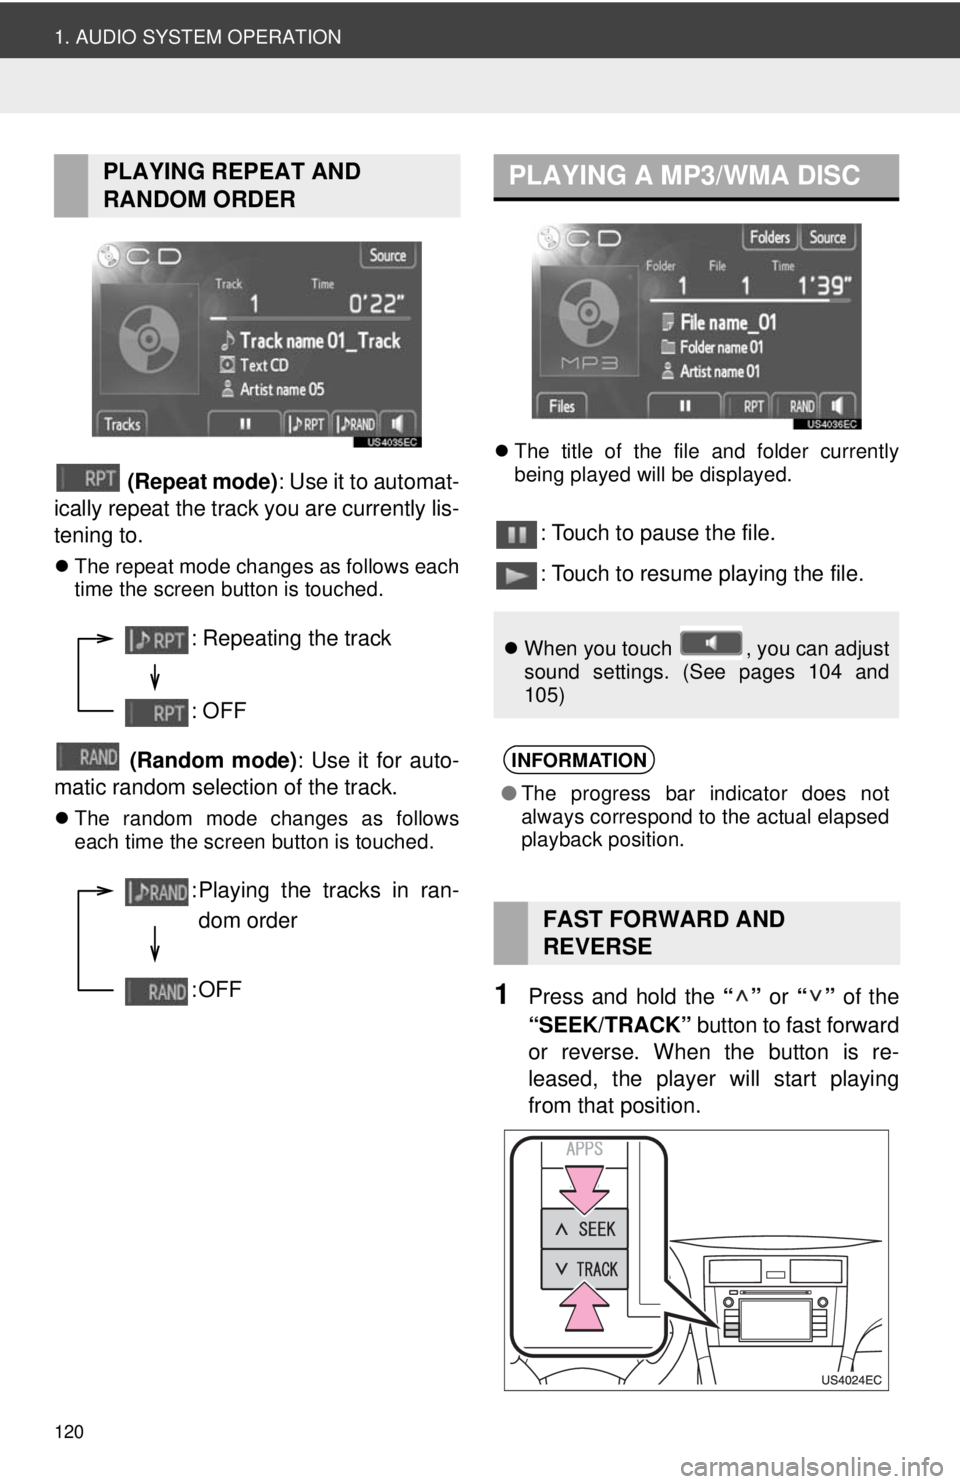
(Repeat mode): Use it to automat-
ically repeat the track you are currently lis-
tening to.
The repeat mode changes as follows each
time the screen button is touched.
(Random mode) : Use it for auto-
matic random selection of the track.
The random mode changes as follows
each time the screen button is touched.
The title of the file and folder currently
being played will be displayed.
: Touch to pause the file.
: Touch to resume playing the file.
1Press and hold the “” or “” of the
“SEEK/TRACK” button to fast forward
or reverse. When the button is re-
leased, the player will start playing
from that position.
PLAYING REPEAT AND
RANDOM ORDER
: Repeating the track
: OFF
: Playing the tracks in ran-
dom order
:OFF
PLAYING A MP3/WMA DISC
When you touch , you can adjust
sound settings. (See pages 104 and
105)
INFORMATION
●The progress bar indicator does not
always correspond to the actual elapsed
playback position.
FAST FORWARD AND
REVERSE
Page 125 of 228
125
1. AUDIO SYSTEM OPERATION
4
AUDIO SYSTEM
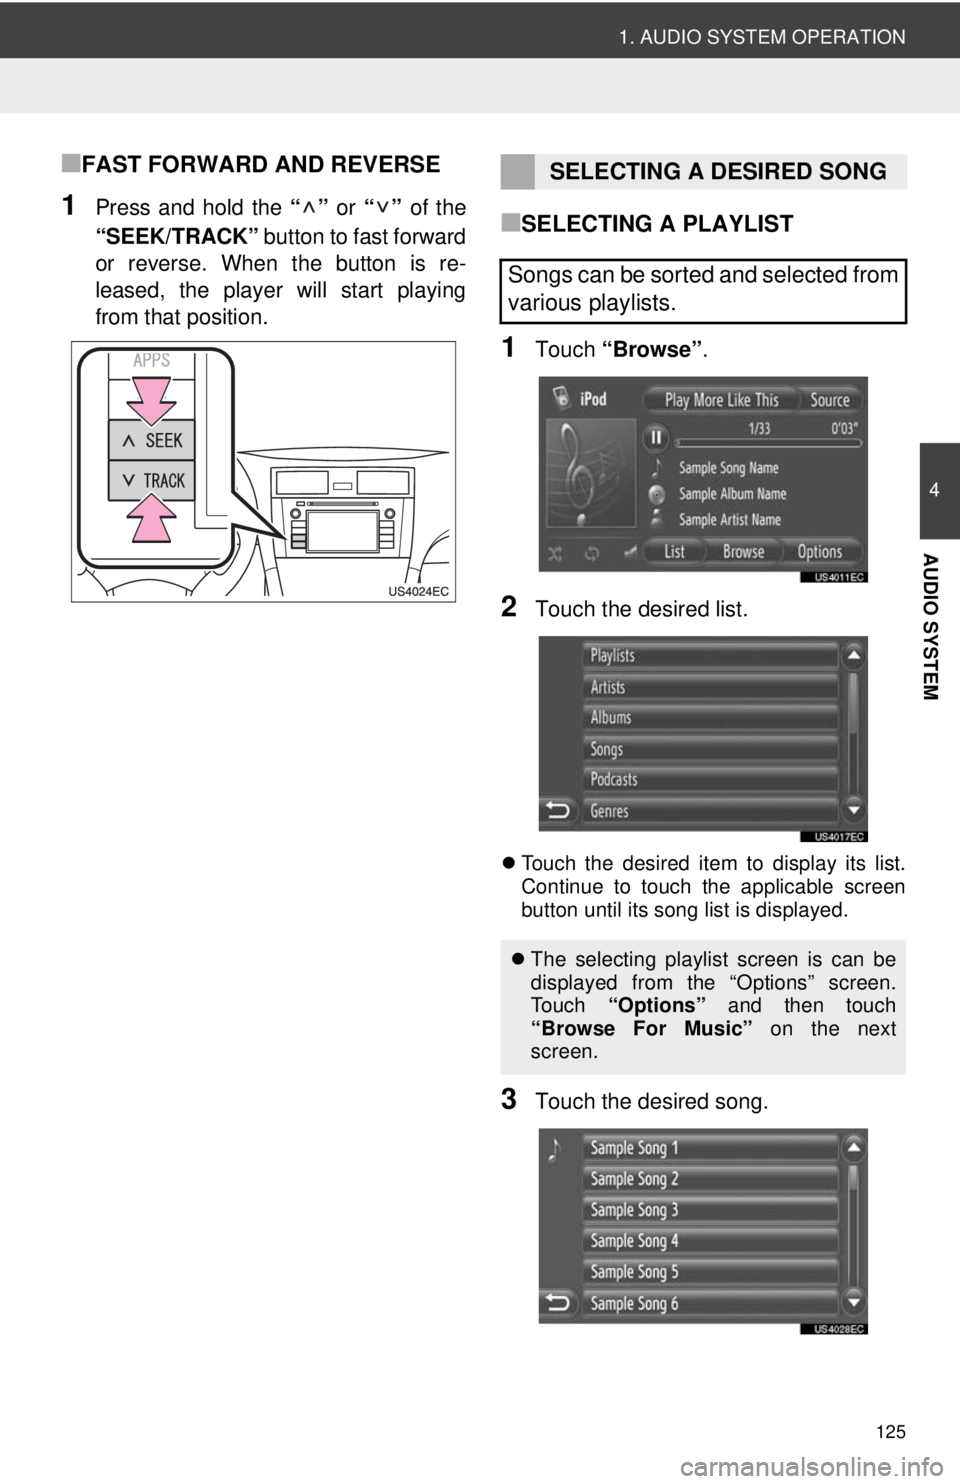
■FAST FORWARD AND REVERSE
1Press and hold the “” or “” of the
“SEEK/TRACK” button to fast forward
or reverse. When the button is re-
leased, the player will start playing
from that position.■SELECTING A PLAYLIST
1Touch “Browse” .
2Touch the desired list.
Touch the desired item to display its list.
Continue to touch the applicable screen
button until its song list is displayed.
3Touch the desired song.
SELECTING A DESIRED SONG
Songs can be sorted and selected from
various playlists.
The selecting playlist screen is can be
displayed from the “Options” screen.
To u c h “Options” and then touch
“Browse For Music” on the next
screen.
Page 138 of 228
138
1. AUDIO SYSTEM OPERATION
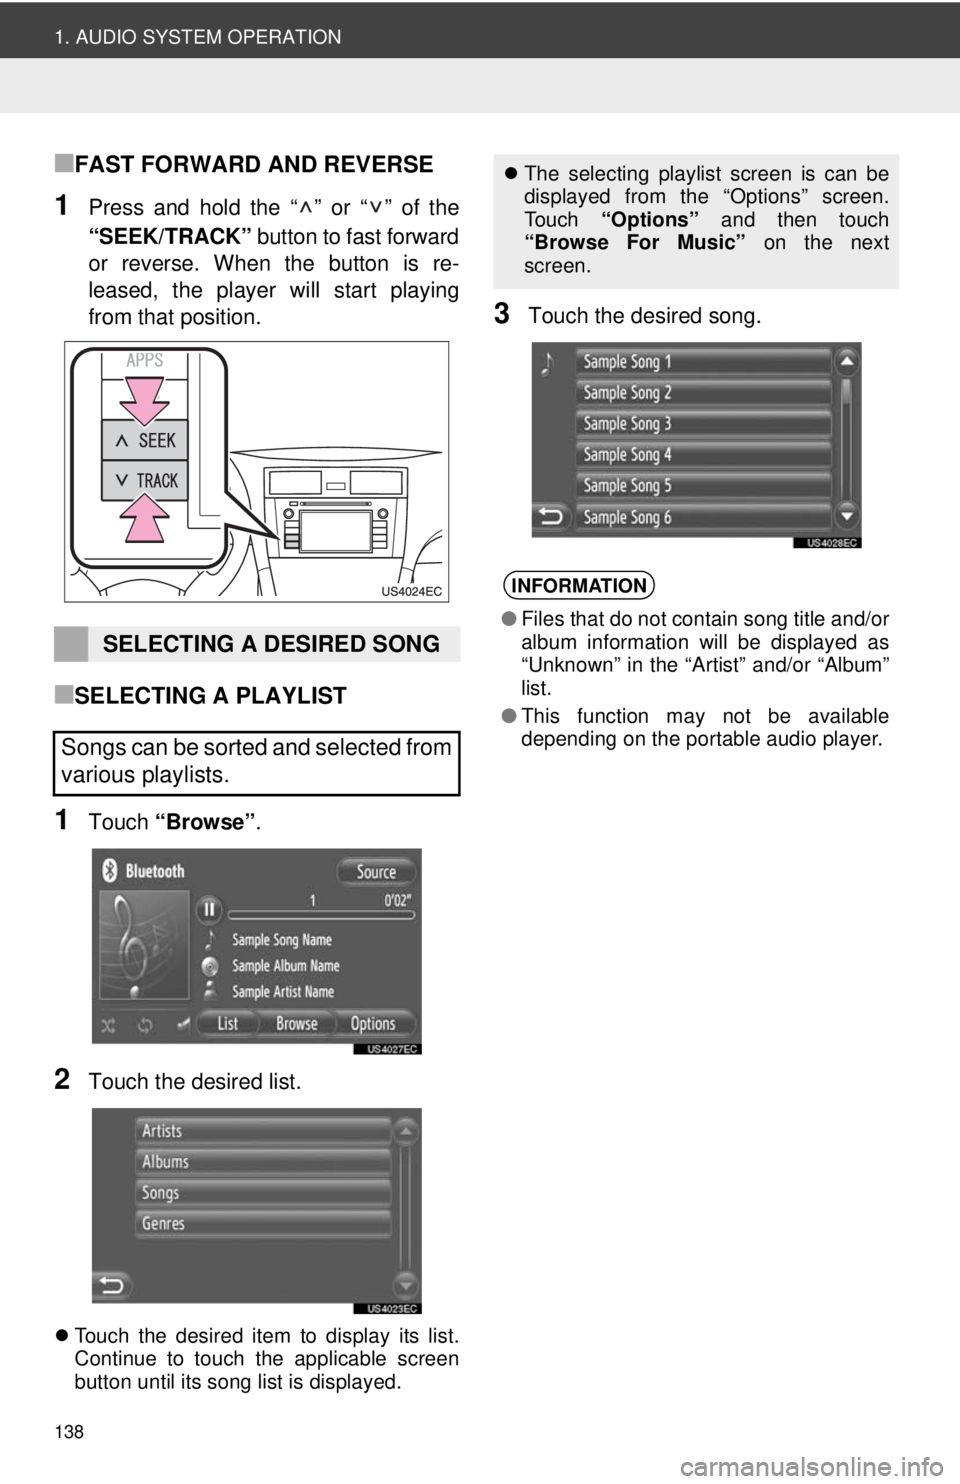
■FAST FORWARD AND REVERSE
1Press and hold the “ ” or “ ” of the
“SEEK/TRACK” button to fast forward
or reverse. When the button is re-
leased, the player will start playing
from that position.
■SELECTING A PLAYLIST
1Touch “Browse” .
2Touch the desired list.
Touch the desired item to display its list.
Continue to touch the applicable screen
button until its song list is displayed.
3Touch the desired song.
SELECTING A DESIRED SONG
Songs can be sorted and selected from
various playlists.
The selecting playlist screen is can be
displayed from the “Options” screen.
Touch “Options” and then touch
“Browse For Music” on the next
screen.
INFORMATION
● Files that do not contain song title and/or
album information will be displayed as
“Unknown” in the “Art ist” and/or “Album”
list.
● This function may not be available
depending on the portable audio player.
Page 141 of 228
141
4
AUDIO SYSTEM
1. AUDIO SYSTEM OPERATION
9. STEERING SWITCHES
The design and switch position may differ
depending on the vehicle. For details, see
the Pictorial index of “Owner’s Manual”.
Details of the specific switches, controls,
and features are described below.
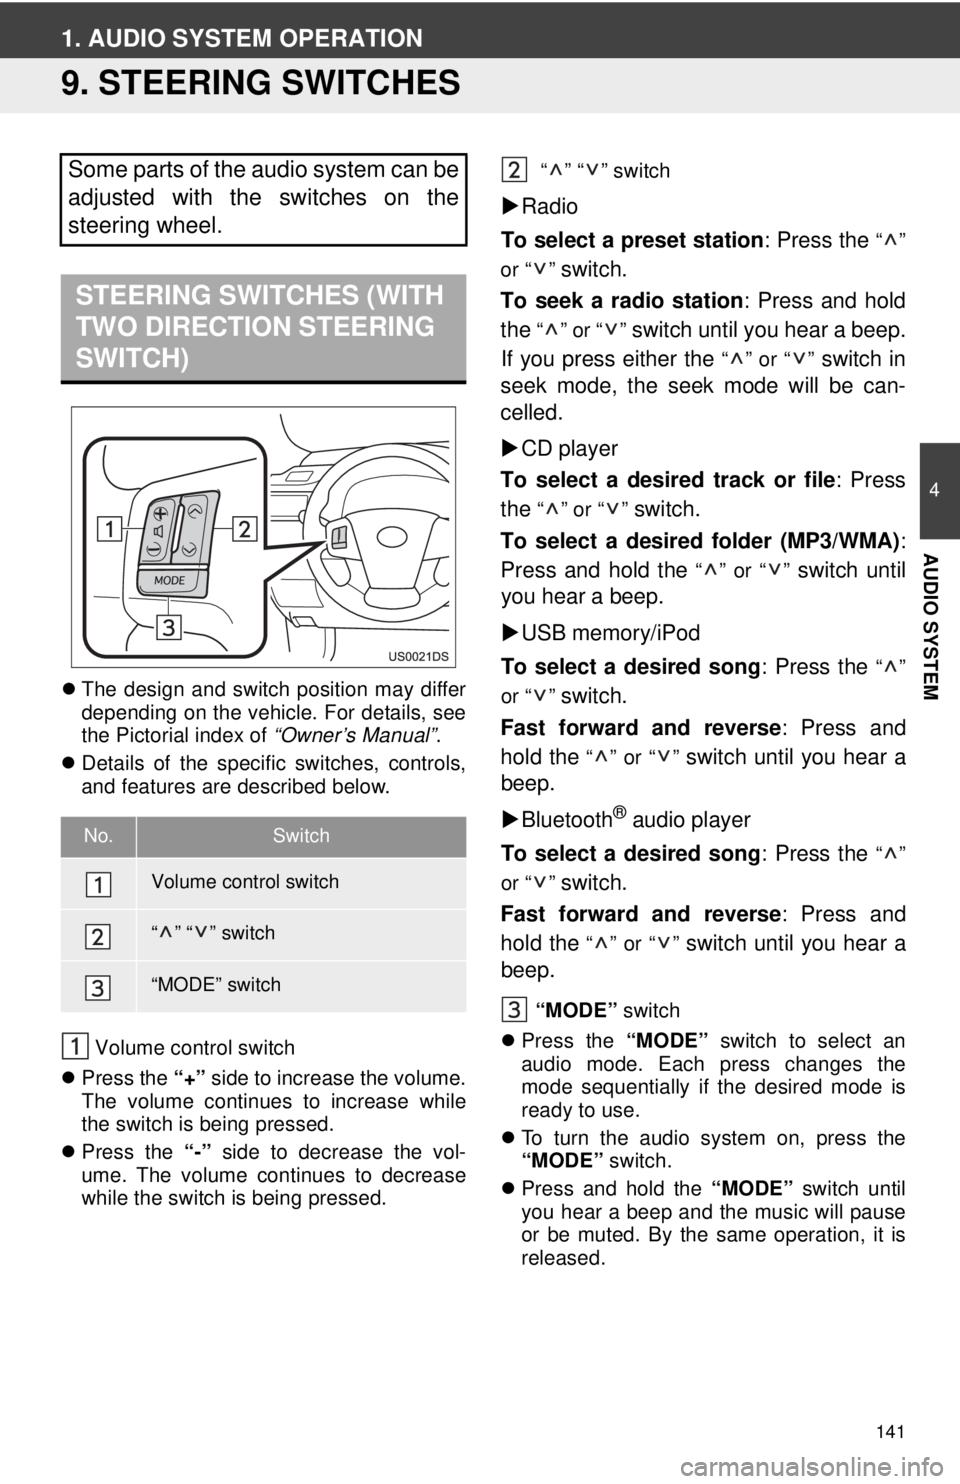
Volume control switch
Press the “+” side to increase the volume.
The volume continues to increase while
the switch is being pressed.
Press the “-” side to decrease the vol-
ume. The volume continues to decrease
while the switch is being pressed. “” “” switch
Radio
To select a preset station : Press the
“”
or “ ”
switch.
To seek a radio station : Press and hold
the
“” or “” switch until you hear a beep.
If you press either the
“” or “” switch in
seek mode, the seek mode will be can-
celled.
CD player
To select a desired track or file : Press
the
“” or “” switch.
To select a desired folder (MP3/WMA) :
Press and hold the
“” or “” switch until
you hear a beep.
USB memory/iPod
To select a desired song : Press the
“”
or “ ”
switch.
Fast forward and reverse : Press and
hold the
“” or “” switch until you hear a
beep.
Bluetooth
® audio player
To select a desired song : Press the
“”
or “ ”
switch.
Fast forward and reverse : Press and
hold the
“” or “” switch until you hear a
beep.
“MODE” switch
Press the “MODE” switch to select an
audio mode. Each press changes the
mode sequentially if the desired mode is
ready to use.
To turn the audio system on, press the
“MODE” switch.
Press and hold the “MODE” switch until
you hear a beep and the music will pause
or be muted. By the same operation, it is
released.
Some parts of the audio system can be
adjusted with the switches on the
steering wheel.
STEERING SWITCHES (WITH
TWO DIRECTION STEERING
SWITCH)
No.Switch
Volume control switch
“” “” switch
“MODE” switch
Page 142 of 228
142
1. AUDIO SYSTEM OPERATION
The design and switch position may differ
depending on the vehicle. For details, see
the Pictorial index of “Owner’s Manual”.
Details of the specific switches, controls,
and features are described below.
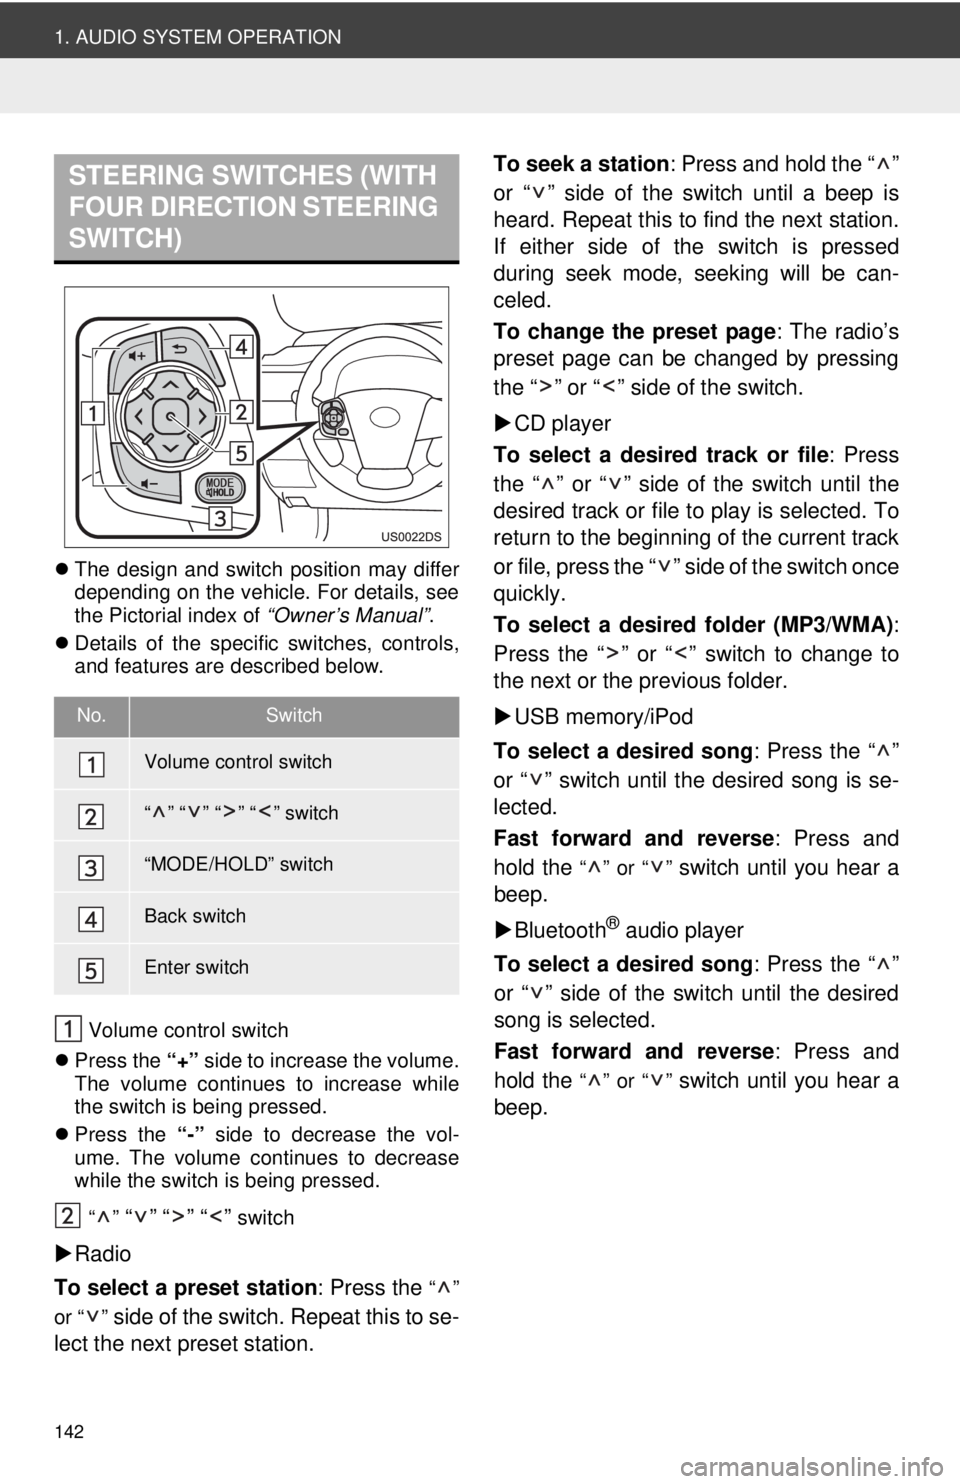
Volume control switch
Press the “+” side to increase the volume.
The volume continues to increase while
the switch is being pressed.
Press the “-” side to decrease the vol-
ume. The volume continues to decrease
while the switch is being pressed.
“”
“” “” “” switch
Radio
To select a preset station : Press the
“”
or “ ”
side of the switch. Repeat this to se-
lect the next preset station. To seek a station
: Press and hold the “ ”
or “ ” side of the switch until a beep is
heard. Repeat this to find the next station.
If either side of the switch is pressed
during seek mode, seeking will be can-
celed.
To change the preset page : The radio’s
preset page can be changed by pressing
the “ ” or “ ” side of the switch.
CD player
To select a desired track or file : Press
the “ ” or “ ” side of the switch until the
desired track or file to play is selected. To
return to the beginning of the current track
or file, press the “ ” side of the switch once
quickly.
To select a desired folder (MP3/WMA) :
Press the “ ” or “ ” switch to change to
the next or the previous folder.
USB memory/iPod
To select a desired song : Press the “ ”
or “ ” switch until the desired song is se-
lected.
Fast forward and reverse : Press and
hold the
“” or “” switch until you hear a
beep.
Bluetooth
® audio player
To select a desired song : Press the “ ”
or “ ” side of the switch until the desired
song is selected.
Fast forward and reverse : Press and
hold the
“” or “” switch until you hear a
beep.
STEERING SWITCHES (WITH
FOUR DIRECTION STEERING
SWITCH)
No.Switch
Volume control switch
“” “” “” “” switch
“MODE/HOLD” switch
Back switch
Enter switch
Page 148 of 228
148
1. AUDIO SYSTEM OPERATION
MP3 (MPEG Audio Layer 3) and WMA
(Windows Media Audio) are audio com-
pression standards.
The MP3/WMA player can play MP3 and
WMA files on CD-ROM, CD-R and CD-
RW discs.
The unit can play disc recordings compati-
ble with ISO 9660 level 1,2 (Romeo Joliet)
and UDF (2.01 or lower) file system.
When naming an MP3 or WMA file, add
the appropriate file extension (.mp3 or
.wma).
The MP3/WMA player plays back files
with .mp3 or .wma file extensions as MP3
or WMA files. To prevent noise and play-
back errors, use the appropriate file exten-
sions.
The player can play only the first session
using multi-session compatible CDs.
MP3 files are compatible with the ID3 Tag
Ver. 1.0, Ver. 1.1, Ver. 2.2, and Ver. 2.3
formats. The unit cannot display disc title,
track title and artist name in other formats.
USB memory: MP3 files are compatible
with the ID3 Tag Ver. 1.0, Ver. 1.1, Ver.
2.2, Ver. 2.3 and Ver. 2.4 formats. The unit
cannot display track title and artist name
in other formats.
WMA files can contain a WMA tag that is
used in the same way as an ID3 tag. WMA
tags carry information such as track title,
artist name.
The sound quality of MP3/WMA files gen-
erally improves with higher bit rates. In
order to achieve a reasonable level of
sound quality, files recorded with a bit rate
of at least 128 kbps are recommended.MP3 files:
MPEG 1 AUDIO LAYER 3
⎯ 32, 44.1, 48
kHz
MPEG2 AUDIO LAYER3
⎯ 16, 22.05, 24
kHz
WMA files for WMA player:
Ver. 7, 8, 9 CBR
⎯ 32, 44.1, 48 kHz
WMA files for USB memory:
Ver. 7, 8, 9 ⎯ HIGH PROFILE 32, 44.1, 48
kHz
MP3 files for MP3 player:
MPEG1 LAYER3 ⎯ 32 to 320 kbps
MPEG2 LSF LAYER3 ⎯ 8 to 160 kbps
MP3 files for USB memory:
MPEG 1 AUDIO LAYER 2, 3 ⎯ 32 to 320
kbps
MPEG 2 AUDIO LAYER 2, 3 ⎯ 8 to 160
kbps
WMA files for WMA player:
Ver. 7, 8 CBR ⎯ 48 to 192 kbps
Ver. 9 CBR ⎯ 48 to 320 kbps
WMA files for USB memory:
Ver. 7, 8, 9 CBR ⎯ 48 to 320 kbps
M3u playlists are not compatible with the
audio player.
MP3i (MP3 interactive) and MP3PRO for-
mats are not compatible with the audio
player.
The player is compatible with VBR (Vari-
able Bit Rate).
When playing back files recorded as VBR
(Variable Bit Rate) files, the play time will
not be correctly displayed if fast-forward or
reverse operations are used.
It is not possible to check folders that do
not include MP3/WMA files.
MP3/WMA FILESSAMPLING FREQUENCY
PLAYABLE BIT RATES
Page 214 of 228
214
1. REAR VIEW MONITOR SYSTEM
1. REAR VIEW MONITOR SYSTEM OPERATION
1To display the rear view image on the
screen, the shift lever is in the “R” posi-
tion when the engine switch is in the
“ON” position.
If you move the shift lever out of the “R”
position, the screen returns to the previ-
ous screen.
The rear view monitor system assists
the driver by displaying an image of the
view behind the vehicle while backing
up.
The image is displayed in reverse on
the screen. This allows the image to
appear in the same manner as that of
the rear view mirror.CAUTION
●Never depend on the rear view monitor
system entirely when backing up.
Always make sure your intended path is
clear.
Use caution, just as you would when
backing up any vehicle.
● Never back up while looking only at the
screen. The image on the screen is dif-
ferent from actual conditions. Depicted
distances between objects and flat sur-
faces will differ from the actual dis-
tances. If you back up while looking only
at the screen, you may hit a vehicle, a
person or an object. When backing up,
be sure to check behind and all around
the vehicle visually and with mirrors
before proceeding.
● Do not use the system when the back
door, trunk or tailgate is not completely
closed.
● Use your own eyes to confirm the vehi-
cle’s surroundings, as the displayed
image may become faint or dark, and
moving images will be distorted, or not
entirely visible when the outside tem-
perature is low. When backing up, be
sure to check behind and all around the
vehicle visually and with mirror before
proceeding.
● Do not use the system in the following
cases:
• On icy or slick road surfaces, or in
snow.
• When using tire chains or emergency tires.
• On an uneven road, such as a slope.
With rear view monitor guide lines (If
equipped)
● Always check the vehicle surrounding
area, because the guide lines are ancil-
lary lines.
● The guide lines are ancillary lines and
do not change even if the steering wheel
is turned.