buttons TOYOTA TACOMA 2013 Owners Manual (in English)
[x] Cancel search | Manufacturer: TOYOTA, Model Year: 2013, Model line: TACOMA, Model: TOYOTA TACOMA 2013Pages: 524, PDF Size: 10.96 MB
Page 35 of 524
35
1-2. Opening, closing and locking the doors
1
Before driving
■
Wireless remote control depletion
The standard battery life is 1 to 2 years. (The battery becomes depleted
even if the key is not used.) If the wireless remote control function does not
operate, the battery may be depleted. Replace the battery when necessary.
(P. 370)
■ If the wireless remote control does not operate
Locking and unlocking the doors: Use the key. ( P. 37)
■ Security feature
If a door is not opened within approximately 30 seconds after the vehicle is
unlocked, the security feature automatically locks the vehicle again.
■ Conditions affecting operation
The wireless remote control function may not operate normally in the follow-
ing situations.
●Near a TV tower, radio station, electr ic power plant, airport or other facil-
ity that generates strong radio waves
● When carrying a portable radio, cell ular phone or other wireless commu-
nication device
● When multiple wireless keys are in the vicinity
● When the wireless key has come into contact with, or is covered by a
metallic object
● When a wireless key (that emits radio waves) is being used nearby
● When the wireless key has been left near an electrical appliance such as
a personal computer
■ When riding in an aircraft
When bringing a wireless remote control onto an aircraft, make sure you do
not press any buttons on the wireless remote control while inside the aircraft
cabin. If you are carrying a wireless remote control in your bag etc, ensure
that the buttons are not likely to be pressed accidentally. Pressing a button
may cause the wireless remote control to emit radio waves that could inter-
fere with the operation of the aircraft.
■ Customization that can be co nfigured at Toyota dealer
Settings (e.g. wireless remote control system) can be changed.
(Customizable features P. 481)
Page 40 of 524
40 1-2. Opening, closing and locking the doors
CAUTION
■To prevent an accident
Observe the following precautions while driving the vehicle.
Failing to do so may result in a door opening and an occupant falling out,
resulting in death or serious injury.
●Always use a seat belt.
● Always lock all doors.
● Ensure that all doors are properly closed.
● Do not pull the inside handle of the doors while driving.
The doors may be opened and the passengers are thrown out of the vehi-
cle and it may result in serious injury or death.
Be especially careful for the front doors, as the doors may be opened even
if the inside lock buttons are in locked position.
● Set the rear door child protector locks when children are seated in the rear
seat.
Page 110 of 524
110
1-7. Safety information
Installing child restraints
Follow the child restraint system manufacturer’s instructions. Firmly
secure child restraints to the seat s using the LATCH anchors or a
seat belt. Attach the top tether stra p when installing a child restraint.
The lap/shoulder belt can be used if your child restraint system is
not compatible with the LATCH (Low er Anchors and Tethers for Chil-
dren) system.
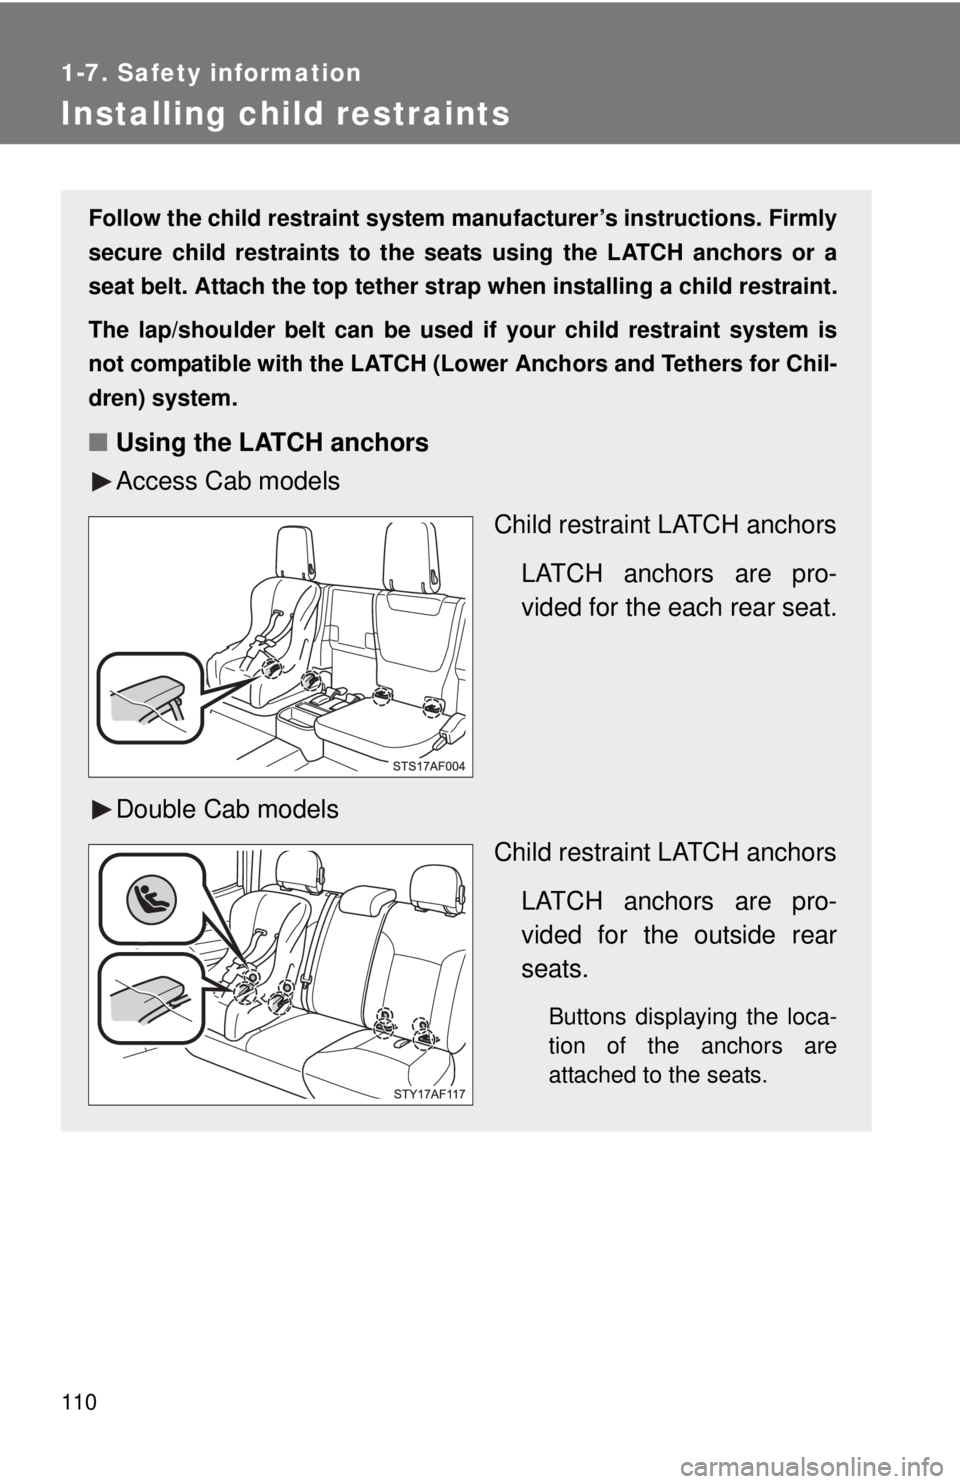
■ Using the LATCH anchors
Access Cab models
Child restraint LATCH anchors
LATCH anchors are pro-
vided for the each rear seat.
Double Cab models Child restraint LATCH anchors
LATCH anchors are pro-
vided for the outside rear
seats.
Buttons displaying the loca-
tion of the anchors are
attached to the seats.
Page 177 of 524
177
2-4. Using other
driving systems
2
When driving
■The rear view monitor system can be operated when
The shift lever is in R and engine switch is ON.
■ Switching the screen on/off mode
The rear view monitor display on the inside rear view mirror can be turned
on/off.
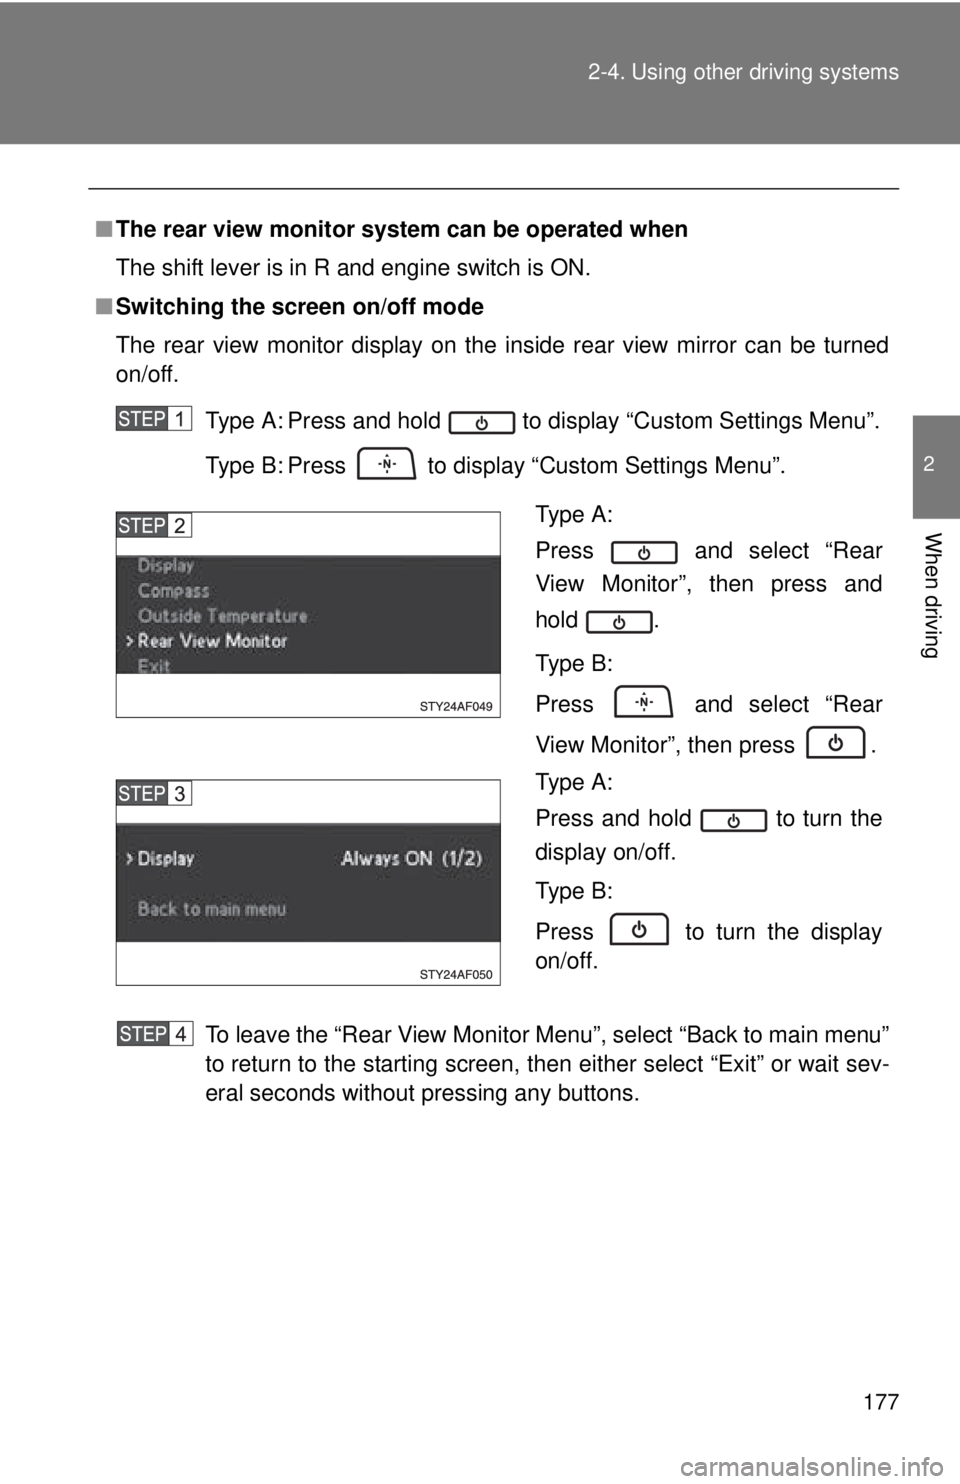
Type A: Press and hold to display “Custom Settings Menu”.
Type B: Press to display “Custom Settings Menu”.
To leave the “Rear View Monitor Menu”, select “Back to main menu”
to return to the starting screen, then either select “Exit” or wait sev-
eral seconds without pressing any buttons.
Type A:
Press and select “Rear
View Monitor”, then press and
hold .
Type B:
Press and select “Rear
View Monitor”, then press .
Type A:
Press and hold to turn the
display on/off.
Type B:
Press to turn the display
on/off.
Page 273 of 524
273
3-5. Other interior features
3
Interior and exterior features
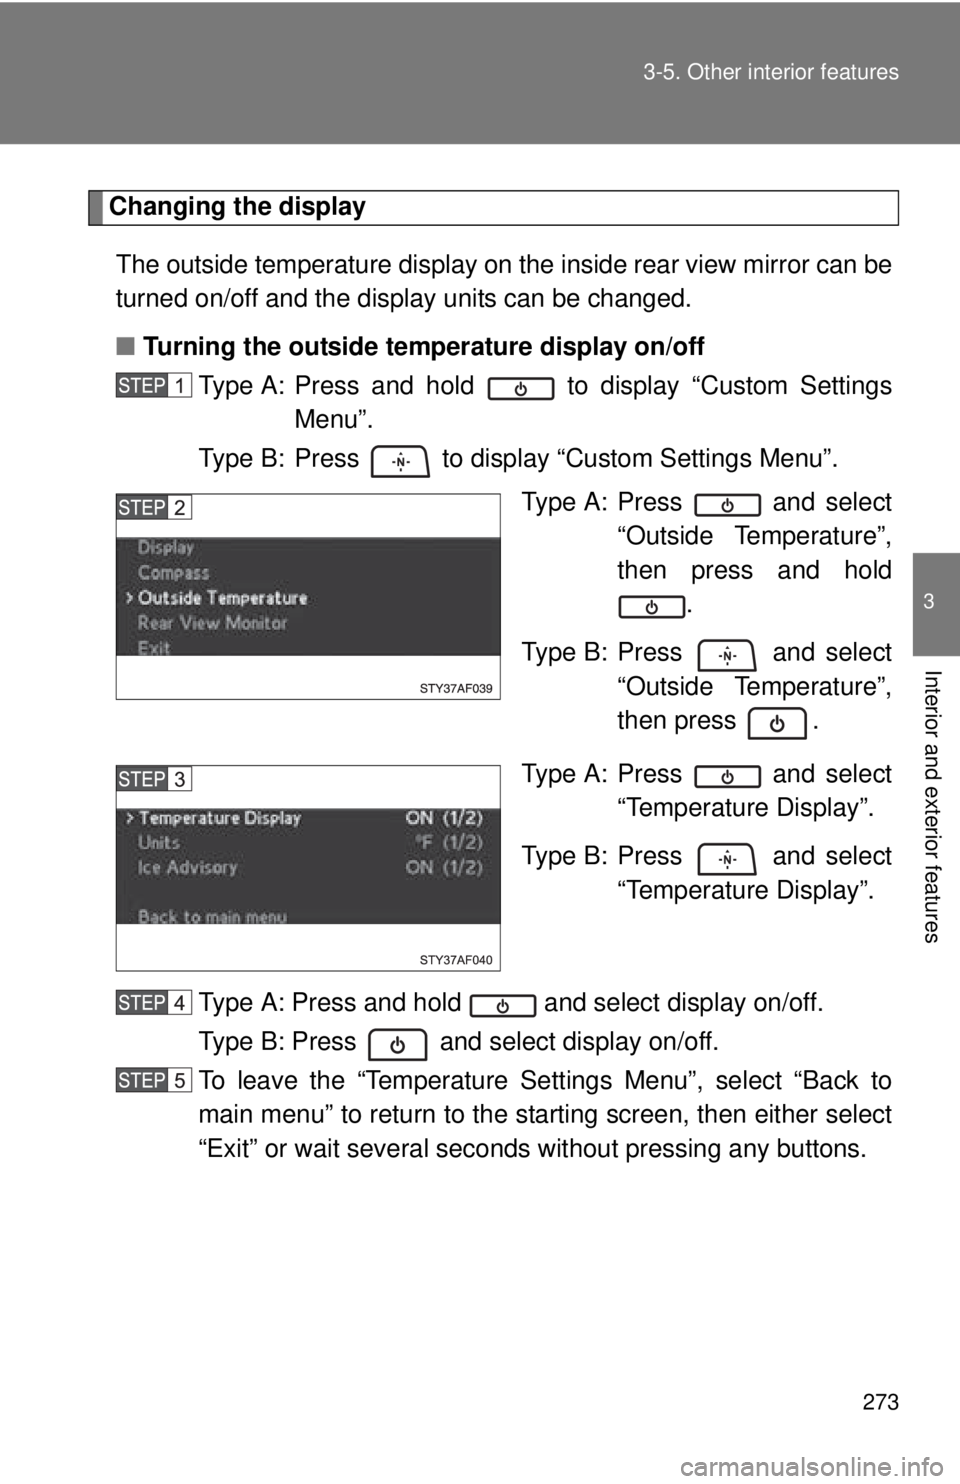
Changing the display
The outside temperature display on the inside rear view mirror can be
turned on/off and the display units can be changed.
■ Turning the outside temperature display on/off
Type A: Press and hold to display “Custom Settings Menu”.
Type B: Press to display “Custom Settings Menu”.
Type A: Press and select“Outside Temperature”,
then press and hold.
Type B: Press and select “Outside Temperature”,
then press .
Type A: Press and select “Temperature Display”.
Type B: Press and select “Temperature Display”.
Type A: Press and hold and select display on/off.
Type B: Press and select display on/off.
To leave the “Temperature Sett ings Menu”, select “Back to
main menu” to return to the starting screen, then either select
“Exit” or wait several seconds without pressing any buttons.
Page 274 of 524
274 3-5. Other interior features
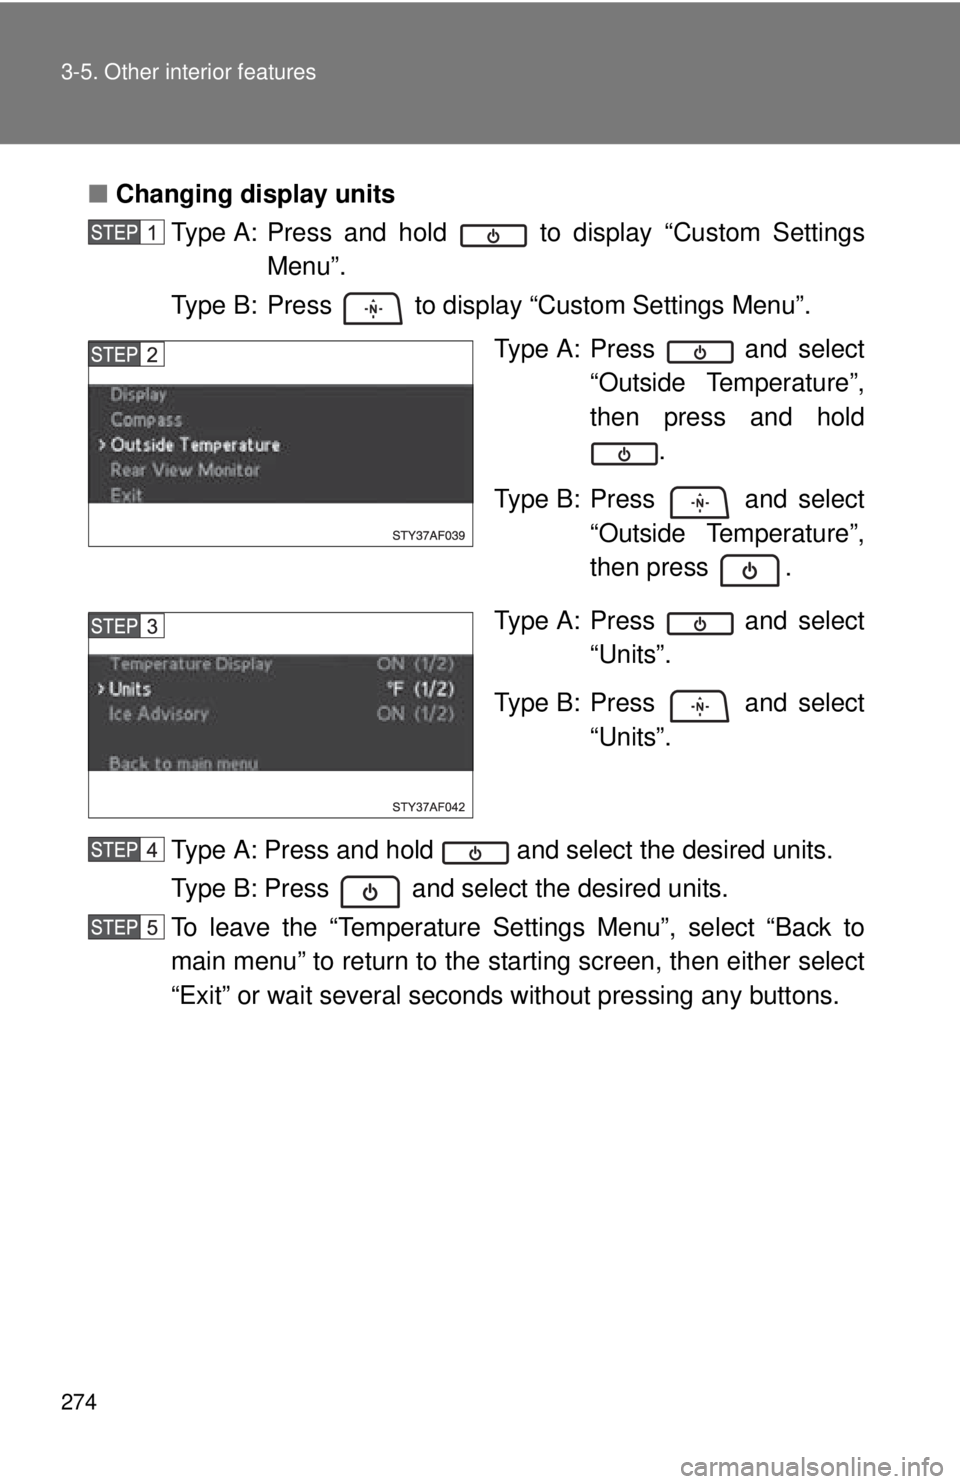
■Changing display units
Type A: Press and hold to display “Custom Settings Menu”.
Type B: Press to display “Custom Settings Menu”.
Type A: Press and select“Outside Temperature”,
then press and hold.
Type B: Press and select “Outside Temperature”,
then press .
Type A: Press and select “Units”.
Type B: Press and select “Units”.
Type A: Press and hold and select the desired units.
Type B: Press and select the desired units.
To leave the “Temperature Sett ings Menu”, select “Back to
main menu” to return to the starting screen, then either select
“Exit” or wait several seconds without pressing any buttons.
Page 275 of 524
275
3-5. Other interior features
3
Interior and exterior features
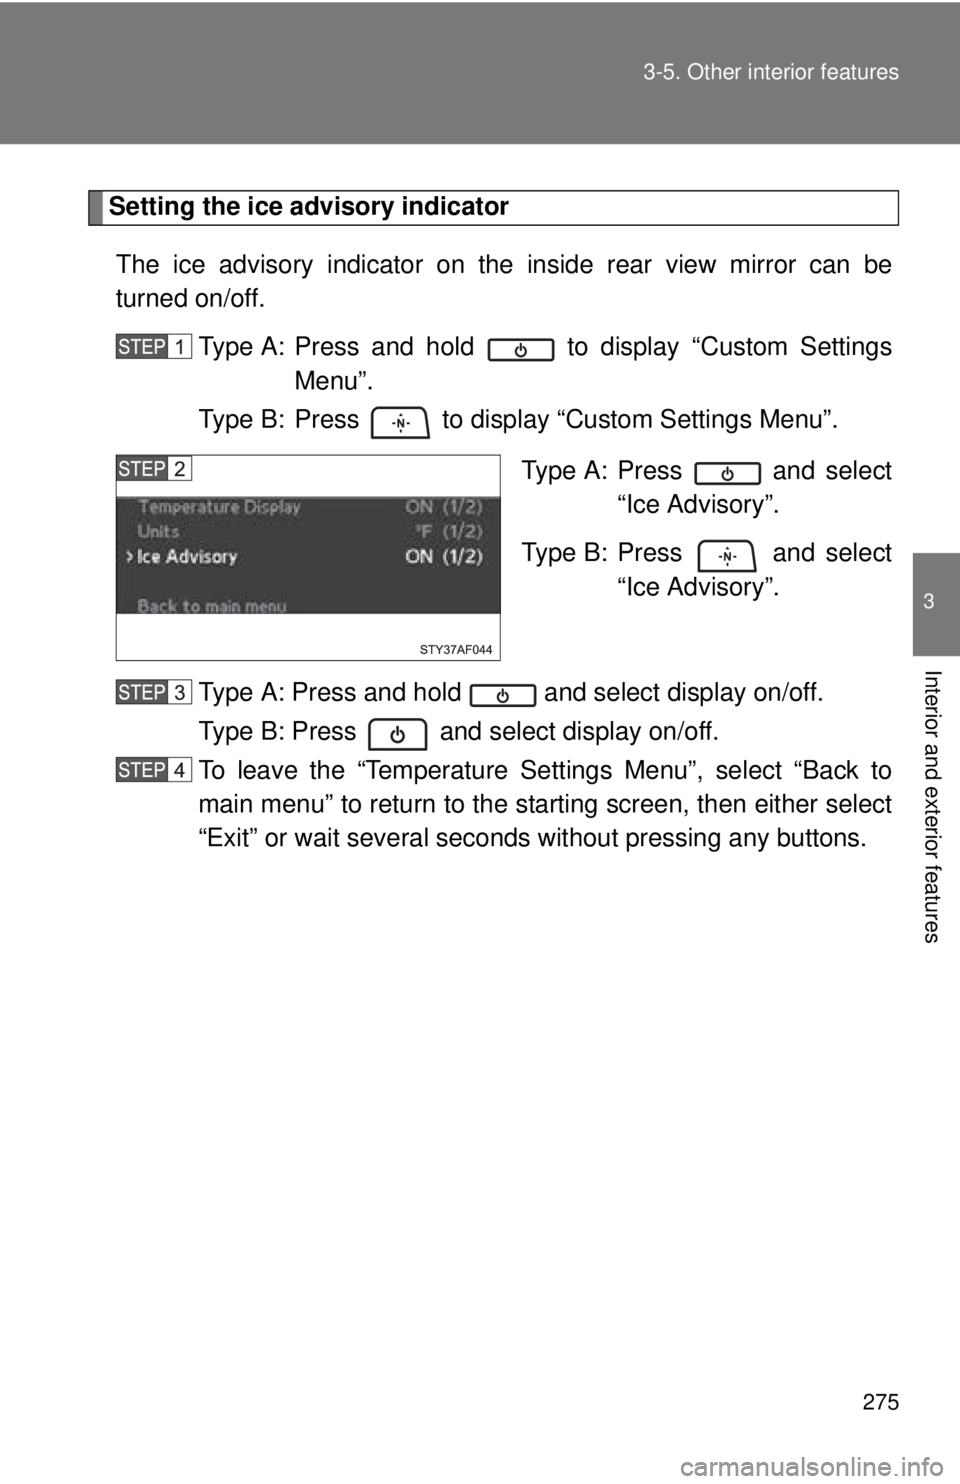
Setting the ice advisory indicator
The ice advisory indicator on the inside rear view mirror can be
turned on/off.
Type A: Press and hold to display “Custom Settings Menu”.
Type B: Press to display “Custom Settings Menu”.
Type A: Press and select“Ice Advisory”.
Type B: Press and select “Ice Advisory”.
Type A: Press and hold and select display on/off.
Type B: Press and select display on/off.
To leave the “Temperature Sett ings Menu”, select “Back to
main menu” to return to the starting screen, then either select
“Exit” or wait several seconds without pressing any buttons.
Page 298 of 524
298
3-5. Other interior features
Garage door opener
The garage door opener (HomeLink® Universal Transceiver) is manufac-
tured under license from HomeLink®.
Training the HomeLink® (for U.S. owners)
The HomeLink
® compatible transceiver in your vehicle has 3 buttons
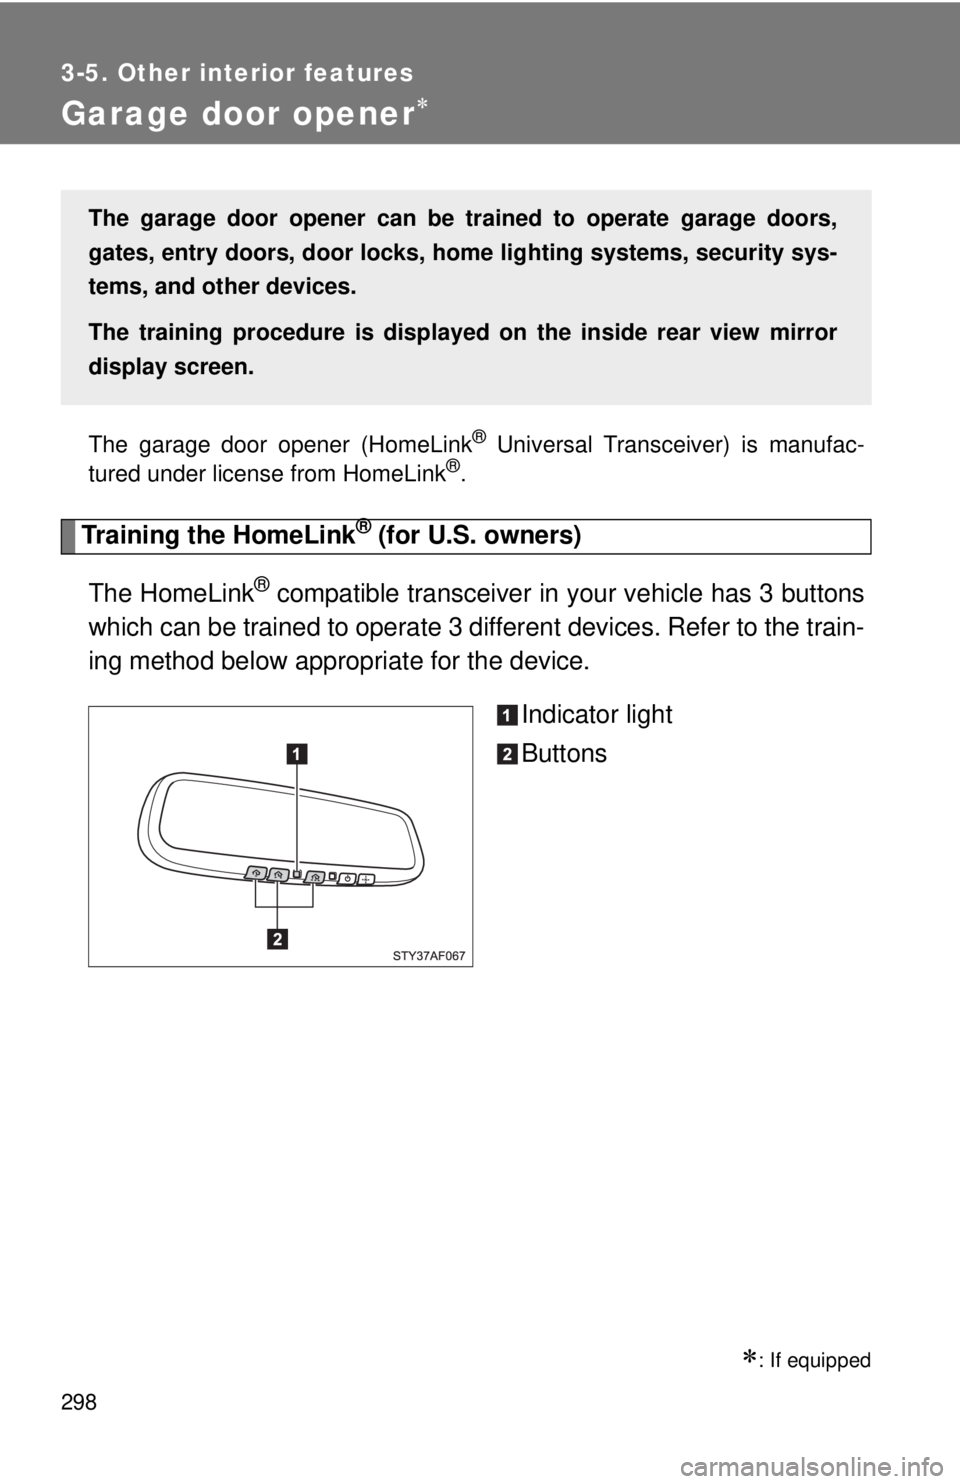
which can be trained to operate 3 different devices. Refer to the train-
ing method below appropriate for the device.
Indicator light
Buttons
: If equipped
The garage door opener can be trained to operate garage doors,
gates, entry doors, door locks, home lighting systems, security sys-
tems, and other devices.
The training procedure is displayed on the inside rear view mirror
display screen.
Page 299 of 524
299
3-5. Other interior features
3
Interior and exterior features
■
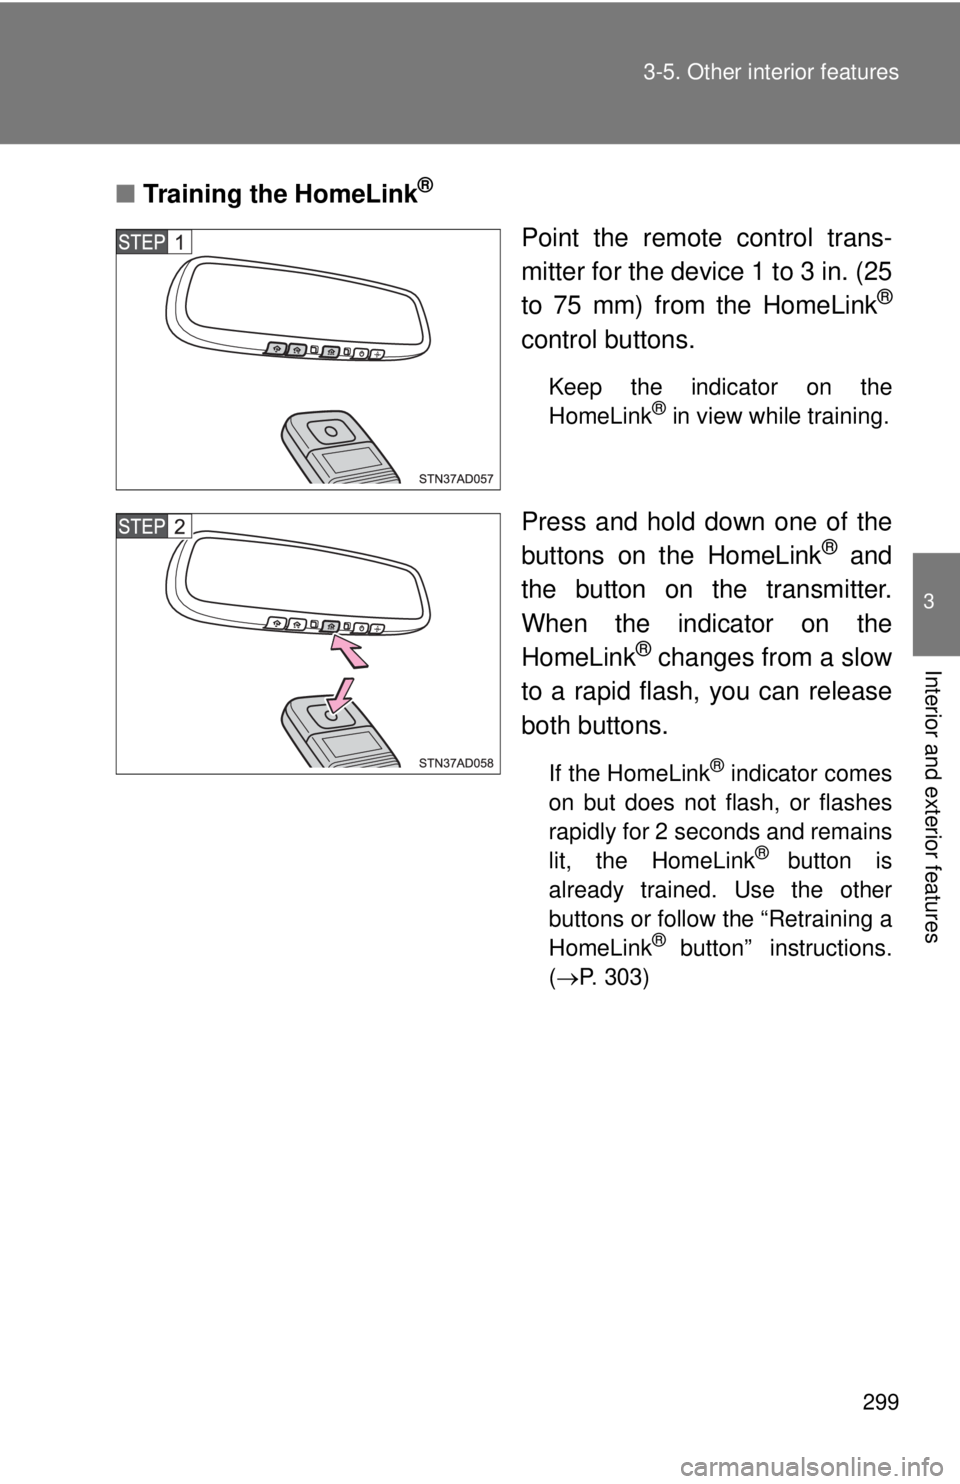
Training the HomeLink®
Point the remote control trans-
mitter for the device 1 to 3 in. (25
to 75 mm) from the HomeLink
®
control buttons.
Keep the indicator on the
HomeLink® in view while training.
Press and hold down one of the
buttons on the HomeLink® and
the button on the transmitter.
When the indicator on the
HomeLink
® changes from a slow
to a rapid flash, you can release
both buttons.
If the HomeLink® indicator comes
on but does not flash, or flashes
rapidly for 2 seconds and remains
lit, the HomeLink
® button is
already trained. Use the other
buttons or follow the “Retraining a
HomeLink
® button” instructions.
( P. 303)
Page 300 of 524
300 3-5. Other interior features
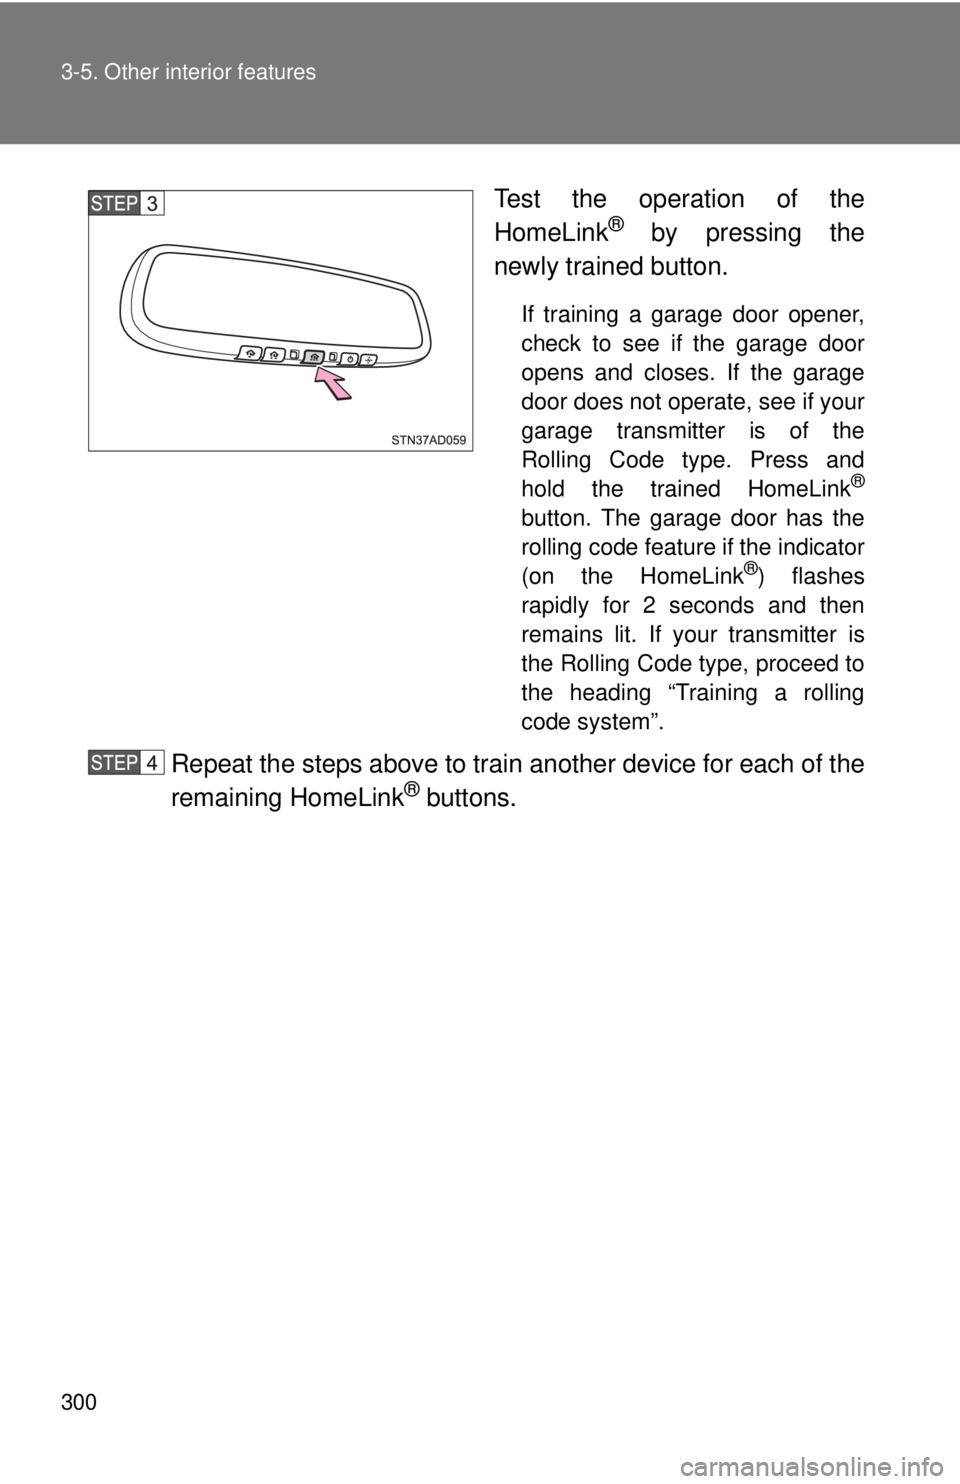
Test the operation of the
HomeLink® by pressing the
newly trained button.
If training a garage door opener,
check to see if the garage door
opens and closes. If the garage
door does not operate, see if your
garage transmitter is of the
Rolling Code type. Press and
hold the trained HomeLink
®
button. The garage door has the
rolling code feature if the indicator
(on the HomeLink
®) flashes
rapidly for 2 seconds and then
remains lit. If your transmitter is
the Rolling Code type, proceed to
the heading “Training a rolling
code system”.
Repeat the steps above to train another device for each of the
remaining HomeLink® buttons.