clock TOYOTA TACOMA 2013 Owners Manual (in English)
[x] Cancel search | Manufacturer: TOYOTA, Model Year: 2013, Model line: TACOMA, Model: TOYOTA TACOMA 2013Pages: 524, PDF Size: 10.96 MB
Page 4 of 524

TABLE OF CONTENTSIndex
4
3-5. Other interior featuresSun visors .......................... 269
Vanity mirrors ..................... 270
Clock .................................. 271
Outside temperature display (vehicles with
auto anti-glare inside
rear view mirror) ............... 272
Power outlets (12V DC) ..... 277
Power outlet (120V AC) ..... 278
Seat heaters ....................... 284
Seatback table ................... 286
Floor mat ............................ 287
Luggage compartment features ............................ 289
Garage door opener ........... 298
Compass (vehicles with auto anti-glare inside rear
view mirror) ...................... 307
4-1. Maintenance and care Cleaning and protecting the vehicle exterior ........... 316
Cleaning and protecting the vehicle interior ............ 319
4-2. Maintenance Maintenance requirements .................... 322
General maintenance ......... 324
Emission inspection and maintenance (I/M)
programs .......................... 327 4-3. Do-it-yourself maintenance
Do-it-yourself service precautions ....................... 328
Hood ................................... 332
Engine compartment .......... 334
Tires.................................... 350
Tire inflation pressure ......... 359
Wheels................................ 364
Air conditioning filter ........... 367
Wireless remote control battery .............................. 370
Checking and replacing fuses ................................. 372
Light bulbs .......................... 382
5-1. Essential information Emergency flashers ............ 394
If your vehicle needs to be towed ........................... 395
If you think something is wrong ................................ 401
Fuel pump shut off system .............................. 402
4Maintenance and care
5When trouble arises
Page 152 of 524
152
2-1. Driving procedures
Parking brake
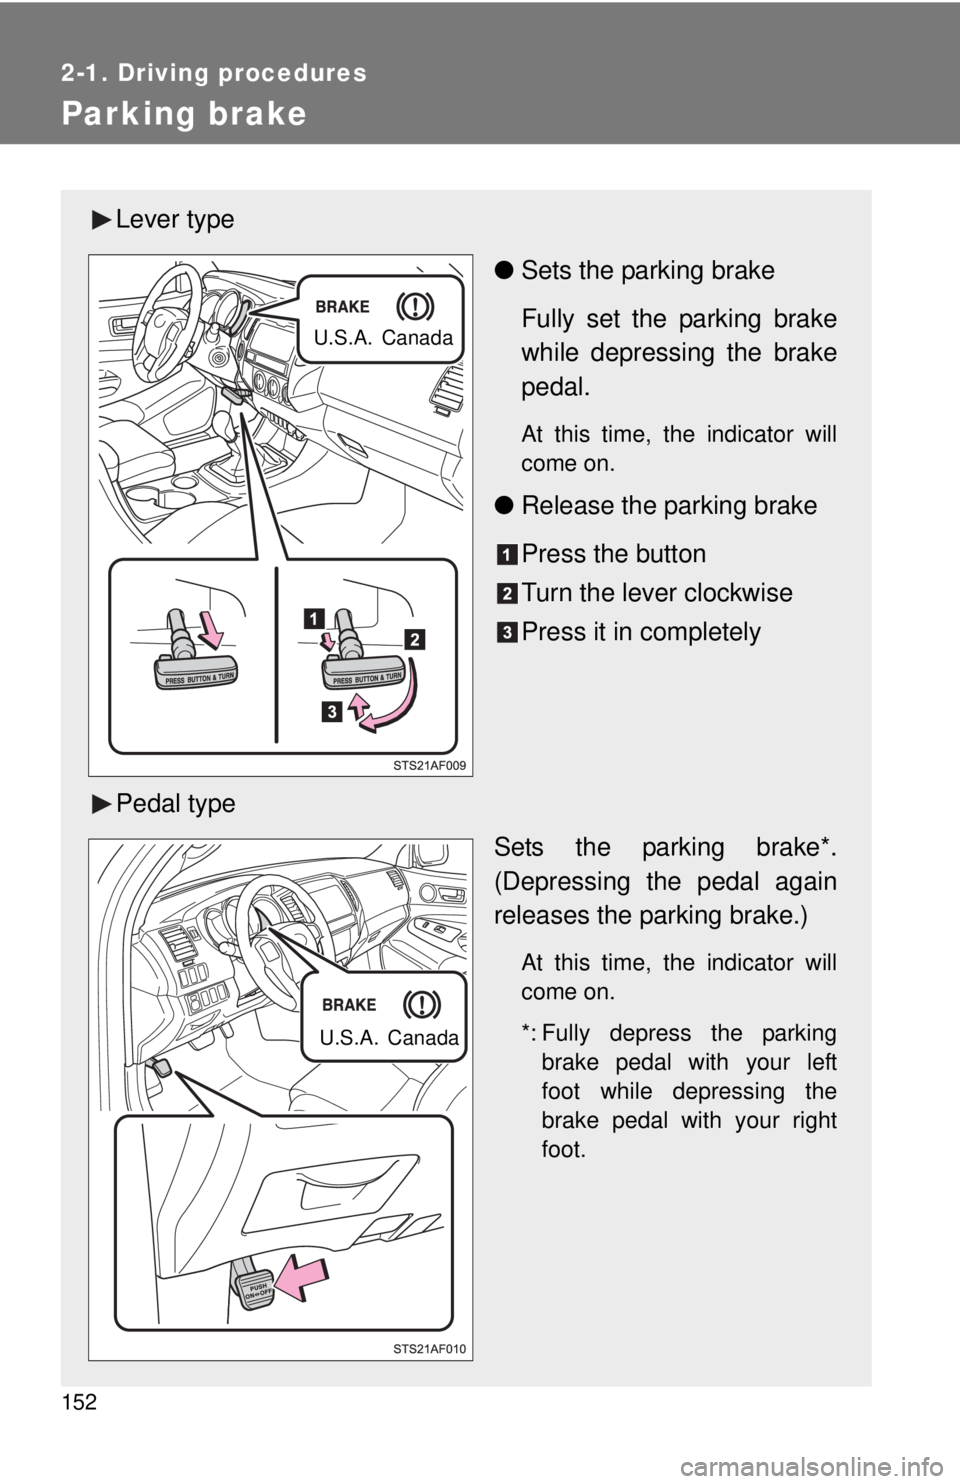
Lever type●Sets the parking brake
Fully set the parking brake
while depressing the brake
pedal.
At this time, the indicator will
come on.
●Release the parking brake
Press the button
Turn the lever clockwise
Press it in completely
Pedal type Sets the parking brake*.
(Depressing the pedal again
releases the parking brake.)
At this time, the indicator will
come on.
*: Fully depress the parkingbrake pedal with your left
foot while depressing the
brake pedal with your right
foot.
U.S.A. Canada
U.S.A. Canada
Page 185 of 524
185
2-4. Using other
driving systems
2
When driving
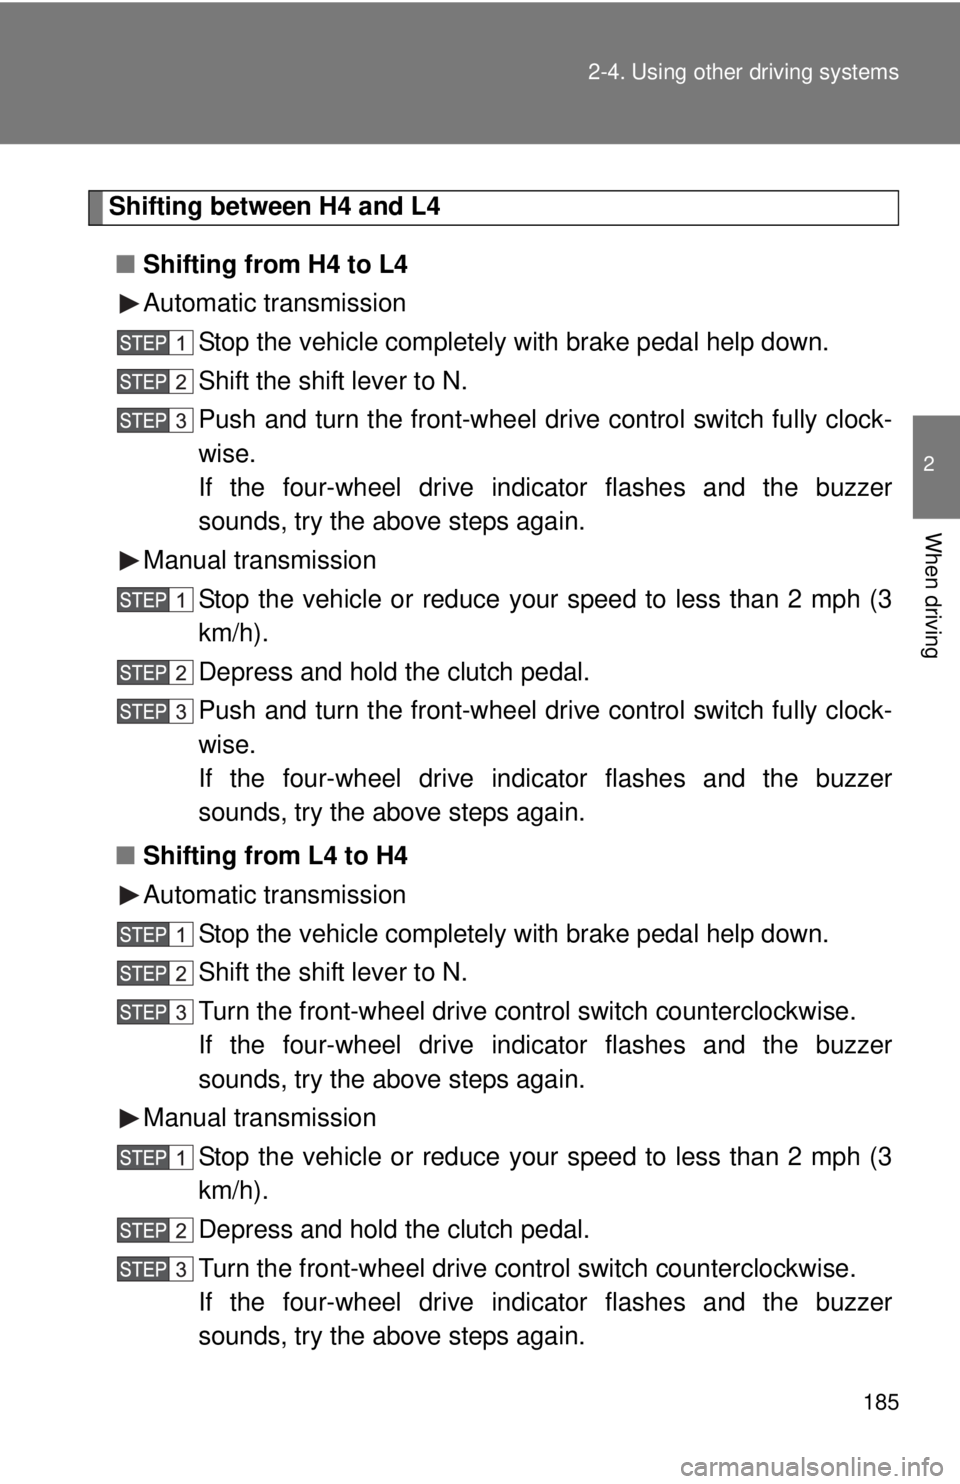
Shifting between H4 and L4
■ Shifting from H4 to L4
Automatic transmission
Stop the vehicle completely with brake pedal help down.
Shift the shift lever to N.
Push and turn the front-wheel drive control switch fully clock-
wise.
If the four-wheel drive in dicator flashes and the buzzer
sounds, try the above steps again.
Manual transmission Stop the vehicle or reduce your speed to less than 2 mph (3
km/h).
Depress and hold the clutch pedal.
Push and turn the front-wheel drive control switch fully clock-
wise.
If the four-wheel drive in dicator flashes and the buzzer
sounds, try the above steps again.
■ Shifting from L4 to H4
Automatic transmission
Stop the vehicle completely with brake pedal help down.
Shift the shift lever to N.
Turn the front-wheel drive control switch counterclockwise.
If the four-wheel drive in dicator flashes and the buzzer
sounds, try the above steps again.
Manual transmission Stop the vehicle or reduce your speed to less than 2 mph (3
km/h).
Depress and hold the clutch pedal.
Turn the front-wheel drive control switch counterclockwise.
If the four-wheel drive in dicator flashes and the buzzer
sounds, try the above steps again.
Page 186 of 524

186 2-4. Using other driving systems
■Shifting between H2 and H4
●Shifting from H2 to H4
Reduce the vehicle speed to less than 62 mph (100 km/h) and turn the
front-wheel drive control switch fully clockwise.
● Shifting from H4 to H2
Turn the front-wheel drive control switch fully counterclockwise.
This can be done at any speed. You need not depress the clutch pedal.
(manual transmission)
■ If the four-wheel drive indicator lig ht or the 4LO indicator light blinks
● Shifting from H2 to H4
• If the four-wheel drive indicator continues to blink, drive straight ahead
while accelerating or decelerating.
• If the four-wheel drive indicator continues to blink and the buzzer sounds, stop the vehicle or reduce the vehicle speed to less than 62
mph (100 km/h). Operate the switch again.
● Shifting from H4 to H2
If the four-wheel drive indicator continues to blink, drive straight ahead
while accelerating or decelerating, or drive forward or backward in a short
distance.
● Shifting to H4 or L4
Automatic transmission
If the 4LO indicator continues to blink when you operate the front-wheel
drive control switch to the H4 or L4 position, drive forward or backward in a
short distance, then stop the vehicle completely, shift the shift lever
securely to N and operate the switch again. Manual transmission
If the 4LO indicator continues to blink when you operate the front-wheel
drive control switch to the H4 or L4 position, drive forward or backward in a
short distance, then stop the vehicle completely, depress the clutch pedal
and operate the switch again.
If the indicator light continues to blink even if doing so, contact your Toyota
dealer as soon as possible. There may be a trouble in the four-wheel drive
system.
Page 243 of 524
Interior and exteriorfeatures3
243
3-1. Using the air conditioning
system and defogger
Air conditioning system .... 244
3-2. Using the audio system Audio system types .......... 251
Operating the sub woofer (on some Access
Cab models) .................. 254
Using the AUX port/USB port................................. 255
Detachable pole antenna .......................... 256
3-3. Using the interior lights Interior lights list ............... 259
• Interior light .................... 260
• Personal lights ................ 260
3-4. Using the storage features List of storage features .... 261
• Grove box ....................... 262
• Front console box .......... 262
• Cup holders ................... 263
• Bottle holders ................. 265
• Auxiliary boxes............... 266
• Overhead console.......... 268 3-5. Other interior features
Sun visors ........................ 269
Vanity mirrors ................... 270
Clock ................................ 271
Outside temperature display (vehicles with
auto anti-glare inside
rear view mirror) ............. 272
Power outlets (12V DC) ... 277
Power outlet (120V AC) ... 278
Seat heaters..................... 284
Seatback table ................. 286
Floor mat .......................... 287
Luggage compartment features .......................... 289
Garage door opener......... 298
Compass (vehicles with auto anti-glare inside
rear view mirror) ............. 307
Page 244 of 524
244
3-1. Using the air conditioning system and defogger
Air conditioning system
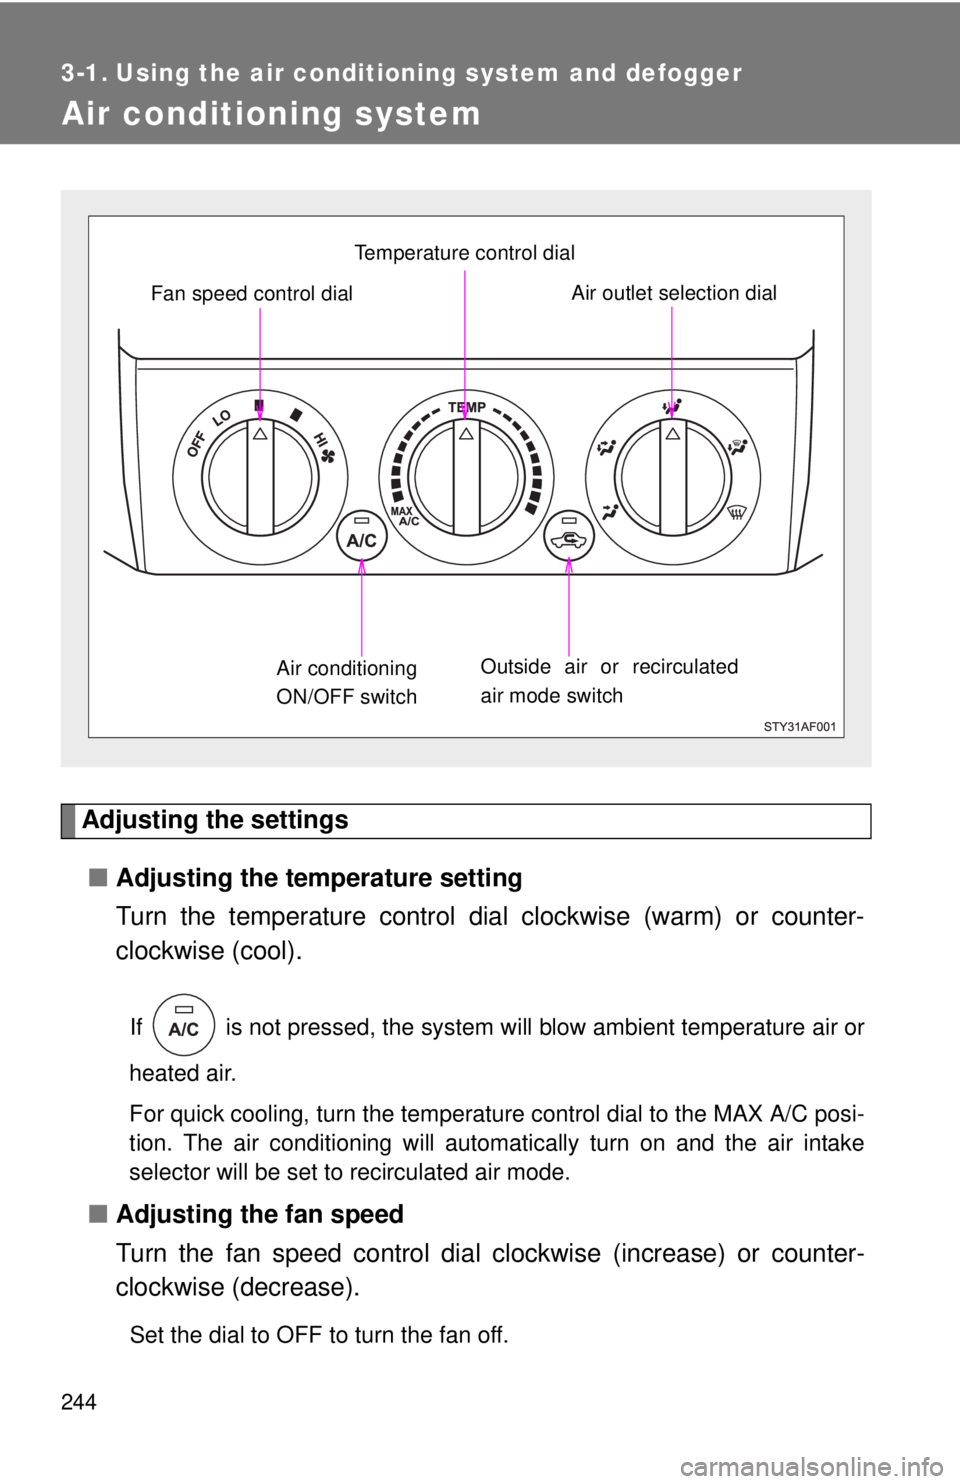
Adjusting the settings■ Adjusting the temperature setting
Turn the temperature control dial clockwise (warm) or counter-
clockwise (cool).
If is not pressed, the system will blow ambient temperature air or
heated air.
For quick cooling, turn the temperature control dial to the MAX A/C posi-
tion. The air conditioning will automatically turn on and the air intake
selector will be set to recirculated air mode.
■ Adjusting the fan speed
Turn the fan speed control dial clockwise (increase) or counter-
clockwise (decrease).
Set the dial to OFF to turn the fan off.
Outside air or recirculated
air mode switch Air outlet selection dialAir conditioning
ON/OFF switch Temperature control dial
Fan speed control dial
Page 267 of 524
267
3-4. Using the
storage features
3
Interior and exterior features
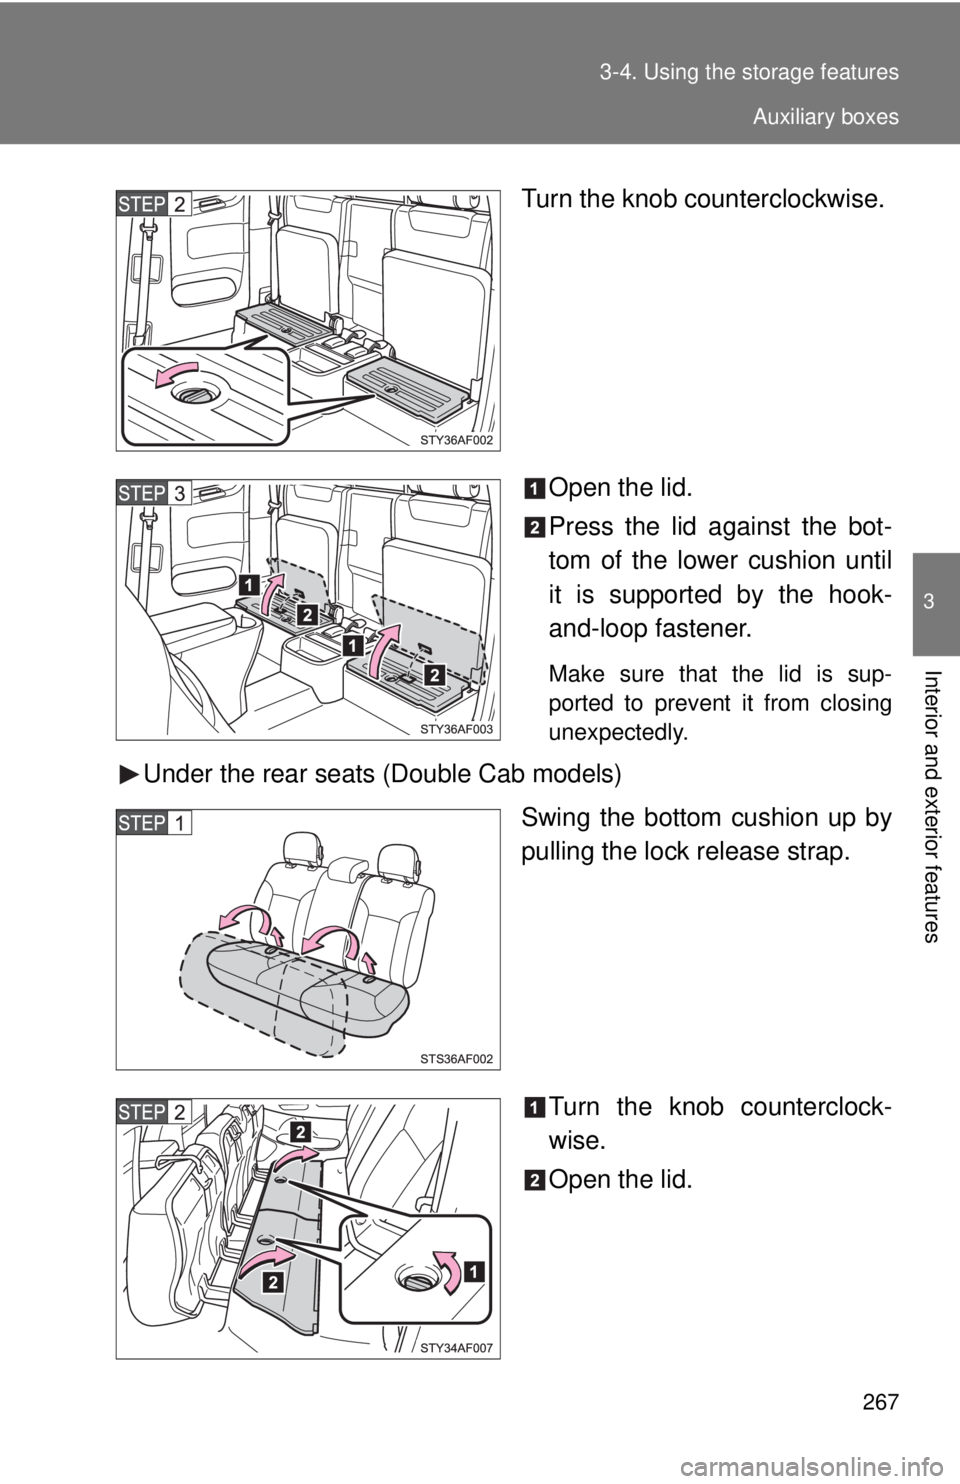
Turn the knob counterclockwise.
Open the lid.
Press the lid against the bot-
tom of the lower cushion until
it is supported by the hook-
and-loop fastener.
Make sure that the lid is sup-
ported to prevent it from closing
unexpectedly.
Under the rear seats (Double Cab models) Swing the bottom cushion up by
pulling the lock release strap.
Turn the knob counterclock-
wise.
Open the lid.
Auxiliary boxes
Page 271 of 524
271
3-5. Other interior features
3
Interior and exterior features
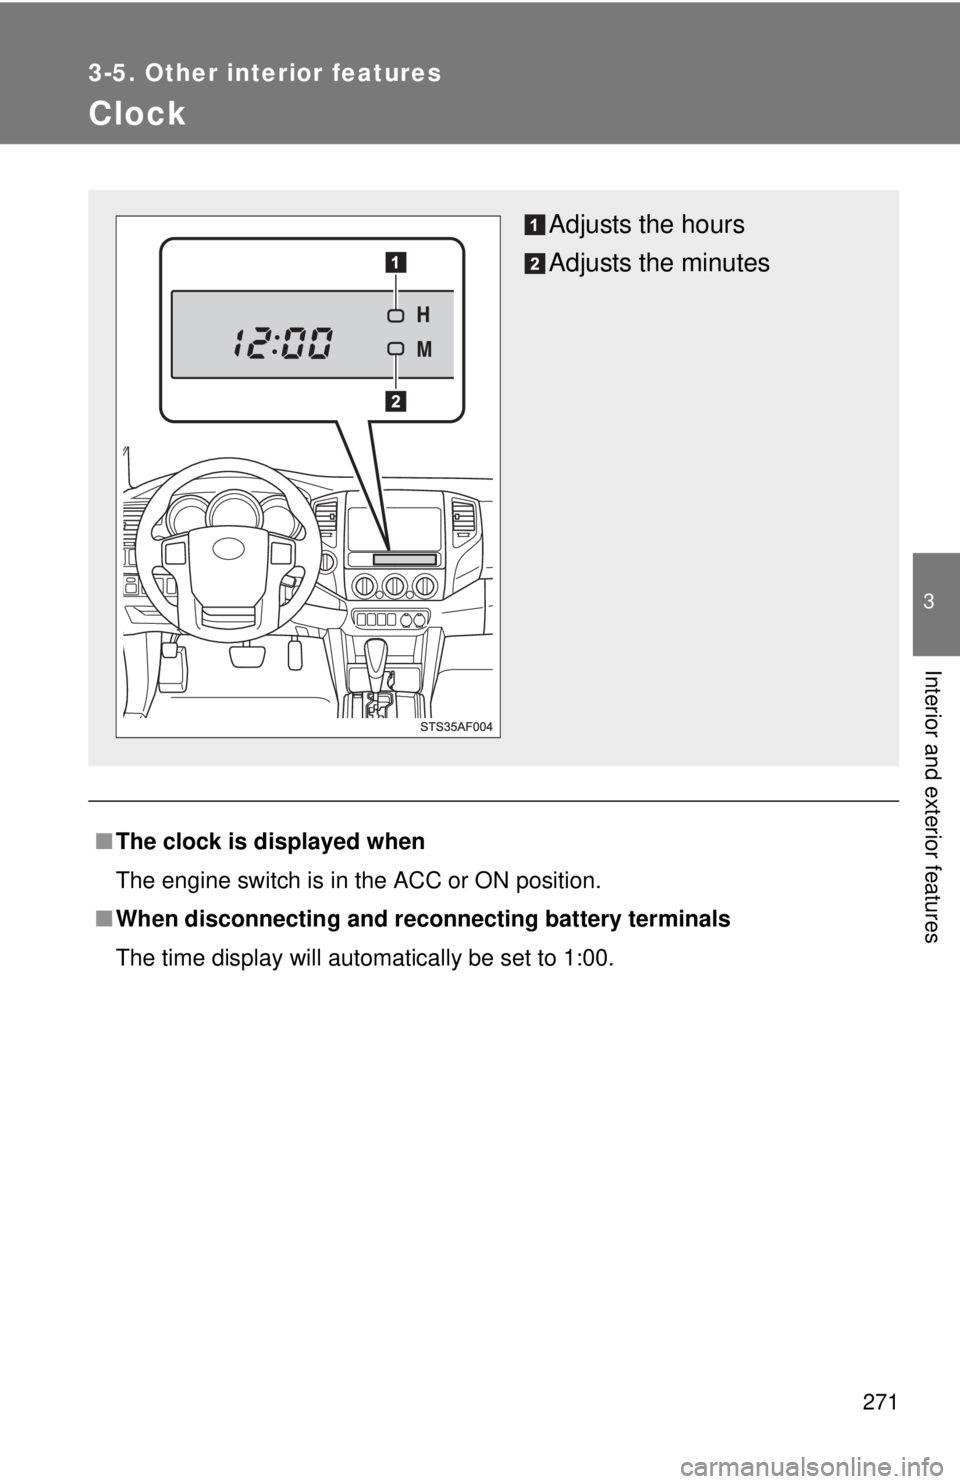
Clock
■The clock is displayed when
The engine switch is in the ACC or ON position.
■ When disconnecting and reco nnecting battery terminals
The time display will automatically be set to 1:00.
Adjusts the hours
Adjusts the minutes
Page 290 of 524
290 3-5. Other interior features
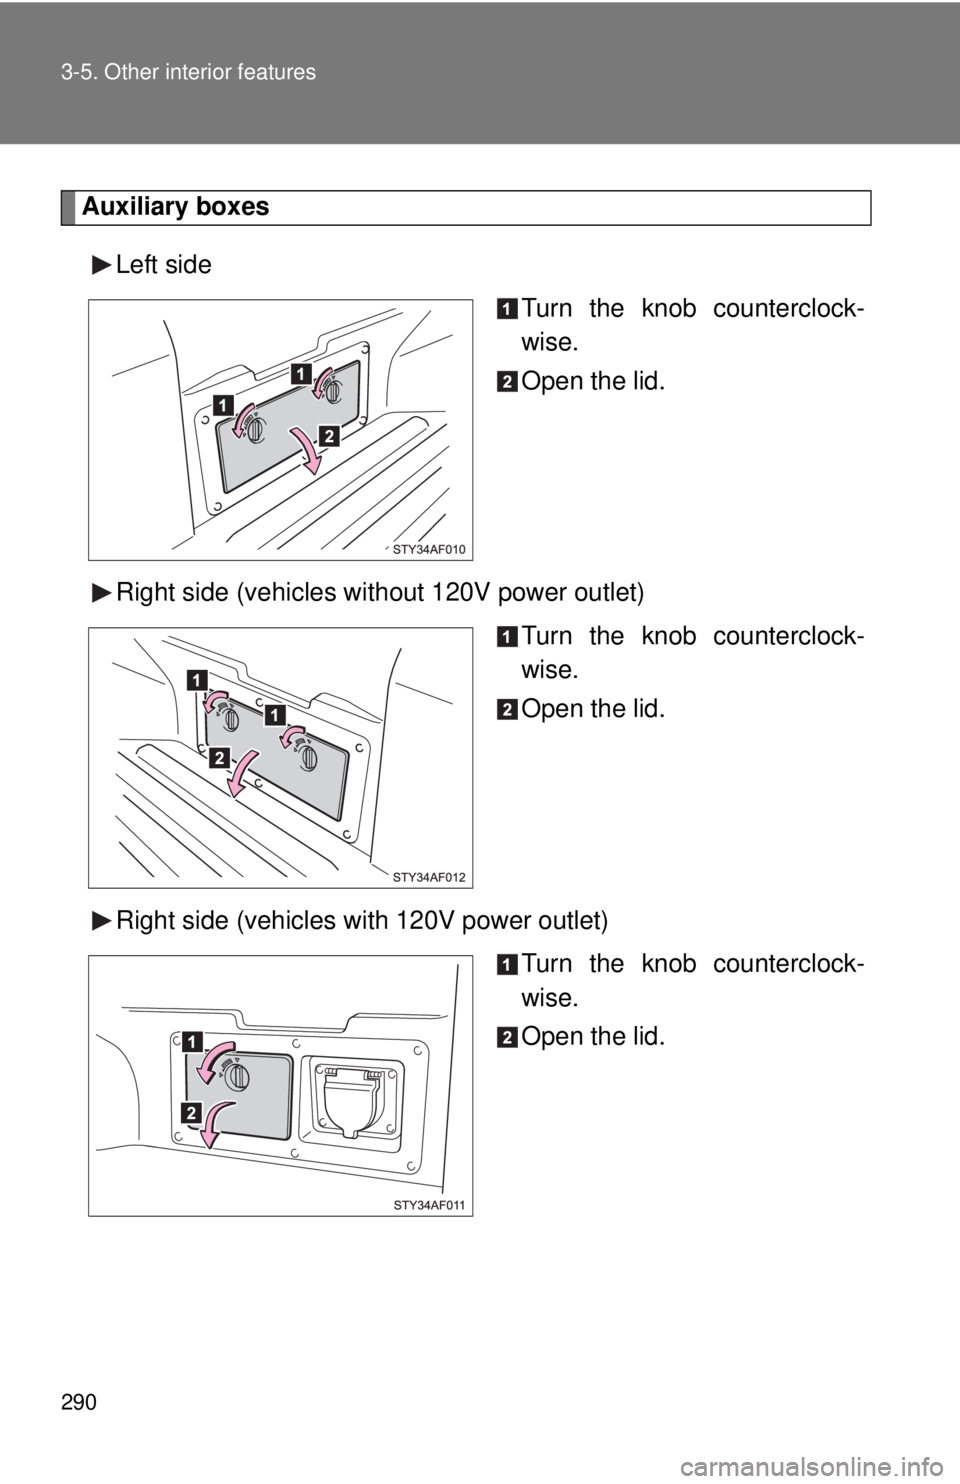
Auxiliary boxesLeft side Turn the knob counterclock-
wise.
Open the lid.
Right side (vehicles without 120V power outlet) Turn the knob counterclock-
wise.
Open the lid.
Right side (vehicles with 120V power outlet) Turn the knob counterclock-
wise.
Open the lid.
Page 292 of 524
292 3-5. Other interior features
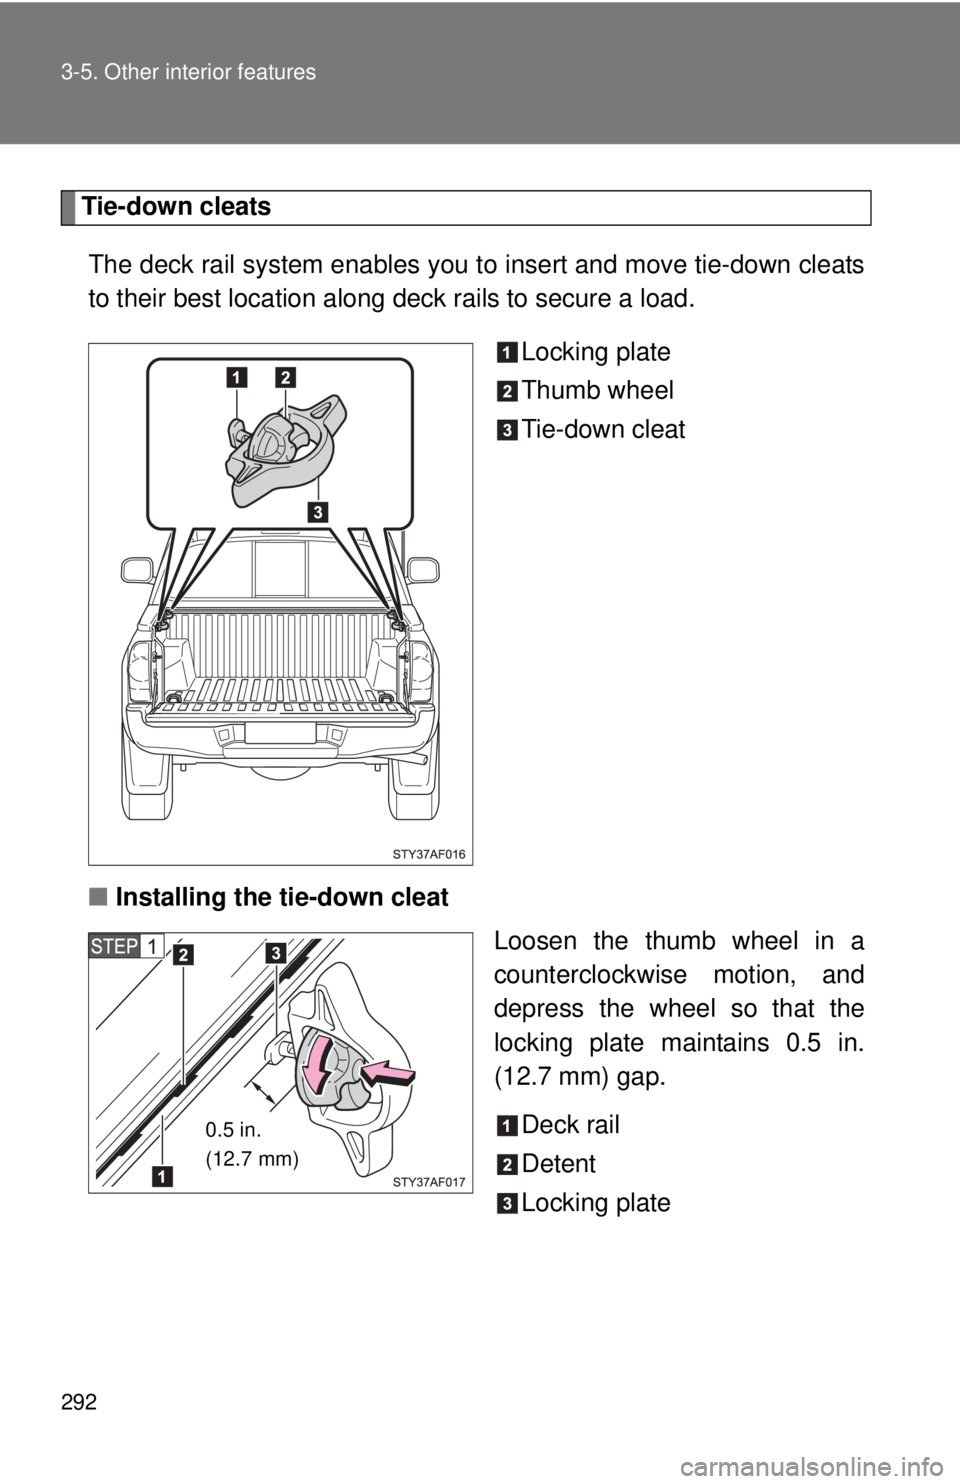
Tie-down cleatsThe deck rail system enables you to insert and move tie-down cleats
to their best location along deck rails to secure a load.
Locking plate
Thumb wheel
Tie-down cleat
■ Installing the tie-down cleat
Loosen the thumb wheel in a
counterclockwise motion, and
depress the wheel so that the
locking plate maintains 0.5 in.
(12.7 mm) gap.
Deck rail
Detent
Locking plate
0.5 in.
(12.7 mm)